Transcripts
1. introduction to Part 3: Hello, ladies and gentlemen. Welcome to the third part of the course called
Sketchup for Beginners, or How to Create a Complete
3D House from Scratch, Even if you have
never done it before. I'm very happy to see you here because it's
telling me that you like the first and the
second part of this course, and that you want
to learn how to Create the other elements
of your 3D House. In the second part
of this course, you have created the paving and the basement of
the house in 3D. Besides that, you have
discovered some new tools like the push-pull tool and how to move objects
with the Move tool. In this third part
of the course, you will discover how to change the measurements units from
meters to centimeters. How to Create the external
Walls of the house. How to make the Holes in these Walls to for
Doors and Windows. And how to create simple
doors and windows. For all of these elements, we will be using
the drawings with exact measurements which you can download below this video. So if you ready to
discover how to create all these new
elements in Sketchup, click the blue enroll
button below this video, and I'll see you inside
2. Creating External Walls: Hello and welcome
to the first video. In this video, we will create the exterior walls
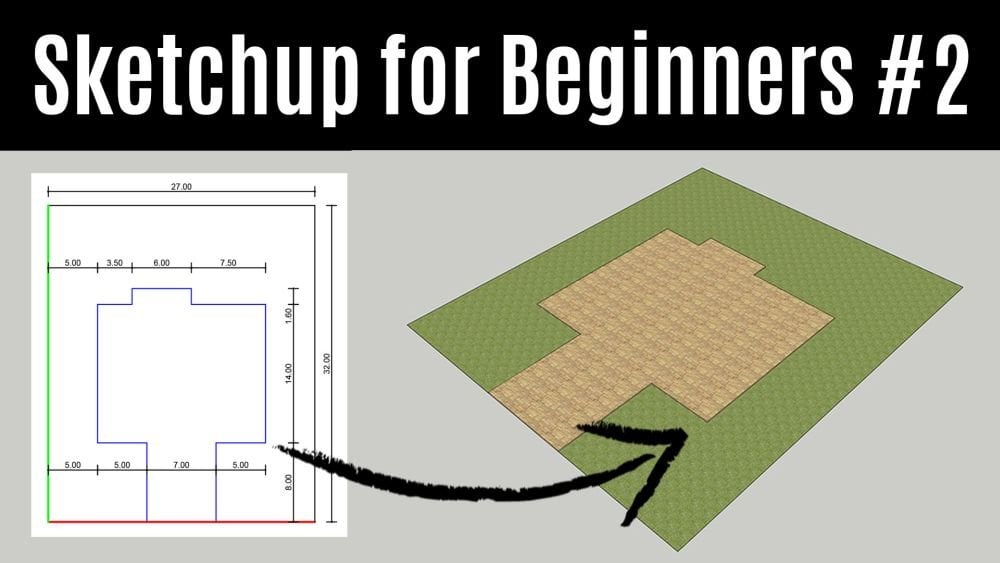
of our house in 3D. As you can see on the screen, the floor plan of our house
is 1,500 by 900 cm big, and the Walls so 20 cm thick. Until now, we use meters
as measurement units. From now on, we will
use centimeters. So that would be the first thing that we
will change in our model. In order to do that, open your model that
you save less time, and then go to Window,
select model info. And from this drop-down menu, change meters to centimeters
and close the window. Now because we are creating the new elements
of our 3D House, we will create a new layer. As always, you can
do that by clicking the plus sign on the
right side of your screen within the layers section and rename the
layer one to Walls, and then select the left button on the left to make it active. Now everything is ready
for the 3D Walls creation. So the first thing that
we're gonna do is to create the rectangle
tool and draw a rectangle that
will be 1,500 by 900 cm big by entering its precise dimensions in the bottom-right corner. Now we will zoom
in a little bit, and now we will use a new tool that is
called the offset tool. We will use this tool to Create the thickness of our
walls that is 20 cm. So click on it to
make it active. Hover over the face
of the rectangle. And when you see these red dots on the
sides of the rectangle, click once and then move your mouse to the center
of the rectangle. Click somewhere in the
bottom-right corner, enter 20 to make the
Walls 20 cm thick. As you can see, we
have two phases. The external one that
are our walls and the internal one that is the
shape we don't need anymore. So we will select it and press Delete on the
keyboard to delete it. We just have created
the shape of our floor plan and the thickness
of our walls of 20 cm. The last thing we
need to do is to use the push pull tool to
make these Walls 3D. Hover over the
face of the Walls. Click on them. Move your mouse up. And because we want our
walls to be 300 cm high, enter 300 in the
bottom-right corner. Zoom out a little bit. So as you can see, we have just created the
external Walls offer house. And in the next video, we will start creating the Holes for the doors and
windows of our house. Thanks for watching,
and I'll see you there.
3. Creating Holes for Doors and Windows: Hello and welcome
to the next lesson. In the last video, we have created the 3D
Walls of our house. And now the time
has come to make the Holes for future
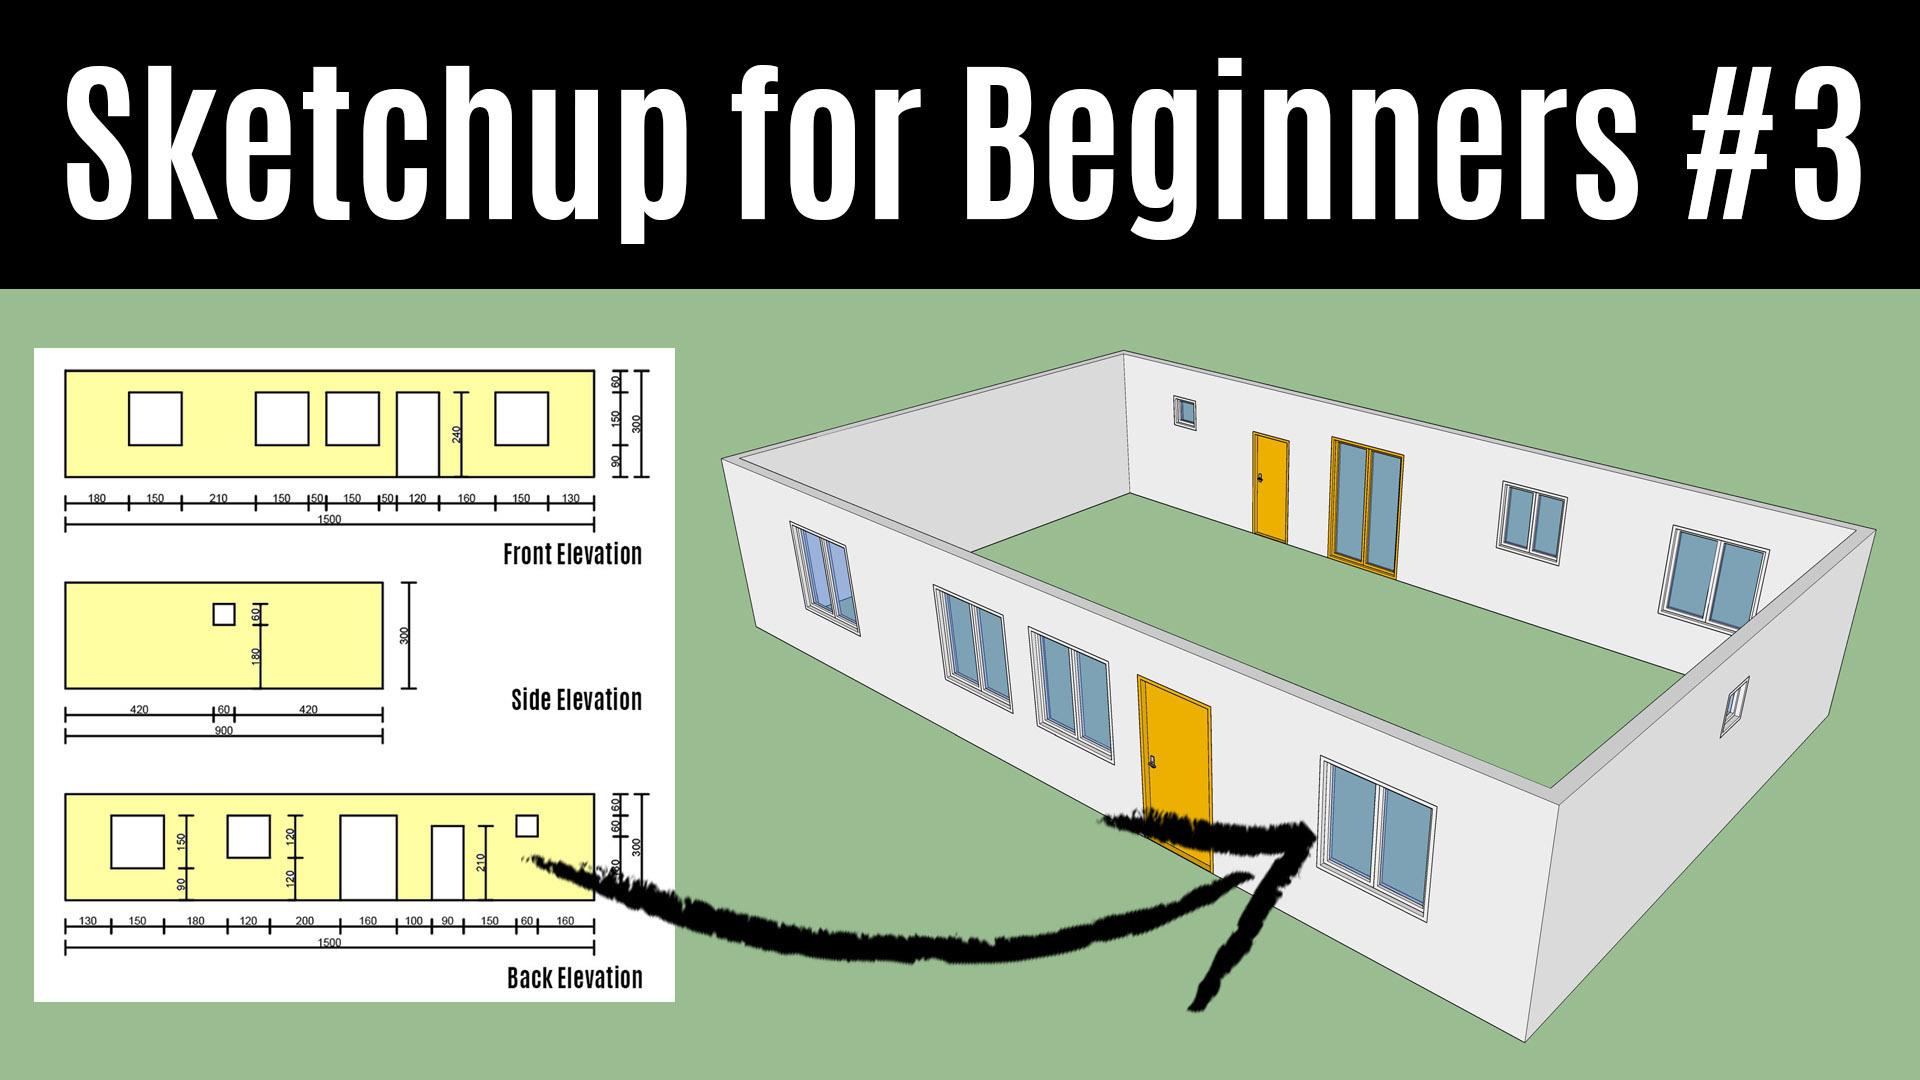
windows and doors. In order to do that, we will use this drawing with exact measurements of the
front Side and Back Elevation. We will start from
the front elevation. And we will use some helpful
guidelines that will help us Create the Holes
at the exact places. We will start by creating
the horizontal guidelines. And the first one will be
90 cm from the ground. The second one will be
240 cm from the ground. So we will open our 3D model, select the tape measure tool. And starting from this
bottom side of the wall, we will enter 90 in the
bottom-right corner. And then starting
from the same line. And taking care of that, we are parallel to the z-axis, 240 cm in the
bottom-right corner to position them correctly. Now we will again
open this drawing and the first Window is 180
cm from this left side, and it is 150 cm wide. So we will zoom out
drawings a little bit. And starting from this left side and going parallel
to the right axis, enter 118, the
bottom-right corner to exactly positioned this
guideline at that distance. The next one is the wave of the first Window
and it is 150 cm. By opening the Drawing, again, you can see that the
second window is 210 cm from the first one, and it is also 150 cm wide. So we will enter 200 then
in the bottom-right corner. And then 150 to make the
width of this second window. The third window is 50
cm from the second one, and it is also 150 cm. Why? We will enter 50. And then the width of the
window that is 150 cm. We will zoom out a little
bit, open the growing. And now we see that
the entrance door are 50 cm from the third Window and they are 100 is 20 cm wide. We will open the model and create the guideline at 50
cm from the third Window. And 112, 34. The doors with the last Window
is 160 cm from the Doors, and it is 150 cm wide. So we will enter 160. And then one cabinet. We have positioned
all the Holes, offer Windows, and in
order to make the Holes, we will use the rectangle tool, draw old Windows at
their positions. The Doors, and the
fourth Window. And now we will make the Holes by using
the push pull tool. I'll zoom a little bit
to show you exactly what you need to do
now, as you can see, if we hover over the
square of our Window, click on it and move until you see the
message on the face, and then click again. And that is how you make
the Holes in the world. Again. The second Window, click on it, move it to the
center of the house. And when a see the
message, click again. Another great thing
about Sketchup is that it makes
sometimes life easier. So the next one, you only lead to,
double-click on it. And on the door to. And the same way, Double-click on the last Window. As you can see, we
have created the Holes for our windows and door
in the front window. Now you can delete
the guidelines. And we will now move
on to the second wall, where we only have one
small window that is 180 cm from the ground
and it is 60 cm high. The horizontal position
of the window is 420 cm for the left side. So we will open our model, select the tape measure tool, start with the
vertical guideline at 420 cm from the left. The next one is the width of
the window that is 60 cm. Then we will make the
horizontal guideline from the bottom at 180. And the last one is 60 cm. For the Windows height. We will use the
Rectangle Tool to draw the position of the fall. And by using the Post poll tool, move from one to the
center of the house. And when you see the message
on phase, click again. As you can see, we have created
the whole for our Window. Now you can delete
the guidelines. And by using the same principle, you will make the Holes of the windows and
doors by yourself, by using the exact measurements that you can see
on these drawings, which you can download below this video to make it your own. That will be all for this video. I'm waiting for the next one
and I'm looking forward to see how you make the Holes in
the Back Elevation Window. Bye for now
4. Creating a 3D Window: Hello and welcome to this video. In the last lesson, I have shown you how to
Create the Holes for Doors and Windows inside the 3D Walls. And if you have followed all the instructions
from that video, you're 3D Walls with Holes should look something like this. In this video, I will
show you how to create a window and how to put
it inside the whole. Before I do that, I will triple-click
on one of the walls of our house to select them all, and then right-click on it and then select the
main group option from the drop-down menu
in order to group all the walls inside one group. The first Window that I will
create is this one that is 150 by 150 cm big. In order to do that, I will first create
a rectangle that is 150 by 150 cm big.
When I zoom in. The next thing I
want to Create a is its frame that will
be 4 cm thick. To do that, we'll
use the offset tool. Click on the face and
then click again. And in the bottom-right corner, Panther for to make
its thickness of 4 cm. We now have two faces because we don't need
this one inside. We will delete it. Now, I want to Create
my frame to be 3D. So I will use the
push-pull tool, hover over the
face of the frame. And when selective, I
will move up my mouse. And in the bottom-right corner, I will enter 24, the height of the
frame of 20 cm. Before adding the other
elements of the window, I will triple-click on it
and then right-click on it, and then select the
main group option to make this frame a group. This Window we have to sachets. So our staff creating the first one by selecting
the rectangle tool, by picking the first
corner to the left and then moving through the
middle point of this line. While Sketchup shows me that I'm in the mint
point in the group. When the new
rectangle is created, I will then create
another frame. So I will again use
the offset tool, click on it again, and then enter for in
the bottom right corner. Again, we will not
use this interface, so I will delete to make
the frame of the search 3D. I will use the push pull tool. Click on it, move my mouse up, click again, and enter aids
in the bottom-right corner. Instead of copying this sash, I will use the existing
one and make a copy of it. But before I do that, I will make a group of this session elements by
triple clicking on it, right-clicking and
selecting main group from the drop-down menu. The copy tool doesn't have its icon on the large
tool set on the left. In order to copy
elements in Sketchup, we will use the Move tool in the combination with the
Control key on your keyboard. So click the corner on the sash, start moving parallel
to the right axis. And while dragging, press the Control key on your
keyboard and then click again. Now we want to Create
the glass for a Window. So we will use the
rectangle tool again. Click this corner,
and then click the opposite corner
to make our glass. To make it transparent. We will use another great
option inside Sketchup by going to Window and by
selecting materials. The materials window will open on the right side
of your screen. And instead of colors, select the translucent category
from the drop-down menu. Inside the translucent
category is select the translucent
glass blow, left-click on it,
and then left-click on the face of the rectangle
to make it transparent. After that,
double-click the glass, right-click on it
and make it a group. Before you move
the cropping tool. That is the combination
of the Move tool and the control key
on your keyboard. And then click this
corner while dragging, click the Control key, and then click again
to make perfect. The first glass is selected. Now, use the Selection tool with a combination of the
shift key to select the second glass and now select the Move tool to
move them both down. Taking care of that
you are parallel to the z-axis and when you
are on the blue axis, anther for in the
bottom-right corner. By using the selection
tool from right to left, select the glasses and the
frame store the Sasha's. And now again, in order to perfectly
positioned the Sasha's, the outer frame, all the
Window click again to move. And then taking care off to
be parallel to the zed axis, move them together 16 cm down by entering 16 in
the bottom-right corner. Our Window is now in the
horizontal position. And Before moving it to the corresponding
hole inside the wall. We want to rotate our Window. And we will do that by
using the rotate tool. In order to do that, select the whole Window,
zoom in a little. Then from the large tool sets, select the Rotate tool. Hover over your
Window until you see this rotation marker
in red color. Select the bottom corner of the Window and then
the opposite corner. And start moving your
mouse up and enter 90 in the bottom-right
corner to make the angle to be
exactly 90 degrees. When you do that, you
are now ready to move the window from here to its
Hall inside the 3D Walls. So we will use the Move tool, click our Window in the
bottom-right corner. And then positioning in the fall by clicking it's
bottom-right corner. Because the whole
Window is now selected. You can now copy
it in other Holes. So we will use the copy tool by clicking
the bottom-right corner. And then while dragging, press the Control on your keyboard and selecting the bottom-right corner
of the second floor. The same thing we will do with the second window to move it to the third hole
and the fourth hole. So that's it. In the next video, I'll
show you how to create a simple 3D doors for our
house. Thanks for watching
5. Creating a 3D Door: In the previous video, I hear shown you how to
Create the 3D windows. And in this one, I'll show you how to
Create a 3D external door. Before I do that, I will show you what to do in the situation when you forgot to Create a new layer
before creating a new element for your 3D model. As an example, I'll will use the windows that I have created
in the previous lesson, and this is how to do it. First, we need to
Create a new layer, renaming layer one, Windows. Press Enter, and then make
these new layer active by using the selection
tool from left to right instead of right to left. Because that way we will
also select the Walls, which is not what we want. So the left from right. And by using the orbit tool to rotate the view a little bit. Select other tree windows
by pressing the Shift key on the keyboard and the selection tool
from left to right. When the windows are selected. You can see that in the layer
box within the entity E4, there is no layer selected, open the drop-down menu and
select the Windows layer. That way the problem is solved. And if you want to check, you can select the layer
zero to be active. And by checking and
unchecking the windows layer, you can see that
everything is now. Okay. We will now start creating
the 3D external Door. First thing first,
press the plus sign and the layer section rename
Layer one to Door. Press Enter and make
this new layer active. The measurements of
the external Door is 120 by two other and 40 cm. Select the Rectangle tool
from the large tool set, draw a rectangle, and in the bottom-right
corner, enter 120, 240. The first element of the
Door will be the frame. And to create it, we will use the offset tool. Click on the face of the
rectangle, and then again, in the bottom-right corner, enter five to make its
thickness of 5 cm. The frame of the Door will be
different from the frame of the windows because it will
only have three sides. But if we erase these two lines, we will also erase
the face of the door. So we will undo this. And instead, we will add some additional lines with
the pencil tool here. Here. Taking care of that are
parallel to the green axis. And by using the erase tool, we will be raised these parts of the line and these two lines. That way, we have created the three-sided shape
of their door frame. And now to make it 3D, we will use the push-pull tool, hover over its face. Click on it. Before
clicking the second point. Enter 20 in the
bottom-right corner. This is another way to Create a 3D element within Sketchup. And when this new
element is created, select the Selection Tool, triple-click on it, right-click, and select the main group option from the drop-down menu
to make it the group. Now we want to Create
a panel of the door. So we will use the
rectangle tool again. Click in the bottom-left corner, use the orbit tool to view the opposite corner
and then click again. The thickness of the
door panel is 5 cm. So we will use the
push-pull tool. Click on it, and before clicking the second
point of the height, enter five in the
bottom-right corner. Again, Selection Tool,
triple-click on it, right, we can make a group. The next element of
the Door will be a doorknob that we can
create very easily. And in order to position it on the right place within
the door panel, we will use the
tape measure tool. Click on the upper
line of the panel. And Before clicking again, enter 110 in the
bottom-right corner. Then we will create another guideline that is 5 cm from the side of the panel, and another one that is 8 cm. To make the width of the
darkness of the height will be 8 cm and centimeters. Now, way the rectangle tool, I'll create another rectangle
and give it the height of 1 cm by entering one in
the bottom-right corner. I will not believe these
unnecessary guidelines and create new ones. For centimeters from this
side and 8 cm from besides. To make a center, we will make some
additional guidelines of 1 cm in all four sides. To make the new element by using the rectangle tool
and make it height of 8 cm. Now, I'll use the guideline
to put it to centimeters. From this side, draw a
line with the pencil tool. And by using the push-pull tool, I'll make the final element
of the dark knob by entering in the
bottom-right corner for the length of this dark. Zoom out a little bit, triple-click on it,
and make it to group. By selecting the option
from the drop-down menu. Click the zoom
extense tool to see the whole model,
village, the guidelines. And now the doors are
positioned horizontally. What we want to do is to rotate
them to become vertical. So we will use the
selection tool, select the door
from right-to-left, because we want to select all
the elements on the door. And now like we rotated the windows in the
previous lesson, we will use the Rotate tool. And when the red rotation
marker shows up, click this corner and
then the second corner. And by moving your mouse, rotate it and enter 90 in the bottom-right corner for
the angle of 90 degrees. Now, we want to move the
Doors from here to here. So we will use the Move tool and more power Door to its right position
inside the 3D Walls. That's it for this video. If you have any questions, please don't hesitate to ask. You can do it by selecting the community tab
below this video. And please be so kind to recommend this class
to other students, your friends or family members by pressing the Yes
button above this video. Thanks for watching, and I'll
see you in the next part.
 Alek Stanojevic, Every day is a new chance to learn a new skill!