Transcripts
1. Introduction: Hello, and welcome to this class of 5-Day of sketching flowers. I'm Patricia, and
I'll be guiding you throughout using your sketchbook and drawing some fun flowers. We'll be going
through four days of learning four different
types of flowers. And then on our last day, we're going to mix
and match everything we've learned so far by
drawing all the flowers. So we're going to start
with some Daisies. Then the second day, we're
going to learn some Tulips. Third day is all about roses
and finally Sunflowers. On day five, we're
going to be drawing a composition of
all these flowers. The idea here is for you
to fill out one page of your sketchbook per
day with no pressure, taking all the time
that you need, and for you to feel
more comfortable in using your sketchbook for experimentation and
to be more loose with it and not worrying
too much about mistakes. This class, all you need is
a sketchbook and a pencil. But really, you can use
any material you want. I will also show you all the materials I'll
be using for this class, but really just
pick whatever you feel more comfortable with
and have lots of fun. You'll also be given
an assignment, so you have real results
while watching this class. So are you ready to sketch
some flowers with me? Then come along and let's start.
2. References & Resources: Hello, and welcome back. So before we start trying, I want to talk to you about a few things
about this class. So I want to talk to you about the materials
you'll be using, as well as some references and resources that
I will give to you. So you can use
throughout this class. First thing you need is a sketchbook because this
class is all about sketching. So if you have a
sketchbook, use that. A will serve. If you don't have one at hand, you can use a notebook,
a noting pad, anything really actually
starting a new sketchbook. So this is an empty sketchbook that I will start
with you so you can see that it doesn't
need to be scary to start a new sketchbook,
a blank sketchbook. So yeah, I'll be using a new
sketchbook for this class. Pens, pencils, stuff
like that. Very simple. I'll be using I have here
the pencil fine liner now, I'll be using this mostly
because I enjoy using them. So basically, just use whatever is the most comfortable
for you and the most fun. So I will be mostly
using this brown one. Let me just show you the
tip if you want to see. So yeah, these are the
ones I'll be using. This will be my main one for sketching and I have
a few colors here mostly for me to use if I feel like adding a bit
of color to my sketches. Now, you can use
whatever you want. It can be a big
pen, for example, it can be a black pen, red pen, purple one,
whatever you like. It can be a fine line like this. You can use a pencil
or colored pencils. Really, whichever is the
most comfortable for you, keep it simple if you want, add colors if you want. I also have this
highlighter in green. Again, if I want to add a little bit more color to
my page, I can use this. Mostly, I just want to
show you the variety you can add to your pages and
how much fun you can have. But bottom line is you can use just a sketchbook and a pencil
and you are good to go. Now, references, each day we'll be drawing
a different flower, and on our last day, the idea is to make kind
of a composition with all the flowers that we've learned throughout
the other four days. So I'll be giving you a
few reference boards. One for each type of flower
that we're going to draw. For my sketches, I'll be
using those reference boards. You do not need to use those. You can look up for your
own flowers if you want. You can look them on
Pinterest, for example, on stock photo website such as unsplash.com or
Pexels, for example. On the reference
boards I am using. I also have a few
examples of drawings, so they can inspire us in stylizing our flowers a
bit more when sketching. And finally, for
your assignment. So this assignment is
divided in several parts. So the idea here is
for you to after watching each video or after
each day of sketching, you pick up your
sketchbook and fill a page with the flower we
learned in that video. So in total, you will have four pages of your sketchbook
filled with flowers, and then we have our last day, which is a mix and match of
everything we've learned. Feel free to share your drawings
with me because I always love to see those and I want to see your progress
throughout each day. So just have fun and
pick up your sketchbook, your pencil, whichever
you choose to draw it and follow me
to the next video.
3. Day 1 - Daisies!: Hello, and welcome back. Now we're going to start
drawing our flowers. And for day one, I thought we could start with
something very simple. So drawing some Daisies. I feel this is probably
the flower we all draw. Sooner or later, it's like
the most basic flower, let's say, the most basic shape that we usually start to draw. So I wanted to start with
something very simple. And I have here my sketchbook. I know that blank
pages are very scary, but listen, the secret is
to just pick up your pen, your pencil and just go in. Do not overthink this. Let's do this. I'm going to be using this brown pen
that I really like. I really like this color, and I think it's great
for drawing flowers. I have my reference board here so I can look at some examples. As you can see, I have a mix of pictures
of photographs of Daisies and some drawings to for you to get some inspiration of different ways
you can draw them. So let's start. And we're
going to start with, like, the most normal way
of drawing them, let's say. So I don't know, let's
start here in the middle. We have a circle for the button. And then for the
petals, basically, it's almost like some ellipses
going around our circle. We can draw more or less petals. We can add here some details
because one of the pictures here we do see like some texture on the petal,
so we can use that. We can even fell here the button and adding a little bit of
texture as well. There we go. Let's try another one, just a flour for now. And let's try doing more petals. So really going around and drawing lots
and lots of petals, as many as we can. There we go. Now,
let's try another one. I want to try, like
if you notice, like the petals are not totally round at the edge of the petals, we have here, this little curve. So let's try to do that. So
let's try another one here, circle and petal, and we have this edge this way and
another and another. Notice how I'm not
even lifting my pen. I'm just going with it. And of course, this is not
going to be super perfect, but it's not supposed
to be perfect. I'm just exploring
different ways of drawing my Daisies because
this is a sketchbook. This is not a place
where I want to make full handred drawings, drawings that I want to present
as finished art pieces. Now, this is just a
place for me to explore. So, okay, we have
these three options. Actually, I really
like this one. I think it looks really pretty. So now let's try and draw
the rest of the flour. So I'm going to go
over here again. I'm not stylizing things yet. We're going to be doing
that afterwards. So circle. Now, some petals. Alright. Now, let's draw here a line going
down and some leaves. Alright, that looks cute. Let's try this one.
And let's try to draw the leaves another way because if you notice
in these pictures, you can't really tell
as well as you want. I couldn't find a
picture, a good picture. With those, but the leaves of the Daisies are not
round like this. They do have several
edges going out. So I want to try
something like that. So circle for the button, and now let's do those petals like this because I
really like that. And try to do this,
without lifting your pen or your pencil and
see what happens. I think it's a good exercise for you to gain more
confidence in your lines. Alright, so now we're going
down the line, right. And now we have going to
make a few lines like this, at least two, and now I'm going to go something like this. This is a bit more similar. Of course, I'm not
being realistic here, but this is a bit
more similar to what we actually find in Daisies. It's really cute. I like this. So next step, let's try to
stylize this a bit more. And when I say stylize, for me, it usually means to simplify the shapes as much as we can. So one idea to do
this is using, like, the most basic way
of drawing flowers. Like we all I feel like we all learn to draw
flowers this way, so it's doing something
like this. Right? I'm not a huge fan of this. So let's try something else. Something I like sometimes is adding basically curls.
So let's try that. So we got a circle and
now some curls like this. Okay? I like this better. But still not
really my favorite. I feel like this does not
represent a daisy very well. So let's try something else. Let's try to do
something similar to that drawing that
we see over there. So we have kind of an ellipse
for the button, right. And now we got here our Daisies. And I do like this a bit better. Also, we kind of
add a little bit of perspective to the flowers
so we can also do that. Like, for example, you can
do something like this, and we got a flower
here. That's fun. Now I'm going to show
you my favorite way of drawing Daisies. And this is going to be
a very different shape, but I really do
enjoy doing this. So I like to go in
and draw an ellipse. And now what I'm going
to do is draw like half ellipses for the petals,
usually four of them. So I'll draw one here, then another,
another, and another. And that is it. If you want, we can add here. These lines as well.
And this is it. This is my favorite
way of drawing them. It's a very simple shape. We can even draw them bit in different perspectives as
well, something like this. And this is my favorite
way of drawing this. So we got here a few examples
already. Let me see. Let me see how else
can we do this? And of course, we can be
very loose with this. So if you want to really start
to feel comfortable about drawing on your sketchbook and being loose with your drawings
without worrying too much, the key here is to be very loose and quick with your lines. So for example, you can
just go over here, a dot, pomp, boom, boom, boom, boom, boom there, a flower. It's done. Let's try again. One dot and a few petals there. I can take the
opportunity and fill here these blank
spaces there, there. Now, if you want, we can draw this with a bit more perspective,
something like this. There. Let's try
another one there. See, be quick. Quick and loose strick and this doesn't
need to be perfect. It can be a bit
messy. That's fine. There we look at this. There we go. Really cute. We can even add just loose
leaves here and there, just fill in here
the blank spaces. And yes, I know I still
have here a bit of space, but there's a reason for that. Right now, I just
want you to feel comfortable in just
going in and drawing something on your
sketchbook without feeling a pressure of
doing this perfectly. That's true, not a curly one, because I do think these are very cute,
something like this. I know I do like this. Okay. So we do have here
a bit of space right. And what I want to do is
draw a bouquet of Daisies. So that means we're going to
have to draw a lot of them close together and perhaps in slightly different
perspectives. And I do know that
sometimes this feels very complicated because we do have flowers overlapping
each other, right? But again, this is
just a sketchbook. We don't need to be too
perfect about this, so we can just, like, go loose with it and give the
illusion of many flowers. So how do we do this?
So I'm going to start by drawing a daisy. Okay, one. Now
let's draw another. And as you can see, this
one overlaps a bit, so I'll just draw the
petals more or less. So this is just what I do. I start drawing. Some
might overlap a bit, but that doesn't matter. And once I like the
amount I have here, I will try to fill in the
blank spaces a bit more. But as you can see, I'm being very loose
here with my lines. But you can tell
these are flowers. Okay, so now we can, like, just make here
some small strokes here and there and give
a bit of illusion. There are more flowers
over there. There we go. Now, I do not have here
a whole lot of space, but let's draw here this
area, the green area. Really cute. I was
thinking of drawing like the bouquet and then a little string
attaching everything, but as you can see, I
do not have the space. So what I'm going to do
is I'm going to draw kind of a jar or a vase where the flowers
are, something like this. There we go. This
is really cute. And now we do have
here some space right. So I think we can fill this
with a few more flowers. And as you can see,
we started with very detailed flowers and then started simplifying more
and more this shape. And I don't know, I
do like most of them. I think these are
all very different, but they all work just filling here the plank spaces here
and there. There we go. And I'm going to add some
little flowers like this one. So I don't know,
do tell me which of these do you like best. For me, I actually
really like this one, the complexity of it. I think it's very beautiful, and it is the most daisy leg, perhaps, but I also
really enjoy the ones. I really like using
these shapes. So do let me know,
or in your drawings or perhaps you draw them
differently. Do let me know. Show me how you do draw this because I'm very
curious to know. Now before we go, I just want to add a little bit of
color to our drawing. So I'm going to use
this green highlighter. And add a bit of color
to our leaves here. And I'm not going to be
very precious about it. As you can see, I'm going
to go out of the lines, I just want a little
bit of color. And in general, I do like to leave these kinds of
things very messy. My sketchbook, I feel they
are more spontaneous. Like my drawings in general
are very controlled, let's say, very organized,
very symmetrical. And in my sketchbook, I do enjoy being a bit
more loose with things. Now I'm going to pick
up here this yellow and add a little bit of color here
and there to the pattern. So we're drawing Daisies, right? We want this little bit of yellow on the buttons
of our Daisies. And as you can see, mostly, I'm just having some
fun with my sketchbook, just adding things,
experimenting. Like most of these, I do not have the pages planned because I do want you to
see my thought process more or less and how I just go in in my pages and have
a little bit of fun doing different things,
seeing what happens. And sometimes things might
not work. It is fine. That's why I'm doing this
on my sketchbook, day one. There we go. And this
is our first page. I do think this turned
out really cute with a lot of exploration of drawing our Daisies in
very different ways. And I do really like the
result of our first page. So for now, this is it. This is our Day one
of sketching flowers. Now, don't forget to download
the heifernbard if you want to use that as reference and inspiration
for your drawings, fill out a page of your sketchbook and then don't
forget to take a picture, so at the end, you can share
with me all your drawings. But yeah, have some
fun, Take your time. There's no time limit
were doing this. And whenever you're ready, follow me to the next video, where we'll be going for
day two of drawing flowers, and we're going to be
drawing some Tulips. So I will see you there.
4. Day 2 - Let's draw Tulips!: Hello, and welcome back. So this is day two of
sketching flowers. And once again, I have
here my sketchbook, and today we're going to
be drawing some Tulips. Now, Tulips are
also really fun to draw because they have a
very interesting shape. And once again, just
like with the Daisies, we can draw them or
as complex as we want and really follow what we're seeing in the real flower. But we can also deconstruct
them into very simple shapes, but still know that
that's a tulip. So we can stylize
them a whole lot. And I think they're really,
really fun to draw. And also, they can
be very simple. So once again, I have
here my reference board. I'm going to pick up my pen, and I'm going to start
drawing one of these. I'm going to look at some of these pictures and trying
to draw what I see. Perhaps with this one,
that is the first picture. And we have, like,
this shape right. And then we have another one
here and another one here. And then we have this
line going down. Now, this green part, I always forget how this
is called in English, but the it is it the stem? I don't think it's the stem, but it is this green
part that goes down. It's a bit thicker. So
instead of just one line, I do like to draw like
two lines to show that. And then we have here these
long, very beautiful leaves. There we go. Very cute. Now I'm going to try and
draw another one here, this one, and we're going to
start with this petal here. And now we got this one
like this and another one. Now Tulips, we can
draw them like really closed or
a bit more open. It really depends
on what you want, but also how at what stage they are because
we got that one over there. It's a bit more open. We can try that as well. But the shapes of the
petals are always more or less the same. There we go. So we got here
this leaf going this way, and then this one is very
interesting because she curls. I really like that. It's
very interesting shape. There we go. Oh, I
really like this. These look very cute. Alright, so I followed some of these pictures and tried to
draw them more realistically, let's say, and now I
want to stylize them. So we have here actually
a few examples, right. And let's start from more
complex and simplify as we go. So one thing you
can do is something similar to this second
picture here at the bottom. So something like this, and then we got this one,
this one, and this one. Then we got here a
tulip. There we go. We can simplify this even more. So if you want to draw
them kind of closed, we can do just something like this and then this and this. For a long time, this is
how I would draw my Tulips. We can simplify this shape even more and draw
something like this. There we go. And this is how I really enjoy drawing
them nowadays. But I do like to add some curls. So what I do is I will
start at the top. So one, two, three, dry them together, and there
we go. Let's try it again. One, two, three,
and there we go. I really enjoy drawing
them this way. Let's try this one again because I'm not very happy
with this shape. So, I like this better. And, of course, we
can be very loose. So I really like that
drawing with red Tulips. It's very loose, and I really like that.
So we can try that. I'm really, like,
kind of doing what I see here because I think
this is really nice. I really like that,
really loose. But we can tell what it is. Let's do that again.
Just like this. Okay, this is really
nice. I like that. So now I'm kind of just I've explored different
ways of drawing them, and now I'm just filling
out the spaces here, and I really like
this way of drawing. Let's try another one
like this. Really cute. I do really enjoy filling
all the spaces in my pages. Like, I specifically choose small sketchbooks because that allows me to do these
tiny little drawings, but they are so much fun to do, and I feel like they
look really cute, and I can fill with just
these tiny elements here and there after
exploring my drawings. And sometimes this
is just what I do at the end of the day when I want to have
a little bit of fun, I will pick a theme and draw many different things inside that them and
just fill my page, try to fill my page
with all those things. So, for example, sometimes
I will pick flowers, and I will just fill my
page with some flowers. Other days, I pick like fruit, and I will look at pictures of fruits and draw
different types of fruit and fill my page as
much as I can with it. Feel this is a very fun way and simple way of relaxing a
bit at the end of the day, but also doing
something creative. But at the same time, it
does not ask a lot of me. I just need a pen and
a few images sometimes to help me get some inspiration
and just fill my pages, you know, and nothing
too much about it. So okay, we have this page, which I'm really happy about. And what I want to do now is
add a little bit of color, and I think I'm going to pick, like, the green,
orange and yellow. We do have a lot of different colors when
it comes to Tulips, so I want to make my
page very colorful. And I want to try out like I'm not really
coloring coloring. Let's say I want to
add some texture, so I'm going to try
something here. So instead of going
in and paint, I want to make some lines with my colors,
something like this. It's very interesting, I think. Alright. Let's pick the yellow now and fill the other ones, so it's not overwhelmingly
orange. There we go. This one, as well.
Okay, I do like this. I do like the texture
it adds here. Very fun. Let's
go for the green. Here on our petals, once again, give
here some texture. Alright, I really
like this, you know, adding a bit of color, but adding some texture. Instead of actually
painting things. I think this is really
fun way of doing this. And as you can see,
I'm being very, very messy with it, because
that's how I like to do this. I feel that sometimes
the more messy you are I feel that it adds
more personality to it, you know, more
emotion, let's say. Now I'm going to
feel the others. I'm going to make here a
mixture of yellows and oranges, perhaps more orange
than yellow because I really like the orange here. There were following here, the shape of the
tulip, you know. Let's go for the yellow now, and I think our page
is almost finished. Overall, I'm just
having fun. This is it. Really, really a
lot of fun here, and that's what I want
you to do as well. And yeah, I think our
page is finished. Let me just name my page here. Look, isn't this gorgeous? I'm really happy with this page. Once again, I really like the
more detailed Tulips here. As I said, usually, I do
simplify my shapes a lot, but I'm really happy
with this more not realistic but more complex with more details,
really, really fun. So once again, it's now your
turn to pick up your sketch. Of course, you can draw
at the same time as I am. So while watching the
video, you can be drawing. But if you haven't yet, it is your turn, time to pick up your sketchbook, your pen, your pencil, whatever you want
to use and fill out a page of your
sketchbook with Tulips. Join me again to
draw some flowers, to sketch some flowers, and we're going to be
drawing some roses.
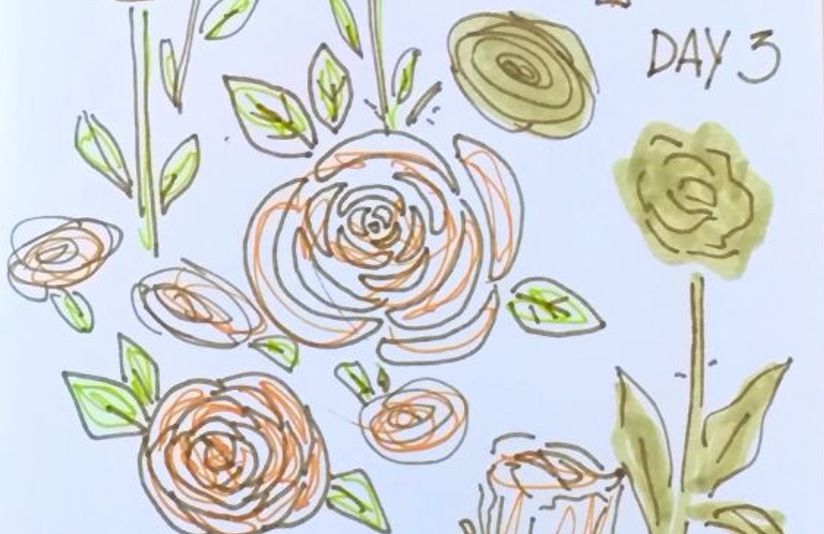
5. Day 3 - Roses: Hello, and welcome back. So this is our third day
of sketching flowers. And today, it's
going to be roses. We're going to draw some roses. So once again, I have
here my reference board, and don't forget to
download that one if you want to follow the same
references that I am. So let me see this is our
day two with our Tulips, and now it's time
for some roses. And as you can see, I've gathered once again
here a mixture, not only in colors, but formats and even some
drawings so that you can take inspiration from different
aspects of roses. So I'm going to start my
usual way of sketching roses, which is kind of like this one in watercolors
that we see here. Usually, that's how I would go. So I'll go in, and the shape I want to draw is kind
of a half moon. So this is the shape
we want to draw. It can be a bit rounder. So if you want, you can take a bit
of time by doing this kind of shape in
different ways, even. So this is going to
be our main shape, a halfm or kind of bean shape if you want it
more round, let's say. Usually, I like to start
from the center of the rows and draw it outwards. So I'm going to start
with some smaller shapes right here and then draw around
it, something like this. Petals will grow
bigger as we go. And as you can see, I'm not
too precious about this. I'll just draw some
petals here and there until I am happy
with the final result. Usually, I like to draw
them fairly small. So this time I'm drawing
it a bit bigger. I don't like to leave
my rows like this, although it really
depends on the kind of drawing that I'm
using that I'm doing, but I always like to add
a leaf or two to it. I think it makes
it look a bit more complete and even more
romantic, let's say. So let's just draw
this leaf shape. I like to do like
two on one side, and then another one
on the other side. If you want more details, we can add these strokes like
right here and there we go. This is how I would
go about this. Now, as you can see, I draw
all these shapes separately. If you want, you can draw them all together. So let's try that. Focus on the same shape. If you want, you can do that exercise where you
don't lift the pen, but we can do
something like this. As you can see, the shape is
basically the same but we do not have all the blank space around it, and there we go. Now, once again, we can add
a bit of green to our rose. We can also try to draw our rose a bit close like
that one. So let's see. The shape is very similar
to the tulip one, right? Now, we got these
bits of green here. And here, I'm just looking at the picture and following it. And now we have here our green. We have our leaves. There we go. Roses tend to have
lots of leaves. As you can see, it even has
some ramifications in there. And, of course, if you want
we can add some thorns, if you want to add more details to your roses. There we go. We can really draw a
rose fully closed. We have here some buttons. So we would have here
our green, right. And then our rose
here, there we go. Now, let's simplify
these shapes, perhaps. So for a more close rows, a very simple way to draw them is to draw
spiral. There we go. And now like a cup or a vase. And if you want, we
can even add here like the petals
overlapping each other. And then we can add here, our green, and there we go. This is one way of doing it. We can also draw it rounder, perhaps this, there we go. And we can draw several of them together two ways that are
really fun to draw our roses. So I'm going to use
here my highlighter so I can make a
bigger spot of color. So what we're going to do is
make a wavy shape like this. Perhaps it doesn't need to be perfect, and now we feel it. And if you want, we
can even go over here and draw our leaves. I'm even getting
some inspiration to that second drawing
we have there, the second picture, there we go. And now we go with our pen. Let me see if this
is properly dry. And we can add some details, just some lines, some
strokes here and there. I'm just waiting a bit
for this to dry so that the paint of my pen
doesn't go all over the place. So I'm going to start here, add a few tons because
I think those are fun. I like to be very
loose with this, and now we're going to go around here and add here a few lines. Or a rose, something like this. This is a very fun
way of doing this. Another way is to simplify
your shapes even more. So I'm going to go
over here again, and I'm going to draw a circle, two circles because I want
to draw two of these. And while this dries, we can
draw a few more of this, maybe open it a
bit more or rose, and even give it a bit of a different
perspective than this one. There we go. And now, yeah, let's go back to this one. So this is the most simple
way you can draw your roses, which is just draw a spiral. So you have some
color behind it, and then you just go like
this. And there we go. Your roses are drawn. And then, of course, you can add some leaves here and
there, maybe some tons. This is the simplest
way you can do this. So just a spiral, and you have your roses. You can do a whole
bouquet this way. Just have some
fun. There you go. My favorite is both of these. I really like doing it this way, and I like that we
can be very loose with that as well and draw them in different
perspectives. I always like adding
these tiny leaves to it. So for me, it's the half moon. My favorite way of
drawing my roses. But the spiral, even though it's not
something I usually do, I think it is a very
fun way to do it, and it could make very
interesting patterns if you want to draw a
pattern out of flowers. So very abstract way
of drawing your roses. So it's all a matter of trying different
things out, really. I think that's mostly it and see what kind of
shape you prefer. So my page is kind of fields, and I want to add a bit
of color, of course. So I'm going to go over here. I'm going to use the
orange because I think it's the best color I have here. And I'm going to add
some color here and there to my roses because roses
can just be white, right? That's no fun. Roses
have beautiful colors, even though that, yes,
some roses are white. I think they deserve
to have some color. And even though, like I said, I don't usually draw my
Roses using the spirals, I always go for
the Huffman shape, mostly because it's the
one I'm the most used to. So it's mostly just
muscle memory kicking in. I do feel this spiral is a very fun way to draw
them. Really abstract. I really like this. I'm
really happy about this. I'm glad I did it because I'm also learning
something with this class. I'm learning that I
actually really like drawing my roses in
a very abstract way. Using this green this time
because it's very vivid, and I think it works very well with our roses this time around. I want to have a very vivid page for some reason right now. So if you feeling
like using paint, for example, Roses
are perfect for that. Both acrylics are watercolor because the Huffman shapes work very well with watercolors. We even have this example
here in our reference board. The ones, even though
this was done digitally, the idea is for it to
look like watercolor. But also for these other more abstract roses or some markers, even because you can just make these circular or wavy shapes, as you've seen on your paper, add lots of shapes
like that, color, and then you can use a pen
and draw a bit more detail. Give that idea of the
rose a bit more properly. Once you finish this video, don't forget to
fill out a page of your sketchbook for
your assignment, and I will see you either
in the next video or in the next day for our day
four of sketching flowers, and we're going to be
drawing some Sunflowers. So I can't wait to see you.
6. Day 4 - Sunflowers: Hello, and welcome back. Today we're going to be
drawing some Sunflowers. This is day four of our five
days of sketching flowers, and this is the last
flower we're going to learn because as I mentioned at the
beginning, our last day, the fifth day is going to be all about putting into
practice what we've learned and doing a page with all these flowers that we've learned
throughout these days. So today, we're going to
draw some Sunflowers. And honestly, these are some
of my favorites to draw. And I do feel I say this
for most of the flowers. And truth is, I kind of went with the flowers I draw the most that I
have the most fun with. But I do feel that most flowers have their own peculiarities. And have their special
way of being drawn. So we're going to
draw some Sunflowers, and I'm going to start in a more realistic
way, let's say. And I say this because, as you know, I'm not
realistic artist. It's not something
super realistic, but it is the closest
way I do that. And what I do is, first of all, you see that the button of
the Sunflowers is really big. And you see all those details like it's not just a circle. So what I like to do is
I go in and I start by drawing some dots like this
in a circular fashion. So this is going
to be our button, and I do start with a button. And for now, we can
leave it like this. If we want, we can
add more later on. And now I'm going to
start to add some petals. And I'm going to do this
in two different stages. So we're going to start
with one layer of them, and this is the
shape I like to use. So the shape is kind of
similar to the one of our Daisies except
the petals are pointy instead of
rounder, there we go. I do like to add here these lines just to
add some more detail. And as you can see, I drew
them kind of far apart right. So now I'm going to add
another layer of petals. So these are going to be behind. So we don't see all
of them. There we go. Once again, a bit more of this. And sometimes I'll even go and add a few more because if
you notice Sunflowers, they have a whole lot of petals. All those layers of petals
that I think are really fun. And this is how I
usually draw them. Now, if you want, we could
make the button here even bigger and we add some
more dots and there we go. Now, let's take this opportunity
and draw this big stalk and we can even add
some big leaves as well because everything about
Sunflowers is kind of big, unless it's the smaller ones, but even the smaller
Sunflowers are really big. Compared to many other flowers, compared to Daisies, for
example, and there we go. Now we can try to do
this a bit differently. Let's try to perhaps draw our petals a bit
rounder. We'll see. So starting with the
center with some dots, and now we can add some petals. There we go, and now some
more, and there we go. Which one do you prefer? Do you like the pointier
petals or the rounder ones? Personally, the pointy petals are the ones that
work the best for me. But hey, I don't know, maybe for you, it is different. That's the point of
this class and of sketching in general is
to try different things. Now, how else can we do this? We can try to do something
that is a bit more painterly, let's say, so we can use
our marker once again. And again, I only
have one color, but we can do here our
circle and a few petals. Let's make another. The fun thing about
the Sunflowers for me is also the colors. I really like the
brown with the yellow. So if you want, and
if you have those, you can pick some markers, a yellow and a brown one. And do this according
to the color. So use the brown for the
center of the flour, and then the yellow
for the petals. That way you don't
really need to go and use this pen later,
like I'm going to do. I'm going to leave
this to dry for a bit. But I'm going to
add some lines with my fine liner afterwards. But while we wait, let's try and do something else. I really like this one.
This is very Japanese. It reminds me a lot of
the Japanese mangus. So this second drawing at the
bottom, I really like that. So I want to do
something similar. But as you can see, I feel that one thing we can all agree
is that the Sunflowers, the button has the
most presence, and then the petals are smaller contrary to most of the
other flowers we drew. The button always takes a lot of presents
here. You know what? I'm going to make this even more cartoony and draw
a tiny face here. So cute. Isn't it cute? Let's go for this one now. So we have here our
sunflower, right. We started with some colors just like we did with our roses, and now just draw my petals, doing this a bit more
abstract, let's say. Usually, when it
comes to Sunflowers, I do like to draw them very big. Here I want to draw since
I want to draw with you, different styles, let's
say, I'm not doing that, but usually I like to just really basically zoom
in on Sunflowers and have them feel not even
like I can't even draw them completely in my pages because that's how big
I like them to be. So let's try that one, as well, because I really like those
shapes, they look very fun. We can try and draw
them like to the side. There's one over there
that's kind of like that. So some buttons. And now we have here our petals and the stock
goes this way, right? Be as abstract as
you want with this. I really like this very
simple way of drawing them, so I circle, and then we
have here another one. And let me try with round petals because I feel round petals will make this
even more cartoony and cute. Well, the stock doesn't work
very well here, no does it. That's okay. We
can try it again. Now, of course, as you can see, I'm going to look at something and take
inspiration from it, and then I'll kind of give
it my own twist to it. That's how I use these
references most of the time. I do something that
I like to explain. This is too big.
The petals here, the proportions are wrong. So the center is always
bigger than the rest of it. But I really like rounding everything up for a
more cartoonist style. Yeah, I do like this. Both of these kind of depends
on my mood, I would say, like do I want to draw
something a bit more cartoony or do I want to draw something a bit more
realistic, let's say. And I do feel that I did
here figure another way of drawing my Sunflowers
because I always go with the more
sophisticated style. I never really explore
the cartoony style, and I really enjoy this. With or without a
face, of course. Now, obviously, I want
to add some color here and I'm going to use the yellow because Sunflowers need yellow. I can't leave my
page just like this. The Sunflowers need to be
as yellow as possible. So cute. Adding the little face, I know it's the first one. I did here, like, kind of giving a bit of a
personality to my flowers, but I don't know, these Sunflowers
here really I feel they really needed a
little cute face to them. Just this one. This one is also fun and could be more
explored, perhaps. Not my favorites, but I think we could also kind of
work with this a bit more. Now I'm going to
paint the green. I want to use this
green just so it's not just very lonely in
these flowers here. Also, should I try to add
some yellow to this one. I think we could try that
just so they're not as different from the other
ones or even, hang on. Giving this more abstract style. Now let's go with the yellow. Obviously, you can't see it
as much as with the others, but I do feel it makes a difference and makes the
whole page bit more cohesive. But, yeah, this is it. Let me just show it to you. My sunflower page, very
cute, very summary. I think this really
reminds us of summer. The color Sunflowers
is the thing that you see mostly in summer,
so very cute. And yeah, this was our
day four of drawing. Of sketching flowers. I will see you in the
next video where we'll be filling a page with all these flowers
that we drew so far. So that's what we're
going to be doing on day five, take our time, fill out a page just
with some flowers, and I will see you
in the next video.
7. Day 5 - Time To Draw Them All Together: Hello, and welcome back. So this is our last day
of sketching flowers. And today, as I said, we're going to be doing
something a bit different. So throughout the
last four days, we drew four different
types of flowers. And for this last day, I kind of want to make a mix and match of everything
we drew so far. So we're going to
fill out a page of our sketchbook with all the
flowers that we've learned. So with some Daisies, roses, Sunflowers and Tulips. I'm going to be using basically the same materials
I've used so far. I'm adding, however, this other highlighter that
I have in this kind of a dry pink because I want
to add an extra color here, so it's not as
confusing, perhaps. So I do have something
in mind right now. So I'm going to
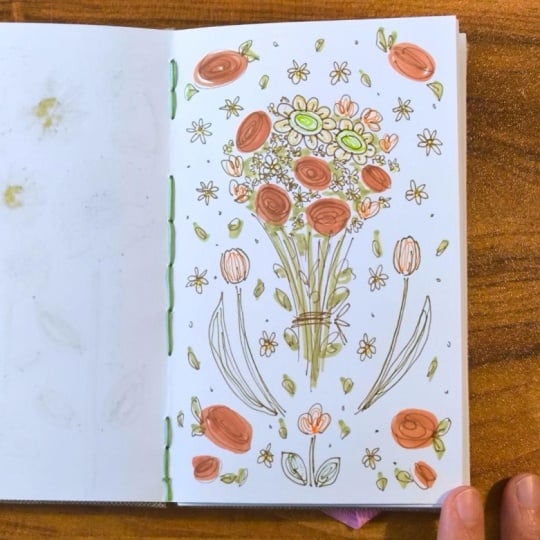
open my sketchbook. I want to draw a bouquet with
a mix of all these flowers. So this is really a
free day, let's say. If you want, you can even
draw other types of flowers. Going to start with
my highlighter, and I want to start
with some roses. I want the roses in pink. So I'm going to do
something like this, and now let me pick
my fine liner, the brown one that I've
been using so far, and I'm going to start drawing
some Daisies, perhaps. I feel that Daisies
will look very nice next to the roses. And for now, I'm just
doing things very loosely and not filling
in all the blanks yet, I might fill them later. It really depends
on the space I'm using and if I need to
use more space later on. As you can see, I'm being
very loose with this. I feel like Daisies have to
be together lots of them, since they're very
small flowers. Now, I'm feeling like perhaps
doing a sunflower here, doing it in that style
that I did yesterday, so let me just check. Oh, yeah, this style here, not sure if I'll draw the face because it's not in line
with everything else. It would be cute, but I'm not sure if that's the vibe
I want to go with. Also, as you can
notice, I'm not drawing any of the greens yet, the stalk, and the leaves. I just want to focus on
the flowers for now, and I think I'm going to
draw another one here. I'm just going with
the flow once again. Sketching for me
is all about that, like no plans, just starting
to draw and go with it. Want to add another here or
would that be a bit too much? Like three, three,
three, is that? You know what? I think I'm
going to draw some more roses. Because I don't want it to
be repetitive, you know, like trees and flowers, tree roses, stuff like that. I feel it might make
things a bit boring, another one here,
different sizes and all. Now, for the Tulips, let me add some more Daisies, perhaps, here in these spaces. So let me check how I
was drawing my Daisies, just so I can be sure, this is more or less it. And as for the Tulips, what is the style
I want to go for? I want to go with
this style over here. You know, the simplest one is on line with everything else. So two here, I want
another one here and perhaps a few more here and perhaps a few more
Daisies here and there, because Daisies are cute. Alright, I think this is it. So now I'm going to go over
here and draw some stalks. Of course, once
again, this is not the most realistic
thing because we do have different
types of flowers here, but I want to add a bit of
greenery here and there. See I'm being very loose, kind of like not a
super perfect bouquet, but something a bit like
a wild flower bouquet, you went outside and
picked something together. Not a whole lot of preparation. Also, I need to finish
here our roses, right? Oh, I really like how
these roses turned out. This color, I think
was perfect for this. Alright, so I have
the bouquet here. And now let's add just
some color to our bouquet, and then we can add all the
elements surrounding it. So my Tulips are
going to be orange. The Sunflowers will be a mix of brown with just the yellow, I think, the yellow
here in the petals. I can perhaps use that
green for the center. How do we feel about that? We do want, however, here some yellow on the Daisies, so they're not colorless. Alright. Now I'm going to use this green here to add a bit
more color and perhaps here as well in between our flowers here because there's going to be some greenery
here, obviously. Alright. Really enjoying this. Now, what kind of
elements do I want here? First of all, let
and here this green. Yeah, I think I like that. There. I'm really happy
with this bouquet. Now I want to add some more
element surrounding it, and I want to check my Tulips here because I think
I want to draw, something like this
here to the sides. So I'm going to try and do that. Kind of a pattern, you know,
surrounding everything else. Now repeating here, kind
of the same motive. Of course, this is
not going to be like 100% symmetrical because
I'm doing this by hand. I just want to have
here a nice idea, let's say, now here, I'm going to draw another tulip. But this time in another
style, something like this. And now I think I want to go for some roses right about here. Maybe I'll draw some
leaves. Do I want? I'm going to do two more roses in here? Something like this. And then I might fill things
up with a few Daisies. I don't think I'm going
to do more Sunflowers. Because they are way too big and I do not like that so much. I feel I already fill the space
with a lot of big things. And also, once again, I don't want it to
be too repetitive. So I think I'm going to
fill out the spaces with some Daisies now
because I think those are perfect to fill out spaces and perhaps a few
leaves here and there, some bits of greenery, you know, two more
here on this side. I'm I'm loving this page. I think this is
looking very cute. And now here some
petals here and there. Very beautiful. I really like to fill out
the spaces in my sketchbook. It's probably my favorite part. Like just adding some
elements here and there, really kind of
overcrowding my pages. I think it's cute.
Alright, so Roses, right? And adding some leaves
to them, as well. So cute. Really loving this. Lovely. Now, once again,
adding the color. So let's start with our Tulips with the same style
we did before, and I'm going to pick
up the green here, not the yellow for the
buttons of our Daisies. I think that's all.
And now, finally, I'm going to pick up my
marker, my green marker. And use it for the rest of
the greeny that we have here. Very loosely. I think
this is all of it. And oh, my God. I
love this page. I'm very happy with this. Like I said, I
didn't have, like, a proper idea of what
I wanted to make. I knew I wanted to make a bouquet and then some
flowers surrounding it, kind of a pattern, but, like, no real visualization of it, just a general idea, and this looks so cute. I'm very happy about this. Now, this is our Day five. Once again. I did not use any references for
this last day. However, if you feel more
comfortable with it, do have all your references
surrounding you, so it is easier for you
to draw these flowers, or you can look back to
the sketches you've been making throughout the day
if you have them already, and just have some fun. If you want, you
can make something similar to what I did here or just think of something
else totally up to you. Don't forget your assignment
is to make one page per day, and then you can post everything if you want
and share it with me. I always love to see the
things that you can draw. It's one of my favorite things about making these classes. So yeah, just take
your time don't forget to download all
the reference boards. If you want, you can also download the assignment
sheet that I made for you. So you can add your
photos over there, totally up to you how
you share your sketches. And yeah, just have fun. And I will see you
in the next video.
8. Conclusion - Before You Go: Hello, and welcome back. And, first of all,
congratulations. You finished this class. So do give yourself a pat in the back. You did it. You're awesome. And I do hope you had
fun with this class and feel more comfortable using your sketchbook, as you've seen, I improvised a lot throughout these videos just for
you to feel really comfortable and having
lots of fun with sketching and not feeling afraid of using your
sketchbook as you want. This is a space for
you to make mistakes. And if something goes wrong, you can always try it again. Thank you all so much
for watching this class. If you can, I would really
appreciate if you could leave a review so more people
can watch this class, and so I can continue making
these classes for you. If you have any other
recommendations of sketching classes, do let me know because I'm always open to
create more of this. Thank you all so much. Don't forget to check
out my other classes, and I hope to see you
in one of them. Bye.
 Patricia Caldeira, Illustrator | Digital Artist | Designer