Transcripts
1. Intro: Hello, and welcome to this sketchbook challenge class where we go through five days of sketchbook exercises to experiment and create
the habit of sketching. Each time we'll have
a different exercise. We'll start with
something very simple drawing some lines and shapes
and as the days go by, we'll have more
complex exercises. The goal of this class
is for you to get more used and comfortable
to using your sketchbook. Just use your imagination
and creativity. With each day, I'll give
you a new assignment. You'll have a total of five
assignments to make and I'll give you any resources or reference that you'll
need for this class. As for what you need
for this class, it's very simple,
just a sketchbook. It doesn't matter how
big the sketchbook is. It can be a smaller
sketchbook or a big one, it's totally up to you, although I do recommend to
have something maybe an A five or smaller because the goal here is to
fill one page a day. If you feel that that's
a bit too overwhelming, start with a smaller sketch. Other than that, you can
use a pen, a pencil, markers, basically
any medium you want, and you can even mix
things up as we go. Personally, I will be
changing the mediums I use to encourage
you to do the same. Pencil, pen, markers, whichever you feel
comfortable with. With that said, grab your sketchbook and
let's start sketching.
2. Resources: Hello, and welcome back. Now, before we start drawing, I just want to let
you know that I have a few templates
for you to download. I will also give you some
references for you to use for specific
parts of the class. Don't forget to
download those and I will let you know when
you need each of them. Yeah, this is it for
now and follow me to the next video where we'll
start our sketching.
3. Day 1 ‘Wrong hand’ Drawing Challenge: Hello and welcome. This is going to be
our first exercise to create here sketchbook
habit and to be more comfortable drawing
just random stuff and maybe bad stuff
in your sketchbook. The first exercise,
I like to call this drawing with
the wrong hand. But what this is drawing
with your non dominant hand. So I like to call it drawing
with the wrong hand because it definitely feels
wrong when doing it. The goal of this exercise, part of it is obviously
developing your motor skills, especially with your
non dominant hand that you usually don't use. It's going to be
a bit hard to do, but also for you to understand
that it's okay to make bad drawings or that
your sketchbook is a place to experiment,
do weird stuff. Do stuff that maybe won't work because that's the
idea of a sketchbook. It's to explore things,
it's to experiment. So things will work, others
want, it doesn't matter. A sketchbook is not a place for our drawings
to be beautiful. I have here all my
supplies and for this one, I'd say for you to choose the supply or the medium
you're most comfortable with. For example, for me,
I'm going to use a pencil because
it's a thing I'm more used to pick up and
to have it on my hands. It makes things a bit easier to choose something that
you're already used to. All right, we're going
to start and the idea here is always to fill a
page of your sketchbook. Now, you can dog with
a smaller sketchbook. I have this one here, but you can go with something smaller and we can start
with very simple stuff. We can just start with
drawing straight lines. As you can see, my lines
won't be very perfect, but draw some vertical lines, some horizontal lines,
take your time. We can go for shorter lines. As you can see, I cannot draw
a straight line this way. It's very difficult
to have the control. Same thing with
some vertical ones. This is the exercise
you do to improve at your line art with
your dominant hand, but it can also be
a good exercise to do with your
non dominant hand. It's a good way to start. Some diagonal ones as well, try to go for a slower line and other times to just
do a quick stroke. There we go. Let's try to do one from almost one point
of the page to the other. There we go, not bad. Now we can start maybe
some curve lines. Trying some waves. As you can see, very
simple line work, it doesn't need to be something
to complex and detailed. We just warming up and improving our skills with
our non dominant hand. If you're someone who's always been used
to use both hands, this will be very easy for you. But if not, I think this can be a great way to work
on that as well. I think it's always nice to try to have the same
skills in both hands. I obviously don't and I obviously don't
practice it that much, but it's a nice skill to have. We have some curved lines, we have some straight lines. Now let's start some shapes. Let's try doing
some simple shapes. Let's start with the square. That could have been worse. Let's try another one. Let's just do a whole
line of squares. Maybe try draw it
in different ways. Maybe we are trying to draw
it in the same way that we do with our other hand and
if we do the opposite, it might work better.
I don't know. There we go. Now,
some triangles. Triangles are a bit easier. Let's try doing
the opposite way. There we go. Let's do an
upside down triangle. Upside and triangles are
slightly easier to draw. Now some circles. Circles of different sizes. So are easier to do, others are more difficult. That's normal. If
you try to do this, let's say you want to really improve at using your non
dominant hand to draw, you can try doing
this every day, filling a page of your
sketchbook every single day. I'm pretty sure you'll
see some differences in a month and maybe one day, you'll be able to
draw with both hands. But I think it's a
very fun exercise. Now I'm going to try
and draw something. For example, let's start
with a smiley face. We got a circle two
eyes and the mouth. Now let's try a flower. That's also all about circles, the button and some petals
around it. Not too bad. What else could we do with cat? This one is a bit
more difficult. But I think we can do this. There we go. I just want to fill these
small spaces in here. I'm going to draw a rectangle. Rectangles are a bit
harder than the squares, and I'm going to
draw a few strokes. I'm just having fun here. Let's do the same
here. There we go. Grid. A very weird grid. What can we draw here? Let's draw a house. Just think of simple things you can draw, the things you would draw as
a child perhaps and do it. It's fine. There we
go. Very simple. If you want, you can just
fill your page with lines. So horizontal lines,
some vertical lines, some diagonal lines,
you can do just this. You can fill your
pages just with this. Then once you feel
more comfortable, you can try and start drawing some shapes
and so on and so on. Just go slowly. And you'll get more comfortable with this. This way, you'll
get also a bit more comfortable with just
making some weird things on your sketchbook on
experimenting and not being afraid of things not working out because that can happen
and it will happen. It's your sketchbook, it's supposed to happen.
This is it for now. Don't forget to
download the template for this exercise,
you can draw on it, you can print it or you
can do this digitally, and once you're ready, follow me to the next video.
4. Day 2 Sketchbook Scavenger Hunt: Hello, and welcome back. This is day two of creating
a sketchbook habit and making different exercises in your sketchbook or
sketchbook challenge. For this one, we're doing something that I like to
call the Scavenger Hunt. What does this mean is we're going to pick
random objects. That are in front of us. For example, if you're
in your office, you can draw stuff that
is on your office. If you're at home, you can grab stuff from different
places if you want. But the idea is to find
different objects and draw them. Now, it doesn't need to be a very detailed
or complex drawing. It doesn't need to
be super realistic. All I want you to do is to just pick different
stuff, random stuff, and draw it without worrying if you know
how to draw it or not, if it's going to be good or not, none of that, just drawing. For that, I'm going
to use this big pen, a very simple pen,
and some markers. You don't need to use this, you can use whatever you want. I want to use some markers
just so my drawings are a bit different and so I can add some color to my sketches. I also have a lot of
different objects here that are broth to
draw and you can use the things that
I'm drawing in here or you can use whatever you find at home or another
possibility is to just go online, go on Pinterest or if
your Instagram page has interesting stuff on your feed and just draw the things
you find in there. Sometimes watching a video also works if you're watching
a log, for example, you can draw random objects or foods that you see in the
video, that's also possible. But I think making this
Scavenger Hunt can be really fun and just look for stuff that
you have around you. Let's start. I'm going
to start by drawing this cat pin that I made. The shapes are very simple. Once again, the goal here is to fill a whole sketchbook page. You can be quick
with these sketches. You don't need to spend
too much time on them. These sketches are
not about perfection, they're just about
capturing something new and doing simple drawings. The idea is for you
to practice that. Keep things simple. Let's go for the next one, this pumpkin. As you can see, my
sketch is not perfect. But that's the point. I just want to make
quick doodles. Also the colors of
the markers I'm using don't really
matter for me right now. Again, I'm not trying to
capture something perfectly, just want to have some fun. I just brought hand them
markers and use them. Go for this one, the pencil pin, as you can see, I'm using
very simple shapes here. There we go. Another one the. Let's strike this one. We have this well. I'll make mistakes
sometimes and that's fine. There we go. I'm also not being very perfect
with my coloring. I just want my drawings
to have some color. Next one, this one. I'm going to start with the bow, so that lines won't overlap. Small objects, this is it. Now I have here some
bigger objects such as this small ghost in here
and I'm going to draw it. I'm going to leave it like
this for a few seconds. If you want to pause
and draw this ghost, some color to my ghost here. Then I got here this pumpkin
as well that I want to draw. There we go, same thing. I'm going to leave
it here for a bit. If you want to draw it, my pumpkin is going
to be pink. But next. Now I'm going to start
looking for stuff around me. For example, I got here my camera case
so I can draw that. There we go. A simple
object, click to draw. I use green because I haven't been using a
lot of green here. We can draw this pencil. We did already draw pencil, but well, no matter, we draw another pencil. That's fine. There we go. Let's draw this one as well. What I do for these
kind of sketches is I'll just focus on the shapes
on each individual shape. Of each object and draw one
thing at a time. There we go. Let's also use this
one might as well, draw all the supplies here. As you can see, my lines
aren't perfect at all. But we can see the drawing here. We know what it is, and
that is part of the fun. What else? We can
draw this perhaps. Let's start with this one. I'll leave it here for a few seconds so you
can look at it. We have this cat, heating sardine. There we go. Now a left one to
fill the space here. Let's draw this
big guy over here. I'm going to show you
for you for a while. If you want to draw him, and we go, all right. This nose should
have been bigger, but that's fun once again
and here we got our eyes. Then we go, I'm
missing here this bit. Let's put it back
and now color it. Now I want to show you
what I usually do as just a final little thing that
I do with my sketch pages. At the end when I do this
random object exercise is I decorate my
page a little bit. This is very simple. I will just pick up my
markers and I'll do random things like a
spiral here and there, just in random places. Is just to add a
little bit of extra and a little bit more
color and fun to my pages. Other than spirals,
we can do stars and maybe just some random
dots here and there. I also like to make some
random ones like this. On some of the drawings. Let's do here as well. Now, let's speck another color
and do more of the same. Now, one more, the pink, we're missing the pink here. There we go. This way, our page looks much
more complete, much more fun, very colorful. This is just a bonus step here. You don't need to do
it, but I think it can be very fun and relaxing. This is it for our
second exercise for our sketchbook challenge, or Scavenger Hunt, so just look for random
stuff that is around you. It can be your phone, it can
be a watch on your pocket, if you have one,
your earrings even. It doesn't really
matter what it is, choose some random stuff
and just put it on paper. It doesn't need to be perfect. It's just a sketch, a doodle.
Just have fun with it. It's just for you to
get comfortable with drawing stuff and
putting things on paper. This is it for now.
Take your time. Don't forget to download the
template that I gave you. I also made a small
reference board with some examples of
objects that you can draw so you can use that
as well and just have fun and I will see you
in the next video.
5. Day 3 Coffee Tea Stain Art: Hello and welcome back. This is our third exercise
date or sketchbook challenge, and this time what
you're going to do is doing some blob art, creating something out of
random spots or blobs of paint. I already have a page ready, but this is very simple. I'll also leave you and
template this image that I have right here for
you to use if you want. Download it and you
can draw on top of it. But basically, we'll just do some random
blobs on the page. I use some leftover
coffee grains, coffee beans to do this.
It was very simple. I just reuse stuff that I had, I didn't do coffee all over
or just use new grains. I just use stuff that was already used and before
going to the trash, I just added some water to
it and filtered it and added some random blobs
on my paper with a pencil and just
splash stuff in here. You can do this also
with some teabags, some leftover teabags you
might have or with paint. So watercolors,
even with acrylics, just mix it with a lot of water and you can do
the exact same thing. What we want to do here is draw whatever we see in this
splashes of paint. Yeah, very simple. I
have here a fine liner and I'll just draw whatever
I see. Let's the first one. This one reminds me of
those very small dogs, but they have lots of fur,
so I'll just draw that. It's very, very simple. There we go, just a tiny dog. This one reminds me of a
cat sitting from the back. Let me see if I can
with a big tail, a big pushy tail and this head is tilted, something like this. There we go. This one
also reminds me of a cat. When cats are washing themselves
in very weird position, that's what it reminds me of. Can I draw this? Just
follow the lines. Cats in very weird
positions. All right. This last one, this is
a bit more difficult, but I think I see a
person here sitting down. This is a very abstract work. As you can see, I'm
doing this, roughly. That's the idea of this drawing. Now for the legs,
and there we go. A person sitting down. These are obviously
very experimental, but I think they're very cool and you never
know what you end up with and feel free to be very messy with
this. There we go. So we got three animals
and one person here. But, you can be very, very simple with
whatever you see or a bit more complex
with more detail, but you'll always see something. Sometimes, all you need
is to just put the pen on paper and just let yourself go because
sometimes at first, we don't really see anything
or we just see a part of it. But as we draw, we start getting more ideas of what could
this stain be this blob be. So yeah, very simple. Just throw over everything. You can download this page, the very same stands that I use, or you can make your own. It's totally up to you. But if you want, you can
download and use this one. You can do this
digitally or with a pen, you can print it
out and use a pen. It's totally up to you. Just have fun and I will
see you in the next video.
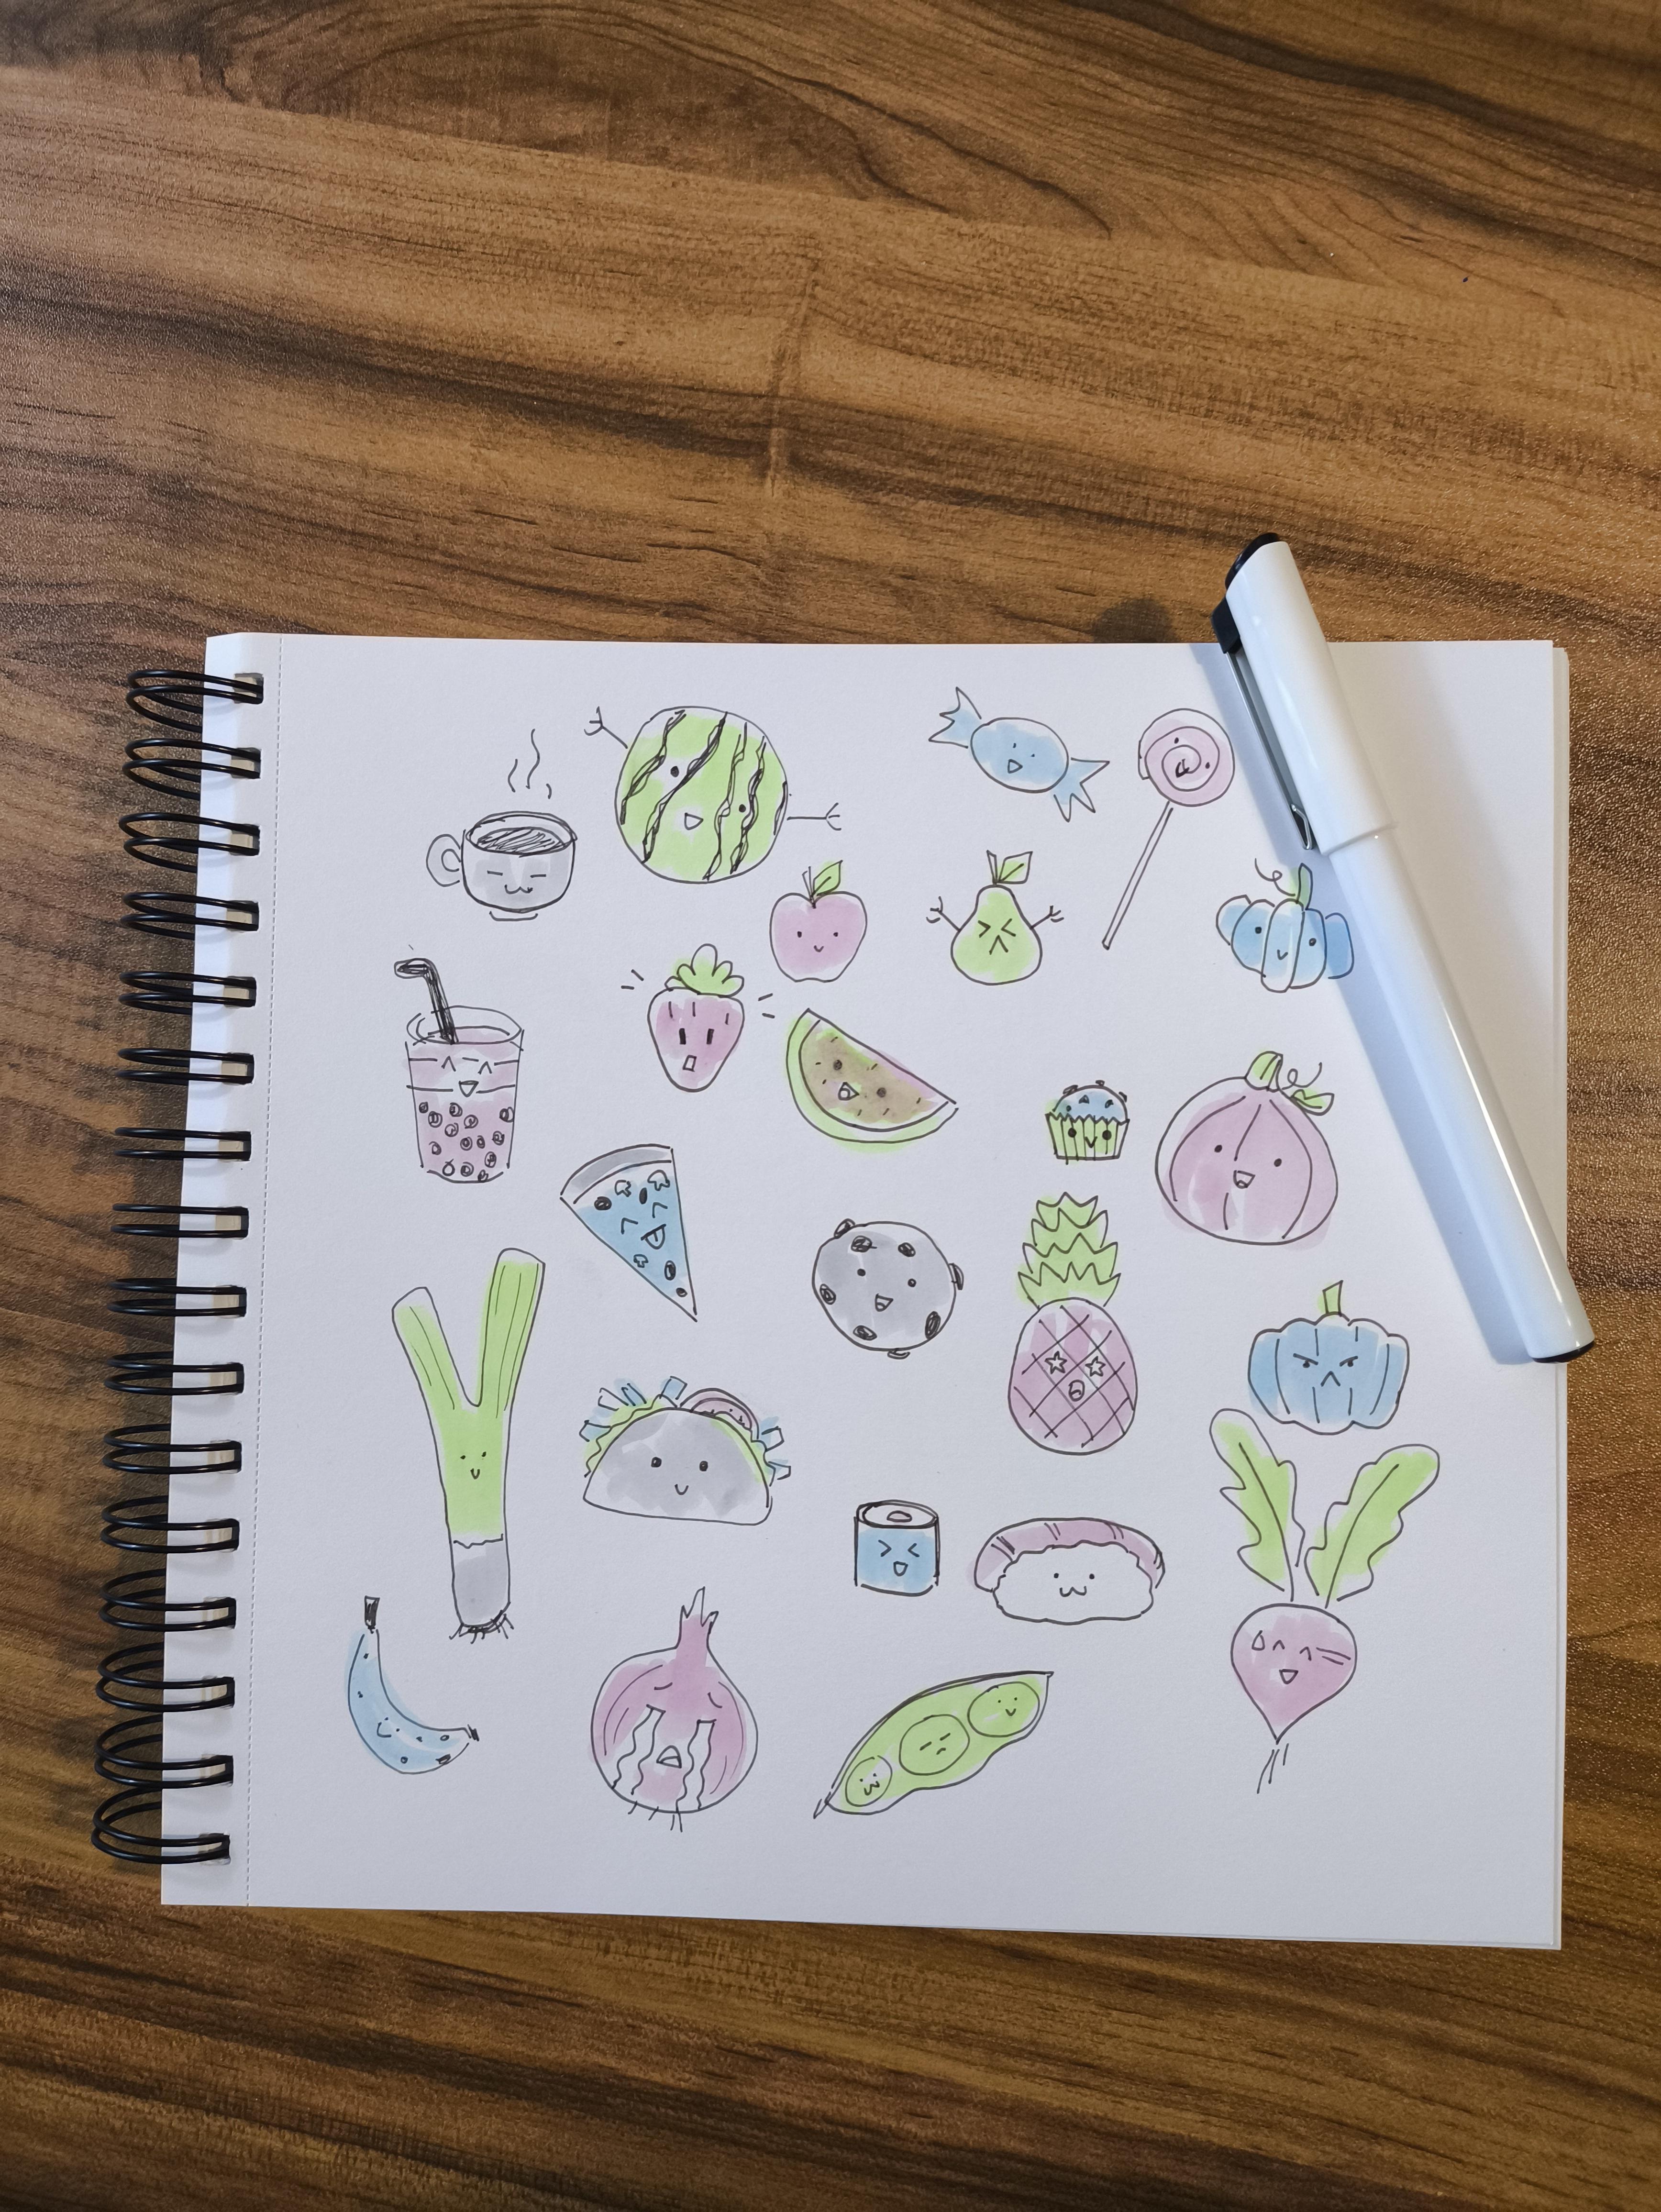
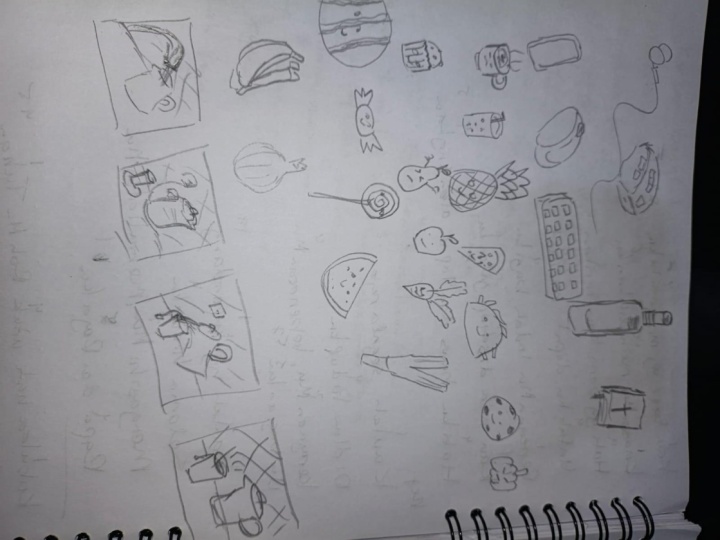
6. Day 4 Food Doodles Fiesta: Hello, and welcome back. This is day four of our
sketchbook challenge class, and today we're going
to draw some food, but we're going to
put a spin on it. The kind of food we'll draw
doesn't really matter. I'm going to draw just
things that come up to me and we want to draw
some expressions on them. That's the twist of it, and we're just going
to have fun drawing different cute
expressions on our food. I have my fine liner for this time and perhaps
I'll use some markers. We'll see. Very simple. I know it's scary to have this
blank page looking at us, but just draw the first thing
that comes to your mind. For example, I'm
thinking apples. That's what I'll draw.
A very simple shape. Once again, remember
this is just a sketch, a doodle, it doesn't
need to be perfect. Now, let's draw here a
simple face. There we go. Cute and simple and you already have
something on your bad so now we just continue. What can we draw
next? Let's keep ourselves in the foot perhaps. Strawberry, for example, this is the shapes I use for strawberry and don't
forget the seeds. This is basically
almost a triangle, but we round corners and then just a puff of
leaves at the top. And as for our expression, what can we do? You know what? I'll keep these
seeds and I'll draw a face a bit differently and
we can draw an open mouth. We can even draw here some strokes of surprise
in there. There we go. Next, a watermelon slice. Basically, we draw
here half circle, now another arch line. Let's start with the
face so we don't forget. Let's draw with the mouth open. Now we can add the seeds. There we go. What else? I'm basically thinking of my favorite fruits
here, a straw pear. The pear is going to be a
bit similar to a strawberry, but upside down and we
can add more curves. This pear is a bit
angry like this. As you can see, we can
make very cute expressions with very simple lines, just a few lines and
we have an expression. What else could we do? Let's go for another thing. Let's say a muffin. So muffin, I would
go basically first with part of a trapezium
shape like this. And then have a few
lines going this way. This is the paper or
surrounding ormuffin and then half a circle at the top and we can add some
chocolate spits to it. Now face, there we go. Let's draw a slice of pizza. Pizza is basically a triangle, but one of the sides is curved. Something like this,
then down, down. Now we have here the crust. Let's draw our face,
something like this, and now we can draw
perhaps olives, mushrooms, there we go,
a cookie, obviously. Cookies basically a circle, but you don't have to worry
about it being perfect. You can have the irregular size because that's how cookies are. If you've made a cookie, you know how it is
and we just keep drawing cute expressions
to them and of course, some bits of chocolate. As you can see, I'm being
very rough with this. Don't need to be perfect. If we want to, we can also
add some arms and hands to our drawings if you want to make them even more
human. That's true. Pineapple. Let's go
back to the fruit. Pineapple, we can draw a circle and then we
got this green area. This is how I go about it. There are always
different ways to draw something and I like to keep
my drawings very simple. I'm going to draw stars
for the eyes here, something like this, some
tackles, so for taco, we have half a circle and
we got here our face, and then we just add some
random toppings like some lettuce, bits of tomatoes. What else? Can we add some bits of meat right and keep
it simple like that. We can also draw a sushi. We can draw I'm going to draw two types like a sushi roll, so we have an ellipse like this and then our seaweed
and our face. Now we can also
make one of those I like nihili if
I'm not mistaken, we have the bits of rice
with some fish on top. We can also draw that. Here I like to make instead of a circle or an
ellipse, a perfect one. I like to add some
texture like this and then the bit of salmon, for example, on top and a
different phase. There we go. Two types of sushi. We can
have a mug of coffee, right. So half a circle, then this curved line below it, and now the handle. There we go. Then we have our coffee inside. I'm just going to add
some color inside of it. We can have some lines here indicating
there's some warmth. And now our coffee that is enjoying our mug that
is enjoying the warmth, can also go for a
tall glass like this. See, my lines are not
perfect. This is fine. I'm just doodling.
Let's perhaps make a bubble drink here
is our expression, and now we can also add a
straw here, very, very simple. Just before almost like before, we can draw a pumpkin. So pumpkin, I like to use
of ellipses like this, but I'll show you
another way to do it. Now we got here our face and instead of doing
the separate shapes, you can also just
make a whole shape right away, something rounder. This is another way of
doing it and now we have these lines for the
pumpkin and there we go. Or you can make
something in between. Adding the lines like
this, there we go. Make a tired face like this, two dots, and now the hand, the mouth going down,
and there we go. Three different ways
of drawing a pumpkin. We can draw what do you
call some green onions. Very simple. Go like this. You're trying an epsulon
like this can add here those bits of roots and now we can draw
face here, a tiny face. We should draw
something set, right? It's not the most fun, but I think we should
draw a set face. I'm sure we can do
more vegetables here. An onion, let's make
an onion crying. I think that's very fitting. This is it, very simple. Now our onion is
crying. There we go. Poor onion, I feel bad for her. Oh, we can make a turnip. Turnip will have a similar
shape as the onion, a turnip or a reddish. This is more of a
redish perhaps, I don't know, and
now the leaves. The leaves have this
wavy look to them. This is a very simple way of
drawing them. There we go. Let's straw some peace and no one expression
for each one. This one is bored and
this one is cute. Let's just try to
fill this space here and perhaps this one, we can make a lollipop, those big round lollipop, something like this, a
spiral, there we go. Now another candy. So a circle and then something like this. Make a watermelon but closed a full watermelon,
so a big circle. Doesn't need to be
perfect because if you look at watermelons, they're also not perfect, and then we got some stripes. Again, not being too
perfect about this. I want to give it some arms as well like we did with a pair. There we go. Now just one more. Make a banana here. So the top of the
banana and then just two curved lines like we're drawing a
moon and then we go. So now I'm just going to
color this very quickly, just to give a bit
more color to my page. I like to add color to my pages. I just realized I painted
my watermelon wrong. Let's more or less fix this. This is fine, mistakes
happen. There we go. This is it. Once
again, as you can see, I'm not matching the true colors of each food that I have here. I only picked up these
very limited palettes here, but that's fine. I'm just adding some color. I don't need for things
to be real or to look real and go according
to reality. This is just for fun, some doodles, and
this is it for now. So don't forget to
download the templates. You can draw the
same foods I drew. Here, you can take this
page as inspiration, or you can just go into
Pinterest or online or even look through your
cupboards and fridge and choose some stuff that
you might want to draw. Similar to what we did
in the Scavenger Hunt. Have fun, draw some of
your favorite foods, draw tiny little expressions
on them, have fun, take your time and
once you're ready, don't forget to share
your assignment with me, and I will see you
in the next video.
7. Day 5 Comic Day: Hello, and welcome back. This is the final day of our
sketchbook challenge class. Today we're going to do
something different. This is perhaps our
most complex exercise, but I believe in you
and you can do this. Once again, keep things simple. We want to draw a comic strip. This time we won't be
filling our whole page, a small comic strip. You can even make four squares perhaps with
whatever you prefer. The idea for this comic
is for you to draw something that you do in your
day. Just a simple task. It can be just, for example, brushing your teeth
in the morning. Waking up, making
your breakfast, just anything that
you can come up with, just a simple action that
you do throughout your day. To make things simple, I would cipher to use only four panels. So try to choose the most important parts of
that task and draw them. Now, I'm going to
use this pencil, this mechanical pencil, and I'm going to draw
four squares first. The task that I want to draw
here is making a cup of tea. Let's draw four squares first. They don't need to be perfect. So we're going to start
from here and here. I think the first action
here is fill the kettle. So first, I want to have a
faucet right and my kettle. And yes, I'm not being
too perfect with it. Once again, these are sketches. Let's say you're
planning a comic, your first drawings
won't be too perfect. You just want to have a very simple idea of what you
want to draw. There we go. Next, I have my kettle turned on and waiting for
the water to heat up, and then I have here my mug with the tib
waiting for my water. Then, of course, we
have the mug again with the teabag and we
have our water pouring, everything very,
very simple and a clock because we are waiting
for the tea to be ready. We have to wait this long. That's way too much,
but you get it. Now, I don't have here an eraser and I do
recommend you to not use an eraser because that way you can't be constantly
fixing your mistakes. Like this panel, it could probably be better,
but this is it. If I was planning on making
this an actual comic, I would probably draw several ideas and that's something you can do instead
of just four panels, you can have several four panels and try different ideas
of the same task. This way, you can try different compositions,
different perspectives, perhaps different
parts of the task, and at the end, you will choose one of
them that feels like it's the right one and finish your comic really go
through the next step, which is making a better sketch, a cleaner sketch, then
making your line art, adding some colors, and finally, finalize your comic
and post it somewhere. If you wanted to make a comic, those will be your steps. Now here we just doodling. We're just putting
things on paper. We're not thinking
about the next stages of whatever project
you want to make. This is just it
and maybe one day I might want to pick this up
and make something with it. Now for my last step, of course, I'm drinking my cup of tea. So I have my mug. I'm grabbing my mug, see lines are overlapping.
This is fine. Another hand here,
everything very, very messy and I want to keep the kettle
here in my kitchen. We can draw some cupboards here, the background like some tiles. Same thing here, some tiles in the kitchen and here as well. You can go back and
forth in your drawings. But yes, this will be it. My cup of coffee, the mug is gigantic,
but this is it. This is very simple. As you can see, this
is very, very messy. I'm not really thinking too much about the
planning of it. I'm just putting ideas
on paper right away. This is the first
thing I thought about and I'm drawing it. If I want to work more on it, I can do so later. Why is this useful for you is because throughout
the day we get ideas. Sometimes you just
sitting down and you get an idea and maybe sometimes
instead of writing it, writing it down and especially
if you have a visual idea, you can just pick your
sketchbook very quickly. That's why it's good to
have a smaller sketchbook that you can walk around with. You can just open it up,
sketch your idea very quickly. Bam, this is it, you
can pick it up later. This is it. Take your time. Don't forget to
download the template that I gave you and
don't forget to post your assignments and share them with me so I can give you any feedback
you might want and I always love to see
your assignments. Just have fun. Take your time, and I will see you
in the next video.
8. Conclusion: Hello again, fellow
artists, congratulations. You finished this class, five days of sketching with different exercises and
with different themes. I hope you enjoyed
this class and don't forget to
share with me and to post your assignments so I can see them and give you
any feedback you want. Also, I'd really appreciate
if you could leave a review, so other people like you can find this class and
enjoy it as well. Once again, thank you
so much for watching. Don't forget to check
out my other classes. And remember, keep on drawing.
 Patricia Caldeira, Illustrator | Digital Artist | Designer