Transcripts
1. Intro: Hi artists. Do you
feel like you need that extra push to pick up the pen and
just start drawing? Then this class is for you. Here we'll embark on a fun seven day doodle challenge that will get you started
drawing right away. We'll start simple with basic lines and patterns to warm up those
drawing muscles. Then work our way through the
wonderful world of nature, delicious treats, and
adorable creatures. You can use traditional
tools like pencil and paper or use your favorite
drawing software and drawing tablets. Whatever you feel
comfortable will work. So not only will be creating
something new every day, you'll also develop a daily
drawing habit that you can continue long after we finish this class
and this challenge. This class is designed
to take you from I can draw to I love doodling. Alright, so I'm pretty
excited to start doodle with you for
the next seven days. So let's get going, and I'll
see you in the next video.
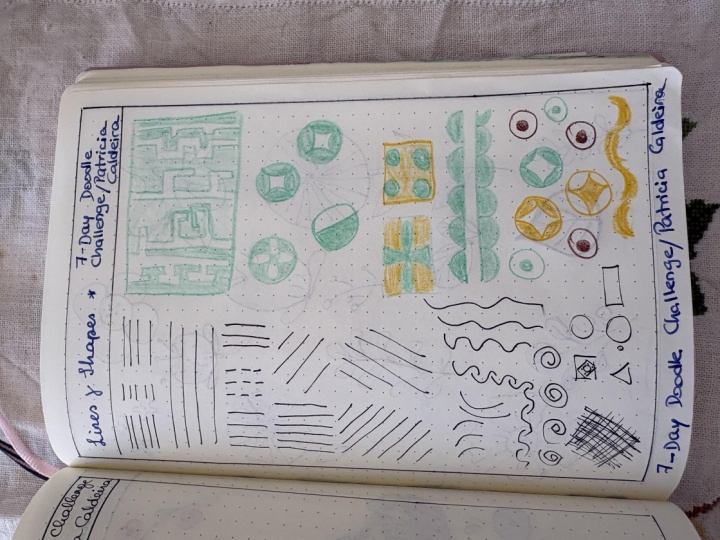
2. Day 1 - Lines & Shapes: Hello, and welcome. So this is our first day
of our doodle class. So we're going to
start with something very slow and easy, kind of a warm up to get us ready for all the doodles
we're going to draw. So today, we're going to
do lines and patterns. So something very simple. I do have a reference
board for you to give you some inspiration of
patterns that you can draw. So don't forget
to download that. And as for materials, I'm going to keep
it very simple. A fine liner or
any pen will work. And just to markers, just to make things a bit
more fun and colorful. But if you want, you can
just use a pen, a pencil, any kind of tool will
work. All right. I just want to make things a bit more fun and
also to give you all the possibilities for your doodles. So
yeah, let's start. So I have here my
sheet of paper, and I'm going to pick up my fine liner and start with
just some horizontal lines. Start with short ones. We're just warming up, right, so we're not still very
used to drawing lines here, and then as you go, we
can make longer lines. All right. Let's
make it even longer, and don't worry too much if your lines are
looking straight or not. Basically, this is also a good exercise to improve your lines. So if you're worried
about your lines not being too straight
or too confident, this is a good way
to go about it. Now, afterwards, we can
go for vertical lines. Again, different sizes can
do something like this. Then go for longer ones. As you can see, I'm
not too worried about how perfect my lines are. Some will be better than others,
and that's totally fine. Now, let's practice some
diagonal lines as well. The trick here is to draw your lines quickly
just like this. Instead of going very worried
about your lines and going bit by bit like this,
just be confident. Go over here and pm line. Another line. Boom, boom. This will really help
improve your lines. Right, so you made
straight lines so far. Let's try some curved ones. Can go for some
arches like this. We can make S lines. We can take the opportunity
and start making here a bit of a pattern,
perhaps, some spirals. So the idea here is to fill up a whole page with line
doodles and patterns. For now we're just
practicing here, our lines warming up, and then we can go
for our patterns. We can also do a bit of
crosshatching, for example. So some diagonal lines, it doesn't really
matter the direction. You can use horizontal
lines, vertical lines. I like to go diagonally. And now we do the
opposite direction. We can add more to one side to create a bit of a
gradient there. There we go. We can also do shapes square, inside the square,
inside the squared. As you can see,
I'm already making here a bit of a pattern. Let's do a triangle, some circles in different sizes, a rectangle, just draw
whatever comes to your mind. There we go. All right, so I had a little bit
of a warm up here. You can do more lines
than this or less totally up to and now I will go I will check out my
patterns and take out a few ideas from that and inspiration and start
drawing some patterns, simple patterns, simple doodles. There's really, like,
no expectations in here, having some fun. I'll somewhere here
on the other side, the Heffern sport, so you can look at it throughout
the class as well. But yeah, don't forget to
download that, and let's go. I'm going to use this
marker this time just for the fun and
trying something new. And I really like the first
pattern with the lines, so I want to do something
similar to that. Let's make perhaps a
rectangle here. There we go. Not a very straight rectangle. That's fine. We're doodling. We're not doing
serious work here, and we can start making
kind of a labyrinth, right? I think it's what reminds
me let yourself go. Another great exercise for
you to practice your lines, but also kind of your
imagination. There we go. Perhaps we can even go outside
of our rectangle here. There are no rules. You can do whatever you want. I don't know about you, but this is the kind of
thing I used to do a lot on my school books
and notebooks as well. Sometimes I will just start going and draw
different patterns and lines like looking like
labyrins like this one there. Let's try something
else. Let's see. Let's try another one. Let's try the one below that I
think is really fun. So circle. Again, not a perfect circle. We're just having fun. We're not taking this seriously. Now we got here these
yellow sparkles, let's say, we also have the one with the triangles
that also looks fun. So using the references
is great because that way you can also practice
that drawing from references. I know that doodling seems to be sometimes one
of those things that you do with no
purpose. Which is true. Most of the times we don't
really have a purpose there, but at the same time, we're actually developing
some things here. We're trying to get more comfortable with our
art, for example, we're taking the opportunity to perhaps try new materials. We can practice drawing from reference like
we're doing here. There are a lot of great
things about doodling. It's not just a thing that
you do to escape bordom, let's say, you can learn
something with it. And sometimes these doodles can actually spark new
ideas for your art. For example, we're
drawing patterns here, right, and who knows? Maybe I'll look at one of these patterns,
and I think, Hey, I want to make a painting out
of this or I want to draw a character that wears a dress wearing a
pattern like this. You know, there are quite a lot of things that you can do. So I'm basically just
going over all of these references and drawing them while trying to
give them something new, we can paint inside of this. And as you can see
I'm being very messy with this,
right. It's fine. You can make this a bit more
messy or more organized. It's totally up to you. For example, maybe perhaps
during these doodles, you can create a
whole composition and join them all together somehow and end up with actually an illustration at the end
on one of these pages. That could work
for me right now, what I want and especially
since this is our warm up. I just want to fill
all the spaces. I'm using always
my reference there for inspiration on what to draw. But sometimes you just
don't really have ideas, so it's great to have visual
helper. So there we go. We have here a bunch of doodles, very simple, some lines and some patterns,
just a warm up. So be messy with it. It doesn't need to be beautiful. Sometimes we are
just hanging out, and then we don't know what
to do or we're taking a call, and we just open a notebook
and start scribbling, right? It's the same idea here. Just start doing some doodles, and it doesn't matter
organized they are, how messy or not they are. It's totally fine. However,
maybe after doing this, you look at one of these doodles and you'll want to do
something with them, and then you can go grab
a new piece of paper or even digitally and
draw something out of it, dig pictures of it and use it for any kind
of illustration work. So be messy. I think the best advice is to be messy and just
have fun. All right. So this is it for our
first day or warm up, starting with something simple, just some lines
and some patterns. Don't forget to download
your headphones board. And once you're finished, don't forget to fill out the
grid template that I gave you and put your first
drawing on day one. And I will see you
in the next video.
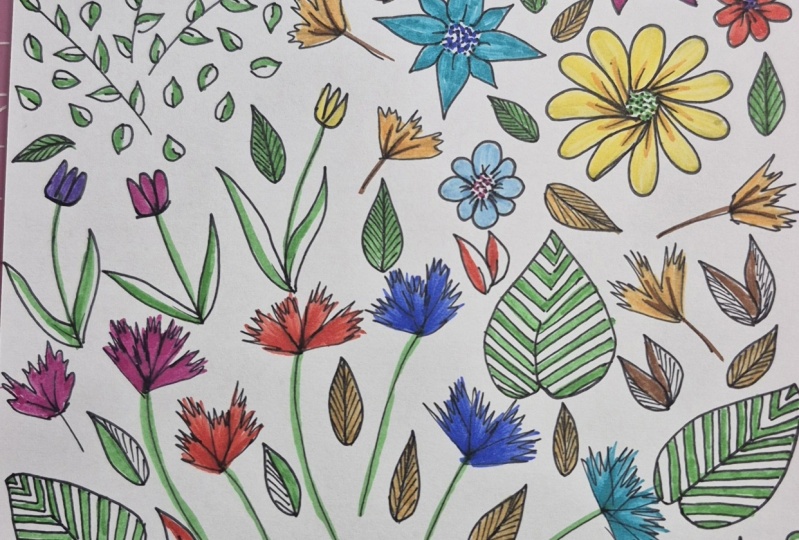
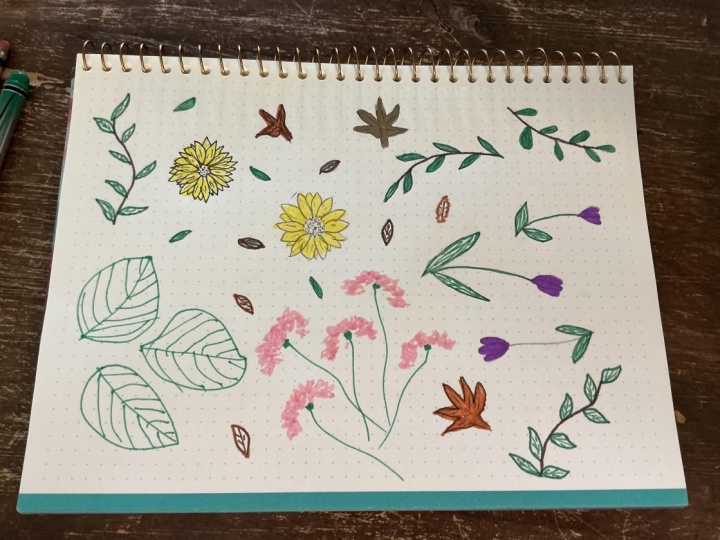
3. Day 2 - Nature, Flowers & Leaves: Hello, and welcome back. This is day two of our
seven day of doodles class. And this time, we're going to draw something more organic. We're going to draw
some nature elements, leaves, flowers, plants,
anything green, let's say. And for that, I'll
use this piece of craft paper along
with a few markers, and again, a fine liner. We're going to keep the markers
and fine liners for now. I also have my reference
board or my mood board, so don't forget
to download that, and I think we are ready. Let's start with
something simple. Go to pick my fine wonder first, and let's draw some leaves line here and just some
leaves like this. Keep it simple,
very simple shapes, and there's no need to
be perfect with it. Maybe let's try another one, similar and let's draw the leaves a bit pointier
this time around. I do a lot of sketching
sessions on my YouTube channel, and most of the time all
I have is my sketchbook, a pen like this,
and a few markers. Sometimes I even limit
the colors of my markers a lot because it doesn't really matter
when we're doing this, if you're using the
right colors or not. All we want to do here is
just have some fun, relax. You can do this kind of
exercise before starting a new illustration
or a new work. You can do this to relax
at the end of the day. Like, I'll just add
here some color. I'm not being
perfect about this. Our paper has this
brownish tone, so we can take
advantage of that, like having this green with a brown think it
looks really good. Experiment with
different things. Try things that you don't
usually do in your art. If you're already used to creating and drawing,
try different things. And if you're not, if
you're just a beginner and starting to discover
art and your style this is also a great
way for you to get more comfortable with the art and to discover the
things that you like, try different themes,
different tools, different ideas, have fun. Right next one, going
to draw a sunflower. Or two. So I'll start
with just some dots. See, very simple random dots. Now it's time to
draw the petals. Me. See, I'm not
even being careful about finishing the
lines properly, having here some fun. It's doodles. It's not a funnel and proper illustration.
Let's do another one. Some dots, some random dots, you can just go, like
in a spiral way, starting from the
inside and growing and growing can make it
as big as you want. And then we got our
petals once again. I think that a lot of times when we're doing these
kinds of doodles, things actually end up
looking much better and fun than when we're being very perfect about
what we're drawing. It has a more natural feeling, a more organic feeling
and personal event, more unique, or it's
an awesome color. The way the yellow behaves in this paper is actually
quite interesting. I wasn't expecting that. So that's part of the
fun as well of doodling. You can discover new things
about materials you're using. There you go. I love it. Maybe we can draw a
leaf here as well. I don't really have a picture
of sunflower leaves here, but we can just
make something up. It's totally fine.
Oops. Well, it's okay. This was supposed to be a petal, but that's fine. It happens. Alright, what next? I
want to use the purple. Let's draw a tulip here. So see how I'm
organizing things here. I think it makes things
very interesting. Combining everything. So we got here a
tulip. There we go. I'm using the image
as reference, but adding my own twist to it, keeping things very simple. Let's add another one here, creating here a
bit of a division between our first sketches
and the next ones. There we go. Time
to use our purple. Be very flow with this.
Just go with the flow. Don't think about going inside
the lines when coloring. Just let yourself go. Go out of the lines, leave it slightly incompleted, makes things much more fun. Next, what can we do next? I like the first flowers
very spring like. Maybe we can draw some of those. I'll start with marker
this time, one flower. Let's draw another one here. So I see, I'm being very messy. I'm showing you another
way you can do this. Just some spots here. Let's make another one here. I'm just taking a look at
the shapes more or less and just drawing them
very, very messily. All right. Let's do the
same with the green first. Just a few lines here and there. There we go. And now we
can use the fine liners. We're doing the
reverse process here, first markers and
then horror lines. As you can see, the results
are a bit different, but both very interesting. For me, the secret of doodles is just this
let yourself go. Don't be afraid of
drawing bad lines, just go with it. There we go. Look.
Doesn't it look cool? I think it looks really nice. And it's very messy, and I did this just
in a few seconds. There, some flowers. Now, let's try some
autumn leaves. Let's try those ones. So we have this. Just try to follow more or
less the shape you see. And as you can see, once
again, not perfect. It's fine. It's
right. Just have fun. Sometimes we are
too afraid of doing certain things because we
think it's going to be ugly, so we overthink it, and that's sometimes worse
for the art you're doing. You will see that struggle. And when you just
let yourself go, you end up with very interesting
shapes and drawings. And don't forget that you can do this with different mediums. I'm using some markers here. I'm using paper, but you
can do this digitally. You can use paint, watercolors, however, even collage,
it can be fun. It's not such a quick doodle, but it can be fun. You can do something with
that. What are we missing? We don't have those monstera leaves yet, so we can try that. Right, let's fill out
the spaces a bit. So it's not as green here. Just a few almost
ellipse shapes, right? We have here some
circular shapes, and now with our fine liner, we can give more shape to this. See? Now, it's a
petal or a leaf. When drawing nature, you don't really need
to worry too much about being perfect because organic things are not perfect. They have different
patterns, different shapes. They're not all the same, so it's perfectly fine. For you to not be perfect
with those shapes. Organic stuff means
imperfection. And there we go. Spage turned out really beautiful. I love it. I love the papercraft and how
it behaved with the colors. Like, it's not too saturated
or bright or contrasting, but still it has a bit of
softness, very organic, right. The paper itself,
it's very earthy, so I think it's perfect to
draw some nature in there. So yeah, that was fun.
See, just a few minutes. And let yourself just
draw a few shapes and paint markers and
paint can really work well because you can make these very easy and flowy shapes and then use a fine liner to
give it a bit more shape. So that's fun. This is
it for our day too. Once again, don't
forget to download the mood board that I gave
you the reference board. Of course, you can
draw other things, find your own references, or just draw whatever
comes to your mind. And once you're done, don't forget to fill out
the grid template and add your drawings to
the second square to the day two square. This is it for now, and I will
see you in the next video.
4. Day 3 - Delicious Fruits: Alright, welcome back. This is day tree of seven
days of doodles class. And today, we're going
to throw some fruit. And I have once again my mood
board, my reference board, still keeping things simple with some markers and a fine liner. You might have noticed
that I've been just adding colors as we go so things so we have this smooth change and changing
ourselves a bit more. So we start with
just a fine niner. Then we'd add one color or
two, then another color. I feel that sometimes when
you have too many colors, it gets a bit more difficult because you're thinking too much about the color combinations. So it's good to start
simple and then add stuff as you
go. Let's start. Going to start
perhaps with a pitch. I really want to use this color. I think it's perfect
to draw a pitch. So not really a circle there, this almost like
a round triangle, but something round, right. Now I'm going to use here
the yellow and try to add some yellow here and there, you know, for those peach
colors that we have. It's not totally pink. It always has a bit of yellow. And let's draw one where
we can see the inside. Once again, I'm not being too
perfect with my shape here, almost like a heart shape. Let's use the purple
for the middle. There we go. And now perhaps add a bit of this peach
color here and there. There we go. As you can see
being very loose with this. And now, grabbing the fine liner and adding a bit of linut. Once again, I'm not being
too perfect with this line. I don't need it to be very perfect with the
shape we've done. Now the other one as well. Alright. There pitches. Now, what next? No, I want to draw an
orange or in this case, let's say lemon because
I only have yellow here. So let's start with
something that is similar to our reference. Start with the circle. Doesn't need to be perfect. And now basically we're
going to draw triangles. Alright. Another one here. This side as well,
and then another and another. There we go. We got here our lemon, a slice of a lemon, very messy, but I think cute. Now we can also draw
instead of a round slice, a quarter of a slice, a quarter, not a
quarter, half a slice. So we draw a curve like this, an arch line, and now triangles. Drawing lemons and
oranges is all about curved lines
and triangles. And, of course, we can
also draw an actual lemon. For the lemon, we can start with an ellipse like
this, color it. And then I like to add
like two half circles, let's say, here to the end
to give that lemon shape. And to add a bit more, I sometimes enjoy
adding a leaf or two, even there we go. Now, honestly, I think this looks quite cute,
just like it is, but just so we keep
the same theme here, let's add our fine
line, our pen. So hardest part
here, our circle. But remember, these are doodles. You don't need to create
a perfect circle. It doesn't need to
be perfectly all around the shape you already
drew with your markers. Just go in and draw
a quick circle. It's fine. Like,
three, two, one. There. Bam, not a perfect
circle, it's fine. Another one, three, two, one. And there we go. And now we draw our triangles. Be messy. Don't overthink it. Just go in and bam. Same thing with the rest.
We want to draw here, half a circle. Bam, another one. Bam. Now we can connect this
and draw our triangles. And now let's finish
here with our lemon. Just let yourself make bad drawings. That's
what I like to say. Let yourself make bad
drawings because at the end, you might notice that actually, those don't look that bad. They are actually quite fun. Now we can add here, like a few dots for texture. There we go. And
our lemon is done. I could just pick up a piece of paper and just throw this
pattern over and over, some slices, some half slices, entire lemons and fill
up page with this. It can be really, really fun. You can end up with new
ideas, for example, you can make a bookmark
out of lemon drawings, for example, do those like this. I actually did that once. It was really fun.
What can you do? So many things. You can make just a drawing and then frame
it if you like it enough. But let's move on. Strawberries. I
love strawberries. So let's draw some strawberries. I'm not sure which one to use, so what I'm going to do
is I'm going to draw two strawberries because we're doodling and I can
do whatever I want. So for strawberries, we have
it's a very regular shape, but maybe we can do, like, circle and then add kind of
triangle to the end of it. There we go. Now let's go
in and draw the greens. Alright. Another strawberry
using the purple this time. So once again, circle and then kind of round
triangle. There we go. Now, I can grab my pen again. Then go over my lines. Don't forget the seeds, a bit of texture here,
and there we go. Now we can take the opportunity and draw our erries as well. Since I'm I have
my pen right here, I'll start with the pens. So this bit where
they're hanging from right now two
lines, curved lines, and now almost a heart shape, but instead of
having a pointy end, we leave it round like
this and like this. Of course, you can also
draw just two circles. So let me see where to go here. So curved lines, and we can just do this two
circles. There we go. We can use yellow. Yellow is fun. There are
some yellow sheries. There are many different
species and types of sherries and some are actually
yellow or even white. But we can also add a
bit of this peach color. Yes. About colors, if
you're using or you have a limited amount of
tools like markers, pencils, whatever, it's fine. You don't really match the color of the
thing you're drawing. Like, yes, Serres
usually are red, but honestly, there
are no rules, and you can just color the fruits you're drawing with
whatever you want, right? Don't restrict yourself to the colors you see
in the references. Use whatever you
want. What do we want to do we want yellow and green? Not too much yellow, right? Should we do? Let's do purple. We don't really have
a lot of purple here. So watermelon. We have triangle, but
with one end curved. Let's do another one,
another slice of watermelon. And we can also draw half of a slice
instead of a quarter. So we have this kind
of shape, arched line. Straight line, and now color
the inside. There we go. Now we want to green for the
outside of the watermelon, but we're going to leave
a white spice right. Usually watermelons, we have
the outside, which is green. Then we have that bit of white, and then we have the actual
red fruit, the red, right. So let's leave here
a bit of spice. Same thing here just now. Drawing a curved line and now do the same thing with the
last one. There we go. Now, all we have to
do is draw our line. So basically, we're
just going to go around our shapes and then
add a few Seats. Okay? Now repeat for the rest. I think we can come up with very beautiful patterns
with this messy style, with this doodly style. Like here is just doodles. But if I organize this, if I pick a piece of
paper and organize this, I think we can make
some very fun patterns. Alright, so we still
have this space here, and I think I basically
draw everything in our heifers board
besides the avocado. So let's draw some
avocados, right? So for that, we're going to use going to use all of
this. No, you know what? Let's do something
different this time. So I'm just going to use
the yellow and the green. And then for the
pit of the avocado, I'm going to use my pen. So let's start with our shape. We have a tear shape, right, like this, elliptical. I want it to be bigger. Alright. And now the other
side of our avocado. Alright. Now let's use
the green for these two, just line around it. There we go. I'm being very trembly here to create
a bit of texture. Like avocados have a lot
of texture right outside, and I want to show that texture. And since I have
here a bit of space, I'm going to draw a full
avocado here. All right. I'll pick up my pen, and here we'll
draw the bit bubs. Not very centered. That's fine. Let's fill it and now do
the rest of our line. Surely you can make this a
little bit bigger like this. And then there we go.
It looks a bit better. It's a bit more centered now. Now here, you make just a circle for the whole
right on the other side. Not just a bit around it. Now here, we can just make
here a bit of line art and perhaps add here like
some texture like this, a few random lines. This is very organic and there's really no
symmetry there. So this is perfect.
Alright, so this is it. They tree of drawing
some doodles. We have a lot we have
lots of fruits here. Again, you can look up
for other types of fruit, look up your favorite
fruit, even. I want you to have
the most fun here. So what I can
recommend you is to look up references of your favorite things
and then draw them. That's a great way for you to have even more fun
with your doodles. And there we go. As you can see, very simple, we don't need to
have the exact same colors. We can just make something
up and just have fun. So this is it for day three. Don't forget to download
your moodboard. And once you're done
with your fruit doodles, don't forget to add those
to your assignments to the Greek
template that I gave you and fill out day three, the square for day three
with your fruit doodles. So this is it, and I'll
see you in the next video.
5. Day 4 - Sky Doodles: Hello, and welcome back. This is day four of seven day
challenge class of doodles. And today it's all
about sky elements. So some clouds, rain,
stars, the moon, the sun, I have here this time this blue piece of paper that I thought was
perfect for it. Again, I just use
what I had at home. You don't need to use the
same thing I'm using. You can do this
traditionally, or digitally, it's totally up to you and
what you have at home. And then I have here some
acrylic markers this time. So to change things a bit
and make it a bit more fun. I also have my moodboard with some examples of
things that we can draw. And with that said, let's
just start doing our doodles. So what can we start with? I would say I'm going to start with have some
stars and the moon. I have here this gold marker, which I think could
be fun for this one, and that's where I'm
going to try to use. I don't really have anything
planned for any of this. I didn't plan anything. I just go in and
try to make a bit of a composition here and
there. So let's start. I really like the image on a reference board
where we'll see all the stages of the moon,
the different stages. So I want to draw that. We start going to go over here, more or less center of my
page and draw a circle. So we got a full moon, then we got half of it. Don't need to be
perfect. I doesn't need to be a perfect circle. It doesn't need to be
a perfect half circle. It's totally fine. Now, let's draw it a bit less than half and then
even smaller than that. And we can even go thinner. There we go. Now let's do the same thing to
the other side. Just repeat, but in a
different direction. Now a bit smaller. Thinner than before. And finally, just a
small piece of the moon. There we go. As you can see, it's not even a straight
line. It's fine. Once again, we're just drawing some doodles,
some sketches. These are not perfect drawings
or perfect illustrations. These are just for fun
and to wind down a bit. Now, since we have here
a night sky theme, let's go for stars next. And stars are pretty
cool because you can draw them in several
different ways. For example, my favorite
is a star with six points, but also pretty regular. So I like to do
something like this. One point here,
then another here. I'm very loose with this. Down, another one here
and here. There you go. You can add more here,
but for me, this is it. I like drawing them this way, but you can do it differently. We can do them smaller. So as you can see, they have this very
silly and funny shape. And that's what I like about them and they can
be very regular. I think they look very cute. Now we can also do like the usual shape star that we
have in a reference board, for example, and we can do them very simply,
just like this. This is the way I do it. I'll go start from the top down, then go a bit upwards, other side, down
again, and feel it. This is for me the easiest
way to draw five point star. But we can do this just
one after the other. It's going to for me, I always looks a bit
weird, but it works. So one point, another one, another, another, and another. We have a more irregular look, but can also have its charm. There we go. Then we can
also draw them sparkles. So for example, angle, but with some curves. So one curve, another,
another, and another. And now we feel it
or leave it empty. We can draw these in
different sizes once again, and they look more
like sparkles. And finally, the simplest
ones, the asterisk stars. So we just draw an asterisk. We go over here, those perfectly
well with the sparkles. So just like this, a cross and another
one. And this is it. And then finally, for example, if you want to draw a night
sky filled with stars, you can pick one of these
shapes of stars and draw a few, and then you can just fill the rest of your night
sky with some dots. Just draw some dots and you
have a sky full of stars. Now, if you want, you can
even connect a few of those. So we have here stars, make the dots a bit bigger, and then you have
a constellation. You can do this for a few. So these are different
ways that you can draw stars maybe there
are more than this. These are the ones I usually
use and have fun with. So night sky, stars
and the moon. Let's try something else now. Now, clouds clouds is something that is always
really fun to draw, and first of all, they're very regular shapes. So you don't really
need to worry about drawing a perfect cloud because
there's no perfect cloud. They're all very different, very unique and fun to draw. But I'm going to show
you very easy way to draw a cartoon cloud. So I have here my white pen, and all I'm going to do is
use circles and ellipses, or in general, round shapes. So start with a circle. Now draw an ellipse to the side. And this is going to be random. Just draw circles,
smaller circles, ellipses, and there we go. We have here a cloud. Let's try another one. Circle. Now let's
draw another circle. Now, let's draw an ellipse that is a bit tilted like this. Now another ellipse here, another circle, another
circle and an ellipse. There, another clouds. This is how I like
to draw clouds, and of course, you can
use other shapes as well. But I think this
is a very way to draw fun and fluffy clouds. Now, we can go ahead. I'm going to pick this yellow, and we can add a lightning
to one of these. So we can go over here. Bam. We have some
lightning here. Can do another one,
be a bit more, have here a bit more lines going all the way down
with some Zitzeg. There we go. Oh, we can also
add some rain to our clouds. So I'm going to
pick here my white again and just a few
lines here and there. Some can be dots,
some longer lines, other shorter, and now we have
something a bit different. We can add a sun to our clouds. I did not add a sun
to our moodboard, mostly because I just forgot, but let's draw it as well. So let's draw a few more clouds. Remember, circle,
ellipse, another circle, another ellipse,
another one here, and another circle here. I'm just being random
with this shape, so just going with it, right? And now this is a perfect
spot for our sun. So I'm going to pick
our yellow again and just draw a round shape. Now, I really like like we
have some texture here, and we can make use of that. So drawing the sun
in the spiral way, so we have that texture. And now we can just add
some rays of sunshine. And there we go.
What are we missing? So we draw clouds, lightning? We are missing a rainbow. So let's use this space here
to draw a quick rainbow. So it just some curved lines. And I have here lots of colors. As you can see, I don't have the exact colors of the
rainbow, but that's fine. Let's just pick
most of the colors we have here and just draw it. So we have four, five,
six, seven, yeah. So we have seven
colors, at least. Let's just draw
some curved lines and form our own rainbow. I'm going to start with
the yellow. There we go. Let's go for this one. I really like this color. I think this green is
really, really beautiful. Alright, let's move on. We have two purples. We don't
need to purples, actually. So maybe we can use the gold. But let's go for
this purple first. Alright, not a curd line. Just have fun and use
whatever you have at home. You don't have to you
don't need to have a scientific, perfect rainbow. Just use any color you have. Now let's go for this
pink. There we go. Now, should we go for
this one or the blue? Let's do blue to add
a bit of contrast. I think this blue is running out of paint
a bit, but that's right. We're mostly done with it. Alright. Just two more colors. As you can see, I run out of
space here, but that's fine. We'll shorten our
handball a bit. Let's do it this way. This marker is a bit. Thinner than the other. So
we just add more paint. Be messy. Don't be
afraid of being messy. It's fine, and it's fun. Sometimes when we're
working on our art, especially when
we want to create a painting illustration or
we're doing this for work, we take things more seriously right because
we want it to be good. We want to for our
painting to look good. So it's good to have these moments where you
just doodle have fun, make a mess, are not
afraid to make a mess, so that art isn't
always too serious. It's good to have
fun. So there we go, a very different rainbow with
the colors I had at home. It's obviously very different
from a real life rainbow, but it's a rainbow nonetheless.
So there we have it. We have here lots sky elements. There might be more
that we could draw. These are the ones
that I just thought about and made a mood board. But maybe there's something
else you want to add, so you can add that as well. As you can see, once again, this veggie is quite messy. It started organized, and then we just started going
all over the place, which once again, it's
fun. It's still fun. So this was it for our
fourth day of doodles, sky elements, so have fun. Take your time.
You don't need to draw the exact same
things I drew. You can find other ways
of drawing your moon, your stars, your clouds. So take the time to
explore that as well. Don't forget to download
the mood board, and once you're finished
with your skydodles, don't forget to add them to the Greek
template that I gave you, and I'll see you
in the next video.
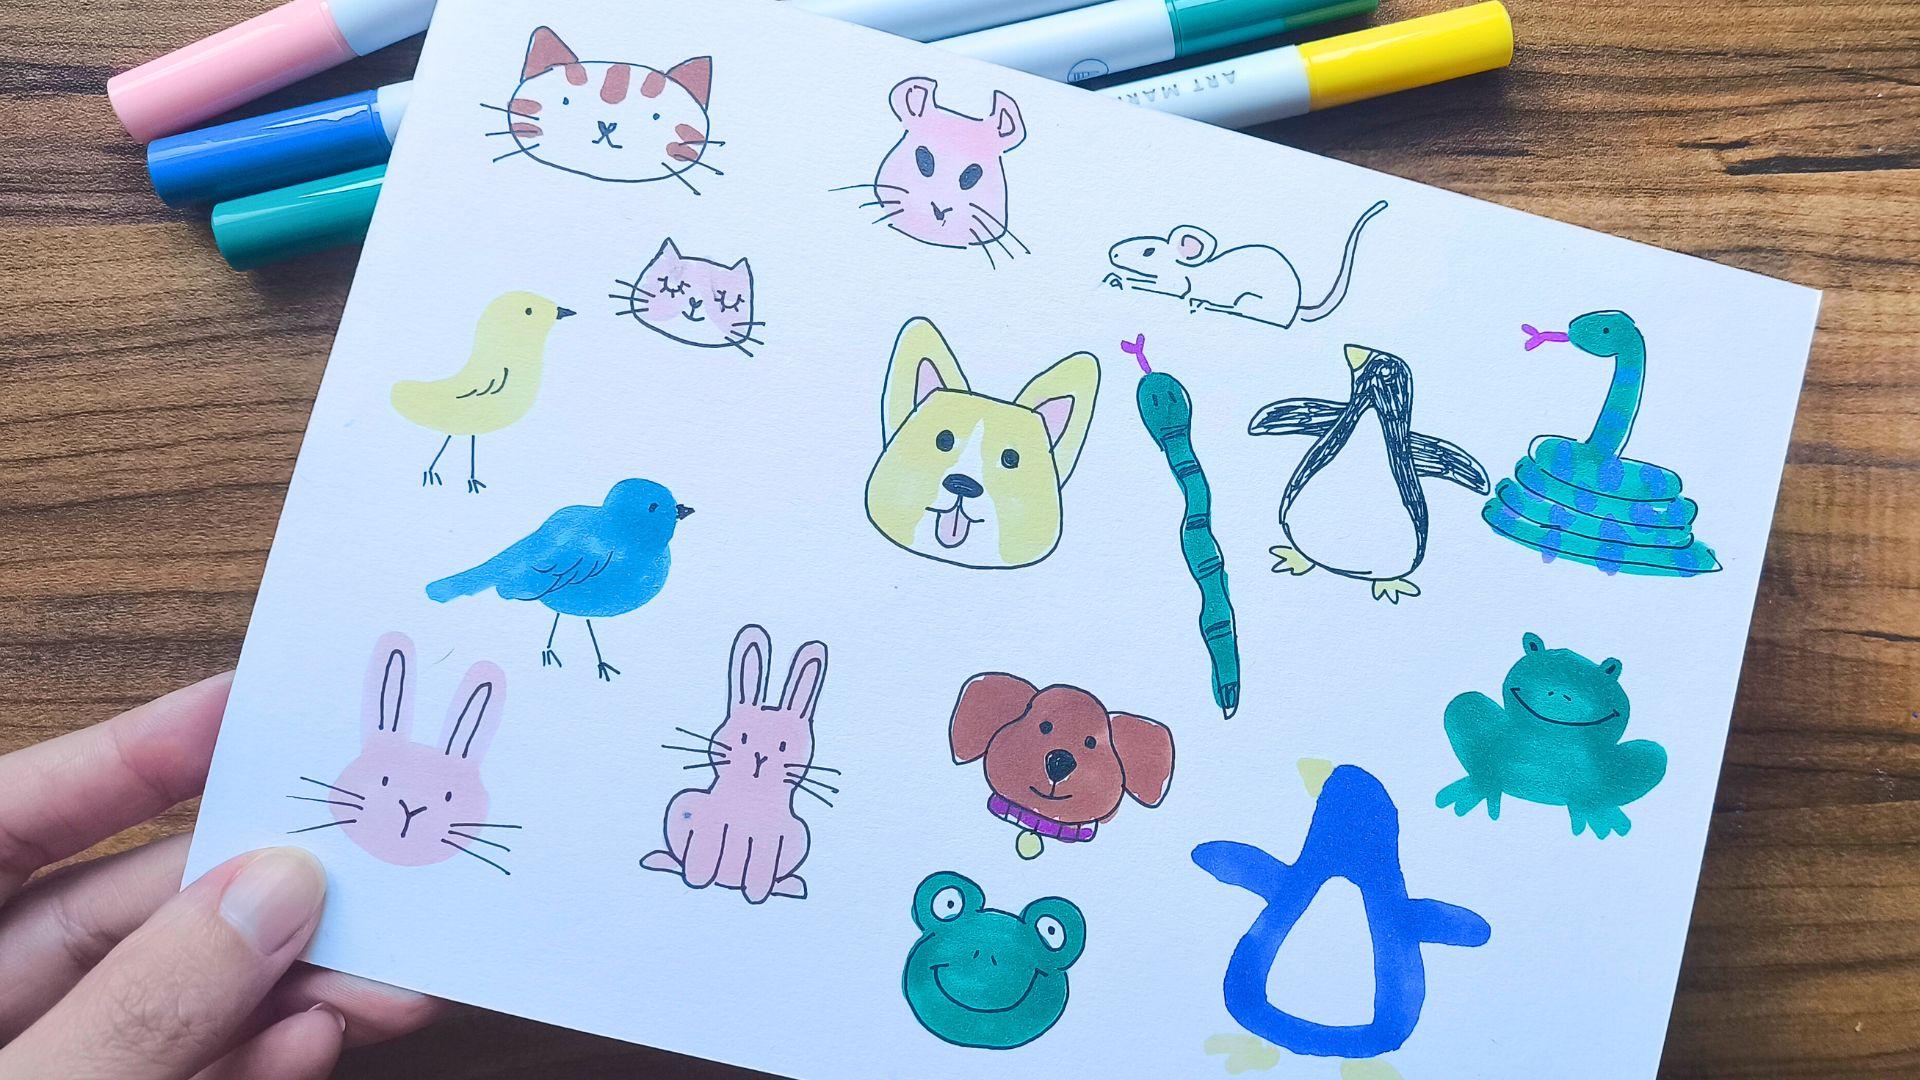
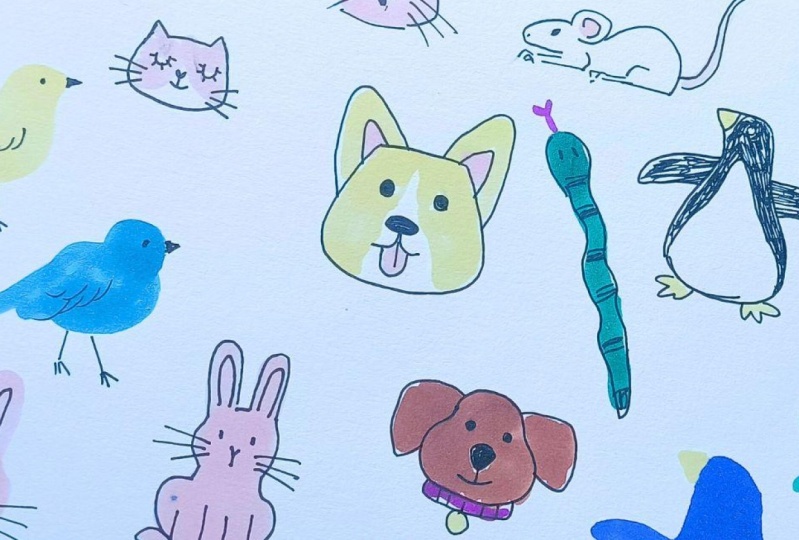
6. Day 5 - Cute Animals: Hello, and welcome. This is day five of our seven day challenge
class on doodles, and today we're
drawing some animals. Now, I know that animals can
seem a bit hard to draw, and they are hard to draw. But we can always break
things down so it's simpler or draw them in a simpler
way, cute and simple. So I'm back to my
usual markers again. So I have some markers
here and my fine liner. This is what I'll be using
for today is doodles, but once again, you can
use whatever you want. So I have here my paper. And I have my mood board, always a mood board
or a reference board, so it helps us with ideas. And so we have a reference
of the things we're drawing. And let's start. So first thing we're drawing. Cats I want to draw some
cats. Cats are the best. I love drawing cats, so that's what we're
starting with. And we're going to draw
them very, very easily. I'm just going to draw
a cat head or two. So we're going to start by
drawing a circle like this. Now we add two
triangles, now a nose. I like to use a hard
shape for the nose, two dots for the eyes, some whiskers, and,
of course, the mouth. There we go. Very simple. Now before coloring,
so it recipe it. Let's try draw them
in another way. So we can draw the shape
a bit differently. For example, we can go
like this to triangles, and then we go down, like this. Now, again, the nose, I like to go for
the heart shape. Now let's try drawing
the eyes closed. So I like to draw like two
curved lines like this. And we can even add
some lines like this. This is a bit more cartoony
and artistic style, let's say, the whiskers, I line going down,
and then the mouth. So two different ways for
you to draw your cats. There are more, but
we'll keep it simple. Two different cat faces. Now we can add some colors, pick up this brown, and we
can keep things simple. So for example,
just some stripes here and there, and that's it. We can paint the ears brown
as well, and that's it. Or we can do something else. For example, let's pick this
peach color once again. And let me see if
this is properly dry, perhaps, and we can draw
a pattern like this. It's not properly
dry, but that's fine. And there we go. Then
we have a few cats. And now I could
fill this page with just floating heads of
cats in different colors, different patterns, and that
would be really, really fun. But let's drop more animals because we want to have
some diversity here, right? We don't want to draw
always the same thing. And I really like the bird, the very round bird, and
I have here this blue, which I'm going to use. So bird, a very round bird, going to start by one circle
and then another circle. Now we just fix the shape
here and there a bit, and now we can draw a pointee and for the wing and
the tail. There we go. And now with our fine liner, we can add the other
details such as the pause, the I, and the
beak. There we go. Now if you want to
add more detail, we can go ahead and draw
here the wing a bit. We can draw different
shapes of birds. So here we draw a
very chubby bird. So let's try to make
it a bit different. So I like to use this shape, which is like an S.
So let me go here. So we have almost like
an S shape, right. And now we do the same thing on the other side, and this is it. Now, once again, I can pick up my pen and finish two legs, paint here, the beak, the eye, and now if you want we can
have here a bit of a wing. And this is it, very cute
birds with very simple shapes. And of course, you can mix
and match this together, or you can explore
different shapes as well. Now, what should we do next? We have a hamster, a bunny. Let's do the bunny. Let's
draw bunny, use it this one. So for the bunny, let's try drawing it just like a face of a bunny and then try
to drawn a full body. So we have different options. So for the bunny face, I like to keep very simple. Circle and then two
ellipses for the years. And this is mostly it. We're going to fill out the rest with our fine liner later. So now let's try trying
the full body bunny. So head now a shape like
this and then two years. And finally, we have
here two paws appearing. And now we can add
details with our pen. Going to start
with the nose with like a B shape and
then going down. And then two dots for the eyes, we can make here this shape
of the years and now, of course, we draw some
whiskers. There we go. Now let's go for
the other bunny, and let's draw a
full lineart for it. So just go over your shapes
and then here we have some pose and we can actually draw here
the back pos as well. We can fill them with the
color later, the years, and now the face once again, our V going down, and then some whiskers. And then we go two bunnies. Alright, so we drew our cats. Let's draw some dogs. So I have here two pictures, and we have a corgi, and I really like
drawing Corgies. I mean, it's part of
my artistic name, right, so I got to draw them. So for the heads, I like to draw a shape that is
similar to this one. So we have here, one line, go down,
and there we go. Now we have big ears. The big ears are the most important feature
of drawing a Cori. Now, let's draw an
ellipse for the nose, two dots for the eyes, and then the mouth
with the dog out. There we go. Let's leave this to dry a bit. And let's try. And let's try another dog with the ears with floppy
ears or longer ears. Let's say, we can draw something similar to the
dog that we have there. So we can draw
something like this, a round shape like a pear shape, and now we can draw the ears. So triangular shapes like this, we can draw the nose, another triangular shape, two dots for the
eyes and the mouth, just like we did for the
other cat right there. And now we can even add a color, for example,
something like this. Now, as for colors, let's use this yellow
for the Corgi. And as you might have
noticed they have this very unique pattern. So we have something like this, and now here, they have
something similar. There we go. Years as well. And now for the
insides of the years, we'll use this pinkish,
and there we go. For the other dog, let's use the brown, going a bit out of the lines. But that's fine. I'm just
feeling this more or less. These are quick doodles. We don't want to waste
too much time here, quick stuff, just
quick drawings. There we go. Now what
else? A penguin. Penguins are really fun. Let's see how we
can draw a penguin. So we can use this
kind of shape, so we have the head,
then we go down. But here we change a bit. We want it to be round, right, something like this. And now we have the arms more or less and not really arms and the feet. And there we go. Now, besides the nose, we can color it with black. I'm going to use the fine liner since I don't really
have a black here. Well, I could have used
the blue, but I forgot. We can draw a blue one next. Instead of feeling
the whole thing, we can just add some
texture like this. And now I don't have orange, so let's use the yellow
for the big and the pose. Okay, let's try
doing another one, starting with the markers. So the shapes are the same, but we're starting
in another way. We're starting with markers instead of starting
with our fine liner, the beak and the pose. And we can actually
leave it just as it is without any
kind of details. It's a penguin, just
very simple shapes and colors, and we
have a penguin. Next, we can draw a hamster. Let's use this one. And once again, let's just draw the face this time for now. Like this, and we have
ears going this way. Now we have here
some bigger eyes, but it's more like a mouse. I think it looks more like
a mouse than a hamster. I'm more used to drawing
mouse than hamsters. Since we are in that area, let's try drawing a mouse. Why should I draw
it? Let's try here. So for a mouse, I like to go here, then big here, and now we can
draw something like this. Like this. This is the B pow, and now we can have
here another arm, little fingers, and,
of course, a tail. And we have a
mouse, very simple. How should we color it? Let's do the tail first, and we can actually leave it
like this, a white mouse. Oh, we haven't draw we didn't do anything like heptile
so we can draw a snake, for example, I
have here a green, and for a snake, we
can do it two ways. So we can start
with a circle and then a curved line like this, add a thug, and now we can
just do our line art two eyes, and we can add a few
stripes like this. So very cartoony, a
very cartoony snake. Or we could do it
like a coiled snake. So we can start with, again, circle or
ellipse for the head. And then we go down, and now we drew some curved
lines just like this. We can add another tongue there to make things
a bit more fun, and we can even draw let's use this purple
for a few stripes. So it's more colorful. And now, once again, I can pick my fine liner and draw a bit
of linut, and there we go. We can also draw frog. Let's draw here just
ahead of a frog, a very cartoony frog
and silly frog. And now we can also try and draw the frog
with a full body. So ellipse here, then we
can have another ellipse. This is how I like to do
it. Now we have here. 22 curved lines, and then
the feet and our eyes. Now just add a big smile
and the eyes and nose. And there we go. We can
leave it just like this. So the process you use for
the doodles can vary a lot. You can start with markers and draw like shapes
and blobs of paint, and then add the lineartO
you can just leave it as bits of paint spots of
painted form an animal. There are many ways
you can do this. As you can see, we
use lots of linart. We started with markers. We started with our pen
and then added some color. We have here just shapes of color and then adding some
details with our pen. So there are many
ways you can do your doodles and this kind of exercises with
doodles that you can explore style and the
materials you use. And perhaps you'll find
new things about your art and the process and the
materials you like to use. It's a very fun way for
you to discover that part, your language in art,
and even your style. So yeah, this is
it for this one. Once again, don't forget
to download the moodboard, find more animals, draw your favorite animals,
take your time. And once you're done, add those doodles to the grid
template that I gave you, and I will see you
in the next video.
7. Day 6 - Expressions & Silly Faces: Hello, and welcome back. This is day six of our seven day challenge
class on doodles, and we're almost done. So for this one, we're going to draw expressions
and silly faces. So basically, we're going to
draw some images, let's say. And I feel that silly faces
drawing some faces is one of those main things
we draw when doodling. Like, I remember when
I had a notebook open, and besides drawing
some random lines, faces were the thing
I would draw a lot, just two dots and a
smile or the thug out, different ways of drawing faces. So this is a very
common thing to draw, and I thought I should add
to this class as well. So I have here another piece
of paper this time, black, and I'm going to use
some acrylic markers once again to change
things up a bit. And let's start. It's going to be very simple, and we can draw different
faces in different ways. I have the moodboard. Don't forget to download that, or you can just draw
whatever comes to mind, or you can look
up on your phone, some images and try to recreate
them. That's also fun. So let's try. Start by drawing
a circle. A big circle. And now two circles
for the eyes, and then the curve
line for a smile. And let's use one
of the images on our moodboard and add a little bit of blush
because that's really cute. Some blush. Alright,
let's try another one. Let's use this purple, and let's straw
that face that is like, Oh, very surprised. So I'm going to start
with the mouth. Open mouth, then half a circle. This is our thug. Then
the eyes, very big. Two dots for the
rest of our eyes. Now we can draw the rest of the face and the
eyebrows going upwards. There we go. Next
one. What can we do? I like those faces
in the benches. I chose that because
I really like the shapes of those faces. So let's draw a few of them. I'm going to pick this one, and I'm not going to draw
like a face or wherever, just a face, just
the expressions. So for example,
we have this one, we have some dots here, and then a long
nose and the mouth, okay. Let's draw the. You can have some fun with the head shapes here
and a bit of hair, even. Let's try another. Let's use the pink this time. So we have a face like this and then the
nose and the smile. Let's do, like a pear
shaped face this time. Well, no, a bean turns
out with curly hair. What else? What else can we do next? Let's use the yellow. And let's draw the face
that has the eyes closed. Very relaxing. Then we have the nose
here and a smile. And let's draw
perhaps a new lips for this one. There we go. Let's see. Let's see. Well, we need to draw a
face with a thong out, right?'s the white and
trying to decide where. But let's draw here
another circle. So we have the eyes like this. So there are many different
ways you can draw the face and the eyes can
be just a simple line. You can also add some
details to add here. The tongue. There we go. Simple. You can add some blush. Again, or we can just go
and do something like this. Like, and it's done.
We have a face. We could do something like
this and we have a face. Let's try. I'm just changing colors to
keep things a bit fun. We could have an angry face like eyes going
down or like this, and we have an angry face here. We can add some details, like some more emotion
to it. What else? What? Let me see
the mose is there? Oh, let's draw one
sending a kiss. Oh, that's much better. I thought I was running
out of paint there, but turns out I'm not. Let's do a few circles, let it dry, and then we
can draw different faces. Then we wait for it to dry. Let's draw one
simple smiley face, but we can also
draw it this way. So you can see
different types of eyes that you can draw
for your emoticons. I'm going to use a pen now, and we can draw like
winking like this. Just looking at the Imogis
and trying to copy it. Let's see what else. I like this one as well
like this, like this. And then we have the
tongue sticking out. Can also have the hard eyes. So this one is pretty simple. Just draw some
hearts for the eyes, and then open mouth smiling. And now I want to
draw the kissy one, which is a mix of
this, the wink, and then the mouth
goes this way. And now we add a little
heart. There we go. So silly faces, exploring different head
shapes for silly faces, different styles of eyes, emotions, and then we can
also just draw some images. So are more old school, let's say, before
we had the imoges, we would draw them very
simple like this, like, similar to what we would do
in a text message, right? We didn't have the mosies
that we have nowadays, we use punctuation
to draw some smiles, some emoticons, and then we have something
that is more modern, copying some emoges
and drawing them. And then we also have
some exploration of faces and heads. So yeah, just some silly
drawings to relax a bit, some very silly doodlings, have fun with your faces,
draw different expressions. So yeah, take your
time. Once you're done, don't forget to add your drawings to the grid
template that I gave you. I'll see you in the next video.
8. Day 7 - Sweets & Cakes: Hello, and welcome back. This is our last day
of doodles day seven, and today is going to
be very, very sweet. So we're going to be drawing
some candy and cakes. So I have my markers, I have my pen, and let's
dive in. So we'll start. Let's start with
something simple. We'll draw some lollipops.
Speak these two. And I'm going to draw
those hard lollipops that we have in our moodboard. So just two heart shapes, one in blue, and the
other one in pink. Now we can just add
the stick like this, and we can draw the rest
of the lollipop, as well. You can even add, like, some bits of details. Be very messy with your lines. Just add a line here and
there, and that's it. What else? Let's see. We can draw a doughnut. So one circle and then
another can also try drawing our doughnuts in another perspective,
something like this. We can draw the colorful part of the doughnuts
with our fine liner, as well as the sprinkles. There are always different
ways that you can draw things. I'll add color later. Let's draw some gummies. So let's try scumbo. So I'm trying the first
gummies we have there. So worms, giving them a curvy shape to make
it a bit more fun. Or else can we mix together some blue and green. Yellow and blue. We haven't used this blue yet, so let's use it now. So this is just a round shape, just like this. Very simple. And now I can go in with my fan and draw the
rest of the shape. We can even go and draw
the warm lines there. We can even have the white pen, and we can draw some
dots for the sugar, fill our gummies with sugar. There we go. Now let's paint
our doughnuts. There we go. Now we can use the blue
four sprinkles in this one. That's here and
there. Now, cupcakes. We can draw some
cupcakes, right. So we can start with
a trapezium shape upside down at some lines.
Let's draw another. And now we can do the top
of our muffin like this. Or we can keep it simple, can make a bit of the
muffin appearing. And then some cream on top and some sprinkles,
and there we go. There are different ways
you can draw a muffin. We can draw something
similar to what we see in our image with
the sherry on top. What else? What else? A cake. Of course, we have to draw cake. So I'm going to start
with the strawberry. Mostly because I don't
want the lines to overlap. So strawberry upside down. Next, a triangle. Like this. Now a rectangle,
and now just draw one line like this or more for
the cream inside the cake. And then we can draw a dish throw the seeds over
strawberry, and that's it. Let's start adding some color, the sherry here,
let's strew here, the cream and pink. You can use whatever
colors you want. Now, it's color or cake, and I'm going to use the purple for the
strawberry. There we go. Some cake, some muffins. What others we can draw
some hard candy for that. I like to do this on llips and then draw here
some squigy lines, and then one line on one
side, another on the other. And then zigzag, same thing
on the other side and zigzag. And we can do other
shapes as well. For example, we can do like
a rectangular, like caramel, some squigy lines, one line, another zigzag, one line, another on the other
side, and zigzag. And here, like a bit
of a label there, can draw some ice cream. That's also sweet, right? So for a cone, can draw a circle
and then the cone. And now we can draw a grid. We can even draw like a spoon coming out of
it, something like this. We can also draw ice cream in a cup and a few
ice cream scoops. And again, the spoon
can also have a sorbet, where can we draw it here, so something like this, we can draw it with a bite. So for that, we have
the same kind of shape. But here we do
something like this. And then go down again
and finish our shape. And of course, we can
draw some gummy bears. So round shape, two ears, and then we go down down, we have here one paw, another. We go two lines straight down, and then two more
circles, and this is it. We can draw face if you want, and we have some gummy bears. Of course, we have cookies. Cookies are easy, circle, and then we can add some chocolate chips can
be as simple as this. We can also do other kind
of cookies like rectangle, and then some waves
around it, some dots. There we go. We can also draw some cookies with a filling in the center V weird shape can be a circle as well,
something like this. I don't know, have fun. Just think of whatever
and just draw it. Let's start adding some colors. The popsicle to be blue, and the other one, let's make it yellow,
a lemon popsicle. The other one can be blackberry or blueberries,
something like that. Let's go here for our ice cream, so we have strawberry. This one is going to be
strawberry, as well. We have vanilla and
perhaps chocolates. Then we go spring here. Our caramel, these are
all chocolate cookies. Now, for our gummy bear,
let's go with yellow. And that's it. Lots and lots
of candy and sweet cakes, ice cream, everything sugar. So, yeah, this is it. We finished our seven
days of doodles. Those were a lot of doodles.
Did a lot of things. We explore different themes,
different styles, materials. That's what playing with
doodles is all about. It's just experimenting, not
taking it too seriously, just having fun and doing
something to relax. This is not something
that we're doing as a final work has something
to share with others. This just for us to relax
a bit and do random lines, random little drawings, just whatever you're
feeling like, and that pops in your mind. So I hope you had
fun take your time. Don't forget to once you
finish to add your drawings, your doodles to
the grid template, and then don't forget to
post it and share it so I can see it and give you
any feedback you want. And I will see you
in the next video.
9. Conclusion - Before You Go!: Great job. You just completed the entire seven day
challenge class on doodles. And hopefully, you've
discovered just how fun and rewarding drawing some
simple doodles can be. Remember to post all your
favorite doodles from the week, and I can't wait to see
everything you've drawn and how creative you can be
with these drawing ideas. Keep in mind that
doodling is all about having fun and expressing
yourself. There's no right or wrong way to do this. So don't be afraid to
add your own twist, your own uniqueness to
everything we've covered, and keep experimenting
with new ideas. And if you enjoy this class
and would like to see more, I would really appreciate if
you could leave a review. It helps me keep going,
and it really makes my day to read all your
thoughts on the class. Oh, and be sure to check
out my other classes. I would love to see you and
your art over there as well. And that's about it for now. Thank you so much for joining me on this doodling adventure. I'll see you next time and
as always, keep on drawing.
 Patricia Caldeira, Illustrator | Digital Artist | Designer