Transcripts
1. Intro: Hello, and welcome. It's time to bring
some adorable, fluffy and super charming
kittens to life on your page. Have you ever wanted to capture irresistible cuteness
of a sleepy kitten? In this class, we're doing exactly that plus
some other poses. We'll cover how to draw a
peaceful sleeping kitty, an alert and adorable
sitting kitty, and a playful standing it. All in a simple
approachable style. And don't worry, I'll
be showing you my process step by
step for each pose. Not only that, but you'll get handy reference boards for each pose to kick
start your drawings, and you also have an
assignment at the end of the class so you can put
your new skills to the test. So if you're ready to fill your sketchbook with
perfectly delightful kittens, let's jump right in and I will
see you in the next video.
2. Resources For You: Hello and welcome.
Before we start drawing, I just want to give
you a few resources to help you out in
drawing your kittens. I made a few reference boards. One for each kitty
pose will draw. So be sure to
download this so you can use them as
references while drawing. Aside from this, feel free to also look up
your own references. You can find several
references on free stock websites such
as Unsplash and pixels, and you can also take your
own photos if you want. There are never too many
kitties in our camera role. All right, this is it for now. Don't forget to download
your references, and I'll meet you
in the next video.
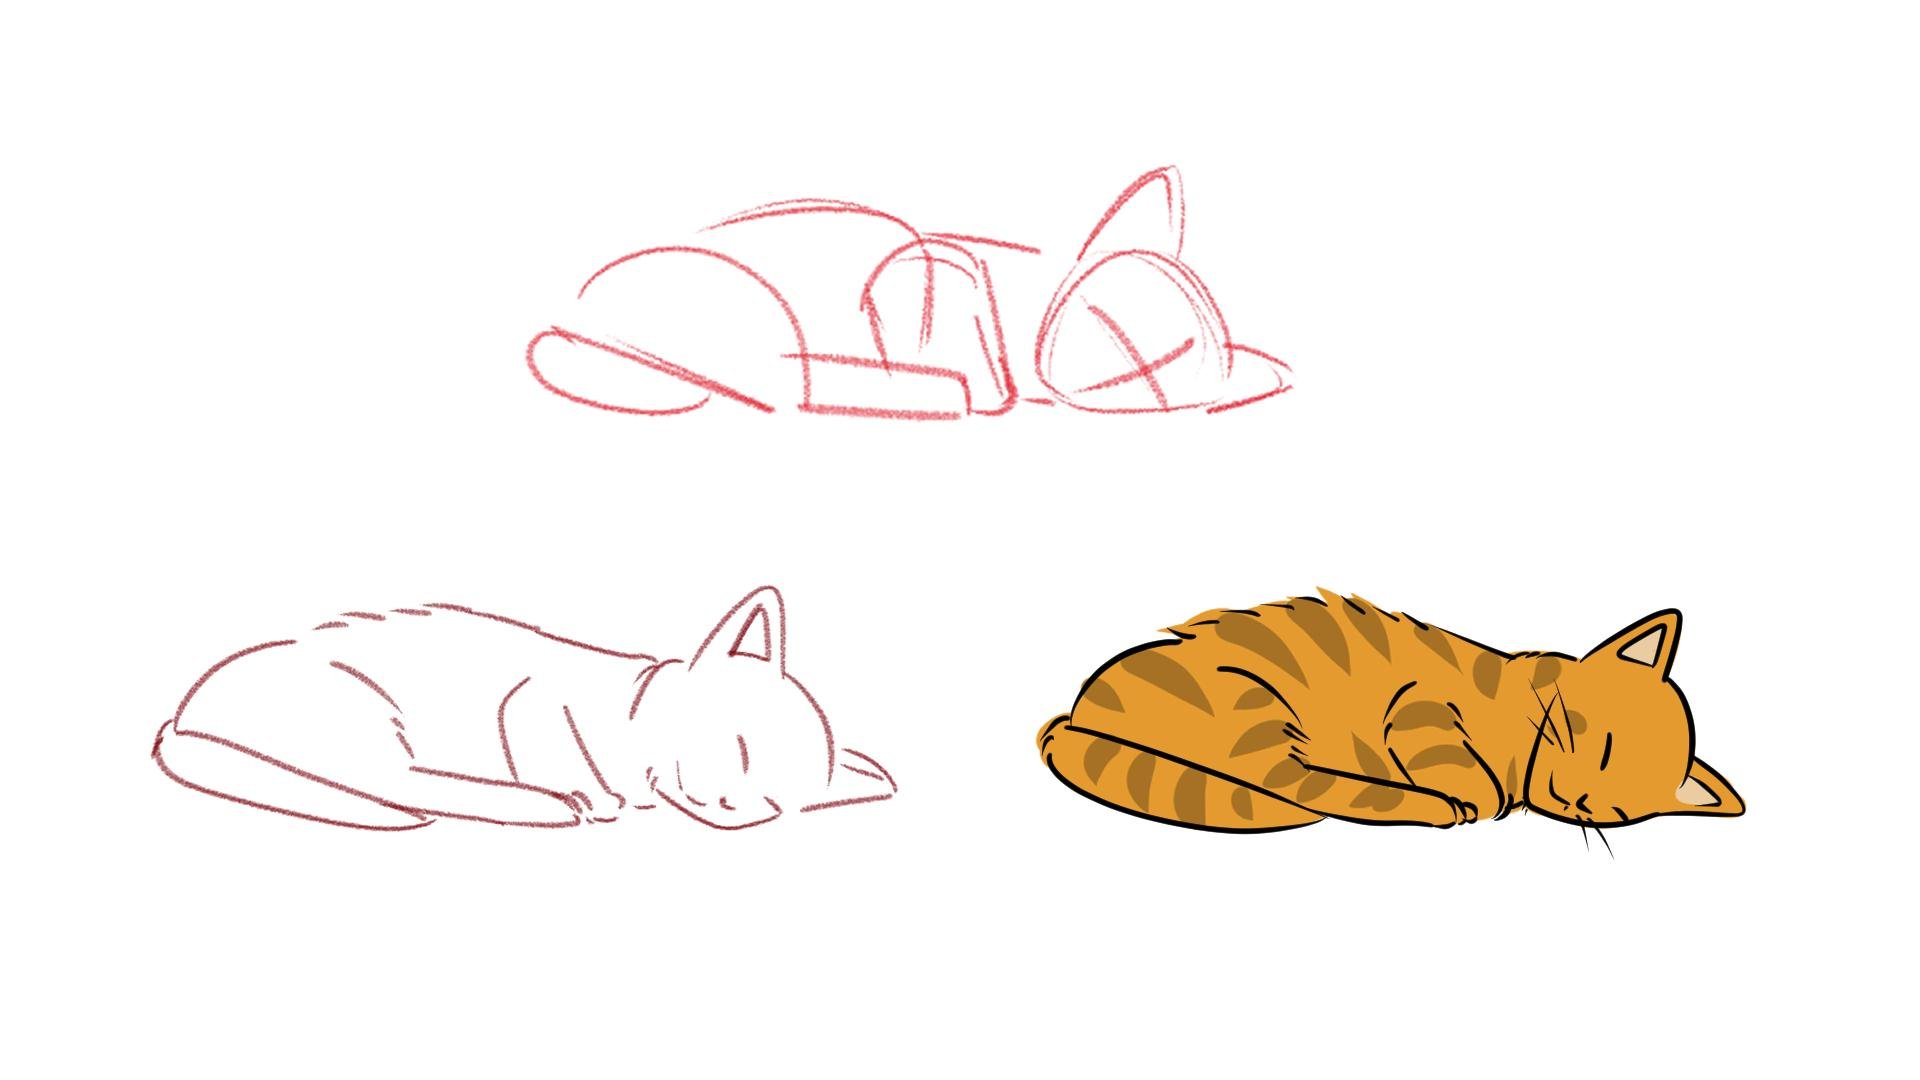
3. Drawing A Sleepy Kitty: Hello, and welcome back. We're going to start drawing
our first pose of our kitty, which is a sleeping pose. So I have here my
reference board, and these are the
references I'm going to be using for this pose. Remember, you can download
this reference board, so don't forget to
do it if you want to use the same references as I am. And the first thing
I want to do is observe the references and
perhaps draw on top of them, find shapes, find what are the main features
for drawing kittens. The shapes we use to draw cats and the kitten are
more or less the same. But you'll notice
that some features are a bit different or we can exaggerate more or less comparing to drawing
an adult cat. So I'm going to lower here our opacity and a layer on top. Now, I'm going to grab
my pencil brush and red. And I'm going to
start looking at these images and start
drawing some shapes. And as you can
see, we have here, they're all kittens,
but they vary in age. So for example, this cat right here is maybe one
or two months old, perhaps one, but this
one is a bit older. This one is perhaps like four
or five months, you know. So we can see the differences, even though they're all kittens, depending on their actual age, some things might be different. So we have here this
very small kitten. I'm going to start with
almost like a round triangle, some guidelines, so I
know where the face is. Now, the years is very small. So the years are fairly
small as well for now. Then we got here a
paw right here we have this shape for another paw. And then we have the
belly very round, a very round belly. So a circle. And then we got a lemon wedge for back leg and an oval
for the rest of it. So yeah, this is our first cat. So main features here
that I notice is, well, the closed eyes
they sleep a lot, and when they're
younger, they can't even really open
their eyes at first. For now, the very
pointy but small ears and around belly
from all that milk. Let's see the next one. So here we go again that round the triangle and
here the ears are bigger. So one thing I notice in most of these cats is
that at some point, their ears seem to occupy most of the
head and their body. So we have these
very small heads, very small features, but
then we got some huge ears. That's something
we can work with to make our kitties more fun. So we got to hear
the face, right? And now, how are you going to divide the body here?
Let's start with the back. So we got here lemon
wedge for the back leg. We got here a bit of our tail. Then we got another round
shape for the torso area. And finally, here we have the other pod that's
going below the body. So as you can see,
the shapes are always more or less the same. But let's continue to
practice some more. Again, round triangle,
face here, big ears. Don't be afraid to
exaggerate these parts. Then we got here our
body, two circles. He's doing a kettle
of pause there, and then we got our pause. Next one, here the head is a
bit in a different position. They got some perspective here. But again, huge ears. Then we got a bow here, torso area, and the
rest of the body. So yeah, as you can see,
it's the body very small. The head seems to be the
main feature here, right? Sometimes it looks a bit bigger than the
rest of the body, and then we have huge ears. For me, these are
the main features. And then we can play with this, we can play with these
proportions when drawing kiddies. So I'm just going over all my references
and finding shapes. And this is something I will
always recommend you to do because I think it's very useful to learn how to
draw any subject, really. Let's kitty, and you can use simple shapes like this
rectangles, circles. Sometimes it can
be regular shapes, but, yeah, this is it. So what I'm going to do now
is choose one of these poses, the one I like best, and then I'm going
to fully draw it. So for me, I like this one, especially because of the years. They're very big. But
I also like this one, since we can see
most of his body, as opposed to this one. And I can always exaggerate
some of the features, right? So I think I'm going
to try this one. And what I'm going to do mostly so I don't
waste your time, I'm going to copy these shapes
and continue my drawing. However, in your case, if you're still exploring and practicing drawing these animals and you're fairly new to it, what I recommend you to do is to first practice
these shapes. So you drew on top
of your reference. You looked for shapes, and now on your sketchbook
or on your drawing software, you will practice
these shapes that you found without having the
reference below your drawing. If you want, you can repeat drawing those shapes on top of your reference a few more times. You create muscle memory, and then to the side, looking at your reference and looking at the shapes you drew, practice shapes a
few more times. This will help you
understand better the pose, the animal you're drawing, the subject you're drawing, and it will also help you create muscle memory
on drawing these cats. I'm going to bring
here there's my cat. Let's make it a
little bit bigger. There we go. So now let
me look at my reference. Now, I'm going to
do the second part, which is drawing a
more detailed sketch. So now I'm going to add some
features such as the face, add some more details to the pose and the
rest of the body. So I still have my
references to the side, so I can look at it as I draw, I lower the opacity
of my first sketch. I'll add a new layer on top, and now I'm going to still use my pencil brush and draw my cat. One thing you'll also notice is the hair is very pointy, right. The hair is still growing,
the fur is still growing. So you see it kind of all
dplace and very spiky. Alright, so the sketch is done, which brings us to
the next phase, which is drawing the inart. So I'm going to hide
my original shapes. Remember, your sketch doesn't
need to be perfect yet. Now when we go to
the line art phase, is a time where we want to be sure that everything
is in the right places, and there are no more
changes to make. So I'm going to create
a new layer on top, grab my paintbrush, and
I'm going to go over all my lines until I have
a completed drawing. All right, so my
line art is done. Now, what we can do before
going for the next pose is add a little bit of color just to make our
drawing a bit more fun. And as you can see, as
I drew my line art, I did change some
things here and there. That I thought weren't very
good in my original sketch. So this is something you
can always do, right? You can always change things in your drawings until
you are happy with it. There's always a chance to redraw anything
you don't like. Even if you're doing
this traditional, you can repeat and
redo your drawings. It's a good practice. You're practicing and you
are improving your drawings. So don't be afraid to do that. So now I'm just going to
grab my paint bucket. So now I'm just
going to add very quickly a bit off color. So I created a layer
below my line art, and all I have to do is go over my lines and paint inside them. Can do this using a brush or by using the paint bucket
to make things quicker. Alright, so here we have
our sleeping kitty, very small, huge hers. It's very important to find good references where you
can clearly see the cat. If you want, you can find other references
other than this. If you have a kitty at home, take pictures of them
and then draw them. But yeah, good references, finding the shapes
on those references, and then you can finish your drawing with a
more detailed sketch, line art and some color. But this is it for
drawing a sleepy kitty. Don't forget to download the reference board so you
can use in your practices, and I will see you
in the next video.
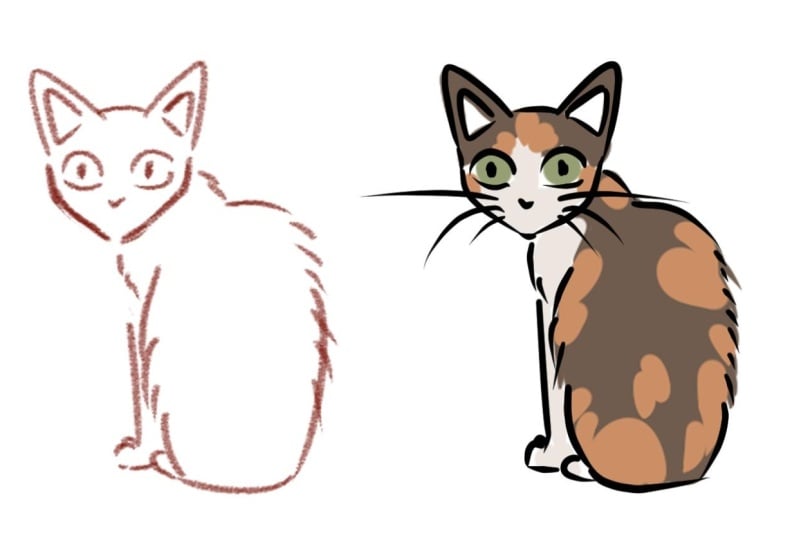
4. Let's Draw A Sitting Kitty: All right, so hello
and welcome back. We're going to draw
our second pose, which is a kitty sitting. So once again, I have
here my reference board. Don't forget to download that if you want to use
these references. And what we're going to
do first is take a look at our references
and find shapes. So lowering the opacity of my
references. A layer on top. I'll grab my pencil brush and the red so I can clearly
see the shapes I'm drawing. And now we're going
to go through each pose and find
the references. So starting with this one,
I really like this one. I like how huge the ears are compared to
the rest of the head. So we got our triangles
for the ears and the rounded triangle inverted
triangle for the head. Then we have this shape here
and then a rounded shape. A paw and another paw. I think drawing cats
sitting is probably the easiest ones
because you always have when they sit down,
they're very compact. They're shapes, so you have less shapes to draw. All right. Next one, this time, I'm using an oval for the head, but here this small
triangle and then an oval. And now for the legs, we got something like this
and something like this. Then we got a bit of the lower part of the
body showing next one. I like this one. I think
in almost all of them, you can see the
hair spiking out. But when a cat has a
bit of longer hair, you can very clearly
see the hair. Spike spiking all
over the place. That's something that
can be very fun to draw. Here. So since
this cat is black, it can be a bit more difficult to understand the shapes,
but they're still there. So here we got this oval. Then we got one leg and paw, and then we got here
another but as you can see, the tail appears here. So let's draw that
with a lemon wedge, and then we got here the back of the body
and another ball. Let's lower this again a bit. Another very spiky cat. This one has smaller years, as you can see, so as I said, it depends on their age. Like this cat is
clearly younger, so possibly two months old while this one is already maybe
four or even five months old. So their features change. Don't be afraid to be messy
with these sketches, right? These are not perfect drawings. They are not supposed
to be perfect drawings. So feel free to make
messy sketches. Something else about
younger cats is that their tail is shorter and
sometimes very pointy. Compared to an adult cat. So as you can see, I'm just looking for shapes and dividing the body
in different parts. So this is it for our shapes. As you can see, they have
many shapes in common. We almost always have this round shape for
the back of the body. Sometimes we have to
adapt that shape a bit depending on the
perspective we're seeing. But we always have more or
less the same shapes here. So now it's time to
go for the next step, which is a detailed sketch. So once again, I'm
going to copy here my sketch and choosing this one. You can
choose any other. You don't need to
use the same you don't need to draw the
same at I'm drawing, and I'll also give you, you'll be able to download all these shape drawings
that I'm doing here. To help you out, if you want, you can draw on top of those so you can
understand better. But it's a bit for you to
have them as a reference, and so it is easier for
you to draw your own cats. But remember what I'm
drawing or the shapes I see might not be the ones you see if you see
any other shape. If trying any other shape is easier for you, then do that. All right? There
are no rules here. What I see might be
different than what you see. Another thing when it comes to is that what I
noticed is that the face is always or the head shape is always really small compared
to all the features. So it kind of feels like other features are trying
to come out of the head. So we have these
very huge ears and huge eyes until everything starts composing
themselves, right? All the features accompany
the rest of the growth. Alright, so here we have it, a very small and skinny body, and then we see all that
face staring at us. I like the hair all spiky. The fur is also still growing. So now I'm going to go
for the next phase, which is drawing the inart. So what I notice the most about young cats is that their proportions are a little
bit all over the place, compared to an adult cat. You can also play
with proportions. But I feel that a young cat, a kitten, it doesn't
really matter their age. While they're small and growing, everything is very
out of proportion. Some things feel like they're still not in their
places and they're not. And I think that's very
fun to draw. There we go. As you can see, I'm always trying to
exaggerate some things. I also adapt it to my own style, trying to make it a bit
more cartoonish, even. Alright. But let's just paint the eyes because they're
very beautiful. There we go. So yeah, here we have our sitting cat very young with these features
all over the place. But yeah, this is it for
sitting cats, take your time, practice your shape several times until you are
comfortable with them, and then I will see
you in the next video.
5. How To Draw A Standing Kitten: Alright, so here we are once
again for our final pose, which is drawing a
standing kitten. Once again, we have
here a reference board, and the first thing we're going
to do is look for shapes. So lower the opacity, a new layer on top, and let's find our shapes. So we got here this one
who can barely stand yet. It's very small with hobby paws. But as you can
see, we still have the huge heres and more or less the same shapes
we've been using so far. Let's see the next
one very curious, big pointy ears,
and then we got, let's see here, this oval shape. Then we got here one leg and pop and then we got
this one here as well. And then we got the
back of the body in a bit of a perspective
appearing in the back. See our next one, oval shape for the head, big pointy ears. And now let's see. I'd say we have
something like this, then we got one leg. Two back of the body and two more legs
appearing at the back. And here we got a very pointy
tail pointing upwards. All right. Next one. So as you can see, the shapes are always more
or less the same. We just need to adapt
them to the situation. So for example, in this one, we can barely see the
back of the body, although we do see
a little bit of it in here, but that's it. Now we have the smaller
kitties here, huge here. We got one paw and the other, then we got here, back, and small but pointy tail. Alright. Last one,
also rather small, pointy years, and
pointy tail once again. So yeah, what I can determine
from this is we got our big pointy years rather small compared
to an adult cat, rather small, but
always attention tail. So the tail is always pointing somewhere upwards to the side. We don't see that those flowing movements
of the tail here. The tail is rather
small, so it's like pointing
somewhere very strict, but very straight,
and the long limbs. If the cat is
smaller or younger, they have heavier
and shorter limbs. But as they grow, we
notice that the legs are very they appear even
longer because again, we have that proportion
of the body, so they appear longer
and quite thin because the cat is still
young and it's still growing. So you see those
differences there. So now what I'm going
to do is once again, I'm going to copy one
of these and draw it. I really like this one. So that's the one I'm using. Spring it to the side, and now once again,
just like before, I'm going to draw a
more detailed sketch while still having my
reference to the side, so I can see where
everything goes. Alright, there you go.
I think this is it. So now all I have to do
is draw my line art. So as you can see, the
process is all the same. And once again, it can be
a bit different for you. It's perfectly fine. Just go try different things,
try different shapes. That's always important
experimenting, different processes, even. And remember that
you're always in time to fix any
of your drawings. If there's something you don't like about
what you're drawing, you can always change it.
All right? All right. So this is it. Now I'm going to
add some colors. Not very happy about this
like here. It's too thick. As we talked about, they tend to have
very thin limbs, so long and thin because
they're still growing, so there are some
differences there. But yeah, now this is it. Going to color this kitty a bit differently because we already
had a al coquet before. So we have different
colors here, the inside of the
year, and that's it. So this is our last kitty post, but follow me to the
next video where we're going to be talking
about your assignment. So I will see you right there.
6. Your Turn! - Assignment: Hello, and welcome back. It's time to talk
about your assignment. We drew kittens in
three different poses. Your assignment is to
pick one of those poses, draw it, and then
share it with me. I always love to see your drawings and can give
you any feedback you need. If you want to
draw more than one of the poses we
did in this class, then feel free to do so. Just take your time, have fun, and I'll see you
in the next video.
7. Conclusion: Hi, again, artist. Congratulations on completing
the kitten drawing class. I hope you had a fantastic
time learning how to sketch these sweet little cats from their sleeping poses to
their curious looks. Thank you so much
for joining me. It's been a joy
guiding you through the process of drawing these
cute little companions. I can't wait to see
which kitten pose or poses you'll create
for your assignment, so be sure to share it. I always love to
see your creations, and I'm here to answer any questions and give you any
feedback you need or want. If you enjoy this class
and found it inspiring, please consider
leaving a review. Your feedback is incredibly valuable and helps other artists discover the fun and satisfaction of drawing
cute little kitties. So keep practicing and most
important, keep on drawing.
 Patricia Caldeira, Illustrator | Digital Artist | Designer