Transcripts
1. Introduction: Hi, and welcome. It's time to give your
adorable shibby character some exciting new jobs. Have you ever wanted to draw tiny charming versions of everyday heroes or
unique professionals? In this class, we're diving
headfirst into exactly that. We'll explore how to take a basic shibby form and transform it with
specific outfits, accessories, and details to represent a range
of occupations. Think of it like a super fun
character dress up session. But with drawing tools, we'll cover how to sketch
a brainy scientist, a creative chef and
a passionate artist, all in a delightful shiv style. And don't worry,
I'll be showing you my process step by step. Not only that, but you'll
get a handy shiv template and inspiring reference boards to kick start your designs. And of course, there's
a fun assignment at the end for you to
showcase your new skills. So if you're ready to
fill your sketchbook with a diverse cast of cute
shiv professionals, let's jump right in and I'll
see you in the next video.
2. Resources For You!: Hello, and welcome.
Before we start, I just want to quickly give you a few resources for you
to use in this class. First of all, I have a Chibi charter template for you to use. I'll be using this Chibi
drawing and dress it up according to each
occupation we'll draw. I also made a few
reference boards so you can use as
reference for each video. So don't forget to download this if you want to use
them through the glass. If you want, you can also draw your own Shiv and even
find more references. It's totally up to you. All right, this is
it. Don't forget to download your resources, and I will see you
in the next video.
3. Drawing A Scientist Chibi Character: Alright, so hello
and welcome back. We're going to start
drawing our characters, starting with a scientist. And I have here my reference
board and my Chibi template. So you can download this. Don't forget to do
that, if you want to use them for
your own drawings, or if not, that's fine, as well. You can find your own references
and draw your own Chibi. But to make things faster, I give you this
template so you can. Now, looking at
these references, what I'm going to do is see
what they have in common. So one of the first things
we'll notice is the lab coats, everyone is wearing a lab coat. Another thing I'm noticing
is the blue gloves. Even though not every person in these images is
wearing gloves, this can be a little extra that we can add
to our characters. What else? The glasses, the protective glasses, I think, can be something that
we can add as well. And then we have other
accessories or details that we can use such as the
clipboard and a pen, the test tubes, and even a
pill bottle right there. So these are the things
that I noticed at first. And after analyzing and
observing these references, I'm going to start
dressing up my Shiv. So first, I'm going to lower the opacity of my template
there so I can see it better, and now I'm going to
add a new layer on top grab my pencil and I'm
going to start with shapes, a very simple sketch. So I'm going to start with a trapezium shape
for the lab coat. There we go. Next, I'm going
to add here a triangle. So I know where the coat is open and also some rectangles
for the sleeves. The shoes. Now, what
else can we add? Let's say we talked about the clipboard
and the pens, right? So we could add here a pocket maybe with a few
pens and pencils. I think that could be fun.
Can also add a test tube. So for that, I'm going to draw rectangle and then a triangle. Something like this
is very simple. So I'm drawing
something like this. What else? What can we
add here? The glasses. I think the glasses are a fun
detail to add. There we go. And I think that for details or outfits in
itself, this is it. So now I'm going to do is
add and draw a bit of hair. So I noticed that well, the man always have
short hair right, and sometimes if the
hair is too long, I see that this
woman, for example, has her hair done in
a bun or a ponytail. So I think it could make
sense for a scientist, so the hair isn't in the way and not in a dangerous position. So I think I'm
going to use that. So I'm going to go
over here and draw bn. We can also add a little bit
of hair showing up there, so to make things just a little
bit more fun and unique. But yeah, this is my first
sketch that part is done. Now, what I'm going to do is lower the opacity of this one, add a new layer on top. I'm also going to
pick a darker color, and now I'm going to make
a more detailed sketch. So there are some
details that we need to add and that's what
I'm going to do. So first thing is adding more details to our lap
code, something like this. This is still a sketch. I'm not really being
too perfect about this. Let's not forget
about pocket here. There we go. You can also
add a nameplate, right. I think that's something that can make our
character even better. Now let's draw here
our test tube. Alright. And now
all we are missing is the face with the
glasses and the hair. I'm being very messy
with this. It's fine. I'm not looking for
perfection yet. I'm going to clean my
drawing afterwards. Now I just want to have
all the details done. So yeah, this is it,
I think we are done. So now what I'm going to do is the last step or
almost the last step. I'm going to hide
this layer here, lower the opacity of
this second sketch, and then I'm going to
add a new layer on top, pick up my brush,
and I'm going to go over my sketch with
some clean inart. So here, I'm not going to
come up with anything extra. I'm just going to go
through my sketch, through all these lines
with a clean inart. Alright, so I think
this is mostly it. Now, all I have to do is erase whatever I don't need
in this drawing. So I'm going to go over my shivy template and erase
all those areas I don't need. Alright, I think this is it. And now, finally, I'm
going to add some color. So I'm going to add a
layer below my lines. Then I'm going to grab
my paint bucket and start choosing colors and
adding them to my drawing. Very quickly, just like this. So basically, if you
recent clip studio, what I do here is have this option refer other layers
on my paint packet active, so as I'm coloring, clip studio will take
into account my layer, my Line art layer in here. So that way, the color
won't go beyond the lines. Other drawing software have
something similar to this, and it makes coloring
much quicker. I'm going to add for the hands. Instead of painting
them with a skin color, I'm going to paint
them blue just like my character is wearing some of those gloves. There we go. Now the glasses
were almost over, and now for a little bit extra, I want to add some color to the lenses here as
well as the test tube. So what I'm going to
do is I'm going to add a new layer on top,
lower the opacity, and now maybe you
can keep this color, use our pint pocket and add some color here to
the glass stuff. Maybe a bit less even. Yep. And now, just for
a little bit extra, I'm going to add some glare effect to the
glasses. All right, there we go. So our scientist is done. As you can see, I took those
references as inspiration, went through two sketches, and I just realized
I forgot about the pocket and the nameplate. So let's add that
very, very quickly. Here in the nameplate, pencil, and let's scrap the
blue again for the pen. There we go. Now,
yes, we are done. So as you can see, I think
adding these little bits of accessories or details make our character pop
up even a bit more. It's not just a lab code, there's something else in there. So that adds to the fun. This is it for our
scientist character, our scientists chevy character. Have fun with it, explore
different combinations even. So yeah, take your time,
and once you're ready, follow me to the next video.
4. Drawing A Chef Or Baker Chibi Character: All right, so, welcome
back. This is going to be the second profession
we're drawing, which is drawing a chef
or baker Shiv character. Once again, I have here my references that
you can download, so don't forget to do
that if you want to use those references as well
as my Chibi template, which is also available
for you to download. And once again, we're going
to look at our references, see what they have in common, and try to come up with something
for a shibby character. All right, so first
thing I notice is we either have this kind of code full of buttons right, buttons all the way down or we have something
more for a baker, perhaps with simple t
shirt and an apron. So we have two choices here. Do we want to go for a more traditional chef look
with the coat and some white pants or do we
want to go with something a bit more casual with
a t shirt and an apron? It's totally up to you the
same thing with the heads. So we either have something
like this, right, or falling down to the side even or just a simple head
that's close to the head. These are options here. I'm sure you can find more chef heads through the Internet. But one thing stands
out with all of them, although some outfits
might change, but it's mostly white. Everything in the
outfit is white, and sometimes we might encounter
a black or a dark blue. But in these cases
with these references, all the outfits are in
the color of white. So the first thing I'm going
to do is drosom shapes. I think I'm going to go with a more traditional
look with the buttons. So we're going to start
by one rectangle here in the neck because some of them have this high color, right. Now a trapezium shape. I'm going to make a line here so I know where the buttons
are going to be. And then the sleeves, two rectangles for the sleeves. Let's make this a bit shortly. So we have the pants below. So I'm going to mark here where the bends end and
the shoes stop. Now as for the head,
rectangle like this, and then something
like this, perhaps. Yeah, we could do this.
So as you can see, very rough, very messy. I just want to get things down on paper on my
canvas in this case, and now we can explore a bit
more and add more details. So let's do that. Let's lower the opacity of our sketch here, and you lay on top
a darker tone. Let's go in and
finish our sketches. I'm going with shorter
hair this time around. As you can see, I'm exploring
my drawing as I go, my outfits, all those buttons, all the pants, very simple. No pockets here. And let's
add some shoelaces here. So we have some
detail in the shoes, and we can differentiate
the pants from the shoe since they're all going to have the same color.
This is mostly it. This is my chef character
here. My sketch is done. So once again, what
I'm going to do now is go over my sketch with
new and plain linear, just like we did in
the previous video. Alright, so here we go. Line art is done,
so now all we have to do is add some colors. Now, you might have
noticed that this time, I did not draw any
extra accessory because I think that the outfit itself is very
telling right away. But you could add
something maybe a spatula, for example, a fork, a pen. I know, there are many options there that you could
add to your character. So have fun with
that and think of an accessory to add to your chef character.
That can be fun. Look up some references and then draw it using the
exact same process. Shapes, first analyze
your reference the searching for shapes and then just develop your sketch with some more details
and then your lineup. So I'm just going to
color this character very quickly. And there we go. My character is finished. As you can see, it's very simple since the clothing
is mostly white, so I don't really need to
add a lot of color here. But this is it my
chef character, once again, using the
exact same process. Don't forget to take your time. You can try different sketches, even in different outfits. You can mix and match
different things. Above all, just experiment and have fun with the
process, alright? That's the most important thing. And whenever you're ready, follow me to the next video, where we're going to draw
an artist hivy character.
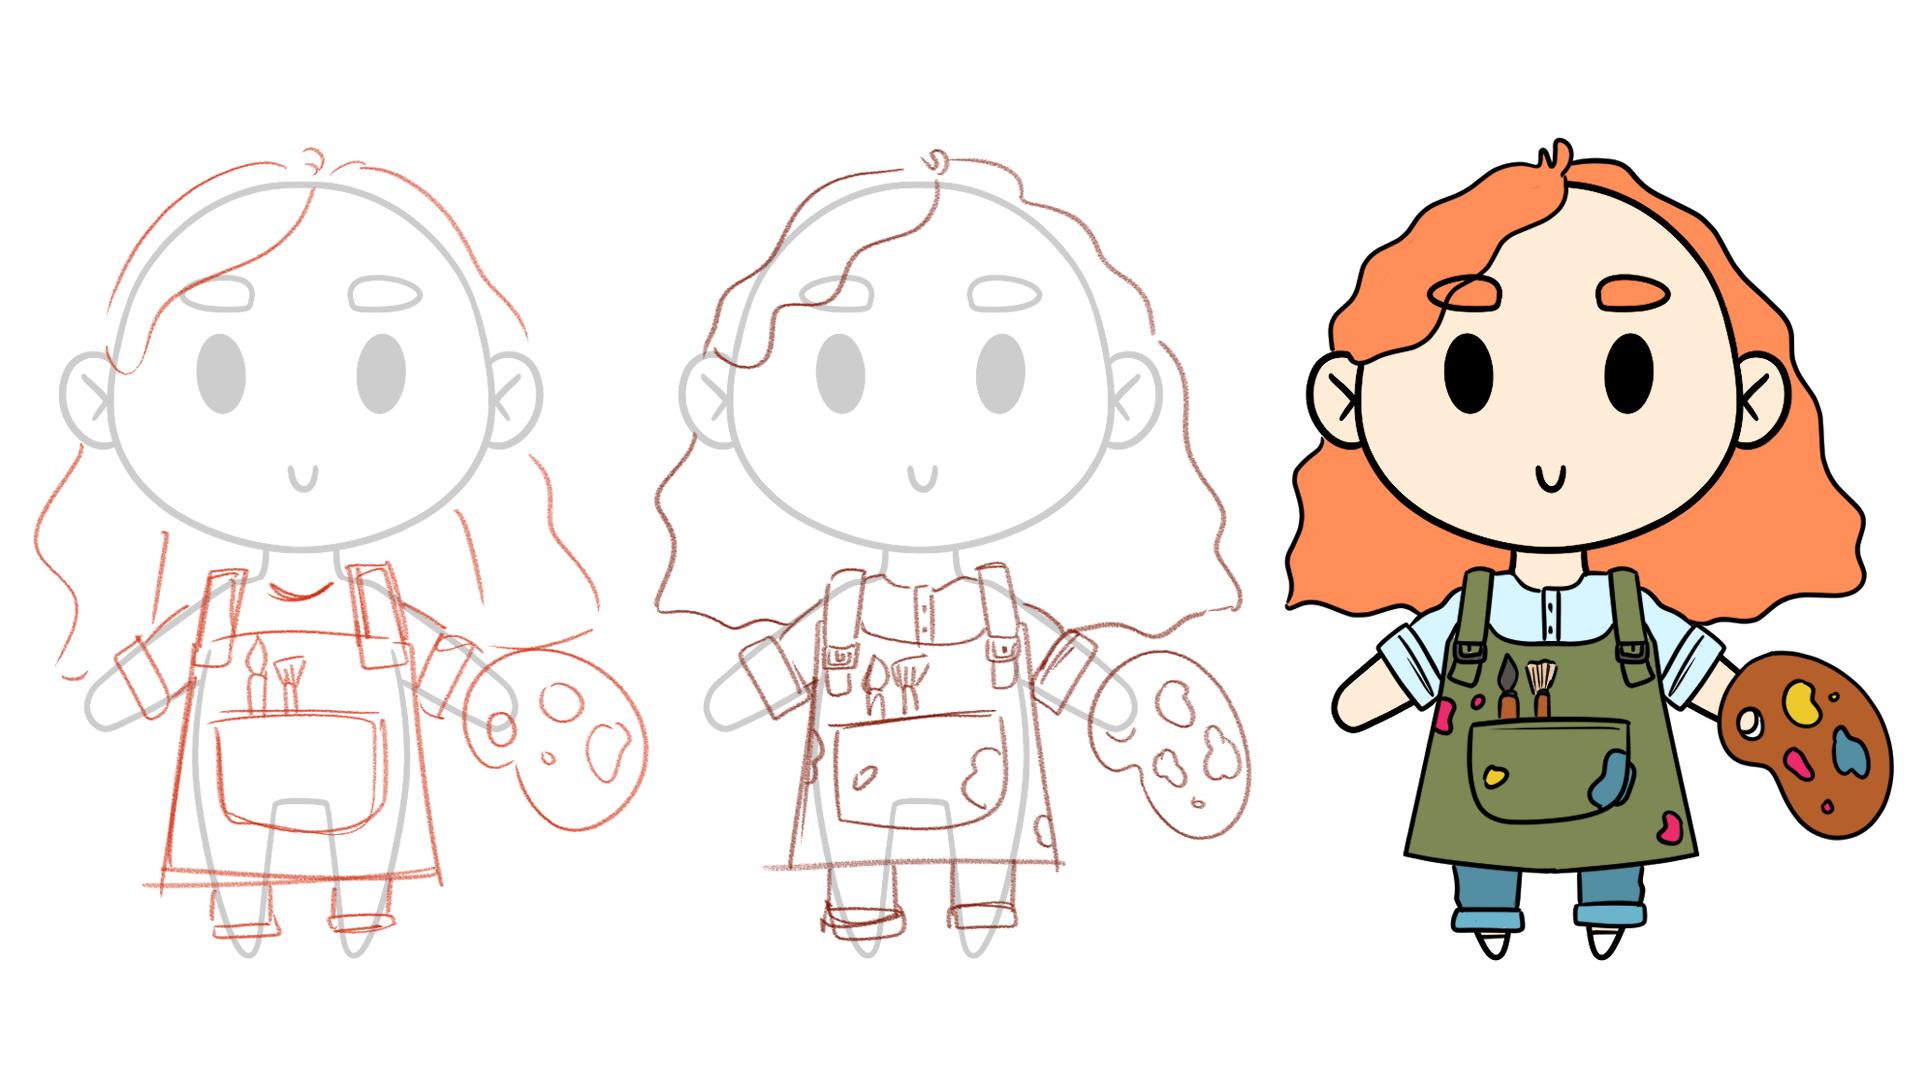
5. Drawing An Artist Chibi Character: Alright, so hello
and welcome back. This is going to be our
last hobby character. And this time, of course, we're drawing an artist. So once again, I have here my Chibi template and
my reference board. So don't forget you have all of the available
to download, so feel free to do that, or you can draw your own Chibi
from the start and use it. It's totally up to you, and you can even look for more references if
you're feeling like it. An artist will be using very mostly comfortable
clothing, comfortable, but normal clothing,
and then wear an apron so they don't
get their clothes dirty. So the apron is always
present in these pictures. We also always see
some brushes right and maybe even a palette for
us to put the paint on. So for me, these are the main features from
these references, and I'm going to
definitely draw an apron. I'm thinking about this
pocket with the brushes. I think it can be fun
to add it and maybe use the paint couplete
here. Oh, yeah. These are some ideas for now. I'm going to lower the
opacity of my chibi, and I'm going to
add a new layer, and I'm going to draw
some shapes first. For the apron, I'm going to
go with a trapezium shape, almost rectangular shape,
and then two rectangles, one on each shoulder. And now let's not
forget a pocket. So for now, this is it. For the inside clothes, let's go with a simple t shirt. We can even maybe draw like a shirt with sleeves rolled up. I think that can be fun
and just some jeans. There we go. Now
as for the hair. Oh, let's not forget
about our brushes here. Let's draw those right away. There we go. You can draw
more or less brushes. It's totally up to you. I like to keep
things very simple, so I'm going to
leave it like this. And now let's draw the hair. Something a bit
longer this time. How do we feel about it? Think that can
work. There we go. And now we can add
something like this with paint. Yeah,
I think this is it. Simple, but we can immediately tell what kind
of character we're drawing. So the base sketch with
the shapes is done. So I'm going to go over my sketch and add a
few more details. Lower the opacity of
your first sketch. I'm going to pick
a darker color, and then I'm going to
go over everything. First thing I'm doing is draw here the straps a
little bit better. Or with some more details, I'm not being perfect
with this sketch. This is still a sketch, so I'm treating it as such. The chins. Now, let's not
forget about this. So paint. We can even had some bits of paint here
and there in the apron. And all I'm missing is the hair, curvy air this time around, just for things to
be a bit different, and there we go.
My sketch is done. So once again, all we
have to do now is go over our sketch with
some clean innards. So I'm going to add
some transpiracy here. Now I'm going to add
a new layer on top, and I'm going to go
all over my sketch. So I'm going to pick my brush, the black for the inart color, and now just going
to draw everything. Alright, so my innards is done. Now, all I have to do is
erase the parts I don't need. All right, so now
I'm going to add a new layer below my line notes, and add some colors
very quickly. All right. So this is
it for my artist Chibi. This was our last Chibi
profession for this class. Once again, take your time. Don't forget to download the references and the
template I gave you and follow me to the next video where we're going to talk
about your assignment.
6. Your Turn! Assignment: Hello, and welcome back. Before we end this class, I want to very quickly tell
you about your assignments. We went through different
chibi characters and how you can draw them. Your assignment is to pick
one of them, and draw it. Then just post and share
your drawing if you want, and don't forget to download a template and reference
boards to help you out. If you need more
specific references, feel free to look up your
own in places like and splash and pixels or even
Google or take your own photos. And above all, have fun
drawing your Shib characters.
7. Conclusion (Before You Go!): Hi, again, artist. Congratulations on
completing the class. I hope you had a
fantastic time learning how to adapt a simple Chibi into recognizable professionals
from the lab coated scientist to the inspired artist. Thank you so much for joining me on this Chibi
drawing adventure. It's been a joy
guiding you through the process of creating
this tiny professionals. Can't wait to see
what you create, so please do share your artwork. If you enjoy this class
and found it inspiring, please consider
leaving a review. Your feedback is incredibly
valuable and helps other artists discover the fun of creating Shiv characters. Keep practicing and
most importantly, keep on drawing.
See you next time.
 Patricia Caldeira, Illustrator | Digital Artist | Designer