Transcripts
1. Introduction: Welcome to this class. As you can see in this class, we're going to draw and paint my favorite flower to flower. I really liked the color of this flower. I like these petals which almost look like flowers themselves. All these details. A really great flower. And what we're gonna do with it. We're going to draw it in my favorite method, and that is quick sketching. We're going to quick sketch in Procreate. But we're not only going to sketch, we're going to paint this beautifully. I'm showing you some painting techniques. We're going to create a nice matching background with it. I'm going to show you some shadow techniques, also some light and shadow on the flower itself. And step-by-step, I'm going to take you through various techniques to create a lovely result like this in Procreate. So from the basic sketch to the final details, join me in drawing my favorite flower. So let's start sketching in the next lesson. See you there.
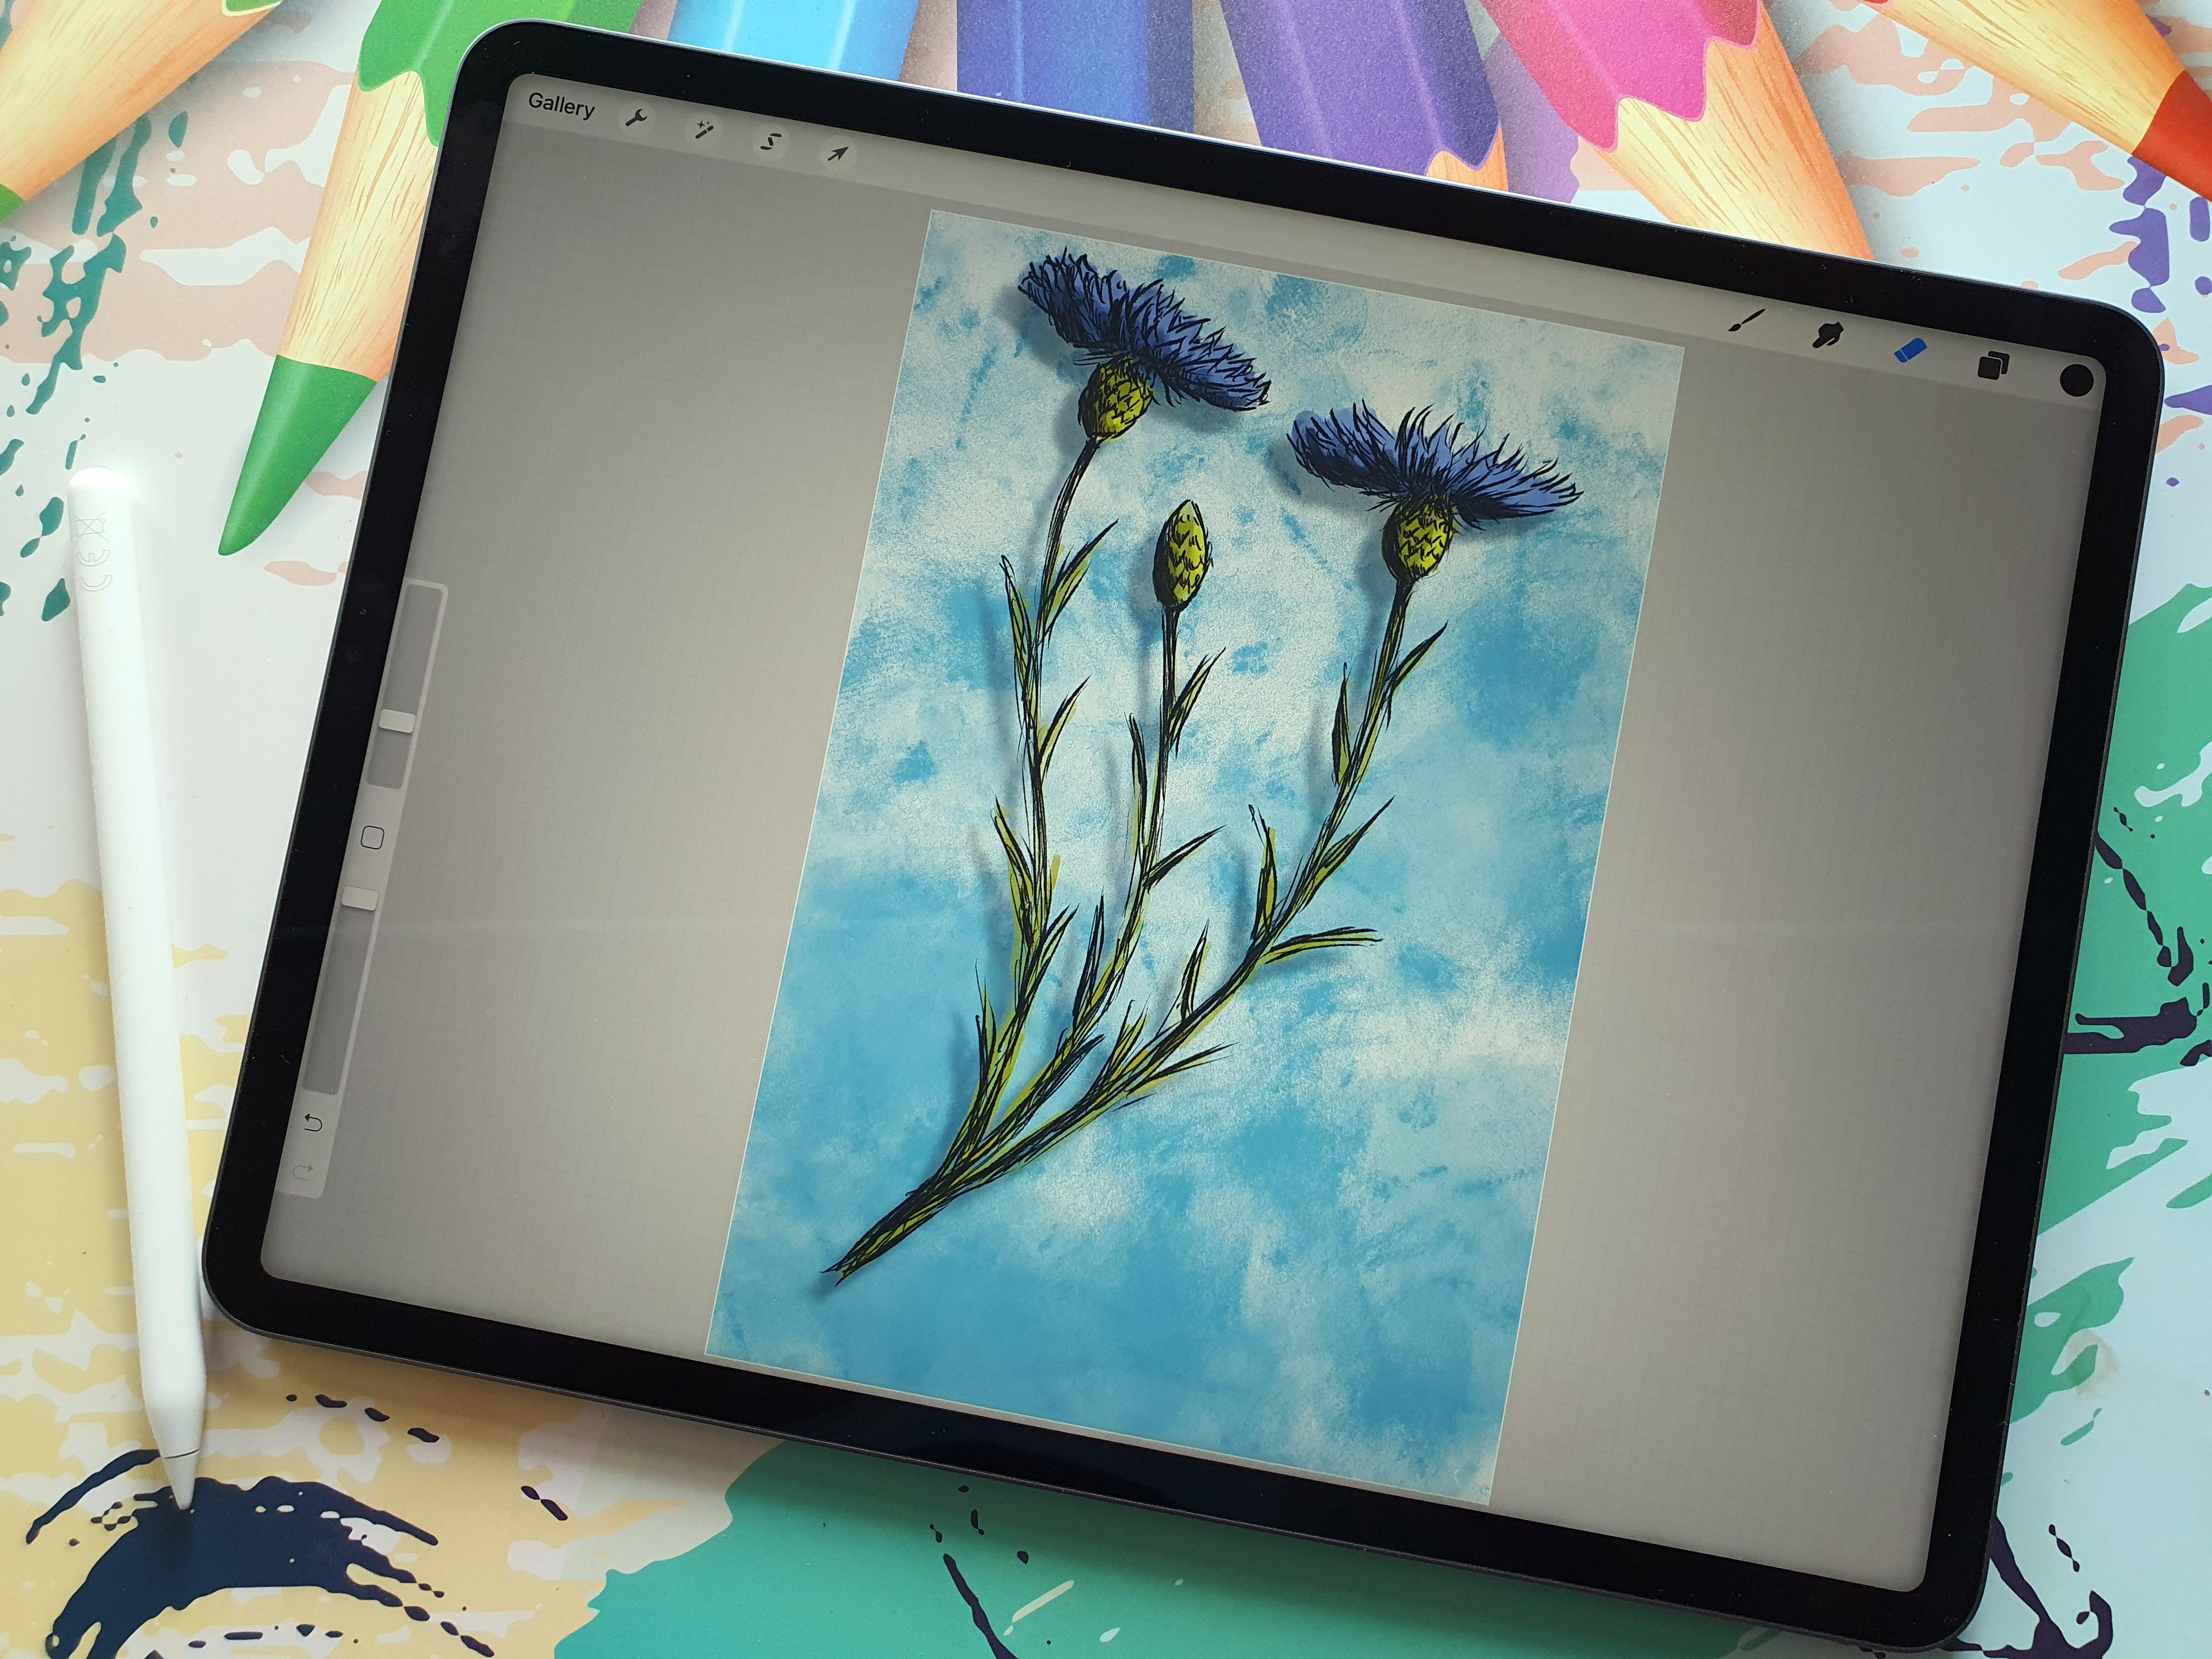
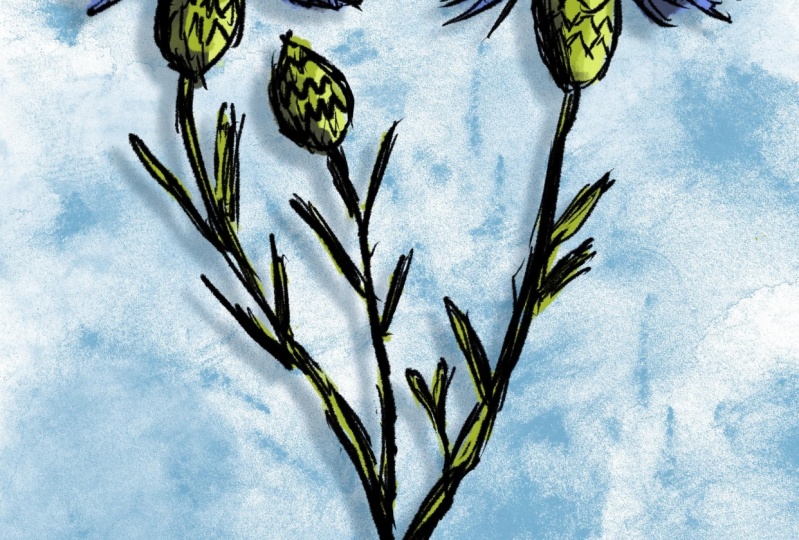
2. A Sketch starts it all: Let's start this lesson and we're going to draw my favorite flower. And that's the corn flour, or also called bachelor flower. Really like that flower, right? I've started up Procreate and it brings me to the gallery. So, and we're starting there, we're going to create a new document. And we're going to use a bit of a size where this would fit. So I'm going to say about a two by three size. And what we're gonna do, we're gonna do, hit this plus. Then we're going to say new canvas. And I'm going to call this a 3 by 2 canvas. Now the width would be 2000 pixels and the height would be 3000 pixels. Then we have a two by 33 by two sides. The DPI you add to a 100, unlike 300, in case you just want to print it later on than 300 dpi is grades. Now the color profile, I'm just leaving at SRGB and the rest, I'm not going to touch and I'm going to say Create. So now creates a new canvas with this size. Now, this is not probably totally printable size, but on a four, this pretty much would work. And on a letter size, I'm assuming this pretty much would work too. All right, so we've got this pretty flower now and what we're gonna do, we're gonna start out pretty simple by drawing it from the sides. And let's go. So I have the flower. Now in the notes, there is a picture supplied from the flower. And you can also look it up online or if it's growing around your area, would say draw at life. Now there's a few things to note about this flower. It has a stock. It has very thin, long leaves. And it grows out of this pot really much the flowers com, as you can see here. And then it just has this beautiful flower or go from the middle and there's the heart of the flower too. We're going to draw it from the side first and we're going to, of course, quick sketches. So I'm not gonna draw all these little details, but I want to give an impression of this flower because when you're out drawing in the field, you don't want to spend ages probably drawn. You just wanna do quick impressions of the flowers and later on, you can always take a photograph and then create a much more complex image of it if you wanted to. But for now, a quick sketch. So what I'm going to use is I'm going to go to inking? Or should we go to drawing first? Let's think. Let's go to sketching has changed my mind. Let's do a sketch first for the sketch, I'm just using an HB pencil. Now for the column, I've got the basic color palette, and I'm going to pick a gray color for this. And let's see, we have one layer. The size of this pencil will be all the way up to bigger size and also the opacity is all the way up. Now. This flower is quite interesting, but it is quite, relatively easy to draw. And what we're going to note first, I'm going to note, I'm going to look at the dimension. I'm going to say, well, this should fit nicely into Box. Part fits nicely into the box, but of course, this doesn't fit into bugs. But we're going to start with this one to start with defining how large I do want my actual flower. And we're going to decide how to put it now normally it would, it grows in all kinds of direction. But basically the flower is pretty straight up always with this kind of flower trying to reach the sun, following the sun. So pretty much straight up. So I'm gonna do it straight up again like this. And we're going to start with that rectangle. I'm just going to draw a rectangle. We can do that in two ways. We can sketch it. Just catch a rectangle, no discourse fairly quick. The second way would be if you sketch a rectangle, you would hold your pencil and draw a rectangle, then you get this polyline, you say Edit Shape. And in this case it's a polyline. I could make a nice rectangle of it. So you'll pick one of these corners. Not totally on the corner, just outside. And just make a nice rectangle of it. Alright, so that's the two ways to do it. And when you're done, I'm just tapping that little arrow and then it's done. Okay. So whether one is better or not, I'll leave that up to you. All right. I'm going to remove this. I'm going to stick to, well, let's keep this rectangle one and remove this rectangle. So I'm going to quickly erase it. Now, this rectangle is in the wrong place. So what I'm gonna do, I'm hit this arrow and I'm going to move this rectangle up to above where I wanted, I want this flower in the corner. Then it goes like this, and then the other parts come and we might just draw in a second flower. That would be nice. But start with 1 first, so that will be the first. Now I want to determine about the middle of this flower, since I want the pot in the middle, um, I just felt Sumerian and the middle would be, um, got my eraser still around there. Now what you could also do, you could put a grid behind it and determine the middle. Exactly. But I'm not gonna do that. This would be about the middle. And that's where my pots we'll come. All right, now let's start with this. Pop them. And I'm just drawing in quickly the shape that pot has while I'm looking really at the flower. And that is for now quickly. And it has these little leaves if you can see them through the camera. And I'm just drawing in those little nice lie right away through the middle. And that makes it. And I'm doing that as you can see right quick, that makes my flower complete. Now, this will be the petals they go in here. And I might have had my square a little bit too high, but then I just cut it off right here. And I got to put the flower where I can see it from the straight top, you see a slightly different angle than I do. Now what I see on here are these little petals, the heart of the flower coming out. And the flower is growing out of that pot. And now I'm just going to draw in the petals. Now, the petals are, you'll cut up. These are singular petals shaped. In 1234 fingers. That's called them fingers for now. So four fingers, 1234 fingers. And then we need to bring that petal in like that. And we'll do that quickly here too. We'll do it here. And we'll go like that. Now, as you can see, this goes really very quickly, very roughly. That is the whole idea. Now, there you go. Now, that would be one way to do it. And one we're going to ink, we're going to get rid of all the extra lines. So there you go. Now theory, you could have done this box in a different layer two. So you could work with various layers. Now, if you look at mine, you're going to notice right away you're going to say that Paul is way too big. Yes, it is. So what we're gonna do, wanna make sure I'm going to make this part now smaller to get the right size proportion. And I'm going to show you how to do this. Now I hit this. It's almost like an S. It is a ribbon. And normally it's on automatic, but I want it on freehand, so I'm pressing freehand. And what I'm gonna do, I'm gonna circle this part where my pods, right? And now I'm going to hit this arrow. And I get the dimensions, and I got this on uniform. That means if I slide one of these corners automatically, the rest will go with it. See. And then I'm going to say, okay, it's about this size. Picking it up and cut that part again and begin. So I've changed the size. Now I've got to move it over, slide it wherever I like. That's where it belongs. And I hit that arrow again, and that's it. Now that's a much better proportion, isn't it? Now I'm just going to roughly sketch in the stock from the middle. And it makes that nice curve. And I might just as well thicken that a little bit. All right. And that would be the quick sketch of my time, at least the first one. Now it's got some leaves, we said, but those leaves are really thin, small leaves now here you can see them a bit better. Some going out like that, some stay close to it. And up there, we do one day or two now that would be all the risks to quick sketching a corn flour. Now a set, we're gonna do a second one. We're going to follow. I'm going to do just this particular it looks greater, comes from here. And I'm just following this line where it goes. But since it's not in water, it's going to hang a little bit, but in real life, It's really up. It's not hanging that much. So it has the strength to go up and I'm doing it here. And I'm just going to draw in that little pots. And it's shaped like that. And those little lines, That's good. And it has those leaves two. And we can do them anyway. Like Now, look at that. Right? That's the first. Now I want to have third one with a bit of a nice curve that goes like that. And I want the flower on there. Alright, so I've cut this now. And now the easy way would be just to copy this part I've already drawn. So what we're gonna do, hit that ribbon still on freehand. Now you could put it on automatic 2 or a rectangle in this case, let's do a rectangle. Rectangle. Then we just move from one side to the other, since it is a rectangle, we select this part. They go and we get this. We're going to say hit the wrench there. We're going to say Copy. And it says selection copied. What we're gonna do now, we're going to say paste. And if all is well, our selection is just on top of it and I can just move it anywhere. I like. Now this one, I want to rotate a little bit since I've got this stock, a little bit like that, and that's this green arrow. And we're going to rotate it until I think it fits nicely. And I'm going to lower it a little bit on purpose so that it will stay in sight. My drawing a bit more angle it Dan stays Nicea comes nice on there. It higher up. There we go. And I'm going to hit that arrow. And now it's on there and it's on a new layer. Now if I don't want two layers for my sketch, what I can do here simply as with this Inserted Image layer selected, I'm gonna hit that layer in, I get a menu. And we're going to say Merge Down. And then now it's one layer, same. And that's my sketch. That's all there is for this corn flour. Now, the one thing I just want to do is sketch the stock a little bit longer. It's all coming from one stock, and that's it. Now, that is a quick sketch of a corn flour.
3. Finalizing the Sketch with a Pen: Well, that's, of course the first step. Now I want to ink this. This is just a pencil sketch. What I'm gonna do now, I'm going to ink it and I'm going to add a layer and to ink it in a new layer. I'm going to pick a different pen and I'm going to go surprise to inking. I like the ink bleed pen, but you can pick any other pen you like or dislike it. So I'm picking the Ink Bleed pen and we're going to see if I've got about the size I want from this ink pad. Know, I do want this a little bit thicker. Can you work the quicker it goes? Basically the smaller work with your pens, then you tend to get caught up in details. So I'm going to remove these. I'm going to check its onset for now. I do want it on 12. Let's put it on 12 percent. And that is a nice size. I like that. Good. And what we're gonna do now I'm just going to redraw all of this, but I'm gonna go first to this layer and select this layer where I've drawn and hit the end and just slide the opacity down to 50. That's good, right? And then I'm going back to my second layer. I'm created where the flower comes on. And you can actually rename these layers. Pressing on it says Rename here. So this would be my sketch. And then I would name this one. I would name inking. And if we use some color, then we're going to use the next one. Call it color. All right, so if I am on my inking layer now, I have my brush ready. And I'm just going to roughly, really roughly trace this starting at the pot here. And I'm using the same technique and I'm doing this a bit, just loose hand as you see quickly, some rough sketching motions. And as you can see, this refines this already a little bit. So there you go. There's these petals coming out right there. And I'm just going to draw in these petals here. And I'm following roughly the size, the petals I have create some of those fingers here too. And I'm reef while I'm drawing, I'm refining this a little bit. And to get it to look more like a corn flour. Now there you go. Now I could copy this, but I'm not gonna do that on purpose because if I trace this one again, so redraw it, then it will look slightly different than the first one. And that's the nice thing about redrawing it. Now as you can see, I'm doing this one slightly different. I'm styling at that. And now I'm going to go with this one in, starting at, starting at this point and bring it in a little bit. And I get a slightly different shape already done that one, right? And up here we're just going to add some quick lines. Let's turn this a little bit so it's straight, starting again with the middle. But I'm going to on purpose, do this one bit shorter and then create a second one on top of it. So that I get basically a bit of variation. And there is that one. And now here I need some of these forefinger flowers too. And I'm going to need some here. And what I'm gonna do with this one, I'm going to add a little bit of dimension. And if you look from the side a little bit, you see some more petals. So I'm just going to draw a couple of petals on top of it to give it a bit more body, and that's it. And now it looks totally different. And then this one, well actually in theory, when we started, it was exactly the same one as this. But now if I hide this one, see I got two totally different flowers. And that's the idea. Don't want to copy and discipline. I have some more flowers or want to go with this one a bit nicer. And this one I bring in some of those lines of the hard lines, folds, day go. And there are my corn flowers, at least part of it. Let me do this one too. That's shape. And roughly do dose petals. We've seen day you go. And now I'm just going to start with the stock. And quickly sketch that in bit thicker at the bottom. And now we need some of these flowers. I give them a little bit of body. And there you go. When he does stock, that joins in the other one. This might go a bit thicker. And if you make a mistake with sketching, you don't like it. Just, I would say, use the Undo button and go a little bit there. That looks good. And the last one, there you go a bit thicker. And this one, I totally forgot to do some of these leaves. But since they're not hard to do, let me draw them in now if you want to sketch first again, then of course, do that. Right. Now. That's it. That is a beautiful cone flower. Let's hide the sketch. There you go. Now look at that. Great, isn't it? It's a bit plane. So we're going to do something about death. Next step we're gonna do is we're going to do some shading, but we'll do that in the next lesson. We're going to stop for now if this lesson. And in the next lesson we're gonna do some shading and add some color. All right, see you in the next lesson.
4. How to add Light and Shadow: I've got my sketch and we're gonna do something with this sketch. I just want to have a little bit more body here. And that's it. We're going to shade it a little bit. We're going to add a new layer under it. And I'm going to call this one shading. And there you go. And what we're gonna do, I'm keeping the same brush. I want to add a little bit of shading to it. Now we're going to go with my brush lower to about 7%. And what I want to do, I'm going to simulate some light effect on it. And I'm going to pretend the light comes a little bit from this corner. That means if the light comes from this corner, everything opposite the corner is darker. And we're going to just paint in. I like this under here too. A little bit of light of sorry, of shadow. I'm going to do it here too. And then just short strokes, not really hedging, but just some short strokes to create little body where shade would be. Zoom in a little bit, little bit here. Okay, and I look at that, that looks right away as if it has some little bit of dimension. And we're going to work with a bit of color. So we're not going to do this too much. Stick with this one too. Right? They're right there in those where those leaves are. And let's close that up a little bit like that. Now this one seems disconnected. Let's do something about it. And some lines paint in a little bit of detail. Lines here to hear a little bit more than scaffold, be quite some shade. Got to do that. Dare to create some shade there. And now I'm drawing in just some lines just away from the light. Basically. One, some on here too, on the back there, on there. And then create some more dimension by a two. All right, Now look that, then I want some shade of these pods. Sorry, I'm below these parts, simulating some lights. And on one side, I'm going to thicken this corn flour a little bit. And I'm doing the same with the leaves. Let's do that at the bottom a little bit. And on the side away from the sun. This one needs some SHA-2. And as you can see, we're keeping this really roughly as it is after all, a quick sketch before do this detailed just will take obviously a lot longer, right? I think that is pretty nice. Let's go back to this one. Had a little bit of specially on the bottom there. More lines so that it gets connected to the part. And you have the idea of some shadow and shades going on. Alright, good. That would be it for this shading. Alright, short lesson, this one. And you could keep on going, but if you do that, that defeats the whole purpose of a quick sketch, doesn't it? Look at the difference we've done this and if I hide that one, look, we started here and then we added the shading and see how much different that's makes, how much nicer this looks. Now, this is pretty much done for a quick sketch, but some color would be great too. So we're going to do some color while we, yeah, we do that in the next lesson. See you in the next lesson where we're going to add a little bit of color to this little bit of a background and then call this done.
5. Painting the Flower: All right. You decided to add some color and you don't have to. You can stop here, but I'm going to add some color and for that, I'm going to add a new layer. So I'm going to hit the Layer button. I want that under the shading. So I want that actually at the bottom. So I'm selecting this sketch, I'm hitting the Plus. I'm going to rename this right away and I'm going to call this color. And there you go. And look at the flower. It's a bit purplish and green there. So I'm going to need, and we're going to need a brush for that. We're going to do, Let's see, painting. We're painting. There you go. We have some choices. Spectra and like the sound of that. Let's pick spectra for this one. I don't have the shape around this one, but lighter. So I'm going to try to mimic this. Then would be in-between here, the blue, but also it is bluish with a slight let's look up here now. That is way, way, way wrong color. It's definitely lighter. I might go for around this column. So let's do that again. I hit that purple one but I wasn't the one. That's not good. So that's totally on the other side. So if I'm using this one as starting point again, but that is too dark. So what I'm gonna do, I'm moving this over towards the blue. And I'm moving this over to a lighter column. There you go. But I want a bit of purple bluish, but not too much. This would be too much. This will be around size. This will be two lines. So I'm going to go for this color. So bit picking. Now there's tricks to do this. You could take a photograph and bring it into procreate and unleaded make a color scheme. You could do that too, but we're not gonna do all of that will just kind of pick roughly a column. So I've got that spectra and I got to see how big it is. It is a big brush now. I don't want it this big. So I'm going for 67 percent. Let's give it a try and make sure I'm on the color layer. And I'm going to paint this in our yes, look at that. Really nice, slightly dark what we're gonna do something about that. And you can see, I am definitely not following the shape. Who kind of glued a little bit. Light on 4%, hit some of these bottom. I'm just going to do it really roughly. Now. Good. Let's see how this spectrum brush. If it works well, we're gonna do on top of it a lighter color. We're keeping the same column but going to the really light shade like that. So a nice light shade we have now. And we're going to add that one on top of it. And I'm just hitting some of the top areas. Yes. Looks good here too. So that we simulate a little bit of that some day ago. Alright, now, look nice. Now what we're gonna do saying with this, we're gonna go to the much darker sides. And we're going to go for free percent. And I'm going to do a little bit of the bottoms like that little bit of this site and create some light and shadow in it right away with painting and that makes a pretty, pretty flower now I don't like my painting work there, so I'm using a heart blend. But I might go for a soft, soft airbrush, medium soft airbrush. The size would be about 5% would be good. To just correct a little bit of this because it's really too much out side of my line work. So there you go. I'm leaving some outside to now. Dead are my cone flowers. Look at those. Now we're gonna do this one, same spectrum brush. I'm going to keep it under 3%. I think I had, is pick a green. This green will do debt green, you are discrete molecule. Let's go for this green. I'm just painting it in again on the same layer. That is nicer. All right? And I want to simulate light with this one too. So I'm going to the very bright side and on the side where the sun is. And painting in a little bit brighter there. And I wanted a really dark. So on the side one knows sun is, I'm going to do it like that. Now look at that. Now we'll go back to the original column. And I need a site about 2% would be good. And I'm roughly corner pains in the stock and the leafs. And again, roughly because we're having a quick sketch and is not an accurate. If you want to do an accurate, you could go from here and do a really accurate one. Use the same techniques but then slow down at more details to it. And now we're just what we're gonna do. We're just picking up the basic information of this flower. That's good enough. Now there's a mistake there. Definitely want to erase that. Don't like that. The rest don't mind. This one is a bit very much out of place. All right. I missed some there. So paint that in. Let's go over it, make sure I painted everything bit there too. And that is one pretty flower. All right, and that is a quick sketch of a corn flour. Corn flour from the site.
6. Adding Contrast to it all: I want a background. Don't think so. Well, let's do something else with this flower too. But first we're gonna do back and let's do background. So under here, under this, under this color layer, I want a new layer. I'm calling this surprisingly backgrounds. Backgrounds. There you go. And what we're gonna do, we're gonna create a background. Now, use that same brush. Let's go. We have that brush. Let's go of that really big. Let's use it instead of a paintbrush as a stamp now. So we're having that background. I need a total different color. I want to go with blue, but a blue that nicely contrast. So I'm going to go over light, this is too light. I'm going to try this blue. Let's give it a try. What I'm gonna do, I'm just going to write in the middle of my painting. I'm just going to press once and do that. So you get this. And I'm going to do that again, hit that again, hit that a couple of times. And I'm going to decide, do I like this color? Kinda like that color works well. So I've got this now as a background, but I want some more, a little bit more in it. I'm keeping that same brush. I'm gonna go for about 40 percent. I'm going to lower that opacity to about 40 percent two, and I'm just going to hit a couple of more times in it like this because I HIP have lower that opacity a lot. I'm keeping my background too. And I'm not pressing really hard. And they go That's more like it. And it's now on this edge away from the light. I wanted to be a bit darker rock if it does that for me. Thank you. All right. And there you go. Now, I do think this might be a bit too strong. The background, we can do something about it. Go back to the layer, keep that n, and we'll give you a slightly opacity till about. Let's go for about 65, 66 percent. Now the flower is popping off the background. We'll do one more thing, a little bit of trig. And what I'm going to, I do want some shared how that would look really nice to have some shadow behind him. And we can just paint that in what we can do it differently too. And for that, what we're going to do, I'm going to duplicate all of my layers except for the background, so the color shading and the inking. And to duplicate a layer, you just slide it over to the left and you see duplicate. I do that with my shading slider to the left and duplicate and with my colors slightly to the left and duplicate. Now I gotta make sure that these three are all on top of each other. And what I'm gonna do is I'm going to make a group of these, the shading, I'm going to move over one of the shadings, put it on top of the inking, let it go and create a new group. And two, if the color I'm going to pick up the color, move it to the same group, but now it's in the wrong order. So I'm going to move the shading above again. This is my new group. Now I've got the flower twice. I want that in this case. But what I want is I want this to be one picture. So what I'm gonna do is I'm hit that group and you get that menu. And you have some options merged down, combined rename, I'm going to flatten it, flatten it. And now I have a new one color. And if you look at that, this is just one flower and that's what I want. All right, I want to see everything color. What I'm going to do with this one, we're going to rename this to my shadow. There you go. I'm going to move it above the background. And I'm going to actually hide everything because this is not a shadow like this. But what we're gonna do, we're gonna make sure this is going to function as a shadow. And what I'm gonna do, I'm gonna pick a different brush. I'm going to get that grayish again. And I'm going to go back to my layers and I'm going to tap that one and you see a function called Alpha Lock. What alpha log dose is. I can now repaint this completely without going outside where I've painted. And I'll demonstrate that we've still got that spectra one. And what we need is a 100 percent, again, biggest good or doesn't matter how large. And I'm going to recolor this and see what happens. Because of the alpha lock. I'm staying nicely on top of everything, but it gets a different shape. Now we could use this shade or another. What we also could use is this dark blue. Pick the dark blue but go to the dark side, not this side, but keep it a bit dark blue like that. So the dark blue is now moved there. And I'm going to do the same. And you get a nicer tone of shaped like this, you're going to use this is nicer than the gray. And when I'm done painting, I go back to my layer. I can alpha lock it. Now it's a regular layer again, bring everything back. It's under there. But we don't see it. And I want to see my shadow. So I want to see the complete thing. I select my shadow layer. I'm going to use an arrow and I'm going to move it till I am seeing there it goes. I would say around there looks pretty good, doesn't it? Way too strong at the moment, we're going to do something about that. Right now. We've got a nice shadow, too strong, as I said. So we can go back to the layers and the shadow selected and we can see use that we could even use Multiply. Put this on multiplying and it's strengthened column. Now let's leave it on normal. It's good. C and we can add this. Well, about 40 percent. I am happy with that look. And that makes our picture, our quick sketch look totally different right away. Okay, there's one thing we could do still to the shadow, and I'm going to show you that we could also blur it a little bit, the shadow. And for that, we're going to use this magic ones here. Magic wand. And you've got a lot of options, and which one you need is Gaussian blur. We're going to use caution blur and we want to blur pretty much the whole layer. So we're gonna make sure that you have your right layer, your shadow layer selected. Otherwise this goes wrong. Back again, caution Blur layer. And what we're gonna do now, you're going to slide to adjust. Now I'm going to put my pencil here and look when I slide, see that's going to blur now it's away. Now it's not there. I'm going to blur it slightly, see colors nicely. I counted about 5, 8%. It says 6, 6% percent works. See, that is a nice blurred shadow and I'm hit that magic want again. And that's it. Okay, that, that looks a lot better now the shadow like real shadows on a wall. You could do a different background if you wanted to. I'm going to stop here. I'm going to stop this part here. And that would be it. So we've created beautiful cornflower of quick sketch of a corn flour from the site. Really pretty. There's some tricks to it so that we make use of Procreate the digital part. We did some traditional drawing really, and then took some tricks from the digital part and combine that into a beautiful quick sketch of this cone flowers.
7. The Project: Well, you made it through all the lessons. So welcome to the project. Now, obviously what you're gonna do is draw your own cone flowers. Now you can pick your own corn flowers. You can go to nature after practicing, just do it life there on location or use the photographs I supplied with this lesson, or take your own photographs, find them online, but just create a quick sketch in a composition with cone flowers. Now, you're welcome to do other flowers too. But since we're basically focused on the cone flowers, I would suggest doing that for the project, but hey, if you like different flowers, use the same techniques for a different flower. That is fine too. All right, simple project. Create your own composition with cornflower different flowers. And I'm just looking forward to what you will create posted. I will even comment on it, maybe give some suggestions. Just, let's have fun with doing this project. All right, enjoy it.
 Benjamin A, Art Teacher, illustrator Art by Benjamin