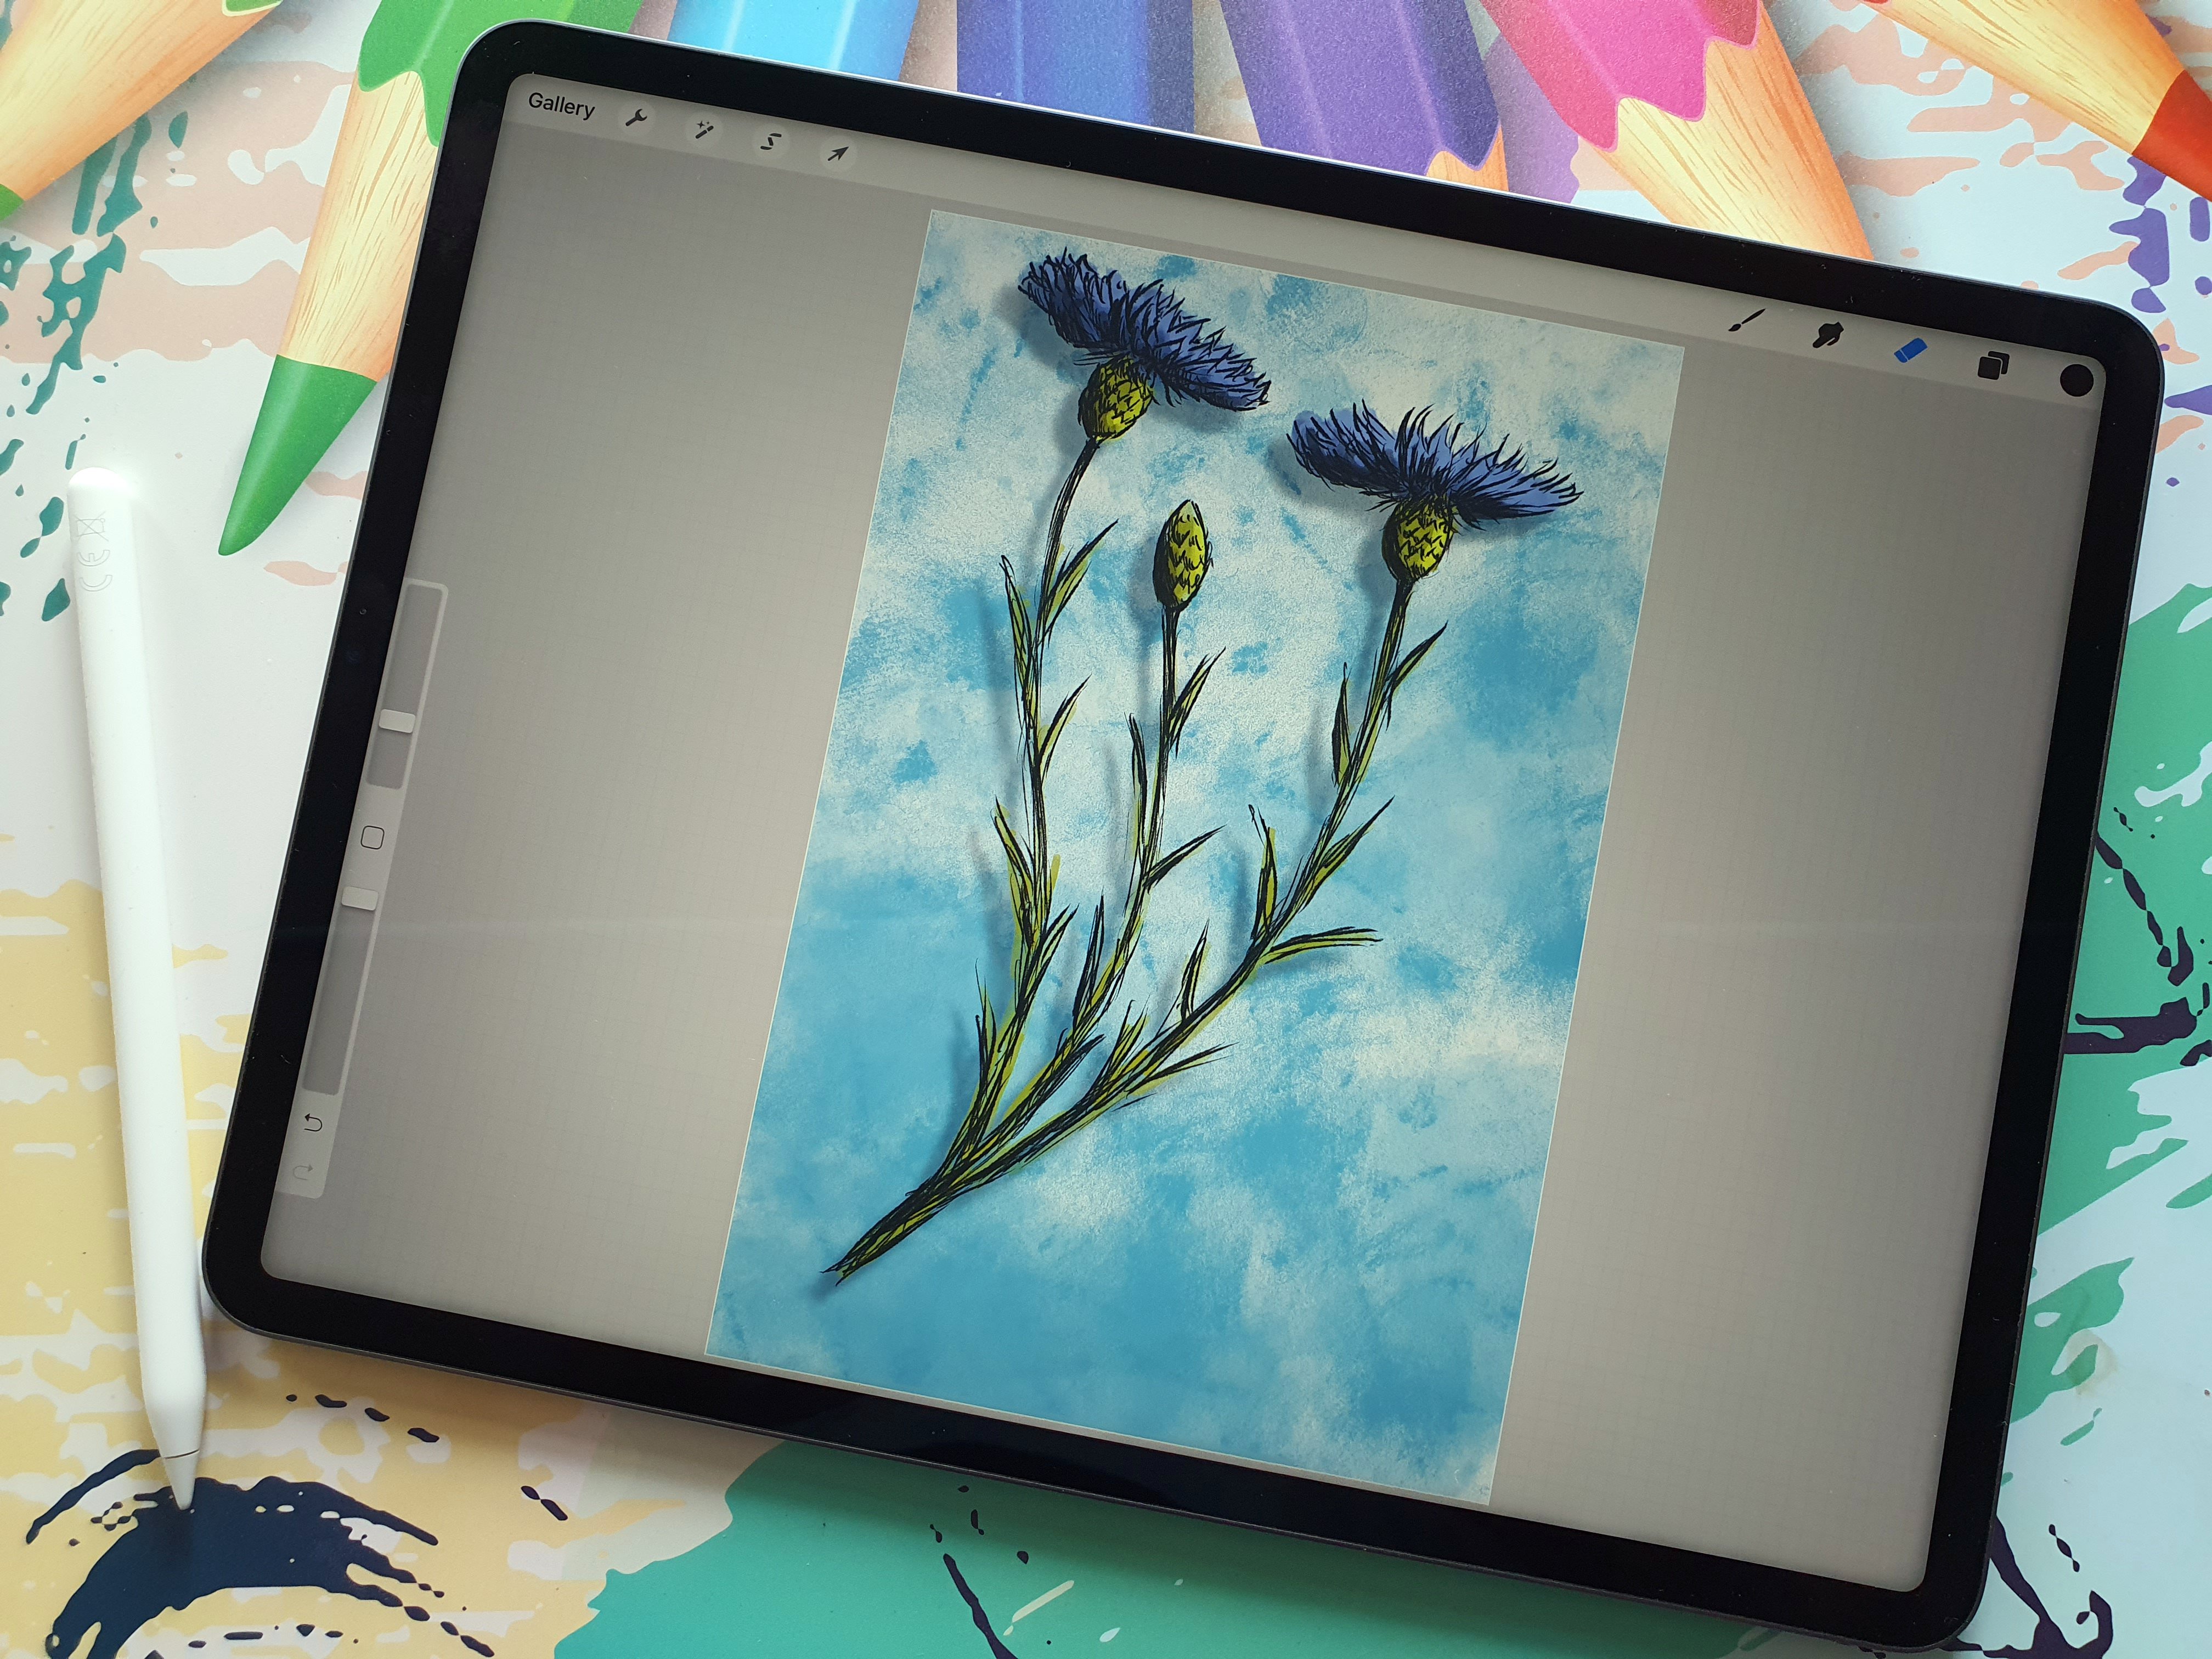
Transcripts
1. Introduction: This class has a
super long title. Let's see if I can
say that correctly. In one go. Let's give it a try. Continuing with n drawings. In Procreate it two steps while
creating awesome drawing. I'm going to check it. Yeah, I actually set
it completely, right? That's what we're gonna do. We're gonna build on
the previous class, where I've shown you a lot of pen drawing techniques to
create beautiful drawing. But it's definitely not. There is plenty more techniques
we can discover together. And in this class, we're
going to explore two more. We're going to look
at shadow lines, and we're going to
look at contour, shading and cross-country show. That's one. And then the shadow
lines combined two. Great technique to add
to the previous ones. If you haven't done
the previous class, I would recommend
doing that first. Unless you already know how to scramble and to hatch
and crosshatch. Then of course, move to the next lesson where we're
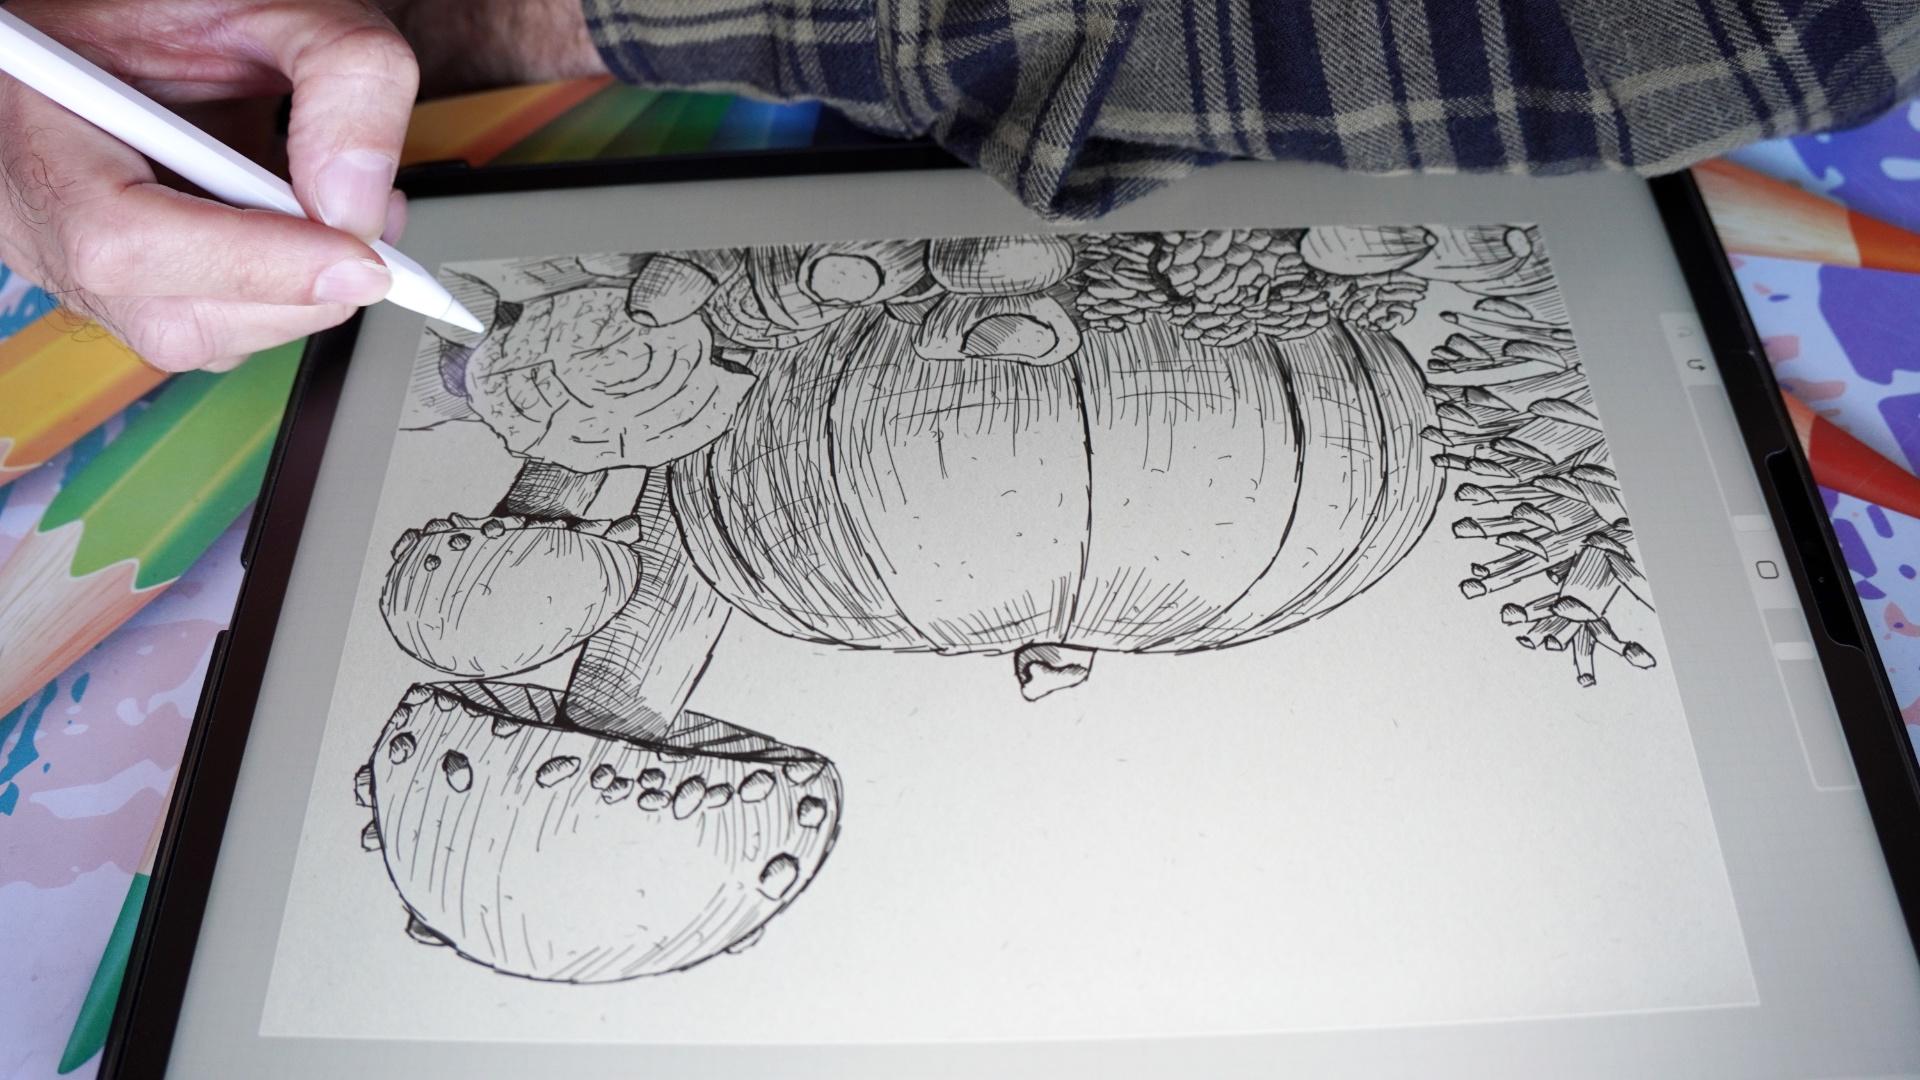
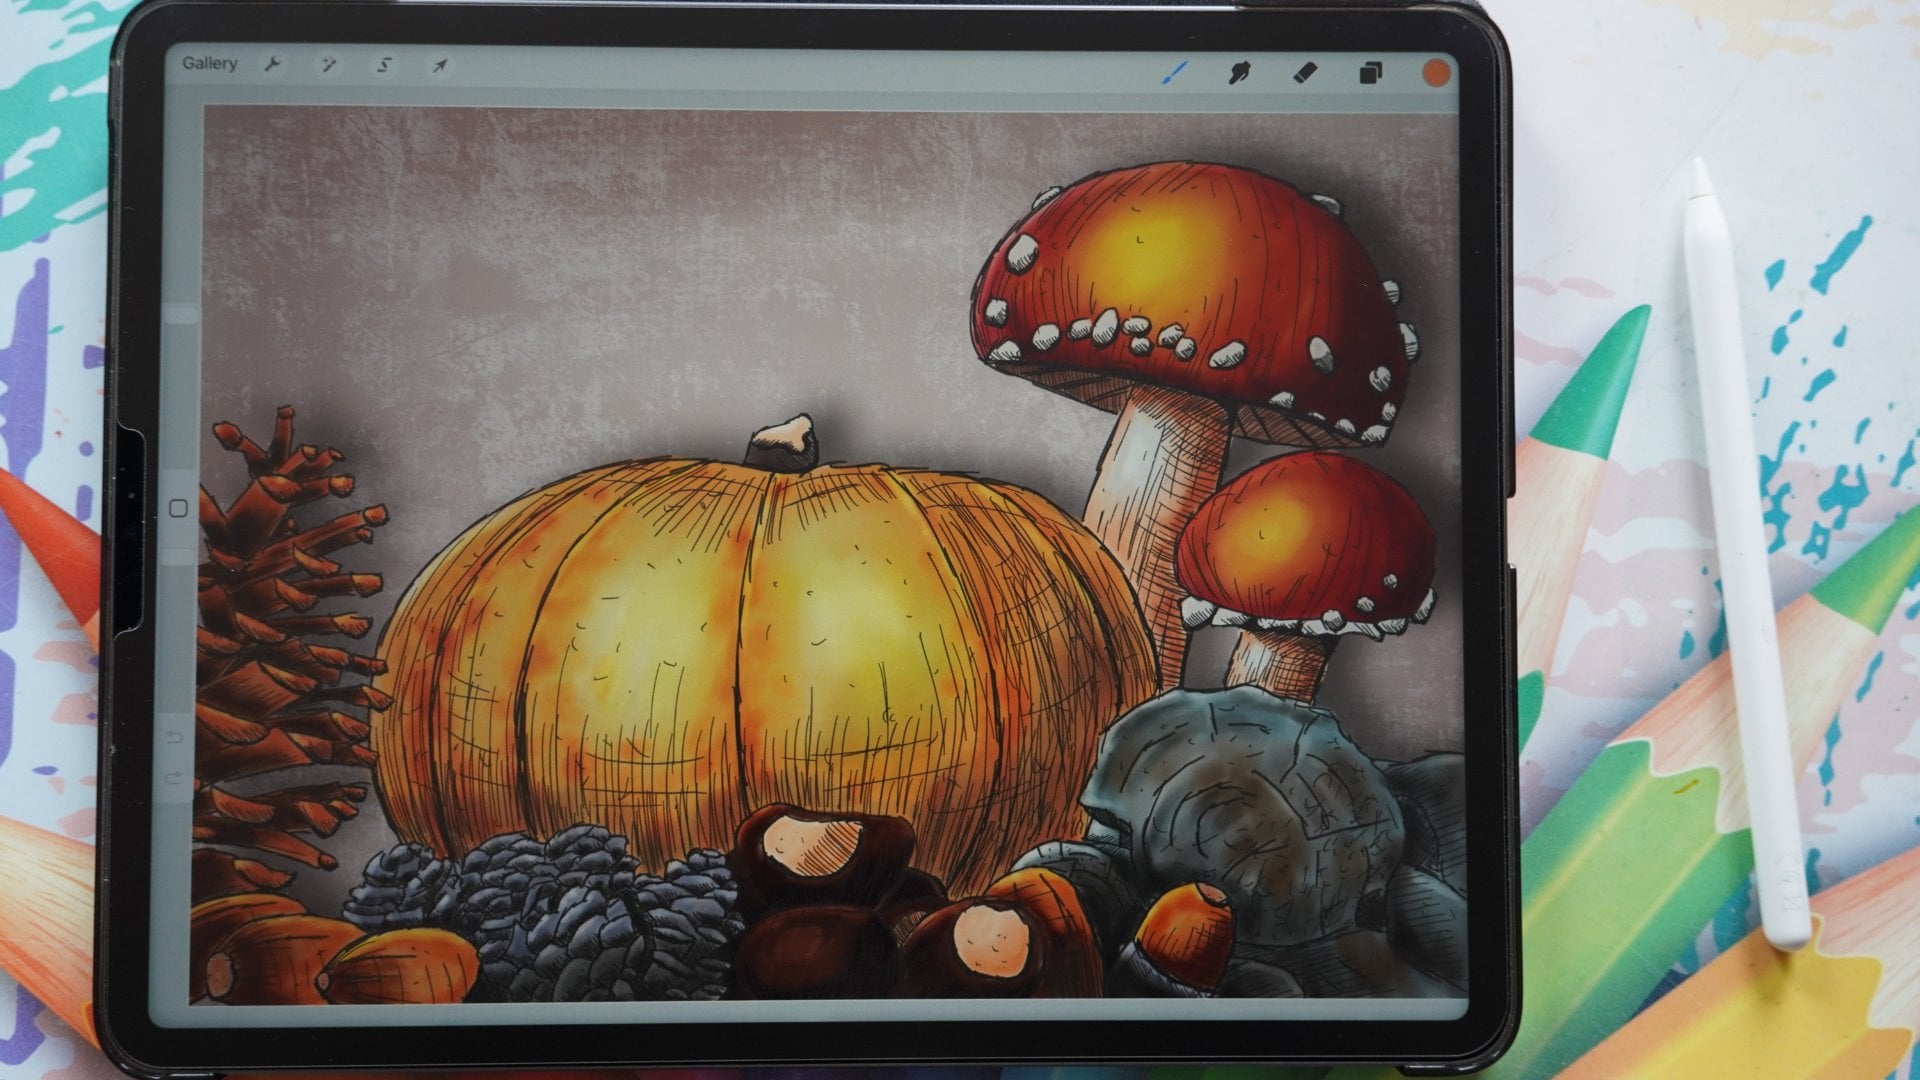
going to draw together, create a beautiful autumn scene. Since it is autumn here
in the Netherlands. I bought a beautiful pumpkin. I said, I want to create
a beautiful drawing. Just a nice compensation, or some pine cones, acorns, chestnuts mood in it. And of course, the
one thing that really needs to hear
in autumn toadstools, and I just created
a beautiful joy and we're going to ink. And once we're done
with the ink drawing, you got to make sure we keep it, store it away safely. Because the next class, we're
going to add some cultures. But that's for the next class. Let's start with adding two
steps to our pen drawings.
2. Getting ready to start: Let's look at what you're
going to need for this class. First, of course, you're
going to need an iPad. I'm using the iPad pencil, really recommend doing that. You need a brush set,
which I've provided, so you need to
download and install that on your Procreate. Then of course you need
procreate and you're going to need the
worksheet I've provided. And I've also provided a
little workbook with it and some photographs you could use a little bit as a reference. So we're going to draw today. So before we are going to draw, we need to set up a Canvas
and we're gonna do that now. I've already set up a Canvas, but I'm just going to
show you what I'm using. I'm using an A4. The worksheet is on that side. If you don't have
an A4 in your list, what you're going to
do is hit this Plus there and select
millimeters here. Then the width would be, it's a landscape towards
longer to nine to 7 mm. And the height would
be 210, that is an A4. The rest, I'm going
to leave as is. And we're going to say Create. Then we have a nice A4. The next thing is that you need to bring in that worksheet. Of course, I can look
for that worksheet. So you can say Add,
insert a photo. If you download this and
you find the worksheet, and there's the worksheet, it should fit right away
without you having to do any adjustments.
And there you go. The next thing which we're
gonna do is we're going to set the opacity of this
to around 50 per cent. Add a new layer. If all goes well, you already installed the brush
set called ABB pens with a number of pens
in it and color palettes. And find that pen colors, you need to set that as default. So we have our color palette, we have our pens, we
have our worksheet. So now we can start drawing. Now the drawing we're gonna
do in the next lesson, we set up the Canvas. Now we've got
everything we need, and we're going to move
to the next lesson. Now the techniques
we're going to do, we'll build on the
previous techniques. If you know how to hedge
already there no problem. You can go to the
next lesson if you don't know exactly
how to scramble, I'm going to show you
get a little bit. So even if you don't have the previous knowledge,
you could come along. But I would recommend doing
the previous class first to get all the knowledge needed
to do this at its best. Alright, good. Well, let's
move to the next lesson.
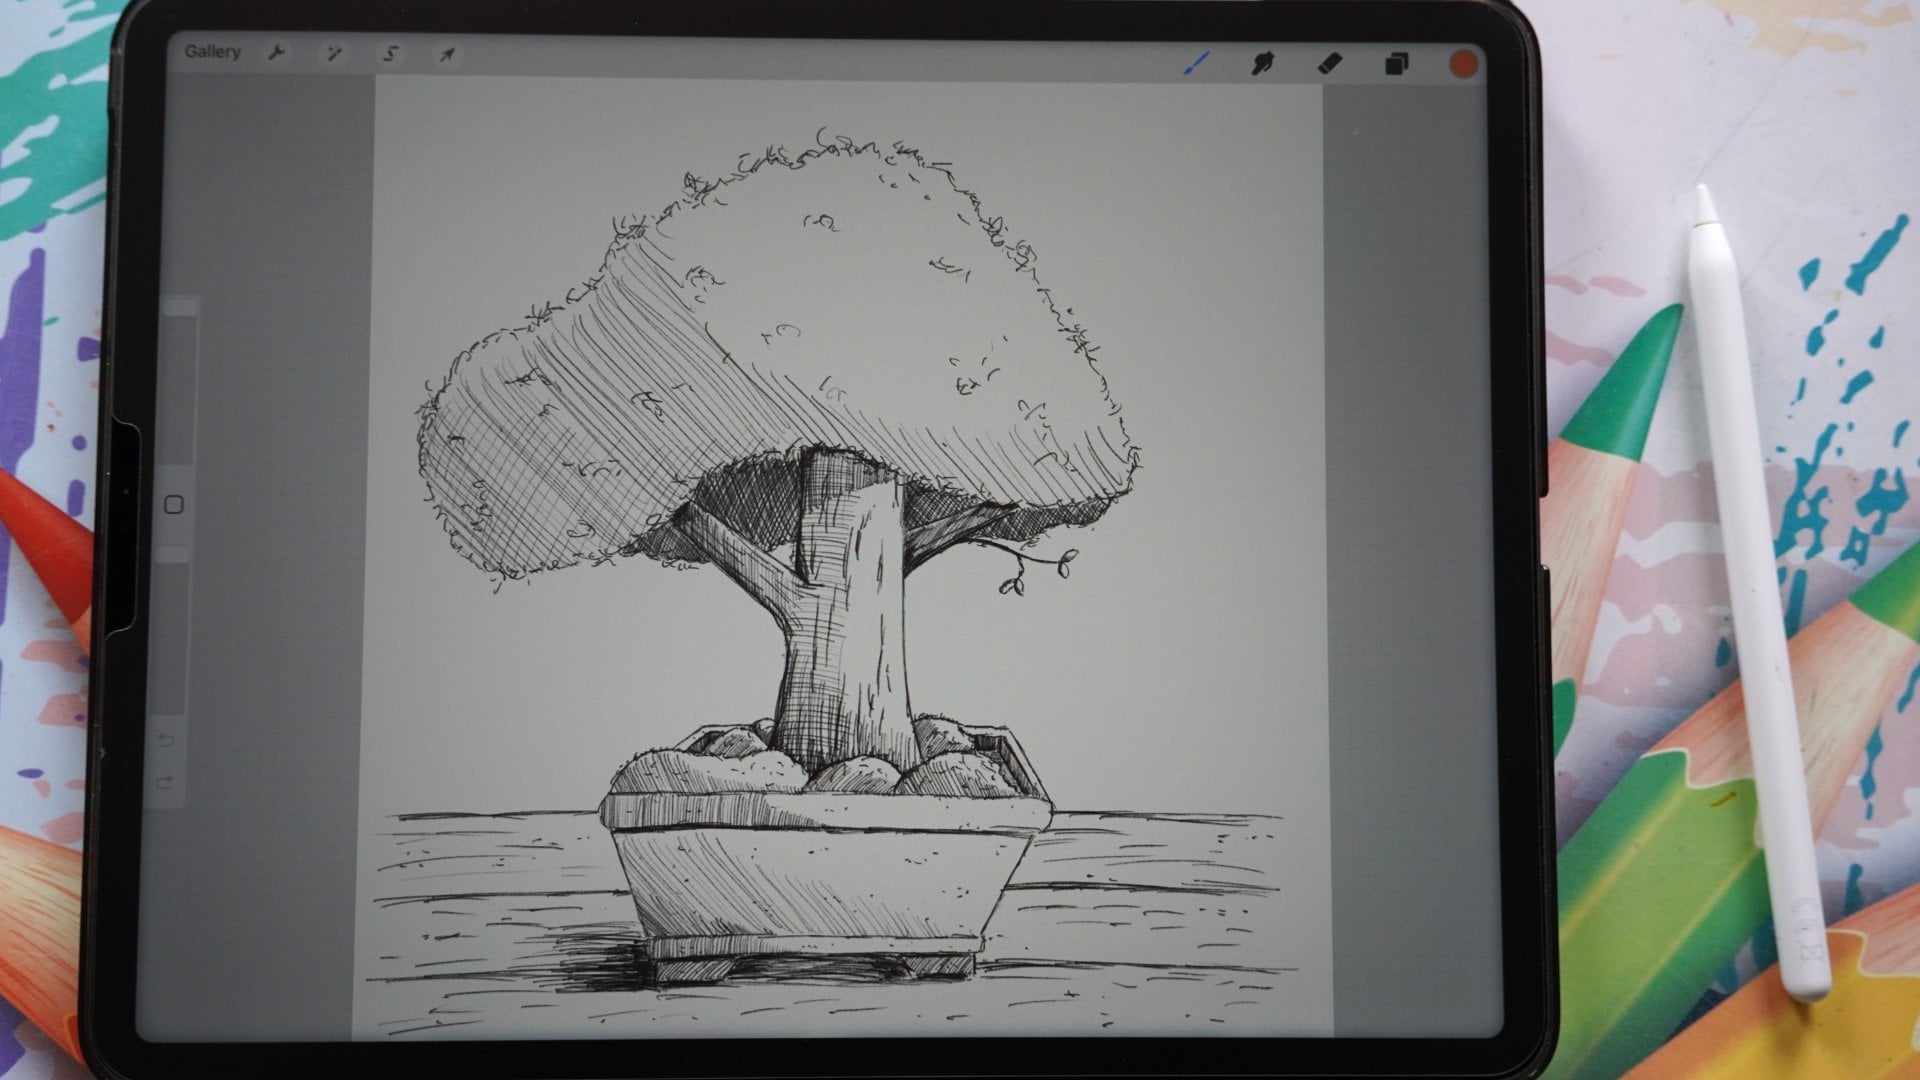
3. Sketching and Hatching: Time to start a drawing. Now before we can start with the new techniques we've
caused me to draw this. I'm going to sketch this. You can do continuous
line if you want to. But I'm going to
sketch it first. Now I'm not going to walk
you through the sketching, so I'm going to speed that up. Once I'm done with
the sketching, we're going to start creating the beautiful drawing,
adding the shading. But first let's sketch. Alright, so what I'm
gonna do for the sketch, I'm going to go with
the black pen today. You can pick any color you want, but I'm going to
go with the black. If you want a different
color, you can do that. In the next class,
we're going to actually add color to this. So I will prefer the black. So I'm going to sketch for that. I'm going to just pick a pen. I think I'm going to
use one pen today. And I'm going to either go
for the medium or fine, probably define, let
me try that out. I have a new layer and let
me see how I like this. I'm going to zoom in a
little bit and I'm gonna do this one here. I have the regular bullpen. We could use this. Now, I'm going to compare
that to the fine liner, the fine line of
fine. Let's see. I like the fine line
of fine, better. We're going to go for
the fine line of fine. I might do the lines out the outlines with the
fine liner medium. Let's go for that. So I'm going to clear this. I'm going for the outlines, for the fine line
medium for my hatching, I will use to find one. But if you want to
use a different pen, fine, of course you can do that. Alright, now this part
is going to be sped up because you don't
need me to see. You don't need me to talk
you through all of that. We've done that in a
previous lab class. Plenty enough. So I'm going
to sketch this first. Now, one thing I'm going to say the nice thing about
sketching in Procreate. I don't care where
I'm going to start. I can start there. Yeah. There anywhere.
There's no smudging. So I'm going to start
with this toad stool. And as you can see,
the sketching, I just lose quick lines. And to get a nice, oh, I haven't
cleared that layer. I gotta clear that first. Alright. So a set, and when we use nice
loose lines today to create kind of nice
interesting effects. Alright, I want to
stop talking and when I'm done, I'll be back. I'm done with the drawing. There's one thing
I'm going to change, I'm going to add here
where that chest notice where these
pine cones are. I'm going to just
add one line there so that I can fill
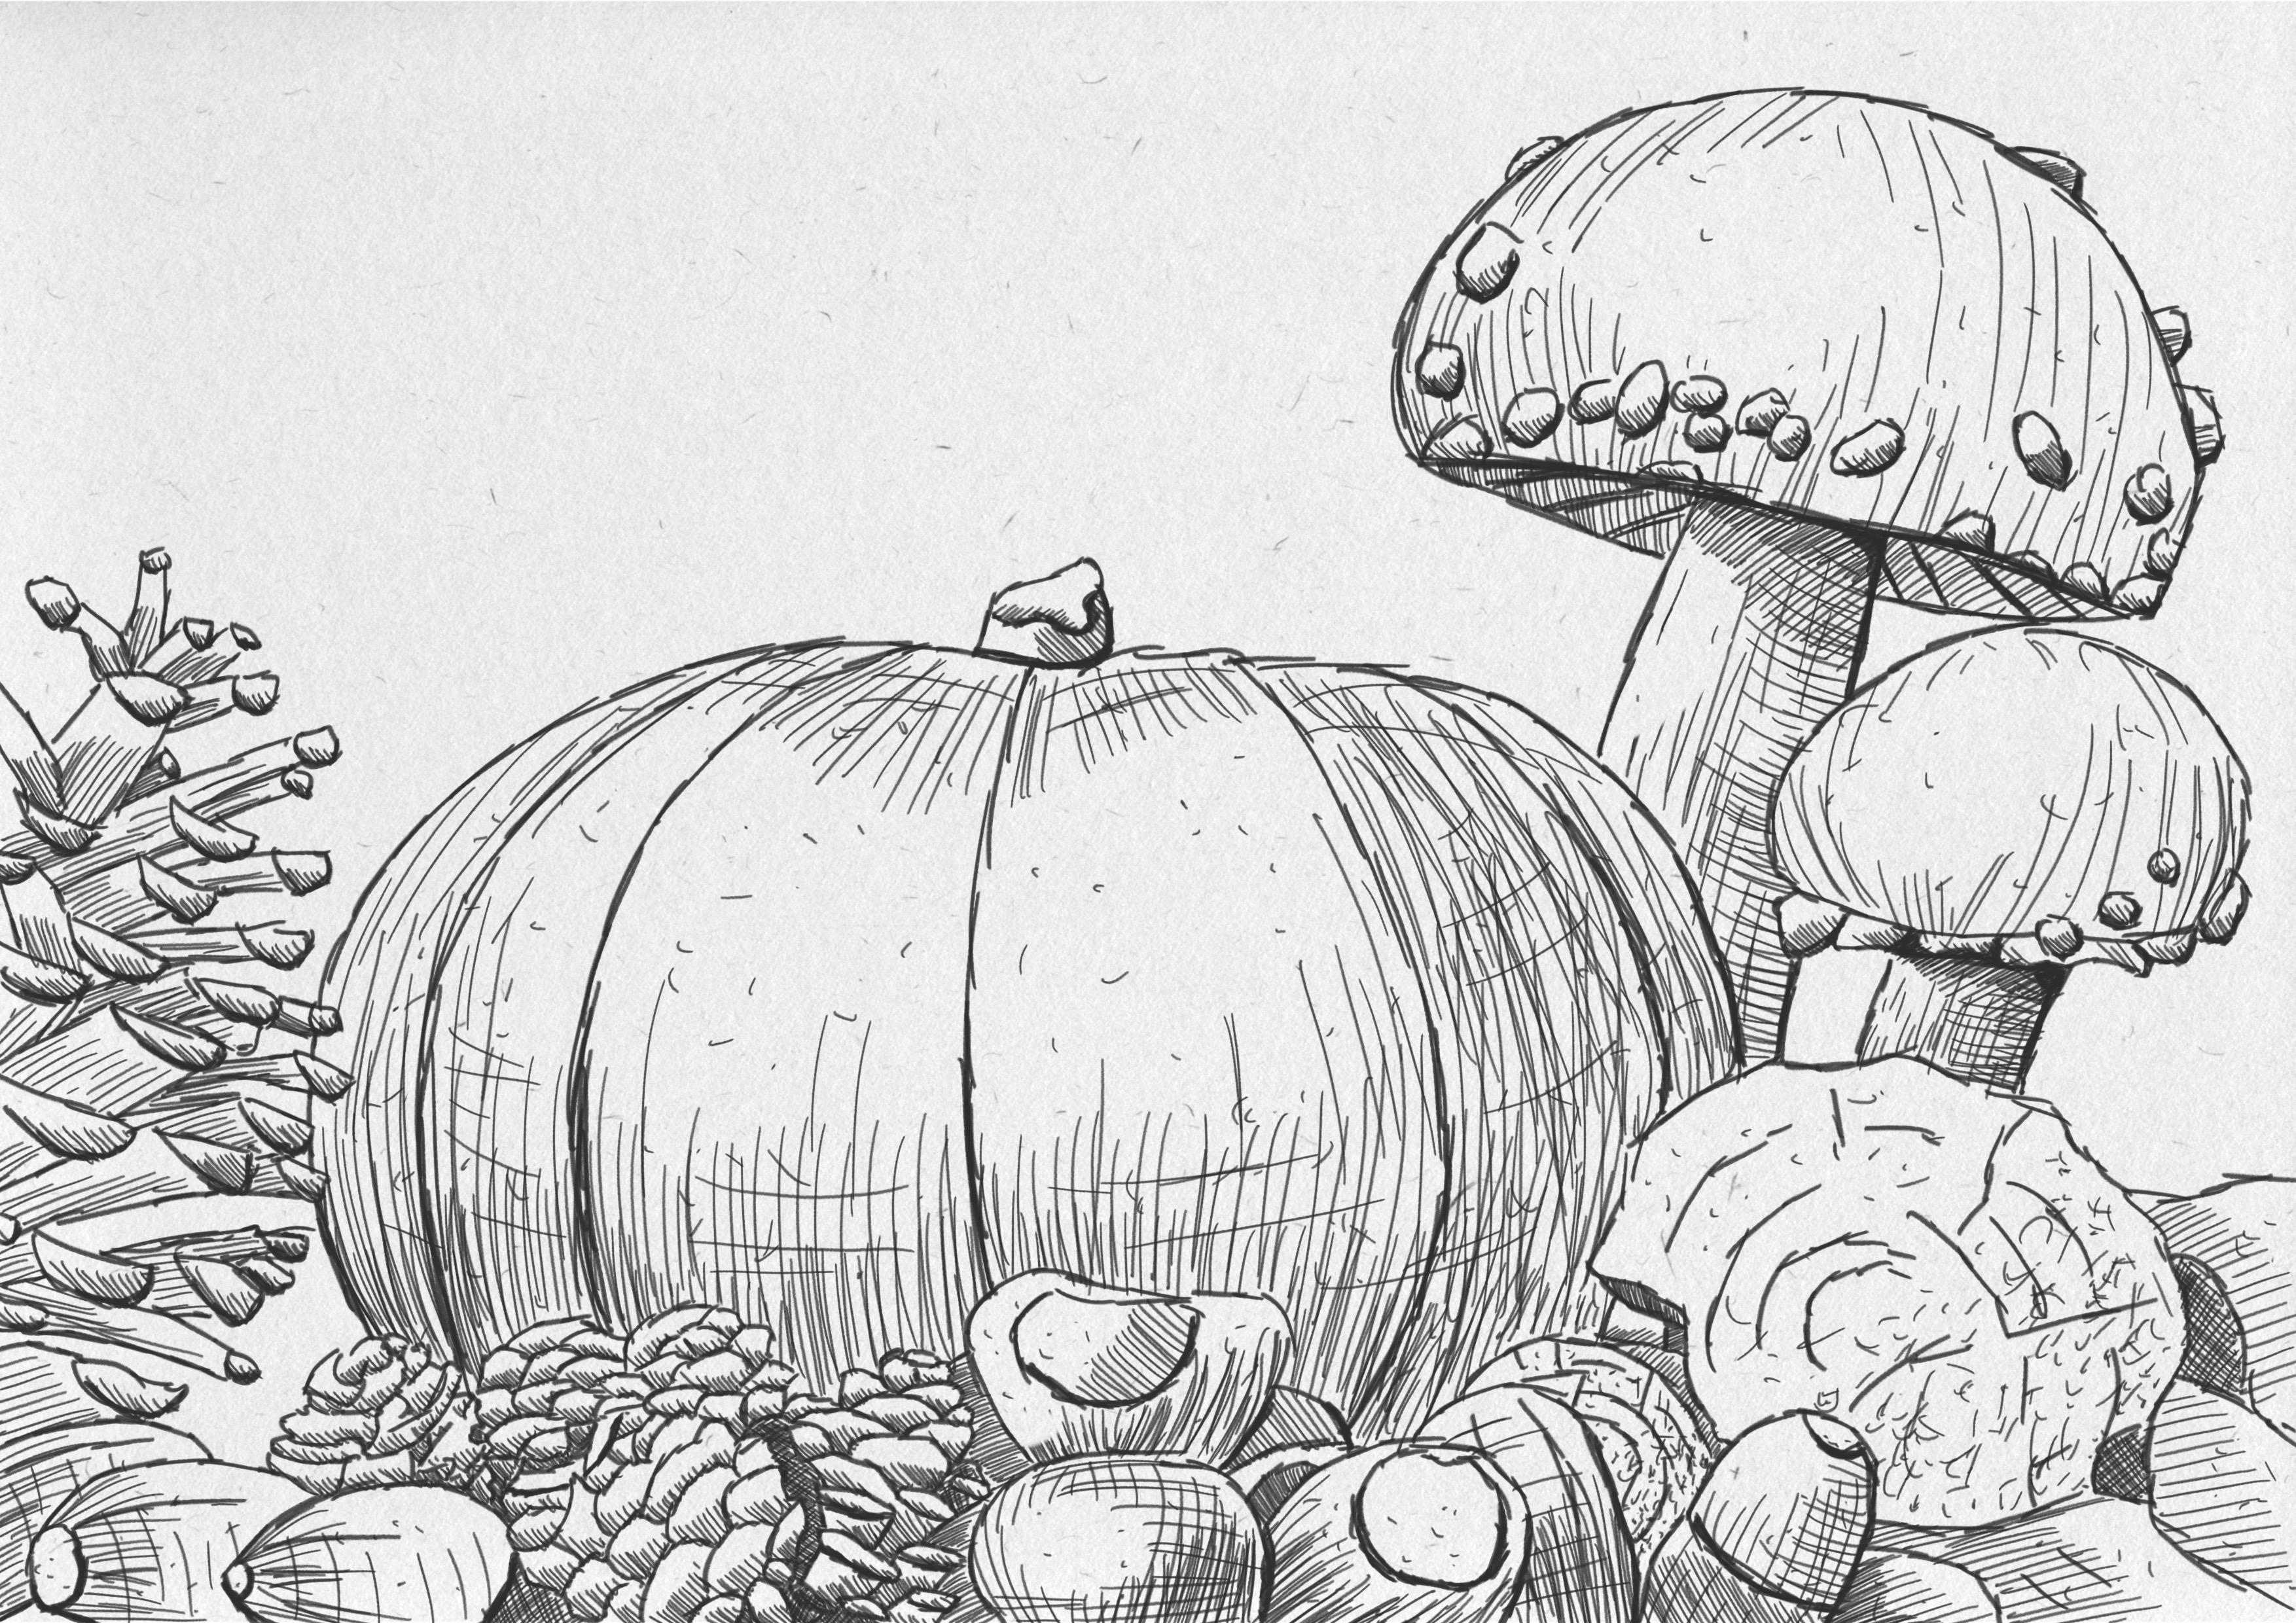
this in later on. Alright, now I'm ready to draw. Now the first thing
we're gonna do, I want to take a look
at this drawing and see where I wanted to use the
previous techniques we've used scumbling and the hatching mainly now for the hatching
and crosshatching. And we're gonna do that first. But before we can do that, we of course need to
determine where the sun is. I'm going to add a new layer I'm going to just use for now, let's say a yellow color. I think I'm going to have the
sun right in this corner. Shining. Right there. The
sun comes there. The next thing I'm
going to say, write, the sun will shine on
this pumpkin here. And let's say around there, we're going to have
a nice sunspot. Of course, on the
toad stool here. Let's give that a nice
sunspot and let's do the same with
here. And the rest. Let's see, we're gonna do
at least some light there. And the rest, we're going
to just figure out why. We're going like e.g. this chest not going to
add some light there. And right there, we're gonna
do some light in here, but the rest, probably as we go. We could do a line there too. I'm okay with that and
here and one there so that it's clear what
we're doing there. And the rest I'll talk you through while I'm
going through it. Alright, I'm going
to add a new layer. This layer I'm not
going to draw on. This is just for me as a guide. But we're going to start
with the hatching and crosshatching first and going
back to that black color. But I'm going to now go
for the fine liner medium. I have a new layer. I want to start real simple map. This on top here. I'm just going to
hatch a little bit. And there you go. If the sun comes
from this direction, I would say this is pretty good. And do it like that. Good. That's the easy part. Now, under the torch to here. That would be then a shadow. And I'm following
that direction. The last one is pretty sloppy. And I'm going to add just
a second layer of hedging. There you go. And I'm a little
bit outside of the line. Distorts to, I'm just
gonna do the same. Basically, I'm
going to start here and make this an extra line
of extra layer of hatching. And that will be the first one. Under here I'm
going to attach to. And what I'm gonna do,
I'm gonna owe hatch them in the same direction. So under these gills, these are called the
gills of the toad stool. I'm just going to hatch
here a little bit. Let's do this one too. But this one we're gonna do
in the opposite direction. I would say yes, let's do that. There we go. So that's, that,
that's the first bit. Alright, let's see. We're gonna
do some hashing here too. But we're gonna go only going to hatch on the ends of this. So I want to hedge all of these ends in here too. And the rest, all these parts of this pine cone I want to
do with a new technique. Alright, good. And that's that. Yeah, the rest I'm
going to leave alone. I'm going to do on
these pine cones, some hatching to, well, let's do in here
first, this part here, we're going to hatch this first where I've drawn that line. There's something there. But it doesn't really matter. What is there. We're just filling it up, believing that on
this side too, we, we're going to
hatch this to here. And there we go. That's that. Alright.
Let's hatch this. Let's leave this open and
let's hatch this part two. There we go. Look at that, that already
improves our drawing right away. Quite interesting. Now under scales of
this toad stool. So the spots, people say, yeah, who would say spots, officially, that called scales. We are going to hatch these two regarding the light coming
from that direction. I think That's something
gone wrong here. I'm gonna erase. Yeah, there you go. And I'll make sure I'm back to the right layer. There
was a spot there. There we go. This one here. So small here, this we
need to do, to do too. Let's give this a little
bit here too then. Just a little bit, look at that. Now, we're getting
somewhere on the here. We're going to do the same. The scales hanging
under the toad stool. And I don't think I've seen
that with a lot of them where the toad stool is having
the skill so far under it. Alright, Good. Now some other, a
few spots are here. And I'm going to do some
cross hatching on this one. I think make that a bit darker. A little bit of a
different texture. Here's one spot to,
Let's do this one. And I'm crosshatching this
one to see these parts do, I don't want much attention
to these parts here, so I'm just going to
lightly hatched them in. There you go. These are
not the important parts. On the hair. Make
my head Sheng Long, and this HER2, they go good. Let's see. Let me do some hatching
on this one too. Yes, why not? What? We're
going to hatch this one too. Good. Alright. Now going back
to these pine cones, these acorns, I'm going
to do differently. But the pine cone, I'm going to use some hatching definitely. And I'm just going to look
at the sun comes from here. So the top part, I'm not touching from all of these parts, only doing them. Every one of them.
Do some hatching. As far as I can
manage on the bottom. Just creating some
light and shadow effect on these parts, really only at the bottom. And I might do this one
with bit closer hatching. So the hatching closer to each other to make
it slightly darker. Here to ego, that will
be the first one. I think I'm okay with this. Alright. I'm gonna do
the same on this part. Today we go, I'm
gonna do this one. Hedge that closer. Do it all the way. There you go. Good. And this hatched two. And this one had
**** closer to Andy. So I'm just gonna do
the regular way again. Here a little bit. This one at the bottom. This hair on my just
fill in all the way, go the opposite direction. And I'm going to write awake, crosshatched at Pod,
make it really dark. All right, going
back to this one. This one, opposite direction, a little bit darker here to make that a little
bit darker. That one. Let's do this one dark too. On the here. Go all the way. Here too. Alright, good. See where are we? I'm going up here
first, the easy parts. I forgot. A couple there. I see. I don't think I'm
gonna touch this part. This, I'm doing
this. Here we go. Right now, this top part. And we're going to do at
the end a little bit today, go this one too. Alright, let's see, we're
going to hatch this one. Would have crosshatching
on that one. And this part here we
haven't done, we're gonna Crosshatch these two. Or that's cross hatch. It should work good. And under here and do some cross hatching
to, alright, good. Now I've got some nice light, dark effects. Let's see. I'm done. Let's see about this. Acorn. Nowhere it's going
to leave that. Okay, that is all my hatching
and crosshatching for now. If I need to add something
later on, I will do that. But for now I'm done. I'm going to do some scumbling. Now, minimal scumbling just to give some
difference in texture. Let me show you
that this company, I'm not gonna do a
lot of scumbling. What I'm gonna do, I'm
gonna use a little bit of scumbling on the pumpkin. But really only a little bit. What am I do with this? If I change my mind later on, Let's add a new layer first, new layer for the scumbling. So now I've got my hatching on one and I got my scumbling
and I'm going to just give the scumbling a little bit texture
to the pumpkin. I'm not going to bring
in light and shadow, but only just some texture.
There you go. Good. All right, good.
I think I'm good. I'm gonna do the same
on the toad stool. Just a little bit of texture. And on this too. Okay, good. I'm going to leave it like this. Now, this one I'm
going to scramble to, but I'm going to recap
the light a little bit. So on here, this
part here a little. And then once I get down here, more scumbling, That's a
lot of scumbling there. I want to get them one away. Yeah, that's better.
That was a long line. So I'm first going to
do the whole thing. And now I'm gonna scrambled
right where the shadows are. Definitely around there. And at the bottom a bit more. But I don't want this one
to have all the attention. So I think I'm okay with this. I could add just of interests a little
bit around here too. And dare you go. Alright, let's see.
I'm okay with that. Yeah, see around here, I might do slightly a
little bit of hatching, so I gotta go back to
my head sheen layer. Let's do a little bit of
hatching their scumbling. I'm going to add a new layer
for the new technique. So let's do that right away. But I want some scumbling on
this part two, of course. So I'm going back to
my scumbling layer. This is some work here too, so I'm going to
scramble this to go. And at the bottom, definitely some more sap. And now I'm going into
my head sheen layer. And I'm going to hatch this. Definitely. That is a
part that is under it, really close hatching
this might as well hedge this B2 on the
hedge this a little bit. And then this part here. Let's hedge debts
to There you go. Now under, yeah, alright. That is, of course,
if the pumpkin, that is a part of the pumpkin, I'm going to say part of the
pumpkin or part of the boot. Now let's keep this,
close, this a little bit. A part of the glute. That's
it for this lesson at least. Now I've got all my hatching in, my crosshatching
and my scumbling. But just pass, I haven't
done those paths. We're going to do with the new techniques to new techniques. Then, first one is
in the next lesson.
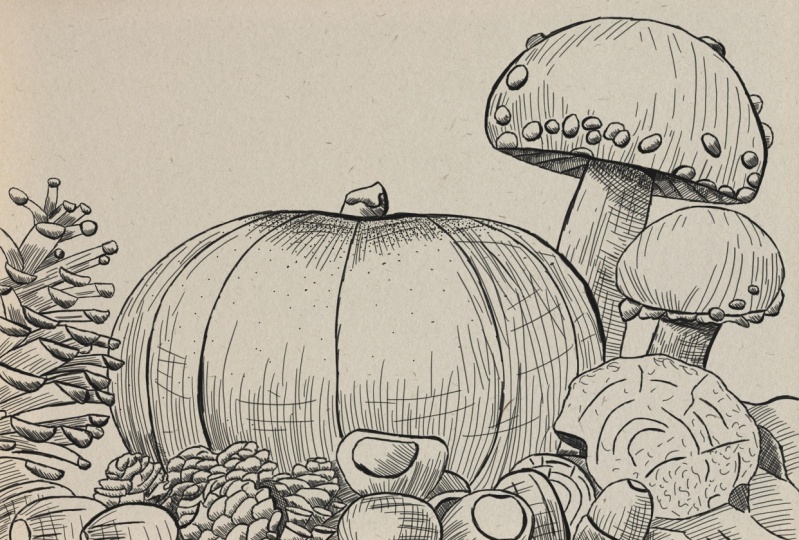
4. Step 1 - Shadow Lines: We're gonna do two
new techniques now, not all of them in this lesson, we will start with
the first one. The first one is what I
call the shadow line. Shadow line just brings in
a little bit of detail, little bit of accent
on certain parts. I can talk a lot about that, but it's way easier to show you how we're
going to do that. Let's go shadow line. The shadow line is just a
line that edge shadow to your drawing on certain parts to just get them out a
little bit better. So I've cut this
new layer already. So I'm going to just
add some shadow lines, not the first part. I'm going to add shadow
lines to add these skills. And what we're gonna do is
just on the back and under it, we're going to add
an extra nice line. And we're gonna do this again because I want to
swap pen for them. I'm gonna go back
to the medium pen. That makes it a lot easier
and nicer, thicker line. So we're doing that on all of them on where the sun doesn't come a bit on the bottom
and back, on the back. See, and now if you compare
this and this here, see, these pop out
already quite nicely. And then really nice thing is, if we're going to
add color to it later in the next lesson, then they pop out even more because of that nice
shadow line under it. Alright, good. Back there. I want a shadow line,
definitely too. I'd even go under
it a little bit. And back here, I
want my shadow line. And at the bottom,
this bottom here, I do want a bit of
a shadow line to. There you go. And what am I do is add an extra line
to them, 21 more. There you go. Now, at the back here of
the stock of the totes too, and that's here too. I wanted to add a
line right away. I'm going to do the same here. And while on it, I'm going
to add the shadow lines two. And with this one, woman
just add it, the back. Just a little bit
and here to open up. Good. Now you can see already, if I, if you take a look
at these toadstools, if I removed them up here, you can see best, see how much detail
and extra that just adds just a small little line. Just to bring out
some of the points. You want to have some
detail under here, the acorn and down there
too. I want to do that. Let's do the back of
this acorn then to the same right here. Just add a little bit of
detail than we gotta do that right here to see that
brings that out nicely. I want to add just a little
bit of a line there too, and here too, and just
an extra shadow line. Let's do that on this back two, and then we need to do that. Dare to. Alright, good. Now here, don't think, let's see. I might wanna do a
few parts like here, where these false are
in the acorn under it. I wanted wanna do some often. Now let's do a
little bit here then two and not too many here. I'm think I'm okay. The icon here, I don't know if this is
not a class at a con, the pine cone, of
course, the acorn here. I'm going to do
that right there. I love this one at the back too. Alright, Good. Now this one I'm going to do at the bottom two and the end, adding that shadow line on all these parts just to give
them a little bit of extra. Didn't catch that one. So now I did. You go I forgot something there. See. I need to hedge that. Okay. Going back to that
hatching layer, back to that fine pen. At a little bit of hatching
there, that's better, good. Now I'm going back
to the medium pen and to the right layer. And there we go. Do I want some more? I want some on the hair, on the back here. And under there just
to make it pop. And on this line here, Let's add a little
bit there too. And I think I'm okay with that. Just add a little bit of a
shadow line here, right? They're not all the way
but just see under it to give it some extra detail. Let's do that here too. Alright, good. I think I'm fine with this. So added some shadow
lines just to make certain parts come forward
a little bit extra. Know what do one
on the hair too. Let's darken this
up a little bit and darken this here a little
bit too. There we go. All right, good. I said that's the shadow
line just on the point. You want to bring out just
a little bit of focus and attention in detail
to e.g. like here. That would be a nice details. You just make a little bit
of a thicker line there to get some extra shadow, right? Not on the bottom here, but around here. We could do 12. Yeah, that would be
good. That's due one around there too. And let's do a little bit
of extra there and here to go see, that's just gifts. An interesting nice shadow. And that's it. That's the shadow line.
So bring out some parts. You want to have some
extra dark lines under it. You could also paint in some parts to make them really dark, but we're not gonna do that. We're going to move to
the next technique. So no shadow lines. We're going to do something
extra to another technique, which I'm going to show
you in the next lesson.
5. Step 2 - Contour Shading: So we've done now
the shadow line. The next technique
which we're going to add to our shading to wealth is contour and
cross contour shading. It's a bit similar to
hatching and crosshatching. Slightly different too. Well, I want to show you that. Okay, let's do that to demonstrate the contour
and cross contour. What I'm gonna do
is I'm going to hide all these layers for now. I want to add a new layer and I'm going to
show you something. I'm going to draw simply with whatever pen I
have, doesn't matter. Something rounds. Now,
That's the round. And what I'm gonna do,
I'm gonna duplicate this and then I'm
going to merge them. I'm not, I'm going to
move this of course, to show you something here. I've got two of them
now, I'm going to merge these two layers as an
example, There you go. Now what we've done
so far is hatching. So if I pretend again, the light comes from there, then we'll dunk counts here too. If I hatched this
really roughly, then the light
would be like this and I would add another layer. And if I want some dark, I can keep on going. And the I can even do a little
bit of cross hatching at the bottom at
probably a little bit of hatching like that. And that's it. Now,
what happens with this? It still is a flat object with hatching and crosshatching. It's very tricky to show
some more dimension, some form and shape. What we can also do, we can do contour shading and
contour shading, as it says, it
follows the contour. So let's say I want to
turn this into a bowl. The easiest way to do, I could draw some help lines. So I'm going to do the help
lines in different color. The helpline, e.g. in this one, if I draw this curve in there. So following a little
bit to come to there, and I'm doing a second
curve now I have a choice, follow this contour
that come to, I'm going to follow this
contour. There you go. Now already, what you get
is, don't like this one. There you go. Better. Now you get the idea that we're not looking at a
flat object anymore, but we're looking at the bowl by adding some simple lines. Now, if I'm going to shade this, going back to my black, what I would do,
I would actually follow the contours so the
light comes from here. And I'm just going
to add the lines. But here on this part, I need to go like this. And here somewhere where
these two parts, so this, I would follow this contour
until I meet my helpline. I'm following that come to
somewhere in the middle here. There's basically a line where they meet and the
sketch straight. Now I've done, we don't have, so I can continue here. So I would follow the contour. So I'm getting some interesting
shading this way here. And now this
suddenly gets shape. Now I can do cross contour. So if this is the contour, I'm going against the console. I'm just going to shade, Let's say on the back
here, some extra shadow. And there you go.
See, now this gets the whole idea of being
a form and shape. And if I want to do
some more on it, I could do actually like this. And you have the idea
that this is more of a rounded object, and that's the whole idea. Now, let's draw another
object. We've got some room. Let's draw a cylinder. So if I draw a similar, simple cylinder,
it has an opening. On the top, it has
a bottom like this. There you go. Now, if I will do
some contour on this, I would actually
get this shading. I'm following the contour. Here. They go. Now, now it's
still a cylinder. If I want to make it round, I'm gonna go cross contour
lines to come to see. And I'm going to bring
in these curves. And at the end too, might take some practice by
just adding these curves. Now you suddenly get the
idea, this is rounded. Now if I want to
do it really nice, I'm going to add these
curves in here too. And you suddenly have the
idea that this is a shape. If I would do the same with huge opening
with hashing only, let's say hatching there, you will not get that same idea. This is obviously all round because of the cross contour
and the contour lines. This is just stays flat. And that is the whole
idea is to create something with form and shape. So cross contour and
contour shading. Now if you want to, you can
practice this a little more. Find some shapes around you. Both. Curves,
puddles, work rate, and then just shake them with cross contour and contour shading to create
that form and shape. I've got a little
bottle here and let's see that there's a bottle. Let's try that one. Okay. Let's see if we
can get the camera. Yes. There's a bottle
bottle with ink. I don't want to let late
too long like that. So if I do a bottle here, so what I'm gonna get is
let me start at the top. I'm looking a little bit like this on the
bottle, let's say. So here's the the lid. That's the length of my bottle. Then we need the flask, the bottle itself,
and let's do it. Now. We're making herself easy. Let's say this is my button. I'm going to put that
one up right again. Now, if I'm going to go hatch, I would go like that,
but I don't want that. I want to follow the
contour a little bit. So for this first shading layer, I'm going to follow
this contour. That's the easy contour here. A little bit shading. Under here, there
will be some shading there and buy only
going straight. You already get a
whole different idea by going under an angle. But the next thing
which I'm gonna do, I'm gonna turn this,
make it myself easy. I'm going to follow the contour with the
shading in here too. Rounded, ends here
to, there you go. And now this way, it looks way more like a bottle. Then if it is just a
flat object on top here, I would actually go
like that a little bit. There you go. Good. There we go. Now, if I add some
shadow lies on this one, that would be nice to
add a shadow line there. Definitely add a
shadow line right there at that shadow
line right there. And then I would the shadow
line a little bit under it. And I might go for some
shadow like that to see. Now it looks complete. That's the bottle.
I'm sure you can find different objects around the house and practice this. And once you've practiced
this a little bit, then I would say comeback because I'm going to
continue with our drawing. And we're gonna do
the last bit on our drawing, the
contour shading, contour shading and
cross-country shading is really easy way
to add some shape, some form, and make it
really interesting. And we're going to use
that on our drawing. So I gotta hide this, bring back all my layers. There's the drawing except
for the last layer. I'm going to add a
new layer on top. I'm gonna make sure I
have the fine pen again. And I want to add
some contour shading. I'm going to start here
with this pine cone. This is really easy
with the shading here. What I'm gonna do, I'm just
going to follow the contour. So there's no really no
rocket science. This one. It's not random. That definitely
not, but that's not really complicated science
or force behind this. Just follow the contour
and the rule is, where does light, a lot
of light do not shade. Where there's a little bit
light. That is not good. Shape a lot. And I've got this. Let's add a little
bit of shading there. So we're just cross contour shading at the bottom
here a little bit in here. There's definitely some
more there to this one. It's come to scoring
like that. There you go. This one goes like that, and it just looks like hatching, but it's following definitely
the contour of a shape. While hatching can go totally against the
contour of the shape. Let's now get bent over
demo. There's nothing there. We wait, there is some, let's put something
there from this part. Definitely something
there, but this is open. Alright, and then this one, I'm turning my rotating my drawings so it's easy
to follow the contour. Look at that there you got that. Now you've got really
the idea that these coming a little bit too
achieved by doing that. If you would have done
that with hatching, you would never have
gotten that idea of the shape in there, the Aegon. Now, the easy part here Is we're going
not totally straight, but following the contour a
little bit. And there you go. So starting with this round, then we're going straight. And at this bottom, we're following this
round more or less. Here we're doing a bit the same, although at the bottom,
but just going straight. That's the contour. Now we're going
cross contour with this one to just add a little bit more of dimension
to it. There you go. And the same here, two
bit cross contour. There you go. No,
I don't want that. Now let's go all the way round. Hugo. And on this one we wanna
do get a little bit too. Why not? There you go. Now you get that idea of
there's form and shape. This one we're gonna do here to imagining I'm
following the shape. There you go in here. And I'm going to
just simply hatched. This. Should have done that
on a different layer, but that's okay. We've done that.
We've done this one, this one going to
be the tricky one. We're going to follow this
contour at this side. Then we're gonna go to contour on this side
somewhere they meet. And I want to do some
on the top here too. Good. And now I'm going this
direction. Let's see. Straight and on the hair, a bit rounded and outlets really add some shadow
around the back here. There you go, good. And we're gonna do
with this one to, this one actually
needs some more shadow around them and we keep
on following its contour. I don't think I want a
cross come to that one. No, I'm okay with
this one. This one. I'm just going to follow
the contour like that. Alright, good. I think I'm fine with that. Let's see this one here. What we're gonna
do, we're gonna add some cross contour
lines like that. And then we may do some
contour lines. There you go. And at the bottom, I definitely
want some more. Good. Now we could have
done this one too. Let's add just a
couple of lines here. And this one, we're just gonna go contour
ends at the end here. Let's do some cross contour
lines. Now look at that. See, this is starting
to look really nice. Pumpkin. We do last and
everything has gone. That's no good. There it is. We're gonna do the
torch to first. Now, this is a bit tricky. I don't want to go
over these scales, but I definitely do want to add a little bit of that dimension. So I want to add
some above there. And then of course, I
need some around there. Let's do dislike this. I want quite a lot
at the bottom here. And I think I might go that direction
around here, go straight. And do it like
this a little bit. I'm okay with this. Yeah.
This one we're going to make slightly more
rounded, go straight here. And at the back. Go rounded like that. I may add some at the back there and a little bit on the top, and let's add a few
there. Okay, good. Nap with this one here. We're gonna shade, that's
a little bit more. We're going to do the
contour like that, follow these lines a little bit, do that here too. Now I made a mistake. I didn't want to
touch this part, so I'm erasing
very small eraser. That's better. I'm erasing this part, makes sure I don't touch that. Alright, now I'm gonna go a
little bit of cross contour here at a little
bit of dimension. And we're gonna do that here to add slightly curved,
as you can see. But not too much. Good. I might want some
more down here. The back. Short ones. These are almost straight lines. There two, Good. Now we're getting somewhere
starting to look good. We got one piece left
and that is the pumpkin. Pumpkin is very easy because I've already put in these lines. The pumpkin have these shapes, the segments of the pumpkin. So what we're gonna do, we're
just going to follow them. So we're going to
start right here. And there you go. That's the first and I
know when not to shade. Let's go outside a little
bit. There you go. Let's shade it like that here to following the shape up here. So I'm just following the shape, but I'm not touching this part. Now this is still okay. There you go. And I need
my eraser around there. A little bit. More tricky part. So here we've got where
they meet each other, somewhere in the
middle, they're gonna meet each other,
let's say there. So this starts out like
that. They meet each other. I'm going to follow
now this come through here and let them
meet each other. Now at the top, I got to do something
the same. There you go. And right here, straight, but here it's under an angle. So I'm going to do it like this. And now we have this part here. And we're following the contour. That is not really
good, bit messy. But has a child does it. And I'm adding some more here. And now we're going
to do these two here. Alright? Now, what I wanna do
is at the bottom here, I definitely want
some more around. They're here to around here too, at the pumpkin bottom
here, too good. And round there you go. And then we need to do
this part two, of course. And this part too. Good, taking my eraser, erasing where I've
gone over board. That's the nice thing
about Procreate. Wherever I've done some sloppy. I don't want to
remove all of that. Definitely want to remove that. And one, there you go. And I look at that. And that's totally different. Now you have shapes and forms suddenly not only hatching
and crosshatching, but you get some great
shapes and forms. We need to hide that
sunlight layer. And I might have got
myself into trouble. No, I didn't. That is the
sun layer and dare you go. And here we have our drawing. So now we've done all the
techniques, hatching, crosshatching,
scrambling around here, and the cross contour. And the contour, you could
do this one of course, if you wanted to add some
lines going back to n, Let's add a new layer here. If you wanted to,
you don't have to. You could, of course, if I had a pen. Yep. There you go. Carefully at some of
these rounded lines up many like that to just give
that an extra dimension. And up here too, to give it even a little bit extra
shape and dimension. And there you go. I
think I might shade this in a little bit more
here to here to make that, make that a light at
pot slightly smaller. And perhaps add a few
lines on it like that. Good, that looks better. I want to add just a
little bit of scumbling. At some point, I got to
find that scumbling layer. That's the scumbling
layer. Here you go. I want just a little
bit more scumbling on the pumpkin to give
it some nice texture. And I want some, if it lets me on
here, There you go, some on there, even some here. And on this acorn here. I'm not allowed to. Actually. There you go, And perhaps
a little bit there. The Heiko, just, just a little
bit of extra texture here to add a little bit of interest as if
there's some texture, some spots on it. Good. I like that a lot better. Alright, want to add, I'm gonna go back to
my contour, shading. Cross contour shading here. I think I might have done something wrong layer
a little bit there. A little bit there too, just to add a little
bit of interests. Not all white. Now, I think I'm done
with my drawing. I've got some nice light
and shadow going on, definitely coming
from this side. Some nice open related spots
and then some darker parts. If you want to make
some parts even way more darker,
you could do that. You can draw a lot of
time like around here. Let's say if you
wanted this darker, go back to the hatching is good. That's the right
layer. E.g. you could add a little bit of extra shading around
their parts like that. So wherever shadow is
cast on another object, At a bit extra, you
could do that here. You can do that on this bottom. Right there. There you go, just to add
some more interest to it. But I'm going to stop now. So if you want to
add more to it, yes, please do so. Alright, now it looks good. There's only one thing we
need to do if this one to add some paper texture to it. So we're gonna do that
in the next lesson, which is right away,
the project too. I'll see you in that one.
6. Adding paper and the Project: Welcome to the project. Now I said in a previous lesson, I'm going to add a little bit of texture to this paper
texture to this. And like I've done, like we've done in
the previous drawing, just to make it even more
convincing for the project, please do post whatever
you've created. The beautiful autumn drawing. And also keep in mind that you
don't throw this one away. Keep it. Because in the next class, we're going to add some
beautiful color studies and combine depend inking what
we've done, some great colors. But for now, what I'm
gonna do is first of all, at the paper texture to it. Alright, the paper texture, I got to find that
that's going to be at a photo, insert a photo. And there are somewhere on here. There's three of them
that they are 123. I'll leave it up to you. Which one you pick? I'll pick the one with the
texture like this. Oh, good. But now everything
is gone. I don't want that. It should right away Center
and be right on the drawing. If you use an A4 like me, I gather, add this
to the bottom. And there we go.
Now look at that. That looks so different from one is dead.
This is so wide. And this, now it
looks like as if I've drawn this on paper
with a fine liner. I can export this, post
this wherever I want that. And if I want to tell people that this is
done with Procreate, probably quite a few would
think I've done this by hand. My case that wouldn't be surprising to anyone
because I work both in Procreate and the
traditional way with pen and paper and paint
and things like that. So people would really wander. Benjamin, which one did
you choose this time? But we all know, we've
done this in Procreate. That's it for this class and
that's it for the project. I actually want to
have real challenge. I would say font yourself
some other autumn items, create something, draw
something with them. You could even trace the photographs if you
have the photographs, trace them and then
combine them into one drawing and create beautiful
autumn piece with ink. And if you do that,
oh yes please. I would look, I would
really love to see that. Looking forward to that, that concludes our awesome
drawing in ink, beautiful pen drawings,
adding some new steps to the techniques we've already
previously discovered. If you want to
discover some more, I've got more classes
here on Skillshare, but I've also got
some on my website. So check that out if you've got some really cool brushes there. So I would say head
over to my website. So brushes tutorials there for Procreate to and
other things too. Okay, well, I hope to see
you in the next class then.
 Benjamin A, Art Teacher, illustrator Art by Benjamin