Transcripts
1. Introduction: Welcome to the third part
of drawing bonsai trees. Now this is going to be a totally different class
than the previous ones. What we're gonna do
is we're gonna do some semi realistic shading in a previous class is
showing you how to do it really cute trees and hedged and bring in some light
and shadow for that. But in this class, we're going
to just take it up a notch and start shading with our Apple pencil in a
totally different way. And the end result will weep. And we have a really
beautiful semi realistic shaded trick. First of all, we're
going to draw the tree. I'm going to show
you some ways how to really capture treat acute way, but in a very realistic way. Sps, bonsai trees.
Once we've kept it, the tree and drawn it, I sketched, we're going
to look to shading, shade with a pencil
in, Procreate. What do we pay attention to? How does light and shadow
work a little bit, and how can we bring that
in really consensus. And once we're done,
we're gonna do a project. In the project video. There's even an extra part, bringing in a nice background. Really making this look like as if we run it with graphite. And that's what we
want in this class. A nice drone, semi
realistic tree in graphite. But yet, well, that's it
for this introduction. Go to the next lesson,
I would say it, but we're going to
really start drawing and have some fun
with Procreate. Use it perhaps total different
way than you're used to, but it will really enhance
your procreate skills. See you in the next lesson.
2. Preparing the Canvas & Drawing Tips: Welcome to the first lesson. We're going to start
with setting up our Canvas, preparing
our drawing. Then the next lesson
we're going to shade. But first of all, we need
to do some preparation, so let's do that together. What I want to show you
first this a little bit, what we're going to work on.
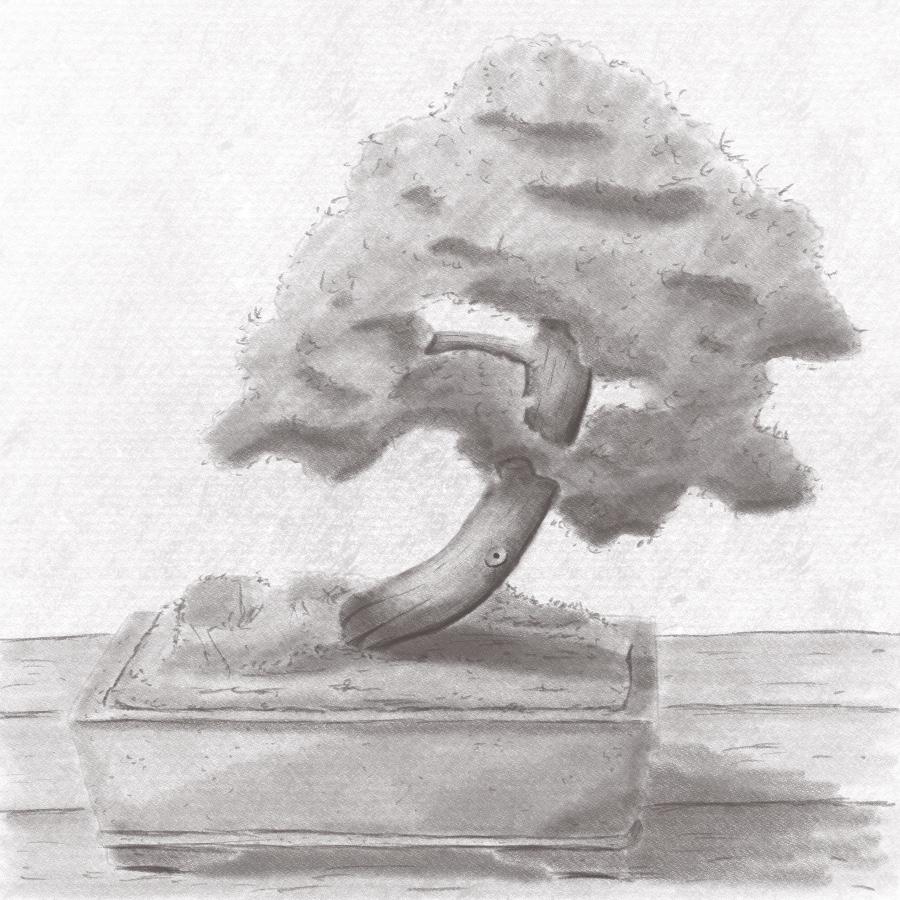
What we're going to work on. This, this is graphite drawings, so this is with pencil and a
semi realistic bonsai tree, and this is what we're after. Now, we're going to
see how far are we going to get in Procreate. I'm not going to say that we're going to have this exactly, but we're gonna give
it at least a try. I've already set up Procreate. And what I want
to, first of all, is a new document and I'm
going to work in a square. If I take this picture again, this pretty much would
fit in a square. So I'm going to set up
a new square and I want my square to be around
3 thousand pixels. I would say, if case
I want to print it, I'm going to say 3
thousand pixels is nice, free thousand by 3 thousand. You could go 2500
pixels student. It would give you
some more layers. What we're not going to use
that many layers anyway. So that maximum layers is
now on the 12th here to DPI, I leave on 300s
of color profiles and everything on this
leaf as they are. And I'm going to say Create. So this will be my canvas. So my canvas is ready, but I can't draw yet. So what I'm gonna do, this, I'm going to show you
three ways how to draw. I'm actually not going
to draw the tree. I'll leave that up to you. So in the next lesson, we're really going to shade
and not focused on drawing. We've done that in
the previous lessons. But I want to show you
some little tricks and tips to help you to draw. Okay, let's do that. So what we are going
to work on the street, and I've supplied a
photograph of the tree nut off this drawing but of
the actual, actual tree. So I need to get that
tree onto my paper. Now before we can start drawing, we need to know what
we're going to draw with. So for that we need a pencil, we're gonna go all the way down. I'm not sure where you
are in your brushes. All the way down. You find the standard brushes
from procreate. We're going to pick sketching. I'm going to use
that dormant pencil. The next thing I
need, of course, is a color. For that. What I'm going to do,
I'm going to slide this one all the way to the red one on a nice warm tone. This little one here, I'm not going to go all
the way downwards black, move it up a little bit
where it gets gray. That's a nice color around here. A grayish tone, I would
say perhaps even. Now that's good. So get a warm, nice,
warm gray tones. Now with this pencil, what you can do, normally
you will draw like this. You get that nice line
and as you can see, I've cut this size all the
way up to get a nice line. But the second
thing you could do, let me demonstrate it again. Clear this layer seems to
be a line on it. Clear. Let me demonstrate that. I'm going to draw
just a little square, and I'm going to have
that square like this. The second thing you can
do with this pencil, instead of holding it
upright, you can tilt it. And when you till it is
going to shape for you. So you're gonna get
something totally health and we're gonna
make use of debt. Now if you shade very lightly, hardly press, you don't
have to press it all. You get this nice shade
if you press more. So you get a nice black, darker one if you go over
it again very carefully. When a new when lifting the
pencil go over it again, you get a darker one and
we're gonna make use of that. To make it ourselves easy. We're probably going
to put our opacity down so that we can
shade really lightly. And then put on some
nice layers like this as if we were shading
with a real pencil. Alright, I'm going
to clear this again, so that's what we're gonna do. We're gonna make
use of the pencil. So tilde it. And as you can see,
I'm holding it now. Normally you would hold
it like this writing. I'm holding it differently. I'm just letting my pencil
rest on this part of my hand, putting my middle
finger under it, securing it with my pointer
and my thumb like this. And I'm sliding it
all the way back. That way I can just let it rest and I'm not
pressing at all. I'm just letting it slide
that do gravity, do its job. And if you go over it a
couple of times you get this. Okay, I'm clearing this, that's just the beginning. What do we need is that tree. Now you can do this in two ways. Normally, probably what
you see most teachers do is they're going to have a
second window next to it. Nowadays with iPad OS, if you have the newest version, you can just press on here, there's three little dots
there. You might see them. If I press on them. Now I have this 11 window, I want to Windows. And what I want is my Calorie. And I want that tree, this tree we're going to need. So the first thing
you could do is you could put them
together like this. And also, or the other way
around wherever you want. And the first thing
you could do, you could just sketch
this outline and look at the tree and sketch it
all the way as set. I'm not gonna do that. And then we would have a
stem there and sketch it. That will be the first way
you could sketch that way. Sketch it yourself as we've
done in the previous parts. Sketch it, make the outline. You only needed the
outline for this. So not all the details, just the rough outline, but there are more
ways to do this. I'm going to remove this again. So most people will
do it like that. Now. I normally don't do
it like that because procreate has a great
feature called reference. You go to Canvas,
click on the wrench, go to can say reference, press Image, import image. I'm going to import
that same image. And now I have the
reference that I can put anywhere I like. I can enlarge it. I can zoom in, I can zoom out. I could do whatever I
like with this reference. And that makes it a lot easier. So let's get it in an hour. Could do actually the same, just sketch it as
done with here. There you go. Now not as rough bit nicer. But there's a, another
way you can do this. So this would be just
catching from what you see. Now that might be tricky. There's a second
way we can do this. I'm going to clear this
one and I'm going to remove this Kansas for
now, this extra reference. What I'm gonna do instead is I'm going to press
again on the ranch. And then as you see
here, drawing guide. And I'm going to switch it on. When I switch on this drawing, either get a nice grid. Now this grid is
too small for me. What we're gonna do,
we're gonna do edit that. And if yours is it on grid, yours might be on perspective, which looks totally different. Make sure it is done on 2D grid. The opacity is around 36%. That's fine with me. I'll do like the color, black is good. The thickness, you can change. I've got 64 per cent, you can do thicker, you can do. I think that fixed 64 per
cent will work nicely. The grid size, I'm
going to enlarge. This is too small. You can
go really small. Work. I want to go a bit larger. I would say for this
canvas, Two 122 picks. I would say that is
nice or do I even go? And I'm gonna go
even a bit larger. Let's go to this. There you go, around 300 picks and you're
going to say done. Now I changed, now, didn't hit the done,
I change the color. If you do that per accident, just hit on this line here. This is the color you can make your reference any
color you like. I'm going to keep it black. And I need to exactly hit that, right to
keep it at black. I'm going to say, done. What we're gonna do next. We're gonna say hits
on the ranch chicken, say adds an Add, insert a photo. I'm going to insert a photo. I'm going to actually
want a surprise. Insert a photo I've got. And I'm going to say,
first of all, fit Canvas. And I'm going to enlarge
it a little bit so that it is in total focus. I needed to put with it
fitness. That will be good. Alright, I'm done with that. Good. Now, the only
thing what happens now, I'm not seeing my reference because of the black background. So I'm going back
to my reference. I'm going to the canvas. I'm seeing edit the guide and I'm going to actually
change the color until I nicely see that grid. Let's go for white. Ego can see now
nicely see that grid. I might now make it
slightly thicker. There you go. That's good. I'm going to the max thickness. I'm seeing a nice grid. I'm going to say,
this looks nice. Now, I can't do much with
this at this moment. What I'm gonna do next is I
need two fingers for this. I'm gonna make a screenshot. Now. A screenshot you can
make in a few ways. If you have the pen, what you're gonna do
is you're going to slide from this
side of the iPads. It makes a screenshot. Now, I don't need
all of this with it. So what I can do is my
finger, I can move this. You can do that with the pen. Did he go move this one too? And we're going to do that one. And that is good. I want this with this
nice grid on it. I'm going to say dumb. Safety photos, good. I've now got a nice grid. The second way you
can do this to take a screenshot is to
put the power button, boots up or down, press them at once. Click and there you have
a nice screenshot two and then you need to
edit it afterwards. So let me open. Or you could zoom in.
Well, let's edit it. Let's go down. Go to your photos again. I've got it on recent, so there's that picture, you press on it, you say edits. You hit this little figure
there, that crop figure. And you can actually
do exactly the same. And apparently now I am allowed
to do it with my pencil. And you will do the same, say, done here. And it saves it. And I got a nice reference. Alright, I'm going
back to Procreate. And I'm going to
clear this layer. And we're going back
to my drawing guides. And I'm going to say
Edit Drawing Guide. I want that color different
because now I can't see it. So I'm going to put it back to the black so I
can nicely see it. Say Don and I missed it again. Apparently. I'm looking at an angle. That's the whole thing. I'm looking at an
angle at my iPad. I'm not sitting on
top of it because of right here on top of
it, there's a camera. If I move forward, you see my head and
not what I'm doing. So I gotta say, Done, hit that. There we go. Now what you could
do next is you can bring up the
reference again. I'm saying reference, but
I need a different image. Now. I'm going to say Import, pick that image with debt grids. And what you could do
now is make this larger. And you could do a grid drawing
and a grid drawing it is, I've got 123456123456,
right there. This square corresponds
to this square here. And what I can do now, I can clearly see where
that outline goes. Now this one needs to go. And this is called
the grid method. And so I would take this part here that will
start around here. I don't need to draw
all these leaves and just the outline, just roughly, so
that will go there. Then the next square next
to it would be this square. And that will go there. And as you can imagine, you would go on here. And then this square
corresponds to this square. And so on and so on. Alright, good. And then you keep them
going and once you're done, you just hide that grid again. Hide your reference and
you got a nice drawing. That's the second method. Well, it's not a
nice drawing yet, but you're going to make
a nice drawing of it. Now there's a third method. I'm going to show
you the third method now, alright, default method. I've got to clear this again, is the easy method, probably we've all done this. What you're gonna do
is import a photo. You're going to pick that tree. I'm going to enlarge it
all the way Fit to Canvas. Makes sure it actually
nicely fits the right. Seems good to me. Yes, this seems
really good to me. The next thing you're gonna
do is press on your layers, put on this n, slide
down the opacity, I'm going to do
around 40% is good. I can easily see it. And then what you're
gonna do now, you're going to add a layer. And on that layer you're going
to just trace the outline. And that's it. So we've got three methods now. And if I hide that underlayer, I only am left with the sketch. Alright, and that
is deferred method. So we can sketch it freehand. We can use a grid method. And on Skillshare,
I've got actually a class explaining
that totally in-depth. If you want to learn,
they're just find it and see how that is done. But I think with
the demonstration, you got that part pretty
much enough entered. The third part would be
just put it under that treated like artists
will do with a light box if
they don't want to draw freehand, if
they want to draw, don't use the grid method, but have a smaller drawing, one to work really quick, they use a light box, and some artists actually
have huge light boxes, A2, A1 size even so, it's not like we're cheating, it's just we're making
it herself easier. We want to have that outline. Now pick your methods, then draw this tree
only the outline, and then go to the next lesson where we're
going to shade. All right, I'll see you
in the next lesson.
3. General Shading & the Trunk: If all goes well, you've
got a sketch of this tree. Now of only the outline. I've done a sketch. You've done the sketch bit, one
of the methods. And how the next thing we're
going to do is shade this so that this tree won't
look as a drawing, well as an outline
anymore and not as in the previous two sessions. Like a really cute three. Now I want to make a
semi realistic tree. And for that, we're
going to use shading as I showed already
a little bit. Alright, well, we're
going to explore that a lot more in this lesson. So let's go. So here's my tree. As you can see, I've ordered a few things from the
photograph that I need to bring back
that photograph canvas so that you can see it. I got still the reference
picture there. There you go. If you still have your grid on, make sure you're hiding it now, you don't need it anymore. So I've changed a little
bit from the reference. I only use this branch. Let me put it there, put this
branch there, this branch. I put the trunk up here. I didn't do all these
little branches because then the lesson we'll take just way too long now you can do all those
branches of course, but I'm going to do
only one branch. And the rest. Of course
there's no details in it, only the rough outline. And I did some clusters of leaves so that we can
bring in those leaves. I'm not going to shade
every single leaf. Gonna do, use a little
trick for that, but we're gonna just
shade the clusters. So it looks like this
tree has leaves, but not every
single little leaf. Alright, let me height. Now I am do I want to
hide the reference? Let me think. Yes, I'm gonna
hide this reference now. You might want to use
the reference with it. I'm going to hide it for now so that it won't get in the way. But if you need the reference for shading, just put it there. But I want to have
this, of course, full screen and I want you
to see what I'm doing. So now I've got one layer here. I'm still using that
same Durbin pen. It's a 100% I've colored
still on around half. I actually sketch with half to your sketch could well be
a lot more dark than that. That's not a real
issue you could later, what you could do is
lower the opacity of your layer later on if
this is really too dark. Alright, but for
now, I've got this. I've got still that
same color and I'm going to add now a layer. But I want this
layer to be on top, the sketch, I want to be on
top of whatever I'm doing. And actually what I'm
gonna do with my sketch, I'm going to slide this over to the left and I'm
going to lock it. There you go, so that I can't accidentally draw on that layer. I'm going to go to layer
two where I can draw on what I'm going to
start with is the truck. Let's start with the trunk. I'm going to imagine
where light comes from. Now, you could use
the photograph, but I'm going to imagine
where light comes from and my light in this case
comes from this site. You go. So that means that light
shines there, there and there. And that's simply also
means that this side of the tree would be
really in full light. If you get a little bit
further away from the light, this tree part of
the tree would be in less light and this part
would have the least light. So in shading, this will be lighter and this will
be darker shaded. The same for the trunk. Now the trunk would be
really liked it here. Then it would have a pod where it's less light
it now that goes around here because this is
blocked by those leaves, so that would get
dark already and the rest will be pretty dark. Now this little part
here on the tree, what I'm going to do with that, I'm going to make a whole lot of debt and I'm going
to hide this layer. We might use that later on. And I'm going to
add a new layer. So now I've got three layers, you perhaps only two layers. I'm going to start
with the trunk. And actually what I wanna
do is I want to draw shade the whole tree
because the background, I'm going to leave
whites, so I need this tree to stand out. And what I'm going
to do with that, I'm going to go
back to the pencil. I headed halfway, but I'm
even going lower with it. I'm going to go till
about 25 per cent. The first thing I'm actually going to do is not the trunk, but I'm gonna do the whole tree. And what I'm gonna do is I'm
going to put this pencil flat and I'm just going to
shade in the whole tree. And what you got to make sure is that you don't
accidentally lift your pencil because then you
get a second layer on it. And I don't want
that. There you go. Now, if yours is turning
out a lot darker, that is not an issue
because we can just lower the opacity of the
complete layer. Diego. And now I lifted my pencil too. Right? Now, this
part I need to do carefully. Here you go. There. Alright, now
I gotta do to tree. And I'll everything
pretty much has the same shading color. But that is not a problem. Now, I see I went
outside somewhere. I'm gonna get my
eraser and I'm just using as an eraser always just airbrushing hot blends and erase where I've gone
wrong on how to sign here. Now if I assume E and Z, you see this nice shading texture. There you go. Let's do the rest two down, and let's shade this part. So that is my first
layer of shading. I'm going to add a lot
more layers to make this actually very beautiful
and quite semi realistic. So we have some more work to do. But this is the first one. Let's keep on going. I'm going to put a
new layer on it. The light came from here. We said two, this will be
pretty much quite dark, except for the top might
still be a little bit light. But the first thing
I'm gonna do is give this another application
of another layer, in this case of graphite. And shade it nicely like that right
there a little bit. Do slit bore. Good, nice and accurate. Bit better. Sum here. Good. Now we're going to look
at this and say, okay, down here, where this
cluster of leaves, this that will cast a shadow. I'm going to add that in, and I'm going to
also on the bottom, add a bit of shading the ego. And I'm going to do the
same right here too. That would cast a shadow and we would have a bit
of a shadow there. Now on top here, we would get the same a bit
of a shadow on it like that. And of course, since the
light comes from here, pretty much this part, we're gonna make a
little bit darker to write to the bottom a little
bit and do it like that. Now look at that. That'll
really looks quite nice. There's a dark upon
death for some reason. Gonna go back to this shadow. I want this definitely
darker than it is. So I'm going to shade it in. And we're gonna do
the same right here. And I'm going to say, Oh, that's too much. Correct that a little bit. Right? This I want darker too. And I want to breach
this a little bit with one application of shading. And I want to make a
nice shaded part there. Let's see. Here we're going to do same. Shade a little bit
at the bottom, only. There you go. Now I'm going to put
my pencil a variety again and add a little
bit of a line like that. There you go. Now, that
looks a lot better. Let's see. Do I need something more? Yeah, Once a little bit
of shading right there. And I do want this
a lot blacker, but probably I can't
go much blacker because I got it very light. So I'm going up now
to 50 per cent. And by doing that, I can add nice dark parts here. I can add a nice
dark part there. This, I'm going to do lightly
shade that in a little bit, get a nicer transition
between everything. Really make the
back nice and dark. And with this, I'm
gonna do the same. But now I'm using
more the point of the pencil because it
is such a small part. And around here. Connect that and do that. Right there too. And carefully shade that
in a little bit more. There you go. I'm hardly
using any pressure for this. And I might just want to go
a little bit more like this. And on the branch just
a little bit more. And that will be my first part. I'm going to leave
this like this now, I'm gonna do this part. I want to start with this here. What I'm gonna do here, I want to add a little
hole in the middle. Put that 100 per cent up, make that nice and black, and go back to my 50 per cent. Then on the bottom, I'm going to add
some shading right around to make this stand out as if it is a broken
off branch and not which has grown
out a little bit. Alright, the next thing I'm
going to do is we go back to that twenty-five percent. And we're going to do
my first application of shading around here. Now a set around there
wouldn't be much. So I'm going to
leave that alone, but I do want shading here. I'm going to not touch
that cutoff branch. We have. Let's see, I want to extend
that a little bit. And around here too. There we go. And I'm going to leave
this nice and bright. Now around here, there
will be more shade. And there you go. And of course, on top of this, that will definitely
be a lot more shade. Alright, let's
start to look nice. I want to put this up again to about 50 per cent because I want this to be nice and dark. I'm pressing firm now. And now if the next
one I'm hardly pressing to kind of blend in nicely on the edge. I'm going to put a
bit more like that, that you go back. I do want that to be shaded
darker around there too. And I want these two to meet
somewhere. There you go. Now look, that looks great. Now I'm not going to press hard. Just going to add a little
bit of a layer on top of it and get a bit of
a transition going. There you go. There we got our next
part of shading. Alright, now I need
to go to this part. What I wanna do is on top of it, add a little bit shading
around it a little bit. And what I'm gonna do
with this is lower 25 per cent and give the front a little bit of shading and not the back so that it
will stand out. The ego. And I might just add around it just a little more
and blend this in. A little nicer if there's 25 per cent of that these lines, we have all disappear and become a nicer transition
into the rest. Let's do that with this
to make a little bit of a transition from one part
to the other and they go, no, that looks good, doesn't it? So what we're gonna do
next is very carefully add a little bit of
shading around that. And if we go outside
of the tree, not a problem, we take up
eraser, erase this part. And we've got to
do that here too. There you go, make
it a bit nicer. And that would be
the first part. There will be the
trunk and the branch. Now, the next thing we're
gonna do is add a new layer. And I'm going to put my
pencil back to 50% is, do I want this all the way up? That's the wrong one. I'm
just messing with my eraser. I'm going to put
this to 50 per cent. Probably want to
lower this to 50. Now about halfway through, so there will be 26 per cent. And what I wanna
do is now bring in some of the bark right away. And for that, I'm
just going to draw some lines just as we've done
with the previous lessons. At some random lines, do that on the branch two. And by doing that, you just bring in some
nice details right away. And let's do that here too. Now with this one, let's
even make a little cut here. So I'm drawing this
in really dark. Let that slide see,
that looks good. And let's do another
one. Right there. It larger or even just
for a nice effect. And around here some
different directions so that you get a nice I did and that was
cut off and broken. And there we go. Nice. Okay, now the only
thing I want this, put the pen back on. The higher. I just want to
go around the bottom here. Ends up there. I want to add just some
really black lines. Stego, we can go
even darker, right? Nice. Toned down, a bit taller. And there we go. We can do that here
to make that pretty much as black as the outline. And there you go. Now, this looks nicely
shaded, doesn't it? Alright, good. Will be, that will be the first part which nicely shaded and
drone in some details, some details right
into the trunk. What you're gonna do is do this, of course, create if you
haven't gotten along, I would say do it
first before you go to the next spot and then actually
move to the next part. Alright, I'll see you
in the next part.
4. The Shading of the Leaves: Well, we've done a trunk, we've done the branch. We now wanna do those leaves. We're going to add shading. Basically, we're gonna do
more or less the same. I want to point out to
you what I'm doing. And then you just
kind of follow along. I'll do it afterwards when you've seen it.
Alright, let's start. The next thing is we're
gonna do these leaves. I'm going to add a
new layer for that. And as always, nice to add new layers for that
one you going wrong, then I don't have
to erase a lot. You just can clear things. And then all what
I've done already just is preserved because I
really like how this looks. It looks really nice. Alright, good. What we're
gonna do is now with this, I've already drawn a simple
picture from this and I said, I want this to be dark,
I want that to be light. I'm on the rest to be disliked, the rest
to be in the middle. But where those leaves are, I'm going to add
some dark parts. So what I'm gonna
do first is we have to spend on pencil on a 100%. I'm going to slide this
back to around 2524. And I'm just gonna start
shading first of all, this part and this part, but not touching that part. Now if I hide this layer, you get this idea of
shading light here, less light here, and
the lease there. But we're going to string
from this definitely. Alright. What are we
gonna do with this is I want to make a bit
of a nice transition. So really I'm not pressing and I'm blending in
this just a little bit. I don't wanna do that
around here too. Get a bit of a nice
natural transition, a bit better than I have. Alright, This is good. Now we're going to do
those extra parts. What I'm gonna do is I'm going to shade under these
lines of the canopy. I've done off the leaves
and I'm going to just shade under it like that. And with that, I'm
adding right away a little bit more dimension there to bringing some
attention to these parts. There you go. Let's
see around here too. There's one way to
do it around there. Here's a very short
one. Here's one. You've got a bit better and
I want to, Alright, good. Now the next thing I'm
gonna do is I know that if light comes from here, these bottom parts would
be hard initiated. So I'm going to give
them a nice darker one. I'm going to go to
the 50 per cent. Want to go darker with this. Alright? Now, that is nice. I'm gonna do seem right here. And now that starts
to look way nicer. Let's see. Where do I
want some more of that? Around here, under here. Good. On the here. The bottom of this. And I see I missed something. They're gonna do it like that. Alright, now here
I'm going to add some more shading the ego that
it's starting to look at. Let's see, what do we
do more under here. Hello, that's too
much outside of it. This part, to be a bit darker. I do want that around there
to starting to look nice. Let's put this back to
about twenty-five percent. And I do want to shade
this in a bit more. Definitely another layer here. And do wanna do
seem right there. Add that makes it better. I do wanna do that
around here too. Bit around there, around there. I've done this part up, undo. Let's do it at the HER2 is add. A little bit of shading here to make it a bit
more interesting. There we go. Alright, well, that takes care of that. That looks nice. Alright,
now at the bottom, 50%, really at the bottom. I want to go really dark day. You go at that
bottom a little bit. This one. This one. As you can see, I'm starting
now with these leaves. Small, goal, larger and larger. And nice enlarge
here to start small, go larger, larger,
and like that. And that brings a nice
interests into this tree. Let me do that here, too small, a bit larger here to profusely. All right, around here. There we go. Alright, good. Shade around these buttons here. Too little bit. More to hire. Good. Oh,
we didn't do this one. A little bit up there. Alright, good. Now that begins to
look quite nice. I'm going to add a new layer. What I'm going to do is
now I'm going to bring in the impression of leaves. I'm going to lower this 100%. Let's go for a 100%, just a bit random like this. Now that is better. But now it is. I would
say slightly too dark. I got to bring it
in with the rest. So I'm gonna go back
to those 50%, right? And just give the impression that there's actually some
leaves here and there. Especially also on the outside. Just like with the tree trunk, we're just bringing in some
interest here and there. And this is really very random. And the more random
you can do that or that is to random there. There you go. Go inside, go outside. And that just makes
this looks great, especially on pods,
where we've drawn something even here.
There are two. Let's see, How is that?
We need some hair. And obviously, there's
hardly anything there. Let's see here. Now it starts to look
really nicely like that. That's way better than before. Alright, let's look
at this. Okay, good. Now let's see what this
pen really going low. Pen, pencil, I'm going
really low, 14, 15%. And we want to add a new
layer on top of this one. I want to see if I can
get a little bit of a more interesting
transition there. Yes, it's putting down not much, but just enough here too. To get a little bit of a nicer transition between those lines of fears lines here. Now we could use a blender pen, but then we're just going to actually erase
everything we've done. And I don't want that because it blends so much that our
texture will be gone. And I want to keep this texture. Alright, I'm using
a standard brush, so I'm working with data. It's not really blending, blending as a pencil ward, but still see you get a
little bit of an extra HER2. And that, that looks actually
a lot better here to adding a little bit of
extra length to get a nice soft transition
than I do have. Alright, called
Dare to, with more. Alright, and now I've added
some leaves here and there. So what we're gonna
do with those, I'm just going to imagine a couple of more
clusters with it. Especially in these
lighter parts. I had a little bit of
shade here and there. Even there around that one to make it slightly
more interesting. Now, we have this obvious
line. What are we gonna do it? I'm going to shade
that roughly away. See now it's a lot better. Alright, good. And a bit more there. See, now we're getting
something nice. Alright, let's see, let's
do a little bit still. They're doing it
really roughly now. Okay. That's it. See, dislike. We want to Cat this way. A bit more. Few layers on that. A little bit of a
nicer transition. Alright, Well, I
think I'm pretty much done with these leaves and that looks pretty
nice, doesn't it? Perhaps a little
bit here and there. Up there to here. It's a nice one. There are some nice one. Good. And we're going to
stop with that. That's the leaves. We're done now with the trunk and we're done with the lease. What I'm gonna do now
is I'm going to erase some parts where I've gone outside the lines.
You can do the same. If you haven't drawn this, of course, she doesn't. It's not really
drawing with shading. Now, I want you shaded that. We're going to go to the
next lesson where I'm going to show you actually
one more part. And then I'm going
to leave you on your own for the last bit. So as you can get a little
bit of practice and see if you can get the idea and put that into practice yourself.
But when are they at? I'm going to show you some more. So I will see you
in the next lesson.
5. Doing the Pot and the Floor: Welcome back. We're going to actually finish your drawing. Now I think we're going to
finish it in this lesson. I want to show you a few
more things that let you do. One part on your own. What I'm going to show
it will speed up, piled up so you can still
see what I'm doing. Or you could just don't watch it and do it yourself,
try it yourself. And then once we're
done with that, we're gonna do some
final details. And then this drawing's
actually done. We are while on the way with it. Alright, let's continue
looking good so far, what I'm gonna do next, I want to show you one
thing I'm gonna do here. And I'm going to
add some shading. Now, if the sun comes
from here, as we said, then this tree here would cast quite some shadow on this part. I need a new layer
and let me see. I need still that
brush, It's on large. I'm gonna go to that. Nope, not 100%. We're not going to
work with for 4050 per cent right away. And what I'm gonna
do is this part. First of all, let's see, I'm going to give this
a nice black line here. And then I think that is good. Alright, that is nice. The next thing I'm
gonna do is distri, is casting a shadow and
we'll make it myself. Quite easy. I'm going to
start at the bottom there. Press nice and heart. Stop there for now. And do it right there. And go up to there. Alright, and now
this tree blended in with the tree a little bit as causing a nice shadow there. And it's of course casting a shadow here and we're going to go straight under it. There you go. Now here an angle and show that
this is a bit lower. I see that. That looks
great, doesn't it? Alright. Now in-between here, I'm gonna go back to that. Twenty-five percent. I'm all for t now,
but that's okay. I'm going to shade
this a little bit. Then I'm going to shade
actually over my tree. I'm going to shade this
bottom a little bit. Rights, and want to
shade around there. Just a little bit furry roughly. Down here. There we go. I think that is good. Alright, let's get a nice. Now, I'm going to say
that this is this part. It's pretty much blocking some lights disbar to
blocking sunlight. Then it's of course, on the bottom
blocking some light and you're getting
something interesting. This is pretty much
in full light bottom. I want to add a little
bit of shadow around here and a little bit of
shadow more around there. So that you get
that nice effects. Alright? And I don't want this to take away from the tree, so I'm probably
might just stop him. What I wanna do
though is go near the tree a bit darker and then
transition that into here. So I'm stopping there. Let's see, that is light. I want to add a little bit of her bottom right there. Good. Let's see. Let's add some
down the bottom here too. And let's do that a
little bit there too. Alright, good. That's it. Now back here, there would be some shadow
but not everywhere. Good. And that's it. And I'm pretty much leaving like it is
now. Alright, Good. Now, as with the tree, what I want to do is I'm
going to add a new layer. I'm, I'm making sure that pencil is on 50 per
cent now again. And I'm just going to
add some interests as if there's something flowing
here on the rocks, down the rocks especially eager, I want that day or two. And just make it
interesting right here. What I'm gonna do,
I'm gonna pretend. I think I did see
that in that photo. There might be some
grass growing there and just randomly here too. Around these edges,
add some lines, some dots. Make it interesting. And adding some
random lines there, alright, some longer lines. Creating a bit of
texture, rock effect. See enough and up here around the bottom and dare
at some lines. And of course around that
bottom a little bit. Okay, let's do a
little bit there. And see that looks right
away quite differently. What I'm gonna do next
is I'm going to create that floor and I'm going
to shade that part. I'm not going to tell
you how I'm doing that. I'm going to speed up part up. I'll leave that up to
you to figure it out. But I think by now, probably you got the
idea light shadow and about how to shade. If not, then the
speed of parties there to really guide
you a little bit, except for me talking
you through it, right? But I think you'll
figure it out. Okay, I'm gonna continue. Now. I've drawn everything, now
I've shaded the whole thing. What I wanna do is bring a
little bit more excellence onto the pot and the floor two. And then I'm gonna just
look it over and see if I'm done with this or
not. Alright, let's do that. Okay, so I'm going to add a
new layer that doesn't really matter where as long as
it is upon the shading, I did the shading of the pot and the floor really down there. I'm going to just add a
shape layer somewhere. I've got this pencil steel. I wanna go to the
50 per cent again, sizes on the hunger per
cent, that's fine with me. I wouldn't want to do is add some dots on the
pot here and there. Just to give it a little bit
of texture and dimension. Not totally flat
here to dare to, wherever you see it. There are two rides around
that edge a little bit, so K, That looks better
now on the world, why don't we wanna do is here, just some stripes here on them? I do add few lines on the hair. Even some shorter lines here to why that's standing
on, making it nice. Good bit here. Alright, now it looks a
lot better. Now let's see. Do I like this? So
far I do like it. What I can do now, I don't like the
outline that much. What I could do it good to
go back to this first layer. I could hide it,
see if I now hide my outline. I've got this. Then I noticed a
few mistakes right away that I haven't
shaded that part. I could also then the height, the floor, and then
I'm gonna get, this looks pretty
interesting too, except for this part here. So I'm going to correct that. I'm gonna go back to that really bottom
layer. There it is. I'm going to put this
to that 20% around. And I'm just going to add just a little bit
of shading there. Let me hide that top layer now and that improves
it right away straight. And Diego, so I've hidden this. Now I want to really
do that floor then. Slightly nicer, and I want to
make that slightly darker. So I'm going to get a good transition between
the floor and the rest. By making the floor darker. I'm making the pot stand out a little bit more.
We can do that. Then. I would go
slightly darker there. And probably add a little bit of a shaded line right there. Good. Now, Now it's better
than I do that here too. At the back. Make that stand out a little bit
more from the rest. Okay, good. So now you've got a
really nice shade a tree. Now I could bring back
the line to unlock it and really go very light C, that would work too. I'm going to around 46%. That works nice. I think I liked that the best. I can do that too with
my layer down here. Which one was it 11? She'll bring it back. Go really, really
low, around 40%. And now I have something
I really like. Bring them back a
few of those lines. Correcting my mistakes. Now, I am actually
don't think I am done. I like this does good. The shading is nice. Yeah, I'm calling this done. And that is it. I am done. I've got a nice
shaded bonsai tree, way different than what
we've done before when we did the trees of the hedging bringing the
light shadow that way. Now we've done away with the hatching and
we've gone shading because Procreate and the pencil allows that to happen too. Alright, well, that's it. Next up is the project. I think it'll be very
short and the project, and then we're done. Okay. See you in the project.
6. The Project & the Background: Let's talk about the
projects, not a project. I can be really short
about history posted. We can all enjoy it. But of course, we can go
a little bit further. Let me show you something.
Now here's a drawing again, and it is nice, but I do believe this
is slightly too white. I want some texture
behind there. I'm going to bring my drawing. And my drawing of course, has its own this
paper with a texture. And you can also see
that the texture really comes through
the drawing. So what we're going to try now, we want to try to
bring in a texture. So that is the challenge.
We're going to just pick. Pick random brush. What
are we going to pick? Oil pastel. Sounds great to me. I'm not sure if
this kind to work. We're going to try this. Alright, what are we
going to do is I want a layer on the bottom
of everything, and I don't want
that layer strong. I want that brush nice
and large because I do think that this might bring
in a texture right away. Let's give this a try. I'm going to go for 20 per cent and I'm just going
to add something. And yesterday something
is appearing. Look, there's our paper texture. Well, I think I might
be done right away. I'll keep on going a
little bit and look at that everywhere around this, no escaping anything. I would almost say
that there is, look at that everywhere. Nice texture right away, some paper texture that
obviously is in this brush. Some creative effects
right away. I'm done. We'll leave that like this. Now of course you can
pick a different brush. Let's put another layer
on top of it, hide it. I'm pretty sure that that's soft pastel works
really nice too, and you get a different
paper texture. So let's do the
same with the soft pastel color was largest, we can go around 20 per cent and just see what
it brings for this one. And I'm just going to give
one application first row. And that is right away. Really nice way to strong. No problem. We can lower the
opacity on this one. I wanted to come
through a little bit. There you go. Now, this makes it look really like a
drawing, doesn't it? That's it. Alright, good. So I've got two
alternatives now. I use the soft pastel or
you can use this one. This one is stronger, but this one is not getting any way. You could lower this
just a little bit. That is not the right layer, it's the ray would say about
75 per cent, that's better. Look at it. Too. Great, nice paper
textures that would look like as if we've
drawn this on paper. Same as this one where you see all the texture in the paper
coming through, the shading. We see that here too, all
the texture coming through. And that is the second
part of this project. So the first part is draw this. The second part is create
that Kansas texture. Pick a brush. There's
plenty of brushes. Perhaps you've got some
nice cancers brushes to just add a kind of
stupid or a paper. And even in previous lessons
I've done previous class, I don't, I've showed
how to bring in Nice Ethan paper effects. You may have followed them. If not, you may want to check that how to do great campuses, although this looks
pretty good already, but you can go wafer with this. I'm leaving it like this. So your project is post this and if possible create a nice
texture too on the paper. And then just post
your projects so I can see it and everybody
else can enjoy it too. Well. Thank you for being with me. Don't forget to follow
me here on Skillshare. There's plenty of more
classes I got on Procreate, but also traditional drawing. Also check out my website, follow me on Instagram
to where you see what crazy things I'm up to. Thank you again, and I hope
to see you in another class.
 Benjamin A, Art Teacher, illustrator Art by Benjamin