Transcripts
1. CLASS INTRO: Are you ready to unlock your creativity and master
the art of sketchbooking? This class will teach how
to elevate your artwork to new heights through
the power of sketchbooks, whilst creating stunning
books at the same time. I'm Vivian. Welcome to
my triangular studio. I'm a professional
artist from Scotland. Join me on an immersive journey into the world of sketchbooks. From choosing the right
materials to designing creative layouts
and adding depth with mixed media, this
class has it all. Are you ready to transform your sketchbooks
into masterpieces? Join this class today and
let your creativity soar.
2. WHY SKETCHBOOKS ARE VALUABLE TO ARTISTS: People talk a lot about
sketchbooks in the art world. However, many artists haven't
a clue how to use them. When I was studying
at art college, I kept asking myself, What am I supposed
to put in them? Where do I start? How do I
make them look impressive? It was only through
seeing other students completed artwork that I finally got it and had the confidence to start using them to
explore my own ideas. Picture this scenario. The
lots of artists experience. You're keen to build
up a collection of artwork for exhibitions. You have a time limit
or you're getting frustrated with a
lack of progress. Does working in your sketchbooks really seem like a
good use of your time? You might just want to
skip to the real thing, the finished paintings.
However, hear me out. I have eight big reasons why
sketchbooks are worthwhile. One, you will gain
experience using art medium. So when it comes to
the final thing, you'll paint with confidence. Two, use them as
a testing ground. You can experiment with different compositions
and styles. So you know the best one when you come to
paint on canvas. If you're experiencing
artist's block, you will get into the groove
again by just picking up art materials and messing
about with them on paper, so there's no pressure to create pretty artwork or
finished pieces. Four, they are ready to capture your ideas and inspiration
while it's fresh. You can keep a small
one in your handbag and use it when you're out and about if you get some ideas. Five, galleries that you want
to exhibit your work in, we'll take your work
more seriously if you can present
enticing sketchbooks. You can provide proof
that you've created original work and not just
copied someone else's. Six, potential buyers
love to look through your personal sketchbooks as their glimpse into how
a real artist works. Seven, Art colleges do your work based more on your sketchbooks than
your finished pieces. They want to see where
your inspiration comes from and how you
turn this into art. They're satisfying
to look through, and you can rediscover
the flame that made you want to paint your
subject in the first place. These are all good reasons
to use sketchbooks. Join me in the next lesson where I show you
how to get started.
3. HOW TO BEGIN MASTERING SKETCHBOOKS: Which subjects excite you? Which art materials are
you keen to explore? What aspects of your work
do you want to improve on? These are all questions to ask yourself when you want to start
building up a sketchbook. One concept to keep in
mind when starting out, pages can be messy. They don't need to
make sense to others. Just remember the word explore when you start to
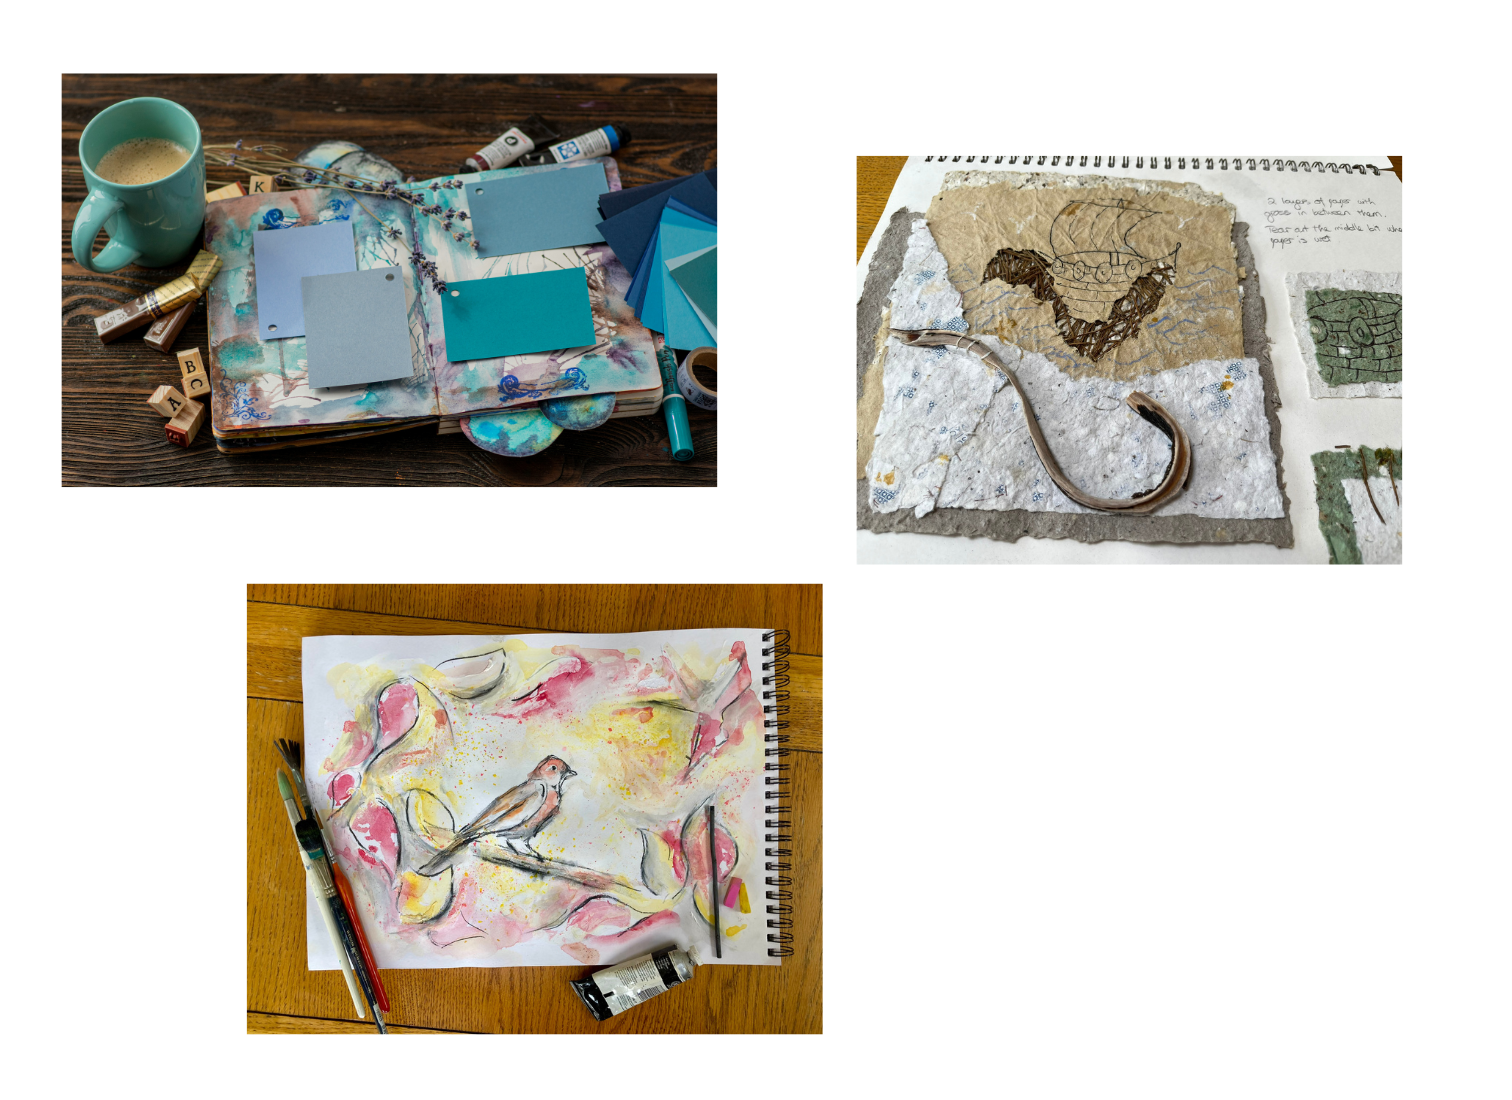
put pen to paper. Here are some activities
to start with. If you can't think of a
subject or theme yet, you can collect and stick down reference materials, use photos, magazine clippings,
texts from newspapers, and quotes that inspire you. You can also add some
natural ingredients like dried twigs and leaves. These are also perfect fusing in mixed media explorations. Number two, you could
draw your subject fast, give yourself a time limit and
see what you come up with. You could also draw a subject, but don't look at the
paper while you're doing it and see what
you come up with. You'll be surprised
at how similar it actually is to the subject
that you're drawing. And then whatever
you've made on paper, you can then repeat this and turn it into pieces
of art later on. Choose a color palette for
the work you want to explore. The sketches and
explorations and materials should stay
within this color range. If your mind draws
blank and you can't think what to sketch
and I've been there, then just commit to
drawing every day. You choose the same subject
and just sketch it every day, and that will get you
into a really good habit. My first sketchbooks were
for exactly that, sketching. Improving your drawing skills is always important,
so no loss there. I'll see you in the next lesson, where I show you the
art materials that are great for using
in sketchbooks. We'll also look at the
different types of sketchbooks available so you can find the perfect one for
your art style.
4. ART MATERIALS NEEDED: Firstly, let's talk about all the different types of weird and wonderful
sketchbooks you get. You get watercolor
paper sketches, mixed media sketchbooks, sketchbooks for
pastels and charcoal, book style ones, which are
good for two page spreads, spiral ones for messier
and thicker works, and also foldout sketchbooks. I'll show you how to make
one of those as well. Before choosing, which is
right for your project, think about what you intend
to study or experiment with. Keep it simple. If your
aim is to do drawings, keep it use the more
traditional type. If you're going to get the
paint out and get messy, then get a mixed media one. They are more sturdy and can handle a lot
more punishment. Now about materials. This is the more exciting bit as the
possibilities are endless. However, firstly, I'll tell you about the most useful
ones to have in your collection that will prove valuable over and over again. You want some soft
and hard pencils. Have a pencil sharpener
or craft knife so you can keep going if the
inspiration is flowing. I love using a craft knife, as you can manipulate the tip of the pencil to give
different shapes. You want a collection of pens, some water resistant gel pens, and others that will bleed. These will give
different effects and they're easy to carry if
you're out and about. You want some charcoal sticks. They're always good to give contrast or to create
three D effects quickly. You can see my watercolor and charcoal class for more
in depth tuition on this. You want a collection
of brushes, the commercial ones and handmade ones for more
interesting mark making. You find all sorts of ideas
on Instagram and places like that on how to
make your own brushes, so that's really good. You want some watercolor paint. It's good for adding a
quick splash of color, and it's easy to carry if you like to sketch
out in the open. Putty rubbers, a great rubber
for adding smudge marks. You can mold it into
different shapes, and it can wipe completely
clear charcoal marks. You can actually draw
with the putty rubber, and that's what I
like most about that. You want acrylic paint. This gives bold colors that can cover previous marks
with no bother. They dry very quickly.
So if speed is an issue, if you want it to dry fast, acrylics are perfect for this. I like to use natural
materials in my sketchbooks, as I often study nature and
things like that in my art. I sometimes stick
things like leaves, twigs and wood
shavings to the books. I will go into more
detail about how to use mixed media in your sketchbooks
in a later section. But for now, some good
materials to have for mixed media that will always
come in handy are PVA glue, charcoal, some pens,
scraps of fabric, sponges, coffee,
colored powders. You get the idea. These things
will all come in handy. But I would say scraps
of paper, charcoal, PVE, glue, definitely
have those by her side. I'll see you in the next lesson, but I'll show you
how to use your sketchbook to explore a theme. This will help you to discover a personal art style that
works with your subject.
5. USING SKETCHBOOKS AS THEMED WORKBOOKS: I'd say creating a
themed workbook is the easiest way to go about building up a sketchbook
that gives results. This is the perfect
way to develop an idea that leads to a
more final piece of art, which is often
what you're after. You can take the design or composition you've developed in your sketchbooks and then create finished paintings
based on this research. This is how I'd
go about building up a collection for an
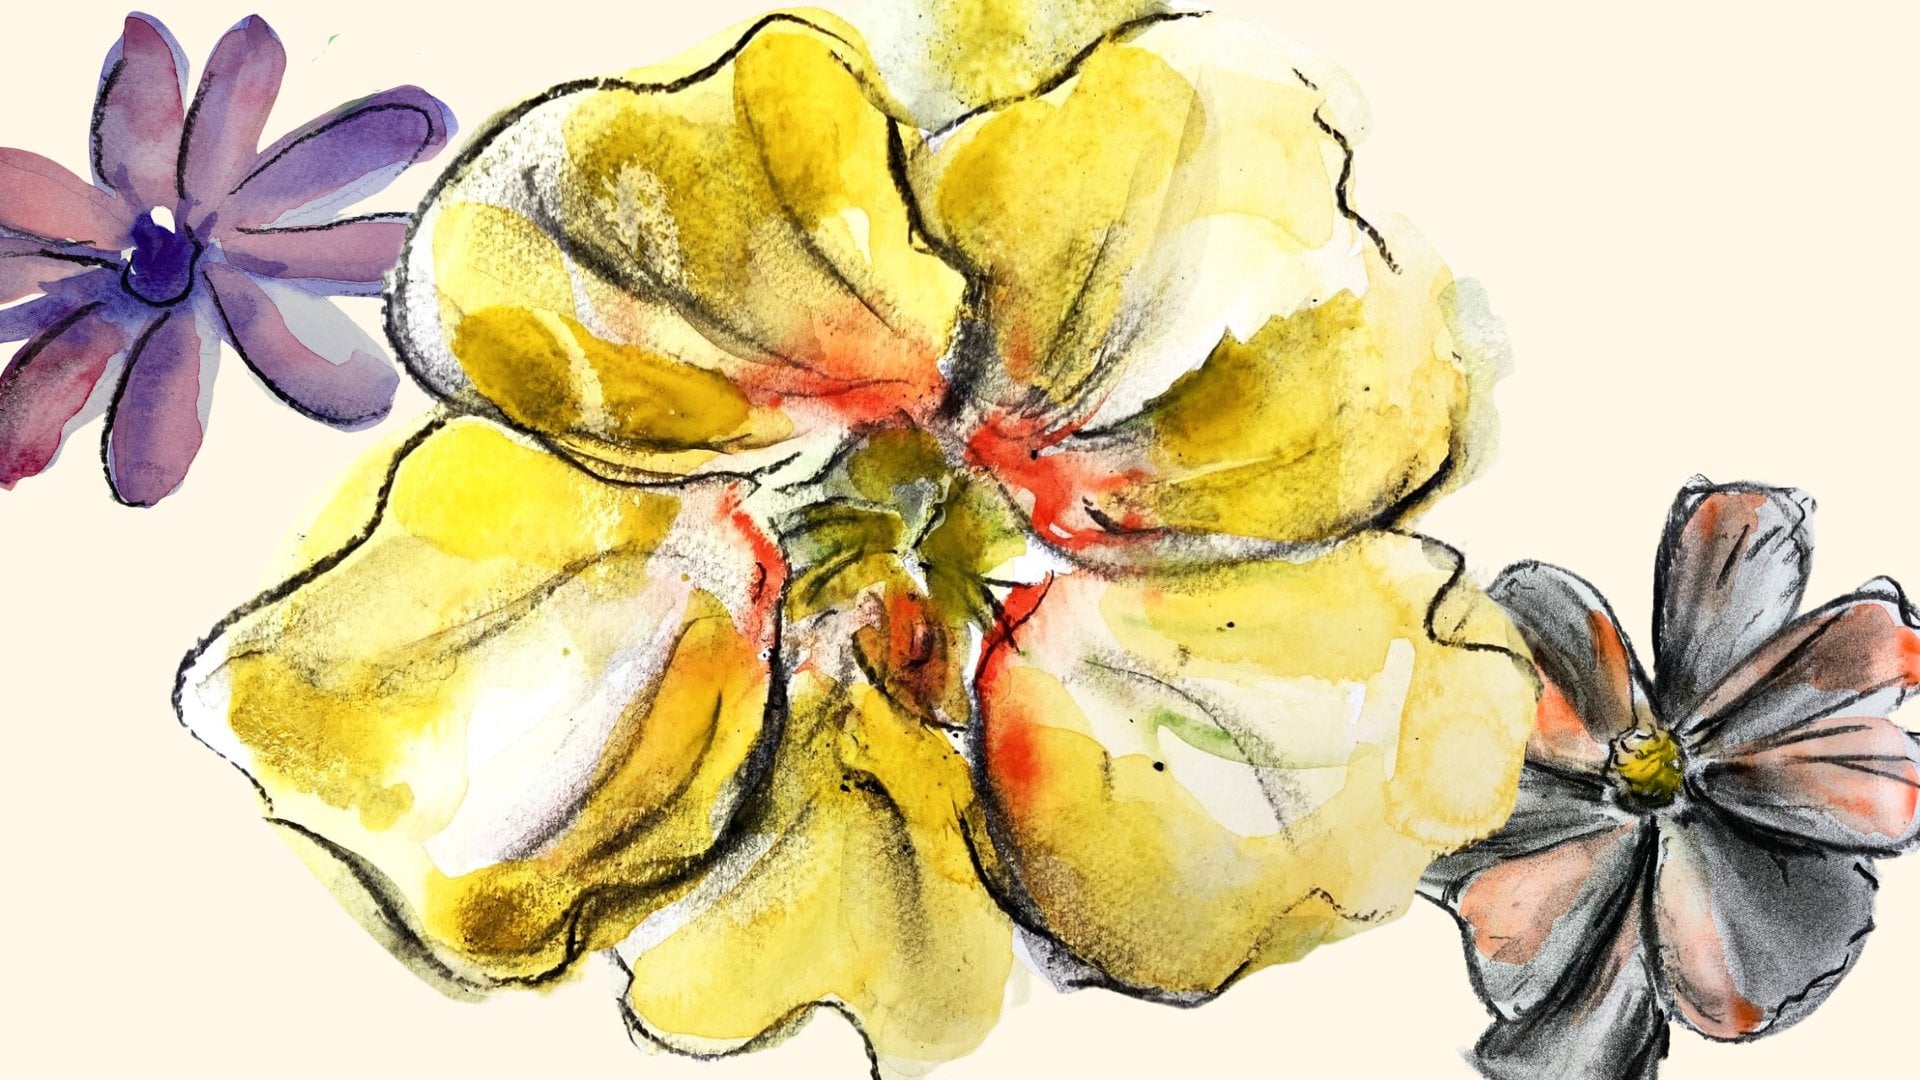
exhibition fold gay. Here's a sketchbook full of
lots of studies of flowers, and I did this and it led to an exhibition
called the blossoming. You can see how I
experimented with different colors,
shapes and textures. Gradually, I built up
enough research and felt confident about starting
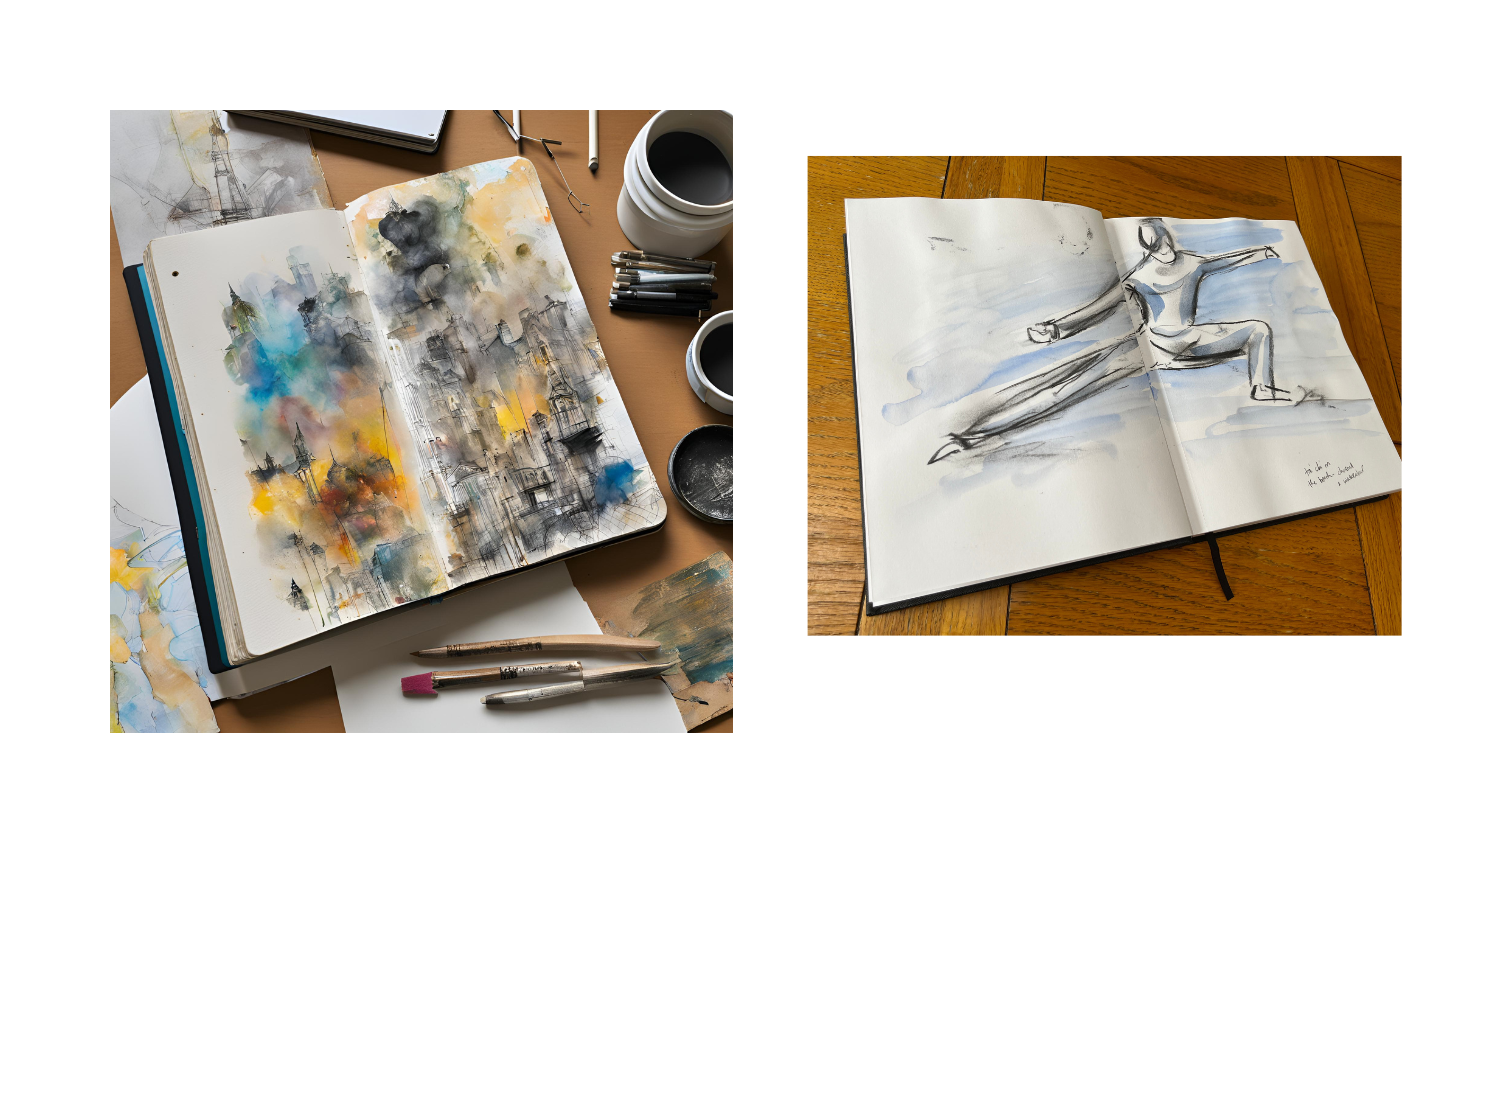
the actual paintings. A subject I'm studying
right now is Tai chi. I found Tai chi to be
really good for my health, and would like to
express this in my art. I'm inspired by the beautiful
yet powerful movements. I see it kind of like
dancing in slow motion. You can see how we begun
some basic sketches here. I'd like to develop
these further by using mixed media because that's
what I do. I love mixed media. The next lesson will
show you how to use sketchbooks for experimenting with different art materials. This in itself could be
seen as a themed workbook, but there is so much depth to be found by really
getting to grips, but getting to know what
your materials can do, what they can do for your art.
6. USING SKETCHBOOKS TO EXPERIMENT: Se yourself as a
scientist testing out what happens when you place one medium next to another or testing to see which
colors work well together. You are in your lab and
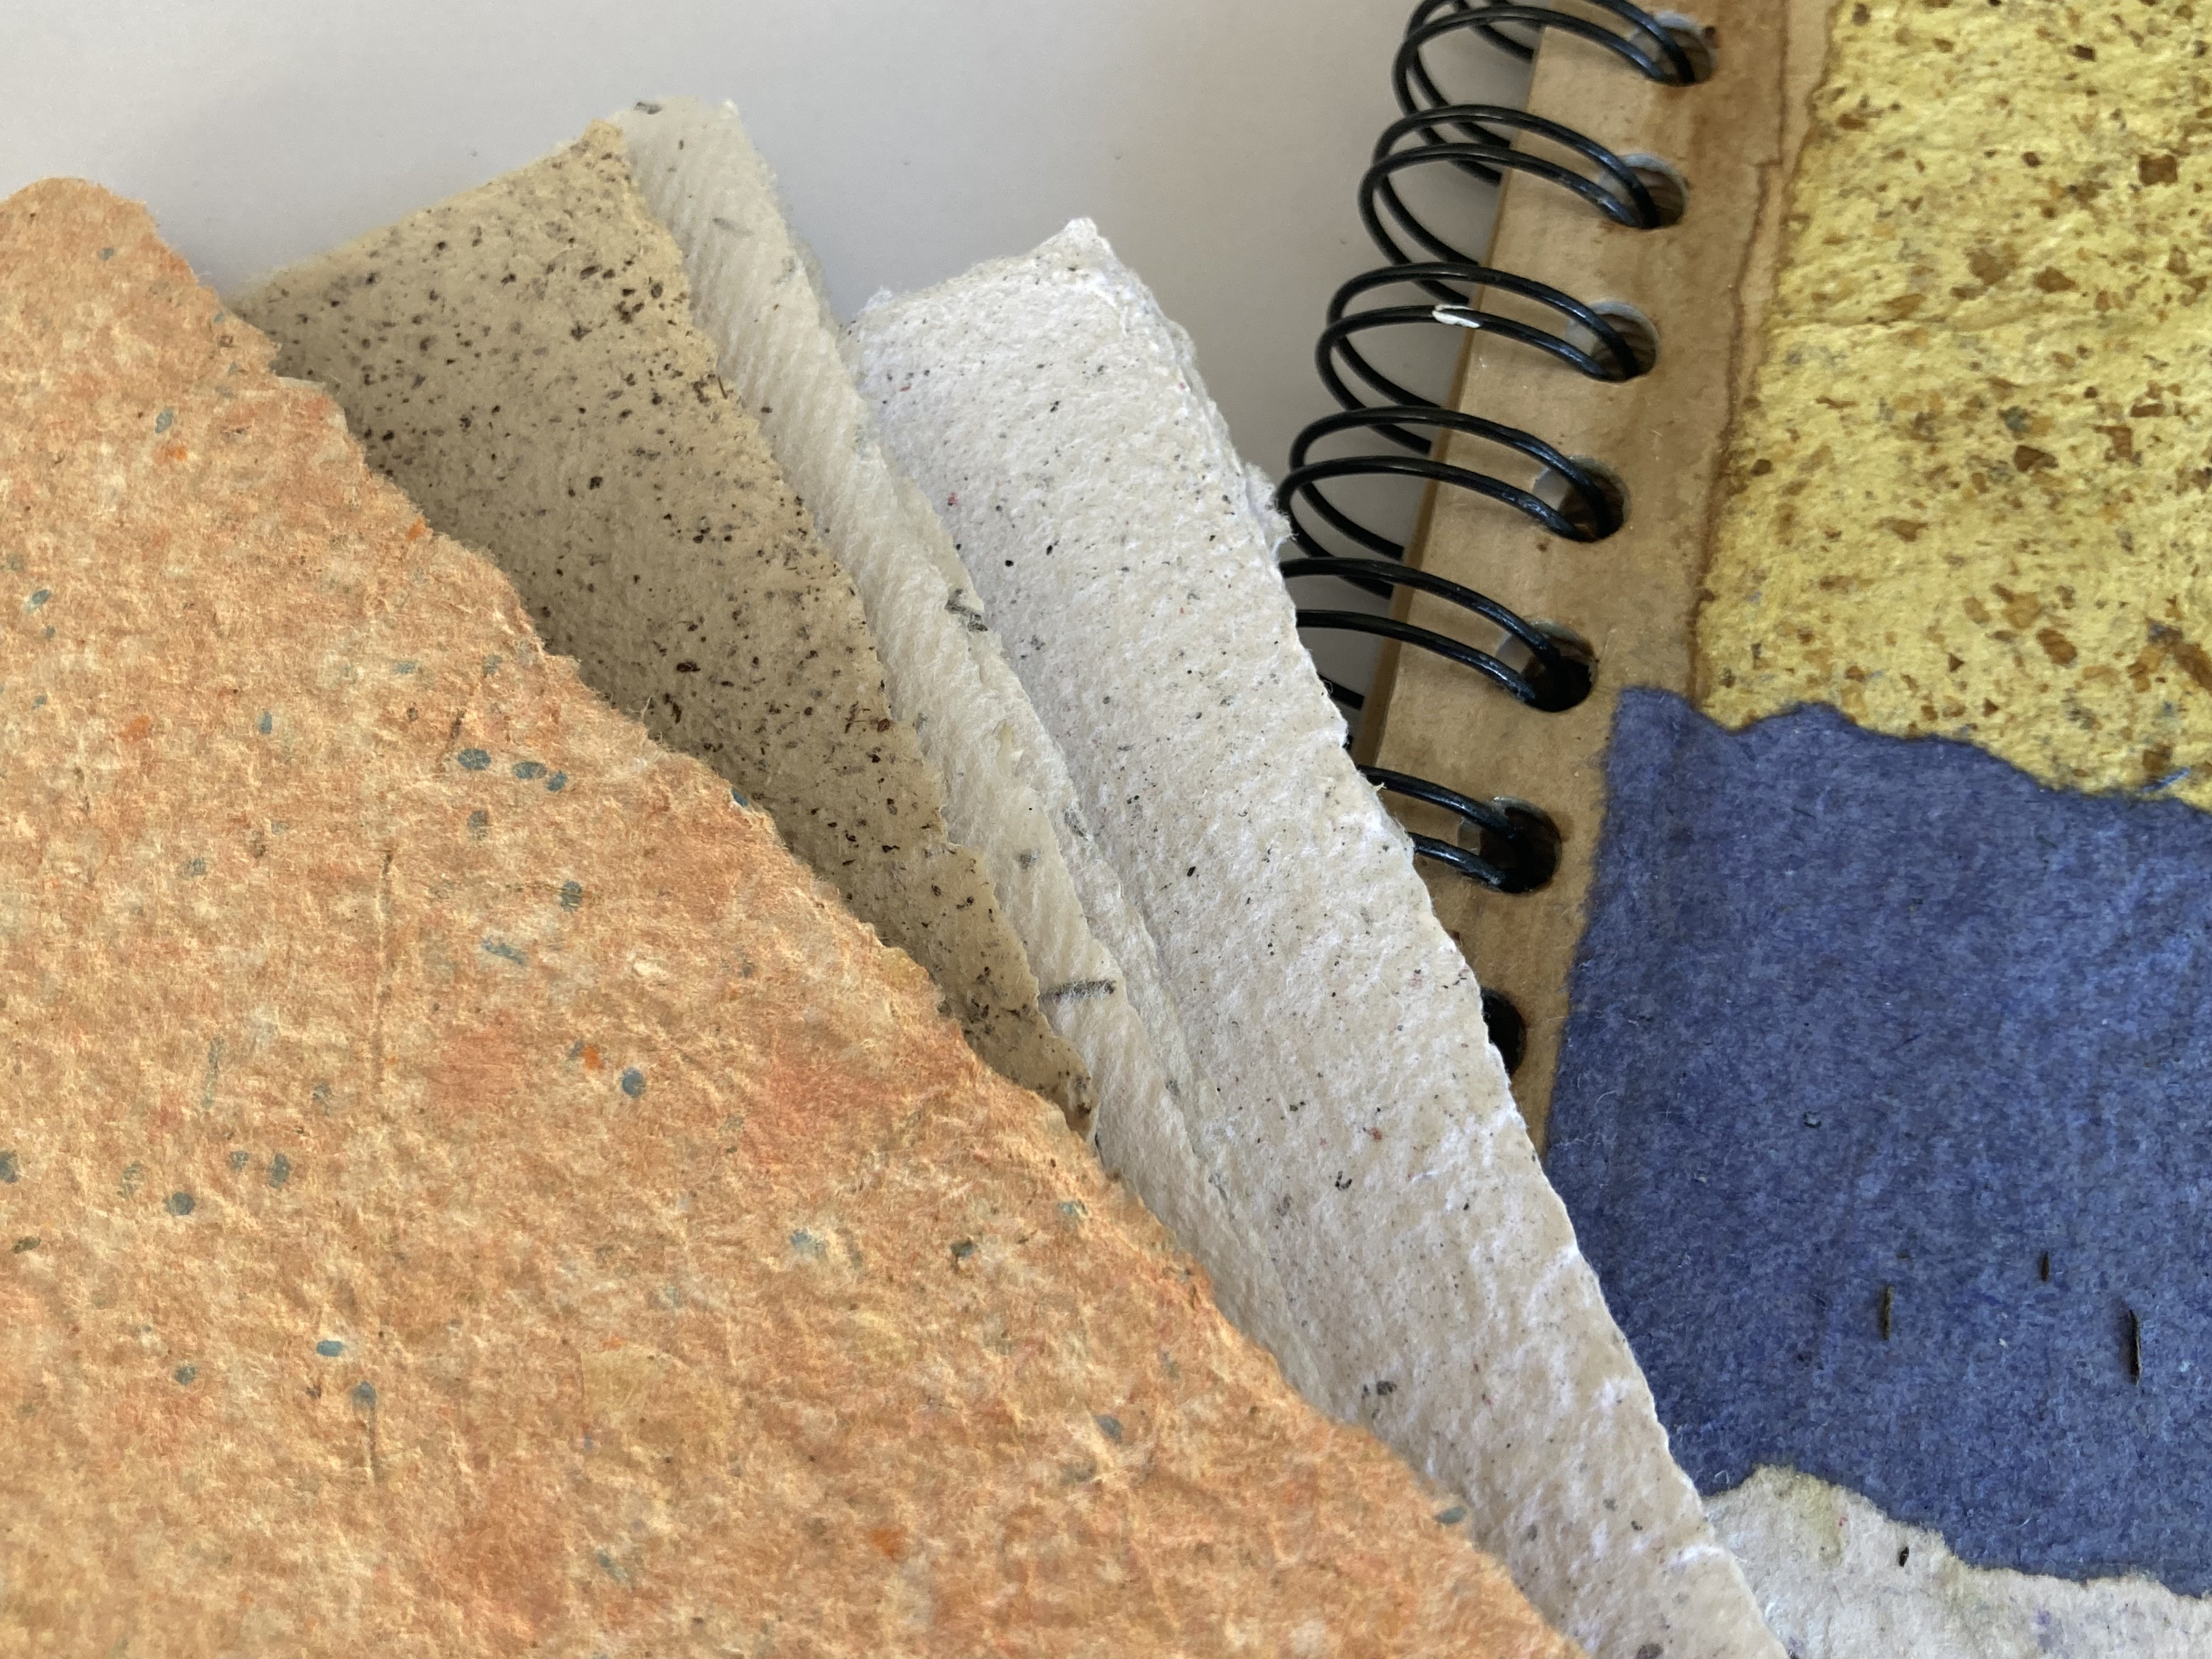
you are loving this. In this sketchbook,
I've experimented with using different natural
ingredients in papermaking. It really is exciting to have
a piece of art with things like heather or petals in it
that you've picked yourself. My mixed media paper making class explores this
in more detail. You can check out if
you're interested in that. You can see in this sketchbook that I've experimented with using charcoal and
watercolors together. I was able to create lots
of beautiful floral art by working out how best to
use these materials together. I also have a class on skill share that
teaches this technique. If you're struggling to think of particular things
to experiment with, how about trying following
three techniques? One, use different tools to
apply acrylics to paper. For example, use an old
bank card, a stick, your fingers or use a leaf to
print the paint onto paper. Two, draw your subject using
only straight angular lines. No curvy lines allowed.
They have to be straight. Three, use scraps of paper
to build up your image. Use the shapes of the paper
to create lines or areas. The temptation to
use a pencil or to draw your subject
will be big, but use different
shapes and colors of paper to build up
your image instead. Join me in the next lesson
where we study how to use mixed media to add interest and excitement to
your sketchbooks.
7. ADDING INTEREST WITH MIXED MEDIA: In this lesson, we'll explore how to add
depth and interest to your sketches by incorporating a variety of mixed media such
as layering watercolors, ink, paper scraps,
and much more. Mixing different media
in your sketchbook adds a captivating
element to your artwork. It transforms a simple sketch
into a layered masterpiece, rich with texture, depth,
and visual interest. Basically, it looks really good, and people can't
wait to touch it. There are so many
combinations you can try, and obviously your sketchbook is a perfect place to
experiment with them. However, I'll show you some
examples that you could try to get you started on
the road of mixed media. Use watercolor paint
with charcoal. Use watercolors to give different color effects and the charcoal for adding shadow, depth, and stronger lines. This combination is super workable and useful
for sketchbooks. My course called
floral painting with watercolor charcoal
goes into this in much greater
detail. Check out. I would use the charcoal to do a rough sketch of the landscape, moving on to using
the paste to give a really thick and texture base. Using acrylics and charcoal
to add color and depth. Layer it up. You can
add them in any order, but that's the way
I would start off. Use collage, charcoal
and acrylics. The collage papers
give the base, use them liberally, pasting them on with water down PVA glue. The acrylics add color. Again, don't be
gentle, slap them on, and if you don't
like it, just paint over it with white
acrylics and start again. The charcoal can be used to give definition and structure. It is used to bring the
different elements together, so the image makes
sense for the viewer. It's not just a whole pile of different stuff being
thrown in their face. You can round it up
to produce an image. When I started to use
Mixed Media art College, I no longer worried about
what I was sketching. The pain just seemed
to fill up quickly, which, in turn, gave
me more confidence. I was at first, like, am
I allowed to do this? I don't need to use
real art materials. And, of course, the
aim is not just to stuff your sketchbooks
as quickly as possible. But if you can see that you're
building up a collection, then it makes it easier
to develop it further. It does give you
more confidence. In this next lesson, I show you how to
manipulate the pages, and this works extremely
well with mixed media. By tearing, connecting
or folding the pages, the sketchbook becomes
even more interesting. See the next lesson for more.
8. MANIPULATE SKETCHBOOK PAGES: H. By altering the pages, the sketchbook becomes more live and interactive
for the viewer. Not only does the person turn the pages of the sketchbook, but they could
also open pockets, pull out sections to
discover even more. It just makes them
more interesting. Please note, the class
project is to manipulate a sketchbook page by choosing
any method you like. So the following tips
will be really helpful. Here are several cool ways to make your pages more exciting. Use thread or wire
to attach objects. That makes them look really
funky in the sketchbook. Add pockets by
sticking on envelopes. You can use conventional ones or make your own from
paper or fabric. You can place items
inside for the viewer to experience or just make the pocket itself
the work of art. Fold the pages. This can include
a simple fold in half or a page that has been
folded multiple times with other bits
of paper added on. You can tear the pages. By tearing sections, you
can add more style to your sketchbook and give another size of
paper to work on. Layer up, add to
the thickness and textures of the paper by
layering up mixed media. If your paper can handle it, there is no need to
keep the pages flat. Windows. Use a craft
knife on the page before to cut out shape so you can look through from one
page to the next. Join different papers together. If you tear or cut
the page in half and stick another contrasting
sheet of paper to the back, a new page is formed. You can join papers
together using sellotape or even sew them together by
hand or using a machine. I haven't yet mastered the art
of using a sewing machine, so I do this by hand. Extra tip. Use old
battered books. They will probably already have textured and torn pages in them. Feel free to make it
as mess as you like. But remember, keep it workable. You don't want your
art to just fall off while make sure it's
securely attached. You can use things
like PVA glue, Pritt stick, double sided
tape. Just keep all together. You can use strong
elastic bands over the entire sketchbook or just certain pages to keep
it securely in place. All of these techniques
will jazz up your sketchbooks and will help to gain people's attention. Viewers will discover
that not only do your sketchbooks contain
impressive works of art, but that they are also
really fun to explore. In the next lesson, I go into detail about how to present
your work in a way that unites the sketchbook
pages together from double page spreads to
balancing color and texture. The next lesson is
full of inspiration.
9. HOW TO CREATE STUNNING PAGE LAYOUTS: Here are nine ways to make
the sketchbook pages work. Create a double page spread. Use similar colors to unite
the work on the page. Place experiments side
by side on the page. Give the sketchbook a
cover that matches the art inside and hide any commercial
stickers or symbols. They don't really make the
sketchbooks look arty. So on sheets of artwork or
sources of inspiration. Don't just stick things
on the glue, that's fine. Find more interesting ways to attach pieces
to the sketchbook. Use similar textures on both pages that will
unite the pages together. Balance detailed sections
with blocks of color. Have the similar
subject throughout. Create the sketchbook for one subject that will
obviously unite it together. Use similar shapes
on both pages. One extra tip. Decide whether to sketch
in an orderly way or in a more freestyle messy
way before you start. This keeps the
sketchbook pages united.
10. FOLDABLE SKETCHBOOK DESIGNS: In this lesson, I'll show you how to make a
foldable sketchbook. When it's fully opened out, it becomes one piece of art. When folded in different ways, they make smaller sketchbooks with little pages of their own, and they can also
be free standing. Here are some foldable
sketchbooks that I made in ink art class. You can see just turn the pages. Each page has its
own piece of art. First of all, take a large
sheet of paper, do your art. Cut the lines like the template
and the resource section. And once you've done
that, you fold it all up. Then you have a page turning
foldable sketchbook, and that's a fast way, a fast way to create a filled sketchbook because every page is already painted. And you could keep it like this, or you could then
work on top of that. So you've got the base colors and you can work on top
of that if you like. Template for this is in
the resources section. So check that out and you can start making your own
foldable sketchbooks.
11. SKETCHBOOK COVER IDEAS: If your sketchbooks are starting to look
amazing on the inside, but still look a little bit boring or commercial
on the outside, then I have an easy
way to spice them up. Have you any interesting
textured paper or fabric that matches the colors and the style of
the artwork inside? If so, by simply pasting
this on top in layers, it will give a quick
and easy method of styling your books
like I've done here, as you can see here.
It's like patchwork. I have lots of handmade paper due to me really
enjoying the process, and I've also got a class on skills here that shows
you how to do this. Here are a few examples
from my papermaking class. I have five more front
cover ideas for you. We'll look quickly at them here.
12. SUMMARY OF SKETCH-BOOKING TIPS: Use sketchbooks to
explore a theme. Your research will give you
the confidence to paint bigger and onto surfaces
like canvas or wood. Experiment with
different papers and mediums to find the best
combination for your style. Use a variety of techniques, such as combining
different media, limiting your color palette, and using different
drawing tools to help develop your ideas, to develop your style, incorporate storytelling
and personal opinions into your sketchbook. Your sketchbook can tell a story as well as record
your experiments. Use mixed media for
a sense of freedom and to give your
sketchbooks more texture. Personalize the covers and add unique touches to make your
sketchbooks stand out. Alter the pages by adding
pockets or folding pages to make the sketchbook
more interactive. Try and make your
own sketchbooks, either by binding spare
pages together or making foldable ones like
I showed you in the class. Use sketchbook prompts, I
feeling a bit stuck for ideas. Most importantly, use all of these tips to
further your artwork. Use what you've discovered in your sketchbooks
and put it all to good use by creating more
finished pieces of work. With all your experimentation, a true authentic art style will shine through in your art.
13. CLASS ROUND-UP & FREEBIES: It's been lovely having
you in the class. Well done if you reach
the class this far. I hope these tips will come in handy for you when
you want to develop your own art style or when you really want your
sketchbooks to stand out. I have included a
collection of resources that will help to get
the inspiration flowing. These include the
templates for making a foldable sketchbook and a collection of
sketchbook prompts. Once again, I'd love
to see your work. So please take a
photo of your project and share it with the
class in the gallery. All the best for
your sketch booking. I really hope this class
has inspired you and has, like, cracked the
code, if you like, into how to build up
impressive sketchbooks.
14. CLASS PROJECT: For the class project, I'd
like you to choose a couple of pages and alter them first
before painting on them. For example, you
can sew on pockets, tear a page intersections,
fold pages, and then start
your explorations, then start your experiments on top of the manipulated pages. See the lesson entitled, manipulate the sketchbook
pages for ideas. Go wild and I would
love to see your work.
 Vivienne Edgar, Mixed Media Artist