Transcripts
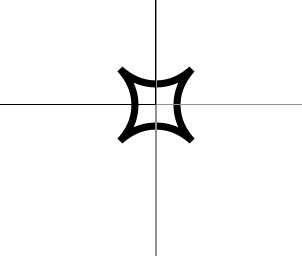
1. Let's Sew the "Prima Ballerina": My name is Brittany King, designer for Theodora gowns. Do you constantly compare your skills to others and get discouraged? Maybe you look at these amazing gowns and wonder how they're sewn. Maybe you always tell yourself, I could never make something like that. I know your struggle all too well. As a young designer, fresh out of design school, I found it incredibly difficult to establish myself as an expert. I had to do it the hard way and build my skill while designing directly for clients. This came with immense pressure, and I made a lot of mistakes in the beginning. Imagine if you could focus on technique without worrying about fit, save money on materials, save on something much more valuable, which is your time, have every construction step detailed for you in video form. Learn valuable self-critique and problem-solving skills first before having to sew for others. That's why I created Theodora and Half-Scale Patterns. It's my proven method to get you past those initial trial and error mishaps, getting you practicing, and honing your skill so you can sew better and love what you sew. In the Prima Ballerina Half-Scale sewing course, you will be making a true to scale miniature dress so that you can learn the construction process of a gown just like this. Some of the techniques include underlining and interlining, a seamless lace bodice, corset with islets, princess seams and boning, gathered tool tutu skirts, invisible zipper, horsehair braid, and attached lining, skill levels of all types will learn something new from sewing the prima ballerina. Inside the course is a printable PDF pattern, a material list, and fabric layout guide. Recommended sewing tools and notions are in the description below. Remember, every small step leads to some progress. All you'd have to do is start. Thanks for joining me, and let's get sewing.
2. Lesson One: Layout & Cutting: Hey there, and welcome to Prima Ballerina. We are starting off with cutting out our main fabric. We are actually going to cut out all of our pattern pieces in all of our fabric. I like to start with the main fabric and folding my grainlines so they're parallel to the selvage or the fold, that way you get two pieces per pattern piece. For the layout, you want to refer to your fabric layout guide, which is in the resources with this course. Right here we've got the back extension, all the bodice pieces, and the skirt. All of these except for the extension is cut too, so you'll just pretty much lift up the extension piece and cut out another pair of just that one. This is your layout here for the main fabric. It depends on the width of the fabric you actually bought. Just make it work as best as you can. The next fabric that we need to cut out is the underlining. This is a fusible knit that gets ironed on to the bodice pieces. We're only working with those four pieces here for that. I like to use pattern weights for these smaller half-scale pieces. It makes it a tiny bit easier and a rotary cutter as well. For this material, we're only going to need two of each piece. I've just folded my fabric there it is a knit, so grainline isn't too particular with this one. You just lay out your pieces and cut them out. You can also mark your notches with some chalk or with a little tiny snip. You'd want to do that with every single fabric that you are cutting out and piece. The next material that we're cutting out is the underlining. I know it looks like a lot of materials, but this adds that extra body, that support, you need for the boning and the strapless bodice that we're doing. Well, essentially strapless bodice it has some decorative sleeves, but this woven interfacing adds that extra bit of body. You'd want it again, make sure you are sniping or marking your notches with chalk or with the scissors here, like I'm doing just very carefully. Here's the layout for the interlining or the woven interfacing. If you need to pause this video at any point, please do so. I know it's a lot of information all at once. But our last material that we need to cut out is our linings. This is the very inner material that is going next to the body inside the garment. I'm just using a simple polyester lining for this. You can use any lining material available to you. I'm doing pretty much the same layout I did with all the others. The skirt I needed to cut out separately because one is on a fold and one is cut too. First step right here is actually the front. I've got my fabric folded, the selvage matching the grainline parallel, and I'm cutting that on the fold. Next is the back piece. It's essentially the same piece just with a seam allowance on the center back. I'm cutting two pieces of that. That is pretty much it guys. That's a lot of pattern pieces. I would recommend keeping your fabric separated, but your pieces together and labeled in some way so you can tell them apart. That will just make it easier from when you're ready to actually sew them. But that's it, guys. I will see you in the next one.
3. Lesson Two: Bodice Seams: We begin sewing our bodice together by prepping the main fabric pieces by fusing the feasible to the wrong side of those pieces. I'm taking that feasible knit there sticky side down to the wrong side and I'm using my iron to give it a nice firm press with some light steam. Now you want to check the instructions on the feasible knit, make sure you're using the right iron setting for this. I use a pretty high heat, I think it's a 3 on my iron. Just take it nice and slow. You don't want to overpress this otherwise the glue will completely dissolve and you'll get the pieces lifting up from your main fabric. You'll just continue this same process with each feasible piece with your main fabric of the bodice. For the extension pieces, you're only going to want to fuse two of these pieces out of the four. That's plenty for these to be sturdy enough to put our eyelets into when we start to sew it. We're coming up on our first stitch of the bodice which is always to staystitch the neck lines and the curves of a bodice. A staystitch is a very short stitch that is made within the seam allowance. I like to sew right alongside my presser foot so the presser foot edge is right up against the edge of the fabric, the raw edge. We're going to do that for every curve. We'll continue on with a regular seam for the princess seam, which is a regular quarter and seam allowance. Princess seams, don't be afraid to use a lot of pins and will continue through the whole bodice and repeat the same seams with the lining as well. Starting with staystitching the top neckline and along the curves of the bust. Then doing our quarter inch seam allowance down every seam of the bodice, including the woven interfacing we're going to use for our interlining. You should end up with three layers of your bodice. You're going to get really good at doing these princess seams by the end here. Yes, so next up, we're going to have to iron all these seams. You can stop in-between and iron them, but I like to do it all at once. It's just more efficient that way. You want to finger-press open your seams and using the tip of your iron, give it a good firm press depending on the material you are using. You can use steam if it's a really delicate silk or anything like that. You might want to avoid steam with that. For the princess seams, we're going to clip right to the stitch line there, just along the curve of where these seam allowances would otherwise end up overlapping and being bulky. You can also trim these a little bit, but they're already quarter-inch so I wouldn't do that. If it was a full-scale dress, yes, we would definitely trim those to a quarter inch or less but these just work just fine and it's enough room for our boning to go in later on the aligning. Once you've got those nice, open, and press seams, you're all done for this first stage of the bodice and I'll see you in the next video.
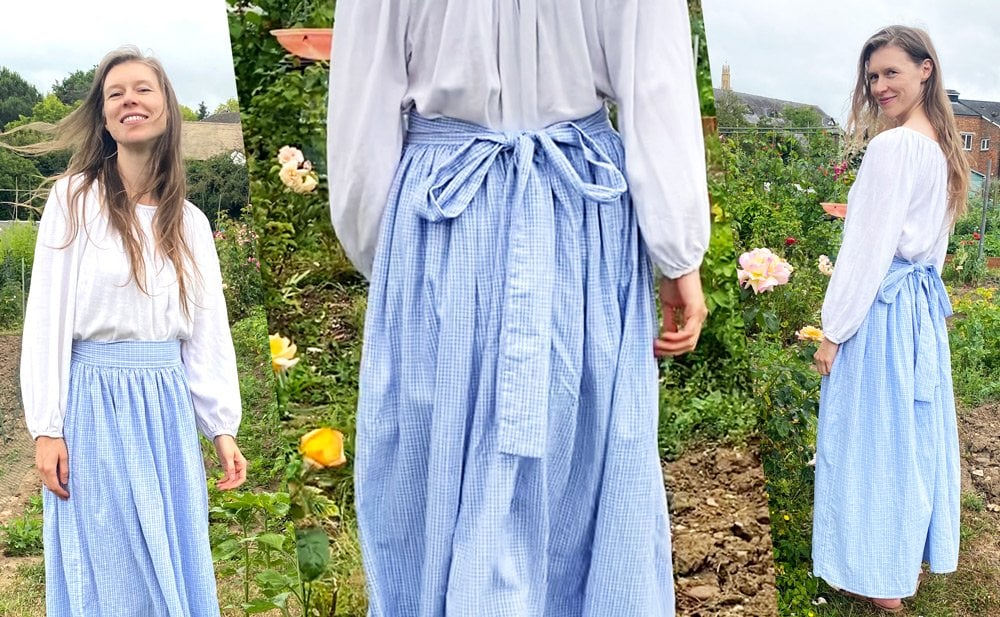
4. Lesson Three: Skirt Seams & Zipper: Welcome back. Today we are going to be tackling the skirt and the first step is to prepare the zipper by marking your quarter inch seam allowance. I find this helps me with the placement of the zipper and you want to put the teeth away from the raw edge. Sometimes it can be very confusing of where to put the invisible zipper, so just check on the right side of the fabric before you start sewing. Basting is a good way to secure that zipper tape down. You're not fiddling with pins and you can easily check and make sure you've done it on the right side. A zipper foot is so helpful, I don't know a way to do as invisible zipper without one, unless you do it by hand. But really invest in one, it's so handy and check the instructions on how to use that as well. For the alternate side of the zipper, you're going to want to first pin and check by zipping up your zipper there and making sure that the ends will match and then once you're happy with that, you can go ahead and baste the other side along your seam allowance there. Make sure that seam allowance is right along the teeth of the zipper. Again before you sew, make sure you check it and that you're happy with the position of the top and that it will look nice on the other side. After you've sewn the other side the same way, we're going to have to close up the bottom of the skirt. To do that, I like to use a regular zipper foot so that my needle is closest to the zipper, so your left zipper foot and just sew as close as you can to the zipper and then continue down to the bottom of your skirt. It should be pretty close to your stitch line but if it's close, that's just perfectly fine you won't notice a thing on the other side. Go ahead and press open that seam and turn it on the right side and make sure you like the look of it. If you get some puckers, it's really easy just unstitch next to that zipper and sew it again closer if you can, but it should look something like that, nice, and invisible looking. To finish up the skirt, you're going to do your regular seams right at the side seam, so a regular quarter inch seam allowance for that. To do the lining, we're just going to leave an opening for the zipper. A good thing to measure the length of your zipper and leave that same amount for the center back. That is the first stage of the skirt done. I'll see you in the next lesson.
5. Lesson Four: Cutting Lace: How ready? We are ready to cut out our lace and to do that we use a single layer of fabric and position our pattern pieces like so. It really depends on the pattern of your lace though. You want something small and close-knit. I'm using a stretch lace here. I begin by placing my pattern piece and I cut the very top and the bottom so they're like your waist and your neckline, I thread trace the center front because we will be mirroring the front pieces, which will normally be on a fold. But since we have a single layer of material, we need to mark that accurately so we can match them later at a point. I'm using a long basting needle to do this, and some embroidery thread so that it's easy to spot and stays fairly secure in the looseness of the lace in the netting of it. I'm just using a color contrast here as well to mark my darts so that I know that this is a dart and these are the mirrored seems that I'm going to match later. It just makes it a little easier. Leaving long thread ends and I'm leaving about 1.5 inches on the side seams because this is going to overlap and we want to have some excess there to work with. I'm just continuing to just cut out the bottom. Now I have one whole side cut out, we're going to flip over our piece of the front on our mirrored line there and do the same thing. I'm cutting top and bottom and then doing the same thread tracing for the dart as well. Now we will continue on to our back pieces, so we'll need two of these. I'm actually cutting along the center back there, and the only thread tracing we need to do is on the side seam here, because we want to make sure that we're matching both our side seams together so front and back. Doing this same thing with our long tracing thread and I'm leaving some excess for the side seam. Moving my little thread ends out of the way, and cutting the tops and bottoms. Continue on with the other half, so I flipped over my piece. That is a very crucial part of when you're mirroring pieces to make sure you reverse them. For the lace sleeves, you want to use your pattern piece to place it in an appropriate area. I chose a piece of scallop edging. It's a very simple piece to cut out. Now I'm just trimming off that salvage there to make a nice little sleeve. We will continue doing the lace in the next episode, and I will see you then.
6. Lesson Five: Lace Bodice Overlay: Now, that we have our lace pieces, we're going to start the tedious job of placing these ones onto our bodice. Now, this will take a lot of patience. Just go nice and slow. Match up the edges, the darts, any matching points where your thread tracings are. Just continue to pin, and placing everything where it's meant to go. Right here, I've matched the top sweetheart neck line to the lace pieces. You can see my darts there. They're just hanging loose. The seam allowance lines that we did, the seam lines of the side seam, they are lined up with the seams of our bodice. I'm going to baste that to the top of the sweetheart neckline, and removing every pin as I go along. This will put everything into place for the fronts. I'm stopping right where the side seam is. Now, since I have a straight stitch machine, I have to trace along the shape of the motif. I'm just choosing a path, and making it look as neat as possible. If you're lucky to have darning foot, that would also be helpful. After I've done that, I cut off any excess, and overlap the other side of my darts. Matching to where that blue line is, making sure it's all nice and flat. I pin that down, making sure that it's going to look very seamless over top so that the pattern doesn't look too thick, and it's not overlapping in places. I'll choose another path along the motif to sew over. I'm sewing right through the bodice, and zipping around every corner, having to lift my presser foot. Just go nice and slow. That just works fine, and you barely notice any stitch lines when you sew through the lace like that. Clipping off the excess right to the stitching that I just did. Then you can go ahead, and remove any of your basting threads from where you've sewn now. But it should all look very nice and seamless. Once you've repeated that same process on the other side, you can now go ahead, and baste between your side seam at your waist line. We're going to try the back pieces now. But first, we're going to do that same tracing along the lace motif on our front edges there, just pass the side seam, and do the same. We're going to trim off our little excess. Once we're done that, we should be good to go to place over top our back pieces, matching up our white threads with the seam line there that marks where our seam goes. You want to make sure that they're nice and lined up. Give that a good pin, and we're going to start basting those edges down starting with the top edge. We'll go right down the center back, just within the seam allowance line. We'll finish basting the bottom. Once we're done doing the same thing we've been doing this whole time, which is tracing over our motif in some design, making sure our stitches won't be seen. This takes probably the most time, but remember to go slow. We'll just then trim off the excess like we've been doing, and removing all of our thread tracing once we're happy with the look of the seamless lace. We're doing that now with our little embroidery scissors. They are very handy when you need to cut some smaller pieces off. We'll just take a look at our work, and you can tell there are no seams. You see the seam line underneath, but not in the lace. I hope you guys enjoyed. The next step is starting our skirt, and we'll do that next time. I'll see you then.
7. Lesson Six: Tulle Skirt: Time to make the tulle skirt, and so feel free to pause on any of these graphics. I want you to really understand what's going on here. This is pretty much the layout that we're going to do. We're going to fold our tulle in half. There's a little bit of math involved, but I've done most of it for you. Fourteen inches is the length of our skirt that we are doing. On the folded edge there, we're going to split the tulle piece into now two pieces using our weights to hold it in place, and after they're now two separate pieces, we need to secure both those layers with safety pins. Now there's a bit of math in terms of how much to gather. Every 75 centimeters of tulle we have to gather around 8 1/2 centimeters. Keep that in mind, that figure and use a measuring tape or a ruler to pin every 75 centimeters. You can see that even with this half scale dress, how much tulle actually goes into a full skirt? Some tips are use a short stitch length, use a gathering foot, and tighten tension for the amount of gathering happening. Test you're gathering amount always on scrap first to make sure you're doing the right 8 1/2 centimeters and divide using your pins there that you did, your safety pins. That is how much you want to stitch for because if you do a continuous row of gathering stitches, it becomes very tight and the tension might snap. You just want to give yourself some thread ends there to work with in case something does break and then you have to gather it yourself. Gathering foot is so helpful, it's a life changer. They shouldn't be too expensive. Just look for one that suits your machine and you will save so much time doing this skirt. The other option is to do the two rows of basting stitches and then gather the bobbin threads from one end, and then that also comes into play. If you're doing the gathering in one long piece, you're going to have breaking of your threads, and so that's when dividing comes into play and it's very helpful. Here I am. I'm stopping at my first safety pin, and just making sure everything is sticking together. Because tulle sticks together and gets misaligned, but just keep going, keep persevering and you'll end up with something like this. A nice edge and you might be thinking, oh, that's so much bulk to go on this skirt, but don't worry, we will fix that. This is where we are dividing into sections again. You take your skirt, you fold it in half and you mark that half with a pin, then do the same so that you get quarters. Then you'll be able to tell where to place it on your skirt. It just makes it so much nice and even. Now, we begin to pin, and pin like you've never pinned before. Because the next step, we're going to base this to the skirt. I'm also pinning a little bit higher. My stitch line is actually going right up against where the edge of the skirt is, the raw edge. Just so that I make sure that I sew over my line and I can iron out that bulk later, and the part that I'm stitching over is much easier to do that way. Just keep pinning and we'll give it a good press before we sew. Take your iron and give it a nice press on the tulle not too far down where you flatten the gathers, just enough to reduce some of the bulk. It will make it so much easier to sew. We're using just a regular machine-based stitch here, and I'm actually putting the presser foot up against the tulle stitched line, the one that's right next to the raw edge of the skirt. That just makes it within the quarter inch seam allowance that we'll have for the waste. Our last step with tulle is to do up the center back seam. But you have to remember that there's a zipper, so measure that distance again like you did in the skirt before and leave that portion open. I'm just pinning and making sure my tulle aligns. It's okay if your tulle it's a little uneven from where you've sewn, you can easily trim, and that's what's great about tulle. There's certainly enough extra to do that. Do a regular typed stitch down the center back. We'll just leave it like so for now and perhaps give it a press in the later episodes. I'll see you next time.
8. Lesson Seven: Boning & Sleeves: The next step for the bodice is to install the boning onto our lining seams. I like to use these flexible polyester bonings here, and I just trim the corners off so that they're not going to poke too badly. These are really great for this half scale, because you can sew right onto them. Using a regular stitch, you can either do both sides or just one right through the middle like I'm doing here. If it was a wider seam, I would do both sides. But this is just fine for our little half scale model. You just cut to length, make sure you measure your top and bottom where your waistline is that you're leaving exactly 1/4 inch. Because we are now going to based the interlining, the woven interfacing that we cut out and sew together in the last bodice video. Basting, you can just do a really long stitch and sew with the edge of your presser foot along the top, so that you don't have your stitches coming through from your regular seam. When we do that one, it's just easier. It's less unpicking and it just secures those layers together. Our next part of the bodice here is we're going to do the sleeves. For this, it depends on the type of lace that you're using. But here we have a stretch lace, so I'm going to be very gentle with the iron, no steam, very low heat, because I didn't want to stretch out that seam there. But I'm just going to stay stitch and then fold under once with this, and give it a short stitch from the edge. Just making a little hem and this will just finish that edge nicely. The other edge is just that nice trimmed scalloped edge from the lace that we cut out with the other bodice pieces from the lace. To attach the sleeves, you're really going to want to mark those matching dots on your pattern piece. Go ahead and take that paper pattern and just really confirm where these dots are, mark them with a chalk or pencil, and go ahead and sew them at your regular 1/4 inch seam allowance there. Just give it nice couple of back stitches, make sure it's nice and secure. Then we'll check our work to make sure that those sleeves are where you want them, that they're evenly spaced over the sweetheart neckline. I've added a little roll here, so I can see that the arm is going to fit through. It is stretch lace, so it should look very nice. I'll see you in the next video.
9. Lesson Eight: Eyelets & Bodice Lining: Now we are ready to complete the corset starting with the extensions and the eyelets. Remember you had four pieces of the extension. One has the feasible interfacing at the back, and one is just regular, plain fabric. We're going to sew three sides of those two pieces. One has a black part and one is just plain. We'll trim each of those newly sewn seam and clip the corners at an angle. We're going to leave the edge, they're free to turn over. To do this, you can use some blunt scissors to point the corners nicely. Once you do that, you can give it a nice firm press with your iron base to that remaining edge closed and mark your eyelet locations using our paper pattern piece by using a pencil to poke through the whole markings and using a marking pencil to mark the positions. The first step to eyelet is to use it all to make small holes in the markings that you just did. I like to have wide in mind a tiny little bit with some embroidery scissors, which are nice and sharp. That allows me to insert the first part of the eyelet, which is the longer shaft. The shorter one, then goes on top of it with its shaft down. I'm using an eyelet plier here. This makes it a little bit more simpler. You literally just press it together and it makes the eyelets join nicely. That's an easier way to do it. There's also the hammer, and all that comes with the eyelets themselves in the case that you get. This is just as good, I actually find it easier sometimes just to hammer it away and it makes a nice little joining eyelet. Keep doing that for each of the eyelets, there's four on each piece. After you've done that, I am using a regular zipper foot here to sew it together. At your quarter inch seam allowance, the using of the zipper foot makes it easier to get closer to the eyelets, so your needle is right up against them. Before you sew on the first one, make sure that they match the opposite side. You're looking for that they're quarter inch down from each of the ends like your waist and the top of your bodice. Go ahead and sew the next eyelet extension, and we're ready to move on to the bodice. The first part of the bodice here we are taking our lining and inter lining that woven interfacing and our lining to the bodice there right sides together. You have your polyester lining right up against your lace and I'm matching each seam of the bodice and pinning it in place. I'm continuing to use the zipper foot here just because of the boning being so close to the edge and it is a small seam allowance. So this makes it actually quite a lot easier. I'm just tracing around the sweetheart neckline and making sure I backstitch right at the point. This add some strength because we'll have to clip right to the point of the stitch line there and I'm just continuing along the other side all the way to the center back where I make a nice neat corner stitch there. I'm going to leave the bottom free and open because we're going to close it up by turning it right side up. But first, we need to do some clipping because there's so many curves in this neckline and bulk with all the lace and the sleeves and the eyelet pieces. We need to clip some of that excess down. Remember to use only the tip of your scissors, that way you won't cut into the stitching lines. Be very careful when you do this. I tend to only clip the lining sides and leaving the main fabric. I think it just smooths everything over, makes a nice transition. Plus the seam allowance is pretty narrow already. Now we're going to turn out the whole bodice to the right sides and I'm working with the boning here and matching it up to its appropriate seam line, giving it a nice pin and making sure that the bonings straighten out and they're not laying funny. We're going to just give it a nice iron to flatten all the seams out. Just nice and carefully with the tip of our iron, making sure that the lining is going to stay put and that's not going to pop out from the right side of our nice, newly finished bodice. You can see here it looks nice and straight. We don't see any of the lining poking through. Our last step here is to base all the layers together raw edge against the presser foot and that will complete the bodice for now. I will see you guys in the next lesson.
10. Lesson Nine: Hem & Finishing: Welcome to your final lesson of the Prima Ballerina. We are now going to take the two pieces together, which are the bodice and the skirt, join them into one and finish the linings inside. To start, we're going to match our bodice seams to our skirt, so we have our side seam, our center fronts and our center backs that we're going to pin and match. Use as many pins as you possibly can and sew at your regular seam allowance with a regular stitch, so quarter inch, and you'll see you have your nice tool just peeking out from the side there. That can all be trimmed off later if you feel so, that will reduce the bulk that is in the skirt but I find it also lifts it so if you leave it, that's totally fine. It adds some body right where the waist meets the skirt. We will take our lining of our skirt and do the same thing, pin it to our waist, matching all the seams, right sides together and this will enclose that waist seam and cover up all our seam lines from inside the garment. Which is always so satisfying when you look inside a nicely made garment and all your seams are covered. Do the same thing, quarter inch seam allowance, do your best with the bulk. I know it's going to be tricky but stick to it. Get through the bodice leaving the ends open there, turn your lining inside the garment and check your work and make sure the scene is all nice and flat by ironing it. Now that our bodice is attached to our skirt and we've got the waistline all nicely and finished, we have to move on to the bottom of our skirt. To give this tool skirt some lift in body, we're going to use some horsehair braid to make the skirt very shapely and stand out on its own. It gives it some nice shape and it's nice and flexible, it's nylon, and we'll just sew it to the inside of our skirt. Take your hem to your iron with some light pressing, and because we're using the half-inch horsehair braid, you should get exactly a half-inch hem. After going around the entire skirt we'll fold up our lining as well so that they match nicely to the seam lines and the end of your skirt. I actually shortened the lining by turning in under an extra quarter inch so that it hangs a little bit higher than the finished garment length of our skirt. We will be hand sewing this hem to our skirt here with one of my favorite stitches which is the Fell stitch, which is very easy to get the hang of, if you use a short needle, you work from right to left, and the needle pokes through the lining fold and you start your next stitch above your very last. So you're making this discreet little stitch and the rest of the thread is going through your lining piece. Here I'll make a little stitch and it pokes beneath the main material and pokes through the lining fold. You'll continue doing that for the entire hem. Finishing off, we'll have to do the zipper like so, leaving that little space there where the corset is. I'm turning under all the lining along the zipper so that it's nice and even and can lie flat with no wrinkling or puckering. I'm pinning everything down first. You can also baste if you wish, but the Fell stitch is just so nice and fast. Use a double knotted to start and you're using single thread, so just keep going a long the rest of the zipper. You'll also have to close up the little awkward spots you left open on the skirt linings to finish off the top edge of the skirt where they meet the bodice and remove any basting that you see poking through your tool that might show up on the good side there so that you get a nice clean finish. I like to use some simple thread tacks around the zipper and the tool just so that you're not getting any tool that's getting in the way of the zipper, so you don't get any snags or tangles. The last bit is to press the hand sewing that you did along the zipper and the rest of the waist. That is pretty much it. I'm so proud of you for taking this course. I know it was probably challenging in many areas, but I hope you really love the final product and that you had a good time learning all these techniques. I would love to see your final project in the projects below this course. Once again, thank you so much for being here. I'm Brittany King and I will see you next time.
 Britney King, Maker Mentor at Threadora Gowns