Transcripts
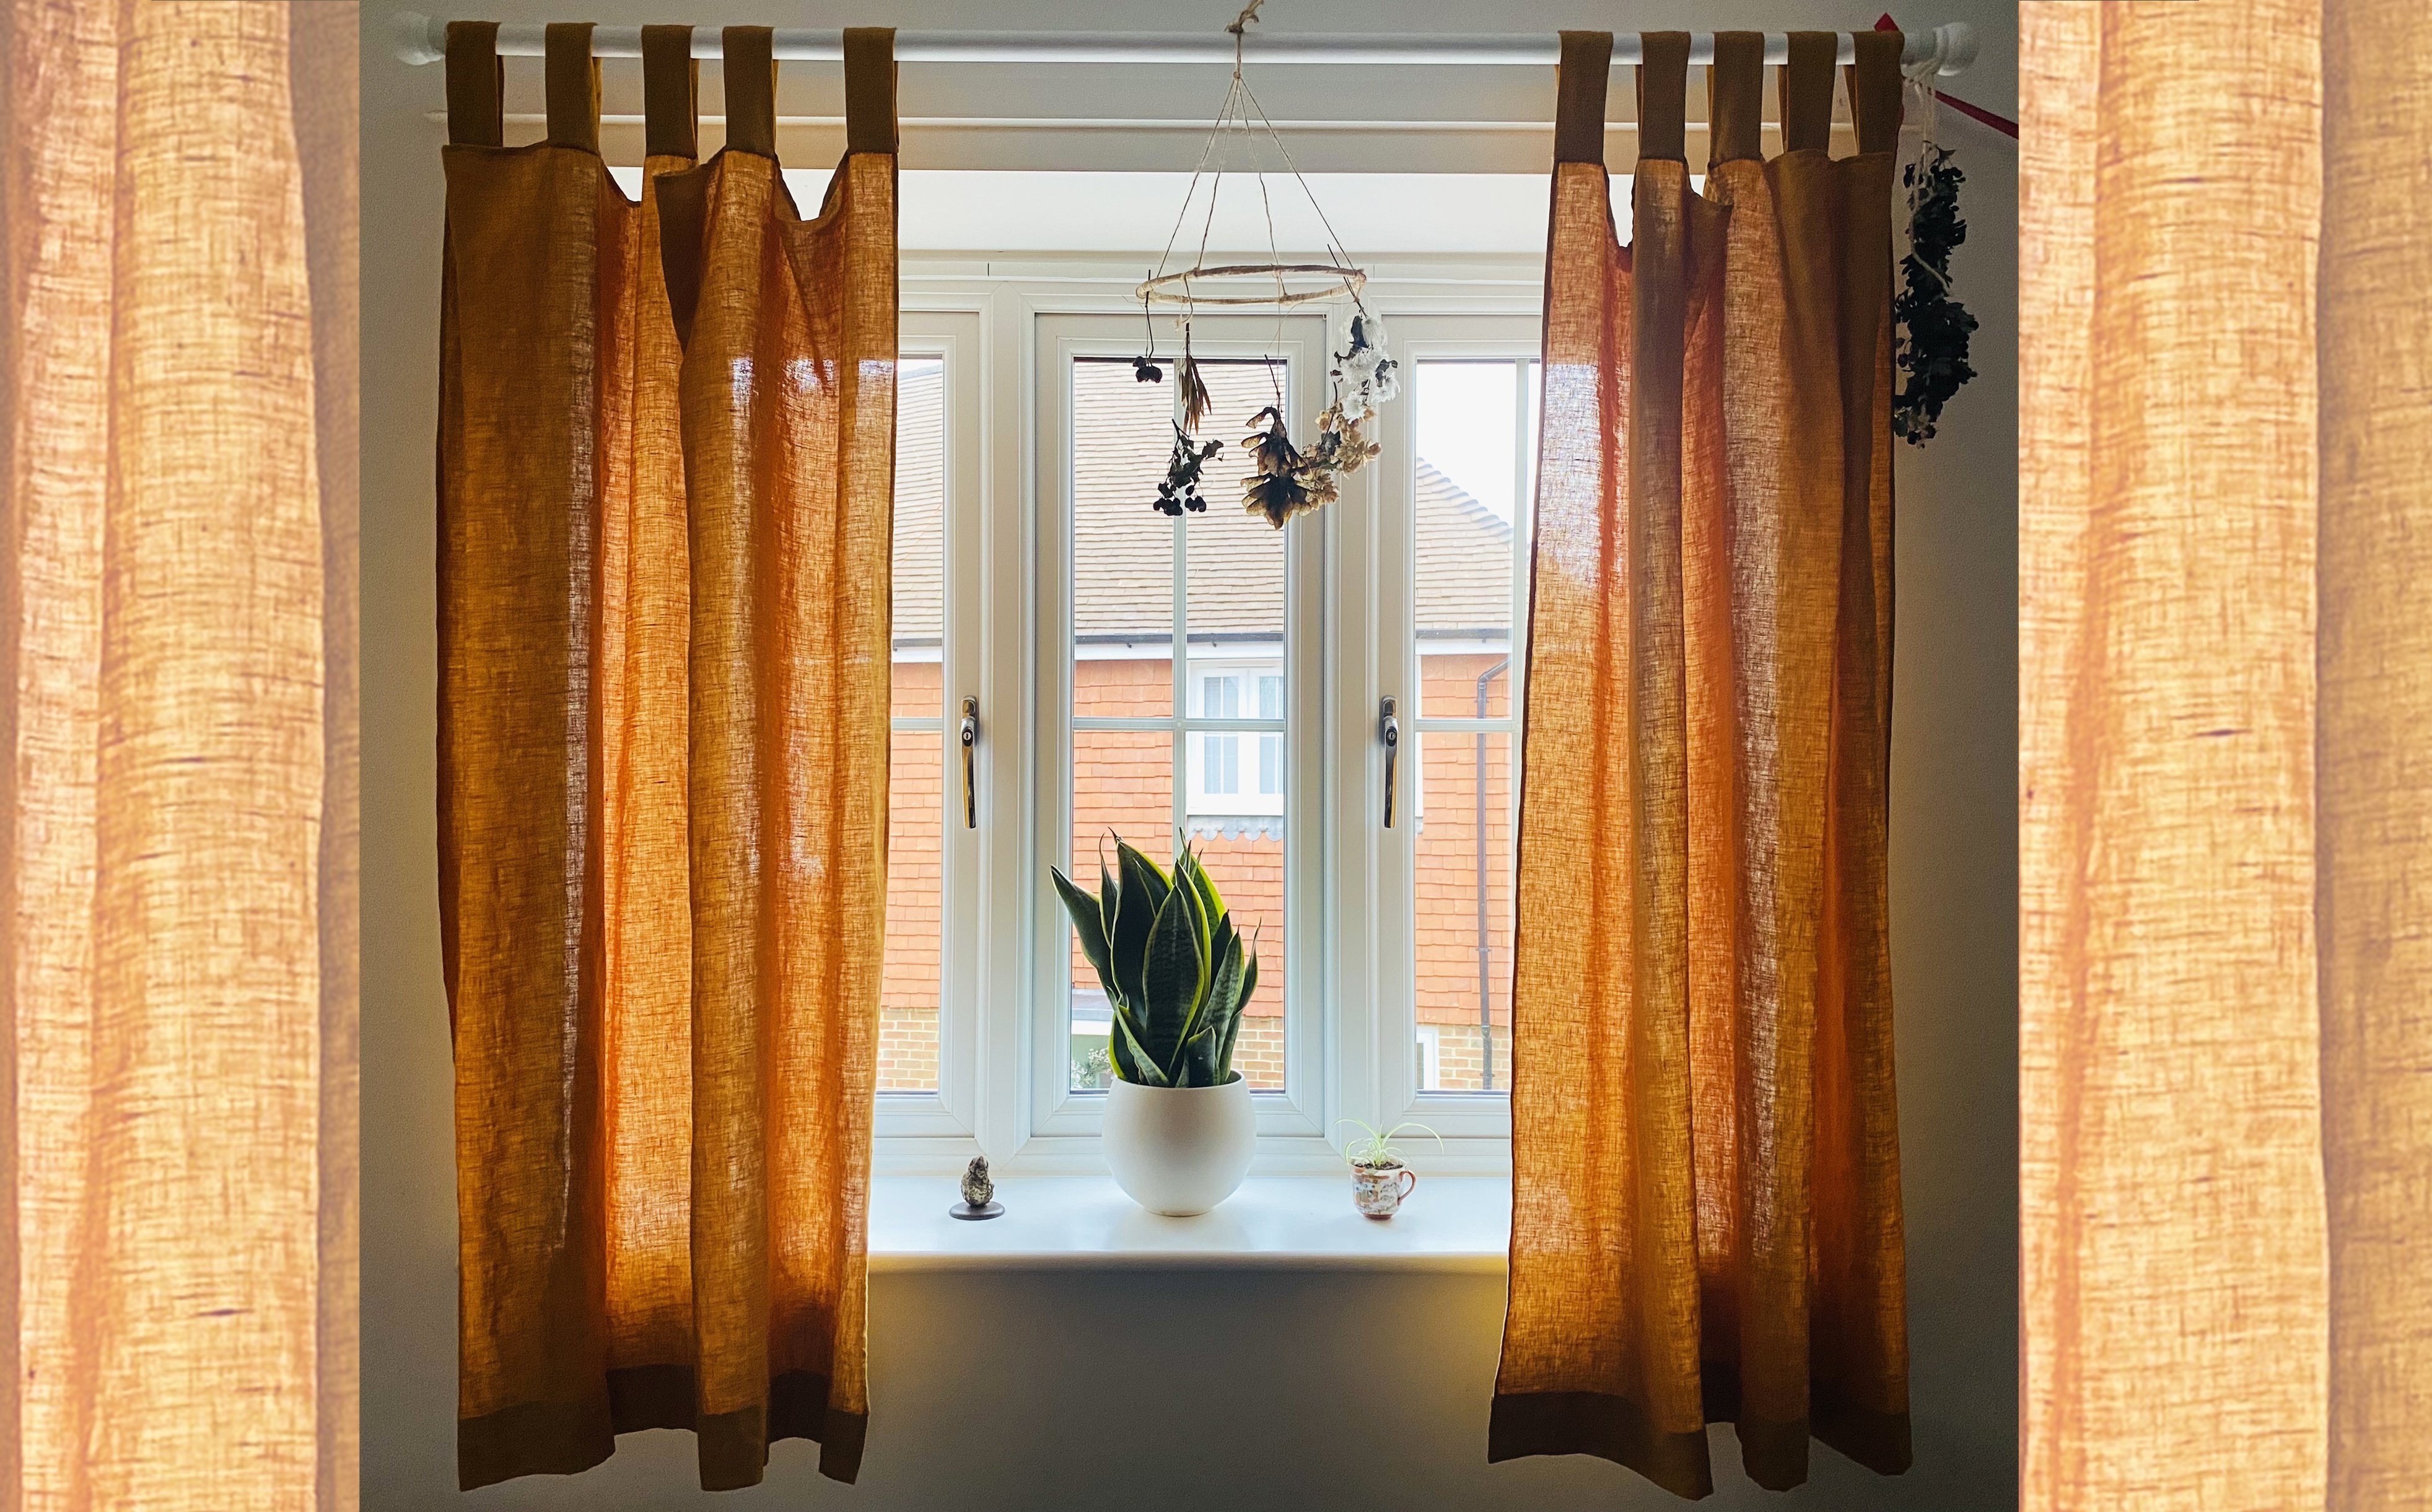
1. Introduction: In this class you are
going to learn how to hand so this beautiful
gathered skirt. And when I say Hansen, I mean truly hand sewn
just your two hands, a needle and some thread. You will learn how
to measure yourself, how to choose, prepare, and cut your fabric, and all the hand sewing
techniques needed to complete this garment. It's simple to make because
you only need to cut out rectangles and it's
all hands sown. So no need for any heavy, complicated, or hard
to use machinery. Just a needle, thread
and cozy corner. My name is Laura lamb and I am a folk singer and seamstress. I started sewing when I was
pregnant with my baby boy. It became a absolutely
huge passion of mine, sewing toys and sewing clothing. This class is suitable for total beginners or
those with a bit of sewing experience
who'd like to try out more hand sewing and
folks sewing techniques, learning how to
sew connect you to your ancestors and
how we used to make clothing it
slow and meditative. Having a daily sewing practice
can infuse your life with a slower pace and a mindful
and intentional approach. This course is the perfect
antidote to fast fashion, which encourages you too. Bye, bye, bye, and always
leaves you wanting more. When you spend hours
making a comment, you really appreciate it and it becomes really special
and meaningful, which is what we're
really looking for. We're looking for meaning. Once you've learned the
techniques to solve this guy, you can make it for any
size from a baby to a child to an adult with
PaaS sizes included, if you are looking to
bring more stillness, satisfaction patients
man intention in your life through the magic of sewing than this
class is for you. I'll see you in class.
2. What Will You Need?: Welcome to this class. In this lesson, we are
going to go over everything that you need to
complete this class, how to approach learning
the skill of sewing, five top tips, and how to
make the most of this class. Let's get stuck in. First, let's talk
about everything that we need to complete this class, you will need fabric. I recommend watching the
lesson on measuring and choosing fabric before
buying your fabric. In that lesson, I'll go into
the specifics of what you need and help you choose the right fabric
for the project. Needles, I use a
small one like this for hand sewing and a slightly
bigger one for gathering. You can get sets of
needles like this, which will have lots
of different sizes. Thread, a good quality thread and cotton makes
your work much smoother. One in matching color of the fabric and other in a contrasting color
for gathering, It's also recommended
that you're gathering thread is a bit
thicker and stronger, so it doesn't snap
when you gather. Tape measure for measuring
yourself and your fabric. Fabric marker, Taylor's
chalk or iron off pen. I personally love a
heat erasable pen that you can iron your marks off when you're finished sewing. Scissors. Fabric scissors
needs to be sharp. And the golden rule is to only usual fabric
scissors to cut fabric. Calculator to do
some basic maths for working out your
Rectangle sizes. A thimble to protect
your fingers whilst you're sewing beeswax, you can use beeswax to coat your thread so it
doesn't get tangled, are stuck and it makes your
thread a bit stronger, but it's not necessary. Traditionally used
with linen thread. So if you find that you're struggling
with your thread and it's getting tingly or snapping, it could be worth
getting some a notebook to handwrite your measurements and draw your cutting plan. I like handwriting and drawing
in a physical notebook, but you can also use a
notebook app on your device. One more thing that
you might like to get is one of these on pickers. However practiced
we are in sewing, however much we check
and double-check. We still sometimes
make mistakes. And these unpick is make it much less painful to
unpick your work. It's very easy to unpick. So you might like to get
one of them working bag. You might like to put
all your sewing things together in a
little working bag. I have this small canvas bag which holds all my
sewing equipment. And then I put the garment
I'm working on in this bag so I can easily pick up and
put down my projects. Now, a little bit
about approach, you will need time, space and a good attitude. First of all, we
need to set aside time to work on our project. This is crucial without
spending any time on it. It's not going to get anywhere. You want to find the
right time that's appropriate for the right
part of the project. So at the beginning
when we are measuring ourselves and doing
our calculations, it requires a bit
more concentration. You want to pick a
time of day when you find that your fresher. So for me, that's first
thing in the morning. After I've had my breakfast, I had a coffee, feel zingy,
unable to concentrate. Then other parts of the
project That's sowing. That's a more relaxing, restorative activity
that you might like to schedule
in the evenings. It's something I like to do. Instead of watching Netflix. I will listen to a podcast or an audio book whilst I hand. So we need space. We don't need loads of space
because we're hand sewing. We don't need a desk
or loads of equipment, but it's nice to make the
space nice for yourself. So it could be
lighting a candle, it could be making yourself
a nice herbal tea, making yourself cozy
for your sewing. And finally, but
very importantly, we need a good attitude learning a new skill that can be
frustrating at times, we need to maintain a friendly and kind attitude as we work through this project. How you do anything is
how you do everything. So make your motto,
elegant efficiency. Approach a project
with a growth mindset that you're going to learn
something learning town so is a totally
different approach to working because it
takes a really long time. So I normally work on my
garments little and often. So it will take around a
month to make something about 30 days as opposed to the 30 seconds it takes
to impulse buy a garment, it's inevitable that
it will transform your approach to clothing
and to consumption. This class is retraining
yourself to be slow and to be patient when you dedicate and devote yourself to
a garment like this, it will bring you so much
joy when you wear it. When you wear
something you've made, it just makes you shine
and it feels amazing. I made this top and
when I wear it, I feel so happy and so
myself, five top tips. Number one, the
kind and patient. When you learn a new skill, it's fiddly, especially
the gathering, trying to get your
hands or holding it right in it feeling
right, It's fiddly. So just be really patient. And if you find yourself
getting really frustrated, just put your project down for a night and come back to it the following day when
you're feeling fresh. Number two, don't cut
your thread too long. So we're gonna be working with a cotton and
thread like this. And you don't want to work with the two
long piece of thread. It can be tempting because then you don't
have to keep rejoining. But the recommended amount is if you hold just wind that back up. If you hold your thread, your chest, reach your arm
out to the full length once. And then half. So one arm and a half, that is the longest you
want it to be because otherwise when you
pull your thread, you go pull it. So that's a very good tip. Don't be tempted
because you think, Oh, if I just cut it
really long and I won't have to keep rejoining it, but it is just part of
it with hand sewing, find your own way. So when you first start
handling the fabric, and especially in the gathering
part might feel awkward. You just need to take
your time to find a way that it feels good
to hold it for you. It might be that you want to use pins to pin your garment
together as you work. I personally don't
use pins because I have a baby in the house and
I just know I will drop one. It gives me too much stress. So I just hold my
garment as I work, I occasionally use the
other needle I'm not using. So if I'm I've got my small needle and my big needle or sometimes
use my gathering needle almost as a pin just to hold a section of it because
I don't want to put loads of pins and lose track of how many there are
and just find one on the carpet and be extremely
stressed out by that. But you might like to use pins. You might prefer to do basting, which is when you, so your two pieces of
fabric together with a very loose and long
running stitch so that the fabric is loosely held
together whilst you work on your more neat stitches to actually fix the
garment together. So we can do pins, we can do basting. And then the third
one is just finding a grip so you might
want to rotate the way you hold the garment so that it feels
unnatural way to hold it. And this will take
time and every time you change the direction
of what you're working, you might want to change the way you're holding the garment. Just take your
time with this and you'll figure out a way
that feels good to you. Number four, think big and
think small at the same time. I think this is a great
metaphor for life because when we're sewing
a big project like this is quite a big vision to hold all these
different steps. And then what you can do is set really small goals as you go along so that you
slowly make progress. So you might say tomorrow, I'm just going to measure myself and write down my
measurements tomorrow. I'm just going to slow
down the side seams. And when we keep making
these teeny tiny goals, and then a month later you
have a beautiful government. Number five, this one is very important measure
twice and cut once. This is a famous
saying for a reason. Once you've cut the
fabric, it's too late. So just take your time
before you cut to measure. Measure again, check it so that you don't make
mistakes that are very, very hard to fix. A few more final notes
before we get stuck in, I'm a folk seamstress and
this is folks sewing. The techniques I use are
self-taught or made up. So the terms I use may sometimes be made
up or incorrect from the more official
technical world of sewing a rose by any other
name still smells sweet. Yeah, so just don't get
stressed out if I'm calling a stitch something
different to what you've heard it before. Who cares? Just do the thing that
I'm doing on the video. Hand sewing is a
great activity to approach with mindfulness
and intention. You can do this to take
a moment before you get sowing to think about how do I want to be in the world? Find an ankle word that
you ponder as you. So for example, my
word is elegant. If I'm going to so elegantly, how am I going to sit? How am I going to
approach any problems or frustration or something where it doesn't go quite my way. How can I be elegant
in my sewing? And then I can carry that through and forward
into my life. I've made two
documents for you to use to help you with this class. We've got the cheat
sheet and tips, which just runs through all the steps that you
need to make the garment. And you can use that for your
goals setting because it explains each little micro step to get your garment finished. There's also the tips
typed up in there. And then we've also
got the measuring and calculations document, which has all the
calculations written in it. And it also walks you through step-by-step how I measured and calculated for the small skirt I made for willow and the red
skirt I made for myself. So if you're really lucky
and you are a one-year-old, or you're making your
skirt for a one-year-old, or you are exactly
the same size as me, then you don't even need
to do the calculations. You can just skip forward and use the measurements and
calculations that I did. Now we've got everything
that we need. Let's head into the next lesson where we will start measuring.
3. Measuring: Welcome back. In this lesson, we are going to learn how
to measure ourselves so we can make a garment that
fits us perfectly. A few notes, four, we get
stuck in, in this lesson, we're going to decide how long we would like
our belt to be. In my opinion, the
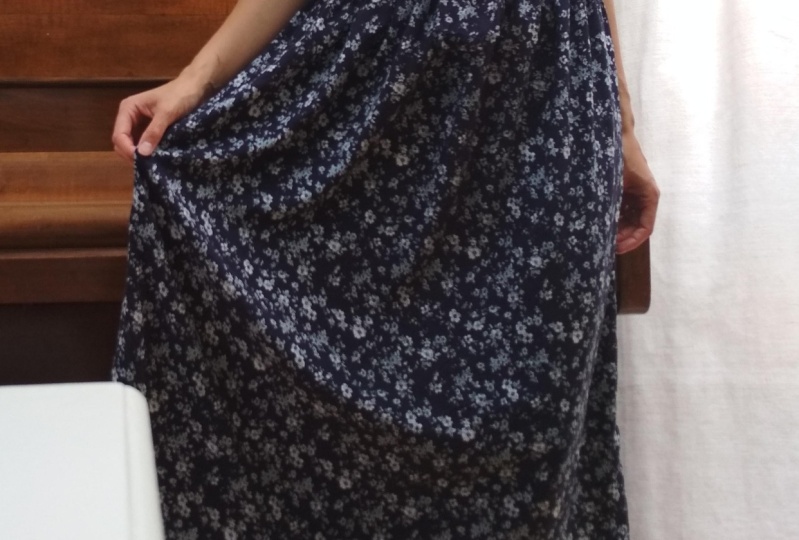
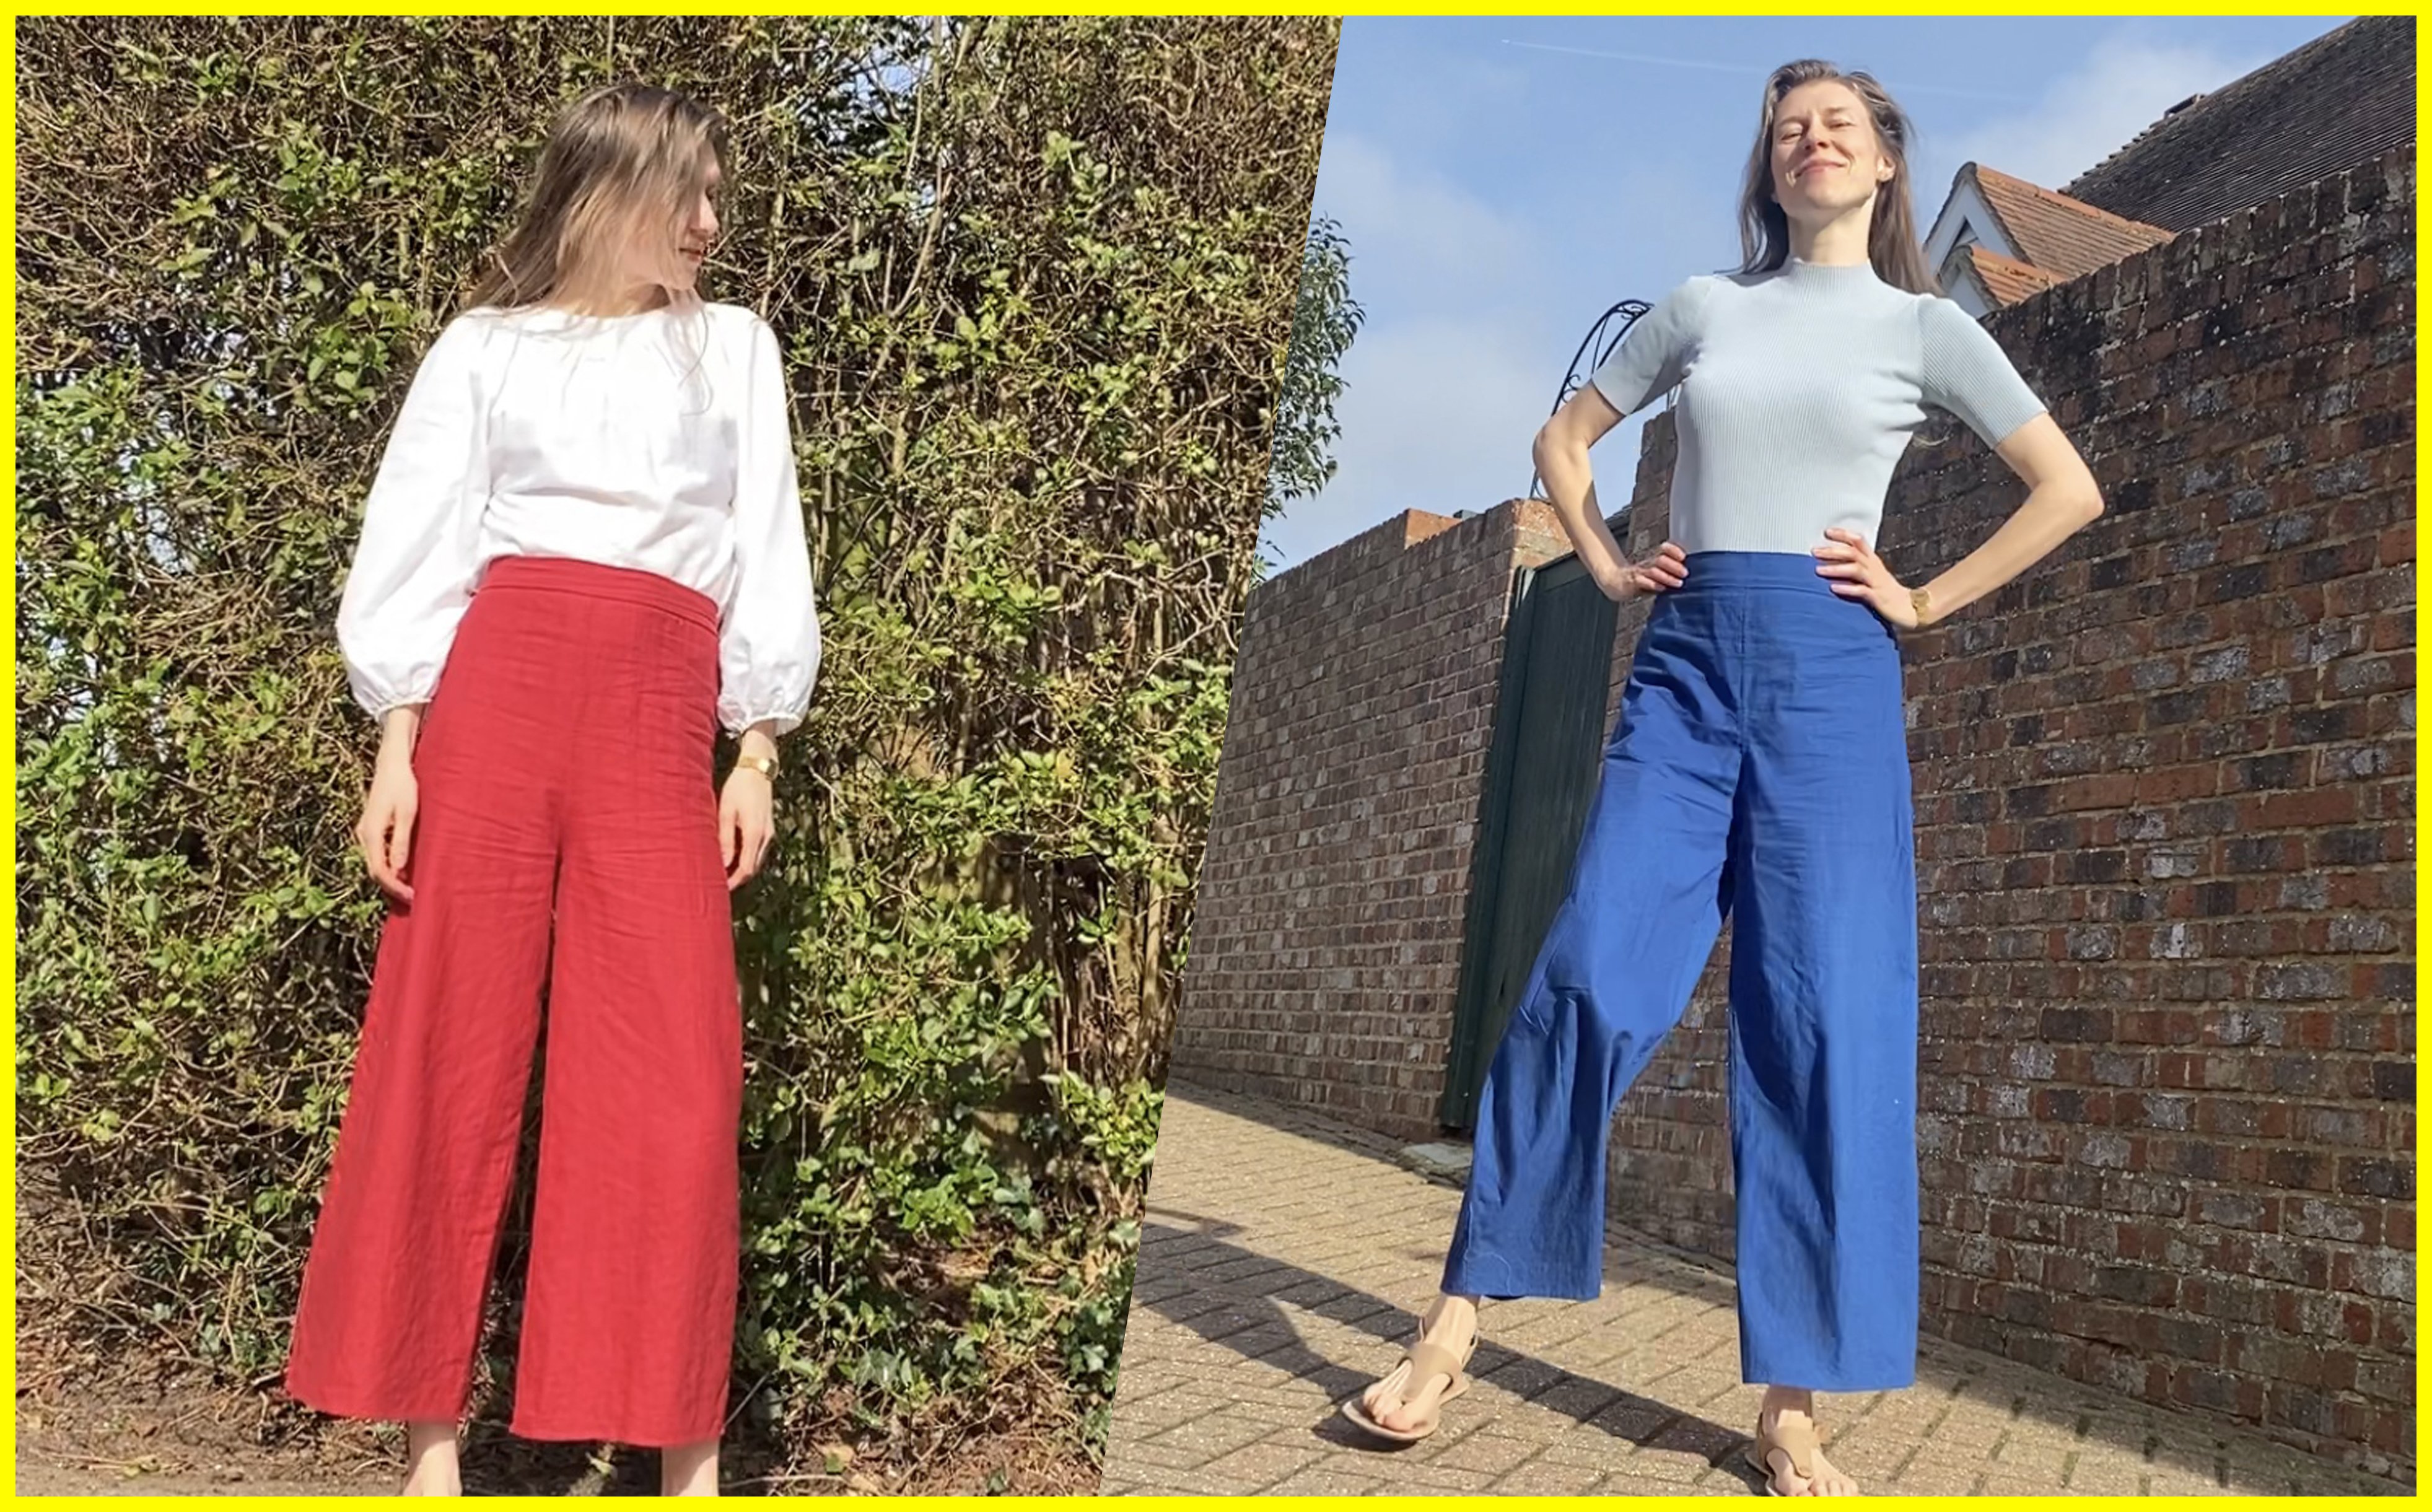
longer the better. If you have a look at my red
skirt and my blue skirt, I made the red 1
first and then I realized it could do
with a long the belt. The belt is longer
than the blue one. I'd recommend you make your belt longer
rather than shorter. If you go to the measuring
and calculations document, you will see the exact
measurements I used for my red belt and
for my blue belt. And you could go even longer
than that if you want. We're also going to decide
how long we want our skirt. I recommend to be a bit
generous with this. So add a few centimeters
on if you're not sure because you can always
roll the hem up more, that you can't add
more on later. Also, when we make the hen, when I made my skirts, I made a very neat rolled hem. So it's only about
a centimeter extra fabric that you can make a
bit more of a statement hen, take about five
centimeters of fabrics. You might like to watch through to the video on hens to see what kind of haem you want to meet and then you can decide how much extra fabric you
need to add for that. Don't worry about your
measurements being perfect. When I first started, I got a bit stressed and
paranoid about this. The thing is we are making a garment that is gathered
and with a Thai waste. So you don't have to be really precise a centimeter
here or there can be easily forgiven
saying that I will stick to what I said
in my five top tips. Measure twice, cut once. When you do this measuring, measure twice as well. Take the measurement
once, take it again. Check that you're getting
the same measurements because you might have your tape measures
or wrong way round. I have done that before. So be mindful, be careful as
you approach this lesson, it's a great idea
to make a note of your measurements somewhere
where it's easy to access. I like to have them
handwritten in my notebook and then
also typed up in the notes app on my
phone or my laptop so they're easy to access when I go to make
something else. Let's get stuck
into this lesson. I've written out here
the five measurements that I'm going to
need to get a waist, be the length of the skirt, how long I'd like it to be. C, the desired belt width, how wide I'd like my belt to be, the desired bot length, how long I'd like my bot to be. And finally the widest hip, so the widest part of my body so that I can get the
skirt on and off. So let's start this measuring. First of all, starting with the waste to standing
up straight, finding the smallest
part of my waist and holding the tape
measure around my waist. You see that you don't want
your garment to be so tight? Well, that's a personal
choice for me. So I like to make sure
I'm my belly is fully relaxed when I measure
myself so that I get an accurate measurement of
what I will be like every day. Can also do this by
double-checking the measurements, sitting down and just seeing is my waist the same
when I relax and I sit down so that you make
a skirt That's really comfortable and that you
can wear it to move in. Now we take the smallest
number on the tape measure, so that's 0 at the end
and I'm running it down to the length I'd
like the skirt to be. So for this example, we're just imagining I wanted the
length of the trousers. Then I find the small of my waist and take
that number there. Then the width of the belt. So this is the red belt
showing you the width. That one is seven
centimeters as a guide. And then this is a smaller belt that I made for another garment. And this one is
five centimeters. So you might want
to use those as a guide for the
width of your belt. Now on to the bot length. So it's a good time now to decide how you're
gonna do your belt up. Or if you'd like both options of whether you're gonna
do a bow at the back, or if you're going
to wrap it back around yourself and
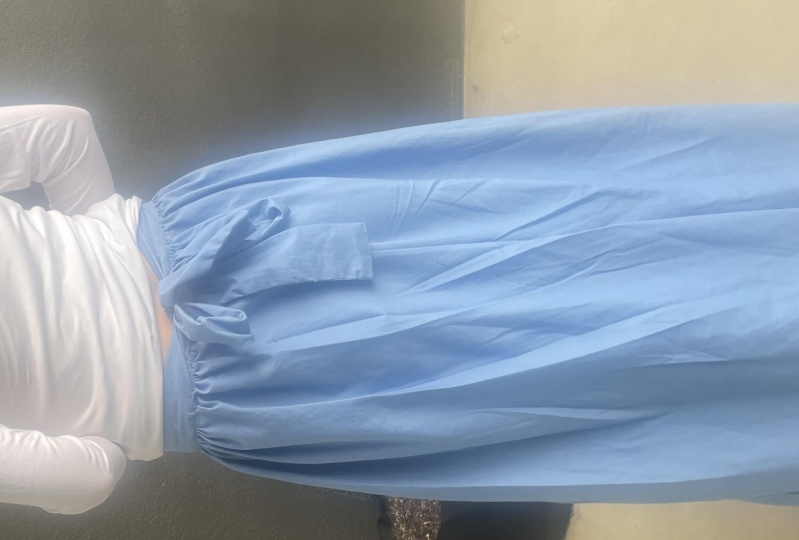
tie it at the front. So my blue skirt and
my red skirt actually both work either
way because I made the made the belt really long. So have a little think about that before you decide
on your bot length. So there's a couple of
ways we can do this. One, we can tie in
imaginary bow with a tape measure in the
size we'd like it, and then work out
how long that is. So for example, a
smallish bow like this is about 83 centimeters. And then trying it again, I'm making a much bigger bow. If we want a really
big statement bot showing that with
our tape measure, and you can hold it up
to yourself if you like. But for this case
I'm just getting it on the floor so you
can see so this is already bigger bow that comes
to about 111 centimeters. If you want your belt to
wrap back around yourself, you might want to double-check
your waist measurement and see that your bot length is at least your
waist measurement. Plus 20 or plus 30, so that you can tie
at the front as well. So an extra thing to
think about there. Then, last but certainly not least is our hips
are widest point. So the widest point of your hips getting that
measurement so that you know, you'll be able to get
your skirt on and off. So now you've finished, you will have filled in your measurement sheet and it should look something like this. This is mine. My waist
is 82 centimeters. The length I'd like my skirt
to be as 98 centimeters. I liked the belt width
to be seven centimeters, like the red skirt. I'd like the bow
length to be a 110. You'll notice there. So
if the bot is a 110, my waist is 82. That means that I have 28 centimeters extra to tie it all the way
around my waist again and tie at the front. Then my widest hip is 96. So we'll need that to work out so that we can make
us get Oscar on an off. Now we've got our measurements, it's time to do some
calculations so we can work out all the pieces of
fabric will need to cut. See you in the next lesson.
4. Calculations : Welcome back. In this lesson, we are going to do
our calculations. So this is the lesson that
requires the most brainpower. So if you're watching this
now and you felt a bit tired, just turn it off,
do something else. This needs to be something you watch when you're feeling fresh, when you're feeling zingy and
you're able to concentrate. So we just need to do a
few calculations too. Work out what size rectangles we need to cut to
make our garment. To go alongside
with this lesson, we do have the measuring
and calculations document, which you'll find in
the Resources section. And that will show you all the
calculations step-by-step. And it will also show you how
I did the calculations for my red skirt and for
willows yellow skirts, you can follow along
there as well. If you were wondering
the red skirt and the blue check skirt and made exactly the same measurements. The only difference is that
the belt is a bit longer. So let's have a coffee, take a deep breath
and get stuck in with making our calculations. First of all, starting
with the belt width. And we work out the piece of fabric we need
to cut by that, by timesing the
desired belt width by two and adding two
centimeters seam allowance. So in my case, I like the
belt to be seven centimeters. So I multiply that by
two, giving us 14, and then I add the two
centimeters seam allowance, and that comes to
16 centimeters. And then now thinking
about the belt length, what we need to do for
that is a waste plus d, the desired belt length plus two centimeters seam allowance. For my case, that's 82
centimeters for my waist plus the 110 centimeters I like my belt to be plus the two
centimeters seam allowance. And that will all add
up 294 centimeters. So that means that is the piece of fabric
we're going to cut out. It's going to be a
long strip like this. It's going to be
a 194 centimeters long and it's going to
be 16 centimeters wide. So that's the first piece
we're going to need. Then onto the front and
back pieces of our skirt. First of all,
calculating the width, which will be a, which is our waste,
multiply by two or three depending on how heavily
gathered we'd like our skirt. Then we divide that by two and add two centimeters
seam allowance. So in my case, I'd like this skirt to
be really gathered. So I'm going to
multiply it by three. So 80 to my waist, multiply by three and then
divide that number by two, add two centimeters. And that final figure, once we calculate
all of that up, comes to a 125 centimeters. So that's how wide I need
my two skirt pieces to be. Then the length. This is the simplest one. We just choose the
desired length. We'd like our skirt
to me and then add the two centimeters
seam allowance for the top and the bottom. So I like mine to be 98, so add the two centimeters. Nice simple calculation
comes to a 100 centimeters. So that is what we will need is these two
squares of fabric, which will both be
a 125 centimeters wide by a 100 centimeters tall. So then the three final pieces
that we're going to need, we need these two big
rectangles of fabric. And then all along belt piece. Pretty simple. And we
know the measurements. We want our belt to be a
194 by 16 and we want, or to skirt pieces to
be a 125 by a 100. Let's have a go laying
that out on our fabric. So this piece of
fabric I have is 140 centimeters wide by
200 centimeters long. So let's work out how we're
going to fit that on there. What I'm gonna do
is I'm going to cut the belt off the end, which will be a nice long, 200 centimeter long belt. And then that will leave me
with a 124 centimeters width. And then if I cut that in half, both of those pieces will
be a 100 centimeters tall. So you will notice that I've lost a centimeter from
the width of my skirts. I initially wanted it to
be a 125 centimeters, but I've lost a centimeter
so that the belt fits. It's much it's much better
to lose a bit of width on a heavily gathered skirt than to lose a centimeter
on the belt because that will really
make a difference to how wide your belt is. To give you another idea
about laying it out. Let's get the measurements
for willows yellow skirt. You can see how I calculate them in the measurements and
calculations document. Willows, skirt belt
needs to be a 150 by 14, and then the front and
back pieces need to be 68 centimeters wide and
37 centimeters long. My piece of fabric is a 150 centimeters wide and
50 centimeters long. So what I'm gonna do
is I'm going to cut the belt off the top. Then if you imagine I
cut those to front, front and back skirt
pieces at 68 centimeters, then I've done some
calculations and I kept these really weird small
rectangle left at the end. I've got nothing to do with it. So what I decided to do is
just make my skirt extra, even more width, is it's
a bridesmaids skirt. Make it really puffy, so they will be 75
centimeters wide. Then finally, I know that I've made her skirt
definitely long enough. I don't need to add any extra, so I will be left with a little strip of fabric
there at the end that I don't need that I
might like to use for another project
in the future. So that is how we do
our calculations. Breathe, relax. Take your time with this step. It's the trickiest bit
in the whole process. And you've got the measuring
and calculations document in the resources
section so that you can use that as a
guide to follow along. Have fun making
your calculations. Make yourself a nice cup of tea, cup of coffee,
opened the window. And then once we've got
our calculations done, we can start preparing and cutting off fabric
and then sowing. See you in the next lesson.
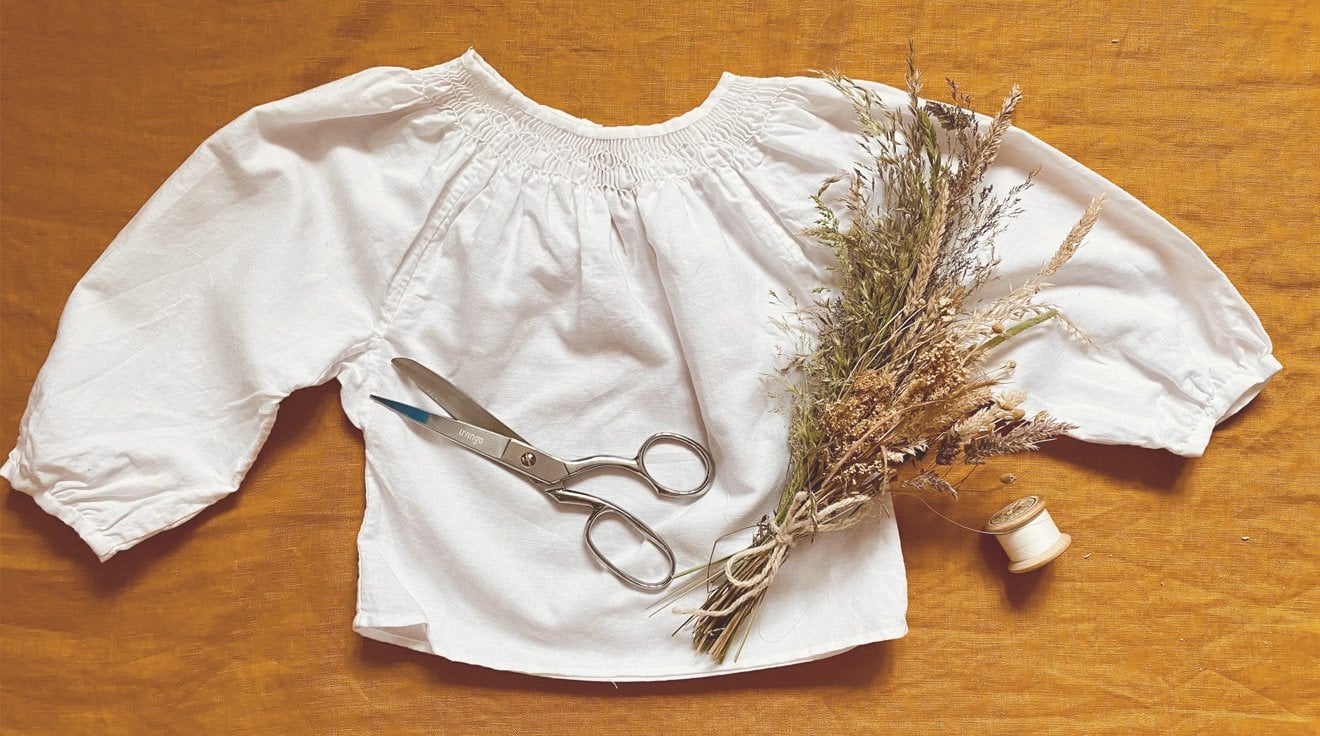
5. Choose Fabric: Welcome back. In this lesson, we are going to
choose our fabric. We will need a woven fabric because we're working
with straight lines. It's much easier to work
with a woven fabric. You can tell if a
fabric is woven, if you look at it
really close up, it will look like a grid. Here's some screenshots of some fabrics that I've looked at online where you
can see the grid. And then I'm also going
to hold up a few of the fabrics I used
for the project and see how you can close up, see that it's a woven fabric. When you are choosing
your fabric in a, in a physical shop or online, if you aren't sure if
it's woven or not, just go and speak to somebody, go and ask for some help. You can make sure you
get the right fabric. So that's one definitely,
definitely need woven. And then there's five
other things that we need to consider and
pay attention to. And they are the
composition, the width, the weight, the ethics, and the color. Composition. When you buy your fabric, just make sure you read
the small print because some fabrics look
like they unnatural. But then when you
read them made of polyester or a polyester blend, which personally, I
really don't like these. I think they feel squeaky
and plasticky and dry. So it's nice to use a cotton or linen or a viscose fabric. They are all natural
plant fibers and they will let
your skin breathe properly and feel
lovely to where you may also find a blend of
those are cotton linen blend, a linen viscous blend. And they will feel
lovely as well. Onto the width. Fabrics
come at different widths. And it's just good to
pay attention when you buy your fabric,
what the width is. When we did our cutting plan
in the previous lesson, we looked at the width
of the fabric and we made some decisions
around that. So it might be good to research, in general what the
width of the fabric, where from the shops that you're buying from
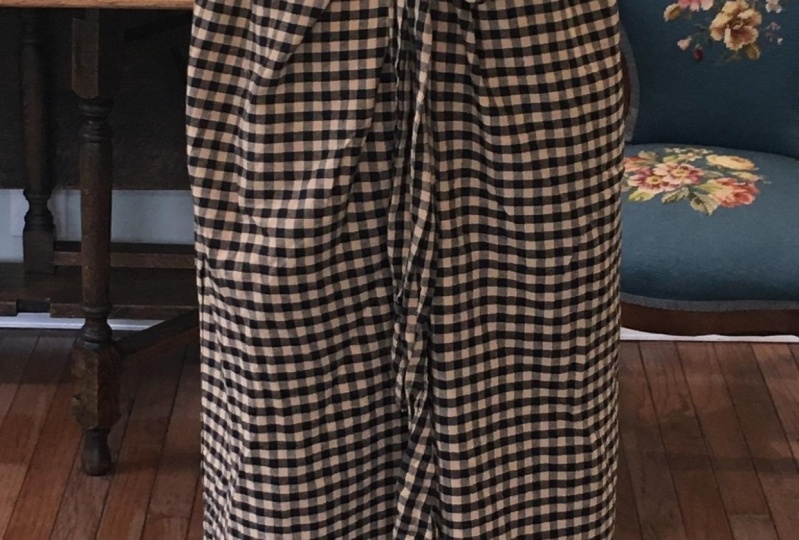
to give you an idea, the blue check fabric was
a 140 centimeters wide and the red linen was a
150 centimeters wide. When you buy fabric,
the wider the better, obviously because you have
more fabric to work with. But it's not always
necessarily like that. It's just good to go
back to your measuring, go back to your cutting plan. When you decide on the width of the fabric
that you're going to buy. The next thing to
consider is the weight. Do you want a heavy skirt that is suitable for
the warmer months? Like my red skirt or do you want a light and floaty skirt
like my blue check skirt? Pay attention to the weight
when you buy the fabric. As a guide, the red
linen skirt I'm wearing is 210 grams per meter squared, and the blue is a 120
grams per meter squared. You can check all these details in the measuring and
cutting document. When you go to a fabric shop, you can feel the weights or contact the online shop and
ask them some more questions. Ethics is good to have
a moment to think about the ethics of the
fabric you're buying. How was it made? Who was it made by? Any implications
of those things? One simple way that I choose ethical fabric is to buy dead
stock or x designer fabric. It's like buying from, it's like buying
something second-hand because it's fabric that they've bought for a brand, for a High Street or
a designer brand. And then they've overboard the fabric so they pass it on to these dead stock
suppliers and you can buy fabric that would be
otherwise thrown away. So that's a really
good ethical decision to find dead stock or
x designer fabric. Just searched those
terms on Google. That's dark fabric. For my case, England
x designer fabric UK. Search that to help
find the fabric. If you can't find any dead
stock wax designer fabric, just take a bit more of a moment to research what you're buying. It can be really good
to look for ICO texts, which is a certification to
prove that the dyes that we use for the fabric
are not harmful to humans or to the environment. So have a look for the
ICA texts stamp if you want to choose a more
ethically dyed fabric. And same with the how to
find your desktop fabric. If you just Google
E cortex fabric UK, you will be able to find some fabric that has been
produced in that way. And the last one we're going
to talk about is color. Choosing a color which you love. You might like to go on
Pinterest and look at some other skirts or dresses and the colors and
what inspires you. You might like to think about other things in your wardrobe. What are you going to
wear your skirt with? I personally, where it with
a white shirt or a black. That means I can
go for any color. If you have other color tops, you might like to
think what skirt you'd like to make
to match your top. You might even like
to make a matching top in the same color and also how the color makes you feel I'm wearing
this lovely orange, and this orange makes me
feel so bright and radiant. So choose a color that makes you feel good and that you're
inspired to work with. Okay, so now we know
everything we need to consider when it comes
to buying or fabric. So it's time to go shopping. And then I'll see you in the
next lesson where we are going to prepare
and cut off fabric.
6. Prepare and Cut Fabric: Welcome back. In this lesson, we will prepare our
fabric to start cutting. It's a slightly different
technique we use for cutting, that we use for linen and
that we use for cotton. So I will show you
both examples. So depending on what
kind of fabric you have, you will know how to
prepare your fabric. The main thing we
need to pay attention here is that when
you buy fabric, often they will not
cut it straight. The piece of fabric
you have will have a slightly jagged edge
and you need to correct that first so that you have a straight line to
work from that's been cut and then the straight
line of the salvage so that you are able to
make perfect rectangles. By the end of the
session, you will have your fabric cut and ready to. So let's get stuck in. The first step is to wash and dry your
fabric as you would. If you're going to tumble dry it, you want
to tumble dryer. If you're not going to
tumble dry it, don't. And if you're going to hand
wash your hands, wash it, but just use the
washing technique that you're going to use
on the final garment. And then once we've washed it, we would like to
iron or fabric so it's smoother and
easier to work with. You'll see here
this scratchy edge that the seller has
left on the fabric. We don't want that because we need that nice straight edge to start off our
rectangles with the linen. What we do is called something, something called
drawing a thread, or sometimes called
pulling a thread as well. And what we do is we find the right length
that we want to cut. And then we pull a thread from
the fabric and use that to create a guideline for
cutting our fabric. So we get a really
nice straight line. I recommend doing this part and really good light because
it can be hard to see the thread that
you've pulled unless you're working in
really bright light. So we keep working the whole
way along until eventually we have a line running along the whole
width of the fabric. You see me just pulling
it through here. So we get to see this nice line. Then if the, if the thread
snaps, we just start again. So I've found where
we want to carry on. I get my needle under there. I pull out another
thread and start again, pulling that all the way along. So eventually we reach the end. We have a line running, running along the whole
length of the fabric. Look like this.
And then we follow that with our scissors and
cut all the way along. So we have a lovely
straight edge. To start cutting. This is very satisfying. You can keep those n bits
for stuffing for toys. Don't throw them away if you
have any plans to do that. Now onto a lighter fabric because we work with that
slightly differently. We don't need to draw a thread. We do something a
bit more radical. So first of all, just
getting that straight edge. So just take a tiny
bit of the end like this and then we rip it. Because when we rip it, it
just rips along the green. And then we get a lovely
straight edge to work with. So there we have it,
and now it's time to start cutting using, using our cutting plan. So what I'm going to
do is I'm going to cut the belt off first. Then that will leave
me with that strip and then cut that in half. So starting with the belt, which I want to be 14
centimeters, drawing a mark. And then doing or slightly surprising Radical ripping
to rip our belt off. I'm showing you
this because it's it's good to work out the order. You're going to cut things
before you start cutting. So I always have a look at my
guide like this and think, Okay, right, so I'm going
to cut the belt off first. Then with the remaining fabric, I'm then going to cut
my two skirt pieces. Festival cutting the length
which I know my skirt. I wanted to be 37
centimeters long. So cutting and tearing that. And then we'll be left with
a wide strip like this, which we need to cut in half for the front and the
back of our skirt. You can measure it. Well, you can. I quite
like doing this. Just fold the fabric
in half using my little marker pen and
slip it in the crease. And then I get the exact
halfway point and use that as a guide for cutting
that piece in half. So this is our last cut, cutting the front and
back into two pieces. Have at the end our belt
piece and all front and back. Now onto my red skirt where I will first of all cut
the belt off the same. I'm showing you how
we do it differently. So I've measured the 16
centimeters and rather than ripping off fabric because we can't do that
with this heavy fabric. We need to carry on with the method of
drawing the thread. So I'm drawing thread
all the way along. At 16 centimeters for our belt. This can be a little bit fiddly and it's likely the
thread will snap. And then we'll need to keep working our way along to get the whole
width of the fabric. You'll see now I can see
that line running along. Need that bright light
to be able to see. My thread snapped. Then I find where it roughly ended and I scoop
up another thread. It might be the thread
just next to it. As long as it's very close by. So you can use that thread
or the one next to it. Now I've got the line
running all the way along with my lovely
sharp cutting scissors, cutting that piece off. Once I've cut all my
red skirt pieces, I will be left with a very
long belt piece like this. And then I'll be left with my front piece and
my back piece. So now we have all our
pieces cut out and ready. It's time to start sewing, which we will be doing
in the next lesson. See you in the next lesson.
7. Sew Side Seams: Welcome back. In this lesson, we're finally
going to get to the sewing. This is where we are going to, so our side seams using the very beautiful and simple
running stitch. It's a good idea now to take a moment to think about
your intention again, your ankle word, elegance, so that when you are sewing, you can hold that in your
mind and in your body as you carry it forward
into your life. Even they're running
stitch is really simple. It can take a little bit of practice to get
the tension right. So be patient with yourself
and be willing to unpick. It doesn't go your way. Make sure you don't make your
running stitches too long. So you want really nice,
neat little stitches. I recommend one to two
millimeters long each stitch. And just reminding you again
about cutting your thread that we pull one arm and a half. Don't be tempted to use
long length of thread, just one arm and a half, and that's the perfect
amount of thread you need to get working. Let's go. And so some theme here, we have our front and
back skirt pieces and we want to sew
down each side. I like to be precise with this. So I I'm marking the one
centimeter seam allowance. If you've got a lot of
confidence with sewing and feel like you can
naturally do this by eye. You don't need to do it. But I find it's nice to
follow the line. It makes it nice and
simple to follow along. I'm drawing a one
centimeter line down each side of the skirt. Now getting my thread, measuring the length
of this guy I need plus a bit extra
for tying knots. Either end, threading my needle, leaving a bit of overhang
with thread there, and starting with a fastening, not which means just
looping under once, pulling the thread through
till nearly the end, just leaving a few centimeters,
looping through again. And then when there's
a small loop left, we talk our needle, just making that loop
pretty clear for you. We loop our needle through that loop and that
forms one naught. I'm gonna do another one now to show you again and
often when I start, I do do two knots just
so it's really secure. So scooping under it through, leave that little loop, put the needle through that
and pull, and there you go. Your thread is fastened. Now for this, we're
going to do running stitch along this line, which involves just up, down, up, down, up, down with the needle. You might be able to get a few stitches on before
you pull your thread. So you'll see here, I'm getting 345 stitches on. I think about three here. Before I pull through
when you first start, you might just want to do
one stitch after time. There they are nice
and neat and even each stitch about a millimeter
or two millimeters long. Carrying on the same
up-down, up-down. You'll find your own
rhythm with this and find your own way of handling
the fabric and holding it. This is how I like to do it. And I'm using my thimble
there to push the needle through at the end
to save my fingers. There we are lovely, neat even stitches carrying along the length of the fabric. So you can see there I've
gone all the way along. And then when we
approach the end, we will be thinking
about another fastening, not here we go. Few more stitches. Get us going to the end. If it's got too
tight, the tension, you just need to
loosen off like this because you don't want
it all bunched up. So I often run my fingers
along like this to loosen off the tension,
looping through once. We get that loop. And then pulling
through the loop. And again, I'm doing too, because Let's be safe here. So there we go, two
knots and then we just cut our thread. And then we need to carry
on and do the other side. So we have two matching sides. Once we finished, we'll have
this side all sewn together. The two pieces. The other side, just the same. Ready to fill our seams
down in the next lesson. See you in the next lesson.
8. Felled Seams: Welcome back. In this lesson, we are going to use a finishing technique which
will make your garment look as beautiful from the
inside as from the outside. Modern garments use
an oval locker, which to me create such
an ugly inside seam. And it can also be
a bit itchy because it's, it's not smooth. So what we're going to
do is flat felled seam. So the scene as felled
found to the garment, which looks beautiful
and feels cozy. Let's go and fill some themes. As with the last
lesson, let's breathe, relax, and focus on
our intention as we. So we've got our same
here on the side. And what we're going to
do is we're going to cut nought 0.5 centimeters, half a centimeter from the length of one
side of the fabric. So you have to be careful
with your scissors to leave the other side
because we want one side to remain one centimeter and the other side to be
nought 0.5 centimeters. And we're going to repeat that mirror image on the other side. So pulling back the
back fabric and just cutting the top one,
naught 0.5 centimeters. My scissors have got a
nice rounded edge which prevents me from cutting
the fabric underneath. You have to be really
careful with this. So you can see there nought 0.5, the top on centimeters
at the bottom. And the two sides are
mirroring each other. What we're going to do
is we're going to fold that one centimeter
around the naught, 0.5 centimeters,
which makes a really neat, flat felled seam. It's my favorite thing. I think it makes your garment look
beautiful from the inside, from the outside in comparison
to modern day garments. So what we need to do now
we've done one fastening, not on the lower
piece of fabric. And now I'm going to do
another fastening not here to secure this folded felled seam. Down. Here we go doing
one nice neat fastening, not pulling through the loop. And then we go and
now we're going to start off fell stitch. We want to fold that
one centimeter around. So be left with
this lovely nought, 0.5 centimeter folded ridge. And the way we do this stitch, we're going to get a
nice close-up is we tuck on needle in just
under a couple of threads. This is a really
delicate, neat stitch. And then pull it through about
two to three millimeters along and come out the top down under a couple of threads along about
23 millimeters. I'm poll again, going down where we came out a couple of millimeters coming
in at an angle. And pulling through this stitch, like all the stitches
tastes best practice to get it really neat and
even but once you do, it's really, really satisfying. You can see here how lovely
and neat that looks. We've got the little thread attaching each one and we just want to be careful
with our tension, pulling it nice and tight, but not too tight. Now I'm going to show you if
you want to switch threads, if your thread is not gonna
make it all the way to the end of filling your garment. You need to do a fastening, not like so where you go under the lower piece
and then the top piece, all in one place. Pull the knot through. And then you want to
hide that tail of thread underneath
your felled seam. Then we will get some new
thread and cut it to length. Ready to join in noticing the distance between
the stitches we want our next not to
follow in the patterns. So about two to
three millimeters along from the last naught. We're going to do
another fascinating. So tucking under in the same place and in
the felled seam on top, I'm pulling through
that loop and there we have another naught. Then we can carry on with
our felled seam stitch. Time to get to the end and
finish with fastening, not pull three. There we go. There. We have it. Fell seem all finished. This is how it looks from
the inside of your garment. And then this is how it looks from the outside
of your garment. Now you need to repeat the
same down the other side. So you will have two
matching felled seams ready to prepare to gather
in the next lesson. See you in the next lesson.
9. Prepare for Gathering: Welcome back. In this lesson, we are going to
prepare to gather. It is worth taking your time to prepare so that we get
nice even gathers. When I first started, I just tried winging it. And I'll just show
you this example of the skirt where the gardeners
are not even at all. And then when I got to the end, there was just a huge portion
of fabric where I'd run out of width to be able to gather. So it's just a non gathered
portion of the skirt, which doesn't really
look very professional. Because we want to
create a really lovely, beautifully
finished gut. We want to take the
time to prepare. And we're going to do that
by gathering in sections. So what we will do is
we will mark notches on our belt and mark
notches on her skirt, and then gather in small
sections so that we know if we keep each small
section even than the whole skirt will look
even this class a bit like the calculations class is a little bit more concentrated. So you might want to take this in the morning when
you're feeling fresh, so they're able to concentrate
on getting this correct. First up, we need a
quick calculation, so go and get your notebook and the measuring and
calculations document. I've got here my
measurements that I need to on this garment. And actually for
this calculation, all we need is the a
measurement, the width. What we're going to
do is we're going to add two or three
centimeters to that. I recommend three for an adult
and two for a child baby. So for me it's quite
simple calculation. We take my waist eight
to two centimeters and we add three centimeters so that we have 85 centimeters to
create this length that goes all the way around the skirt from one edge
of the belt to the other. You might be
wondering why we add three centimeters to
our waist measurement. It's so that we have some 0s
in the waste of the belt. Whether you are
going to tie it in a bow at the back or wrap
it back around the front. It's nice to have a
little bit of give from your waist measurement so that you have space to
do the belt up. Saying that I personally don't like my clothes to
be really tight fitting. So if you want your
skirt to be really tight on your waist
and you want to tie it up really tight. You might want to leave
this measurement as the exact measurement of your waist and not add
the three centimeters. But just so you know, the red skirt I made
the blue skirt and aid. And this one for Willow. I for all of them, I did add well, for willows, I added two centimeters and for mine I added
three centimeters. And it just gave
the garment that little bit of give
so it fits nicely. Going to do the notches, like I said at the beginning. And we do that by
making nine marks along the belt and nine marks
around the skirts. And then we match those
nine marks up to each other so that each section
is gathered perfectly. So this is how I mark
the skirt piece, imagining this is the skirt and those are the two scenes there. I do it by folding. So rather than all the
fiddling with a tape measure, I just fold this
in half and then I fold the half into half. So then one side of the
skirt is now split in four, then the same on the other side. So fold it in half, fold the ends into
the halfway point. So now that is those
eight sections. And then here's me doing
it on the actual fabric. So I've drawn the halfway point. Then I've taken the end into the halfway point and use my thumb to crease it and create
a line and mark that. Repeated it all the way
around and on both sides. So looking at our skirt now, we have 123 lines and then plus the two
scenes at the end that makes five and then
same on the other side. And then we repeat
this with our belt. We draw two marks on our belt. First of all, which
needs to be the waste. We do the same thing. So folding, folding, folding. So we can create those eight sections or nine notches for the
gathering on the belt. So that is what it
will look like. But here we are on
the actual belt now. So first of all, folding the belt in half to
get that exact halfway point. And once that's marked, then we can measure
from the center point. So from that center point, I need to measure out 23 centimeters in
this case because we are working on a
baby willows skirt doing our foldy
moldy now so that we get these eight
sections marked on. Knowing notches. See me just solely
working through that. So fold in half in half again, and then half into half so
that we get these marks. You might prefer to use a tape measure and
work out divided by eight. But I find that's
more complicated and this makes it a bit easier. So then once I've drawn
all these notches on them now numbering them
from one to nine. There we have it, the belt
with all the marks on. Ready to get that
lovely even gathering. So what I like to do
is I like to have both sides matched
up as well because these two sides of
the belt are going to be like the bread in a sandwich. And the gathered skirt is
going to be the lunch, meat or cheese and pickle or whatever you like
to put in the sandwich. So we want them to be even
on both sides of the belt. During these marks all
the way along, mirroring. And then I'm just making sure the lines are
really bold so that I can see them clearly for when it comes to the gathering. Okay. So now for the numbering, I've already made the
opening in the skirt, but you will do that
in the next video. So don't worry that you
haven't done that yet, but you'll see it from that gap. The middle back is number one. So the center back of
your skirt is number one. And then number nine is where your skirt ends the same hole. What I'm doing now, same as what I did
with the side seams, is marking that one
centimeter seam allowance. So I get nice straight
lines. For me. It makes the sewing much
more relaxing if I can just follow the line and not be constantly checking if I'm going straight because
it's very easy to start waving around if you haven't got
aligned to follow. So that is the seam
allowance line all or all the way around
the top of the skirt. And then I also repeat
that on the belt. So this is what it's
going to be like. They're going to fold under. And that's going to make
the two pieces of sandwich. The gathering. Going along here with the one centimeters on
the belt and drawing a straight line so that we have a line to follow on the
belt as well as the skirts. We match those two lines up using a piece of code to
draw a nice straight line. So there's the belt with a lovely seam allowance
running all the way through. And you already saw that I've done the skirt with
the seam allowance. So that means we
are now ready for the next lesson
where we are going to cut and create
the role opening. See you in the next lesson.
10. Rolled Opening: In this lesson, we are going to create the opening
for our skirt. We're going to work out how long the slit needs to
be at the back so that the skirt opens up to fit
over our hips and then we close it to tie
it up for this. For this, we're going to need to make another quick calculation. Go and get your notebook and you're measuring and
calculations document. So what we're going
to do is we're going to look at our
waist measurement, look at our hip measurement and work out what the difference is to make that slit. In my calculation,
I decided that was a good idea to add
four centimeters. That is because
some of our fabric is taken into the
gathering portion. And then we just want to
be a bit generous with this measurement because
if we make it too small, then we won't be able to
pull it up over our hips. Or if we have to strain, It's pullover our hips, It's going to put tension
on the garment. And that is why I added
four centimeters. So we've got plenty
of wiggle room for getting our
garment on and off. I'm going to leap in now to the measurements
and the calculations. You might want to
pause the video as you go along and
make yours or refer back to the measuring
and calculations documents so you can work it
out for your measurements. For this calculation, we
need our measurements. Again. This time we need to, we need e, which is the white,
the widest hit, and we need a,
which is the waste. And we're going to
do this calculation, E minus a plus four
centimeters and divide by two. So for me, E is 96 minus 82, which gives us 14, add four
centimeters equals 18. And then we divide that by two, which leaves us with
nine centimeters. Go and check the measurements
and calculations document if you need
more help with this. Now we've worked out how long
our slit is going to be. We can go and cut it and
make are rolled opening. My slit was nine centimeters, but the skirt we are working
on today is for willow, so it will be
different measurements recapping where we're at. We've got our paper
version of our skirt here. And this is where we're
going to want to cut our role opening in the
center back of our skirt. So it looks something like this so that we can get
the skirt on and off. Here's our front and back of
our skirt with our marks on. So we're going for
that center one. That's what we're
going to be cutting. Measuring the length of our cut, and drawing a line down
that we can follow. We have it cut open. Now it's time to roll. We need to make sure that the garments the
right way around. This is what the outside
of the garment looks like. This is what the inside
of the felled seams. And we want to roll
towards the inside. So currently the fabric is
now wrong side facing us. So I'm rolling the fabric
but only by a couple of millimeters each role
because want to keep this really tight and neat. As always, starting
with a fastening, not looping through
the whole of the role. And then drawing that not. There we go. And now we work down this
role with the same stitch, the filling stitch that we used when we flat
felled our seams. So we scoop under and then
we scooped through the role. The thing to note here is
when we felt the same way, we're just taking the very
few threads at the end. Whereas here I want to go through the whole
layers of the role. You'll see I'm going through almost through the middle of it. So there's definitely secure, dined on and just get the edge. You want to go right
in the middle of it. So it's really secure. Carry on, working our way down until we get to the
bottom of the cut. And this is where we
switch to button stitch. So I go down and then I
pull through the loop. It's almost like a fastening, not the way it's
different is that you pull towards the opening so that all the knots will line up
and create the button look. So pulling through,
leaving that loop. And then I pulled down towards, so I get a nice not
coming at the end. Carrying on the same
all the way down. So I'm doing it about the
last centimeter of this role. And then I will go around
the edge of it as well. So now we've got to
the very bottom. I'm forming a curve with the with the buttonhole stitches always pulling
towards the opening. You can actually go up like you see I just
did in this one. Or down when you do
your buttons stitches. It's better just for your own technique that you stick to one. But I seem to be. Switching between up and down shows it doesn't
really matter. But often it's just
choose one up or down. So here I am coming up, going through the loop, pulling it towards a lovely neat not carrying on around that buttonhole. You'll see I'm working about two millimeters away from the edge of the fabric so you
want it to be secure. Once I've done that, switching back to the
role the other side. So rolling in decent amount and making sure that I pull
through the whole role. Now we get to the end, we do our fastening. Not it looks a bit like this. From both sides. I found out from a historical sewing video that to make that
even more secure, you can so the bottom
of it together. First of all, I've just noticed a stray thread is good, right? The end of the Garmin, we're
going to check these things. But as you go, if you
notice any strays, give them a little clip. And we are now going to just
seal that button closed. You'll see what I mean here. So because we just want, we want to reinforce
this because this is the weakest
part of the garment where we take it on and off and we don't want this to rip. So doing a fascinating
not in here. Then what I'm going to do is
just join the bottom of this slit together by a few stitches just to make it a
little bit more secure. So going round, pull through
and carrying on like this, just doing a few loops
so that this button hole is really secure at
the end and it's not going to come open or tear. When we put our garment on. Doing a few stitches
and a few knots, there's another naught so that it looks really secure there. Once that's finished, we
make the thread disappear. Oh, look another
bonus not, why not? Why not do another naught? And then we make it disappear. So we just put the
needle in the role, thread it through and
then cut our thread. Now we are ready to
gather or skirt. So I will see you in our next lesson where we
will start gathering.
11. Gathering Part 1: Welcome back. In this lesson, we're going to do the gathering. This is the longest lesson in this class because
it demonstrates the friendliest process of the whole Scott
feudal extra notes. Before we get stuck in make sure that you're gathering thread that we're going
to use is strong. So you want to pull it
like this and see that it doesn't snap because
when you gather your, your, your fabric along
the piece of thread, it will be under some tension. So if you have a weak thread, it could snap and
it will cost you all your work of your
lovely gathering. Also to note, when we
gather the fabric, we will leave our
gathering thread running through as we saw. We really want to make
sure we don't catch it. That's why we use a
contrasting color. We want to stay. As part of the way
the technique we use. We will always be half
a centimeter away, but just always paying
attention that you're not catching it in your hand sewing because
then it will make it hard to pull the gathering
thread out at the end. We want to take it out
so that it doesn't show because this is
the villi as process. This lesson requires extra
kindness, extra patients. So take a deep breath,
focus on your intention and let's get gathering. We've got our skirt and
our belt ready to go. Now time to thread with
our gathering thread. So I'm using a very contrasting dark thread,
which I recommend. So you can really see it. This slightly thicker
black thread. Cut it to the length of one
side of the skirt plus a bit. And now we're going to
make a big hairy not. We do this by twisting,
twisting, twisting, twisting, let go, twist, twist, twist, twist,
twist, twist, twist. And then we pull. We get this really
big hairy naught. Which will mean that
when we gather, there's no chance if it's
slipping through the fabric. Here we are just showing you another big
hairy not so twist, twist, twist, twist, twist, twist, twist, twist, twist. And get the end. Pull through. They carry not starting
at number one. And we're going to work
all the way to number five with gathering stitches. So each stitch is
like running stitch, but just a bit bigger. So each stitch has about two
or three millimeters long. Working like this. I'm also using a
slightly longer needle. My gathering needle
is slightly longer. Just makes it easier as we work our way along with these
gatherings stitches. Working all the way
to number five here. And then you'll see I'll just slightly overshoot the mark. So that number five is
definitely in the gathers. And once we get to the end, taking your phone
needle and forming another big hairy naught so that it doesn't pull
out this end either. So that we go to
be carrying knots. And that is our stitch that runs through that
makes it easy to gather. Now we've got the belt here. I'm preparing it, checking
everything's lined up. Okay. He's good. Check check, double-check. Just folding it in half, ready to sandwich
the gathering in. So as I neatly checked it, I noticed that my number one Mark was not the
same on both sides. I'm just correcting that now. So this is the time to notice
if you've made any errors. If anything looks off. Now we're going to fold on one side the fabric along
the seam allowance line. I'm going to fix that to
one side of the gathering. So number one, I'll ask it matching up to number
one on our belt. So it will be like this. We'd line up to squish
the number two in. I'm just now during
the numbers on the other side of
my belt because I noticed that it's it makes it easier if we can
just see them on both sides. So you might like
to do that as well. Not necessarily, but if we can make our lives
easier, why not? So I normally work sideways now you see I've turned the belt sideways and I've got
the skirt sideways. And I often want something sticky so that the gathering
has something to land on. And I find a bare leg is quite good because
it's a bit sticky. We might like to
use a rubber mat or something like that so that when you gather you
have something to put it on. But for now I'm attaching
my fastening not on. I'm on the skirt right
now at number one. Where that red seam allowance
line is fixing number one. Then matching that
up to the number one with the folded seam
allowance of the belt. So one meets one. Looking at those notches, matching them up and
doing a fastening, not that secure now ready to go? Just making sure I can
definitely see my notches, making sure they come
over the seam allowance. So if your lines
aren't long enough, make sure that they go over
because when we gather, we want to make sure we
can see that line to match the two to the two, which is what I'm doing now. So this is the Vitellius bit. I did warn you. But
once you've done it, once, once you've done
one section, I find it. It goes much more smoothly
because you get used to it. So I'm using my thumb to hold the two and
the two together. I came up with this
hack as I worked on the checkered skirt, that actually the best
way is when you match up your notches is use
your gathering needle, you're longer needle
to hold it together. So as you gather, you know that those two
notches are not going to move. So there we go. But in this
case I'm just using my thumb. I'm just checking
now the evenness. So using my leg as a mat that secures
the gathers in place. So they're not
slipping too much. Then just checking,
does this look even does this look even
moving them along? And then what I do is I take the very top of the
first gather and then I attach the top of
that first gather to the belt in a similar
stitch to the Fell stitch. Looking along to
the next gather, take the top of it. I'm scooping under the belt. This is a bit like knitting
or crocheting where you get a feel for what
the tension is like. And then you can work
with that tension. So the first time you do this, it might feel really strange. And the end result might
look really bunched or, or a bit screwed
up or something. So just really be patient
with yourself in this step. And you might want to
work from one to two. And then you might end up unpicking the whole
thing because you think, Oh no, this doesn't look right. But be patient with yourself and you will get it and
it will look beautiful. So just baby steps here. So I keep taking the top, the next gather and then attaching that
gather to the belt. So now we've reached
number 21 section done. And it does definitely get
easier from here because we've already Salsa to get a feel now for the tension
of this, for how, how regular the gaba
czar and a bit more of a feel for the way
we're going to hold the fabric and the way we're
going to work through. So now I'm heading
onto number three. So I find the three on
the belt and I find the three on the skirt.
And I matched them up. And just fiddle
around till I get the gathers looking right. And carry on working
in the same way. Where I scoop the next gather at the red line and then
join that to the belt. Now we here at number four, getting close to the finish line on this side of the skirt. Well done. This is how we change thread if
we have run out, so I'm tying and not
here at fastening, not on that gather. And then to be double secure, I peel the belt away. I do an extra not just behind. So I'm doing another not here. So we've got two
fastening notes. And I'll do the same
when I joined the next not so I first
of all peel back and I go underneath and I do
a not on the belt because this is going to be hidden
inside our garment. So doing a little knot here, going through the loop as we do. And then pulling on
the next gather, finding that scoop
through the gather, skip through the belt. And then we do one naught. So I'm just going to go
through just the belt, pull through the belt
and form a naught. So we've got two knots to join this new piece of thread because this gathering is going
to take a lot of weight. Don't want to risk it slipping. Carrying on the same scooping
and gather going along. Now it's starting to
look very pretty. And we've done all the way from number one to number five. So we've done one side. So we now need to repeat
from five to nine.
12. Gathering Part 2: Repeating the same process, measuring the thread from
number five to number nine. Running around the
garment like that. It's easy ways to measure. And then just add a bit
for our big hairy knots. Doing a big hurry
not on one end. And then finding
number five where we just finished attaching
the gathering. And we're just going to
undershoot the line. So just go just behind it
and start gathering with this black thread from
number five to number nine, working our way around. The reason I don't gather
the whole length from one to nine is don't
wanna risk it snapping. So it's plenty far
enough for it to travel along one
side of the skirt. Don't want to do the
whole amount of Snap. Extra note that you do want a strong thread
for the gathering, their extra side note. There we go. We have it now running from
number five to number nine. And then we can slide
our fabric along the gathers to bunch it
up into the sections. So working now from
number five to number six in the same fashion that we have scooping under
the top of the gather, under the Belt, and on and
on and on till we get to number nine where we will do
our fastening, not like so. And once that's false
and we can cut that off. So now this is what
it will look like. All of one side
will be gathered. So now we need to fold the
belt and match it up the same. So we do this by turning
the garment inside-out. Now we're matching the number one from that side of the belt, from this other side to the
other side of the skirt, say folding that checking or notches match the
notch to the notch. And working our way around. We are going to pull out
our gathering thread. At the end. We don't leave this
in the garment. So for now let's cut our knots so that it will
be easy slip through. And now we are doing two fastening knots.
At the beginning. I'm working in reverse
this way because I like to hold my belt on my left
and my skirt on the right. So I'm now working from
number nine to number one. So going down the numbers
down my fastening not and making sure I've cut all the big hairy
notes from all ends. So there will be four big
hairy knots to remove. So just make sure
you've done that so there'll be easy to slide out. And now, making sure that gathering thread is out of the way because we do
want to slide it out. So it's kind of a bit tangled
around here. There we go. I've worked all the
way to the end now. So I've done number 9987654321. We're now at number one. And making sure we
are avoiding sewing around the black thread
because we want to be able to slide it out easily. So I've got to number one, right to the end, checked that
my notches are matched up. And then I am doing my two fastening notes to make sure that that is really
secure at the end. So there we have it,
it's all gathered up. Now onto the next lesson where we are going to close the belt.
13. Sew Belt: Welcome back. In this lesson we are going
to so the two ends of our belt shot before
you close your belt up, do make sure you've pulled
out your gathering thread. So in the previous lesson, we cut off the knots. Just make sure you've
pulled it all out before we saw the belts shot. Let's get stuck in and
get this belt finished. This is where we're at now. We have our skirt gathered
beautifully and then we have our two ends of our belt
still open like this. Now, you this is
the option again, if you'd like to personally, how I like to do it is to mark the one centimeter
seam allowance on the outside of the belt on what will be the right
side of the fabric. Drawing that one centimeter
all the way around. Or the three sides of the belt. Then using something straight
to draw along those lines. So you have what
looks like this. All three sides marked out
with the seam allowance. And then what we're
going to do is we're going to fold it like this. So both of these seam
allowances fold in. And then we join them together. This falls like this, join it to like this, and it will look like that. Lovely, neat edge. And then when we get to
the end of the belt, we can fold it like this. So we fold the end
of the belt down, fold it in half, and then fold the sides down. We get a slightly bulky
but at the end there, but it's so mildly bulky, that's not a problem. This belt can slip and it's
very easy to get wonky. So what you can do, I'm showing you here
on my check skirt, you can run a
basting stitch along to join your belt so that you know that it's even
the whole way along. Once you're confident
that it looks good, the other thing you could
do is iron it or use pins. I'm not into pins, but you could pin it to make
sure it all lined up. Okay. And then we're doing a similar version again to the Fell stitch to join
these two pieces together. So we scoop under. We go up two or three mill, and then we come out
down where we came in at an angle two to three
millimeters and round. And this forms a really
lovely, neat stitches, almost invisible when
you use a thread that's the same
color as the fabric, you won't be able to
see it and it will just look perfectly
joined together. In this case, I'm just rolling the fabric and
joining it as I go. I wouldn't really advise this because when I have
done it in the past, they have slipped and
then I get to the end of the belt and it's very wonky. And that's very hard to correct. And often you have
to go back and undo a lot of your work. And that is why it's a good
idea to do that base sting or ironing or pinning to
make sure your belt is nice and even all
the way to the end. So working along with
my Fell stitch along the belt, we nearly at the end. Now. You can fold it as I did
before or like this where you fold the end down that way. So either way there's gonna
be a slightly more bumpy bit, but you can hide it with your
stitches, so that's okay. So I've done it on the side here now rather than at the end. Just making sure
it's nice and secure and then tucking it
in nice and neat. And then going through
all, first of all, just the top two layers in
a sort of way to hide it. And then we will need
to go through all four just to make
sure it's really secure and that that is
not going to come loose. When we wash and
wear our garment. Attaching that, I
also like to to make sure that this
bit is secure is that when I get
right to the corner, which we are just
approaching now. So one more stitch to
get to the corner. And that corner stitch
for me I do as a not just so I'm confident that that is all
really secure there. So there's that fastening not then we've got lovely
straight line at the top, working along exactly the
same with the Fell stitch. Pressing and squeezing as
we go, looking so neat. Now we're right at the
end doing a fastening. Not. Then we will make that thread disappear
into the belt by pushing it back in. Then the needle will peek
back out somewhere else. And that is where we
will cut our thread so that all thread
has disappeared. There we go. Look
how nice that is. I have been practicing awhile, so mine is particularly
neat, uneven. But you will get to this
level the more you practice. And at the end. So we now need to repeat that on
the other end of the belt so that both the
belt ends are finished. And then I will see you
in the next lesson.
14. Felled Hem: Welcome back. In this
lesson we are going to finish our hem. This to me is very
satisfying step because we're right at the end and it just gives our
garment that extra sparkle. You might decide
to have a really narrow him like I
did on my skirts, or a small rolled hem, which is about a
centimeter long. Or you might want a bit
more of a statement Hen like I used
on willows skirt, which is about five centimeters. So now you've decided
if you're going to have a small hand or a
bit of a wider him. Let's get stuck into this lesson where we are going
to help us get. Here. We have our skirt with a little mark to indicate what length we would like
our skirt to be at the end. I tried the skirt on Willow
and mark that dot on there. So I knew you might prefer a
smaller him with my skirts. I just did something like this. I just rolled a
very small amount up and then treat it
like a felled seam. But in this case we're
doing a bit of a wider one. I want to fold it like so. So we've got nice
big structured him. I measure how much I'm
taking off and it is six centimeters so that I can keep my hen even
all the way around. I'm drawing dots at six centimeters all the
way around the skirt. I would recommend
joining these dots up with a ruler so you have
a straight line to follow. I didn't do it in this case, but I think it would
make your life much easier if you had
the line to follow. Because then what we
do when we fold it, I'm folding it once on the lovely neat dots
to make straight line. And then I'm going to talk
about other bit under. You can use your
fingers to press this. Might even want to
use an iron ore, as discussed at the
beginning of this class, you might like to use pins, whatever suits you best to hold this in place
neatly as you work. Also normalized based it
as I did with the belt. So securing that in place, checking the line is straight. These final touches do
make all the difference. So I'm using my
fingers to press it is an example of basting
on the belt again, if that's what you might
like to do with the hem based all the way
along it so that, you know, it's held even. Starting at one of the scenes. We're going to fasten
off thread on there. And we do that by pulling a good old fastening
not so we're gonna do one underneath in the seam,
underneath one naught. So that's secure. And
then once we've got that, then we're going to
just double-check. This seems all
lined up straight. And then we're going to attach the scene with another not. So there we go. We've got two fastening, not
Swiss definitely secure. Want to make sure
that hymn stays up. And then we start working
around with all fell stitch, which means we scoop a couple of threads and then
come through and angle about 22 to three
millimeters away. Here it is again close up. So pulling a couple
of threads through, going in at a time,
in at an angle. And working like this the
whole way around the hem. Scoop a little bit, come in
at an angle. There we go. Like lots of this project. The more you do
it, the better you get and the more even you get. I'm just making
sure as I go along that the dots are still at the end and that it's nice and straight because I didn't in this case based
it will use pins, but I would recommend that
working all the way around, eventually getting to the
end and tying a knot. Let's do two knots again
to be extra secure. If your thread doesn't make
it all the way around, go back to the felled seam
video and watch that and that will show you how to
rejoin when you're failing. In this case, my one thread
made it all the way around. So I'm now pulling it
out and cutting it. So that is all our sewing done, well done us now onto the
next lesson where we're going to do a few more final touches
and finish our garment. See you in the next lesson.
15. Finishing and Well Done: Before we say big, well-done for finishing, there's a few final touches
that we can do. The first one is just
checking for loose threads. So as we worked on this, we cut the threads off, but you might have
missed one or two. Just going around and noticing
if there's any threads or any other fabric remnants. I was working on that
red skirt as well, so ended up with a
few flecks of that. Then we press it
when we INR garment, it really finishes it off
and makes it pop because I use the ion off markings. I now go round and just make sure all the markings
are removed. You see there than just
disappearing with the heat. And then making sure
our Hen is nice and crisp and ironing
the whole skirt. Once you've tidied up your
garment and ironed it, then you are finished, so well done for
finishing your skirt, that is a real achievement. It's now time to celebrate yourself and reflect
on the process. How can you celebrate yourself? You might like to
wear your skirt to a party or to a picnic
to show it off. Or you might even
like to arrange a friend or family member to take some photos of you so that you can show
your skirt off. And it's also really useful
to reflect on the process. What bits did you find hard? What bits did you find easy? What would you change next time? What did you learn? Would you make any
adjustments which you make the skirts shorter, longer? Would you make the belt narrower or wider,
longer, shorter. All these decisions that we made the first time we
made the skirt, we might make it
different next time. So for example, with me, I, after I made the Red Scare, I decided I wanted to make
the bell even longer. So I did that for the blue sky. I made a much longer belt. The other thing I did was
I adjusted the techniques. I mentioned during the
belt class that the, the two fabrics can easily slide and then your
belt can go wonky. So when I did the blue skirt, I made sure that I pasted
along the length of the belt, so I definitely got that
straight rather than a twisted twisted belt. I also made sure that I noted down my measurements
and my calculations. And then when I got to the end, any adjustments that I
made during the process. So maybe I decided I was
going to cut it that long, but then actually ended up
getting quite a bit longer, just making a note
of that so that when you go back to remake the skirt, you've got everything
easy to look at and easy to understand for
making it next time. Because previously I was
in the habit of making these half scribbled
notes all a big messy piece of paper and I go back,
I don't know what it says. So make neat notes. So when you go back, I want
to make a future Garmin. It's nice and simple and
easy, elegant efficiency. So now we've
celebrated ourselves, celebrated our lovely
skirt that we've made, and we've reflected
on the process. It's time to say goodbye. Thank you so much for taking
part in this class with me. Skillshare is all
about community. So let's make sure
that we connect. If you have any questions, you can head to the
discussion tab and ask me any questions
that you like. And there'll be answered
by me or other students. I would love to see
what you've made. So share a photo of your skirt in the
project section and if you're going to upload it
to social media as well, do make sure you tag me so that I can see
what you've made. Tag me at lower lamb or hashtag
folk sewing with Laura. It also really helped me
if you write a review, if you've enjoyed this class, do pop a review. In the review section, you can visit my
teacher page where you'll find out about other
classes I have on offer and be first to hear about
new classes that I'm making on my teacher page that also
links to my social media, my website and my email list. I send out a friendly e-mail
about once or twice a month with all the projects I'm working on and
what's inspiring me. That'd be a lovely way
to stay in touch ME. The magical of sewing
bring more peace, patients, intention, and
beauty into your life. Thank you so much for watching.
 Laura Lamn, I light the Creative Spark