Transcripts
1. Intro: [MUSIC] Hello and welcome to this class where we are going to hand sew and
embroider a pet orange. Why do I need a pet
orange, I hear you ask? This pet orange
serves many purposes. First of all, as a stress ball for when
you've had a difficult day. Number 2, for staring at you lovingly on your desk when you are working on a
boring spreadsheet. Number 3, for practicing perfect posture like you're a Victorian finishing
school and number 4, to practice your one
handed one ball juggling. Jokes aside, this is a
really fun project to make. It uses up old scraps of fabric. I've made this orange out of an old sweater and old shirt. Hand sewing is a
lovely, relaxing, and meditative hobby to take up to keep you
calm and creative. This project will
take a few hours to complete and at the end
of it you will have a lovely gift to
give to yourself or to one of your
friends or family. This class is suitable for total beginners
because we're going to break it right down to basics. If you've already got a bit
of experience with sewing, you will definitely
learn something new. There will also be a
pattern that you can download and print in
the resources section. If you prefer not
to do it like that, I'm also going to show you how to draw it out and
design it yourself. I've absolutely loved
learning to sew. I find it a very nourishing and restorative
creative practice. May this course inspire
your love of sewing. I'll see you in class. [MUSIC]
2. Getting Prepared: Before we get stuck
right into class, let's go through everything we need to complete this project. We will need scraps of fabric. I have used an orange sweater for the main body of the orange, an old linen shirt for
the center of the eyes, and a little bit
of black fabric, an old top, and the white is
an old bed sheet. You need to dig up
some colors like this of scraps of fabric. Next, we'll need some thread, need a selection of threads. It's nice if you have threads
that match your fabrics, but also it doesn't
really matter. You need thin thread, a bit like the
thread you would use for a sewing machine,
something like this. Then we need something
to stuff our orange, I like using scraps
of fabric so you get a lovely heavy toy at the end. But you also might like to use a polyester stuffing
or wool stuffing, or you could even pop some beans in there if you
want it to be like a bean bag. You will need a needle
for hand sewing. You can get sets like these which have a
selection of needles. This is the size of needle
that I normally use. Not completely
necessary, but you might like to have a thimble as well to protect your fingers if
you do a lot of hand sewing, this thimble is a
finger saver for me, I definitely love using this thimble and use it
every time I hand sew. Then we need some scissors. Scissors is one thing that
you can't really scrimp on. You need good fabric scissors. These tiny scissors that you
see me using in the video, they are actually nail
scissors that I don't use and they work pretty
good. They're pretty sharp. But the bigger
scissors, these ones, these are fabric scissors. If you plan on
getting into sewing, I recommend getting some
nice sharp scissors. We need something to
mark our fabric where there could be some
tailor's chalk which you can rub off, or I like these pens
that iron off with heat. They're really quick and
easy to remove the pen. If you are going to use the
pattern that's provided, you will need a printer and
some paper to print that out, but you also don't need that. I am going to show you
how to work out yourself. If you're going to
work it out yourself, it'd be nice to have
some stiff card and a pen to draw your
design out on the paper. Last but not least, you'll
need some bees wax. It's not essential,
but it's quite nice to run over the thread to make sure it doesn't get caught
in your fabric. Those are all the
practical things we need, but there's a few extra things. We need time. We need to set aside some
time to do our sewing, you might like to do
it in the evening. I personally find it a
nice relaxing activity, rather than going on an endless stream of
Netflix or YouTube, getting lost in a
YouTube vortex is quite nice to spend some time
in the evening sewing. You'll also need some space. You don't need a big, glamorous sewing studio, you just need a little
cozy corner where you can sit comfortably to sew. Thirdly, you need
a good attitude. Sewing if you're new to
it can be a little bit frustrating and fiddly when
you first get started, but that is so rewarding and
so worth giving it a try. Be kind to yourself and be
patient in the process. Now we know everything that we need to get into this project, let's head to the next lesson where we are going to
learn the stitches.
3. Measuring and Cutting: Welcome back. In this measuring
and cutting lesson, we are going to measure
and cut our orange fabric. Just a little note
that it's good to draw out the designs on the
wrong side of the fabric. I want you to draw your
sewing line and you're cutting line on the wrong
side of the fabric. This is the time now to
print out your pattern. If you don't want to use the pattern and work
it out for yourself, this lesson will show
you step-by-step how to measure and cut the
orange. Let's get started. I've got my tape measure here and I'm just showing you how you can get a feel of what size your orange or your
ball is going to be. You can just curve the tape
like this and it'll show you for you to imagine how
big your orange will be. If you want to do it really
small like a satsuma, or if you want to do a
really big like a melon. This size I'm doing is
quite a large orange or maybe nearly a grapefruit and
it's 14 centimeters long. We draw a line on our
ruler, 14 centimeters long, and then we find the
halfway point at seven centimeters and
draw a dot there. Then we need to do the sideline and we want that to
be half the length, so seven centimeters
in this case. We did 14 centimeters long,
seven centimeters wide. I want to draw a line, and I want to make sure
that it's exactly in the center so that dot is matching up with 3.5 on the tape so that it's
exactly symmetrical. Then drawing the shape, it looks a bit like an eye, so curving around like this. Draw a nice curve
shape to match up our 14-centimeter length and our seven-centimeter width to
create a round ball shape. Once we're happy with
our curved line, we want to cut that
out with scissors. This is going to be our piece of pattern paper that we're going to use to draw on for
the stitching line. Note this is not
the cutting line where we're going
to cut the fabric, this is the line that we
are going to stitch on. It becomes a guideline for us to sew running stitch along. I've also drawn here that we want the grain to go this way. Looking at the grain
of your fabric so that the toy sits nicely. I'm working on a
very thick jersey, and it's hard to see the
grain in this video, but I've lined it
up with my shape. I'm drawing a nice
bold line around the pattern piece making
sure I don't miss any spots. Take it away, check. I missed a little bit
at the bottom there. Let's just be careful
and add that bit in. That is going to be
our sewing line. Now we want to make three
more of these so in the end we have four of these
lovely eye-shaped pieces. You see now I'm drawing a dashed line around it and this is going to
be our cutting line. I recommend about one centimeter away from
the sewing line. We're going to do
that for each one and then we're going
to cut them out. There we go. We have now four pieces all with
our sewing line marked on and all cut out with a centimeter around
the edge of each. Now we've got all the
pieces ready to go and it's time to construct stuff
and close our orange.
4. Constructing, Stuffing and Closing: Welcome back. In
this lesson, we are going to put those four pieces together to make our orange. Then we will go on to stuff
it and close it all up, ready to get embroidered
on. Let's go. Starting by getting
two of our eye shapes and placing them
right side together. Ready to start
constructing this ball. We want to work along
one side of the eye, measuring some thread
of the same color. The length of the line we're
going to sew with a bit extra threading our needle
and getting started. We want to start right at that tip point of where the
two sides of the eye join. We're going to do
fastenings stitch. One of the stitches I showed you in the introductory
stitch video. We pull through, we make that loop knot and
then tie it off. Because this fabric is quite thick and I
want to be secure, I'm going to do two of them. It's also good to show you. Looping through again, making that little loop,
threading through. Now we're nice and
securely attached. Now we're going to work
the running stitch along. Because this fabric is thick, I'm going to have to come out the back thread through and
come back to the front. If your fabric is thinner, you might be able to
weave it through, like in the introductory
stitch video. But for me, this is too thick. I need to work like this.
This running stitch. We want to work
all the way along this side in this fashion. Making sure our stitches
are nice and small. You'll see mine are
about a millimeter or two millimeters long, so we get a nice tight
finish. There we go. I've stitched all the way along one and then I'm going
to finish it off with a fastening stitch to
finish that line. There we go. That one is done. You'll see now I've
done the same on the other pair of eyes, both stitch down the side. Now they look like this. We have two of the
halves of the orange. Now we just join them together. We want to place
these right-side together and join
up the third line. We're now going to do this one and join these two together. Finding again that nice
point right at the tip of the orange and making
our fastenings stitch. There, ready to do running
stitch along this length. Making a nice loop to start off that lovely knot
to hold it secure. Then working our running
stitch down that length all the way
to the bottom, to the other point
where we will fasten it off just the same as we
did with the other two. Now we have three sides
all joined together. You're starting
to see the shape. Thick shape. Now we want for the last one
to join together. We're only going to go halfway. We've got space to turn
it inside out. Like this. I've just left a
little gap here. When I said the running stitch enough to turn it inside out. Look. Starting to look good. Looks a bit like a basketball
through the color. Now we're going to
start stuffing it. I like using scraps because it's a good way
to use waste fabric and I like that heavy look and the way it's a bit lumpy as well adds a bit of character. You might like to use wool
stuffing or whatever else you prefer to stuff with. Here I go just slow and steady. Stuffing in strips of fabric and squishing it
around to make a nice shape. This quite an enjoyable
therapeutic process. If you want to add an
extra special touch, you can write something down on a piece of fabric and put
it in there as a reminder. Something I'm thinking about
the moment is remaining content while being passionate about my creative projects. Because sometimes I get all span out with my passion enthusiasm. I want to find a still center. Contentment and passion is
my motto at the moment. I'm popping that
inside the orange, to remind me of that. Then once we've filled it
nicely have a nice shape, we want to do all fell stitch to fasten the outside of these two pieces of
fabric together. Holding that up there. That is where we need
to stitch along. Joining in, you'll see
here that I've worked back a few stitches from
where the running stitch ended because it got
a little bit loose. The running stitches is
a little loose there. I'm doing a knot about three
stitches back from where the line of running
stitch ended just so that it's really nice and secure when we close up so to have a whole. Starting with that
first fastening knot, and I'm going to do two here. It's really nice and secure. Then we're going to work along with that fell stitch along this line to close
the orange up. Because this jazz
is a bit thick, this can be a little bit fiddly. Takes few times to
get the right spot and get it in. Take your time. Going in where we came
out to the under piece of fabric and then going
in a slight angle, to go through to pick
up the top fabric. Slowly, working all the way up that line until we close it
off with a fastening knot. There we go just
finishing it off now with that little
fastening knot. Going through the loop
to make the knot. Then we want to make that
piece of thread disappear. We thread it back
through and pop it out down the scene so
that can disappear. Then we cut right next to the fabric being careful
to not cut the fabric. Just cut the thread so
that, that disappears. There we go. We have our
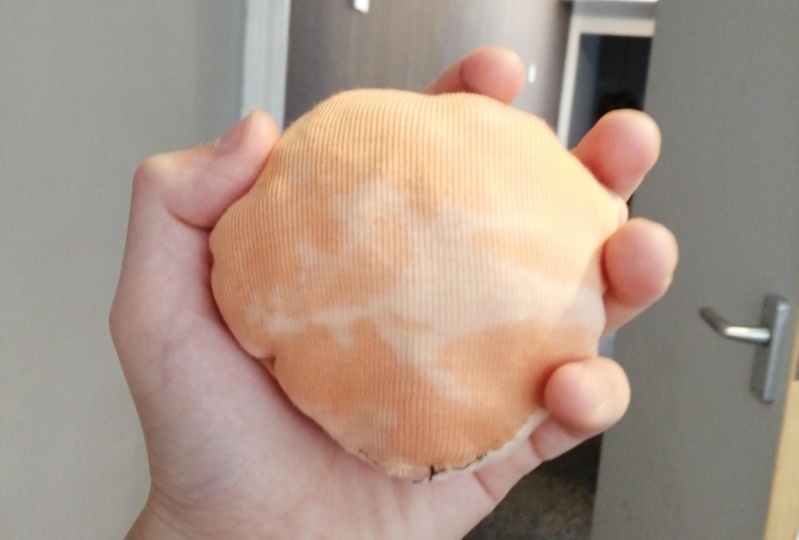
nice lumpy ball shape. Very satisfying.
There we have it. A lovely round orange
ready to be decorated. Let's get into the next lesson where we're going to learn how to attach the stalk
and the leaf.
5. Stalk and Leaves: Welcome back. Now it's
time to make our leaf and our stalk so now I need to
get our green fabric ready to go to make this
part of the orange. If you'd like your leaf to look exactly the same as
mine use the pattern, but for this video, I will be doing what's
called winging it. I'm just drawing a
design for the leaf, to start with the
orange pieces that bold line is going to
be the sewing line, and the dashed line around
is the cutting line. The dashed line, because
I'm going to fold it under, is more like half a centimeter, not 0.5 millimeters rather
than one centimeter, because we don't want
too much excess fabric for this teeny tiny leaf. Then using the first
leaf I've cut out as a stencil to cut out the other shape so that we have two matching
leaf shapes, then we need to
attach them together. This fabric doesn't
have a right side or wrong side, but if yours does, you want to draw your
line on the wrong side, because now we have
the fabric right side together to stick it together. Starting off with
a fastening knot to join the two
pieces of fabric. Now we are going along with running stitch along that
one edge of the leaf. We're just doing one side
like we did with the orange, just one side of the leaf, then I am getting right once I get right to the
end of that other point, going to do a fastenings stitch, and then I am folding it around. We're going to do fell
stitch to close it. What we do is we just tuck under the five millimeters of scene to join these
two sides together. This can be a bit fiddly
so what I normally do is one little area at a time. I'm folding up this end, I'll do a few stitches, and then I'll fold again. I decided to do a running stitch to add a bit more interest and
texture to the leaf, you could also fell
stitch them together. You'll see now, I'm working running stitch up the
side of that leaf, and making sure I'm quite
near the edge of the fabric because we haven't folded
it under that much, and I want to make sure
that it's all secure. Working that running
stitch along, and then folding
it under as we go. Tucking that five
millimeters have seam in, matching them up nicely, and then carrying along with the running stitch
until we reach the end. Then we need to do the other
side so that it matches. We've got running stitch going all the way around the
leaf and then finishing off with a fastenings
stitch at the end, and once we've done
our nice secure knot, we tuck that in and through so that the
thread disappears. There we go, our
leaf is complete, which means that we can now move on to working on the
stalk, looks lovely. Let's find and make a
stalk to attach to it. Measuring five centimeters, you measure how long
you want the stalk, I thought five
centimeters look nice. I'm drawing a
five-centimeter square, so one side of the square, the other side, and
then cutting that out. The fabric I'm using is my partner's shirt
that he wore out, a lovely green linen shirt, I really like the color of this, and it's nice, fine linen, which is really lovely
and light to work with. Once I've got my square, I'm ready to roll it
up to make the stalk, you might want to
wait your fingers to get a nice grip on the linen because it
can be a bit slippery, and we roll all the way up, and then at the end, we want to tuck a bit under because we don't want to leave a raw edge because it's more
likely to fray. Folding that in, tucking around, closing up the stem, and then the first
thing we need to do is close up the tip of the stem. We do this by doing a few
stitches round and round, making sure that
we include a few fastening knots in there
so it's really secure. You'll see me just working
around and around, little crisscross but
pretty looking end, nice and secure as
well so we know our stem isn't going
to fall apart, and including some fasting knots in there, it's all knotted up. Then just checking that the stalks rolled up
as tight as it can be, and then we start working down
it with some fell stitch. Slowly we go, this can be a bit fiddly, and it's one of those
ones where you can end up stabbing
yourself quite a bit, you see my thumb on the left, ended up being victim to
the needle a few times, so just take it slowly
and be careful. Tiny little neat
stitches here working all the way to the
end of the stem. Once we've got to the end, we do as we always do, and fasten off with a knot
so that is complete, lovely. And this end, this messy
end is the end that we're going to tuck
inside the orange, so let's get that ready, and what we're
going to do is just carefully squish it in
there into the gap. Then we want to join on
a new piece of thread. It's your choice what color
of thread you use here, I decided it look quite
nice with the green, so I want the green thread to join because when we're
joining two fabrics together, it's always the choice
am I going to use? Which color am I going to use? The artistic decision
or random decision, so I decided green
would look nice, and you'll see I'm just looping in a little bit of orange,
a little bit of green, so that they can be
secured to each other, and slowly working
around in a circle, round and round to attach
the stem on all sides. Again, if you want to make it really secure your
want to pop in an extra few fastening
stitches here, fastening knot so
it's really tight. You'll see here, I've worked all the way
around that it looks like there's about
seven stitches, I thought it would look better and would be a bit
more secure with more, so I worked around
one more time, so now you can see it looks
more like 10 or 15 stitches. Now it's time to join the leaf. We need to pop the needle up the stem so that it comes back out where the
leaf is going to be, so first of all that
fastening knot, and then threading the needle up to about halfway up the stem, and from there that's where
we can attach our leaf. We attach the leaf a similar way that we attach
to the stem to the orange, just doing lots of
stitches round and round to get it nice and secure, and starting with
a fastening knot. We've done that lovely
secure fastening knot, and then we work around
and around and around. We can test it by pulling it and check if it's really
tight on there, so we scoop a
little bit of leaf, a little bit of stem, and
then pull it together. Once we feel confident that we've worked
around it enough, and that it's nice and secure, we end with a fastenings
stitch, fastening knot, and then make that
piece of thread disappear by turning
it back up, and in. There we go, that
thread is now out, and then we can trim that. Look how lovely
our orange looks, trimming it off,
and there we go. There we go, we
now have our stalk and our leaf complete, ready to add a bit of
personality with some eyes.
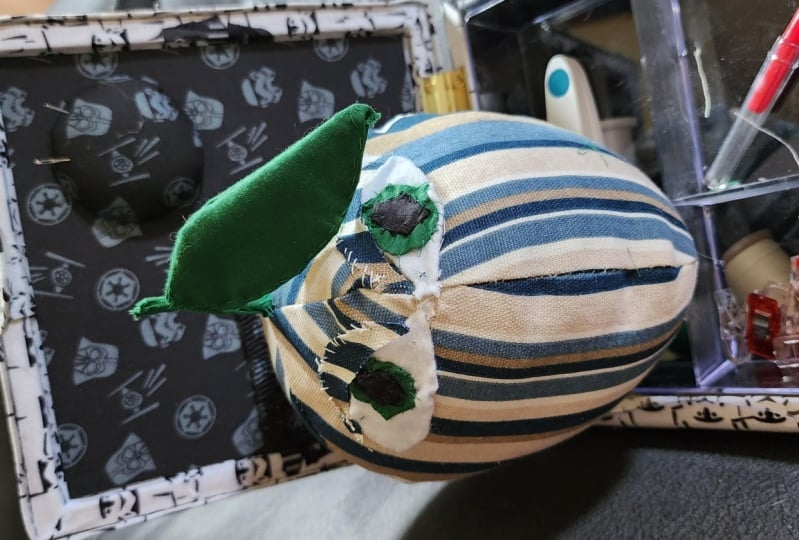
6. Appliqué eyes : Welcome back. I
love this lesson. This is the lesson
where we're going to learn more about applique. When we applique the eyes, we will need white fabric
for the white of the eye, we will need a color for the
pupil. I've chosen green. You might also like a blue or hazel and you'll need
the black for the pupil. Let's get stuck
into this lesson. Starting with white fabric for
the white of the eye using my thumbs to measure the size and marking
the length of each eye. As with other stages
of this process, the pen line we're drawing
is going to be the line that we're sewing on
the actual shape. Then we are going to
cut half a centimeter, somewhere between three and five millimeters to fold under. Because for this part of it we're going to
do turned applique. So I've also drawn the
iris and the pupil on just so I can get a bit of an idea of what it's going to look like. Fact of the day,
did you know that the white part of the eye
is called the sclera? You never hear that word, you hear pupil and iris, but the white bit is
called the sclera. This is the first bit working on one eye cut out,
then using that. Because my fabric's really thin, I can actually trace
the other eye through. If that's not possible, your fabrics a bit thicker, you can just stencil
and draw around it. Once we've got that
other eye shape cut, then our pupil and our
iris sketched on there. We can cut that out. It's nice for our eyes to match. It's also nice for our
eyes to not match. It can look a bit quirky. If one eye is bigger
than the other, don't worry about it, it
will become a feature. Carefully cutting
round the sclera and leaving three to five
millimeters around the edge, which we are going to do tend
applique and turn it under. We're going to lay
them out on our orange just to get an idea of
where we want them to sit. I personally think it looks
better if the eyes are very wide set rather than
narrow together. So lay them out there and
test out what it looks like. I found it, the seam of
the orange lined up with the outer edge of the iris. That was quite good look. Then you've got the
decision again, am I going to use the white
thread or the orange thread? Because I'm joining
two fabrics together, I decided on orange. Starting off, as
we always do with a fastening knot where we
plan to start our applique. Then carefully
turning the fabric underneath and we want
to do teeny-tiny, neat stitches that
just catch the very, very edge of that turned fabric. Then we're going
to turn as we go. So we do a few
stitches, work along, then turn and fold the
next piece of fabric, and on and on and on until we've worked all the
way around the sclera. I'm using that word now, to attach the sclera to the orange and this
can be a bit fiddly, especially at the corners. Trying to get a nice corner
finish, but there we go. There it is finished. Then
time to work on the other eye. Once we've got both
scleras attached, then it's time for the pupil. I'm using my thumb to
measure out the green pupil. Again, we want to cut about three to five
millimeters around the edge to turn the fabric. So we do turned applique. You will see that I'm going to also cut a few little
notches around the circle so that it folds nicely because we're
trying to create a rounded curved shape. These notches just help with the folding so
that it's curved. Carrying on working
our way around. I did about five cuts in there. Then I will make another matching iris
for the other side. Again, adding a few
little notches in there, five or six notches so
that I can turn it easily. Now it's time to attach
them to the sclera and we do that the
same way we did with the white is that we
just fold a little bit under, do a fastening knot, do a few stitches, and then carry on to turn. So you'll see here that I've
folded just one end of it. Then I will attach that
with a stitch or two. Going through the orange,
going through the white, and going through
the green to fix it. Then when we get down
the sides of the iris, we will just be linking
the white to the green. Folding and turning, and
then pulling through. Make sure that you do what
I just didn't do there which is hold that green
fabric down as you go. It makes it easier to just keep one thumb on that fabric
holding it in place. Nearly finished now
working this iris, carrying on down
the bottom where we go through a bit of orange, a bit of white, a bit of green, teeny tiny little
stitches at the edge. When you stand
back a little bit, you can barely even see them
magically stuck on there. It's starting to take some shape now and
look like an eye. Once we finish that one, we do the same on the other. Then I'm going to
draw the pupils on so that I know where I'm going to sew my pupils because
these are really tiny now. We're getting really tiny. The pupils, I just
cut little teeny tiny squares just slightly bigger than the
circle I've drawn. This one is the
fiddliest of them all. We just fold a little bit under. I'm trying to fold a bit round and just get an idea
of is it possible to fold this to this tiny
little shape. Yes, it is. Then as before, a nice fastening stitch and
as well having that decision, am I going to use
the green, or are am I going to use the black thread. Looking back, I wish I'd
actually used the black thread because you see more of
the stitches on the top. I went with green. So if you'd like your
pupil to look really neat, you might choose to use the black stitch so that
it disappears a bit more. Tucking and folding that
under and then working around and around with all
very careful filling stitch. Like I said, this
one is a bit fiddly, so just take your time with it. Slowly tucking, folding, wiggling it around so
that it disappears. The raw edges disappear
underneath and you get a lovely circle
when you're finished. I'm finishing with a
fastening knot as we do, and then doing the other side. Can you see what I mean
about the green stitches there showing up. This can be a style feature, but if you would prefer those stitches to
disappear a bit more, you might choose a black. Using my thumb to
measure the eyelid. I noticed that it was
from the tip of my thumb to my thumb crease for the eyes, and therefore the
same with the eyelid. So we just draw from there, measuring length
from there to there. Then I'm going to draw
a curved eyelid shape. Looks a bit like a new moon. Once I've got one new moon
shape drawn for the eyelid. This time we're going
to be a bit different because we are going to cut on our sewing line because I think it looks nice with a
raw edge for the eyelid. Also because I'm working
with this thick fabric, this is very hard to turn
for turned applique. This is your decision here. Do you want to do turned
edges for your eyelids? If you've got a thinner fabric
or do you want to leave it raw again for a bit
of a rustic look? There I have my two raw eyelids. I can see here that
this bit's a bit too long when I lay it
on top of the eye. Before I start sewing,
I'm just going to trim that little side off so that the eyelids have a nice shape
and match the eye. A lot of this work
is done by just looking back seeing how
it looks. It looks okay. To join the eyelids, we use an orange thread. The stitches mostly disappear. You still can see them, again adding a little bit
of texture and interest, but they're not standing out. This could be a decision
that because we're doing this raw edge applique on these eyelids
that you might want to use a really bold stitch, like a black thread
for it to look a bit patchworky raggedy anish. Your decision. But I decided to use an orange
and then I work through and you'll see that the
stitches need to go in a little bit because
of this raw edge. So making sure that they're at least a few mil in so
that your fabric doesn't fray and your stitches come out and keeping your
thumb on the eyelid, holding it down as you work. So you see I've done about
three or four stitches there all the way to the end. Then now I'm working on the
inner side of the eyelid. Want to be extra careful
here because we don't want the orange showing on
the white or the green. So just tucking it right under and making sure
that we're generous with how far the needle goes into those eyelids so that you've definitely
got a nice stitch. 1, 2, 3, 4, 5, 6,
7, 8, 9, 10, 11. About 11 stitches I did round, and I thought actually
that is not enough. It doesn't look secure. So I went round again in between the gaps and did
some more stitches. There's probably
about 20 in the end. You could just do
that first time around or if you feel
like it's not secure, just go round again. There we have our
lovely looking eyes. You might want to
leave them like this , but it's up to you. There we have it. Don't
the eyes looking lovely? Starting to have some
personality there. Now, it's time to add
the eyelashes and a bit of extra detail to make
those eyes really pop. I'll see you in the next lesson.
7. Add the Eyelashes: In this lesson, we are going to learn my pioneering stitch, which I've invented
called eyelash stitch. This is to add some
fabulous eyelashes to the eyes and also add a bit of extra sparkle
with some gold stitch. If you don't have a gold stitch, you could use a yellow or another contrasting
color just to add a little bit of extra detail to the eyes to really
make them pop. Let's get stuck in. Here's
one I made earlier. I practiced this eyelash
stitch before I showed you. Now, I'm going to
demonstrate it with you. Getting a nice black thread, I actually found one
that was a little bit thicker so that the eyelashes have a bit of thickness to them. Starting off with, as always, a fastening knot so our
eyelashes are nice and secure. Making that loop,
pulling through. There we have it,
nice and secure. So for eyelash stitch, we fold a little loop
about the length of the eyelid or however long
we want the eyelashes to be, and then we scoop
one stitch under. Then after the first stitch is pulled through
nice and tight, we then do a fastening node. That completes that eyelash
that is now secure. Onto the next one, make a loop, hold it under your thumb, pull the thread through once, do a fascinating knot. There we go, second
eyelash complete. We carry on working all
the way along the eye, I worked all the way to the
inner edge of the iris. Once we've done that, so I had to look at it afterwards and I
thought that's not actually enough eyelashes. I decided to go over
the whole thing again and add the same amount
of eyelashes over again. You see now I've got double, which creates a more
chunky false lash effect. Now, to finish off the
black eye decoration, I want to make it
look like we've got that cat wing eyeliner. We're going from the
edge of the eyelashes to the corner of the eye
with a nice backstitch. This is a little bit
fiddly for me here because the jersey is quite thick over the white fabric. I'm just trying to
get a nice neat line here was a little bit fiddly. You see I worked all the way
to the end or did it once, and then I'm working back again so we can make
this line thicker. Backstitch one way
and then backstitch the other way so that we've got a nice bold chunky line
for the eyeliner look. Once that's finished, we
knot that to complete. Nice fastening knot to secure. I noticed that
there was a bit of extra string fraying
fabric here. This can happen
when you do larger. I just decided just
to trim that off. It was ruining the look
of the corner of the eye, always something
that you can do. See these eyelashes
looking lovely, you might want to
leave them like that, they look quite cool, or rounded as well. I wanted to trim mine. When you trim them, be cautious with how you
do it and just start with a little bit and then
trim more as you go. When I did this, I actually trim a bit shorter
than I originally wanted. It doesn't matter, but if you just do a
little bit at a time, then you're not going
to make them too short. Then looking back, just
giving everything a squished, you're checking how the
eyelash is looking, even trimming off any other bits to get them looking pretty. Can see how long they are here. Now for some extra glam, we're going to add
that gold detail. This is a French knot
we're going to do. It's one of my favorite
embroidery stitches for adding texture. It looks really nice in the
corner of the eye here. So we pull through, then we loop the thread 1, 2, 3 times around the
needle, pulling it tight. Then we go back into the fabric, very close to where we came out. About a millimeter away
from where we came out, tuck it back down, and then pull it out. You might want to watch this stitch back a few times
to get it really clear. You see when I pull through, makes a very pretty
little raised circle. Really love the look of that. If you don't have a
shiny gold thread, you might want to use
another statement color. It could be a bright
blue or bright purple, just to add a bit
of extra decoration to these pretty eyes. I'm working along now with some gold backstitch over the top of the eyelid
to add a bit more glam. Then once I've finished, just trimming it out. They always come out as seams when I have access
threads there coming out. Snipping that off and
that is looking lovely. Now that the eyes are
finished, they look amazing. We just need to add the mouth
and do the final touches. Let's see you in
the next lesson.
8. Mouth and Final Touches: Welcome back. In this one we're going to do the mouth and just look over
any other final touches. Let's get stuck in. Now drawing the mouth
on to our orange. You can try this a few
times because this pen is iron off then you
can draw it once, iron it off if you don't
like it and start again. I was pretty happy
with my first try. Then I'm going to
thread my needle and instead of just leaving a
short length at the end I'm going to pull the
thread all the way through so it's doubled up. It's creating a thicker line. Then because working with
double thread like that it's much more likely to
get knotted I find. I get my beeswax and I run
that along the thread a few times just to make the thread
a little bit slipperier. This is traditionally
used when working with linen using the beeswax. Joining in at the edge of the mouth and doing
our fastenings stitch. Then for the mouth we're
going to use chain stitch which probably is my
favorite stitch after French knot for adding some pretty detailed
for embroidery. You might want to go
back and see it black and white because
it is a bit harder seeing because I'm sewing onto a black line
I've already drawn. But we do one back stitch
coming backwards like this then we meet that back come up. That's our first
chain done there. Then we very carefully
using a needle slide under the first chain and enter
back in where we came out. That's the second chain
stitch and carrying on the same so coming out and then working back going
under both of those chains. We work that all the way
along the mouth and end it with a fastening stitch. In the end it will look
something like this. Now it's time to clean up. Because my pen is an iron on
pen I'm going to get my iron and just clean off those marks that are still
showing on the eyes. Also got nice to iron
the eyelashes so they really stay outwards and up. Just giving the eyelashes
an iron and getting rid of the pen marks admiring our work. Then looking if there's any
stray bits of thread anywhere or just anything else that we were not happy with
that we want to change. If you stray bits here and
there pulling them off, giving a little squidge
to make the shape nice. I actually noticed that on one side the eyeliner still
looked a bit thin and I wanted to top that up with a few more stitches so it would match the other
side to finish off. Adding in a few more
stitches there. Now it's time for
the big reveal. Look at this beautiful orange. [MUSIC] Well done you. There's one more video
left where we're going to wrap everything up. See you in the last lesson. [MUSIC]
9. Well done: Thus this class is finished. Well done for completing. I would love to see
what you've made. Do post a picture in
the project section. It will be really
nice if you write me a review on Skillshare because then the
Skillshare algorithm will fall in love with me. You can also visit my
teacher page where you can find other classes
that I have on there, and also links to
my social media. If you post something
on social media, please do tag me @lauralamn. Well done again. Thanks
for watching. Bye.
 Laura Lamn, I light the Creative Spark