Transcripts
1. Ringmistress Introduction: Welcome to the
ring mistress half scale dressmaking course
by Theodore gowns. I'm Brittany King, dressed
designer and your instructor. I created these half scale
evening gown patterns and courses to help you learn
modern dressmaking skills. In half the time, you'll experience
the entire garment construction process
inside the course. But you'll have the
advantage of using less material and
finishing in less time. This allows you to focus
more on perfecting your skills rather
than fit or budget. You'll learn techniques
such as pleats, buttons, boning course that loops a modesty panel
and so much more. I'd love for you
to also check out my mini mannequin
course and make yourself a cute little display for your
half scale garment. You'll need some
basic sewing tools and equipment to
complete your dress. I have listed some
recommendations below. When you have them all gathered, you're ready to start sewing. I hope to see you there.
2. LESSON 1: Layout & Cutting: Welcome to the first lesson
of the ring mistress. We'll be cutting out
our material today. There is about four layers
you'll need to cut out using different fabrics are
first one is the underlining. And you'll use your fabric
layout guide as a reference to layout and which pieces
you'll need to be cutting out. Feasible knit is very
easily to cut out and there's only a couple
of pieces you'll need to conserve fabric. You can fold over only what you require and leaving
the rest single layer. That is a great tip
for any sort of material that you can work
with different widths. So I'm just cutting out here mostly bodice pieces and these will be fused
to the main fabric. On the wrong side. This is our little cups that
we're going to cut out. And the point of
feasible knit is to give the pieces some
extra strength. It's, it works as an
underlining and that keeps the shape of the seams. And yes, you see this in a
lot of couture garments. And the feasible note is a really great
convenient way to do so. Our next layer here
is our lining. So you'd probably
gotten a polyester or an acetate or maybe
even a rayon lining to line your skirt
and your bodice and the various pieces are listed on your fabric
Leo guide again, I'm starting here with
our cut to pieces. So I've folded over the
fabric matching myself edges. And I've left out pieces 10.13 because those
are single layer. So we have our front and our modesty panel that
are single layer. So we will cut those separately. I like to use a rotary cutter. It just provides a lot
more ease than scissors, but these are pretty
small pieces. So if you feel you need to pin and use scissors, feel free. It's just what you're
comfortable with. I'm using my scissors here just to mark the
notches on each piece. And you do that just by snipping on the pattern notch line
on the pattern piece. So you don't even have to
have a pattern not sure. To clear the way. Just snip right into the
paper pattern piece. And I'm almost done cutting
out the skirt pieces here. And we will need to cut four
of the side, back and front. Lift and flip your piece
over and cut again. That is done so that the
pieces line up because you're working with a folded
over a piece of fabric. It's just a good tip
to keep in mind. And here we have our next layer, which is our main fabric. Finally, it is got a
lot of pieces on it. So refer to your
fabric layout guide for the position of them all. Line up there, green lines. I find that using a ruler
to go on each grain line at the end points and measured to my folder of my fabric to make sure they are
the same distance. That's how you ensure
that your pieces are straight and it helps
keep them on grain. So these are two pieces that
we're gonna do single layer. And you'll do this with
the lining as well. And this is our front piece, so it's got no fold. It's just one straight
piece being half scale. It's a smaller piece in general, so it's easier to cut
out on your fabric. If this was a full sites piece, it would probably
be on the fold. Cut-out piece number 13 the same way and continue with
your cut two pieces of your main fabric
and that should be all of your lining and
made fabric pieces. Now our last and final piece
to cut out is our contrast, which is whatever
color you've chosen for your silk satin, you'll only need a very small
amount of fabric for this. But for now I want you
to leave this piece, I'm cuts and we'll
cover it later on when we're ready to
deal with the front piece. So we'll continue with sewing the bodice
in the next lesson.
3. LESSON 2: Bustier Cups: Welcome to lesson two
of the ring mistress. Our first test today is
fusing our bodies pieces. So you'll use a
steam iron to press gently onto each pattern
piece, matching them up. Before you do, make
sure you set aside the right pieces so
you know which one is which label them if you have to. I know all the pieces might end up blocking
all the theme. We'll start stay stitching all of our curves on the bodice. So use a short stitch
inside the seam allowance of each curved seam here. So this is under the bus, will need to support those seams because it will be clipping
them in the future. That is always, usually the
first step of a bodice is to make sure those seams
are nice and supported. So also the side backs here, I'm only showing
half of the bodice, so always you'll repeat
with the other side. I'm sewing the center
back here just with a regular SIM and your seam allowances or
quarter inch and a half scale. For the bust cops, you'll need to match
at the notches. And so together. It's important to mark those notches because
you won't know which side of the bust
is left and right. So this helps you
figure that out. So those centers
themes together. You'll mark here a little dot there that will
indicate your center. Your center front. Always remove your
pins when you, So that is a good
habit to get into. So you'll end up with two of these pieces and we'll
press them nicely. So that's seam is
nice and flat because we're going to do some
top stitching now. On each side of the scene, on the right side, about one-eighth of an
inch from the seam line. We're going to get a
nice straight stitch, nice and carefully. So we get a nice
clean stitch line. We'll do that on the
other side as well. And on the other cup too. So you'll have two of these matching cups with their center front
marked with those dots. We'll continue pressing now. The bodice here,
making sure each seam is nice and pressed steam is great for this and that nice fusing and allows it to
stay nice and stiff. So we'll be doing a
cup variation here. So this replaces
those padded bras, cups you see all the time. This is the do it
yourself version, the old school method. This is shown in a lot of
old couture goddesses, this wool batting
that's in cuffs. It just provides that coverage, that port shaping
of the bus line. It just looks so professional, just adds that extra, you know, that is based in onto each cup. I've pasted down the center
as well so it keeps in place. And using steam on this nice
wall further shapes it. So you get that nice curve
to the bodice there. I will continue
sewing the baddest in the next lesson,
I'll see you there.
4. LESSON 2.2: Bodice Seams: Welcome back. We're now ready to tackle that center plead verse
silk satin material. We're going to
start with tracing those sharp angles and cutting out the
rest of the pleats. Make sure you mark
all the notches. This will help you in the long-run match
those top plates. They're very important
to have those marked. I'm cutting out
carefully the top using the tip of my scissors
so I don't go over. Good thing, this is
such a small piece. You'll have plenty of fabric
just in case you mess it up. Next, we're going
to fold our pleats, match each notch
at the top there and iron it out in place. Then I like to go over
and secure it with some pins and use a lot of pins. And we'll just continue
down each side. This takes a lot of patients. So go nice and slow. Try to make them as
straight as you can. This is good practice for when you do something
like this full-scale because it requires a lot of finger movements and
careful placing. Pins or your best friend, keep pinning and making
sure they're straight. And even, you can even fold up your paper piece there as a reference so you can
make sure you're on track. You're going to
fold over that last bit so that the savages
or the raw edge of the piece is taken care
of and it looks all nice and folded and clean. I am pasting everything
now together. You don't have to worry
about basting your plates. They're going to stay in place. Once the top and bottom
there is secure. I'm going to now place it on our front piece or center
front that we've just sewn. We need to do this before we do any other construction
on the bottom. And I'm just making
sure they match. And painting them in place. Having good sharp
pins is always great. I use these small
dressmaking ones that are nice and sharp. They're good for all materials, especially the more delicate
ones like this silk satin. I'm going to use a
white thread now, so I'm going to match whatever
color my pleat pieces, and I'm going to just go
over top of it once more, securing it to the bodice and cutting out all
my thread ends, they're going over the curve. And that will also mark my
center, center point too, which is very handy and
we'll need that when we do the bar, the brackets. Now I'm giving it a good Press their malware ready to
continue the bodice. We've already ironed our seams, so we're gonna do exactly what
we did on the broad cups, which is do our top stitching
on either side of the CMBS. This is a nice look
to the bodice, so it provides that kind of full exposed course that look, these nice top
stitch seems we're just going to continue
the rest there. This is again, one-half
of the bodice. You'll keep going on the
opposite side as well. Just do a nice small
stitch one eighth the way. And now we're going to attach that center front
piece that we just put the pleaded front on. And we're gonna so that with a regular stitch and
regular seam allowance. And after that sewn
than the other side, we're going to have a full
complete bought us ready for the bra installation. But we have one more
theme to top stitch. So we'll do that on either side. Next, we're going to
prepare for the bra cups, and we'll do that by
clipping our best curve. Be careful not to
clip through the stay stitching that we did
in the very beginning. This is tricky. This is where your dot marks of your center front
come into play. You're going to match those up with your center front piece. They're both of those
should be marked with a dot that you'll match up and you'll follow
along the curve, spreading it apart to
make sure goes smoothly. And now this is tricky, so go slow based if you need
to by hand, if you need to. It's very tricky to work with
a curve so sharp like this. So take your time. And for the final cup, the next one, you're going to
match those dots up again. It's okay if they're overlapping and seam
allowance a little bit, that will all be turned under. Just keep checking the front, making sure that
they're centered and they're even
they're not lopsided. So there I have a
little bit of overlap. That's totally okay. We're going to attach those
there with irregular seem. Overall, our basting. This is one instance that
I did keep my pins in. You can also hand base this first if you want to avoid that. But for pressing,
we're going to clip the wool edge now so that it
matches the broadest part. And we're going to press that seam down
towards the bottom. And we'll continue sewing
in the next video.
5. LESSON 3: Skirt Seams & Attaching to the waist: Welcome back. Today we are tackling the skirt. We're starting
with the two-sided skirt pieces in the center. We're sewing those together
to complete the front. It's always helpful to lay
out your pieces first, I find there's a lot of
pieces in the skirt, so either keep
them separated and labeled matching your notches. Notches are a good indicator
of which piece is which. And we'll do a regular
seam down each panel. This is the center front
and the side front piece. We've got two side fronts, so we'll do the same
on the opposite side. Or next piece is side
skirt to side skirt. See here I'm flipping
it over and I will go and pin that piece together. These pieces are identical, so it makes it
easy to figure out which one is which were being
gentle with the curve here. Keeping our fingers
taught and growing a lawn the entire skirt length
all the way to the ham. Doing your backstitch there. Next we're going to have to
mark the center back opening. Most will be the end of our modesty panel
and our core sit back and we'll continue with our side skirt to
center back now. So we're working all the
way around the skirt, doing all the seams. It's very satisfying when
they're all put together. And you pretty much
have a entire circle, circular form taking shape. We'll do that with the
other side of the piece. And once that's done, it's time to press
all those seams. Depending on your fabric. If you've got it thicker fabric, you might need to use
some steam there. Mine was quite a heavier sense, so I'm using steam to get them all nice and press straight. So now we have our
full skirt there, all the panels sewn the center back
completely open still. We're going to repeat
the same process, exactly the same like our main fabric with
the lining pieces. Lining is definitely
more slippery. So make sure you're
going slow and you're really holding that fabric in place as you're going along. Removing your pins as
well with this fabric. Because if you sell over them, they might shift and it's just a lot safer to remove them. And you can work with any
puckering going on there. So I think this is probably
one of the signs were doing a lot of seems. If you're confused
with the pieces, is so handy to keep them
separated or together, even then labeling
them so you know, which is which we're ready
to press that as well. Having an iron shoe with this
delicate fabric is good. And shiny fabric. Shoe is what is on
top of my iron here. It allows me to press
on the right side of fabrics without damaging them. So it's a good protection to
have depending on your iron. So now we have our lining piece. They're all done as well. So we're ready to put
it together here. We're going to pin the
bodice to the waist. And it is so important
to match your CMBS. That is the one thing that makes a dress so
pleasing to the eye. It's when all your seams
continue all the way down. Not mismatched. They're not uneven. So we're just continuing
or checking as we go. Your body is going to feel
a lot more tighter than your skirt because it's got
that feasible knit to it. So just work with this by stretching it
a little bit gently. Stretching as you so as well. Just ever so slightly
so you avoid any puckering that's going on
as you cross each theme, removing your pins as well, because that can cause
puckering too as you go along. So we're doing a regular,
regular stitch here, quarter-inch going all the way to the center back as well. So just like how we did the broad cups pressing and
down towards the waist, we're going to press the
waist upwards this time. Instead of opening, I
just find this a lot better for courses
did things is, and especially with
a thicker skirt, pushing it up
towards the bodice. Just a lot easier with all
this thick fabric going on. So if you wanna do it open
to, that's an option. It's totally up to
what your fabric. It's like. This just gave the cleaner look
for my material. So there we are. We've got a nicely pressed, there's a little bit of
a white thread poking out there that can
all be trimmed. But it's looking
pretty nice so far. We'll continue in
the next lesson.
6. LESSON 4: Corset Loops: Hello and welcome back. We are tackling the course, it loops at the
center back today, we're going to make some
bias strips here by creating a right angle
with our salvage edge. Use some grid paper or a ruler to make sure that
angle is a right angle. When it's 90 degrees like this, it creates that bias grain line. And I'm making one
about 24 " long. And I'll need to
make two of these, but make extra if you can. This will be enough strips
to do on either side. So I'll cut it out here. So I've got one that's 2 " wide and then one that's one
inches on the fold there. So I've made two strips
for my course of loops. We're going to make our loops. So I always start at kind
of funnel shape at the top, they're going down into the
measurement that I suggested. Making a nice loop and having
that on a bias makes it easier to curve and loop
around some tight loops. So there's my funnel. And I will trim this carefully, making sure not to go
into my stitching. Trim away all the
access they are leaving about
one-eighth of an inch. And that will make
it so easy to turn. A loop Turner is lovely,
preferred method. Depending on your fabric, this could be quite difficult. So a loop Turner is
a must for this. So that catches the end there. This was tricky for me. My fabric was quite thick. So it just took some
extra, extra work. They're getting that to turn and it creates
a nice tight loop. There. They're made longer. So having that funnel can
just be cut off eventually. To prep the seam, I'm pressing it to market where the center back is
going to rest, right? We want to make sure our
loops are along that center. I want my loops about
three-eighths of an inch and down. And this will mark the
start of the loops because that will
leave enough room for the seam allowance up at the top where we're going
to turn under our bodice. I'm going to start
sewing these loops by pinning one of the ends. And we're going to
just loop around. We're going to stop
after each loop is made. We're gonna make them tight. And you're going to want at
least half inch in-between. There we go. We're checking with my seam gauge or use a ruler. You can also preform the loops and secure
them with scotch tape. I've seen people do
it that way as well. But this is definitely
the quicker method. Just looping them around, making sure they're the
same width as well. So I'm signing a
little bit and then I'm looping at and securing it, checking the width there. And this is quite the process. So go nice and slow. To mark the opposite side. You can either use
a marking pencil. I like to mark with pins. So I'm just going
through the middle there of my loops that will indicate where
I need the middle to be on the office side. I'll just do that with
all of the loops, making sure when you
pass the waist there that your wastes are
matching as well. So you don't make them
off kilter a little bit. Make sure that they're
the same and we'll do the exact same thing
on the other side. But now we have
those pin markers or you're drawn lines from mirror pencil if you
did it that way. And we'll just continue
all the way down. Each 12 are marked, um, center, center,
back start there. And we'll do that now. We're going to sew up
that center back seam. You can see how frayed
white material is. If that is annoying to you, you can always pink the edges or surge them
if you have a searcher. But here I am pinning
all the way to that notch that I did to
mark the end of the bodice, where the modesty panel is
going to eventually be. You should leave at
least three-eighths of an inch space there. Because the modesty
panel we'll cover that. We'll do a regular
stitch all the way down our center back. And as always, we're going to press our siem after
we've sewn, it. Makes sure you've double-checked
that your loops line up. If they're a little off, you can always switch and adjust them. And we'll continue pressing
the rest of our themes, and we'll continue with the
bodice in the next lesson.
7. LESSON 4.2: Modesty Panel: To finish up our core sit back, we're going to need to
complete the modesty panel. This is cut out with on a single layer of your main fabric and
you're lining fabric. You'll do that and
you'll end up with two separate pieces
that will then be sewn right sides together. Now a modesty panel
is to cover up the space that is left
when there's no zipper, there's just a corset. Larger ones sometimes even have boning in it so that
they keep shape. But this is really just
like an inner flap to cover up that skin that
might show through a course it after we've sewn, we're going to
trim the edge off, making sure the
corners and the curve there is clipped nicely. We're going to turn out and push that corner out
with her fingers. It's going to leave a
nice rounded edge there. And we're gonna give that a
good press, nice and flat. I use my fingertips to roll
that lining over so that it's underneath the
main fabric and a nice straight line
Just continuing down. If you need to
remove extra fabric, you can do that as well from
excess and seam allowance. So we'll end up with
that one open edge. So we need to based that close. Now. This will be the edge
that is sewn to the course it, to make it look a
little bit nicer, we're going to top stitch the edge of the
modesty panel there, just so that that folded
over edge stays put. It's going to look nice with some top stitching
to match the bodice. We're going to pin
to our opening, which is on the left
side of the dress. We're going to do it one
loop down from the top. That just allows it because there's that
seam allowance there. Otherwise it's
gonna be too close to the top if we
don't move it down a little bit and it
makes it easier to loop and tie together. Eventually, I'm just going
to pin those nicely. It's a lot of material
to go through, so go nice and slow
with your machine. If you have the option
to lower feed dogs, that might help if you
are having difficulties. Here we go. I'm going over the
machine is quite sturdy, so I can go over
my pins like that. I do remove some of
them though there. When it's really thick. There we go. I've done
a regular seem there. And we'll finish up
by top stitching that edge down because it's
quite thick as you saw. We want to make sure
that turned under side. Looks as nice as possible. Do a little back stitch. There we go. It's looking nice and clean. It matches to where we've
sewn the center back. Now we've got to make the
other side look just as nice. So we're going to fold under that seam allowance or
loops kinda pop out there. And we're going to talk
stitch that down as well. This side will then
be lined underneath so that right edge will be taken care of
at a later point. You can iron that top
stitching and your loops down with maybe a pressing
cloth or an iron shoe, and it will continue
sewing in the next lesson.
8. LESSON 5: Front Lapel Pieces: Welcome back. Today's lesson is putting together the lapels. These pieces make up for the turned over color like lapel piece that is
on top of the bodice. You're going to
want two of each, the fuse and the main fabric. They're gonna be double-sided, so main fabric on both sides. And here I'm cutting
out on the fuse. And I'm going to show you
another way to cut it out, which is I'm doing
it single layer. So instead you're going
to do two of each piece. So I've traced around it. I'm going to cut that out and then I'm going
to repeat that for the second piece as well. But you want to take that
second piece and you want to flip it over because you are cutting out
on the right side, you can either flip your fabric or you
can flip the piece. The piece is generally
easier to do. That way they mirror perfectly. Here we go. Using a Taylor's
chalk or a pencil. This is the back piece here. So this is all done
on a single layer, making sure the green line is parallel to the
salvage edge there. That way you'll always know
that the grain is straight. And here's the second back
piece or tracing that around. This method takes a little
bit longer because you are cutting out double
the amount of fabric. And the next step is to fuse
your front and back pieces. One fuse to each piece. You want to make
sure you're fusing on the right side so you can lay out your pieces making
sure they're exactly mirrored. You don't want to fuse the right side of one
wrong side of the other. That will do so. Just double-check that. You also want to
transfer your notches. This will mark the
center of your cup. So the smaller end there
is your center front. The longer edge is what you
attach the back piece here. You want to make sure that
those line up nicely. You don't do a regular
stitch for that. You notice that
the pieces go into a V when you put it together,
that's perfectly fine. So when you open it up there, they make a nice angled slope. And you'll do the
same for the lining. So you'll end up
with four pieces. So to inlining to in the main fabric that you
will then press open. Each of those seems there's
the main fabric and then I'll continue
with the lining and the other
matching two as well. We want to match them up
right sides together. Painting the corners and
the bottom of the pieces. So you'll know that the
bottom is the inner curve, where it's curves
outward is where at the top of the cup is right. Will so together
leave the top open. Because then we'll baste that together because that will be attached to the bodice
and then turned under. We go, we've sewn the bottom. We're going to soak up the side. I guess this would
be the center front. Then. Now we're going to trim and clip the corner and
an angle like that, that gives you a
nice pointed corner. So we'll do the same there. For every curve, especially
that inner curve there. We're going to clip
to the stitching. Careful not to click through it. You can use a point turner as well to get a nice sharp corner. Or your finger or the
scissors like I used. I'm doing the same kind of turning method that we did
on the modesty panel here, pressing nicely with my
iron and some steam. Then we're gonna go ahead
and base that top edge. And there we go, do that with the other side and we're ready to continue.
I'll see you next time.
9. LESSON 5.2: Bodice Lining: Welcome back. In the last part, we did the cuffs are
the lapels and we're going to go forward and
attach them to our bodice, match the notches and the
side seam so that they are at the right spot
and adjusting as you go. And it should and right out to the very center back seam there. Or the loops are
going to sew with a regular stitch
and a quarter inch seam allowance along that edge. And that edge will be finished with the
lining when we do it. So we're gonna go ahead and do the other side the
exact same way, lining up our points there. And so that it ends
at the center back. Taking out my kin. The material is
quite thick here. If you're having a little
bit of difficulty with it, change out your needles, make sure they're
nice and sharp. There we go. Our to lapels are sewn to
the top of our bodies. Now we need to put
together the lining. And you'll have to remember from the previous lesson where we put together the main
fabric version. So we're going to do
the exact same thing, although we don't have to do the top stitching on the
scenes with this one. We literally just have
to use so the fronts, the side back in the
center, back together, leaving the center back open
and the cups off for now, we're going to do some
pressing on that. Just like normal. After every scene we
have to press them open. And there's a lot of scenes, just like the skirts that hurts a lot of themes
of those bottles. So there we have it. We
have the whole front done. Now, we're going to need
to check our pieces of the cups here the
dot is the center, notches everything
to make sure that the right pieces
are put together. There we go, we're
going to double-check, are going to just check that
our notched their matches or notch on the bonus that we saw the right cut piece to the
right bust line. There we go. Bought us lining
to cup right sides together with a regular stitch. When you're matching
up for the next cup, you want to match
those dots, of course, and it should leave about
a quarter inch from this, the point there if
your center front. That avoids overlapping
when the lining turns over, which is similar to what
the main fabric was like. So you have your one cup, you're going to match up your
dots and your notches and your second cup there should start right where
the other one ends. And so on. Other piece there. And lining is slippery. So sometimes my pins just
end up still in there. And do the same thing
where we're pushing or pressing the seam allowance
towards the waste, making sure everything
is nice and flat. Our next task is to
mark out the boning. So I'm folding my bodice in half here to see
the center front. And that is going to be
where we're going to put a boning line as well. So I like to mark three-eighths
of an inch up and down from the seams for the
waist and then from the top. And that's going to ensure
that no boning will be sown when the lining is put on. That would give us our length
of our boning as well. So I'm using this
nylon type boning. It's soluble. You don't even have to
put a casing on it. It's really convenient. So we're going to cut our links, they're using are marks
that we just made. And I've cut out a boning
for each seam there, including the center front. And that should be quite easy to do to make the corners less intrusive and easier to where we're going to round those corners just by
snipping them off. This boning is really easy to do and half scale because you don't really even have
to do two edges really. You can really just
sew down the middle. But if you want a cleaner look, then you can definitely do the two edges here
like I'm doing. So we get a nice it looks
nicer on the lining side. On the right side of the
lining when you have two seams going down their side. So it's nice that you don't
even have to pin them. They're pretty
sturdy and you just have to keep them
centered on the scene. I've used a clear boning piece
here so you can better see the stitching that I'm doing
now because I ran out. That's what's great
about boning. And I will catch you
in the next lesson.
10. LESSON 5.3: Bodice Boning: Okay, we're now ready to put our lining bodice piece and pin it to our actual bodice
right sides together. Matching all our seams are
boning and our lining. And the main seems
on the main fabric. I like to curve over my my boning there just
to shape it a little bit before it turns under bending it so that it
makes a nice round curve. And now we're gonna go. And so the lining
to the bodice using a regular stitch
length quarter inch, removing my pins, stopping and making sure I'm not getting
any puckering going on. This center part is probably
the trickiest part. Just so and then either
backstitch or use a smaller stitch length to
really reinforce that point. So just take your time with it. Make sure you got no
puckering going on and you're not going over
your boning pieces as well. They should be
further enough down that they don't get touched. So now we're going
to trim the bulk off from our bonus and
clip our curve there. The top of our
broadest needs to have a nice turnover with it. So that reducing that bulk and clipping really helps with that. Because there's so much
interfacing, there's fusing. There's like four layers of fabric here that we
need to trim out. And then to turn under, I like to just temporarily pan my lining down
here at the waist. That will eventually
be based in together. But I like to just make sure
that those boning lines, the seams are not going to shift as I turn under and it helps kind of role that lining under, making sure that they're
in the right place. It just makes it nicer finish. And I'm using my fingers
to roll that seem under Get the shaping
of the bus really down. Curving that boning. Here we go. We've turned it
under and pinned it. Now we just really
need to press it and make sure that's
going to stay nice. So take your steam iron. I'm using my Taylor's
ham there to help lift lifted off my ironing
board and work with the curve. There we have it. We've got a nice edge to the
baddest cups and the front. And we'll continue on
in the next lesson.
11. LESSON 6: Buttons & Understitching: We are now in the finishing
touches stage of this dress. And the first thing
we wanna do is to understand which are
top of the bodice. Now sometimes this is done with the machine just opening up your lining and your bodice and stitching in the
ditch as they say. But this is a complicated bodice and with many couture garments, it's done by hand. So I'm using the Fell stitch, which goes right to left, starting on the lapel side, exits through the lining side. Then the next stitch
is exactly above the last on the lapel side
and it just repeats. So if you need to pause
this video, please do so. Our next step is the buttons, the decorative buttons
on the center front. And this little trick I learned to help
with your spacing. I'm going to do a basting
stitch that length of those two dots I
made on my finger, which is the width of my button. I'm just continuing
down each one. Then you ensure that you've left enough space for each button. Pretty nifty, and
it helps a lot. When I place the buttons, I'm going to start
the top of the button right in the middle
of that first space. That way I know that
it's the center and my buttons gonna fit and they're going
to evenly spaced. Sewing a shank button
like this is quite easy. You can see where your
stitching and you're just looping around that
shaft that's at the bottom. Depends on what button
you have picked. These are covered
buttons, pre covered. You can buy these at
some supplies stores, but a pro button would be nice. Something that goes
well with the design, which is totally up to you. So our next placement is in the middle of that stitch there. We know that those
two buttons are now going to be side-by-side. And there, sometimes they
have different sheen. So you want to make sure you're doing your
best to line them up. If that sort of thing
bugs or use them. Some people don't. It doesn't really matter. But depends on your
button to my buttons are shiny and the greens are
going different directions. Yeah, I just continue with
that method all the way down. I think I did about six buttons, five or six buttons here. Looping through the shaft
and then making a stitch. Finishing off with a
secured double knot. And doing a couple of loops
back and forth. Here we go. And here's the double not finishing off that
last, very last button. Here's the finished
product looking very cute. And we'll continue the finishing touches
in the next lesson.
12. LESSON 6.2: Skirt Lining & Hand Sewing: Alrighty, we're
almost near the end. And our first task
in this lesson is to stitch up the center
back on our lining piece. So we're sewing
all the way up to that notch that we had made. That will open to
our modesty panel. So we'll do that with a
regular stitch all the way down and then pressing
it open once we saw it. When we do that, we can go up further
a little bit, just marking that seem there
and that will help us hand. So at later, now we're going to attach the lining to the waist. And we'll do that by pinning and matching or seems like normal, making sure they're aligned. You'll notice that I've
left the bottom lining free for now because we'll turn
that under separately. We'll do our waste
stitching here. So in the lining to this skirt and feel free to trim off any
of those fraying bits. We're going to pin our lining
closed along our loops. So turning under the seam
allowance and pinning it alongside the modesty
panel side as well. So that just gets turned under right next to
the modesty panel. Like so nice and evenly
giving it a good pin. Then we're going to hand, so this all the
way up. Like that. Very nice. Making sure you're
even and you've got no puckers near the end
sometimes that happens. But I love a good looking
lining on the inside. For this here, we're going
to turn under our waste. So pretty much I'm
just pre pinning everything because all of
this will be hand sewed, will match our CMBS. Giving it a nice press, two, if you'd like before
you start sewing it. So this is the other
side of the waist. I'm finally tucking that. This is the top of the
bottle spur our loops are. And we'll turn that
under and Pinot as well. These, this final corner here. Just get it as, even as you can. Pan it. Mttr takes a little bit to get
it in the right spot, but pins are so useful in this. So our hand stitch that we're gonna do is the Fell stitch. Again. We use this to under stitch our bodies and we can do
the same here on our waist. I prefer the Fell stitch to a slip stitch because
it takes less steps. So you can see it more here. We are going on the
skirt lining side, coming out on the bodice. Then our next step
stitch is right above our very last
one, right there. Then I'm coming out on the
lining side of the bodice. Then repeating, this is near the bottom
of the modesty panel. I'm just making sure that
that is nice and secure. And I'm going all
the way around it, coming out the other side here. Going up the other side
of the course at loops. It's, it's a big job. But in half scale, it makes it so much less time than if you were doing this on a full-scale at the very top, I'm going to just
tack down the ends of the lapel here just
so that they're not flipping up constantly. I think wearing that and having that happen would
be pretty annoying. So we're thinking
ahead and we're attacking those nicely
down so they stay put. And that's it for this one. And we'll see you
in the next lesson. To finish up.
13. LESSON 6.3: Hem & Corset Ribbon: You've made it to
the final lesson of the ring mistress,
which is hemming. It's always the last
step to any dress. And with this one, we're going to press up
our half inch him here. I'm using my seam gauge or him gauge you can
use making sure that half inch is pinned and steamed any excess
out for the lining, you're going to want a folded under an extra quarter inch, so that would be
three-quarters of an inch, I believe, in total. Before you start
your hand sewing, you want to hang this dress up and makes sure that the
hem isn't looking funky, that it's the right length
that you've turned under. And make sure that
it's even of course. Then you can continue on
with your hand sewing, which we are doing the Fell
stitch again, my favorite. This is a perfect
one also for hymns. It's just attaching
two layers here, the lining and the main fabric will do this all the way around. The hem of the skirts, going all the way around. So again, the Fell stitch is your stitching
from right to left coming out the other
side and the lining going right directly
above your last stitch. Here we go. I've made it all the way around
and I'm just doubling up my knots and finishing up
that last bit of hand sewing. Who? That's quite a lot. You want to give it a final
steam pressed to make sure it looks as good on the inside as well
as the outside. And our last thing we need to do is how do we
close this dress? We need to cut some ribbon. And we finished that edge so that we don't get any
fraying with a nice lighter. They're good old Bic
lighter to seal those ends. And we can have now
something to lace up the back of our dress
width to do a course it, you go back and forth alternating and a
zigzag type fashion. And it takes, it
takes some time. Please dresses our work
and you want to make sure that it's easy to do for your clients as
much as possible. So sometimes I've had
to use a pin there to put some of the ribbon through
on the lower end there. Finish it off with
a nice bow that you can tuck into the
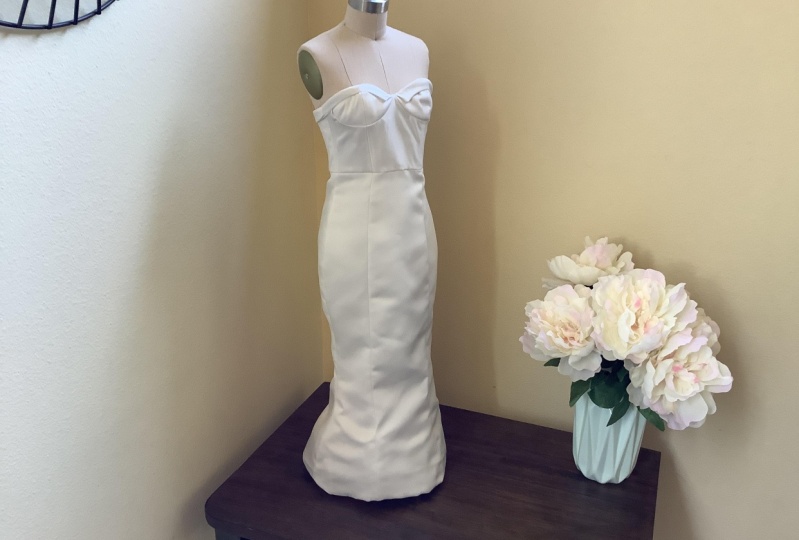
dress eventually. But here we go. There's the final dress. I want to thank you so much for being here and
taking this course. I hope you've had fun and that you've learned
something valuable. Please do leave me a review or a comment and remember
to post your projects. I can't wait to see them. And hopefully I see you again in another course, happy sewing.
 Britney King, Maker Mentor at Threadora Gowns