Transcripts
1. Welcome to my class on Zippers: Hello. Your money, Miss Melissa From Melissa Jane Design. I'm a dressmaker and designer from Cans Australia. If you'd like to see any more of my work or contact me for anything, here is my Facebook and my instagram. In today's free class on zippers, I'll be showing you how to install four different types of zippers and so many different ways that you can't finish off the inside to give you a professional look. Even on the inside of your comments, this class is a part of my learn dressmaking. Siri's. I'm hoping that this cost will help you to upgrade your own sewing projects and make you feel a little bit more confident in your own skills. I would love to see your own projects. So if you could post a comment or photo in the night section, I would love to see it. So I hope you enjoy this class
2. What You Need: So here's what you're going to need for today's class. The first super that we're going to be looking at is called the invisible Zippo, where the pool tag is on the outside and it's nice and smooth on the outside and the teeth are actually on the back. The next one is going is called a open zipper. This particular one is usually used for jackets or sleeping bags or some regular bags. It's where you can open it up and have a completely separate, and then you're able to put it easily back together again. This is the most commonly used boats called Address Zippo, and there's multiple ways of installing these particular kinds of zippers. It just depends on the situation that you need it for, and this is still a dress zip a. But this one here is extra long, so I'm going to show you how to shorten this particular Citgo. Now, the different kind of machine fate that we're going to be using this one here is called a zipper foot. This particular kind is one that I definitely prefer. This one is called a invisible zipper foot, a see through invisibles. Before that I got off eBay and it is fantastic. It gives a much smoother finish when you're installing invisible zippers. This is a regular straight and zigzag foot. Um, it definitely comes in handy for just about every day. Stitching This is a little attachment that used to attach to the machine, which can also work with the invisible zipper foot. We're also gonna be using some dress pins. Some fabrics is, is and on pick up just in case fabric marking pencil rule them and some threats nips. Now, if you're new to this, I would definitely suggest you practice using some plain woven fabric. That way you can try it a few times. Teoh practice before you start putting it into clothing.
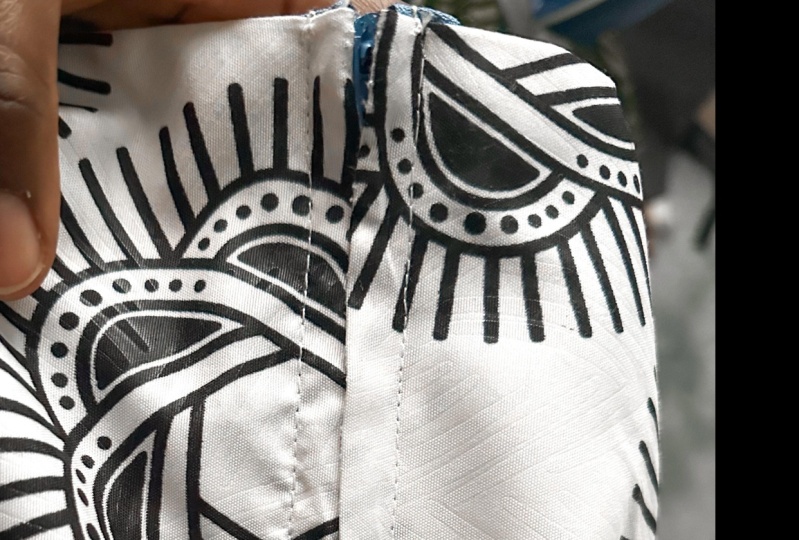
3. Invisible Zipper: So our first zipper is the invisible zipper. With the fabric here, I've made sure that the salvagers are pointing the same directions that we don't have any issues with grain lines in the future. Now here, I'm going to be putting in the same line. Now this edge of the fabric is not straight in anyway. So I just made sure to put a straight line down the fabric just to create a guideline. Then he opened up the zipper with the teeth facing the inside of the fabric and not to be not to the outside. But you lie the teeth along that same line, and then you put a little market the bottom of the Zippo. You leave that first section not stitched, and the new stitch down the bottom section there. Now, this is a very, very important step that I only just realised recently, actually, but what you need to do so you need to open up the zipper, turn it over to the back, and when you have, is it. But you can actually push open the teeth of the Zippo so that it's actually facing downwards or facing outwards towards the front and then you steam iron that open. This I actually found made it so that when you have stitched it into the government, it creates a much cleaner and it very invisible zipper. If I didn't do this, they would still be quite a open section in the garment when I put the zipper in. So you could definitely tell the zipper. After I started doing this particular step, I could not see the zipper at all. So I highly recommend you open up the zipper and then steam on the teeth to face down once again and you'll see it a little bit closer a little bit later on. So after you've signed it and you've zipped it closed, this is what actually happens. It's interesting. So now we're going to be pinning it in place on the fabric here. So what I've done is I've stitched the two pieces of fabric together at the bottom section . Now, here's that little piece of plastic that you don't actually want to get into the final garment, because if you have that, it creates quite a lump at the very top. When you zipped it closed. So this goes to the very top within the top seam allowance as if I was putting a waistband or arrest of address or something like that into the bottom here. And when you put the pin in place, you can see how I actually push the teeth in towards the fabric. No, I'm just gonna be pinning this in place to the edge of the fabric. But when I get to the bottom off the zipper, I will have to line up the bottom teeth off the fabric along the same line that I've already stitched in place at the bottom there to make sure that it has a smooth line going down the invisible zipper and just goes directly into the scene and you don't even notice it. You can see how there's a little what section of where the threat is, and I have to make sure to line that up perfectly with the bottom off the zipper as well, so that I pinned that in place. And then I work my way back up to the top of the zipper, moving the zipper further in onto the fabric to make sure that I have a nice, smooth line going from the top of the zipper down into the same line. I prefer my pins in this way. I find it much easier when I'm stitching to remove them. Don't have toe fiddle around with it in any way, and now we're gonna sit in place. So this is the regular foot, some just taking it out and replacing it with the invisible zipper foot. Now, this is also a really important step as well is that when you put the invisible zipper foot in you bring the natal down and the new pull out from underneath the foot, the end off the thread. I've noticed that this creates a much smoother and cleaner stitch line at the very beginning off your your thread, and you won't have to worry about the Thailand's of the thread getting court in your same lines so he can see your I've got the edge very top off the zipper going into the left hand track, and by doing this, you can see that I'm getting the stitch line as close to that teeth as possible. This is where mining it makes it a lot easier because I don't have to hold the teeth down towards the fabric because I've already I did it in place. I found when I didn't, I in it in place, the zipper would go everywhere and I couldn't hold it in place very well. And I'd have to redo it over and over again, making sure the bottom is old lined up, doing a back seat, you both of the top and the bottom. And that is the first sections dish in. So now we're going to measure marking the spot where we're going to stitch in the other side. Now we have to make sure that this is going to be even, so we turn it back over. This is the making sure that both sides of the fabric equal and so we don't get any pulling in one direction on one side of the fabric. So we close up the zipper, making sure that the there is exactly the same amount of fabric and seam allowance on both sides, and then we have to pin it in place. I do like to check quite a few times before I pin or I stitch or anything like that, because it means that I don't have to go back and do it all over again. If I can avoid unstitched ing or on picking something, I will. So I'm only putting three pins in here because what I'm actually going to do is that once those pins it are in there, I opened the fabric back up and then I open up the zipper. I try to make sure that everything is nice and equal. There's no pulling anywhere, making sure the zipper is wide open. Now what I do is that I made. I have made sure that the zipper is exactly lined up with the same. Then I have put pins coming in the other way. There's I just find it just makes it a lot easier. I know that I'm doubling up the steps, but at the same time it makes it a lot easier when I'm putting it through the machine. It means that I only have to do it once, and I don't have to unpick and go back and do it all over again. So I do this step, even though I'm doing it twice. I do this step anyway because it makes it much easier when I'm putting the stitches in. So here we can see the close up where the natal is going in directly next to the teeth and the zipper is not moving in any direction sideways. Because I always had a big problem with that before I started lining the teeth down towards the fabric. You can see I've actually lined the teeth up with the same line underneath that you can see underneath my fingers there. It's all nice and straight. Make sure you back stitch as well. Now see, there is quite a little space at the bottom here, and we're going to be stitching that closed in just a second. But for now, we're going to be checking to make sure that the fabric isn't pulling in any direction, that it's all nice and equal. And I don't have to go back on pick and do it all over again. Now we're gonna be closing it up from the front is to see how it looks. Now, If this super was actually the same color as the fabric, I don't think you would be able to see the difference between the fabric and the Zippo. See, Look out. It is nice and smooth. There is no pulling anywhere, and the fabric comes together really nicely. So it just looks like a same line. No, you can barely even tell. See, I never got it that smooth before I started dining the Zippo. Now I'm gonna pin to the two layers of fabric together to make sure that there's nothing caught in them. They're all nice and flat, and it's gonna be ready for me to stitch that little section closed. Now I'm just changing over to the traditional zipper foot, making sure it's on the correct side. Now I do still leave other slight section open between where the zipper has been stitched in and where I'm just stitching it in here. I find that that just gives a little bit of ease of movement and there's no pulling anywhere. Make sure you back stitch this section here as well to create a nice, secure sing. So there is a much smaller section that's still open, but because it's been back stitched on either side of that, we shouldn't have any issues with it. And the zipper is not caught. So here you go. You can see how it is a beautiful scene. You can only just tell that there is a zipper in there because it is a very different color to the fabric. And even though I'm pulling in a pot, there's only a very small amount of space there. So I've used contrast, threat of use, contrast it, but and everything just to make it a little bit easier for you to see in the video here. So the last step here is actually the finishing off the Zippo. So if you've got a lining inside of your garment, you won't really need to do this. But I like to do this a lot because I only have usually one or two layers off fabric so you can roll over the edge of the seam allowance here and then stitched that in place. And that creates a really nice edging on the edge of the zip on. But it does create a little bit more bulking in the back as well. So what I like to do is actually like to cut the edge of the seam allowance here to the very edge off the Zippo. And then I do a zigzag stitch to catch the edge of the fabric and the edge of the zipper all the way line, and that creates a nicely finished, um, edge off Zippo so that the fabric is not gonna fray in any way. It also depends on how big your same allowances as well. So what? I like to do so like toe open up the zipper. Actually, the fabric is lying flat underneath the edge off the Zippo and then do a nice wides exact stitch. So the one side off when the needle goes down on the right hand side, it's on the outside of fabric, and it's it's not catching the fabric there. It's just on the outside, maybe good. So it's going around fabric, and I do that on both sides, just going to the top where the pull tab is. So you can see there. How are not catching with needle on both sides. It's only just catching on the right hand side. There. Now that's with this one. I close it up and then I do the bottom section of the zipper and the fabric. Now he had the option off going all the way down the bottom off the fabric along one side off the same loans. But this side. I decided, Teoh, just go to the bottom off the zippy here. And then I bring the two sides off the seam allowances together, and then I just sit with them both closed. But when you do that, make sure you put a little cut right at the very bottom off the zipper on the fabric. On that way, the zipper will actually lie flat. And then you can just iron the seam allowance to one side, and that creates a nice, smooth edge. A nice move. Seen you're gonna have any lumps and bumps anywhere They're right there with my fingers are on the right hand side is, but you need to trim it, Need to cut it. And every day, that is an invisible zipper.
4. Dress Zipper: Plus, it's about the dress zipper. So here is just showing you the zipper again. We've got the teeth on the outside. The polls help on the outside, and it's nice and flat on the inside. That's what it looks like now were the two pieces of fabric I've made sure to draw a line for the same line and I've pinned it together. And now what I need to do is I need to mark where the bottom of the zipper is. So where the pull tab is when the zipper is fully open. So I put a mark fair, making sure it's all lined up properly the way I wanted. And then I put a mark right there. And now what I do is that actually, I put basting stitches from the top to the bottom of that mark and the normal stitches underneath there. So here I'm showing you that making sure that you don't back stitch at the very top you because the basting stitches will be coming out and I make sure to never so over my pins cause I've broken too many machine needles to do that. So we stop here right at that mark, change it down to a much smaller stitch length backstage, cheer a few stitches, and then we go down as per normal and then make sure you backstage at the bottom as well. So here I could have gone and just I end at flat. But I decided to just press it open. It's quite good fabric, this particular one. So I make sure to press it open from both sides, because what I'm actually going to be doing is stitching on the dress IPO on the seam allowance first. So I've just opened up one side of the same allowance and folded the other side back. You open up the zipper and pain and push the teeth into that same line with it, facing down towards the fabric. So the outside off the zipper is facing towards the fabric, and then they just pin it in place with the teeth pushed snugly up against the same line Here. These are just holding stitches to hold it in place, but you still think to get it in as nice and snugly as you possibly can, just where I'm mark it down. That's what you stitch. So I made sure to go back to the zipper foot again. Very old zip before this one, actually. So it, making sure to stitch it in place. The stitches are not going to be removed, but at the same time, it's best to make sure that they're nice, small stitches as well. So we go all the way down to the bottom, making sure to hold everything in place nice and neatly. And now what we need to do in order to make sure that both sides going evenly, we need to do up the zipper here and then just maneuver with your fingers and make sure that there is no little bubbles right where that same Linus and then you just pin it in place, they can see I'm maneuver, maneuvering it around to make sure that it's all gonna be nice and flat and snug right into that same line. We're currently stitch it in the exact same way. So we are only stitching this into the same allowance. Remember, we're not actually stitching it to the outside fabric, so you can't actually see any of the stitches for the zippy yet on the outside of the fabric, as you can see here. I cannot see it. It'll So now what we're going to be doing is we are attacking the zipper and the seam allowance around the zipper. So this is the outside of the February, and I'm just putting in some tacking stitches around the outside of the Zippo. But we I'm doing it as close as possible to this teeth themselves. So what we are going to be doing is we're actually going to be stitching the final stitches just the outside of these tacking stitches that I'm putting in here, so these will eventually come out. So now these are the final stitches on the outside, and these are done to create a slight placket that goes over the top of the zipper toe. Hold it. Only nice and neatly in place. Make sure the back stitch and you just do it just to the outside of these tacking stitches . We might not get it perfect the first couple of times. Heck, even the first couple of dozen times for May, but at the same time, it's really good to practice that sort of thing as well. I did my tacking stitches a little bit too far down. So it was a good idea for me to go up a little bit higher when it comes to these. Okay, go around and we go back up to the top again. Now you can clearly see all of the stitching here and the zipper itself against the fabric because I've chosen very contrast threads and zippers, so they can easily see it in the video. But if you're using the same color stitch the same color thread, the same color zipper, it's not gonna be nearly as noticeable as what you can see here. So for now, I'm just going to be removing all of these tacking stitches out of the way. Just he's a trusty same repose. So we first take out just these tacking stitches. And now we're going to take out the basting stitches at the very center off the same as well. He doesn't look quite as clean, and his need is what I would like it to, mostly because, um, it's a very contrast threat, and you can see it's shifting crowd around quite a lot on the fabric. But if it was the same color as the fabric, you probably would not notice it nearly as much. And just a little note. Yes, The reason that little plastic ball is actually on the same Ripper is for this exact thing is to put it into the fabric like this, certain it doesn't damage the fabric in any other way. And now in it, all I need to do is just remove all of the loose threats. And they go, you have a zipper that has been inserted into the same him. And there are many different ways that you could finish off the inside of the same on the inside, off the fabric and the zipper, just like I did with the invisible zipper. You could zigzag it down on either side with the same allowance, and that makes sure that it doesn't fray in any way. Or I'm actually going to be showing you in the next tutorial. Um, a few other different ways that you could enclose the fabric and the edge of the zipper fabric as well, and it's slightly tedious to do all this, but the end result is quite nice. And I'd say if you actually pressed down this particular spot, um, just along the zipper, it would create a nice and flat zipper. But I'm also doing here is also showing a few different ways that you could finish off the top section as well with the zipper. That's one thing I always had a lot of trouble with. I like to make sure that I fold over the fabric, or it's like I'm creating a waistband here at the moment. I like to make sure that I folded over with the metal stopper at the top is included in the fold, so when you have the zipper fully closed, it doesn't create a lump at the very top. Wary, it meets the metal stopper at the very top. It creates a much more smooth line at the very top off your government. So if I was to, um, allow the zip it to go right to the very top where the metal stopper is, I noticed that it actually makes it stick out quite a lot, and it becomes very annoying just like that. So if I was creating a waistband, I could stitch that down my bet
5. Open Zipper: and I was 100. Do the open zipper. So the opens about you can easily recognizes by the very bottom of it you can actually separate the two sides off the zipper and then put it back together again. This is what you would normally use for things like sleeping bags or jackets and things like that. So what you need to do, you need to get the zipper, open it up, and then lay it down and then flipped them over so that the teeth off the zipper are facing away from each other. Now, I've drawn down the same line as per usual, and I've drawn a little line about six centimeters down from the top so they could be equal on both sides. I've pinned it down so that the little stoppers just above that little mark so that when you stitch down, it should look like this. Hopefully. So we got back to the regular zipper foot and do a back seat to the top and then just it all the way down to the bottom, following on a straight line, as close as you can to the teeth so that when he folded over it will look like this. It's nice to press it down as well, with an eye on a give you nice crisp edge full of the fabric, and they do the exact same thing on the other side, just trying to make sure that you get it as close to the teeth as possible. This is definitely one that you get with practice and doing small stitches. Well, not too small. Um, about 3 to 4 millimeters usually works quite well. Now here is one that a lot of people do this quite differently. I like to get to this point and leave the needle in the zipper and leave just enough room to get the pull tag just past the needle. That way, that the zipper and the fabric doesn't shift around too much, and it creates a little bit of, ah, bump in the spot. So what I've done is I've kept the needle in there, and then I'll just finish sewing all the way down to create a nice, smooth line all the way down. That's what it'll look like. So now we've stitched both sides off. He opens it by onto the fabric, and this is them putting together it looks quite nice if I do say so myself. So now finishing it. Which usually means just, um, doing something about the inside of the fabric to make sure that doesn't fray Andi, to ensure that it's got a nice professional looking finish. So we have bias tape, and we've also got twill tape. The one I'm cutting The moment is actually the tool tape and you'll see close up in a second that it is a herringbone wave. So what we need to do, where we're actually going to fold this in half, and if you press it down, it should stay in half quite well, just like that. So what you can do is that you wrap this around the raw edge of the fabric and the Zippo. You pin it in place and then you stitch it down. That way, it will entirely enclose the raw edge off the fabric. So you try to push the edge of the fabric right into that fold of the tools, and then you pin it in place and by folding it in half first, it means that you don't have to worry about whether or not you're gonna catch the underside of the 12 tape because it will be exactly the same length exactly the same on both sides. And that's what it looks like pin down. I'm gonna do the exact same thing with the other side, except with, um this is a two fold bias tape. So what we're essentially going to be doing is that we're just going to be folding this in half like so and then we actually going to be pressing it down with the I and because it doesn't stay in half. But when you just, like, push it together with your fingers so it will have to be I and down. But first things first is that you need to measure how much you will need and cut it off. I've pressed it down. So now it's got a nice crisp fold and you just pin it in place just like that. So we're gonna go back to the zipper foot as well. It's much easier to use, and I'm gonna stitch down both sides and there we go. That's what it looks. It it will entirely enclose the every allege off the fabric on both sides. The main differences with these is that the tool tape is quite thick and Europe effectively doubling up the width off the 12 type by folding it over and including the with off the zipper as well as the fabric. So it is a quite a thick edge that's you're going to be creating the bias tape not so much because this particular one is a poly cotton bias tape, and it's a very thin fabric. So even though you still folding it over, it's not nearly as thinkers what the tool tape is. It will still create a slight, um, raised area on the front of it, but it won't be quite as bad as what the tool tape is. It really depends on the situation that you're going to be using this particular type off finishing. It's always better to experiment, to try and figure out what works best in the particular situation. So in that garment that you are making, try to just experiment, figure out what's gonna work for you, and they were going. It's all done, and that's what it looks like on the inside and this. Get little nicely finished and you won't have to worry about it. Frank in the future
6. Enclosed Exposed Zipper: So now we're going to be doing the exposed enclosed zipper. This is one that is normally used for inside pockets O r like a pocketful inside of a bag or a jacket or something. Now this particular zipper, it is far too long for what I named. So I've decided to cut this one down a little bit, and I'm going to cut this one down to just over 20 centimeters. But the usable amount off Zippo will actually be closer to about 18 centimeters. I tried to make this so that you can easily see how far I'm going to be cutting this down and making it in the very center off these two pieces of fabric that I currently have here . So what I need to do is I need to create a cutting line. So this is the very, very center line that will be used for me to stitch a large rectangle around it so that I can use that as a guideline. This is yes. It is mostly just a guideline. So what I'm going to do is I'm going to measure out a centimeter straight up and straight out from the very top point, and then I use that as like an imaginary sort of square where I could make sure to put the needle down in that particular area. So I mark that same line. Sorry. The guideline against the side of the the foot of them. So machine. And then I can use that to stitch around that particular line and always make sure you keep the needle in the fabric when you're turning it to create a nice, sharp turn that so what we're actually gonna be doing? We're actually going to be cutting along that line itself. And from the end of that point of the line, we cut diagonally from the end of the point to each of the corners off the rectangle that we've stitched. I do prefer to use these little threads snips to cut this section here because I found that I'm able to cut thread by thread, and I can do much more precise cutting with these particular scissors. But I wouldn't use them for anything much thicker than this particular fabric. So we're cutting it right to the very corner. We're not cutting it on the actual corner itself. It just kind of trying to cut just a little bit before. Otherwise, if we cut that thread, it's gonna create a big hole in the opening. And that's not what not what we want. So we do that on both ends and they were going. That's what it will look like. And then from there you take out the pins and then we'll flip it the right way out by pushing the top fabric through the hole and out the other side. So now what you will get is two pieces of fabric with the wrong sides facing each other and the right sides facing out on both sides. And now what you'll have to do is I'm just about to press this, and I definitely suggest you press it with the iron. So now that it's been I and down, you can easily see that the inside Tia is actually where you're going to be stitching the zipper onto. But first we have to prepare the zipper, so we're just gonna measure in place to make sure that it's not. The opening isn't too big or too small, and it's actually it's just a little bit too big than what I would like, but I was trying to make it very obvious what we need to do. So now we're going to do. We're gonna prepare visit, but by hand, stitching the top two little pieces together. That's to make sure they stay together while we're stitching it in. It makes it a lot easier in the process. I'd highly suggest during this, trust me, it saves a lot of unpick ing later on, and it creates a much smoother finish in the end. I do try to do about four or five stitches there to make it nice and strong and to make sure that it's not going. Teoh break open at any point. And that's relatively the same stitch that I do for the other end as well. And I just rep the thread around the teeth off the zipper, and this creates a just a thread stop for the zipper. And one way I tied off is that I like to put the thread in between the two threads at the base of the knot, and that just helps to keep it all together and to make sure that they're not doesn't come out the other side as well This is just purely my own preference. You could do it, however you wish. So I put a few stitches here. I like to put maybe three or four, sometimes more, depending on the particular zipper that I'm using. But with this fun, I'm going to go need about four stitches in there. Just a great a little a thread Stop for, um visit, but ensure that it stays in place. There we go. Now, what we do is that we I just cut it off just below the thread. Stop there. And they were good. We never much shorter zipper that will stay together at both ends. So now what we need to do, we need to pin it in place under here. So we're actually gonna be pinning it from the inside here. So you start off with one end to make sure. Make sure it is scented. Make sure the fabric is lying nice and flat as well. This way, you just have to make sure it's equally spaced on either side. So once you got a day to put a pin on the outside and then you work from the inside when you take up on that later. So I'm showing you every single little step here just in case. I feel like a lot of tutorials that I found in the past seemed to have, um they skip quite a few steps and I feel like if I just video every single little step, it will help you in the process. I might do something just slightly different to the way that you do it, or you might just find a little bit of information and that might help you along in your own journey. So there we go. It's all pending, and you can see how it's gonna work. So now what we're going to do is that we're going to get the zipper foot. I'm going to try and stitch this as close to the stitch line as possible from when you stitch the two panels together. So we're going to try and que hold it all in place and stitch right along that same line. Don't be afraid to move around the foot if you need to. And they were going. One zipper is fully stitched in. Now you can see the little fabric stop that I've put into the zip with at the end, But that obviously means that I just put the fabrics up in a little bit too short. If you like, you can take that out at this point because it has been stitched insecurely or just next time, do it just a little slightly bit longer than what you might think.
7. Thanks for watching: Thank you so much for watching my class on zippers. I really hope you were able to get some great information out of it. I'd love to see if you've created anything with it, so please make sure you post up some photos in the class. Thank you.
 Andi Bowen, Dressmaker-Corsetiere-Creative Weirdo