Transcripts
1. Introduction: How would you imagine snowy
morning in the mountains? Would you be cuddled
up in Knuckles IV into keeping drinking coffee in bed, watching snowflakes gently
collect near the window sill, and dreaming about
what adventures would be going to next. Perfect, right? Hello dear friends. My name is Marie and I'm an
artist from India, and I welcome you all love the people from
across the globe. To discuss this winter
inspired painting class, using gosh as the medium. In this class, we will be
painting a cozy winter cabin, a few blue lights
at the windows. The k-mean will be
surrounded by pine trees, and we will add these
in different number of years, photorealistic touch. This class is of intermediate
level and hence does not include basic gosh
techniques separately. Or do not worry if
you are a big no, I've got you covered as
I explain everything, why lapping in a
step-by-step manner. So what are you waiting for? Come join me and paint along
with me in this class. See you in the next lesson.
2. Art Supplies: Let's see the materials that
we need for this class. For do people use any peak watercolor paper
which is at least 200 GSM? I usually prefer smooth
texture for grasping. For the project, I will be
using monotony AMDR people, which is approximately
15 by 21 centimeters. My gosh beans that
I will be using is a masterclass set of
16 by White Nights. You can use any brand that you own or even both two
colors would be fine. For the brushes. I'm using heritage set up
for my Princeton. It has a three-quarters
flat brush. Size ten, precise tree and your size three
by 0 round brushes. These are synthetic sable vein and hence are good for water. Again, I'm provided with snap. It just north necessary
to have so many brushes. Only our flat brush and a
round brush with a good find. It is what? I will be using this
transparent palette for mixing the paints. I'm asking did a Zoom and a
fine liner or micron pen. Bike Ben autos a little pen. I will be also
using this palette, nice for mixing purposes. It is also ready, have wounds, grabbing our paints
from the adopts, a job or container of
water, wash nappies. Any hard to board for
fixing the project. You can attach the
project, whatever. But in this way, you can move your project
in different ways. The aud audit issue. See you in the making off my project.
3. Fixing the paper: So now this time
the project onto the stack by dating from
one side of the people. I am, I am boiling and policing the masking tape exactly on
top of the age of the people. My son goes on top
off the masking tape. In short that Andrew gaps in between the Muslim
ban the people. If you prefer, you can
use this scheme for this. But it is not necessary because that is not much
of water in water. So that it has been mostly because of the consistency
or the cost base. By ensuring this process, you are also ensuring
clean borders.
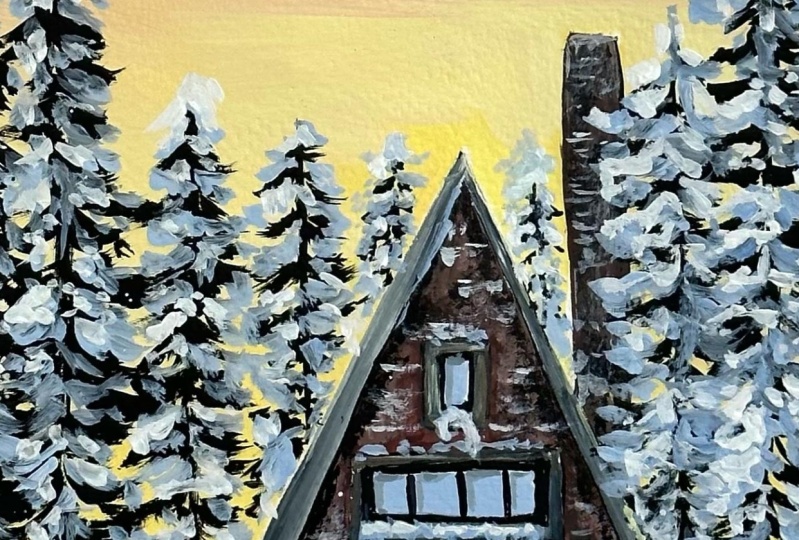
4. Sketch: So let's start the sketch, my drawing as glue. Draw two small baselines for the keeping on top of the slope. The baseline for the Caribbean is approximately
seven centimeters. Mark the center from the baseline and or double
lines from the sides. And it will look as a triangle. Draw a rectangle somewhat in
the center of the Caribbean. Draw another small window
on top of this main window. Let's draw a baseline
for the window you I'm erasing and
reducing the size. A bit. Dark double outlines
for all the windows as bars. Making such double our
plants will give a good to semblance of outside
bars of the window. I'm sketching some dark lines for the inside bars
of the window. Make two to three vertical
lines anywhere on the window. This will resemble the
inside parts for the window. Close the double
line for the roof. Draw some lines as brick like patterns at the
base of the Cuban. These lines are just to show you that we will be having
some pine trees. You are in the background. I'm sketching a small chimney. You are at the top
of the gaming. You can make brick
leg patterns here. And we are done with the sketch.
5. Color palette: The colors we need, madder lake, red, yellow light, lamp, black, burnt umber,
Prussian blue, and white.
6. Color mixing and swatches for sky: I'm taking three parts of white with the help
of a palette knife. I'm making three
shades of blue year, but you can also make two. Instead. I will take
some Prussian blue with the help of a pallet knife
and mix it well with white. I have speed at
section 22 x here. But you can always do the
spirit of your preference. For the second part, I'm going to add two parts
of the pollution load to the white mix that is only proper mixing
that is required here. So I have split the sections. Palette knife is very helpful
for mixing the paints. Now my lab, the second
part of Prussian blue, to create a darker blue shade. If you want, you can only
create these two sheets, which is the darkest
and lightest one. And the intermediate shade, will be formed automatically
while I'm now adding and mixing blue to the white and creating and temperature change
between the two. So I'll swatch that color shades for you now because you
are done with that mixing. This is the darkest
blue piece still sheet that we have obtained. This is the lightest or the icy blue kind
of obesity sheet. And here it is the
n-dimensional pieces that you can either
create Oscar. So other than the blue
pistols for the sky, we also need some
red and yellows. So I'm adding a very tiny pinch off madder lake red to the
white and mixing it well. So you would have split
this section because it is on the mixing and
nothing much to observe. We will get a pink shade. Let's watch this space here, the red color and
see how it looks. And it is really pretty. So this is the base still
read sheared that we need. Photo-based and yellow shear, add some yellow light to
the white and mix it. Well. Make sure you have
a good quantity of the space in yellow
because we will need it more in quantity to paint the sky as well
as the bottom ground. So you'll notice that beautiful
yellow base to shade. And these other
colors for this guy.
7. Blending the sky: Let's start painting the sky forced with the I
love Excel sheet. I usually start with
the outlines and then gradually move
forward with the painting. Just color blocking the
bottom part with this shade. Also makes sure that
you are painting in a thicker consistency because
that is what we need here. I'm painting the
outlines carefully, but you can be
carefree and paint because gosh is a
forgiving medium. That is, it can be
corrected as it is, take opaque and creamy and can be walked up on indifferent
and multiple layers. I am now switching to my
three-quarters finite brush and filling in the bottom space with this base still
yellow color block, this bottom region evenly. Almost half of the sky or more, is covered with this
pastel yellow shade. I'm using some water you
to even out this texture. You can use very little
water to spread the paint, like how I'm doing here. I'm covering the
bottom part here. But it is not actually
needed because we will have background trees here and
everything will be covered. So I'll wash my brush now and next state the
base, so red shade. I'm adding this red pasted lines directly on top of
the yellow shade. Using back-and-forth
motion of the brush, I will blend this well. That is, you have to move left to right from bottom to the top. You will get smooth blends
while the paint is wet. So if you feel that a painting
is starting to dry up, use a little water
or use more pins. Next time washing my brush and taking the lightest
pastel blue shade. Similar to the previous step, I'm adding this at the top of the red paste and
shade and blending it. Well. You can use this
method for blending by adding one color
on top of the other. I personally like planting all the colors
together at the end. I have blended the
intermediate loop is still shared with the
lightest one as well. Now, taking the darkest
blue pastry shade at the top, blend
everything well. Just go left and right and
make sure the paints are wet or use a very small amount
of water for blending. That is, your brush
should be just wait. If your brushes dry and
the paints are wet, it will form streaky
kind of pattern. The blend will not be even. So take care about this. You will be able to blend well if your paper
is thick enough. So since the basal red is
dried up now I'm adding more, pasted it on top of this
layer and blending it well. Please be sure to
wash your brush while switching with the different
shapes of the sky. You want form multi
colors because of the pastry chefs
that we have created. But just take care that
you do not make some blue and yellow because it
might form a green. And you obviously do not
want a green in the sky. However, the chances are very, very less because of the
sheets being in pasted form. So you can always, always correct such mistakes by adding more layers of pins. And that is the
beauty of caution that we surely cannot ignore. I've moved from
bottom to the top, and now I will do the
same by adding more layer of looping and then
move to the bottom. You can follow any direction from top to bottom
or vice versa, as per your preference.
8. Color swatches: For the bottom, I see ground
which reflects sunset. We will need to shave
so which is a darker, gray and lighter
or darker shade. Now I'm mixing a tiny thing, just lack in and adding some white or yellow to form
this lighter, warm gray. We will also need burnt
umber for the given. My adding more water to this
color gives such an effect. You will also need a map. By adding a small black
in the pace of new shade, you give us an icy blue shade. This is stuck on that. Using on the pine trees as
basically the window panes. You can observe the
color difference between the light and the ICD.
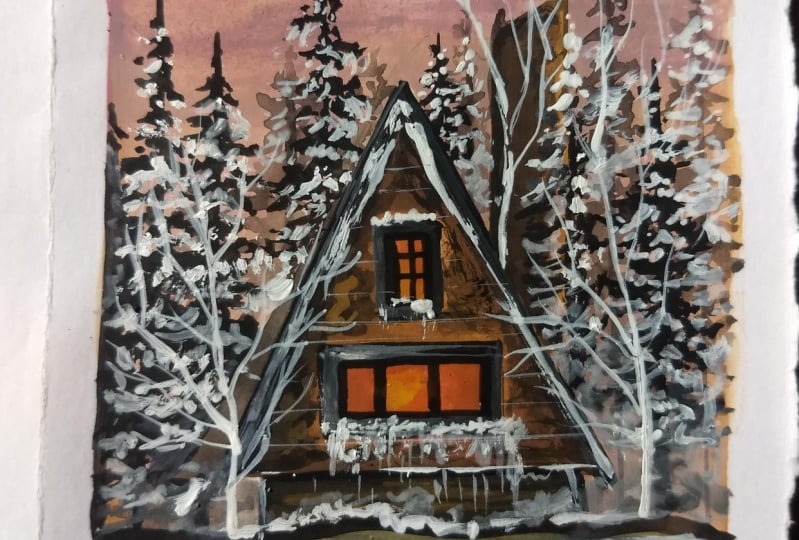
9. Cabin: I'm mixing a little bond on
bot with this yellow shade. The windows with this
light brown shade. It's nothing specific
year but I'm just using the leftover
paint from the brush. I'm using burnt umber,
what the cabin. But the outermost
part of the cabin, I will paint and darker
and thicker consistency. Whereas for the central part, I will be using light, but there's a watery
mix of burnt umber. Observe us how good
adhesion of water we can create different effects
like that. Who would? I'm using round Wrigley kind
of motion of the brush here. First I'm adding some
bond on both the sides. And then using water, I am creating Wrigley motion
to create this effect. For the base of the cabin. I'm going to add black. I will post on the outlines
in the form of bricks. You can also use a dry
brush stroke here. You can keep this at
this point you are now, or you can be indeed completely with black and then paint
the texture on the top. So now I'm showing
both the waist here. I'm using the base
two in the yellow and adding some texture as bricks. On top of this black delivered. I had some black at the outside of the bars but do we know also add some to
the roof lining? I'm using dry brush
strokes here because I will be adding a little
white on top of this, which will give it
our charcoal look. If you want, you can mix it separately on the
palette as well. Be careful while
painting this line here. So since I'm directly
mixing on the paper, I'm adding more
white to black now. I will paint the outside bars of the window with
the same color now. Dark shade also looks better. So I won't keep this
shape for the outside. Just make sure it is not exactly Blackman because
the inside bottom of the window could get
lacking guns and knives in. Boys. Do not worry if the underneath gains
are getting activated. Then with dark colors, blending with the underneath, add some burnt umber for
protection and mediations. Normally in gosh, it
is not referred to. And then tear off the bark. Texture and fun. I'm
directly on the big boom. Nereid, some burnt umber
for more contrast to this small line at the top of the tomb in Nevada. So government lack
measuring via nor disability difference
between the charcoal gray and black up the
bars of the window. After making the spot
on the dendritic. Yet I will add to the
top and Weissman, Let's add some contrast with black for the base on the god. I'm lining the inside
of Peru with some black now and it
should be ready 109. I'm using a dry brush technique. You're exiting the
excess off the pigment. Dynamesh technique
involves using the brush on the
pigment and no water. The brushstrokes are incomplete
by this and some places, but that is more area. The scopes are larger compared
to the ones which have a less space. Mountain. Some black schools wash our brush now. We will be now using the base still icy moon shape
or the window panes. I had a small line with black
on the window with the ISO. The darker shade,
shadow on the Moon.
10. First layer for pine trees: I'm drawing some lines for the branches
of the pine trees. The pine trees in the world, the other cavemen
are shorter in, whereas the ones of
what's alone, Good. I'm using black for
the, underneath. The lines that we have drawn are the baselines
for the pine trees. From bare here half to make
a triangle looking fine. But for each of the pine
tree is really simple, all you need to keep in mind
is the basis will be Ticket. Distract from the
other thoughts. I have sped up the
process because it is very much fabricators,
swapping, being alone. Or if you want to slow down this huge section that you can
access the speed asked me, be specific while
painting the pine, nice. Complete random while painting this pine tree, I'm adding the branches first
and then the food. So it is not necessarily
exactly the way I am. Because your pine tree
might differ from mine. You consider several ways
of painting pine trees. The pine trees with
more of the black. It just fine if
the BCR is getting activated and forming a
charcoal gray triangles. Using the tip of my
brush, release gently. I am making the
tops of some type. Use any brush that
you need this for. This. Similarly paint the pine
trees on the opposite side. Being distinct id to
meet overlapping. It sends up or down patio and you are
done with our underneath.
11. Icy ground: Us based only on
the bottom I see grab the dark, washing my brush. I'm using some bottleneck or
WhatsApp group and blending with the bottom part
should be more darker. If you're being asked in red, you should be able
to blend it easily. The shared, so great. I'm blending all of
this to get done on. I'm using just a small gap of water to blend this together. Us walked out on
me because my son, I will add some more great
for texture and shadows. These are random strokes
which I will name Diego. I got dressed from AdWords to Innosight and
create some strokes like this instead of bending it. This one add depth and
texture to the IC. Using my brush, I'm now adding some textures in
the form of small dots. Blend these thoughts
in the background. A good consistency off Connie, I will scatter some
at the bottom here. You're seeing that paper
on a toddler color, the top portion,
not the project. That's it for this snowy ground.
12. Second layering: Our second layer for
the pine trees will be overlapping the
black with the IC. I'm painting the
four days on top of black while still
showing the underneath. Some of the underneath
visible part and added depth is in the form of small
dots and clusters. Since the process is acidic because I've sped up this week, you can adjust the speed
from the speed section. I'm adding some downward
strokes lock you up before. So again, See you back now
I'm crowbar majority of odd, fine piece, this icy blue color. And I'll read a little
of a block has been also add some IC near the
kidney on the ground. With I see on the
bingo says, well, by using the Dutch in some dipping smoke
from the Windows, add some snow on them first. Also add already 109 were burdened with
the same icy blue. You can also use a
white pen instead.
13. Layering and highlights: If you're not
comfortable with brush, you can also use a white pen. As a second meal. I'm adding more bite
on top of the IC. Give it more highlighted look with the regulator. Lot of white left bound. I'm Josh, I'm adding a
string for the nights. I will wash my brush right now and take some yellow
for the types. I'm adding it as wrong
thoughts on the string. Using a damp brush. I am not blend into the
rest of the K1 with them or lending what they will give a light. Blue. No, I just got so big the
green light bulbs. Let's wash our brush now. I'm going to pick consistency. All right, I will not highlight
on the ICF most known. This is satiety. I'd put a pine trees white, ensure that the *****
to ask them visible. Since the bottom
biters, not bad, right? And I am going or what? One mole, fine. 30s. And it's also the cost of understanding
what's not right. Let's paint the paint. I'm doing it in the seventies, so good. With black. I'm painting the Bob socks on the details. I'm painting once more paint
to just the top of it. Now with the thick
consistency of white, I'm painting of snow,
date and paint. You can paint any of
your favorite teams. I have some water spilled on this project and that
assumes an office lines. Such a nightmare, right? But I will leave this
project as it is. Request the more you try to fix something, the motor it was. So sometimes it is good
if you accept loss. And finally, I support
for the pine trees. I'm using a wedding cake or consistency or fight
and I didn't go home. Can you see the
difference that it has made my painting layer? So what? I am now going with
some brush strokes from the outer rings
to what's inside. And it just shows the left, the warping that
is on the brush. So complete random brush strokes that are towards the bottom. Wash your brush now
because we are done with that painting and
that is on your mind, you do snack and may require Micron pens and
Jelly Roll pen for that.
14. Final details: So first I'm using this micron pen off naught phone number. I guess the nib is
off point to fight and you start drawing lines
across a table like this. Imagine that the
Woodward are launched into get-go one
about the adult for New Zealand general fan. I will not proceed with
the exact same procedure just to take this
time to have to draw the white line on top
of the black line. Why places like this? I'm directly with the
hand insert office. This is willing to
December 10th node that is settle in-between
the wooden blocks. I didn't highlight
few more avionics better, the biggest necessary. And also with the Micron I really doctrine
few of the slides. You can choose to skip
this mine, you'd be dx. And I think now it is done.
15. Painting reveal: Let us find the painting by
removing the masking tape. Be extra careful one of
the main masking tape, this angle and maintain
attention while pulling. So you'll notice
about this painting. I hope you liked it. I know how the
base circle that's showing the stinking from me. It has to end up being project. I'm going to paint the
pine trees, add an icon, it's made me the magical theory. So thank you for like the mask needs to liberating effect
when helped me a lot. So see you in the next graph.
 Mayuri, ARTrinkets I Watercolor & Gouache Artist