Transcripts
1. Introduction: The holiday season
is finally here. And it is the most amazing time of the year because
it is Christmas, which means it is
time to decorate, celebrate, and embrace all
things, merry and bright. And of course, the main
thing is being each others Santa and sending heartwarming postcards
to your dear ones. I'm very excited for this
class as Christmas is here. And these postcards will reflect the vibes
throughout the class. I hope you'll find time. to send these postcards to your loved ones. Hello friends. My name is Mayuri and I am
an artist based in India. And welcome to my class on Gouache, Christmas Holiday postcards and metallics for the added bling. This is an intermediate
level class. So do not worry if you are a beginner as I will be
guiding you at every point. Merry Christmas dear friends. And as Christmas is creating happy hours together,
Let's get started.
2. Art Supplies: The supplies needed
for the postcards are easily available and
the most basic ones to get started with. So I have cut down my A3 size peoples into
small postcard size, which is six into four inches. As senior in the home postcards. For the paper, I'm
using Umbria 190 paper, which is 300 GSM and 100
percent are low-speed. You can use any watercolor
paper that you have. A strong board taped by the masking tape at all the sides will give us
stability while painting. The only important
factor in Gosh, this time the people
should look thick enough for the layering
and blending to happen. And I will be using set off 16 gosh beans by White
Nights there, where did it, which
creamy and vibrate. These glial naught into
paper very smoothly. I will be also using new sky and pilotitis, metallic gosh beams. You can also use
any other market. This is a completely
optional step. If you do not have even these, you can use GridFS. This university
departments are also very helpful as the
off week to work on. But for any other
minor highlights, you can use white general event. Under brushes, I will be
using my round size 8 brush. This one has long winded excitement be
using silver black one, size two round brush
for your backgrounds. I will be using
this, for instance, heritage three-quarters
like Rush. Besides for flat shader
brush my data. Masking tape. I will be using
half-inch masking tape. Your you can use any size
on extinguished autopilot. However, we even need only
few colors to be mixed up. A pencil and an eraser, a jar or container for
Dobhoff feeding your brushes. How to learn. And also
Gulf, which is optional.
3. Masking tape: So I will start the postcards by taping from all the sides. The masking Dave,
that time using your is smaller in size, which enables small
little border. If you're like having
bigger borders, You asked you to do so. Or postcards without any borders will also be very attractive. But the only problem
without the masking deep within that value will
be mostly bleeding white. Art. You can also cut
the edges of the host, cut after the beam. Hello and welcome. I like running mapping goes or word ID to ensure that
they're just stuck well.
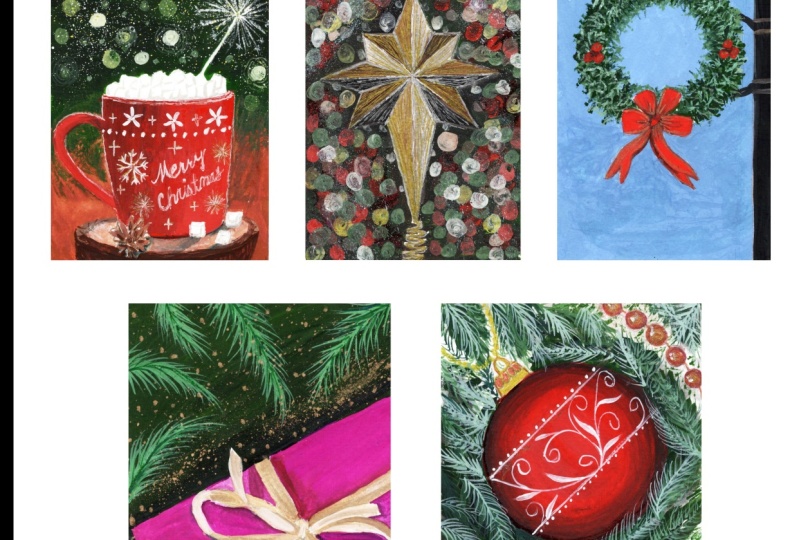
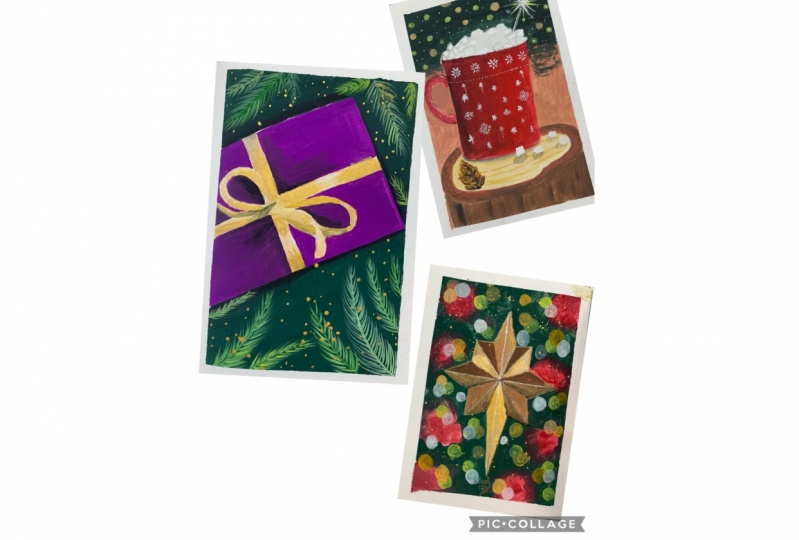
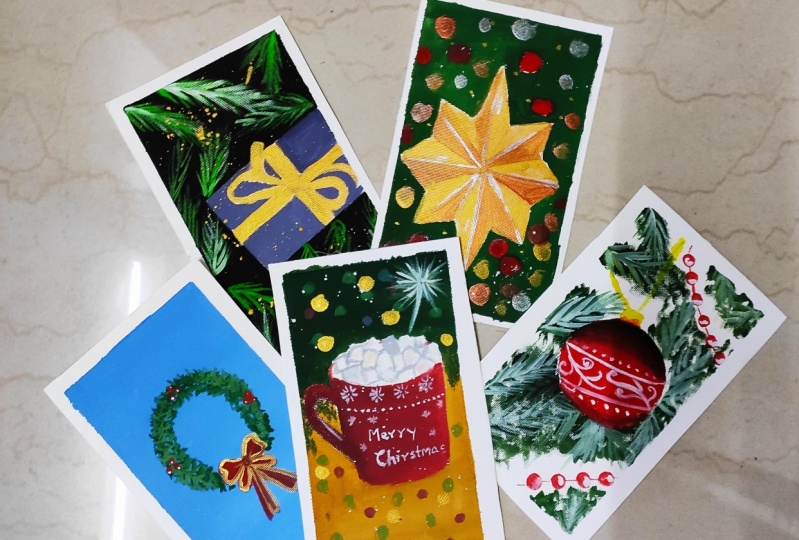
4. Project 1: Star at it in Bokeh: So our project one is
guided date in bookie. Look our list item. We will need our lean
deep red, lemon yellow, ochre, Titanium white, burnt sienna or burnt umber,
and lamp black.
5. Sketch and background: So use a ruler to get
started with the sketch. I'm marking around
11 centimeters, your 0.705 and 11 centimeters. Taking the five centimeters
point as the Sangha, I'm drawing a line of eight centimeters by keeping four centimeters on each side. Now connect all of
these points together. It will give it a semblance
of a guide sheet. Now Mach point of saying
goes for all of these lines. Balcony, these point
of saying doors and make sure you are passing
it through the center. Now from the biggest sections, I am drawing approximately
five centimeters and dividing it into
smaller sections. I'm dividing it into smaller sections
roughly and not taking the exact house not connected or points to the smaller hubs. Synced up arts are
not equal house I release and meet
the required changes. I'm doing this out of love with my hands and not
using the scale. Finally, drawing the line now
passing through the center. Connect all the top end points. If you're getting confused, looking at so many points, connections, lines, says Don't
worry and follow with me. You will understand it well if you're doing
it along with me. As for your preference, you can always pause
the video or reduce the speed of the video spread
from the speech section. So since I feel this is not
equally divided as well, I'm already using and
making the changes. So it is all dark lines are the guidelines you can observe now, got more than bottom
the status longer. Lines again, I'm erasing and
redefining our dark lines. Let's make us well-designed. At the bottom you are. And we're finally
done with the sketch. I use a new darkest green
that you have here. I'm using green deep shade
from White Nights here. If you do not have
any darker green, mix any light green and blue
to form the darker shade. Like mixing sap green
and Prussian blue will give you the sheet and a blob. So Fred randomly in
between the green. So since this is our background, it should be blurry and
not ready well-defined. For this purpose,
you will have to use your Gosh beans like
water containers, which is a non-greedy mix, and not the usual
creamy consistency. Our gliders holds as well carefully and fill
in the species. Since the drying
time, of course, beans is quicker than
that of watercolors, I'm using two brushes and switching between
red and green. This will enable
a better blending between the two colors. Imagine the red Christmas
ornaments based on a Christmas tree and random,
and accordingly, please. Randomly use it on swirly motions to get
the blending easy. Whenever you feel precious
to dry up the outside. So I'll just start and be very, very careful with this one. Green and then fill the space, isn't I'm leaving
some ECS for radio. So my brush more in the form
of some ground to Gleevec. This effect to the background. Almost like wet-on-wet
technique seen in watercolors. So as you can see
the blog software and that is enough water on my brush to make
this consistent. So now let's watch
a bit of blending. Let's continue this in
this last one part. Squash is water soluble. I'm using it as water
colors for the background. Now switching back to my brush. So I really clean damp brush. This is required. Since I'm adding. This will take more time than
usual to drive because of using the bokeh effect. Once this is dry.
6. The Bokeh effect: So I'm using diluted
awarded a mix software. This is because not much afraid is going to be
reflected in the book. Since effect is created
by the Knights, it is mod of oranges,
yellows, and rights. Values move up the
so-called start at 1 and rho d2
operation 36 students. And that you have
your perfect circle. Don't worry if you're not
getting perfect circles. Says Gosh, is a
forgiving medium. Anything that goes
wrong can be corrected. You can be in circles like
this with the blue circle. But you would have to
wait for a longer period of time for the
soft goods to dry. According to me, this
is a waste of time. I don't have the patients
either to pin so many circles with the group.
Just new paintings. So ghost-like this with
the flight brush is really therapeutic and
satisfying as well. And it happened in no time. Next time, create circles
with lemon yellow. It's okay if they're
underneath the artists. Just have fun guys. You can see not
all of my circles. But sometimes laws like this. You can own your
mistakes with gosh. Are going wash my brush and take some lemon
yellow on my brush. Making a small mixing until
you get to like light. And also overlapping the
previous ones with this sheet. I'm not using consistency because I want some off the underneath dawns
to be visible. You can use consistency. Asked for consistency. Welcome. Consistency. Now, it looks like our clean sheet. The so-called comparatively few in number for the previous ones. And also overlapping. Express how satisfying
this process. You should try and buy yourself. A lot of them. Didn't wash my brush now because you are
done with double effect.
7. The Glowing Star: This side also need a born with white
black directly. Since black pigment, make sure you're painting
in this section itself. I'm being really
careful to being, in fact, the section on Slack on the opposite
side is red. Use any brush that you
have for the staff. Also paint alternate
section with black. On the opposite side. You can use bond,
but I will be using burnt sienna instead because I have leftover
black on my brush. So I prefer mixing on the palette because this gives another type of
texture and effect. If you can observe the
same two data off bond. Similarly now, on the
opposite section. The next section with
the same shooter. Pretty beat on the
exact opposite side. Now paint in between
the two black sections. I'm now using gold ocher with the same brush mix
of burnt umber. You wouldn't get this ping
desktop most half part of this start with
the same shoot. I'm using the leftover. When that is reflection, that is moot light
and the dark Ming reflected the dark shading
whether the present, any dark objects which is
in the close proximity. The light part will reflect
the light data objects. So I'm washing my brush now
and taking some weight. So I'd be placing the white onto the sections that I
want to be lighter. Taking some gold ocher and mixing and directly
with the white did not get confused
with the shapes, as I have used,
mainly folk or less, which is black and white and buoyancy and not to
form the bond on bushy. I'm adding black
for the D2 flexion. You can also use bond on Boyar. Instead. I'm digging and forming us move. Touching the different
places to Moscow. He was born. He was infant goes to create
a soft looking effect, rather than using a
clean damp brush. Using bond on both
create some shadows for this 11 thing. That is important when we use darker shading for
reflection by the dark objects. I'm using my fingers
to blend the colors. For the dark reflection shading, you can either use some
black, are born Dumbo. Wash off your brush.
Now, let's paint some highlights with
the white brush that do have highlight only few off
the outlines of the star. So since we did not paint the reflections by
the light objects, use the same brush with leftover white beans and
drag on to the start. At places where light
will straight forest. If you do not have metallics, you are done, done your butt. If you do have metallic beans or sparkle beans or sparkled bends, you can go for the
additional staff, wash your brush now and
we are done with desktop.
8. Adding Metallics: If you have the dopants, you can outline the start and strike and make some
shading a few places. But since I have, gosh, mcdonald's, I'm going to
paint the whole of the star. Use any gold medallions for the lighter part of the start. So forced to hide
use as Deck GUI. And now I'm using couple
for the black part. Since these are Gosh metallics
to underneath being, is being activated again, which is why the black is
mixing with the corporeal. So to make sure that the
metallic stand up when you need Inaki me
antique consistency. That is the bond
on board, Black. Use this copper metallic. And for the light though
once as ten gold. Okay. I'm going to add here because I want I'm adding darker
regions aspirin. So since our highlights
are not ready when I'm using light
to add the highlights. So just kind of
highlight your light. Similar to the previous step, you will still leftover lights
on the brush, dry brush. I'm adding more often now because it is very
light in nature. Reshaped the outlines of desktop if you
think it is needed. And do not forget to add links to this wall
at the bottom. Now comes my favorite
step. Us war Dot. Good consistency with just
like Mark door watery and n2. And then this one step offs, not getting that
beings everywhere. Everywhere. If you want
to avoid them mess, you can use tissue or any
other waste people and cover your table or near the belonging because even if you are
doing it and knock on doors, manner, like how I have
done using a single brush. It might still be a mess around. So this is the best and
most economical way to use pins without wasting much
by using the leftovers. And by leftovers, I mean, by that is still remaining
onto the brush like the one on the pilot or the mixing
dish can still reuse, but the excess paint on the
brush is always washed off. So use each and every
pigments to the fullest. Take off the masking tape, ready with me and act on. I am so happy that I have
clean sharp borders. This is one of the nightmares
and artists can have to not have a clean sharp model
because of the masking tape. So we are done with that project
and I hope you liked it. I found the bokeh
effect process very therapeutic and
satisfying the metallics. Oh my God, So, so damn
pretty to look at. I'm sure the ones receiving this postcards
from you will be the happiest and galactic the
ISO. Thank you for joining.
9. Project 2: Hot chocolate with marshmallows?: Our second project is hot
chocolate with marshmallows, and the colors are exactly similar to that of
the previous project. Green, deep red, lemon
yellow, gooey ago, titanium white, burnt sienna or burnt
umber and lamp black.
10. Sketch: So let's start that project. My drawing a cup. Make
any dominated gulf for the rim of the cup. Mixed light lines for
the sides of the cup, and not in the form
of straight lines. Similar to the rim of the cup, make an elongated goals
for the base of the cup. For the handle of the
cup make us see with the dog bark being broader
and they bring downwards. So since I'm not happy
with the size of my God, I am elongating the site
by increasing the length. So a thing that I request is to wait for the
sketch and abilities complete and then pause the video or habitual to
complete this sketch. Because I would be
making a lot of changes underlined
completely satisfied. Okay, so now let's make a double outline for
the rim of the cup. A double outline
for the handlers. And as I've said, Wait, wait until I finally
completed the sketch. So I want the edges
off my mach to have rounded shape and not in
the form of straight lines. So let's get this done. Maybe I'm okay with this much thickness
of the cup handle. So I will finalize this as well. Now to the most amazing part, we have marshmallows in
our hot chocolate monk. So I'm sketching these
randomly in form of cubes. Obeyed, age is not
actually a cube because it has rounded edges. And I guess it is
called score girl. I'm not sure though. You will still understand it
with the help of the sketch. You will be surely knowing how much melanin look
like the course. These are everyone's favorite. To be honest, I have never tried hot chocolate with marshmallow. But that reference image, God my eyes and strengthening. I'm placing it one
about the adult, like they're flowing
from the mug. Let's make a poster for
the mock today Istanbul. Let's make a wooden coasters. So this is like a rough
outer lining for the Kusto. Let's make a BSW fact-based
show more after wooden bug. Mug is full of
those marshmallows, let's draw some of the marshmallows fallen
down on the coastal to add to the Christmas season. I'm adding I was not going to add this one because it
includes a lot of details. And I wanted to
keep the projects, but I thought it will
really enhance the project. If you do not wish to
do this pine cone, you are free to do so. You can make changes
to that project. As an herbivore, you like, support the pine
cone and just do some elongated Hughes rising
from one about the UDL. Sketching is something most furious and
time-consuming thing. My dad does also the
most important step, and it should be done with all your brains and focus on it. So I'm also making our sparkler fire cracker that this may be coming
out from the mug. This is also something coming
from the reference image. I thought that's keeping this because adding modalities to this sparkler will create a
nice glow to the postcard. So my cup will have
omega Christmas you're in the bottom part
may be or the sandal. This wants to put down the
Ghosh being to undo this. But this is to let
you know that we will be writing
medic Christmas with metallics on DACA and
also some snowflake.
11. Background and Mug: Let's start by digging a good consistency
of burnt sienna. You can use. But I'm
using a flat brush. I'm using a very light
wash of the color. Since this is a bit automatic, just placed under
the Christmas tree, you can be any color
of your choice. I'm adding white to this year
to create a consistency. This one gave a nice more cache. So that texture is even
the cause of right now. With this MOOC. And wash my brush now and next
big the green deep. And even. On the top side. This is why the Christmas tree, so use any darker green. I'm using horizontal strokes, ten line space for this popular. Again, it's like outlining and then filling the
species which makes it the sum of the xs, green brush outline, all of the marshmallows
carefully with the green. Okay. Brush strokes. I'm making
sure that the paint is even. Since I wanted to use a dry
brush technique for though I will take off the excess
paint on the brush. So since data step
and it cannot form guy brush strokes, I'm
extending downwards. I see these two do not
like wasting themes. So then I put afford changing the reference image and going with the flow rather than just sticking to what
we are supposed to. Since that is spreading
the paint left on the brush now I'm
using dry brush strokes. You'll also do not forget to do this. We need the handle of the cup and the y same pressure will be. So I wanted to resemble like the bottom most part
of the Christmas tree. I'm leaving this for you. You can also paint or what
you want because since gosh, she's a forgiving medium. Again, correct any
mistakes that happen? Okay. So the ngDialog property with the lines and the last mean, I'm adding black for
the shadows now. You are the lightest strike
gave on the right side of the left side is
in the darkness. Let's make a smooth
gradient lambda from adding a little more black. I'm using language window. You can see I'm reducing, doctor, and you are now
with more and more. If you are drying up more war, more coverage, especially the brush strokes. Because this is how
you will actually, because the black
is to some extent. So I'm washing my brush now. Let's add some black. So some lining the bottom of the day, similar to data. One last time for
my satisfaction. So we are done with that.
12. Wooden Coaster: So I'm using one part. Adding this to this. I'm taking other didn't
bite without washing my brush and painting
the inner side of the day if a tiny danger of going local and add
to this whiteboard. Now, there is a reason
for not asking you to pre-mixed colors
because the effect between the two colors will be more beautiful
in this way. Now with the same brush and
add electrons to this course. San, just feel the leftover paint on my brush. I'm using a dry brush strokes on the outer part
of the question. Let's start with burnt umber. Now. If you did not have, you can create one by
mixing burnt sienna. So let's create some texture. Now. I'm just dragging my brush and making brushstrokes. Brushstrokes. Brushstrokes with one sienna and two brushstrokes on and white. To add more depth,
I'm using black now. I'm creating lines
within the coastal. You can clearly see
the difference now.
13. Pine Cone, Marshmallows and Details: I'm starting with the addition of black at the bottom side of the scale of the top. And the bottom will be darker. I'm adding them more. Using born CNS. Back to this day don't mix well. With white. You can also use so many different lines, crossing lines in
different lengths. So since this line is where
I'm rubbing it with myosin, looks like a few lines
mix some crosses, a few randomly into,
Thank goodness. Well, I'm adding them a new
layer on top of Spark lone, scientist, my daughter for orange at the top
of lemon yellow. Add a black line at the top
of orange for the bond area. Add some lines with
lemon yellow us where I'm using a media
looming. For the lines. I had a few dots
off lemon yellow randomly on the Christmas tree. Would assemble the lighting on the damp brush, lighten the outlines
of the darts. You can see that this
step has created because I've been diffused. If you want, your white
or lemon yellow dots are the same dorsal sports. I'm adding white to
the previous gray mix for the shadows of
the marshmallows. So try and keep making
shadows to the left. I'm not specific for
painting the shadows, but because I'm imagining
Batman light is striking. And hence the
shadows to be placed on the outlines of
the marshmallow. I'm adding highlights and do not forget to
falling marshmallows. Adding some more
shadows to this one. The shadows. So with white, Let's reshape these
marshmallows. Welcome. Do you have for this Starting few more down and dry brush strokes. He was born Dumbo. And all of these bonds on my brush. What you can see how each and every step at a
time is giving life to this. The bottom part of the bond. And then outline bond Dumbo or black. Dry brush strokes at the bottom. Using black, add some shadows to the mug and the marshmallows. Extend the shadows
towards the left. Now use any white jump in
there and draw a dotted line. But if you wanted to
again, skip this step, you can go northeast. Metallics after this step.
14. Metallics addition: So let's please three dots
as centers for the flowers. I'm using lights of the
volume for the flap. I don't just initiative. Press the belly of your
brush and then lift off. So very pressure initially and then reduce the pressure
towards the center. Normally, I would
have daily data board and they did it in 360
degrees for the freckles, the cross in this way it is
against our normal motion. But since I don't want
my setup to move, I will be painting in this way and this is indeed a fun process and so
satisfying to watch us valid. Also it does because of
the contrast of that. Having such a beautiful thing, I would suggest to it, or did the postcard white painting, despite the cost of
movement, would be easier. So let's add a line of dots
beneath these flowers. If you want to can award this dots and make
it in the form of a small brush painting, this Merry Christmas. Okay. You can also use barcode, bent or word The first. Let's also go over
these snowflakes. Now. These are just
three cross lines with a web-like in
the same dough. And do line striding
outwards from the ends. Let's paint this
model snowflakes now. For the spock, let us just go over the
previous white lines, but a few ones. And for the yellow ones
who have been used. So few lines for the pop. I'm adding some gold
for the Christmas tree. Assembly randomly on
the Christmas tree. Hello. And again, my favorite
step of splattering pins, flat dealing with
that StEC gone. Just few small black
dots. You are in there. And with the same brush and add few dots and do use
against the fullest. I'm adding a legalese glow
to the Christmas tree. Yeah. This is almost like
a dry brush technique. This is a technique that I have incorporated in almost
all of my projects. So let's wash our brush now and we are done
with that project. Take off the masking
tape very gently. And we do have clean borders. I hope you like this project. The shine of this
syllable is amazing. I think it is mainly because of the red contrast of the mock. The ornamental also popping
out from the Christmas tree. This is also the cause
of the contrast. By and see you the next project.
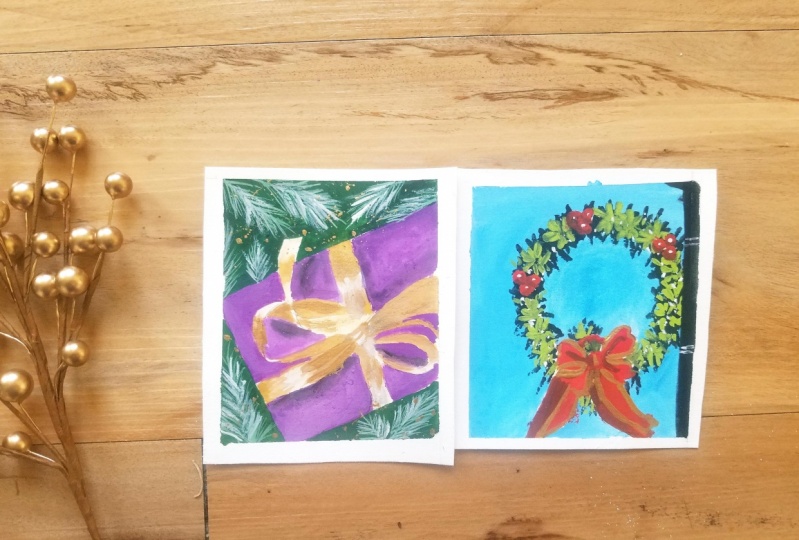
15. Project 3: Surprise! Suprise!: Our third project is a gift
box here called surprise. Surprise. The colors needed for
this project are green, deep violet light go local, titanium white and lamp black.
16. Sketch: Let's start our sketch, my drawing, our rectangle box. So it doesn't surprise gift box that you would send
to your loved ones. I'm making future
injuries because it is not as body ideas from my mind. Let's draw it had been
further gift box. The broad ribbon
doesn't seem nice. So I'm making a 1001. Make it crossing to
the vertical one. And then we even have a
boy at the center as well. Since there will be a
naught in the center, the ends of the loop
you're tapering, whereas the other
ends will be broader. Since I'm not using
a reference image, I'm making a lot of changes. So I request you to please be a little patient with me
and start with the sketch. When I'm done with the sketch. The first try to
understand what I'm doing and then do
the for the steps. Since I'm making some
forms to this as well. Let's make more loops now. Do will have four weeks. So make sure you pay attention
to the details as red. So I'm using and
making the arc length. So the opposite loop is
diagnosed or D first one. Well what lapping? So imagine you twist, we are done with the sketch now.
17. Ribbon: Get the gold ocher color ready, because we will be using
this color for our ribbon. I'm going to be using gold
metallics on top of this, and hence I'm using this color, but you can use any
shades of yellow. If you want to go for
other shades of metallics, you can use any other
underneath dawns, like forests
invertible, you can use a dark gray or other
grace for the shadows. I invite for highlights. If you wish, you can paint that had been directly
with metallics. So I'm just painting
with gold ocher yellow. In the book. I'm using black for the shadows. I'm using my dear to Moscow
New Deal after dark. I'm pulling out black and
blending it with the rest. I've washed my brush now. The master doc. Sometimes I do like
using my fingers for the blending rather than
up clean, damp brush. So let's cover
this side as well. I would wash my
brush and now for the highlights, I would. I've been doing this
from the side as well. This is a mix off
by filling it with white, I'm going to
highlight it and adding some euros. The underneath side of
this being lighter. So with a different brush, I'm using a weighted like
black for the shadows. Using white, I would
blend this with. I'm adding a little white
because it has not gone away. It should have. I know what that is. A lot of experimentation
you are as well. If you want to avoid such details of shadows
and highlights, you can do metallics using weight now and placing
it in the same dough. Pull out the pins
using a flat brush, which will give a
reflecting effect. I'll correct that exist
part on the white later. So since I have a little
white mixed on my brush, I'm holding down
the Gulag cashiers. So using a clean, damp brush, I have removed the access of the goal or code
that was dead. Just drag your brush from
one pigment to the other. This will create a nice soft looking effect
of reflection. Adding some more to the
other sides as well. And now adding gold
ocher to polar pigments. We're pulling out pinned as for dragging the brush
from bind to another. This creates a soft
shading effect. Using white, black and add shadows. Adding some light pigment off black. Shadow would have been some shadows would like
to just black ERS. Lights. If you do not
have a flat brush, you can pull out paints like
this with Russia's ready. Using the value of the shadows. We are done with that.
18. Gift box: For the gift box, I'm using wider to light, but you can use any
color of your choice or the favorite color of your loved ones to whom you
are gifting this postcards. So initially very large, just the plain colored and they can get
off the boundaries. We will need to add
the shadows and the highlights with
black and white. Be ready good for you to not paint that it begins
with docker load. This is a really
scary for me as well. We can mask one Leo with
an adult, with gosh. But the system, the scariest
thing I can ever dream of. Because ideally preferred
avoiding such scenarios, but rather than
correcting them Lido freaking me out, I fill it. So the size of that had been gone for shadows. So going on with the pins again, we distributed evenly very, very little black
on your brush and just paint under that had
been like that there. So please read our
shadows will be because we've cast a
shadow on the box. So I'm just making a
black line under that had been and then I've been
blended with the rest. So as I've said, you can either use more dough
to blank, use more paint. Some highlights
with white dress. Adding some more. Once again properly. Using the same techniques
being the opposite side. Adding black for the shadow. I'm painting. Because I want to show that this side
is immoral for the darkness. I'm taking more
beans for blending. I am dipping just a tip
off my brush. More paint. Okay, Let's add a white
for highlights. From left to right. I am pulling to the light. Now. Be careful while painting with my luteal. You can also spread to
with that Andromache. Instead. I looked up on
clients with that Arne brush. For now, I am just utilizing the access of beans that
are there on the brush. So since I'm getting
dry brush strokes now, I will wash my brush and brush. Wash my brushes. I'm a lot. You wouldn't have to switch to
our detailer brush. So for this basis, thank you. I assume that the
shadow will fall. So I'm placing it like this. Thank you. Switching to my
size two brush now. I'm switching back
some white highlights. Okay. Okay. Since this happened, such
mishaps happen with US. Okay. Gift box, shadow brush now.
19. Background: I'm using green for
the background. I'll use some of the pain data's already there
on the palette. Using more don't I am forming a good consistency of the paint. We will be painting
all of the background with green and dark
green using black, Laughter spaces and stuff like that. He was black now
surrounding div box. I don't mind covering with the darker green because
that gave the contrast. So we're going to be adding some four pages on top of this. So it will stand out, well. Like this. Metallic center. We don't stand out on
a darker background. So I'm assuming that shot off
the boxes falling as red. So I'm using black
box and FADH this, from this, I will use
blend with the rest. Okay. I'm using water to blend it. You can see I'm using the
whole of my brush to blend it. Does so I'm adding
more darker shade. Now. I'm switching to my
size two round brush. This is Jakarta. Few
minute due dates. I accidentally went or
whether it had been. So I have to reduce
the size a bit now. Saw that studies and I oversee, be careful by painting
my new details. For the filming purpose. I actually can't be ready Gloucester painting
and look under do this. And that's 30s and
they make mistakes. Voting or maybe actually
mistakes essential as well as how we learn to
do different techniques. You find different ways. And most essentially we learned how to
correct our mistakes. I came back to this gift box. I taught dividing a
little character to the shadows and highlights as well with weight. Please don't be mad at
me for this because I do come back at mapping ding
and make a few changes. It is Here's my main dad keeps coming back and doing things. And I guess it might be
happening with us when, when the creative
mind is at work. So I'm taking green. So this green deep shade, few grass, just make it in different directions and also make Deming different lengths. So these actually four sides and angles to the green deep. Now to formulate a lighter
green on top of the foliage. You will now understand more. So that line. So just to
get an ordered manner. So before going to add more white to
the previous slide, green mix, mix spread
in a good consistency. Not completely
masking underneath is to not completely mass comm. Few parts of the underneath
also goes on decreasing for the final highlights
on top of this, but very few in number. Done with that background.
20. Metallics: Getting the gold
metallic ready now, I am diluting or making
a 10 or 30 mix of this. This is because I wanted to underneath dawns to be visible. Using a flat shader brush. I am painting over gold, but with a very gentle touches. You have to be
light on your hand. That is, use less pressure
by painting this. Otherwise you will end up
reactivating the underneath. So Jane clipping all over the world have
been with the school. Wherever that is white
or the highlights, I'm using a light
wash of the wood, the same flag brush. I'm not splat dating
the goal splatter in the background and try
avoiding the gift box. You can see how lazy I
am to not even cover the gift box with another
P, but our tissues. It seems like I'm
doing some examples. So try avoiding the box. I can't get enough
of this plateau, so I'm doing a little more. So trying to wipe some of the extra plateaus
on the box with my fingers and retouching
few of those spots. So we are done and let's wash our brush now and remove
the masking tape. Either drip a little
of the people. This is also because
I did it real quick. And we have a final
painting ready. I'm so, so happy how this is looking because this was
completely from my mind. I know that there was a lot of experimentation that
went into this project, but it was really what
did the splatters are? Oh my God, so
beautiful to look at. So yes, see you in
the next project.
21. Project 4: Wreath it high!: Our fourth project is retained. Tie. The colors
that we will need. Our green, deep red to blue, go local, titanium,
white and lamp luck.
22. Sketch: I'm using the outline of the beam spokes to draw
a line since I'm not finding modelled
line for Christmas, read to this point. The background will be our sky. So if you want, you can make it smaller in size. So that more of the sky. But if you want them to be
the center of attraction, then make it larger. Dry land for them. So now let's draw the elbows down, cleanse proper. Also make the tie. Since I'm making these
diagonal lines with cross, I know a lot of changes. But this happens mostly when
you are doing something from your mind and you're
just not that way. So I'm reducing the
size of the day. Let's draw a bottom
part of the lamp.
23. Sky: So far this guy and I'm
taking white on my palette and mixing it with the right to form a light
blue for the sky. I'm having a little white on my brush along with the
blue that were mixed. And this is for
creating textures. I'm just a finger
tip of my brush to create a little smoother mix. Since the beans already dry
and difficult to glide on. And for the as and when needed. I have created a very
little amount of color mix because I'm experimenting
the color sheets on the paper itself. If you are happy with the
shade you have created, then just create a larger
mix for the theme. Because if the
shape that you have created gets over before
the painting is done, then it might be difficult to create the exact same sheet. Since gosh is a
forgiving medium, you can paint with this
blue all over the fleet, under Bot and then
paint on top of this. But I like but resolving
the weight of the people. This is because maybe it's my perception that the
painting is more vibrant died. I'm taking a look
at Prussian blue. I'm blending it with this guy. Can be done, end up
being dry or semi dry. Blending. You can use more paint on your brush and
then do the blending. If you can observe, I'm using more of the horizontal strokes. So for some texture
I'm adding blenders. And it's okay if that I like brushstrokes scene because
guy will not be Blinn, but rather have some
dark and light dawns. Similar to the Prussian
blue I'm taking, right and adding
white brush strokes. Since I created that I differentiate so my brush and I'm letting the magic
happened on soon. So I'm excluding the bowl
and painting the sky region. I'm not being very particular about just trying to preserve. I'm using I'm using water now. Whitespace is now cold with paint. All of the sky.
24. Wreath: I'm using my flat brush and lamp black. This black. Okay? Okay. But you can use any model using the same brush and a random brush
strokes in the form of so-called using a
stippling motion. Small, small dot with
the flat shader brush. Brush like this, you wouldn't create textures
like this easily. I'm just creating small dots of light brush and just
creating this effect off grass. I'm having no water on my brush and the pigment is
also ready less. With the same lesser pigment. I'm adding the color to
the bar of topology. This is like a
charcoal gray sheet. Let's take green deep
on a palette and mix black with it to
form a darker green. I'm using the same brush strokes now for creating
textures for the deep. You can also use a brush to
create this grassy patents. But in this way with
the flat shader brush.gov race would be faster. The brushstrokes are
diagnosed or each ago, which creates a good pattern. A imaginary center line from which I am taking the brush
strokes diagnosis to each of. You will understand this
better by observation. Okay. So you have seen how
does taking shape now and stuff like that. Green that you have. So these are just
seemed brushstrokes. I will add few more
and wash my brush now. I'm now switching to my size two round brush. Size
two round brush. And I do have a dealer brush. Mixing white with
green will give you a lighter green like this. You can also mix white with the black and green mix that
we had created earlier. This one give us a muted color. And since I'm looking
more of a muted color, I'm mixing this with the previous dark
green and black mix. So maybe this is
the fourth layer. Now, I'm not using my flat shader brush
because I want the minute details to
stand out ready read. Random grass like lines arising from a single
point or a single line. Did not make them ordered, but they shouldn't be
diagnosed with each other. Not mosque near
underneath us completely. To look attractive. Lines for the bushes and not in
a form of cluster. Something that
we've got instinct. I am making small lines and
in different directions. Painting, paint and consistency. Do not forget to add a
few small whitespace. Some white enacted
a slight green mix. After mixing well,
as competitively. Previously you also do not forget the key off realism. We just look like. I'm making some of the
smaller lines in the form of rising, promising good point. Look really beautiful. Almost done. A few finite, I just feel bad.
25. Bow and Details: So today I will be
showing the ball or not. So this is the exact same book, but just in a bigger size. They get off the
outlines of the book and the rest is ready to
fill it up with red. Since I want this region
to be highlighted, I am painting it with
lighter pigment. That is, I'm not taking any
morphemes for Donna fresh, but rather using
the leftover ones. This will give a light
wash of the same color. You can also use water
to dilute pigment. Shadows, mix black with. So since this isn't
beneath the first one, I am placing the shadows are shadows to the board. I'm increasing the depth of I am using light
amount of dollars. When I'm using techniques like the
one I'm doing now. It looks really pretty dark. Shadows as more tasks added
to the beauty of the bowl. Let's paint the
bad Eastman goods. For the highlights
you can use or less a pigment painted
completely with red. And then later do
the highlights with white or white space
in the center. So we're going to
use the same black, red and mix for the shadows. So you can see shadows. Okay. I added this to all of the lines and moves
in dry brush strokes out into the blood was
also not recorded. The cost of storage problems, but it was nothing Meijer and just the outlines for the book
and our plans for the bar, which was done using a
uni-ball syllable open. After doing the dry
brush strokes with world and make some white
highlights for the babies. Just 11 tiny dot on
each of the betas. You can avoid such
minute details. So we are done
with the painting. Let's take off the masking tape. So it is a project we take high. And the golden sparkle
is amazing to look at. I must say the
brushstrokes with golden has added a lot to the
beauty of the beat. So thank you for joining and
see you in the next project.
26. Project 5: Got Sparkly Decorations?: Our fifth and final projectors, Gore sparkly declarations. Let's see the colors needed. So it does green, deep, madder lake, red, burnt sienna, titanium,
white, and black.
27. Sketch: To start with the sketch, you will need any round object
I have used around Lidia. So using any round object
that you have drawn around. So that is approximately
one to two centimeters on the left and right. So make a bubble of this size. Make a dot cap for this. Make two vertical slit. And then may call it is
under slit below this. Join this basis of the
horizontal slit with triangles. Make a loop for the above
value to hang onto. Then a string through
which it is hanging. Let's make a round
period string. So on a string make this round balls with a
little spaces between them. I am Adi shaping them
into proper circles. So even have grass
for leisure as well. So this is just dotted
lines for those. I'm making another string good. This time I'm making it a bit smaller in size compared
to the first one. So we will have
some foliage duress when we are done
with the sketch.
28. Background Foliage: So let's make our
light more cashier using burnt sienna color. I haven't mixed
white. Would burnt sienna using my
three-quarters brush. I'm using a flat brush, but you can use
around Russia's well, you can use any shapes
of your choice, but make sure it is
lighter in color. I have to write a
little after bone, sienna and formula
lighter more comics. Paint the background
using this more comics, excluding the Christmas more
but under beaded string. Okay, if you paint on top of the Christmas
ornaments, just died. The light macaca
there is over NAM, so I use water, use glucose. It does not matter to have the background color everywhere. As the foliage will
be on top of this. Only few spots will be
seen as the background. And hence we had done this. Otherwise, even white
would have been fine, but I didn't want it
to live it clean. So I went with this light
macaca layer instead. I'm using black now, as you have seen in earlier
projects for the four liters, it is the forced or the
underneath, basically a folder. So you know how this is done. So it should be in the form
of some leaf-like structures, blobs of paint, and just make
some bush like structures. So you can see how
easy it is to create such structures with the
help of a flat brush. Just adding blobs of paint. You might be wondering
what I'm doing right now. A few brush strokes with black, adding some more black. And observed that
the outside soften blobs of paint,
dry brush strokes. I am mixing black with
green. Next scientist, just few places now. Wash our brush now and remove
all of the black pigment where I am now taking green deep directly
from the painter. So like we have seen in previous
projects, may find nice. This is our second layer, so it won't be
very much visible, but still you have to
make it very well. The structures of
leaves arising from a different point should be
very well nor destroyed. I'm using my round brush
to opt in the grass like leaves here. Imagination. Hey folks. The green can be noticed ready when the cos site
is not underneath. Don't. So make this fine leaves in the form
of clustered or Single, Single by just be random
and go with the flow. Also while loading deck add that to paint Interco
consistently. Because if the
mixes 10 or watery, the second layer will not
be very much visible. Okay? Okay. Mixing green. Using a dash. Make sure you do not
hide the underneath. Okay. Bump, bump, bump, bump, bump, bump, bump. I'll turn my foot. Washing my brush ready to form. Even lighter. Shade is start off a sage green. So I wouldn't make very fine. Also do observe
the brush strokes. Like four stops off all of this process to
understand it better. Because if you both civic
when you will render it well. Okay. The last because it does a bit I would say but
a bit challenging. But just trust me. Okay. Okay. She does have different point. So I guess this was a 40-year
and we are done with it.
29. Christmas Bauble : Father Christmas Bob, I'm using. But you can also use this soft shadows
and highlights. I'm outlining the ball and
then filling the space. I'm making like a bar
edition yard and showing the sensory late
acid reflection. Most often bytes are
being reflected back and this would reflect
the light objects. You could also own
reflections for dark objects, but I will go for
the light ones you. The method remains
same for both. Yadav, I added water to dilute
the pigments are needed. I'm going to be dividing
this reflection with the line like this. Blending two reflections
might be only going complicated so you
can make one instead. So from one direction to the adult. Walks through our doors. Sandra. So wash your brush. Clean, damp brush. Use black for the shadows. Make sure you're not using
a lot as it will be. Using shadows. Oh, nice. I'm using some more Christmas Babu top side with more of the
shadows like such. Then continue with
the same brush. I haven't washed my brush
now we are done with Docker. Forgotten to add some shadows now using the same brush. And we are done.
30. Foliage Layering: To add another layer
for the Fourier, add some white to the
previous late green mix. The loading is reticent in
such cases as you have to adjust light in
the previous color by addition of more
and more bite. By addition of some green dip, I have created a fresh
light green cheerier now. So by now you know how we
have to walk on this door, observe how am I making their structures arising and different points
on a single brand. But ask, few are
in the form of a clustered arising
from a single point. Let me complete them. Anyway. Testing. Okay. Okay. Consuming process. And hopefully with that company, okay. We will have a design on
top of this with metallics. So for that I'm using are
Benson and marking on line, you draw two lines
are the same dose of debacle between which there
will be some designs. I'm making few goals. Might you can make any
design of your choice. You can add any
designer first choice, like Flaubert's leaves, etc. All follow the design that I'm showing
you if you like it.
31. Adding metallics: I'm using for the boy period, chin on the ball's directly
in a thick consistency. We're going to be
adding the shadows and highlights on top of all of these so-called, and also add the
copper to the string. And using a tiny black, I'm adding the shadows. You can also add a black
forced as shadows. And on top of this ad, you will see that after
waste that you find easier. I am painting using
water techniques. Do not forget to add a string that connects
all these beads at the bottom now with black for the shadows, and then fill it in with black on my brush. So I'm removing the
excess on the dish using GAAP, but black
paint has dried. You can be my going over
it again and again. I'm adding some copper to this medium as a test
done, you're ready doc. Now connecting all these bits
together with the string. Wash my brush now and get tao1 Madonna USA scoring mechanics for the string that is hanging out Christmas Bob, and then find using the
brush that you own. So during off that gap. And then finally to the cap. I'm adding a little
less ordinal minutes. I'm now using a Docker goal, which is to income
for the shadows. Previously I had used, which is a little
lighter in comparison. So I'm adding to the designs
of the CCAP, as you can see. Also use it for the
ring and the string. I forgot to add
stamps for the fall. So I'm adding it now. I'm using asset will stand out very well
on this background. I'm going over the line
again to obtain us more. Leaving some space for designs. I'm just going with some goals. I'm making it. I'm adding some leaves. Now on top of this design for the highlights. Yeah, done with them.
32. Final Highlights: As the final layer, I'm using more of the white and awaited little after green. I'm adding water for
us, Muda consistency. Welcome back from complete them for that. And those are perfect. And complete the curriculum for that company. But something from
complete them. Hello and welcome everyone. I'm not speaking a lot now because maintain
as an observation. And I hope by now you
have learned how to paint the elements using gosh. If you have any questions
related to the class, feel free to ask using
the discussion board. I am always happy to help. I'm overlapping the
Christmas marble with more and more
highlights here. This will add depth to our paintings and
give it the look. We just made our
photo-realistic look. Hi folks. A special case of complete them. And those are perfectly fine. So you can find a libor
shadows now as we are done. Let me take this
gap side, the side. And now let's do
the loving thing. Remove this masking death. Oops, I did ripple
middle of the paper, but I did so I am being
ready ambition now, bow to you, please be ready to scaffold by removing
the masking did and the last one off. And we have a
beautiful painting. This Christmas
bobbin has my heart. It looks so damn beautiful because of shadows
and highlights. It has added more
after realistic Dutch and the medallist compliments
all ready read on this. This project had a
lot of leading and idiots and hence was the
last and the best one. Maybe. I hope you like the
class and it was helpful. Thank you so much for
joining the class.
 Mayuri, ARTrinkets I Watercolor & Gouache Artist