Transcripts
1. Introduction: But in his back and
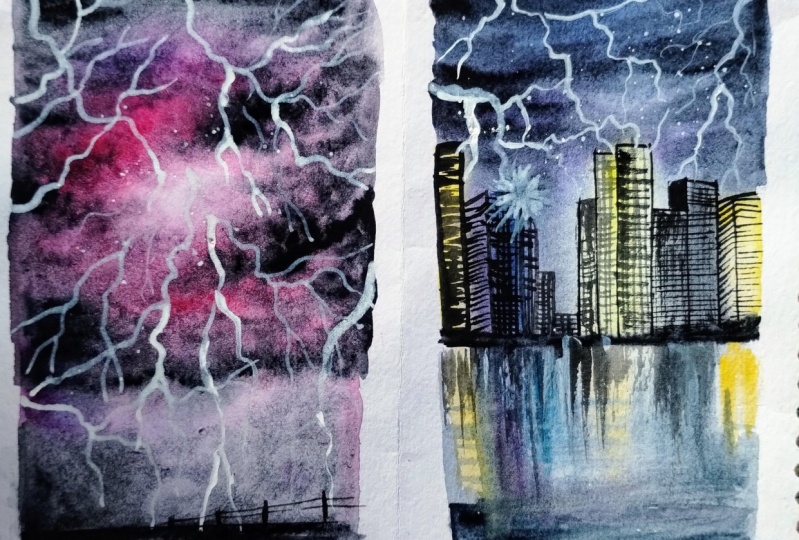
it's terminating, exploding with color and light, NACA, dazzling
fireworks display. I love to understand
as it make me feel like I have captured
be soft mother nature. And if you do to join along to capture the beauty of
thunderstorm into our painting. Hey guys, I am an
office-based in Guam. I welcome you all.
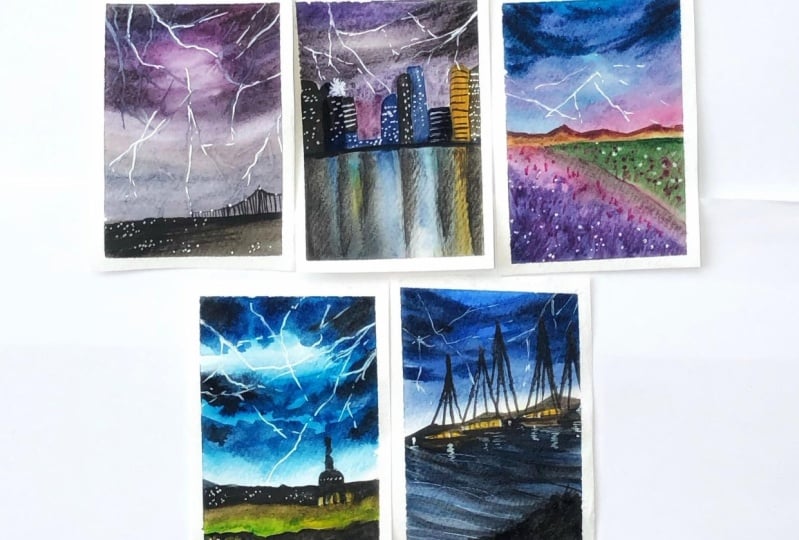
In this class. We'll be installing landscapes. In this class, we
will be painting these five new default
to understand projects, watercolors, in case you're new yard and watching my
class for the first time, we can get to know me more
by connecting on Instagram. You can first look at the
materials that we will need for the projects and then move on to the basic
watercolor techniques. As this class is a complete
beginner friendly one. Also, in-between the
painting process, I have shared some tricks
and tips to help you with the slightest of the things
to achieve food deserts, storm is coming inside. So come join me in this
class and see you soon.
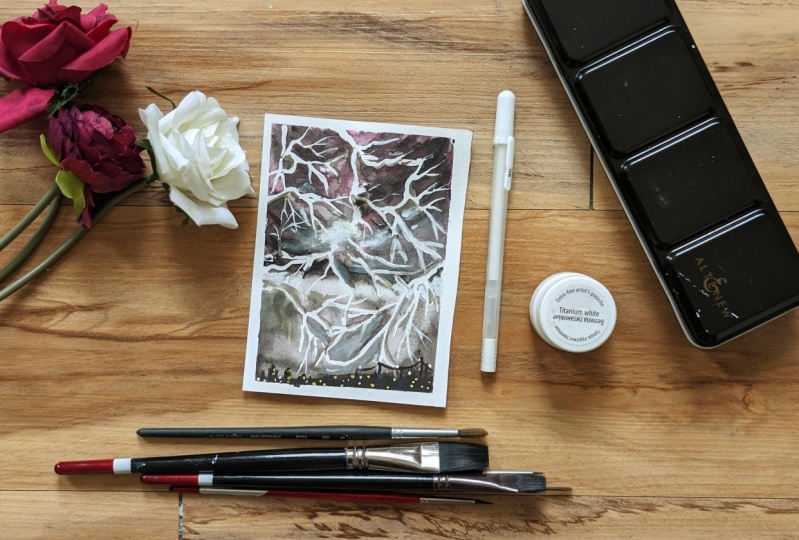
2. Art Supplies: Let's look at the art supplies. Forced. The most important part of any watercolor
painting is to people. For the projects, I will be using Arches watercolor paper, which is 100% cotton. And you can see it
is 300 g/m square or GSM or one-fortieth moms. In whichever unit
you understand it. It shouldn't be
less than 300 GSM because we will be working
wet on wet layers. I'll be using this
April size in half. This paper is cold pressed, so that is very minimum texture. You can also use a lot of
green texture if you like. Moving on to the watercolors, I will be using this sonnet, newer palette by new sky up. And you throw that at 21
watercolor pans in this set. All of them are highly
pigmented and Dr. bright. The pens come in this
metal tin container and a shade card for reference. We won't be using
all of the shares. So relaxed because you can use watercolors are
shares that you own. Similar shapes can also be
made up by color mixing. So do not worry. This container
half-full works you, which are feasible
for easy mixing. So I'll keep this
set aside for now. Apart from this set, I will be using
some other sheets. So this shade is neon
pink from White Nights. I had opened it long back but I was really has turned
to use the shoe. The shoe does kind of VOC bright and so perfect
for a lightning flash. Also, I prefer
using Payne's gray or black and this set
does not have fun. I'm using one from Penn Gox. Moving on to the
next important part, which is brushes, I'll be using this three-quarters flat
brush from Princeton. It is really helpful to
obtain some flat streaks. I'll be using this size eight round brush by
Princeton majorly. You can see it has
a very good finder. Also, I'll be using this size for mop brush, my brush stroke. This is completely optional. I prefer some plots with this mop brush rather
than a round brush. For the details, I will be using this size silver
black velvet brush. Also to secure the projects, we will need a masking tape. You can use any size. We will need a pencil
for the sketches. We will also need a scale or a ruler for drawing
some straight lines. A spray bottle, this is
completely optional, but I like using this. I will be using masking fluid. If you do not have
one to not worry, you can use a masking
tape instead. I got this masking fluid
for a reasonable price. While using masking fluid, use brushes that are synthetic
and old and not of use, we will need a jar
of clean water. Then to fix our project
onto something stable, we need a board which is stiff. If you're using
watercolors from cubes, you might need a
mixing palette or a dish. That's it. See you.
3. Techniques : Let's start our exercise with
wet on wet technique post. For supply of clean water. Make sure it is even and there
are no puddles in-between. I'm applying gray color, which is wet-on-wet because the paint is wet and I am
applying on a wet paper. This is wet on wet flat wash as there is only
one color in work. Next I'm adding small dots for
clouds with greenish blue. Since the layer is still wet, it will form wet on wet. And since there is a lot
of water on my brush, it will form larger clouds. So the correct way is to have little amount of
water on your brush. You can solve the excess on your tissue or even wait
for the people to dry for a bit so as to let the
paper fibers so the water, the more concentrated
your paint is, the mode you will
form smaller clouds. And if there is too much
water in your brush, then there will be larger rooms like all hairy
structures for me. My background is too wet. That is why it is warming
heading structure. So you have to like
wait a minute. For the gradient wash. I will also be expanding
wet on dry technique. So you can see that I
did not apply water on my people first and directly
painted with a paint. So since the paint is wet
and the paper is dry, it is wet on dry technique. Gradient washes off
one color on me. But I've shown your blending of two colors for your
understanding. After just use left
to right motion of your brush starting
from top or bottom. A dry brush technique
involves soaking the excess water
on the brush with the help of a tissue or tablet. And then it is just
scratching the size of the brush or the belly of the
brush on paper like this. Never used tips for such
purposes as you might. Brushes. I'm showing
a small part of wet-on-wet
reflection technique. We will be using dry brush
technique in combination with this further
reflection technique, it is easier and it can be
understood that I'm just placing the colors side-to-side and they are mozi on their own. Masking fluid is
very helpful when you want to retain
some areas white. I'm drawing a building. And if we will call this, width, must include using an old
brush that is not enough. You have to coat it evenly
and let it dry completely. And then only you can
paint on top of this meal. Not all people, some
masking fluid friendly. So you have to test for people
before the final project. And if you do not have a
Muslim fluid, do not worry, you can use a masking
tape instead, and it is available in
cheap for major parts. You can use masking tape like this and cut out the
shape as desired. This will also help to retain the area white and
you can paint freely. Glazing is a technique
that involves painting a layer on top of
an already painted here. I'm showing a block, or maybe you can assume this
is brilliant. I'm painting. I will wait for this to dry, to paint the second layer. Now, I'm just quoting another
layer on top like this. This technique can be
used in various ways. The lifting technique, I'm applying a layer
of paint forced. That is a lot of
purple on my brush. I'm doing a third year of Lizzy. Coming back to lifting. I have taken a clean damp brush and I'm soaking the excess
water on the tissue. Just press the belly of your
brush and lift up like this. Wherever you want to
lift the excess pigment. A synthetic brush works best
for this lifting technique. And you can also practice if
you're not familiar with it. You can try different brushes of different sizes and try and
see which works best for you. For splattering
technique, I'm going to load my brush with a lot of paint and water and tap
on the brush like this. This was on dry surface. Now let's see on wet one using red now I will splatter on this white background and you can see it is forming blooms. Also, I have switched
to a smaller brush, which gives me the
smallest platters. The quantity of
water in brush will also determine the
amount of plateaus. And good size. Negative painting is when we are working in the negative space that
is around the object. Now e.g. these are buildings and have to show the lights
as the main object here, so forth, depending on the
color you want for the lights, you have to paint it like this. And then you have to paint with our darker values around this, assuming that our
windows and the lights. My object here is Windows
and I'm painting around it. Are we making horizontal
and vertical lines for the windows like this? The yellow part isn't dry yet, but I'm showing this on purpose to show that it
gives a faded look. So you can use this wet
on wet technique is also for such fine details. You can switch to a
smaller sites around brush for showing that gosh, are opaque watercolor
technique to paint on. First, I'm making a
darker layer for you all to understand how it makes a difference in radius
dark paintings. So until this dries, let's go back to
the mask technique. Since it is dry now, I'm painting on top of this. And you can see how it
resists water color. Now this layer dry and then we can take off the
masking fluid and keep. Coming back to the
Gouache technique. I have taken quick consistency, of course, and
painting lightning. Also, opaque, white watercolor, will provide the same
results as that of oh gosh. Let's take this off and you can see how clean
the results are. You remove the
masking fluid with the help of a finger or eraser? There was a little paint on
my fingers which led to this. So let's use an eraser now. So using these techniques, you can paint any
lighter areas like this. We are done with our
basic techniques. So let's just take
off the masking tape. Now. Let's have a recap of all the techniques
that we have learned. Forestry, so wet on, wet for clouds, then gradient, wash, dry brush technique
and reflection, masking. Tape technique for
retaining whitespaces, then glazing and lifting, splattering on wet and dry surfaces and
negative painting. Finishing off with the gauche
or opaque watercolors.
4. Masking tape : So let's start by taping my
paper down from all DHS. Since in watercolor paintings
with a lot of photo or techniques like wet
on wet or light washes. Masking tape is very
helpful to prevent buckling of the paper and also it will provide neat
and clean edges. I'm using normal
masking tape and it is readily available and
also cheap in price. You can use border
thickness of your choice. I like having a thin
to medium-sized border for my paint to ensure that there's no gap in-between the masking tape and the people that are
on your fingers or a scale over
the masking tapes. Once again, we can now
start with the project.
6. Sketch: We will start our sketch
by drawing a baseline. It is sloping downwards
towards the right. The thunder lightning
be loose with the sketch and just
make some wavy lines. So at this point, I will have my origin of
the thunder, lightning. The father you hold your pencil, the better you will
achieve results. This is only for
achieving those patterns. Whereas when you want
some detailed ones, you have to hold your pen so
you towards the right now, I'm sketching only few main ones for applying masking fluid. On top of this. I am making this a bit lighter
with the help of an eraser. If you have kneadable eraser, it will be well and good. After taking off the
excess graphite marks, I will apply the masking fluid.
7. Masking Fluid: I'm using masking
fluid by Bruce Toyota. Keep your hands ready light while applying the
masking fluid. Because we need
thin, fine lines. If you do not have
masking fluid, do not worry as gosh paints
will come for the rescue. All you need is a white gouache, as it is opaque and can be
painted over the previous of. Also while applying
masking fluid, make sure you use an old brush. Lightnings might
appear as roots as they branch out from
taco to final ones. Apply this similar knee
on our sketch lines. After you have done
applying masking fluid to all of the main lines, let it dry for at
least half an hour and then we'll proceed. Being being the project.
8. Prepping paints and paper: Let's start the project by prepping the paints
and people with water. Spray bottle is very
helpful for this. For this project, we
will need neon pink, and this shear is
from White Nights. I'm using Payne's Gray from Van Gogh box and mixing
it with the neon pink. This is the darker shade. We will obtain more
of a lighter one by mixing more of neon
pink in the mixture. If you do not have neon pink, you can also use carmine or operator or any other
similar colors. Being ready. And now we
have to prep up April. I'm using my
three-quarters flat brush for applying water
all over the people. Apply it evenly. About the horizon line. Apply more and more
water eventually, as the fibrous we start absorbing the water
on the surface. You can also use a
spray bottle for this. As it renders even distribution
all over the surface. Using the flat brush, I will even out the water
on top of the horizon line. The water on the surface should be even and have a
machine like this. If there is any
extra blob of photo, you can see it with
the shoe or clot.
9. Color Swatches: Let's watch out the
colors for the project. For shade is neon pink. And the second is Payne's gray. You can also use some blank if you don't have Payne's gray. We will also need
some yellow deep.
10. First layer: I'm using the pink mixture now and applying random
brushstrokes. Just go with the flow of
the paints and water. This is the area
of a region where the light will be more bright. So try and keep
this phase right. I haven't washed my brush and directly using the dark
Payne's gray, I'm sure. I'm applying this
directly on top of the previous pink and
letting it blend on its own. I'm now using Payne's gray directly for adding more
contrast to the sky. We will add Payne's gray
in different layers local ballot for adding
depth to the sky. This time, I will take Payne's
gray with lesser water and more of the pigments that
will add more of the color. Now just beneath this pink, I'm adding darker Payne's gray. I'm adding some brush
strokes from the site. I'm adding some
darker stormy clouds. All you need to do
a snap your brush, like how I'm doing. A mop brush will be very
helpful for forming clouds. Are Payne's gray
directly at the bottom. I have some neon pink
left in the brush, but it is completely okay. I'm trying to keep
the areas near the lightning byte just
to show a glow effect. But if it's like difficult
or not possible, then you can just paint over. It's okay. Initially, I'm
adding a lighter value. At almost at the middle
of the painting, we have our darker line,
that is the clouds. And beneath that
it is like gluing. The glow is all
from the lightning. Add some darker values
at the sides like this. And I'm just trying
to maintain a glow around the masking fluid by
keeping the value slider. And if at all it does
not happen to not worry as you can use
lifting technique for RSQ. For every time you lift
paints from the people. Wash our brush properly
in clean water, wipe it with a clean
towel or tissue, and then use it for
lifting techniques. Now I'll form more
structure clouds by using darker Payne's gray and
my darker Payne's gray, I'm in more of the
pigment and less of water just from smaller clouds. Now, with the help
of dabbing motion, since this mop brush has a good, fine tip, I am able to make
smaller clouds as well. If you're not comfortable
with the mop brush, you can use a smaller
round brush as well. So similar to the
previous steps, I'm going to add depth by adding few more darker
values of Payne's gray. So now that I have
finally washed my brush, now using a clean, damp brush, I will lift on the
hairy structures. Are we adding a bit of touch-up with
Payne's gray here? I'm lifting some paints
here from the origin side, but it looks like the
paper has dried up. Now. For some touch-up, I'm adding the Payne's gray and
neon pink mixture. Since the paper has
got a bit too wet. Now I'm trying to lift again. We will paint a second
layer on top of this. Since the paints have done
very light and shade, and I'm not really happy
with how it looks.
11. Second layer: For the second layer, I will impact my people by
using the spray bottle. Spray bottle will
helping we go writing of the paper compared to a line
with the help of a brush. Okay, let me keep
this brush aside because those paper to
listen now, to do the job. Now I'm taking the excess water with the highest buffer tissue. And the machine shows that
that is unevenly or photo. I'm using Payne's gray
with good concentration on the brushstrokes and
the areas that are to be dark are similar to
the previous ones. I haven't used my mop brush
for the second neon because mop brush tend to hold more water and less
of the pigments. And hence, I have switched to a round brush of size eight. I will tell the
board from left to right to let water and
paint to the magic. Now, with a clean, damp brush, I will lift the excess pigment
from the glowing spots. Make sure your brushes clean
every time you lift pinch. You can also use tissue by dabbing like this
to lift off paint. I'm adding some more
concentrated Payne's gray here. Now, keeping a masking tape here at the bottom of the board, I will obtain Oslo or
tilting the board, which will let the gravity
work on the beans and water. This method also leads to a natural blend of the
pigments and the water. I'm adding even smaller
dots now as clouds. With the help of a
clean, damp brush, now, I'm softening the edges. And the ones I've softened it, I'm going to add more
Payne's gray at the top. My paper is now semi dry and the strokes can be
distinctively scene. So I'm trying to add a few brush strokes like this by using the
size of the brush. And just almost like scratching with the help of the
belly of the brush. Why is the paper
is semi wet paint? The bottom part like this with
Payne's gray for the city. I'm dragging the
paint downwards. I'm just filling it in. See you next in
painting the details.
12. Details : Let's take off the
masking fluid, either with the help
of your fingers or with help of any reason? Always test your masking fluid on the people before
starting out. Few papers are not very
friendly with masking fluid. That is mostly handmade papers, which are 100 posts important. I'm now using white gosh, no good thick consistency. Just be light on your hands. So have you observed roots
of small lines closely? They are initially thicker and branch out
into thinner ones. I'm just doing it randomly
as a power like it. So all you have to do is mix
them EBV lines and have fun. You can also use a white pen for this purpose to make
a thin, fine lines. I'm adding these white lines to darker areas will
highlight more. And I guess that's
enough of a lightning. Just beneath the
force clear paint, another layer with a
darker Payne's gray. And I'm just filling
in the bottom part here with the
leftover means green. Now with the same, I'm drawing
some bars for the bridge. Draw lines like this and
connected with each other. Now start making some
grass like Patton's, just from where the
second year started. Now to the towers of the great. I'm adding some light. I'm using yellow
DPO for the lines, but you can use any yellow. Add few dots randomly for depicting the
city lights as well. I'm using white gouache to add more highlights
with the lights. Now. White dots will show
more glowing lights. That will create a better
night scene of the city. Let's wash our brush now because we are done
with our painting. I felt that maybe the lines
you should be darker. So I'm just adding
a few of them. See you in the final
review of our project.
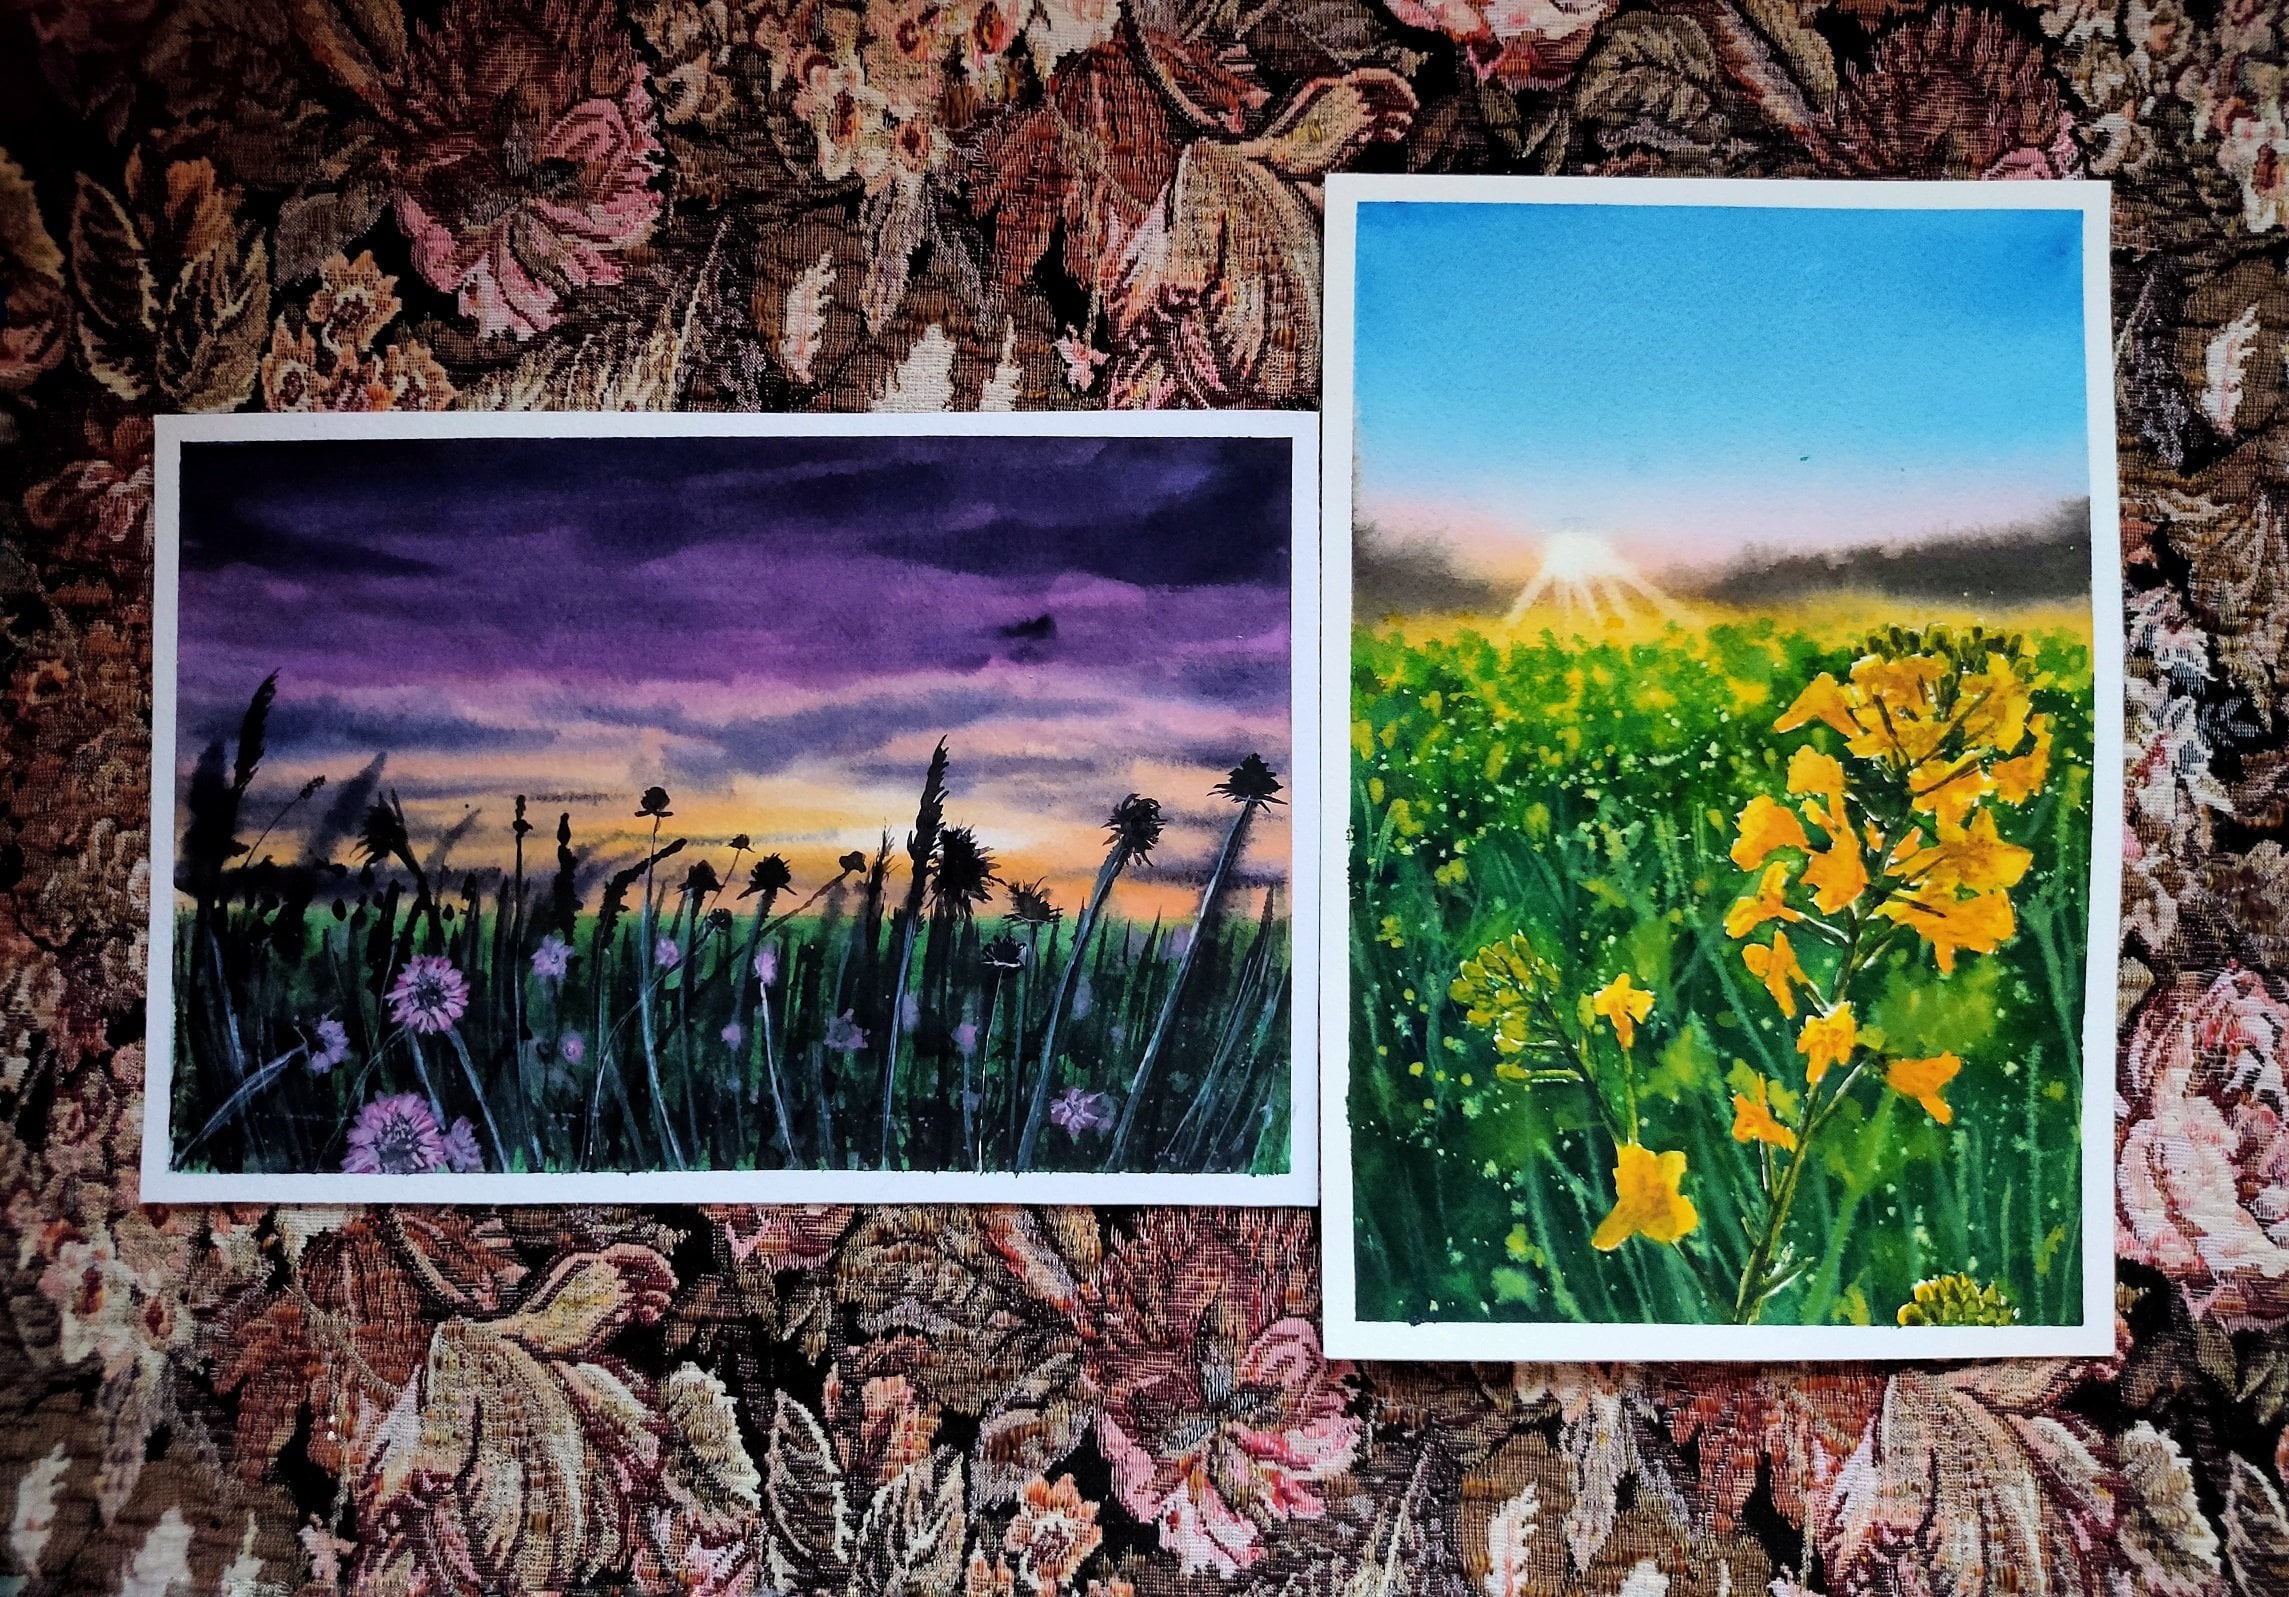
13. Final reveal : Hi, I'm always so scared to
remove the masking tape. Since these are Arches paper, the people want to rip off. But always pull at an
angle and the patient, while taking the tape off. We have a clean edges. And I'm really loving
how the project looks. I hope it was fun to
try this project. I'm awestruck with the thunder, lightning and how it looks. The glowing this car
is so beautiful. We had our original the
time to lightning from where all of the time
that I mean, arises. See you in the next project.
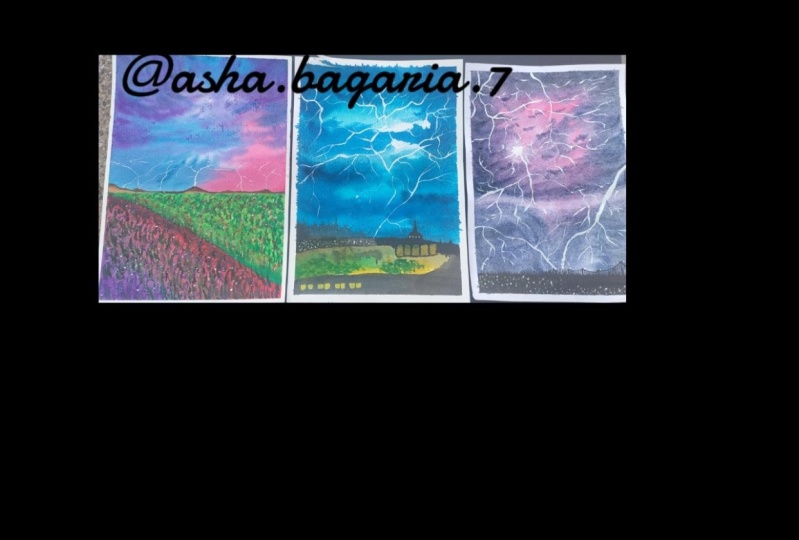
15. Sketch: This project includes
a city with reward. So our baseline for the river. Now all you have to do
a sneak some blocks, that is, draw some
buildings over here. The sizes of your brain
links can vary from mine, it's a completely okay. So from the baseline, I will draw lines upright and then connect these
with each other. I think it is better to
use pen tool directly then using our skill
because it might save time. Draw some bushy structures at
the bottom of the breeding. I'm drawing some smaller
beginning complexes. Now, let's align all the pencil sketches
into straight lines. And that's done.
16. Masking fluid: Let's start by applying masking fluid over
the building it, yes. You can also use a
masking tape and sturdier if we do
not have Muslim. If you're using masking tape, you have to first cut out the desired shape
and then applied. You can also think
this kind directly by writing the sky area only. But the movement would
be very restrictive. So if you do not have
a masking fluid, at least use a masking
tape for the movement. Once you have applied the masking fluid on
all the buildings, let it dry for at
least half an hour. All masking fluids are different and hence the drying
time is different. So you have to check
the drying time of your masking fluid. After this is dry, we can start painting
with this guy.
17. Prepping paints and paper: I'm prepping my paper and
pins for painting now. Use a good amount of water
for wetting the paper. Because once you apply for
the fibers are going to solve the water as soon as the water comes in
contact with them. This is why we have
to keep repeating applying water from
the nearby evenly. Once you have a good sheen
on the paper, it's done.
18. Color Swatches: For this project, you will
first need violet deep. You can use a new
wireless that you have. The next year. It is burnt sienna, yellow medium, or you can
also use cadmium yellow. Next is yellow D, you can add a little orange. The yellow, bluish green. Last year is Payne's gray. You can also use black
or neutral tint.
19. First layer: We will first use Riley deep in a very light
concentration. Stan map line from
the top left corner. And using a left
to right motion, come at the bottom. Just file it will
add Payne's gray. Now in very light concentration, sky will be very dark
with stormy clouds, but we will do that in the ears. Let's do the placement of sheets and then build up layers. Now you'll be in a very good concentration that is less of water and
more of the pigment. And just make some
random brushstrokes from left to right like this. Using the same brush and
blending with the Payne's gray. Now take a very good
concentration of Payne's gray and make some random brush
strokes in the form of clouds. Just some dabbing motion. And the paper and portal
will do its magic. The pigments will flow with
the direction of water. After making clouds
at the top makes some brush strokes
from sites like this year with a darker Payne's gray at similar brushstrokes
and build up layers. I'm trying to maintain a white
lawyer towards the right. You have to just try awarding
mixing paints over there. You're white glow can be
any left, right, or center. Now I'm making similar
brushstrokes from the top here. I feel the top part needs to more of a darker Payne's gray. So I'm adding a little
bit of the brush strokes. Now I'm making small low clouds. I will be repeating
the same brushstrokes. Only thing is I'm building layers by layers
with Payne's gray. Let's make some small
stormy clouds here. Then making some treat and diagnose brush
strokes like this. It looks like my paper
and I started to dry. So I have to walk up faster. Makes a little violet
with any brand that you have and add some brush
strokes at the bottom. Some euro spent
for some contrast. With a clean damp brush. I'm lifting some paints. Your father lightning. If your paper has dried up, it's okay because we will
be also painting a second. This is not a necessary step, but it adds a glow.
The lightning. Sum that up yeah, For the left top parts. And see you in the next block.
20. Second layer: For the second layer of the
sky, gently apply water. Do not be too hard
while applying water. Otherwise, you will
end up activating the liver and pulling up paints. The top parts will die out for, so apply more water. Once I'm done writing
the first year, I went to the excess
water that offered issue. Whenever that is more of water at the sites of the
masking tape that are more chances of the water coming back into the painting
in the form of blues. So to avoid this, it is best to the excess
water that is dead. And the painting, I will start with paints gray and a darker version of
it for the clouds. The brushstrokes and
just left to right tapping motion and
completely random. Add some at the top of this
violet clouds as well. Since my wildly tan brown. Or when I'm making some more
and adding it to the sky, I'm lifting a little
over a year for sure. Are lighter clouds. Just to light in the
sky a little more, I'm lifting up, But
you can also use a clean damp brush
instead, like this. With Payne's gray, I will add some more contrast
two sides bomb. Also make some darker diagonal and vertical strokes like this. Add smaller clouds as you like. Would that go for clean, damp brush like this for
the thunder lightning? If your paper has
dried up, it is. Okay because this is just for
w of the thunder lightning. It is not a required step.
21. Details: I will post mates.
Who thinks outline. First, follow the sketch
that you have done. That will make it easier for
understanding the buildings. If you're afraid to use a brush directly or for the outlines, you can use a micron pen,
which is waterproof. With a micron pen, your work with me much easier and your time
will also be saved. But I prefer using our brush. Painting lines with brush
directly helps to boost confidence whilst also improving the muscle memory of your hand. So for the first building, I'm just filling it up with
horizontal lines like this. Once the horizontal
lines are done, I'm going to add vertical
lines or dots in random. This is to show that not all the fluids are
rooms of the building or let the white part will show or resemble the
lighting of the floor order. For this Berlingo, I'm showing front as well as Bo
angular side view. Draw lines as soon as possible. This is a really good
exercise, I tell you. Just don't be afraid. Nobody's judging New York. This will make you
understand how much you too long. For
some variation. I'm making like
vertical stripes. You then making a
block in the center. Then make some vertical stripes on the bottom lines as well. Now with the bluish
green are making some horizontal stripes
on this breeding. Using yellow medium, I will
paint this full length. You can leave some white
spots in between as well. But this bringing
other paint using dry brush technique with the white and yellow areas
will represent light. Just some contrasts and adding
yellow deep besides, you add some yellow dots
to this burning as well, resembling light. I'm adding yellow paint
randomly onto the buildings. I know this is all to me
by just trust the process. Using bluish green, I will
put some parts of the Berlin using glazing technique. I will paint on this
already painted lines. Using Payne's gray. I will add some more
details, lightest lines now. First I'm drawing the
outside boundaries of the buildings and then pulling it with random lines,
horizontal or vertical. And this is happening
in complete random. So please, please
sit back and relax. Forced, absorbed, and then I'm sure you will be
definitely able to do it. So our only AMU for
the Berlin should be to fill it with
random lines or stripes. Keep waiting. The
tone of Payne's gray. This morning, I'm going to
make some small center lines. And from those, I will extend
outwards like Navy Yard, you have to imagine
parallel pixel columns. We can see three
sides facing us. I'm now mixing dark
lines for a better view. It would also add to
a darker contrast. For this bending.
Now, it will Payne's gray and they will need two
spaces with the yellow. Once we are done with the basic
outline of the buildings, will be more
contrast with beans. We are painting
over the same line. So again, what I'm
believing the contrast, I haven't washed my brush now and take a good amount
of yellow deep. We will add this to the top of the buildings. Asked lights. Just use dots at the links for assembling
the lights at the terrace. Now from distorted
lights will make some rays are quotes
like that of the sun. I'm adding a little bit
of bluish green neon because I didn't feel
it right this way. Also, I didn't want it to
break down. With Payne's gray. I'm drawing a line just
below the buildings. Do not get confused when
I'm seeing it is painting. If you're not confident
enough to make finer details, you can also use a micron pen. Once none would this
horizontal line, I'm going to add some bushes
just on top of the line. Let's now add some highlights
using white quash. Add small white dots at the
center of the yellow lights. This will be for a more
of a concentrated blue. Then you can add white dots
randomly for the breedings. Just make sure it is inside the square blocks or the nurse. But the light, you can add as many or as little as you want. Similar to the previous steps
that we had done in here. Now with white mix, some arrays are quotes. Maybe I'll do this
for all because it looks better with white.
Instead off the handle. I will start the thunder, lightning forced
with the mafioso. From this main branch,
Yahoo poke out. My branches are always turn
out to branches are good. So I'll start on
one up right here. You can see how we
glean a motion. I'll make one more
crazy wavy reviewer for the final branches. And you can also use and that's it. We're done with our sky.
22. Bottom lake: For the bottom lake reflection, we will start by applying water force applied
evenly on the people. For deflections,
we have to paint the exact same shifts that
are there on the top. For stem starting
with bluish green. Wherever I see bluish green. For the buildings. These are just simple downward strokes
and nothing difficult. After this, clean your
brush and take yellow deep and paint below the
breathings like this. This shapes will try
and mix together, but try and prevent it. And if it does not happen
and you form a green, it's okay because we'll be using Payne's gray for the rescue. So I'm adding it
wherever there are lines are the outer
boundaries of the buildings. Bill darker value
slowly in layers. I will go over some part
from the bottom as well. Now, if you've any area
and does not seem right, you can also corrected
using lifting technique. I will add some yellow deep
in-between the darker areas, show some lighter flexion. I'm mixing wider deep with burnt sienna and painting
it on the bottom. This will be the
reflection for this guy.
23. Final reveal: So let's do the final
reveal of a project. And you know, the peak
of masking tape gently. And at an angle. My table is a bit
cheeky for the moment. But I hope you like the project. This project was a
little overwhelming, but I'm sure that you will be happy with
how it turned out. Thank you for watching.
25. Color Swatches : For this project,
we will need blue. You can use a Prussian blue. Then I'll be using
OCR from this set. You can use sagittal and
blue as the alternative. Then we will need to violet. You can also create
your own purple. Then I'll be using this VOC, neon pink from White
Nights, sap green. I'll be using green
deep as well, but you can just add
blue and this sap green to form a darker
green, burnt sienna. And Payne's gray
or neutral tint.
26. Sky: Let's start with
the sketch first. So draw a line. The horizon line should be approximately
at half of the people. That is 50, 50%. Or you can even go for 40 to 60. 60 being for this guy. Then draw a diagonal line from the starting
point like this. Draw another diagonal
line just below this. Starting from the same point. Dorsum mountains of lactose
like this for our floral fee. And with some upright
mountains like this, we are done with our sketch. Let's start painting
the sky now. We will be working wet
on wet for the sky. So apply a good even
layer of water. Reapply, water as the fibers
will soak in the excess. Carefully outline the mountains
like this with the brush. I am reapplying the water
and making sure that it is even A-flat or hockey brush is very useful for waiting
with water like this. Since my brush is a little smaller to the size
of what I'm painting. I have to go over repeatedly. The sheen of the people
should be even like this. I will start the sky with neon
pink and decide like this. Just use dabbing motion and
apply paint at the side. When you move upwards, paint with a lighter
value of the neon pink. You can also use
crimson or calm mind. I'm initially going
with the darker shade and then proceeding with
the lighter values. The placement of the colors
will be complete random. Do not go for a darker values
at the beginning itself. As painting in layers will help in adding depth
to the painting. I am now heading. We can add
any blue of your choice. So at the bottom, I'm adding a darker
shade and then I will paint lighter
values at the top. I am doing this because
some of the areas in our sky will be gluing
because of the lightning. With a lighter value
of absorb blue. I'm drawing a line
here like this. The bottom of this clouds there
will be a lightning glow. With a clean damp brush. I will lift some of the excess
pigments that are here. We will go with
diagonal brush strokes at this glowing spot here. And I'll blend is too. I'm using left to right motion. And I'll blend this
with a clean brush here because the excess
of us and Think, Do not worry much
as the water will do its job of
blending on its own. You have to only make sure that you are working wet-on-wet. I'll be adding a little more concentrated neon pink
at the right corner. And if the blue
mixes with the pink, it is okay because it will
form a beautiful purple. I'm taking a little
purple from the bottom and adding at the top like this, because it's too much. Now taking a good, good concentration of blue
and to the top like this. And then come to the
bottom as the pain starts getting off
lesser value as seen in a gradient wash.
With the same blue, I'm marking a line
for the clouds. And then add some stormy clouds
at the top of this line. Do not go for darker values
at the starting itself. Make random brushstrokes as where you live for the clouds. Let's add a layer of clouds to this line at the
bottom like this. Then with the blue Add
diagonal strokes like this. Starting from bottom. After washing the brush. So the excess water
on a tissue and lift the pigments like this diagonally starting
from the top. Now, we are doing this because the line below the loop
notes is the glowing area. Next with wider deep, I'll add some clouds
like this at the top. Observed the brushstrokes. As the pigment value from
the brush is lesson. Now, I will move to the
bottom for the clubs. I'll sum on top of
this pink as well, like this, at this size. Smaller clouds using
smaller brush strokes near the lightning like this. There was too much pigment
at this side here. I'm taking a little and adding other clouds at other places. And do this by adding value to the previous
pope is now its own. Add a darker value of
neon pink at the bottom, and add some touch
ups if needed. Now with darkest value of blue, I'm adding some smaller
clouds on top of the previous existing purpose loves doing this or
painting in layers. We'll build a depth
in the painting. I'm adding clouds randomly, like some are small,
some are big. And in any direction. You simple brush strokes. It's like almost I'm drawing a line on sectioning the pot, adding some at the sides here. And also in-between and
blending the pink and the blue. Using Wiley deep,
I will further add the darker clouds at the sides. Asda new lessons I will
miss to the bottom Clouds. If you observe, I'm washing my brush very less frequently. Now for our final show stopper, let's add Payne's gray to the
top and all super contrast. Paint smaller clouds and ensure that the layers
beneath our visible. You can now finally, wash your brush as we
are done with this guy, only that we have
to lift some of the areas for the
lightning glow. So for lifting technique, always so the excess
water on a tissue or a towel and do not introduce any new
water into the painting. We will have only a little
lightning for this project. So only the glow from the clouds can make a
difference in the project. From the bottom point of the clouds lift a
little like this. And we are done
with our gluey sky.
27. Magical field: I'll be increasing the
size of the Florida. So in case you do a similar
line like me previously. I'm so sorry about it, but it's just a line. And this project is
completely from my mind. And right now I just felt that maybe I need a
more of the greenery. Then start directly
with sap green. The sap green from this naval
palette is very bright. I'm using wet on dry method and just applying
the green paint. Being completely with the
sap green within the line. I'm using a little Born sienna
and adding to this line. This is to depict some marred and to add depth in the field. Just add small, small dots like this that will resemble foliage. Use more burnt sienna to
add more darker values. If you've absorbed, the
dots are more towards the line and lesser
towards the top. Printing this line again
with leftover color. And it is not necessary
to be a straight line, just that it was
a demarcation for the separation of the
two colors in the field. As next, we will be
painting lavender field. I'm using green deep. I'm adding some foliage
or grass like pattern. Cover the entire Greenfield
with this pattern. Paint darker values
near other line. Whereas when you move upwards, you can use lighter
brush strokes. This random strokes as given such a fuller look
to our feeding now, using neon pink, I will add
some small dots as flowers. I'll be using a little
white watercolor to make some tasters sheets. Take some white aside and add
a little neon pink to this. You will get a beautiful
bright pink shade. You can also use
crimson, red instead. Mix well and in a
good consistency. And splattered on
top of the villi. Be careful to not
splatter on the sky. Splatter in small
clusters like this. As wild flowers. You can also add dots like this, but it will take a lot of time. Just marking the
oxide line a little. Next for the lavender reside, I'm taking some burnt
sienna and do this. I'll be adding some
neon pink mix well, and I directly using
wet on dry technique. Using neon pink, I will add
some like this and blend. This is for the
added contrast and texture that rest with the neon pink and
burnt sienna mixture. Now take some wider deep or any winery that you have
enacted the corner. Then blend well using sides
talks between the two colors. You can also add some water if the paper is starting to dry. The only key to better blending
is when the paper is wet. Some neon pink and blank again. Now using green date, some grass like patterns or
foliage for this as well. Also using a thick
concentration now sap green add some grasses
in a similar manner. Add wherever you feel it is a study that is no restriction
as such for the grasses. Just add the Binet blending
should be visible. Wash your brush well, and now let's make our
different basins sheared. So do some whitewater color, add some violet deep
and nickel-based till. Now, since there will
be a lot of splatters, I prefer covering the sky with the paper using
their dark purple. Now splatter some in the window until you can add some dots in a
line or living dose. I'm switching to my size
eight round brush now and adding some more white
watercolor to this previous. Take a good consistency and
splatter as much as you want. Well, some variation. Add some neon pink,
the space symbol. Smudging this other Dell because the splatters
are too big. Now finally, using
some white watercolor, I will flag it like this
in small, fine clusters. Also, I have switched to
a smaller size brush. You can add white dots wherever
you feel it is necessary. We are done with splattering and the field looks gorgeous. So now you can take off the cover people and
wash your brush. Well.
28. Details : Start with burnt sienna
for the faraway mountains. You can also paint
with burnt sienna on top of the existing Skyping. That is, we will be using glazing technique
using burnt sienna. If you observe, well, I'm using burnt sienna, but the color appears
to be off burnt umber. That is because the
existing paint layer beneath is creating
a darker color. Just adding some
dollar mountains like this, add some pieces. You can also add a tiny thing, Jeff Payne's gray, I'm blended. Well. We are done with our basic
shape of the mountains. So let's take the paints aside because we will be only working with white gouache for
the lightning now. And it will also give me
a free movement of hand. You can also use a
white watercolor. If we do not have a Gosh paint, I'll start with a very thin
line from the mountain. You're like This,
reaching upwards. All the lightning
strike that we will be painting will be
below this lawyer. I'm going with very
thin lines and find lightning and not
like the previous ones. Make fine lines and
branch out even to not. I'm adding a small dot as light and then filling it out
with a clean damp brush. Then switching back to a
smaller sized round brush, I'm adding some small, small dots for lights. For final touches. I will add some
small white dots in the field wherever I feel it
needs a little highlight. And then finally, I will start with the white
quash overall. And we're finally done
with our project. So you can wash your brush now.
29. Final Reveal: Let's take off the masking tape and see how the final
painting looks. This is so satisfying
to take off the masking tape and have
clean sharp borders. The project looks so beautiful and the glow from the
lightning is so stunning. This one looks really
magical. What do you say? If you love this project? Do try and share in
the project section. I'll be more than
delighted to see this magical beauty
from my students.
31. Sketch: This sketch make a
little sloping line and then add a semicircle
for the temple. On top of this semicircle, add another smaller semicircle. Then on top of that semicircle, add a small block like this. And then add a small ring like semicircle on top of the block. And then cover it with
another small block, autofocus and then draw a line extending
outwards like this. We will have some
bushy structures. So this is for that make some small lines of blocks
as part of the temporal. Besides it, I'm drawing
a line and below it, I'm making some small windows. Now, our overall view is to be blurred and it is not
anything in detail. You can assume that
our rows of houses, you and besides that, there is some other institute or something which we will
not be focusing on. On top of this, I'm drawing another line and then extending the temporal
part downwards. I'm drawing a small rectangle. We need this temporal
part as part of it. And then we will have
some trees here besides the temple that will be
in the lighter areas, assuming that our street lights. So we will be using a
little masking fluid. You are as well. If you do not have a masking
fluid, do not worry. You can paint using cosh. On top of this. Then I'm drawing lightning
and some random strokes. Assuming the origin to be here. I'm not happy with how
it looks using this. And I'm extending the line downwards and
making final lines, branching in
different directions. And our sketches ready.
32. Masking fluid : Before applying the masking
fluid, I will fade. The pencil marks are little. And then using my
old thin brush, I will apply very fine
lines of masking fluid. Apply as ten lines as
possible for the lightning. You can also speed
up this section a little if needed in
the speed section. Also add masking fluid
to the slides over you. Then I'm rubbing some
towards the bushes. The bushes are not necessary, but you can add some like this, just like stippling technique. Add masking fluid to
the Windows properly. Coming back to the
lightening part, I will add some
very thinner lines. Now. I'm scratching a little
bit of masking fluid, this temporal part here, and then we are done.
33. Sky: I will get my pain steady, force my spring water. Then it's time for
the people who get all the water for working
on wet-on-wet techniques. By now, you must have
known that work in layers even for prepping
the paper with clean water. Because initially the fibers are going to soak in
the excess water. And you have to cover the entire working area with left to right or top
to bottom motion. And the paper should have a
beautiful shine like this. I will start with as
your blue for the sky. Leave a little space
right below this and add some in a similar
manner like this. Next, just beneath this, I will add bluish green. Initially, I'll be working in
light values for the globe. Then on top of this, I will be building more
concentrated values. You can also use acetylene. If you do not have
a bluish green, then at the top, I'll
be adding some blue. You can use a pollution Lucio. Now, with the concentrated
value of bluish green, I'm adding some
random brush strokes. Then add a darker value of blue. Add the same blue to
the bottom line is. Now take some more concentrated blue and add some brush
strokes like this. Using a clean, damp brush. Now I'm lifting from
the lightning parts. That is wherever that
is masking fluid. This will render a
glow to the light. You will have to repeat
the steps multiple times. As the paper is wet and the
pigments will flow back. Water will flow back into this. So that's how the
difference it is. I'm switching to my size eight round brush and
adding bluish green. I'll add some in-between this lightning
speed here as well. Now at the extreme top, I'm adding a very concentrated
and then spreading it like this using random
brush to add the same, using sides strokes like this. Just take care that the beneath lighter
layer is still visible. Add even more darker
blue brush strokes starting from the top. I'm not covering the
entire sky with it, but just small brush strokes in left to right or
a dabbing motion. Add some small brush strokes
in-between your ribs. The top part should
be very dark. So keep repeating these steps. Now taking a very
concentrated value, I'm adding a line of clouds in-between the lines of like me. This is just one layer of glass. We have to do more. So keep adding those smaller,
smaller brushstrokes. You have to just use the dabbing motion of your
brush using the sites. All the tape. Observation is the key to achieving
similar results. Now to increase even more depth, I'm adding Payne's gray and
making even more stormy, darker clouds from the side. I'm just adding and pushing
the paint like this. It is really easy. You have to just use a
dabbing motion of the brush. Add some darker clouds
with Payne's gray on top of the existing clouds, not the bottom sky. Arteriole, smaller clubs. Add some in-between
the lightning as well. Small look now, just
add some small dots. Once done with the sky, I will lift some of the
areas near the lightning. If you're not using
a masking fluid, you can lift some lines, assuming that is like I always say this. But use a clean damp brush for lifting and go over
the same place multiple times. Guys done.
34. Foreground : Let's start painting
the bushes first. I will first add yellow medium. On top of this, I will
be adding green deep. You can also use a blue and mix it with yellow to form
our darker green. You can also use a sap green. Then take any brown of your choice and blend
it with the green. It will also form olive
green in between. This will add to
a lot of texture. For the pot. Just beneath this, I will add black. Or you can also
use Payne's gray. Add a little more concentrated
black at the corners. Cover the top part as well, but lack some bushy structures. You can also paint some trees. Covered the temporal part
entirely with black. And be careful while painting
the fine structures. Or you can also use
a micron pen here. Also paying the small blocks
besides the temporalis. Without washing the brush, I'm adding small, small dots. You're at the lighter areas. This will add a depth and
contrast with the painting. Now I'm taking a good
concentration of yellow deep and adding just
beside this white dot. If you haven't used
a masking fluid, then you can just assume, oh, lighter area and add
the colors respective. Similarly, I'll add
some yellow deep besides his windows as well. We lose some touch ups that
is blending at some places. And also since I'm using
a smaller brush now, I will add more fine structure. That is fine lines
or other details. I want the area to flow a little more so I'm
adding yellow deep and bending it like this using a sideways motion.
And we are done.
35. Details : It's really fun process to
remove the masking fluid, but also tiring one. You can use any method for
removing the masking fluid. There are special
erasers as well. For this purpose. You can also do it
with your fingers. But take care that
it does not smudges. I'm not showing the whole of the mourning process
because it's the same. Do not forget to remove the masking fluid
from the bottom. Using black, I will force
outliner windows properly. Then using burnt sienna or any brown outline the windows
like this from the inside. I first add lemon yellow to this slide
eight parts. You are. Then on top of this yellow
ocher, cadmium yellow. Further temples
highlighted parts. I'm going with a very
light wash off on sienna. Coming back to this tree here, add some lemon yellow and
on top of it, maybe yellow. I'm blend with the rest. On top of this, I will add some green
deep in form of dots. Since this lighter areas
are where they are forming blooms and
adding to our texture. Using some yellow
blend with the black. This is just to represent
some lights over you. Also, I will add some yellow around this
lights over here. I'm blend with the black
background in a circular motion. Also for more definition, I'm using black and adding
it in the other temple. Just defining the
windows properly. And using glazing or
dry brush technique. Just blend with the rest
of the lighter area. Add some yellow inside the
windows to show lights. Just adding the leftover dots. You're randomly and
rinse your brush. Well, because we are done
with the foreground. Now for the lightning, use a thick consistency of white wash and be
adding query thin, fine lines starting from
the previous lightnings. The previous lightening lines that were in masking fluid that have to go n will be the initial points
for the new lines. Now, I hope you are
understanding my point here. Just absorbed and it will
go by it easier for you. When you branch out lines, make sure it goes
thinner and thinner. Hi. I guess that's enough because
it's massive Lightning. Just for a few highlights, I'm adding small dots at
the same dose of the light. I'm few teeny weeny dots, just to represent the
light bottle away.
37. Sketch : Let's start the sketch with some rocks over here in
this corner right now. So we will have a lake here. And that draw horizon line. I'm drawing few boats
near the horizon line. And it's just a basic
shape of our board. I'm drawing one
beside the other, like they are at the shore. And change the
shape of this boat. Alerted. One more board here, and then I will draw some houses or how sports
behind these foods. Don't stress out too
much with the sketch. So just some basic how's leg
structure here? Few windows. All of this part are going
to be in the dark and only the light's coming out of the windows will
be essential ones. So do not worry much
about this sketch. It is a little complicated, but it will be simplified
if you just assume that everything is going to be in the dark and you have to
paint only with black. So essentially only
the boundaries or the outer edges
will matter you. The light coming out from the windows will be
the important ones. You can draw any shapes or blocks to represent
houses or how sport. Just behind these
houses are houseboats. We will have orange
of mountains. So you can just make some
plateaus up and down. All this area would be in black. So it does not matter much. The outer boundaries
is what matters. I'm drawing a line
because we need visually paint a lighter
version of black. And it might represent
a rock houses. I will use a ruler
now for drawing the wires are the lines of
the transmission tower. I will first start
with the center part, and then gradually
I will draw lines slanting from the middle
on both the sides. I've drawn various lines
across the transmission tower, which will make it look complex, yet eye-catching to the viewer. Now from the middle, I'm doing small bars across like this. Just correcting and detail and drawing a little
small bar at the top. Now rho similar
transmission towers of reading lens across
the one before Sunday. You can just overlap
one on the other. Which will actually mean
that it is an online, but up curing as one
behind the other. Do not worry much
about this sketch. I will upload the sketching the resource section so you can either print it. Oh, get to it. Since this corner
you're kind of empty. I will draw one
small slant line and that completes transmission
towers for the painting. For the faraway mountains. I'm just darkening
the outside line like this so that it's
easier for me to understand.
38. Sky: We will wrap up paper by
applying water first. Apply a generous amount
of water for this guy, but then with a flat brush, just spread it across even me. That is just too much water, so I will move it across. And this is possible
because of the board. By taping paper to a
board helps in mind, which is obviously
a better option than fixing your
paper to the table. Apply water above the
mountains carefully. Wait for a minute or two for the paper fibers to soak
in the excess water, then reapply water
evenly onto the paper. Without issue, I will solve the excess water that is
there on the masking tape. Otherwise, it will go back into the painting
and form blues. I'm starting the
sky with blue and applying it across
the sky like this. You can use any blue and
apply it evenly at the top. Applied more pigments at the top and lesser towards
the bottom or the single. Using normal
brushstrokes, I will apply at those sites like this. Keep the center part white,
fur decided brushstrokes. I'm starting from the edge of the masking tape
and ending it in the center with the leftover or diluted blue add to
the top of the mountains. By top of the mountains, the bottom part of the
sky beyond the mountains. By adding brushstrokes
from the right I have obtained now or glow
at the center bottom. For adding depth to the sky, we will use Payne's gray. Add it to this guy using sides strokes similar to those
that we did at the bottom. It's not necessary for the whole underneath
LEO to be visible. Only few sports is enough. Little by little, with more added concentration
of Payne's gray, you have to build the
depth of the sky. I am painting in a
similar manner to that of the previous painting. Different layers
of concentration. I'm lifting your own
little within which I will paint more darker
clouds with Payne's gray. Using highly concentrated
Payne's gray, I'm not small, small clouds
with the tip of the brush. I'm just touching the
tip of the brush and dabbing it like this for wherever I want
the clouds to be, add as many clouds as you want. I'm adding brushstrokes
randomly for the cloud. Add some darker paint to
the top part as well. Similarly, I will add
to the sides as well. Are we paying even
darker clouds now, with the highest concentration
of the Payne's gray. You can use some
black if you like. Since this cloud juris not much visible now
and add some more, hand looks like the
paper is still very wet. I will spread it a little and add a little
to the side here. With a clean damp brush, I will lift a little
across the cloud, especially for adding a glow to the Clouds as well as a
glue for the lightning. So I will repeat this
water multiple times. And every time I do this, I'm going to clean my brush. And so the excess
water on a tissue. The good line for the thunder, lightning, and we are
done with our sky. See you next for painting.
The bottom part.
39. Foreground : I will use wet on wet technique for the
houses or the houseboats. I will first start
with applying water. Do not apply water to the Windows or the
votes in the front. I just love watching the
pigments flow with the water. Once I have applied the water evenly onto the parts
other than the boats, I will drop on Payne's
gray and let it spread across, excluding the windows. Are this diluted,
payne's gray everywhere. I will now get the boats
in the front as well. Digger, good concentration of Payne's gray now and add it to the top part of the board
like this and let it spread. Since data is a lot of water
on the brush and the people, I'm soaking a little
under tissue and then lifting a little
and blending it. Well for the boats. I know right now
everything looks so messy. But watercolor is a process
that is built in layers. In watercolors, we start
with lighter value is first, and then the darker values for the depth and
contrast in the painting. For the lights. Now, I will use yellow and add
it to the remaining parts. That is a Windows. It's okay if it is
blending in the Payne's gray on its own with
the flow of photo. So this wet on wet technique, you will show that the light
is spread across the parts. Let's add more character now to all these pods by using
our darker Payne's gray. I am using this darker Payne's gray for the outer
edges of the boats. Will add some lines
across the board as well. More darker or more
darker pink here as well. Let's paint the fido, give mountains and be backwards. Just outlining view
of tall windows here. And feudal houses. Adding few random
straight lines like this. With the brush itself. This will just add a
little character to the painting whilst giving the look of various details of the row houses and
Fido be passports. Black or more darker,
Payne's gray. Add all these boundaries well, and try adding some imaginary
details for the senior. Nothing is in-focus. You you have to just imagine line of row
houses with LED lights. I'm seeing row houses
again and again, but it might not even be that there's just
a few places to our houses or whatever that
might be across the show. For the reverse, I'm wetting
it with water first. Start with blue and
apply similar strokes to that of the sky as it will show that
reflection in the water. So I'm using the
tip of the brush to paint this part of the
lake or the reverse. Similar brush strokes
from the right as well, leave a part of white in the center that is a
little towards the right. For the reflection of the sky. Start adding Payne's gray
from the sides like this and do not cover the
blue, completely. Switched to a smaller
size brush now, because we have to paint
lots of ripples and waves. Reflection would be in
screen just below the boats. I'm going to add
ten fine lines with Payne's gray that will
resemble waves in your eye will make some letters drawn lines in circular
or coughed form. Start with a lighter
color first. Move your brush in
us wall motion. And you will obtain
Beaufort triples. Also, the paper should
be wet while doing this. Taking the Payne's gray aside, I will add the waves and ripples in gradual
concentration. This side here, I've not small, small dots that are arising
across the reports. Even near the boats reflection, I will add views. These are just blank
lines from the board using a deeper value. Now, add views from the sides. For the bottom part, just cover it with
Payne's gray or black. You can make it
look like a rock by smooth edges or add some
grasses or trees here. It's just your wish. I will add some
grass light patterns that are there in
their dark years. See you next in painting, the details of the painting.
40. Details : Using black or Payne's gray, start adding fuel thin lines, adding form, of course, closer to one another. I'm adding the line
slipped really randomly. Darkening the lines for
the transmission tab. You can use black directly for this or even use a micron pen. I will be using brush directly. This is a really good
exercise for brush control. With this, you can learn to draw straight lines using
brush directly. Just remember, practice
will make you perfect. So draw or paint
all the lines of the transmission tower
as per the sketch. Using Payne's gray, I am
darkening the mountains are little because I feel it is a little lighter
in appearance. Just going over a few
of the lines again, I'm darkening and
adding feel more. Let's outline the boats with
some Payne's gray or black. A few stripes in
the middle as well. Now to the faraway
house or houseboats. You have to do is just add few boundaries are the
outlines for the windows. As I've said, a new
nothing yard is in-focus. Where do I just defining
few of the outlines. Your I'm outlining it as
though it is the lighter part. That is, the nucleoid is
acting like the lighter part. I will also add some reflection to the
boats, which is darker. You can use a dry brush
Tokyo and painting higher concentration of
the black of Payne's gray. After cleaning the
paint brush thoroughly. And we'll move on to
the thundering part using the white gosh. Let's take this aside and
just white wash. Now, using a good thick consistency, I will paint in ten
lines like this across the glowing areas
that I've left earlier. Then from this starting point, just branch out and
finer wavy lines. You can start from
anywhere you like, or even connect to
all of the lines. If you are more comfortable
using a white Jelly Roll pen, you are free to do that. It's okay if you
are painting about the transmission
towers because at the end we'll still paint on top of it with black
or Payne's gray. This will make sure that
you are lightning is in a continuous form and that
is no break in between. And it's okay if you do
only few of these as being, being so many thin lines
can be overwhelming. And I went to much overboard. Using white gouache, you can add some small dots as light. You can paint some
small dots that will represent light far away
across the mountain. Photo, find that highlights, we will add some reflection
for the lights in the lake. I really dab the
excess with my fingers and just add some
little streaks. We'll vary the reflection here by adding just
a little offered. Use very little
water on your brush. Or you can even go with
a dry brush technique. So, so can any extra water
that is set on the brush, on the tissue and
then you will be able to get such highlights. I'm adding some small
dots as attributes. The center, I'm
adding some lines. Add few dots, CRS, which will add depth to
the painting as all of these highlights will
complete the reflection part. A little more touch here. And maybe that's enough of the highlights to add
more of the contrast. I will use Payne's gray
and add few lines. Or maybe I will just go
for blue and see how it turns out as a part of
reflection from the sky. Just adding few
very minute lines. Nowadays, the final
lightning threats. I'm not kind of much satisfied
with the reflection part, so we're just adding a little more darker
value of the gosh. I will add some streaks you
are as well in this corner. Now for the final part, I will just darken
the lines that are not visible because
of the white course. Just using the leftover to darken the outlines of the boat. And with that, we're
done with our project.
41. Conclusion : Let's take out the masking tape and reveal our final
painting for this class. Be gentle while taking
the masking tape. So we're finally
done with the class. And I know it was
really overwhelming. I hope this class
was helpful for you. And you like the projects. Feel free to use the Discussion
tab for any queries. I'll be happy to hear
and answer them. Please do leave a review for your thoughts
regarding this class. That will help me get
to do much better. Until then, bye-bye.
 Mayuri, ARTrinkets I Watercolor & Gouache Artist