Transcripts
1. Introduction : Flowers have an
enchanting way of captivating our hearts and
inspiring our creativity. The delicate petals,
vibrant colors, and intricate details of laurels have been amused for
artists throughout history. Hello, dear friends. My name is Maui and I am an art educator and an
artist based in India. Welcome to my class
on learn to paint mini watercolor florals,
ten detailed masterpieces. This class is unique because we focus on minique
watercolor florals, allowing you to create beautiful artwork
on a smaller scale, perfect for cards,
journals, and more. In this class, we'll dive deep
into the world of florals. We will not only
appreciate their beauty, but also learn how to recreate it with watercolors
on a smaller canvas. We will be also learning
different textures, composition, color
variations, and details for the florals
with watercolors. By the end of this class, you will be able to create stunning mini watercolor florals with intricate details
and various styles. Together, we'll embark
on a journey that allows you to express your admiration
for florals through art. We'll learn techniques to bring out their
intricate details, vibrant colors, and
unique personalities. This class consists of ten
projects that are beginner friendly and it is divided into different sections
for easier learning. The mesmerizing
beauty of florals is what we will explore and
celebrate in this class. In the next section,
we will look at the art supplies that are
needed for this class. Now I encourage you to actively participate in the
class community by sharing your thoughts, questions, and project progress. In the discussion
and project section, let's learn and create together
without further delay. Let's get started
with the class.
2. Art supplies : Welcome back everyone. So before we delve into
the creative process, let's look at the art supplies that we need for the class. The paper I will be using
is from Legion Stonehenge, which is a cold press paper. It is a small watercolor pad
consisting of ten sheets. The size is approximately
nine, 6 centimeters. Next, moving onto
the watercolors, I'm using an goog
watercolor pans. These are honey paste
paints and they are highly pigmented. Let me show you. This air tight palette consists
of 24 watercolor pans, a brush, a sponge, and few wells for
mixing the colors. You can use a mixing tray dish, or a palette, anything
that is available to you. I will be using a spray
or missed bottle, a jar or container of water. Moving on to the brushes, I'll be using this
round brush by Princeton Heritage
Series. The size is ten. I'll be using this for
the paintings mainly, but for minute details, I need a detail brush. I'm using three by zero
of the same series. For the sketches, you will
need a pencil and an eraser, and a cotton rag or tissue for wiping the excess
water or paint. If you have any questions
or need alternatives, feel free to ask in the
discussion section. So gather your materials and let's get started
with the first project.
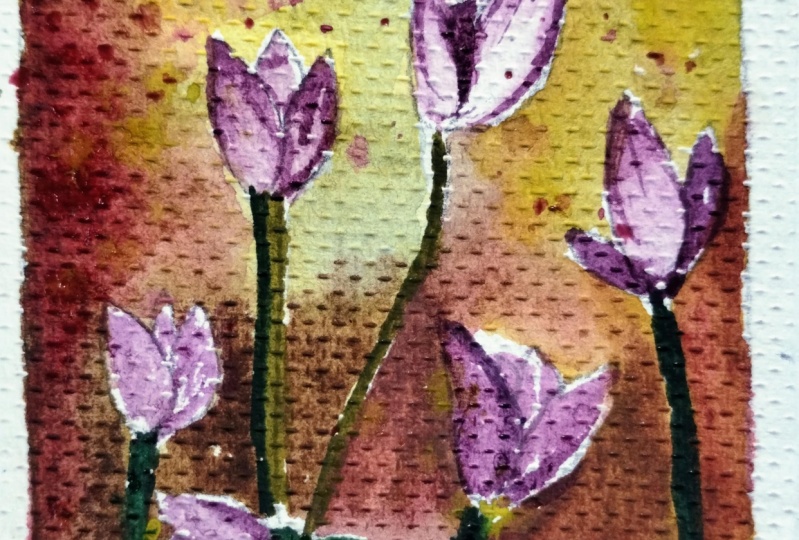
3. Project 1: Sketch: Let's start with the first
project of the class, which is rain lily flowers. We have to begin
with the sketch. You can see the size
of my watercolor pad. It is very small. We will not paint too
much into detail. It is easier to paint all the intricate details
on a bigger surface. This is like many
floral paintings, we will not focus much on the minute details
of the florals. Draw three petals like
this for each rain lily, and at the base, add a stock
a little diagonal to it. I'm adding another
stock for another lily. Here goes the petals. Just some pointed
petals with curves. Now I'm drawing another
one at the bottom here, like this, also adding
the stocks properly here. Observe the curves and
folds of the petals. It is different for all, like for the middle petal. Here I'm doing a marquise shape. Or you can see it is oval and
pointed at both the ends. Don't worry about
perfection at this stage. We are just capturing the
overall form of the rain lies. You can draw as many lies as
you want. It's your choice. I think I'll go
with one more ear, like this at the base, which is Ben, it's talk, Cross the other lies. I'll erase a little of
the unwanted lines. We are done with a sketch.
4. Background : I always begin my
painting process with spraying mist on
the watercolor pans. This help activate
the water colors. Let's prep a paper as well. Just apply clear water evenly on the surface that
is on the background. First of the florals. Also, I'm giving you
a choice to leave the background completely blank to solely focus on the rain, or you can create a soft background wash to enhance the
overall composition. This applies for the rest
of the projects as well. After you apply
water on the paper, the paper fibers will soak
in the excess of the water, then you have to reapply
water on top of it. This will help us work longer
with wet on wet techniques. The wet on wet techniques
will create soft, diffused backgrounds that will beautifully harmonize
with the rain Lees. First color is not
actually a color, but I'm starting with white just for some pastel
shades at the top. On top of this I
will add yellows, but it will give in light
pastel shades to the yellow. Initially, I will go
with lemon yellow. Using any later yellow, just add a few
streaks like this. At the top, I will take some more of the
pigment of the lemon yellow. It is completely your choice for the placement of
different colors. Whatever I'm doing random, there's nothing
specific as such, I'm just going to
keep sa blank with white and the rest with yellow and other
shapes of the brown. Next, I will be using a
little darker tone of yellow, that is medium yellow. You can use gamboge, whichever is available
in your palette. I will add little streaks
near white at the corners. Be careful while you
paint the background. Take care that you do
not paint the insides of the florals as they will
be lighter in color. And we haven't used a
masking fluid as well. Adding some of
yellow at the bottom and annex shade will
be burned sienna. Take only a little pigment of burned sienna and add
few streaks like this. Do not take a lot of
pigment initially. Because we are
developing layers, it is essential to start with lighter layers and then
move with the darker ones. Use a good pointed brush so that you can work around
the details as well. Our bottom part here
will be dark because of the field I will just lend here with
the bone sienna color. Using a little darker
tone of bone sienna, I will add to the other
parts of the painting. Just keep adding contrast
to the painting. Trust yourself, you can do this. It is nothing specific. Just believe that
nature is random. So will the colors
be My dear friend, just go with the flow. Also, you can see my colors
are blending on it soon with the rest because I am
still working wet on wet. Make sure that the
background is wet. There are two ways
to ensure that your paper surface remains
wet for a longer time. That is, first, you can
either apply more water to the surface or you can apply more wet
paints to the paper. I have added burnt umber. This darker tone will be
comparatively less in amount, just adding few spots
here and there. Next essential color for adding contrast to the painting
is pain screen. You can even add black if
you do not have pain screen, but adding small quantities
or lesser pigments. I'm adding lines or
shapes that resemble a little foliage or grass like patterns
in the background. If you are uncertain about this, you can just add few
dots. That's okay. With more pigment
and less water, I will add more fine details
of the grass or foliage. I'm just adding
small dots or blobs randomly at places I want
more contrast to be. Just choose that against the flowers or just beside
the outline of the flowers. What this will do is since our flowers will be
lighter in color, it will add to the
depth in the painting. Be careful while painting near the stalks and it's
okay if you mess up, But just be careful. I missed the spot here. I will fill it in just
with this pine spray. Just refine all the outlines of the florals properly
with the shapes. For blending the
colors properly, I will rinse, brush,
wipe the excess. And then only I will
blend the colors. It is really easy to
blend two or more colors. You have to use a clean
brush or you have to use the same tone of the colors or the pigments
that you have to blend. The top part of my page
has started to dry. I'm adding more water. That is clear water,
evenly like this. Then I will add same
pigments on top of it. Going ahead with medi yellow, I will add more pigment that is starker tones
around the florals. I'm maintaining quite
a little of the white. So now it's okay. I want the background to be
darker and in contrast to the rain lilies with
the same brush, I will just blend
everything else. Well, can you observe, Since I picked up with my brush, a darker pigment and
a back and forth movement led to creating
spots in the background. I will add more yellow to the background and blend
it well with the rest. Especially wherever I have created pit spots
and uneven patches, since there is no visible pond, Siena, I will add more of it. It will create a warm tone for the background and ren lilies
can have a cooler version. Blend everything well
with a clean brush or just same color on the brush
that you want to add at different places To blend and clean the hair like structures that form
here like this, I will use a clean damp brush. Now since I'm happy with the colors or the
placement of it, I will just use a
clean tap brush for the blending process for
some cool background effect. Now I will use a smaller
brush and just load it with some water and sprinkle it on the
background like this. Just load the brush with
water and tap on it. Let the background dry, and then we can move onto the
rain leaves. See you next.
5. Floral details: Let us now start with the
details of the florals. Let's mix the colors. First, I'm using Quinacridone rose and cobalt
blue ultramarine. This will give us a
beautiful purple shade. You can use purple directly
as well, or even violet. I'm taking a little hooker
green tape out, mixing to it. I will add some
burned sienna just a little and it will give us
a beautiful olive green. I will add this
beautiful olive green to the base of the flowers here. Like this, I will use little water with the same
pigments on the brush. I will add it to the
rest of the stalk of the flower for some contrast
with more pigments. I will add some dots like this. Also, I'm adding a
little pines cray painting in layers will add value and character
to our painting. I'll rinse off the paint from the brush and just apply
clear water on the petals. A little green pigment will obviously flow with
the flow of water. We will be working wet on, wet on this very
small area as well. I'll be now using the purple
shade that we had created. Just very little of it and
just small lines like this. White florals or anything in white is not completely
white as well. It has some shadow part to it. The color of the shadow
depends or can be decided upon the tone of the image here. For contrast with
a warm background, I'm using a cooler
version of Pupal. Usually we use different
kinds of grease or pine s gray for the shadow
part of white florals. For some early tones, I'm adding a little bone Siena. I'll rinse the brush, wipe the excess water and a little paint from
the florals like this. Then with a dam, I'll just
even out everything and make the line smooth just where
it is looking very odd. Will add a little olive
green that we created. Repeat this process for
all of the other florals. I will add lane water. I'll begin with a very
light value of the color. I'm just adding
some small streaks or lines with a light
value of the pupal. A use the olive green for the stalks and base
of the petals. It will blend automatically
because of being red. Ton white techniques are really useful for such soft
effects that we need. I'll use a little paints gray at the bottom of the stock here, using the purple or lilac
color that we created. I will add few more details. I have less water on
my paint brush and I'm using only the pigments
in greater concentration for some color contrast. I will add Nachridon roast directly here a little bit only. Let's complete the other
florals in a similar manner. I'm applying water to the side. Two petals only and
not the middle one, or both of these florals. For some variation in the color, I would like to use more of
cobalt blue, ultra marine. Taking some more
of the blue ear, but adds streaks in
very light and manner. I'll move on to the
stalks with the olive green rather than moving onto the third petal
of the florals. This is because if we add paints of water in the third petal, it will start flowing towards
the other two petals. We need a little drying time, until then we can complete
the rest of the painting. I will add just a
little as we are lodi, a little paints gray
for the dark contrast. Now, since the
petals would be dry, I will add a few
more details with the lilac or opal color. Let's move on to
the third petals of the florals every time Initially add a
little value only and leave a little
area white as well. For the last floral,
I'm directly adding a dilute value of the color. Then I will add a little
olive green at the base. This is wet on dry technique. Since the stock outline
is not visible, I will try making it here at the backward part of the
other floral stocks. I'm taking a little bone siena
for adding to the stock. Mix it with little of the
green and create olive green. Let's add the final details
of all the florals. Now take a good concentration
of the purple shed. Just add small outlines. Use a fine, thin
round brush for this. Or you can even go
for a detailer brush, mixing a good consistency
of Chinese white from this palette
with the opal sheet. I will add small thin lines
to the stocks like this. This will resemble the small, thin hair like structures
that are there on the stalks or small structures of the stalks
reflected by light. I add a tiny tinge of paints, gray to the bone sienna. And add details to the sepals or the receptacle parts
of all of the florals. Finally, I'll rinse the
paint brush and using a good consistency of the Chinese white from this palette, I will add small platters on the florals and the
background as well. This is really satisfying. Do as long as you like it, but not too much as well, because we are not
painting stars here and we're done
with our painting. I hope you liked it. See you
in the next floral painting.
6. Project 2 sketch: Let's begin with
the second project, which will be African
daisy or the blue daisy. I'm starting with the center, just a small circle, and then I will
draw oblong petals. I'm drawing the second petal
closer to the first one. The third petal, I will draw at a little space from
the second one. And similar on the other side. Do not be worried too
much about the shapes. Just make it tapering. Not too much tapering, but a little thinner
at the center part. The petal should
be bulging towards its ends almost like drops. And we have left the
spaces to fill in other petals that are
behind the forward ones. I'm doing this just to show the gathered look in this way, it will be easier rather
than going one by one. Imagine that there are
two to three layers of the petals of the flower. Draw the topmost ones first, then the second
layer for the third, just draw small petals that
are visible here or there. So if you're not happy, like me, with some of the petals, you can reshape it, erase any rough lines, and keep only the final lines. I'll just once again in the final outlines so that it
is easier for me to paint. I'll just reduce the
size of this petal a little because it
looks too fat and just correct the
alkalines with that. I can say that the
sketch is now ready.
7. Project 2 floral: Let's begin with the
painting process by activating the
watercolor pans. I'll start with lemon yellow for the center just a little bit. And then I will add paints
gray in small dots like this. I'll take a little
Quinacridone rose aside. Add just a consistency
with water as needed. I am taking a little more
color on the palette for mixing because it is
better to have the less, since we cannot create
the same shade. Later on, I'll add a little
more of the Quinacrdon Rose, because I haven't received
the desired color. It's okay to have more
quantity of the shade that we are creating because
it won't be of waste. It is water color, it can be reactivated and used
for other projects. Whereas in acrylic
colors we see that the excess of the shades
created get wasted, usually because of drying. This is nothing but just a deep purple color
that I have created. And for the petals,
we will first apply clear water so that the paints are uniformly spreaded and the
water does its magic. I know the area that
I'm working on, wet on wet is really small, but the outcome is
really beautiful. The pigments from the center are flowing with the flow of
water, but it's soaky. It can be rectified
by lifting like this, just so the excess of the paints or water on
a damp cloth or tissue. Let's apply water to
the other petals. And I'm doing this only
for the topmost ones. I'll be painting the
topmost petals first, and then second,
onwards, greater. Now let's use the purple
shade that we created, but only in outlines
and streaks inside. Like this, I'll go with very
little value on the brush. Then using a bigger brush, I will just use it
to spread inwards. Be careful while applying
the streaks or while drawing the outlines or
lines inside your paper. Or the petals should
be just wet and there shouldn't be
too much of water. Otherwise it would
lead to glues. Just add little lines. Two to three lines may
be inside the petals and water will do its magic
even towards the center. I'm adding a more concentrated
or higher pigment of the same shade. And I'll use a bigger
round brush or any brush to spread
and make the paint even the other petals dried up. So I'll add water again
for those petals. And I'll follow the same process for the other petals as well. But before that, I will
add more details to the previous petals just going in with some
thin lines like this. Okay? Not that difficult, right? More pigment, that is, less water and more of the paint and create
outline like this. Okay? Because the other petals beneath should have a shadow. So this darker outline
will represent the shadow of the topmost
petals on the innermost ones. And it will also create
a depth in the painting. I'm being very light on my hand for this
line brush strokes, so be very gentle while adding these thin
lines on the petals. Just at the tip, you can
add more darker lines. At the middle section
of each petal, I will add more
and more pigment. This will give value
to the petals. Also use the thinnest brush
na you have for this purpose. Do not add thick, bold strokes. Just add thin lines
towards the center part. I will add more darker value this or you can even
use paints gray. The paints gray or the same deeper shade from the center should
be spreaded evenly. The other middle section, just use a clean, damp brush for the
blending purpose. Okay, finally I'm done
with these three petals. I'll wash my brush and I'll go with the mid yellow
color for the center, and I'll just add small dots. After doing this, I
will clean my brush thoroughly and go again
with the purple shade. And follow the same method
for all the other petals. Just border or outline the shade first and then
go with the inner one. Since there is a
little too much water on the petals here, I will lift or just
balance the excess. And then after just
a few seconds, I will start adding lines. I'm adding water to this petal here because the adjacent
two petals are dry now. And I can add details
for this one. We can work
simultaneously like this, for whichever petal possible. We now have a paste leer
for all the petals here. Now we have to add the details. Use more pigments and
add thinner lines. Some streaks like
here or some lines can still bleed because
of excess of water. Just wait for a few
seconds and work on the other areas
while dry a little. For the shadow part, I'll mix a little
paint screen with the purple shade and add it like this beneath
the forced petals. You can even use paint screen, but do this in layer by layer. Addition of the color will
give parallel to the painting. Maybe I can now add few
steaks for the petals using paint scree. I will add more shadow to this
second layer of the petal with plain water. Now I'll
add the third most clear Er, since the previous
petals are a little r. Now I can add
further details to it. Just thin, fine lines. It's okay if it is
bleeding a little because nature is not
structured, but rather random. This petal here turned
a little bit dry. I will use a bigger round brush. With the help of water, I will spread the pigments like this. The rest of the petal, you can add more darker
details if you wish. After the petals are
dry in water color, you have so many explorations
that you can do. And it is possible because in watercolor we work in layers. So many layers can do such a great magic
for the petal part. Closer to the center, I will use paints, gray,
adding the details. For a few darker
value to the petals. I will use pain screy
and add thin lines just at a few places and
be very gentle. While doing this with pain scra, I will add some lines that will add the depth of the flower also. Let's now define the center part with
more fine dots. After adding dots
with pain screen, I will add some yellow dots. I'll add some around the
center part like this. This will give the
visual appearance of the center part popping up. I'll clean my paint
now and again, go with the paint screening. Use the finest preshow you
have for adding these details. Adding such fine details will
give it a realistic look. I'll clean the paint brush
and loading some water. I will add onto the other
petals that is clear water. Although I'm using the same jar of water for rinsing the brush, as well as adding
the water wash. But make sure you use different because right
now it is not that 30. Whenever it gets 30,
I just change it. You can follow this method if only a single jar or container
of water is handy for you. Adding water initially for wet on wet techniques
takes time, so be patient, but follow
this step properly. After waiting for a few seconds, add the purple color
that we created, just like the previous steps. So let's complete this. After adding the outline, I will now add few
details like lines, I'm still working wet on wet, so the paint will flow. Do not use too much water. Okay? Because
already the surface that we're working
on has water on it. So it will cause blooms and
that is not what we want. Right? Moving onto paint
scree for the shadow part, since these are the bottoms or the second layer
of the petals, make sure you add
more of the shadow. So I'm actually
adding paint screen besides the forced
layer of the petals. And then I'm just blending
it with the rest. Switching to my line up brush, I will now add the fine details. And you have to wait for a few minutes for
it to be semi dry. There are still four ending
petals that are remaining. We'll add some water. Or if you do not have
the patients now you can go with the base color, like the lightest
purple color directly. Since this is my second
step of adding the purple, you can paint this
at the first step, movie onto the pain screen. You can also directly
add opal or, you know, mix of pinscreen and popal that is a dark shade
for the end petals. We are now left with only the detailing part of
all of this, So let's do it. Just keep on adding thin, fine lines with
paints gray directly, just wherever you
feel it is needed. Okay, And I think I need to add a little bit
in the center as well, just a few fine dots and yeah, we are done with a basic flower. See you next in painting the background of
the African daisy.
8. Project 2 Background: Let's begin with the background
wash and use clear water. Apply it evenly with any
thick brush that you have. I'm using size ten brush, since I'm working
on a smaller area. This round brush is
perfect for the wash. I'll just apply an
even coat of water. You have to keep repeating
the process because the paper fibers will soak
in the excess of the water. Be careful while painting
near the floral part. You can switch to a
thinner brush if you want or if you do not feel that confident
while doing this. Take your time here, because if you add
water onto the floral, the pigments will bleed into it. And that is not what we want. For the first shade I'm
using pinacrude on the rose, and I will just directly add some dots or blops of paint
directly on the paper. Since this is wet on wet, the pigments will flow. You can also tilt your
paper like this so that the gravity acts on
the paper and pigments, and with the flow of the water, the pigments will
flow accordingly. For some magic and fun, you can add water directly
on the paper like this, and you can see how
beautiful it is. Right. I'll just blend
few of the areas. After this, we will
go with paints, cray and add the darker values. I'll start with the
bottomist area, it will blend automatically. I have really light value of the paint screen
on my brush and I will just carefully blend and also draw the
outline properly. Here you can actually refine the edges and
the floral part. Here, I have chosen this color background
because it might resemble blurred florals
of the same variety. Taking some more concentration
of the quinacrdon rose, I will add some
flops randomly in the background like this that resemble some blurred florals. Also, fill out any blank caps carefully with a pointed tip. Use a round brush with
a good pointed tip. I'll switch my brush to a thinner one and add more
of the concentrated color. This method is really good
for adding foliage or any blurred elements that can be made out but are still
blurred in the background. That it will help in defining all of the
blurred elements. It is always great to start
with a lighter value and then build up more
and more layers with darker concentration. Like I'm adding the paints cray value work at one
area at a time. If you have attached to
your paper to a board, you can move the paper
like rotate the paper as you wish and paint for me. This is easier for my hand
movement so you know, just do whatever is easier. At the top, I will add only few dots of this
paints cray, Okay? So actually what
I'm doing is I'm borrowing the paints
from the bottom part. Like there's no need of too much concentration
of the paint. Okay, so you can just continue
with whatever is left in the brush or in case you find
it very less than you add. Now, you know, we just have
to blend the outer border of the floral and the
background together because it is looking
different from the background. So just with pine scray, I will add the outline properly. That will give it
a darker value. That is, it will be seen as a shadow part
beneath the floral, adding similarly
at the top year. Lastly, I will add some
more Quinacrdone Rose. Here I'll add some more darker values of the pins at the bottom part
and a few dots at the top. I had just a few small dots at the center because it
has turned lighter. And for some more
detailing to the flow, I'll add some lines, thin lines with paints gray. Okay. Do not overdo your
flower if you think it is complete. I'll rinse the brush. Now with a clean brush, I will take some green. You can take any green. I'm using permanent
green from this palette. I'll rinse the brush
and use a little of the azo yellow deep
adjacent to the green. Clean your paint brush properly Now and using clean water, just add some
splatters like this. Since I'm working
on a smaller paper, I'm using a smaller brush
to add the splatters. If you're working on a
bigger surface brush, just load the paint brush
with water and tap onto it. Or you can even
use another brush. Whichever method you feel
is easier for you use it. I feel the floral part has
dried up very lighter. Just to match it
with the background, I will add few more darker concentration
of the pines gray. You can paint in higher
concentration or higher pigments on the previous lines
or you can add few new. I'm doing both because so much precision is not needed and we are
having fun over here. Right. I'm sure once you have all the ten
mini floral paintings, you will be overwhelmed with happiness and joy
of creating it. I'll add a little Chinese
white to the floral. You can also use gash
or a jelly rolled pen, very thin lines, and at few places only for
the highlights, adding some to the
center part as well. Once you feel you are
done with the highlights, clean your brush and relax. Because you have done
with the painting, let it dry properly and I
hope you enjoyed painting it.
9. Project 3: Welcome back guys. We are onto the
third project now. It will be red poppies. Let's begin with the sketch. I'm just drawing
something like this. I don't know what to call it, may be heart shape, but not exactly heart shape. And this is the first petal, besides which I will
do the other petals. This will be our main red poppy. And just add a
stock to it. Okay. Now at the bottom,
I will draw some more, just random shapes. You can follow the sketch
here by pausing the video. Add some birds as well. I'm drawing one here and another one here. Also, a third one here
behind the main red poppy. Let's begin with the background
first for this project. So I'm using plain water. That is clear water, and I will be adding it over
the other poppies as well. If you want, you can
be careful like this. But I will go on the other
petals of the florals. I'll be preserving
only the center pop and the rest will be in the
background that is blurred. Or you can choose two to
three elements to be in the focus along with the center
poppy. It is your choice. Okay. Apply the water
evenly onto the background. Wait for a few seconds for the paper fibers to absorb
and then reapply water. Be careful around the edges of the florals because if you have to keep
them in the focus, they need to be done
using wet on dry method. I'm using Vermilion
for the poppies, this is for the
bright red color. Later we will be adding darker
shades for the shadows, just adding small dots. And you can see it is
spreading a lot because there is too much water
on the paper right now. If this is happening
with you as well, you have to wait
for a few seconds and not do the same
mistake as mine. See on the top,
it is dry, right? It is not spreading much. You have to wet your paper. Even here. The weather conditions
right now is hot and humid. The paper is drying faster. Just take care about it. For the green foliage
part or the grass part, I will add some permanent
green like this. It is just random. Okay, taking a little yellow light, I will add it to the
permanent green. And add some blobs like
this for the foliage in the background because
of water on the paper. It will blend automatically, but at few places you can blend it like
this using a clean, a brush or the same pigments. Next, I will use yellow
light directly like this at some places
just to add some lighter green while adding blend it with the
rest of the paint. Adding a second layer
or more concentration. Now this is like more defined. I'm just adding or creating
blooms with the yellow shade. Okay. You can also add some lines like this
resembling stalks or grass using permanent green. Now I will add some
more definition to the foliage or background initially like you have to
start with lighter colors and then go on to move onto
the darker shades. Because watercolors, we work
from lighter to darker, whereas in gash and acrylic you have
endless possibilities. But watercolor is really
a beautiful medium, just creating some
shapes like this. Okay, just besides the shade, you can create outlines. I'll take a little
more concentration of the paint and add
some small dots using a clean, damp brush. I will lift the paint here because the
green is spreading in the red and we do not want to mix our poppies
with the greens right. Next shade I'm using
is green tape. You can use any dark green that you have in your palette and add a few small dots or create
some lines or grasses. I clean the paint,
brush properly, wipe the excess water, and lift the paint here
from the red poppy. You can lift the paints wherever you feel
it is necessary. But every time you lift paints, make sure you clean the brush because it will end up mixing. Otherwise, once done
with the lifting part, I will switch to a
smaller brush and add the vermilion shade once again
with more defined manner. By that I mean the
shape should resemble that of a poppy and
not just some blobs. Okay, add some smaller poppies that are at the
distance as well, or they can resemble as buds, as many as you feel is good. Once I'm done with
adding the poppies, I will use the leftover
paint like this for the topmost part here in the background
using paints gray. Let's add some depth
to the painting. I'll start with the topmost
part here, just a line, and then I will add
small small dots that will resemble some bushes
in the farmost background. Then I will add some stocks
like this and darker. That is the paints gray shade. I'm adding very thin lines. You can skip this step if you feel your background
is complete. I'll rinse the brush properly
and using yellow light, I will add some small dots or o florals that are there
in the background, but it is like further away. Just add very small small dots. I'll add few at other
places as well. And it will
automatically mix with the green and form
lighter shades of green. Using vermilion, I will give the poppies a little
better shape. I'll load the paint
brush with some water. And it still has
the armlion shade. I haven't leased a brush, this will actually give
splatters with the melion shade. Let's add some depth to the
background by using pre. I'm using a light tone
of the paints, gray. Adding some shadows or character to the poppies
in the background. Basically, you're just
adding outline of the petals using a light
tone of paints gray. You can also use
brown if you want. I'll blend this a little with a damp brush using clear water. Now I will add some. I know the water
is not that clean, but I'll still go with it. Lastly, I will use Chinese
white and add some splatters. I'll add a few lines for the stocks that will give
it a highlighted look. I'll mix some yellow light with a permanent green sheet and
add some splatters with it. With addition of a few
lines for the stocks, we are done with a background
of the third project.
 Mayuri, ARTrinkets I Watercolor & Gouache Artist