Transcripts
1. Introduction : Hey guys, I am really
an artist based in India and welcome to
another Skillshare class. This class is going to be
a little different from the previous classes because that is definitely watercolor, but a lot of doodling fund. Before starting, I
want you to relax, take a deep breath and know that this project seems
a little complicated, but it's really easy and
a beginner friendly one. Today's class is about
creative doodling. They're entangled
and painting fun, realistic autumn
leaf in watercolor. Sometimes looking at different
artworks we've already, or we feel that we cannot
do this because it has too many intricate details
or some unique skills. But today in this class, I want you to let go of
all of these feelings. There will be a second
version of this class where we will be doing this autumn
leaf, inspire Mandela. You will definitely enjoy
both of these classes. We will make a lot of intricate abstract designs that will help improve
our imagination. Creativity and drawing skills. Do not worry about
the art supplies because we will need
only few basic supplies. And I'll be explaining this or not separate section altogether. Idealized ads and tangles
or doodles helped me a lot in designating
myself and relaxing. There is no right or
wrong way to do it. The more you create, the more you will feel
confident in your style. We will also look at the color palette that
we need for the class. And I'll be explaining the
watercolor techniques that we need for this class are
painting the autumn leaves. Only few basic
watercolor techniques is enough for
painting the leaves. I am muted just to guide you and show you
different techniques. But trust me, with practice, you will evolve and create
your beautiful masterpiece. Beginners are welcome
as these doodles are creating mandalas is known
as complex as they look. A little enthusiasm
and that's it. What are you waiting for? Let's get started right away.
2. About this class : Basically do the order
is actually a design or pattern that we
created once we're both or when you're
thinking something, it is just something out
of your imagination. To link. Our scribbling is something
that we used to do estrogen because we used to daydream in their classes or while teaching. So it really helps
us bring our focus back on what we have to do. Delta is composed of different
types that is sent angles, man data, then doodles, then botanical line
art that we do. This, all of this just
to create more and improve your focus.
Simultaneously. Mind Relaxation, Rule link, also helping creating new ideas. Doodling is a fun way
of expressing yourself. Also scientifically,
doodling helps lower your stress by reducing
the cortisol levels. So just doodle a lot.
3. Art Supplies : For this class, we need
only few basic supplies, letters for the people I'm using more Antoine
watercolor people. It is 300 GSM and good for
watercolor techniques. You can use any watercolor
paper that you have. I'll be using A4 size of
this moon fall sheet. It is not necessary that
the paper be 100% cotton, but it's your choice completely. You can use 100%
cellulose as well. I'll be using this
sonnet watercolor pans and we will need only few, like yellow, orange,
red, and burnt sienna. We will need a fine
liner or micron pen for the design purpose. I'll be mainly using this stage
load try plus fine liner, but also this table
low point for MM fine liner or painting. I'll be using only
the single size eight Princeton
velvet touch brush. We will need a pencil
and eraser as well. For bigger areas, I will be using this coil
coloring brush pen. I'll be using almost
all spray bottle for activating the pains. We need a ruler for
drawing straight lines. The pro circle, campus and
white quash is for them. And Darla, that is the second
version of this class. We will need a jar or
container of water and a tissue to avoid
smudging of the ink. That's all we need.
4. Color Swatches & Techniques : Let's look at our
autumn color palette. I'll be using yellow deep. You can use any yellow that is darker like gamboge yellow. Next, shear from this sonnet
watercolors is orange. You can also create your own by adding a tiny tinge
of red to yellow. Our next shade is red light. All the colors are
very bright from this sonnet studio
watercolors set. We will also need a
little Burnt Sienna. These are the only four colors that you'll need
for this project. Let's look at the basic
watercolor techniques, so forth time applying water
evenly onto the people. Just a small area
for explaining. I'll take some paint on the
brush and since it is wet and dropping onto the
wet paper surface makes it wet on wet technique, you can see how the pigments
flow with the flow model. Whereas wet on dry, that is the wet paint
on a dry paper surface, will not lead to this
spread of the colors. Water control is also important
because the more water, the more it predispose. Because you can see
the yellow pea, It's a little wet, but it
disposes only a little pigment. Both these techniques are very helpful and basic of
watercolor technique. Let's move on to
the splattering. I will load some burnt
sienna and just a little tap on the brush will give
you controlled splatters. You can use another brush for tapping on this brush
loaded with paint, but it will be a
mess everywhere. I hope you can see
a clear difference and both wet and dry technique.
5. Sketching Maple leaves : For the basic sketch
of the autumn leaf, I will first start by drawing
the skeleton of the leaf. And that is by
drawing a line first. This is the mean wind part. So draw double lines and enclose
it with the bottom line. The line shouldn't
be exactly straight. And slide pico and slightly
broader at the lower end. From one point of origin, you will be drawing
the lines like this. And now around those four lines, we have to enclose these
structures in different shapes. For the bottom two lines, I've added only a
single tape margin, whereas for the other three, I will be adding more curves
and more indentations. So first, just opposite
to the tip of the wing, add a pointed edge to more pointed margins of the leaf across the first one and
connect with the bottom part. Then similar manner, sketch
for the top part as well. Now, like me, you might not
be happy with how the leaf. So what we're going to do is add a little realistic
touch for this. And by that, I mean
that we will add some irregular codes and
margins to the leaf. Rbac and making a
lot of changes. So wait until the last. For the final
sketch of the leaf, I'll start by adding more
calls at the bottom. And these are very small. Imagine the mean when asked
the sender and the two sides of the leaf from the center as mirror images to one another. So what I am sketching is
not exactly mirror images, but they are somewhat similar
from the previous lines. Keep adding some goals
and margins in VB forms. Adding these small
curves will give a realistic look to the leaf. If you are happy or light
the previous simple sketch, you are you to proceed with it. I'm increasing the speed
of the video to do X. If you are sketching along, you can slow down the video
from the speech section. The petiole seems
very much broad, so reduce the size a bit. Always give attention
to the proportions and your perspective
in sketching, instead of pointed tips, I'm going with
COVID indentations, added such Coby margins to other parts of
the leaf as well. With a little erasing
and finalizing, your leaf is complete. It's pretty isn't
it? Now, let's add few more at the corners. One at this top left corner and the other at
this bottom right. You can sketch only half of it. And such big size is not needed. You can draw in a smaller size. So similar to the previous
skeleton of the leaf, I will draw a line
that is our mean when and from the point of origin
that is at the bottom. Redraw for more lines. So sketch this and
similar manner. I'll increase the
speed now because you students who are not sketching alone might find it repetitive. But you can always
adjust and reduce the speed if needed from
the spirit section. Now for our last leaf, sketch it in a similar manner, or just a tip of the leaf, should be facing
towards the top left. With these three pretty leaves. We are done with the sketch. See you next in painting
these three leaves.
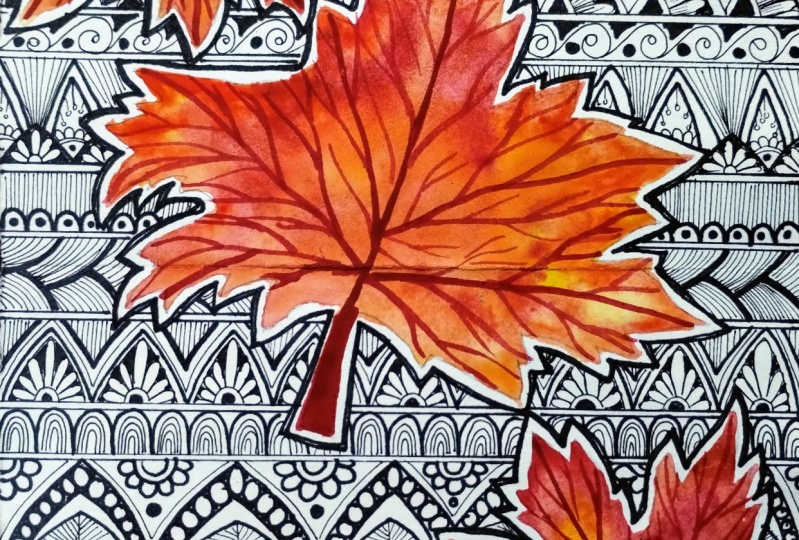
6. Painting the leaves: We will start painting our leaf, but first we have
to apply the water. The reason we are
applying quarter is for obtaining wet
on wet technique. Apply water evenly
only to the leaf. Be careful while applying
water at the edge list. I'm speeding up
the process here. But you can change it
from the spirit section. If you are painting
along with me, I have speed it to
two x because it is just applying paint water, IMD applying water onto
the same area many times. The reason is that the people fibers with soaking
the excess water. So you have to wait
for a minute or two and keep applying water onto the top surface so
that you can use wet on wet technique for
a longer period of time. The paper should be
glistening as such. Since that is too much
photo at the top, I am letting gravity act on the people and let it come down. I usually activate my watercolor
pans, my spring water. Using water, I will use yellow deep and add to the
central parts of the leaf. If you do not have yellow
deep from this set, you can also use your login boats or any
darker yellow is fine. You can also create
a similar shape. Adding a team toss red to it at the border
parts of the leaf, I will now add orange. I will use a good
concentration of it. You can also create your
own orange by mixing yellow and let the colors flow and blend on its own
with the flow of water. I'll be adding this orange
to the main wanes as well. But first time and just
see where the parts are. That is, paint the
origin line forest. Cover all the boundaries
with this orange. Speeding up this section due to x because it is three potatoes. You can change the speed from this section or even pause
while painting alone. I'm going to blend
using the same brush. Or you can even use a
clean brush blending. Just use the sides of your
brush and pull it in. Add orange to the main when I'm not adding
it in sharp detail, but rather blood are the same orange to the
stock of the leaf. To add some contrast
to the leaf, I will add I regarded only at few places or the
outside margins. So in stopping in software, it, it will do its job of
blending on its own. With the red. I will
add the details of the wings as
well as symmetric. You can use a smaller size brush or a detailer brush.
For the details. From this wind photo, I will branch out
more small Lovins, add similar details to all
the other parts of the leaf. I'll speed up the process here, but you can pause in between AD read at the outer corners for contrast. After adding all
the wings to add some darker values to
the stock of the road. If you want, you can just add a line at the outside
of being details. So next, I will use burnt sienna and add some splatters
to the leaf. Okey if it's status or
little outside because it will be later covering it
with our design and doodles. Brush the way I'm holding
and tap a little so that it is easier and conveniently
fault on the need for itself. I will also add some bigger
sports for the leaf with burnt sienna and some touches
at the outside edges. Just add burnt sienna at some
of the corners of the leaf. And that will add a
depth in the leaf. Usually the bottom part of the autumn leaf
is more darker. So I'll move to the bottom part. I'm adding some
more random spots and beans with burnt sienna. I'm toning the sheet by
90 degrees because I find it easier to paint
a simple line like this. This is because I'm not
using any detail brush. And since I have to be lighter on my hand or
easier brush control and I will keep rotating
the sheet as in however, I feel it is easier for me. You can do the same
because we haven't paper sheet and
this is precisely the reason that we
have introduced any masking tape you're
obtaining clean borders. Let's start painting
the next leaf with a different method now, so forth, apply a
clean coat of water. This is just similar to the previous step that we
have done for the first leaf. I've spread this process
of applying model. After applying evenly
or photo to the leaf, add some yellow deep to
the leaf and descender. Then from the center, moves to all the other parts
of the leaf carefully. Because of the edges. This is just plain applying of the yellow deep
and nothing else. So whenever I'm speeding
up the process, it is because it is very rapid theater
and to be understood. But if you need to
slow down a little, because if you're
painting along, then you can change the speed
from the speed section. Our next color that
we will be using is orange and we will be using
wet on wet technique. So the yellow paint that
we applied should be wet. Even me. Next for the fun part, you can drop on the orange, pink anywhere you
like on the leaf. But preferably the wings and the outer corners of
the leaf is good. It is just like adding some small orange
sports to the leaf. Just dab or does the tip of your brush and the water
will do its magic. You can then just blend the
orange with the yellow. For blending purpose,
I'm using the side of the brush and there is no
pigment at all on the brush. Similar to the previous. We will add red here and the
outer corners of the leaf, and also to the wings. I really dab some red
and some of the corners. It is a fantastically off colors and the contrast
will be amazing. You can use any yellow, orange, and red from your
palette that you own. For this talk of the leaf, I will add red directly. No random lead to the
different parts of the nice. Make sure you do not cover
all the underneath layers. And the Aston posssible are just random
blending to urine. Our last shade of
the autumn palette, we'll use brown that
is born sienna. You can even use a Van ****
brown or even burnt umber, whichever is preferable by you. I will add only few, find dy dx with this one
sienna for this leaf. You can use a very
fine detail brush to add very fine thin
lines like this. This starting point of the leaf, I will add more of the bone sienna, some shadows. You can even add a thin line. This talk of the
leaf with Brown. After washing the brush totally, we will add yellow deep
directly to the last leaf, covered all the parts. When would this yellow deep? You can even use gamboge yellow. Be careful with the outlines
and being within it. Or even if you make a
mistake, it's okay. We can cover it later
with a darker shade. This section is fair enough
because it is simple, setting off one single color. Next, I will use
orange and add it to a few parts of the leaf and
blend it with the yellow. I will add some to the top
and some at the bottom. For blending, just use the size of your brush that
will be clean. Or you can use a clean brush and go in a left
to right motion. Or you can even use similar sheets like your you can use yellow to
blend with the rest. I'm using yellow deep and blending it with the
rest of the leaf. Using a fine tip, I will add orange for the wings. Load some good
amount of orange in the brush and
splatter underneath. Would this seam
left or well-being? I will add the color to
the stock of the leaf for some realistic touch. Now, I will add burnt
sienna. Few places. Add some burnt sienna
to the starting point here and sides of
the stock as well. And finally to the wings. After adding dark sports with bonds Sienna
at random places, I will use a clean damp brush and blend with the
rest of the leaf. Adding these brown spots as given idealistic
touch to our. Finally, I will
wash my paintbrush. We are done with all our three leaves and
they all look so realistic. See you next in
creating their designs.
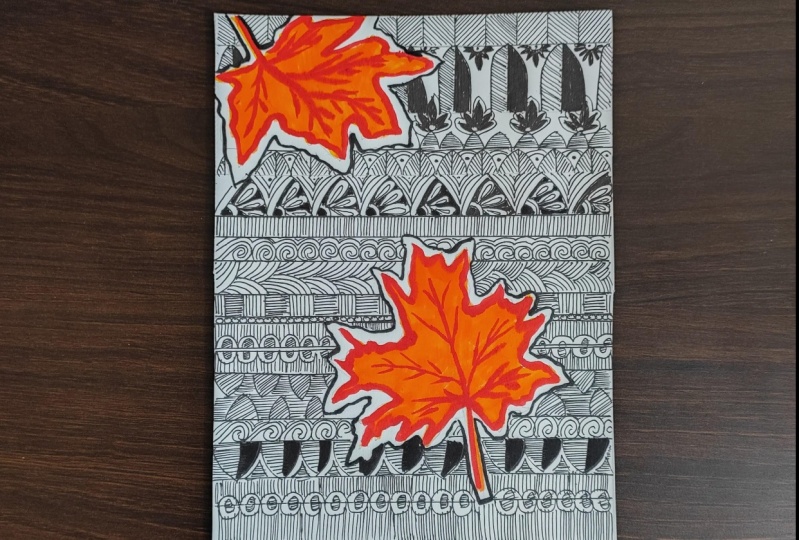
7. Outlining leaves: We will first need to
divide a sheet into half. So I will mark 14.8 on both
the sides and draw a line, which will be the center line. Our next step will be to
outline all the leaves. I'm leaving around
three MMF space. You can leave how
much ever you want. I will first outline it
with a single border and then I will darken
this or make it blurry. Do this for all the leaves. I will now make
these lines bold. You can use a thicker, fine liner if you have. Personally, I find
it satisfying to darken with the same
micron pen or fine liner. It does dearly mind relaxing because as kids we
used to do the same. We used to just fill up color within a structured
or muse to scribble. I'm going to speed
up this section you, because everything
is replicated. I'm just darkening the outlines that we drew for our leaves. If you find this
process intimidating, you can skip this lining and
just go with the simple one. You can use a thicker
micron pen or fine liner. I take on a micron pen or a fine nano will help in
making this more lines faster. So finally I am done with making bold outlines for
all the green leaves. Let's move on to
the Zen tangles.
8. Doodling around the leaves : Let's start by darkening the line that we have
drawn at descender. Use any scale or
for this purpose. Because we will be
doing many lines. Rotate the people and
draw another double line. I am mocking six
MM on both sides. And we'll draw online. Then we will have a
thin frame within which we have to do some
designs all doodle. I will add another double
line and border double lines that I have are very
thin in nature, that is approximately one MM. So you can see that I
have drawn another line and that is approximately
1 cm maybe. And I'm covering it with
another double line at the top. Let's start with the fun part. So first I'm going with this inverted use or
dome shaped petals. Would the sides will
have the same designs. So add the dome shaped
petals in equal sizes. After completing
this, we will go with another inverter use within the first one is almost like lining the
false ones with another. Now within this
second inverted use, make another that is third in
order and fill it with ink. Or you can even add like
a circle and color it up. Right now, I'm going
with semi-circles or in water use inside the
double inverted use. This is a really great exercise. Your mind and take your own time and fill up the spaces
with this design. If you like, you can go with any other designers. In total. There are three in
water use over here, so you can go with two
and to love t inside one. Our next design is
this edge petals. I'm going with a bigger
size because the size that I've kept between the
two lines is greater. Similar pointed petals on
the other side as well. These petals are really simple. You have to just go from the inner side and meet
at a point at the top. And then from there you have to make another code. Inside. One can be filtered. You're at this corner as well. And now I'm going with double
arc lines for these petals. Goes to you while
doing this outlines. Many are times in rush. We make mistake in the
simple things as well. This class is all about spending your time GIG,
even eating ourselves. And the media that will let this happen is watercolor
magic and do their art. After you have completed
this double outlines, we have to make another
smaller pointed petals within these patterns. It is easier and just similar to the previous inverted
use, that we did. Keep a fairly good amount of space between the
double outlines and Gretel because we have to make different smaller flower
petals within this frame, I am first drawing
the longer petals. For all the bigger petals. Because of the pointed tip, this petal will be longer
beside this first pattern. Now, you have to draw as many petals as the
fluid inside the frame. For me, for petals on each side, for it inside the frame that are approximately equal length. Do this for all the
other patterns. I find this drawing of the
petals very satisfying. If you'd like, you can
shave these petals as well. Or you can add a single
line and a dot on top of it that resemble as
payments within the petals. Let's quickly fill all
of these other petals. It's okay if you
make any mistake, you, nobody is
going to judge you. Take this as a project
for your mind relaxation. Once done with the petals, I will fill the inside part with ink by in-kind be the same
fine liner that I'm using. So I'll just fill the
spaces around the petals. You can use a bigger
nip, fine line. Now, I'll speed up this section because it is
just filling all the spaces. So you can observe, if not understood clearly. After filling up the spaces, I will make another arc
line within the inner part. You can draw in water, use if that is easier for you. But since you already
have made pointed petals, I would go with that Food
Lab, the inner space. So if we get up
completely with black, I'm adding a bold outline outside the outer edge
of the pointed petals. So you can draw like this, goes to v and then darken
it or make it bold. Now within this code, I'm going to add
lines and fill it up with as much as straight lines possible
close to one another. I will rotate the
sheet because I find it easier for
filling it up this way. It depends on your
freehand motion, how you're comfortable with. So accordingly, you do the designs are one border frame is complete for the next, I'm drawing a line and this is approximately around
five or six MN. I'm not measuring it. If you want exact equal parts on both the sides,
you can measure it. On top of this, I'm drawing a double line that is approximately one or half. And then for this border frame, I'm going with OH, group like intertwined
structure. So I'll start first by RKO and then almost
at the center of it, I'll start another one. And it is best understood
if you observe properly article then from the center add another
than from myths and art, another, and so on. I hope I'm making
some things here. Within these curvy lines. We will add another thing, curvy lines following
the same outline. It is similar to the previous straight
lines that we added, but you are, the
lines are and go for because of the code ship. I hope this pattern is easy, so I'm speeding it up. Also, make the outline
borders more bold. Docking on the outline borders forced or Leto,
anyhow you prefer. Now it does look like a rope
intertwine with each other. Or maybe a bleed. Moving on to the other side. And forced make these
outlines spoon and then fill it in with the curvy
lines close to one another. I am forced feeling
with only one side, which is easier for
my hand motion. Then I rotate the sheet. Fill the other half of the design are rope-like
board of frame as complete. And moving on to the next, I will draw another line. There is no fixed sizes that I'm doing for this
border frames. So you can use any size
you want or you like, or any patent that you wish. Any border frame that I'm doing, I'm enclosing it
with a double line. I will start the design by
adding some small inward. Use. Small, equal-sized domes. Add onto the other side. Make a bold outline
to all these domes. You can even use
a pointed tip of a brush marker and outline it carefully
to add more details. I don't want to bore you because this is very
simple process, so speeding it up. And since I'm using
only a single find, 9.3 or 0.4 MM. It is involving a lot
of time comparatively. Within these bold outline, I will add smaller dots, all ready, smaller domes, and color it off. Fill it up with ink. You can add just a symbolic dark and see how pretty this looks. We will complete this
border for them by adding straight lines and I'm
using a ruler for this, you can go with freehand
straight lines if you wish. I find it easier without and you will get even
ten lines with this. Speeding it up from you. If you find drawing lines
like this better and faster, you are free to do so. I'll go with this scale. It says for our next design, I am directly starting
with pointed petals. These are somewhat
flat in shape. I'm thinking of
switching to this. Then. Let's see. So to check, if I'm in the line of the
other side of the petals, I will use a ski and then
draw these pointed petals. This way, it is easier to draw within the size limit
for the petals. Like maybe my ruler
slip a little ahead. So I have to now. Balance all of the other
patterns, changing the shape. The rest three
however, looks fine. The problem only with
one offered next door, some teeny weeny small, so good. At this mortem party
on the same day. Then, after completing the
circles for all the petals, draw good longest
small flower petals within these factors. Besides the force,
I will add two or three how much I've
offered on both the sides. This is similar to the previous flower
petal, that either, but this time there are only five smaller
flower petals in total. Whereas the previous bigger
flower petal has almost 91. I will speed up the part you, because this is very
easy and I trust you, you can do this
very beautifully. Once done with the petals, start filling up the
spaces around the petals. I add tiny dots inside
of the so-called, they already small
circuits and Burke sternum adding ready teeny dots inside, add small semi-circles
in-between these pointed petals. I'm just adding half
of the vector u. Since that is this autumn, even between only a
little awkward should be shown semi-circles with the
other half of the design. I'm drawing a line and I don't know the exact
size of it with I'm just drawing it randomly and do not suggest much
on those sizes. You can change your designs
as in how you like. I will enclose this line
with their double outline. Let's donor sheet. And moving on to the next part. Within this plane, I will
add long pointed petals. And I'm starting from the
tips of the previous petals. And since I've taken a greater distance
in the line angle, smaller pointed petals, I'm getting longer pointed petals. Now add double arc lines to
these long pointed vectors. Now for a change, I'm adding lines within these
outlines of the petals. So fill all the double log lines with small lines
close to one another. And this is really
satisfying to me. According to me, anything that involves filling up of the color or new lines that is really
satisfying and mine relaxing. I will darken all, make the inner outline bold. Adding more lines will enhance any design compared
to a clean one. I'm really loving the way this outline for the petals
have turned out.
9. Doodling of middle border frames: I want you to take your time and do the same design
on the other half. So I will speed up this section
because it is just seen. I really darken the top
outline for all the petals. This code, we like sheep that
remains after the battles. I will fill it up
with straight lines. After adding straight
vertical lines, I will add straight
horizontal lines. This will give us
live across pattern. If you want, you can go with any adult pattern
of your choice. This mesh like design. On the other side, it's red. This war takes all
the pointed petals are small lines like this. Next, add small, so
close to these lines in a similar manner. Now starting from the
vertex to smaller lineman, so good, like this
for all the petals. So we have small
learned like motif, learned like Motif
inside the petals now. Add a tiny semicircle
and double outline. And then on top of it
add small, small petals. If you do not like this pattern, I have given you
full freedom to use your own designs and create
your own masterpieces. I feel it's better
to darken this line. So I'm just filling
it in like this. Or maybe using the
skin is better because it will make
it easier and faster. Now, definitely
this looks better. The next model stream, I am making all small one by adding nine act or distance
off of rocks five to six MM. And almost like a costume, I'm going to close this
line with a double line, turning the sheet or word. And for this mortar frame, I will be adding some salts. I'm using around three-fourth of this border frame
and growing this towards the early fun and
easy to draw these words. Keep connecting these
spiders with each other. So you can start almost from the bottom part
of the first one. So keep adding this
continuous spirals. I feel I need to correct
this undeterred. We're just connected
crop B with each other. I'm trying to draw these
spiders close to one another and not give too much space in between two
consecutive spirals. Once done with this Biden's, I will add an outline
at the top part. So just go V outline
close to those vaults. Now, the remaining
space with black. For a change, I will shift to this step below 0.459 months. Just for filling this part. I've increased the speed
because it is easy. Just filling up the space. I will draw a line for
the next board of thing, but it looks like
it is not aligned. I'm aligning this
line as well as drawing or double arc
minus simultaneously. I'll just darken the arc length. We have a border
with double outline, similar to the
second board of art. Pointed petals of
almost similar size. One petal here, and add double outline to
all of these factors. Now, for a change, let's add the center part of the flower petals
at the sides. So I will add two codes and Julie intercourse then add another code for
the flower petals. Fit in as many petals
as you can and fill the remaining space other than
the petals would lacking. For the remaining
one-fourth of the petal, add small circles
as much as you can, or you can add it up
closer to the patterns, then fill up the remaining
space with lacking. I want you to take
interest in this. Filling up by small mistakes can lead to smaller petals,
so smaller circles. So be careful and
take your own time. I feel this is the prettiest petal of all
the designs that we did. It almost resembles
a butterfly wing. Do not forget this
corner spaces. Assume that the leaves
are placed on the design. So some part of the
design should be still visible and not left blank. For the other parameters, you can add the code part first. So I'm adding the
double arc lines followed by the other opposite. So let me do this for
all the other writers. Now, why are these
smaller flower petals? This is my most
favorite of all of the doodle part or
the designing part. I just love adding these
small flower petals. You must have observed most
of the designs are off. Flower petals on me. I guess it is
everyone's favorite. Next part is adding the circles. I convert approximately for matters of all z to the petals. So I will add four. I'm increasing the speed because you need to
keep it quite short. Otherwise, the glass would be exhausting in case you're not doing the project along with me. Now I'd feel the inner part of this flower petal followed
by the spaces around the petals and the so-called
be slow while filling it up. Because you don't want
to do in this 3D design. If you are drawing the
project along with me, you can pause in between
or reduce the speed. I don't want to
absorb too much of your energy by watching
the same thing. So that's the only reason. Next, darken the
outlines as well. I'm doing the watercolor sheet because I find it
easier this way. After making the outlines
book at me like outline to all of the remaining spaces of the petals within
the broader theme. Within these scoped me spaces, I'm going to add dark
creep level petals. Since that is lesser space, only three petals will suffice. For this border frame. You can draw the petals first and then fill
it up with ink. You can directly
draw the top petals, like how I'm doing it. I will add another ten line
in-between these scoped me space and the outer outline
of the pointed petals. For our next design, add some smaller pointed petals. After drawing the petals, add lines in between
all of them. So you're just basically
dividing it into half. Then I'm going to add
slant lines are closer to each other from the
center line of each petal. So basically we
get a leaf design. I hope you are finding
all of these designs relaxing and they are
not very difficult. Take your own time. There is no rush. Try shifting your people
left to right or C, which movement is
better for your hand? If there is too much resistance while making any
of their designs, just keep rotating
your sheet and you will find it easier in
different directions. As you can see for me, this side is easier for
this kind of non lines. For the other half part
of the leaf I will do on the sheet or later and
then add the lines. And this way it
is faster for me. We are done with our patterns. Let's move on to the other
half of the board of theme.
10. Final Doodling : To complete this board of frame, I will add semi-circles
or arch like pattern. I will add this at the pointed tip part of
all of the little petals. So we have an easy
start and end point, which is the tip part
of the below petals. After adding all of
the arch structures, add double outlines from
inside to all of it. Next, I add some brown, black dots at the center
of this arch patterns. You can also add round so
goods and color it up. Our next part of the design
includes some flower petals. A meridian arc for
the inside part. Question, figuring out
where this design nine, I will go with long
pointed petals. We can see only partial offered. I've added flower petals, which cannot be seen completely. Within the arc structure. I will draw another
double art line. The inner part, I will add
some crisscross lines. Whereas for the petals, I will add some shading. Using a scale. I will add this
pointed petals between two quantitative and
points of the arch. You can even draw
a rough line for drawing these pointed
petals are similar height. Are these small double
arc line semi-circles to all of the petals. I will first start adding the longest petal
for all of these. So start almost
from the same door and cover it onto
the top corners. Then add as many
smaller flower petals as possible within the
bigger pointed petals. I'm fast-forwarding
this part because by now you might be thorough with this drawing of the petals. Our next step is to color the
inside spaces of the petal. Just speeding it up to two x. Take your time and enjoy
the filling up process. I'm speeding it up
because I don't want to make the class
pretty much exhausted. Also simultaneously, I will be sharing the smaller
flower petals. You can also add small lines and a dot on top of it that
assembles statements. And do not forget to add the crisscross lines within
the semicircle part. If you want, you can
make shooting darker. It is your choice completely. We have this last
one year and adding some to this slide and
corner. And you're done. I will add some small
goals in-between. The point is, my next step is to add double arc
lengths to all of these. Using a ruler, I will add lines from this double outlined. And I'm drawing it in random by leaving our top
space of approx, five to six MM. You can straight
away draw a line at the top and not do this. I'm just not very
sure if I'll be drawing a line or making a
board of name at the top. But maybe I should do so. I will add a line now at the
top in the remaining space. Now from some work at the
sites of the top part, I will add small lines and
then go from the top part. I hope you're getting
what I'm seeing. I'm just going to add some
small lines like this. Okay? And from the
top line part, I will add some code. That is I'm just going
to join it together. This petal is almost
like an elongated. Once I'm done with the outer
outlines of all the petals, I will start adding slant
lines close to one another. That is filling it up with lines in each half of the petal. John ******** because this
way it is easier for me. So depending which is
your dominant hand, you can find your own
comfortable position. For the other half of
the leaf, or the better, you have to just fill
it up with plain black. You can use a fine
liner like this, but with the thicker
nib, if you have. I'm switching to my
stably low point for fine line of filling up. This is kind of difficult
and not even fulfilling up. And it looks like it is
not even working properly. Or it is only for
smaller details. Maybe the ink is about to end. So I'll stop using this. The best pen for filling up such big spaces
is the brush pen. I'm switching to this coil
coloring brush marker. You can see it is so much easier to overlap
with this brush pen. Justin, two to three strokes, the entire area. Speeding this process. For our last Board of green, I will draw lines approximately half a centimeter
aren't equally spaced. After we're done with the lines, I will start adding slant lines or tonic knee
in each of the blocks. Mentioned, the
remaining blocks with opposite lines like this. Fill it in the corner
spaces as bread. If you have some
booster, let n i. So final step for
the border frame, I will darken the
vertical lines. I will darken the line as
well with the hypophyseal. Know. If you have to find your work
will be easier. But since I'm doing it with ones and I have to make it
void in and display. Flip the paper. And I
will add some small dots. I'm adding it in the spaces and almost closer to
the vertical lines of the top board of pain. So this is how it looks. Sorry for not doing
this in the thing. Once then adding the dots, you have to encircle around these diesel goods with dots are for the center
part of the flower, petals, of the flowers that we
will be adding next. Add a small outline
and then fill it up. Then from the sides, keep smallest molar
that goes like this. You can leave spaces
in-between the flower petals, will make them move, ticker and close to one another. Another great way is to add the outlines forced
like normally do, and then filling it up. Or you could just directly
add dark petals like this. I have speeded this part. But you can keep adding these small flower
petals at your own pace. We are done with a
half-page off design. For the other half page, you have to make exactly
the same design, but it should be
super embossed or mirror image of each
other from the center. From the center, I'm adding one more line or a small border. And adding these up and
down triangle like pattern. Then you can feel either the
bottom part or the top part. You can make any other
design of your choice. I'm feeling the bottom part of the motor FIM and they
appear like triangles. Once done with the border frame. Add double arc line through it. Now almost equal to the second board of three
or the first activity, the board cream that
we did initially with in-order use line
of equal size two that I missed adding the
triangle border pane. So I will compete. And then one to the next. I will flip the paper now and
start adding inverted use. We have to do this
exactly similar to the previous board of cream or the one that can
be seen beneath. So add double log
lines like this. Thanks for let n
inside with dark, what is good design
will remain the same. You have to just
keep in mind that the thin triangles Bordeaux
is actually our center line. And from that, the
designs are seen by Justin opposite
directions to each other. Coming back, the initial design, I think I need to fill in these spaces are
armed or inverted. So I will do that for both of the board of
names up and down. I'm speeding this part because it is just filling
up of these spaces. And by now you might be a pro at this this one. I will add dark coats. You can skip this step. I felt I need a little
touch up for the schools. So I went ahead. So my dear friends, we are done adding
designed to half a sheet. Now we are left with
the other half. That is the exact design, but just in the
opposite direction. So let's take a coffee
break and I want you to complete the other half by
yourself taking your own time. So see you after the completion.
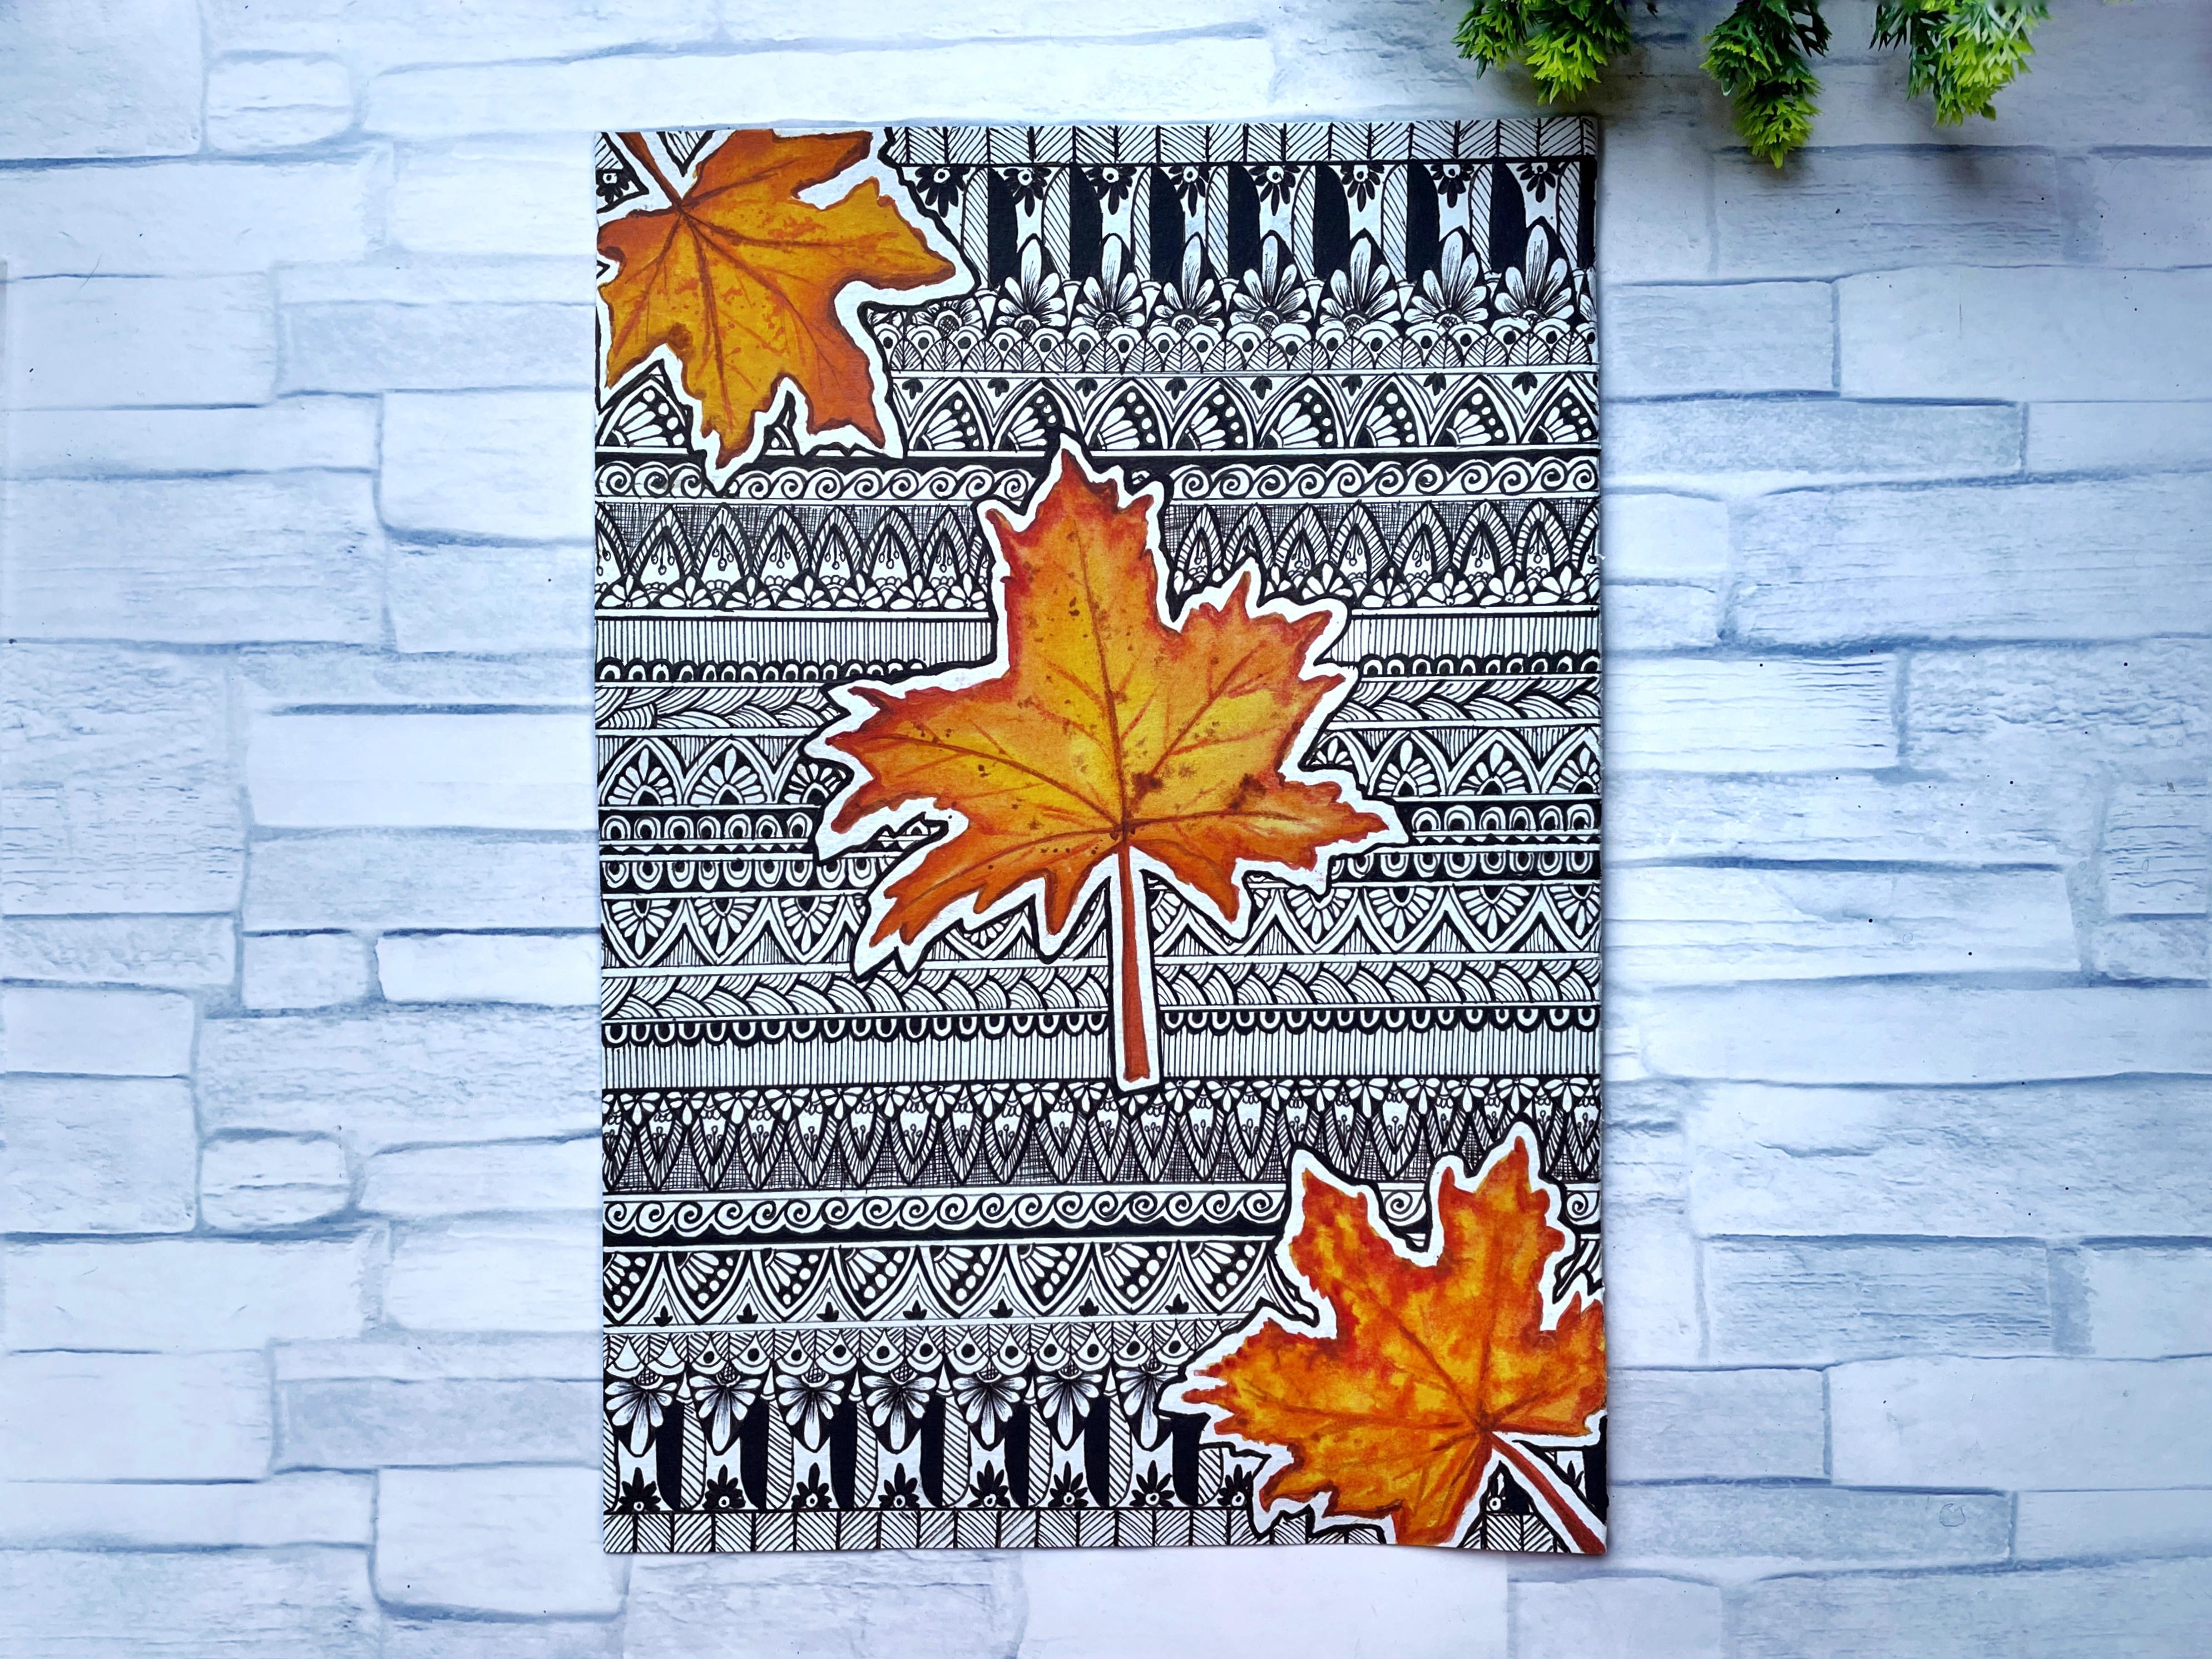
11. Conclusion : So here is our completed project and this is how it looks. I hope you had a
fun time completing the other half part of
the project on your own. I'm so happy the way this
project have turned out. It is really beautiful. All the leaves look so
realistic and lively. The project has seemed designs super impose
to each other, but they are still eye-catching and DOD beautiful
and standing out. Well. Thank you so much for joining and giving your
time for this class. Thank you so much for
joining this class. I hope you enjoyed it if you like the class and it
was helpful for you. Please leave a feedback as
it is a source of motivation for me and helps me improve
further, further classes. Until then, see you in
the next version of this class where we'll be doing this beautiful
nonetheless.
 Mayuri, ARTrinkets I Watercolor & Gouache Artist