Transcripts
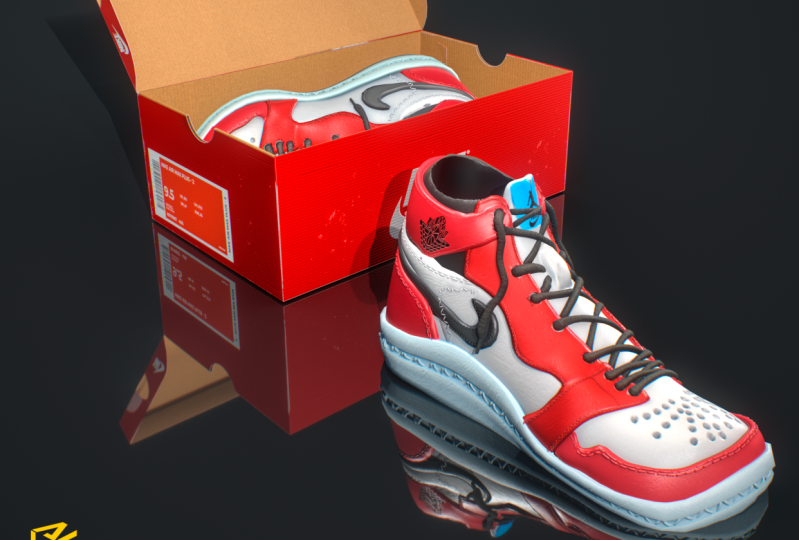
1. Realistic shoes zbrush intro: In this course, I'll be showing you how to create Jordan retro is the toddler addition inside ZBrush. I usually start with a sphere. Whenever I'm doing anything organic, it gives, just gives me the option to create volume easier. Now here what I'm trying to do is I'm trying to create something which is called in the industry or within mold that a shoe is usually created on top. So I'm trying to capture the volume and the essence, if you will, of the shoe. And once I'm happy with that, I'll start extracting the main panels. And those panels then are overlaid and overlapped on top of each other just to create so we can get the final elements of the shoe. And once I'm happy with those, with those parts, I'll start adding, cleaning them up, tweaking and make sure they're overlapping correctly. And then finally we'll be adding a bit of thickness to them. And once we're happy with the final panels, we can go ahead and add small details like stitching, laces, vent holes, and any other tweaks that we need to do before preparing the files to be exported into our 3D software like Maya, 3D max to be rendered in VRA or whatever you, you will be using. Now, I will also be showing you how I display my sculpting using a software called Sketchfab. I really like Sketchfab because it gives me the option to show the 3D model in actually 3D and not render as a 2D stuff.
2. 01 Creating the shoe mould: All right, So when starting to work on any shoe, the first thing you need to create is what it's called in the industry, the shoe mold. And usually these are made out of wooden and you can see in the photos that I'm showing you. And when I start, I usually like to start with a sphere and I'm using ZBrush is see-through to create. So I can see the reference material, any photos that I have opened behind the ZBrush window. There are different techniques to do that, so you can load the image into inside ZBrush. It's all about, I love this technique because you can switch it really fast and it's not, you don't have the hassle of loading in reference. So you'll notice what I'm doing here. I'm just moving around from just using the Move brush, just trying to, to capture the silhouette as much as I can. So capturing that form and as close as possible, it doesn't have to be perfect. Because what we're going to using this, we're going to be using it to extract the main shapes. Now, when we rotate, you'll notice that the shapes look really bad from the front. And this is why whenever somebody starts, especially newcomer into 3D, you have to get into the habit of writing your camera and looking at your model from different angles, sometimes even switching perspective on and prospective off and so on. So here I'm just using the flat brush so I can flat that top area. And I'm looking at this and softening it and moving it and doing some Z remeasure just so I can have like a clean, clean mesh. And as I told you, this, this part is really important because this is the part that we are going to build the whole shoe on top. So again, to see-through, going to take move and start moving some parts. You notice when I go to Mesh the upper part wasn't lost a bit of that angle when I went in and soften it. And I'm using shift to soften. And I'm thinking I'm just using the regular smooth for this one. Again. Don't forget to check out this from all views and also make sure you have multiple reference for any shoe that you're making. Although you'll notice that with the see-through, I'm only working from the side. I do have on my secondary monitor and this is why I showed you that image. I do have other photos from different angles, close-ups and so on. So I know what I'm building. Now, you may ask yourself, why is the shoe symmetrical? Because as you know, shoes don't have like a symmetrical a shape. Well, it's easier to build all the shoe in symmetry mode. And then once we have all the battles, and then you'll notice that once we have all the panels done in all the pieces, we'll just move it and sculpted so it fits left and the right foot. Again, as you can see, I'm just using the Move tool. Nothing else. Always using the see-through. So I can jump around. I'll do edit, smoothen up, smoothing a bit, and then I'll go back again 3D view and do some tweaks just to make sure it looks good in 3D. And not only from the side, because the moment you start moving some stuff on sideview, you, you'll definitely change the volume and the shapes in other views. And you always have to keep in mind to always check your sculpt, whatever you're doing. So here you'll notice that I'm using flattened and 0 mesh. Again, I'm using z to mesh. So just to make sure I have a clean mesh, so I don't have any weird stretching of polygons and so on. You'll notice with each added that I do, the model just changes a bit. So I always have to go in, take the Move brush and start moving and pushing stuff around. Again, as I said, it doesn't have to be perfect, but try to get it as close as you can to the silhouette of the shoe. Because in the next video, I'm going to show you how we can go ahead and create all the different panels.
3. 02 Creating Shoes Panels: Now that we have the shoe mold ready, we can go ahead and start creating the panels. Now, you'll notice here, I already went ahead and did a couple of lines before realizing that I didn't record that part. But don't worry, i'm I'm gonna go through the same process with all the other parts. And trust me, you'll you'll get bored of how many times I'm going to show you this, this technique. So what I'm doing here I just traced looking was three see-through. I just trace the main panel that I'm going to be using. And what I'm doing here, I'm just going in with the brush tool holding Control and just drawing in that brush. Now, you can do this using the lasso brush, but I like using this because it just gives me more control and I feel like I'm creating each, each part. And with the Lasso just seems a bit messy and I use, you always have to go in and delete some of the parts. As you'll notice here, I'm just dragging a rectangle before just to fill the other parts. Now sometimes when I finish the main shape and you'll notice here, I'll press Control and click on the model. So it's softens that mass. And then while I have it softened, then hold Control and Alt. And just to sharpen it back again. And this way, just get rid of any weird shapes. And also you'll notice if you have any extra parts. Now what I did here is I use a plugin that I really love, which is called extract plus. And you can do this without the plug-in. And I have a video just showing you that you can do the same technique without the, without the plug-in. But I highly recommend checking out the blogging Because The, what it does is it just saves you a lot of steps of how to extract a mesh from, from, from a model. And it's nine, really love using it. Does, it does a great job on 0 and just doing the extraction, the Z remeasure and the sharpening in one go. So it's just about, you know, it's just about saving time and saving and just doing something fast. Because when you're working and you're trying to create the different concepts, the only thing, the most thing that takes time is just going in and trying stuff. And you just have a limited time when you have a specific deadline to finish something. So I try my best to find those plug-ins that helped me reduce the amount of time spent doing doing any step. So as you'll notice here, I'm back. Once we extracted that shape, I'll go back and select the wooden mold that we created. And we'll, I'll do the the masking again. And you'll notice that I'll do the ones, ones the shape is done. I'll press Control and soften the mask, and then again Control Alt and just to sharpen it. And once that's done, I'll go ahead and do extract plus. Once I have that shape extracted and you'll go, you'll notice that it just creates a new tool for it. I'll go into inflate and I'll just inflate that Bart so it sits on top of the mold. Now you'll notice we're gonna go ahead and do a lot of edits to this because I need to layer these panels in a specific way depending on the design and the design that we're doing, right? So what do you notice? What I'll be going to be doing is I'm going to be doing a lot of inflate and then I'm going to be using the Move tool so I can move those panels and an out and sometimes I'll sharpen them edges or move some stuff around. Now that we have two panels done, I'll go ahead and you notice that go ahead and just tweak those shapes so it can fit the silhouette. Again, I'm working really rough. As you noticed, not worried about, you know, really close details because we're going to do that once we have the the final, the final panels overlaid and ready for ready for, you know, thickness and sculpting. Now, for this one, I'm going to do the side panels. And this is you'll notice now this is why I don't have a left and a right because if we had a left and a right here, then I I should've have. Then we had to work double. And then you can do the masking part and you have to do it for each side and you're pretty sure I'm pretty sure you can't get it exactly the same no matter how hard you try. So instead of doing that, I'm just working in symmetry, masking in symmetry. And this way I'm sure each side is going to be exactly the same. And when once we have all the panels done, we're going to go ahead and do the asymmetrical boards of of the of the shoe and make sure it looks good on a left, on the right and a right foot. So again here, masking. I'm softening the mask, sharpening the mask. And then once I have the shape that I like, I'll do extract plus. So I'm gonna go ahead and extract that Bart. And it's going to create a new mesh for me. And then when you, when you, when I'm, I'll select that at a bit of inflate to it and then just move those parts around and tweak them. So it's fits with the, with the reference that now when you, when you, when you're starting to do a new panel, just make sure you don't forget to unmask. Because what's it gonna do? It's always going to create any parts you have masked. So it's going to extract that board. So if you have any extra parts coming with the extraction, this is why here, you must have forgotten one of one of the pieces when you started the new one. So now I'm gonna do the panels that hold the laces. And again, you'll notice I'm using the same, the same technique. And again, I'm not using Lasso, I'm using the mask pen. And for this one you'll see, because I'm working in symmetry, I'm just, it didn't come out that nice, but it's just a matter of tracing, so I know where what I have to have those shapes and this is why I was saying you need to have multiple angles for for your shoe or the model that you're doing just so that you wish to be sure you have all the references and you need to the model that you're creating. So with this one, again, the same technique going in. Masking those areas using the mask pen. Just making sure it's clean. And so usually what I'll do, I'll do the outer shape and then just fill that in. And once I have a shape that I'm happy with, that I'll go ahead and smooth it using control. And then, and then I'll sharpen the mask again using Control Alt. And once the shape that I'm doing is good, we'll do extract plus. So again, you'll notice that I do have lazy mouse on for the masking just so it makes, it, makes it easier to create those clean lines. And you'll notice that I have that added to my, to my interface, to my custom interface. So again, you'll notice here I'm going in doing extract plus. So it's extracting that mesh for me. So once I have that ready, I'll do the same thing. I'll go to inflate. And I'll inflate that. You may ask you, why are you using scaling? I like the fact when you use inflated just keeps that shape and it modifies the volume, not only scales it. Because when you're using scale, you're actually scaling the shape and not with inflate, you get a better, a better result and just keeps that same shape that you're going for. Like as you notice when you're doing the Nike Jordans there, the pattern, it's really complex. So if you think about it, you have the first panel than the overlapping of those panels are really, really complex if you think about it. It's not just you get to appreciate how much design work went into, went into the shoe. And since I've been using this technique to create multiple sneakers and sculpting them. It just made me appreciate how much work goes into designing each each pattern on each and each panel of leather and how that is overly on top of the other and the suing and so on. So again, what we're doing now I'm doing the, the the front part and I'm trying to, I should have, I think I should have zoomed in more on the image, so then I would have a bigger model to work with. So I didn't have to struggle so much to get that mask. Perfect. But it did the job as it again, I'm not looking for it to be perfect. What I'm using that reference just so it didn't give me the rough ER the rough shapes because at the end of the day is I still have to go in and clean it and do it manually and paint, do the masking for that part. And you'll notice here, you know, what I've told you before is I forgot to unmask that part. So now just going ahead and soloing that and using Lasso, I'm a mask that part because I don't want it to extract two shapes from me and just wanted to extract the front one. So even if it creates two panels for you, then what are you just select the one that you want to keep it, just delete the other one. So again, creating the mask, filling those the interior of the shape. And once I'm happy with that, I'll do the softened mask. We're just by holding Control and clicking on the model. So it's often the mask and then I'll do the. Sharpening of the mask, which is Control Alt and clicking on the model. And just to make sure you have a clean and it's also going to shows us this tiny gap here, like the parts that I didn't mask properly. So again, looking at it from the top, I noticed that the shape is not as supposed to be. Again, making sure you have multiple reference. Always, always make sure you have much reference as you can. So you can, especially if you're trying to recreate something that people are used to it and they know how, how that part should look. Always make sure to use reference. So again, extract plus. I'll have that part and I'll go ahead and inflate it. And you'll notice that some parts are inflated more because I need to suppose to be a bit further because they're overlaying, overlapping like two panels. And you'll notice once we start adding some thickness through these, you'll notice that each one has a bit of a different difference in thickness and how they're overlaid. So now again, I'm gonna go ahead and check if I have any edits to do. So the front one. And notice that the edge is a bit too low. And I think the last final board I need to do is the heel part or the back of the leg. And I'm going to just do that with the lasso because it's a simple shape, so I don't need to I don't need to go in and hand paint that one. So I'll just I'm using the lasso here. And again, I'll do the same thing, Control and click to soften the mask. And then I'll do Control and Alt to sharpen it. And then I'll do extract plus and to extract that mesh and then just inflate. And I think this one sits on top of all the other. And I need to make sure it doesn't go too far out because you don't want the thickness of that leather part to be too obvious. But again, you'll notice that once we get into creating the thickness for each battle. So again, here, what I'm doing is I'm just making sure all the panels look good while I'm checking out the reference materials that I have. My second screen, just making sure all is good. And now I'm gonna go ahead and create the tongue. So again, using the same technique, using the pen, the mask plan. Gonna go ahead and mask the area that I want it to be to have the tongue extracted from. And this is why the shape of the mold is really important because it's, it's everything you create. Panel lines and shapes are extracted from that model. It doesn't have to be perfect, but it has to be as clean and as much as possible to capture that silhouette. Because I've noticed when creating shoes, I think the most important part, because the rest is just creating panels, details, extracting them. And he has you use, you can see it's repetitive work is the same thing. But if the volume of the mold is not correct, then everything else is going to look weird. So you gotta make sure the main mold, the main shape is clean, is simple, it's easy to read. It captures the design elements that you're trying to recreate. Now I'm going to select them all again. Because the, if you think about it, the the tongue sits inside the shoes so I need to make like a gap. So what I'm doing is I selected the mass, inverted it, and then move the the, you know, not selected part inside. So I can get a bit of that gap inside so I can have the tongue sitting inside the shoe. And I don't know. I don't want to be sitting on top of the shoulder. This just be sitting inside. So now I'm just softening those edges. Moving the the tongue of the shoe just a just a bit in and just tweaking that shape to make sure all the parts are looking good. So now I'm going to just tweak, move the shapes around, smoothing it. Again, making sure nothing is overlapping. But as you notice, I'm still keeping everything rough so nothing is no details just added. Just, I just wanna make sure. Now using the inflate brush. I go in and just add some volume to it because this part is soft and a bit squishy, so it has that foam inlay in it, so it doesn't have to look perfect.
4. 03 Creating the sole: Now that we have all the panels ready, I'm gonna go ahead and create the soul. And for the soul we're gonna using the same technique. So we're going to select the what a mole that we created. And then using the mask lasso tool, I'm going to go ahead and select the bottom area of the shoe. Again, keeping the shapes rough. And I'm going to go ahead and mascot soften the mask, sharpen the mask is in control and then Control Alt. And then I'm just going to do extract plus so it can extract the shape that I will be working to create the sole of the shoe. Although you'll notice in the reference, the sole of the shoe is a bit, has more hard edges and not, not this soft because when I created the interior of the mole is more created two for the panels and the leather parts that are inside of the soul when there were there gluten. So now using, I'm going to be using the Z modular. So I'm gonna go ahead and select the polygon and press space. And we're going to be using poly group and poly loop. So what is this gonna do is we're going to create a new poly group using a polyline of polygons. So I can, this way it's going to help me create two separate parts. So I can sharpen the bottom of the soul while keeping the top the same shape as, as the shoe so it can follow the same silhouette. So now I'm gonna go ahead and select the bottom group. And just scaling that using the gizmo and making sure it's flat. And just tweaking and moving and tweaking that shape. So we have a sharper edge that goes into a softer edge. So here is just a matter of, you know, tweaking and making sure that the lines are clean. I'm just I'm just, I'm just selecting that bottom poly group, which is the red part. Only that one is affected now, so I'm just moving that around with the move tool and with the gizmo and just tweaking these shapes until, until I get something that I'm happy with. As you noticed here, I went ahead and using the SSID modeler, I deleted one of the, one of the edges. And I tried doing a 0 measure just so we can see if I can create a cleaner, a cleaner look. And even tried a bit a bit of a bevel to see which one because what I don't like, and unlike the, the huge space that it's being created in the front. So what I ended up doing is I ended up sliding some of those polygons. You think the Slight tool, when you select, when you hover over an edge and you press space while having Z modular selected, you have the control for the for the edges. And then just moving these along so I can get the shape that I'm going for. Again, I'm not super happy with the shape. So it still needs a bit of tweaking. And again, it might look a bit weird now because it doesn't have any left and right shape to it. But again, it really helps me keeping the shapes clean and easier to manage rather than having different, different parts to worry about. And once I'm happy with the shape, I can go in. And so what I'm doing here is I went ahead and soften the, the, the soul using the Polish by feature. And what I'm doing, I'm just, you know, deflate and get. So if you go minus, you're going to deflate the shape. If you think it's going a bit, a bit outside. I wanted to make sure that the, the soul thickness is enough. So if you go scroll down in the tools to display properties, you'll notice that when you create a single sheet of polygons, you only can see it from one view, so you can't see the inside faces. So to fix that, just go to display properties and make sure you have double click. So now what I wanna do is I want to create that edge where the stitching will be sitting on the soul. So I'm going to using the same z modeling technique that I've used before to create a new polygon group using the polytope. So using a loop, I went ahead and created a new poly group using the poly loop from from Z modeler. I'm just making sure the shape is as clean. It looks good from from all sides. Here's just tweaking the front part because I noticed that looking at another photo and notice that it's a bit too round and skilling a bit too high. Again, it's still looks a bit weird because we're used to seeing the shoe and it has that inside form or a bean shape from beneath. But just makes your life easier when you're creating. And now you'll notice when I created the group. Greater the same group as the, as the orange one. So I'm selecting the other ones and just creating new groups. So I can extrude that part. An only that, only that poly group that was created. So once that's extruded n, I'll go ahead and tweak this. Just add a bit of dynamic smoothing to it. And you'll notice that I'm redoing this a couple of times because I'm not happy with that part because it has to be a bit has to be a bit smaller. And I thought when I did the dynamic subdivision, I just looked a bit too, too thick. And, and again, this is why references is really important in looking at photos from different angles and making sure it looks good. So now what I'm doing, using the see-through, just overlaying it on the, on the reference image and just moving the soul but down notices was a bit, a bit up. This is why I tell you to when you're doing the extraction or the masking on the mall, you don't have to be exact because you're gonna do a lot of a lot of tweaking. Anyhow. We're going to be moving a lot of stuff and so on. So what I'm trying to do now is I'm trying to select the interior of the, of the shoes. So I'm gonna do the same thing using the polytope. Just make sure you're selecting the polytope that you need. You need to tweak. Now. Selecting the interior poly group and nothing else. So it's not affecting the exterior of the shoe. I'm just moving that into I don't have that gap between the panels and the soul. Now, you'll notice even when we're going to start adding thickness, we're still going to be tweaking and moving some stuff around. So we're still in the rough portion, so we're still creating rough shapes and just blocking in. This is what I call blocking in the main shapes of your model before adding any NAD. And this is the, actually this is the most important part in any, in any project is just making sure your shapes, your main shapes are clean, are easy to work with, easy to edit. As you notice, I'm keeping everything really low polygon. I'm not worried about adding too much mash or subdividing it too much. I'm using dynamic subdivision just to test out the shape when it's smoothed out and see how it looks. So now that I'm almost happy with the sole, you'll notice that we're going to edit this a bit more in the next videos. I'm going to go ahead and do the exact same thing that we did for the panels and just to extract the swish and for this one using the see-through, overlaying it on top of the sometimes I'll turn on perspective with the see-through because you have to keep in mind that the photos reference that you're using are actually captured with a camera. And you have to keep in mind that cameras have, depending on It's telephoto or if it's 35 millimeters of 50 million meters times it's going to add some distortion. So it's always a good idea to view your model with perspective and with perspective on and prospective off. Just so you can see if it looks good, because it might look good if perspective is off, and then when you turn perspective on, it would look really, really weird. And as you'll notice, I'm not worried about the shape not coming out, you know, exact because I'm just using it so I can roughly know where the shape, where that swash has to has to be sitting. And then I'll just go in and with the mask pen and just and just create, create those shapes. So filling in the shape and creating a clean mask, just have a couple of lumps here that I'm taking care of. And then connecting the back part. And you'll notice that I forgot to unmask the bottom part. So I'm doing that now, so I don't have an extra soul part 2 to worry about. So now doing the same thing, extract plus, I'm extracting the swash. And now it's a matter of just going ahead and cleaning this up part. And this part is really important because I want to keep the sharp edge of the swish and I want the rest to be clean and smooth. So I'm selecting only the poly group but the polygon. And then under Polish by feature, I'm just sliding that a bit and you'll notice that it's going to affect the entire shape of it and it's going to soften those weird angles because our mask wasn't perfect. And this is why I say don't worry about if it's, if the shape is not super clean because we'll, we'll worry about that in once we, once we clean up the final, the final version. So now go and go ahead and inflate the shape. I'm going to tweak it a bit. Just making sure all the parts that are all the panels that are, that make the shoe are overlapping properly. And preparing for. In the next lesson to start adding a bit of thickness.
5. 04 Preparing shoe for final form: All right. Now before I start adding any thickness to the to the panels, one final thing, I, when we created the mold, I wanted that mall to have 3D, high density and a lot of polygons. But for our final model, I need really simple cage. So starting from a sphere, I just go ahead and, you know, really sculpted using just move tool and softening and just following the same mold that we had before is the same technique. But for this one I'm just, I just need to make sure to keep it, you know, low polygon because I'm not going to go ahead and extract anything out of this. I'm just going to be using it so, so I can have a clean topology and clean loops. And you'll notice that I'm going to be doing that so we can create the interior of the shoe and also to create the the part that the tongue is going to be, is going to be sitting in. And again, the same, the same technique that I showed you when creating the initial mold. But this one is just way lower in density. I think it was like 1, 0, 0, 0, 0, 0 polygons or something like that. So just going in and moving those. So we can, this way, we'll have the high polygon in case we need to extract any other parts that need to be high density. And we'll have this part so we can create, you know, have a clean mesh to work with. Easier to render, either to extract, you know, extrude and have clean poly groups. So you'll notice using the z d modeler, I'm going to go ahead and click Alt and select a couple of faces. And this is going to be the, the body group for the extrusion. Or the, you know, the the, the place where the tongue is going to be is going to be sitting. So I'm just going, going in and selecting couple of faces using Alt. And then I'm just dragging to select that area. And then using the 0 modular am using extrude to create that interior area. So you notice that this gives us a bit more control. Also keeps the mesh way cleaner and lower. Because the lower the density of the mesh, the easier it's going to be tweak to make big changes. And especially, you'll notice when that's going to be helpful when you start posing the leg. So it can work for a right and the left like so I'm here, I'm just using the Move tool and just moving those those polygons. And I will only selected the yellow poly group and smoothing those edges without affecting the exterior. Now that we happy with the shapes, I'm gonna go ahead and make sure it's sub tool has only one poly group. And I'll do that by selecting each tool and just doing Control W, just to make sure I have, you know, each part is its own particular because it's going to be making it easier for me when I start merging these. And you'll notice here that each one has its own color, so it's going to be easier to select if I need to tweak any of the parts. And then also afterwards when we start extracting each Bart and splitting this into a poly groups. So you'll notice here that I turned off symmetry and I'm starting to sculpt the shoe using some reference. I have a couple of photos looking at how the shoe looks from beneath. And I'll tweak until I'm happy with the shape. And you'll notice with especially with kids shoes in the front there a bit more round and soft that they have that should be looked to them. So I'm going to go ahead and just using the Move tool, just move some parts around. Always make sure when you're doing any edits to look around from the other views. Because again, any tweaks you do, it's going to affect the other views as well. So make sure you look at the shoe from perspective, from the top, from the side just to make sure you're not affecting it and it doesn't look come out looking bad. So here I'm doing the, the, you know, the interior part of the shoe which is, you know, you have like that inside part of the shoe which is which just goes in. So here you'll notice that I'm selecting the Pauline group of that panel, so it makes it easier for me to do any edits if I need to flatten, if I need to solve and if I need to move some parts around without affecting the other the other parts of the shoe.
6. 05 Adding thickness to shoe panels: Before we start splitting each part and start adding thickness, I'll just go ahead and make sure everything looks good. I'll turn off dynamics subdivision just so I can see how the shoe looks with a bit of softening. I'll select the front panel and split that using the split hidden. And now using the panel loops, I'm going to go ahead and add a bit of thickness. And my settings usually are loops. One, Polish 0, bevel 0, and elevation minus a 100 because I want the thickness to be on the inside and not go on the outside. So as for thickness, It's really depends on your model. So depending on the scale of your model, it can, it might vary from 0.1 to 0.01. So it really depends how, when you created the model, at what scale did you create that model? So it doesn't have to be exactly what I'm doing. Now. It's just a matter of selecting the part, extracting that part using split hidden, and then going into Banner loops. You know, tweaking the same tweaks loops to one, Polish 200 bevel to 0 and elevation minus a 100. And the thickness sometimes from for the each part on the same shoe, it, they might differ because if I need that part to be thicker and just go inside the shoe so I don't see that the underneath side of the interior side, then I might make that a bit thicker. And you'll notice that here I'm selecting each that Bart solo. And what I love about BATNA loops is, you'll notice here that it creates, always creates three poly groups. It's going to create the outer shell. It's going to create the thickness. It's has its own poly group and the interior has its own poly groups. So this makes it really easy for me to go in and select each part that I need to tweak. Now if I'm not happy sometimes what I'll do is I'll select that part. Like for example, for this one, I deleted the, the interior and I went ahead and selected the outer polygon and added some smooth do it. Now, for this, you can go ahead and use crease under z modular. But what I like, I like adding insert edges because when you add an insert edge, it still has that nice soft edge when you smooth it so it doesn't look like it's made out of plastic. Although if you'll look at choose usually that those edges are really sharp. But I don't know coming from my ion, coming from a 3D models, we always add a bit of softening because nothing in, my mentor used to say nothing in nature is that, is that sharp, even, even a rock sharp proc has softened edge. So the same here. You'll notice that before I started adding thickness, I selected that part and added a bit of Polish by feature. It helps if you have any areas that warrant, you know, clean it just cleans them up. And then I'll go ahead and do this same thing. Panel loops, add bit of thickness. And then I'll just go in and add an edge and insert edge, one closer to the outside and 14 the inside. Now, you can, for the inside maybe you can use crease edges. But I don't know it just, it just easier for me to do to add that. So now we're doing the back, the back part, again, selecting that poly group. Again, softening it up a bit. And you'll notice that this Because I didn't check out how the clean the mask was. It had like extra shapes, but again, I selected that part and deleted the other ones. So now that I know I have a clean mesh, I'll go ahead and using panel looks again and add a bit of thickness, thickness to it. Again. Always making sure because you're working in solo mode, you don't know how much or how that looks with the rest of the shoe. So always make sure you, when you make an edit, go out of solo mode and tweak those. So you can, you can still make sure that the shapes looks clean. So now again, Control clicking on a poly group, isolates that. Then we do split hidden, and then under panel loops. Before doing panel loops, I'll do Polish by feature, just so we can polish those shapes just a tiny bit. And then I'll go panel loops at a bit of thickness to it. And and elevations always going to be minus a 100. Just in case you need to engage you one, in case when you created your shoe, you want that to come outside as you noticed here. I didn't I wasn't paying attention, so I put elevation of a 100 and not minus a 100. So now I just went ahead clear selected the outer face and deleted the interiors. This is why I love band loops. Again, said that's wise now. Because it creates, it gives me that option of creating an outer shell and thickness and the interior shell. B, if I need to select or tweak or delete any of the parts, I can always do that. I'll select the exterior face and delete hidden. And I can go ahead, tweak it, smooth it, and just redo the thickness again. As you'll notice, for each part, I'm doing the same thing and I wanted to record all those steps so you can see that it's the same process on each part is just a matter of going in and tweaking each one. Now, yes, you can have all parts under one poly group and do the panel loops for all poly groups. And it will work. The only problem with that, then it would be if you want to select one part to extract it, you will either have to do auto groups and it will select, create multiple groups and then you wouldn't have that control. So I know it's a bit more work to go in and do each part, but I loved doing it this way because I know I have that level of control that I can always go back and tweak, always go back and delete if I need to make it thicker or I need the shape to be a bit softer or I don't know, maybe at 1 I need to tweak it or I need to, you know, change the design for some reason, right? And it gives me that option. And you'll notice for this one, I have two dots on the, on the bottom that we're extra from the extraction. And again, it happens. And you can always because you have that. You'll notice here afforded the swash. I decided to go with the crease and not use the insert because I wanted that to be just to have a bit of a more sharp edge then the rest of the shoes. So we can have a bit of a different texture, a bit of a different shape to it. So again, I'm selecting those parts and delete than, so. Doesn't matter if sometimes you forget, you have like an extra part extracted. So now I'm going in, I'm selecting each part and I'm trying, I'm adding some dynamics of divisions. Because the moment you start smoothing some parts out, you'll notice that the you lose a bit of volume and they might shrink a bit. Or it might be too soft or maybe, maybe on one part you forgot to add a bit of an edge or a crease or whatever to soften that shape. So now for the tongue, I created the same thing using banner loops. And now I selected only the interior part. And I'm softening that up, but it's not affecting the the exterior part. So that exceeded part stays exactly the same. And this is why I like banner loops, because it gives me that option of control. And I think especially when you're working as a freelancer or you are working projects for other, for clients, is working non-destructively is the best thing you can learn how to, how to do. If you want to work as a freelancer, you have wanna do projects even if you're working for yourself, it just gives you that more option too. You know, always coming back and tweaking or always coming back and making edits or always reusing. If you want to reuse the model, you always have that because you have the, you know, the rough shapes and and just gives you, it gives you more options to work with. Now, for the next part, we're gonna do is I'm going to go ahead and create the holes for the laces. Now for this one, I'm going to be using something called Boolean. And what I'm doing here is I'm creating a cylinder and just using the IMM primitives that you can find under the brush. So I went ahead and created one cylinder and I started duplicating it by holding Alt and just dragging the gizmo so it creates multiple. So then once I'm happy with their placement, I'll go ahead and add a bit of a crease so I can hold that edge and you'll notice in a bit. So now looking at the reference and looking how where the holes are supposed to be sitting. Just going ahead and duplicating that cylinder using ALT and move and just moving it in. And then once I'm happy with the placement of that one, I'll go ahead and do it for the next. Again. It you always have the option to work rough. So always do not worry too much about having it sit perfectly or being perfect because you always working non-destructively gives you this option. Now, I love using this method because it gives me the option of tweaking. And you'll notice, you know exactly what I mean in a second. So when I added the, the cylinder for the whole and notice that this panel was supposed to be a bit square and not that rounded. I think I rounded a bit too much when I did the Polish by feature. So now that I have these shapes n, and I'll go ahead and move these down. And before I use the Live Boolean, I'm just gonna go ahead and increase the interior of the Soviet. When I add a bit of DynaMesh dynamic subdivision, it will keep that shape and it's still going to get solved. And with this technique, it just gives me the option of going in and making the hole's bigger and smaller using inflate and without affecting the model. So now I haven't added any holes through the model. I didn't break though the polygons. I still have the ability to tweak. I still have the ability to go in and move stuff around. So using the library and just helps me have that much level of control.
7. 06 Adding stitching: In this lesson, I'm going to be showing you how I add a stitching to each panel. And for this one I'm going to be using some IMM curves that I usually use when adding brushed detail. You can use Alphas, but I like using those because it, they look more realistic. You have more control on how big you want them to be, the distance between each one and so on. I'm going to leave a link for those brushes so you can go ahead and check them out and purchase them. If you think, if the thing that I really think the artist made a, an amazing job creating these. So what I'm doing here is using the curve for this one. For this panel, I used a double stitching. And you'll notice some panels have double stitching and some panels have only one row of stitches. So I'm just going in and drawing those using the curve brush on top of the panel. And once I have these laid out and go, go ahead and select the Move Tool. And I'll just tweak those and move them. So they, so they follow the curve exactly. Make sure when you using the Move tool on, on these, make sure you don't stretch them too much because then it's not going to look that natural. And you'll notice that if you start tweak, you know, dragging too much the move tool some, some lines will be a bit stretched a bit too much. Now, once I'm happy with the placement, I'll go ahead and do a bit of inflate on on those stretchings and I'll tweak them until I'm happy with the placement and I'm going to do the same thing for the other ones. This is why I like using curved brushes because they are actually made of polygons that are actually low polygon. So you can actually, you know, dynamic subdivisions them or you can actually import them into mild VRA and you can render them as meshes. And at the end of the project, and if at 1 you want these to be as an Alpha, you can actually merge them to the mesh and you know, have them exported as a normal map or a displacement map, depending, depending on your project. So you'll notice that I'll go ahead back and forth a lot tweaking these and moving them in and so on. So now moving to the next panel, I'm just gonna go ahead and do the same thing. I'm going to go ahead and solo it. Don't forget to have reference, close-up reference for how you want the stitching to be. I have the photo that I'm looking at, how each panel, if it has one stitching, one row of stitching go for double stitching. Now, again, for the size, it really depends on the scale of your of your of your scene. So can be similar to what I'm using here or not. And that the curve size, it is actually controlled with how the size of the curve brush that you're, when you start creating, your start drawing it. What's the size that you are starting with? And try to keep when you're selecting like 19 or 20. Tried to keep that in mind if the other panel is going to be using the statement type of stitching. So you can stay consistent between, between the two. And you'll notice again, once I'm happy with the, with the initial placement. Now the thing with curved brushes is, although there's a really powerful tool, they do have limits on how, you know, how close that curve can follow the shape that you are that you're trying to draw. Now here, if you go under brush and you go into depth, you can actually select how deep do you want that curve brush to go in so you don't have to go and do it manually for each stitching that you're adding. So just, just by tweaking that depth area, just going to add a bit more into. And you'll notice the difference here between this one and the first battles that added. Again, using the Move tool, I'm going to go in and tweak these until I'm happy with with how deep they are, how they're sitting on each panel. And once I'm happy with the shape, I'll go in and add a bit of inflate tweet to each one. So just gonna go around and do the same thing for, for all the others. And I think for the interior of this one, this panel, I think I'm using 11 row of stitches and the exterior particles to robes. Yeah. And for this one, I added the stitching. And here's the beautiful thing about curved versus if you need to tweak the size, once you laid out your curve, you can actually resize the brush and you can, if you click, it will just resize those stitching. So again, with the move tool, tweaking them, moving the men and making sure that they're sitting inside those meshes. And you'll notice that all the meshes of the battles and all the parts of the shoe are actually dynamic subdivision on. Because as I told you, when you subdivide something, when you add that I'm subdivision, the shape of it just changes a little bit, it loses a bit of that volume. So you always have to keep in mind when you're adding curved details or adding another mesh on top, just make sure what is the final look. Because if the final look is not DynaMesh, that it's going to be simple and just low polygon. If you're using it for a game or whatever, then you don't have to worry about that. But if you, if you know, you're going to be subdividing your model at the end, just make sure you have dynamic subdivision on. And it just going to make it easier for you to go in and tweak and, and make sure how deep that part is going to be. And you'll notice that I'll be doing a lot of editing for this one. Even, even before, even when we start adding more detail, I'll go in and fine comb with the fine gum and just make sure each stitching is precisely what it's supposed to be. Now, with that said, if the model that you're doing is not going to be shot up close. And by that, I mean, if it is not going to be rendered really close to stitching details and stuff like that. Didn't you don't have to worry about it in the shoes are just on the, on the model and they're just never going to have a close-up shot, then it's not a thing to worry about. But I know for this model, I'm going to want to render it as a close-up of the beauty shots, so as a product shot. So for that, I wanted to make sure the stitching look as realistic as possible and it had like a nice placement so you don't have any any of them hovering or floating or not, or maybe just a bit too deep. And so you'll notice on this panel I'm doing the same thing. I'm just going to round a, lay down a part of the brush and then once I'm happy with the placement, you'll notice that you can actually continue just by dragging the curve and it's going to create like a red line, red tail. And you can drag that. And it's going to just continue creating that curve. Now if it goes a bit too inside the model, just drag it a bit and should, should come out. Now, again, the curve brush is a bit fiddly, to say the least, Like it's not, it's not perfect. It's an amazing tool. But again, it's not perfect and it's, it needs a bit of tweaking. But their results, if you just spend a bit of time on them and just take, take your time and not rush it. Just going to look really, really beautiful and you just gives you that option of 1. You want to merge them, you can. If you wanna keep them like that, you can. If you want to use them for rendering. Again, you just gives you that many options, like for, for the purpose that I'm using them. They're usually used them for two things. If I need to render them in Maya, It's easier and cleaner for me if I, if I import them as meshes, if I'm going to be using them for one of the toys that I sculpt. Then I'll in the end, once I have all of the details done on each panel and each stitching, I'm just going to inflate them a bit more. Sometimes I'll, I'll even use like really big size because it really depends how, how small the print model is going to be. Because there's a huge difference if your model is going to be three inches or your model's going to be 12 inches as the final, the final product. So you need, you need to keep that in mind with adding stitching. Even if the reference in your reference, the realistic scale is different. It just a matter of artistic and also how, you know how clear you want that detail to be. So you'll notice that on that part, sometimes the interior part doesn't work, just goes a bit deeper. And that might cause a bit of issue. The curve brush, as I said, while it is a really beautiful tool to work with, is a bit fiddly sometimes to get it right. But if you take your time and I love using, using the brush with dynamic because if you start adding, if you start defining your mesh, you can't add curved brushes, so you need to make sure it doesn't have any subdivisions. So dynamics of division here works perfectly because I can still keep the model fairly low in Bali numbers. And here, ZBrush crashed. Yeah. Happens. So you'll get used when you're working with ZBrush. So again, this is why sometimes I see the files. When I'm working on a project, you'll see how many iterations I have of of the model. Who's going to have, you know, shoe one, the tails one details to detail three digital for bigger because your software is going to crash. So make sure you get into the habit of saving multiple steps and don't rely on quick save it because sometimes, although quick save works, sometimes it that, that might be corrupted and it's way better if each 15 minutes or 10 minutes or 30 minutes. Depending on how fast your work, make sure you save different iterations. It also helps you to, if at 1 your client wants to go back, you can always have one of those files to go to. Go back to. And again, you'll notice I'm using the same thing, using the curve brushes. Adding adding those stitching for this panel again, it's one stitching, no double stitching for this one. Once I'm happy with the placement, it doesn't have to be exact. I'll just go in with the move tool. Just make sure when you're using the Move tool, make sure you don't stretch those parts too much. Just makes your edit subtle. And if you do, end up stretching some parts, you can always move some parts around so we can move some of the other stitching so it doesn't feel that awkward. So once the shape is unhappy with the shape, I'll just go ahead and add a bit of inflate. And you know, and you tweak the battles because sometimes when you start adding a bit of those stitching because they do have a bit of thickness. They might protrude the other panels and it might affect the look of the shoe. And now, I think this is the final yeah, this is the final panel that I'm going to be adding the stitching to one. And this one I think it has double stitching. And I always try to keep a piece of paper on my desk and just take note of. Because sometimes even if you have the same curve brush, they might have different settings of like 20 or 23 or 30. And I like just just take notes on what sizing that I use for that one. And again, it might be different for your model depending on what scale you worked when you, when you start to creating the model.
8. 07 Finalising stitching: Alright, in this video, I'm going to go ahead and show you the rest of the stitching. Again, I'm not using any new technique or anything. I'm just using the same the same one that I've been showing you. Again for this one, I'm going ahead and adding a curve brushes for the stitching. And they'll notice with this one is going to be a bit, a bit more complicated because the shape is a bit not that complex, but because it has, it's a bit longer, I think. Now looking back at it, I think I should have split this into two and just make the stitching in the backers would have been wouldn't have been. That's obvious because the wood the curve, brush, the moment you starts moving stuff. So you'll notice here it's going to affect how the start and the end, even if you lock them down, is still going to have a bit of, you know, it's just gonna give you a bit of headache because it's connected and it's still, you're going to go ahead and tweak them with the Move brush and just took a bit more time than I would have would have liked to. And are now looking at it. I think would have been better if I would have split split this into two and maybe start from the start of the swish to the back of the shoe and just have two more like four sets of stitches rather than two long ones, which ended up being taking a bit, a bit more time than I would have liked. Again, same procedure. Once I'm happy with the placement. I'll just go in and you'll notice that sometimes some of them will look a bit not perfect. So I'll have to go in and tweak them with the, with the move tool. And you'll notice that I'm doing the same thing even on the, on the bottom part, although the, you know, the top part give me a bit of a headache, I didn't change the strategy. So now, again, you notice that, uh, that that one didn't work out so light and did that and I tried to tweak and have just a cleaner shape. But again, as beautiful and as strong, the curve brush is sometimes it's a bit, a bit of a headache to get it right. So once again, once you have once I'm happy with the shape and you'll see filling with it. You can actually see the back forth how it's being affected when, when I start moving some stuff and how it goes outside line. And this is why I think splitting this into two parts. Maybe, maybe you can try it and see, see if that works better than what I did here. Just split that, that maybe have the stitching area in the back. Now the problem is when you start, when you want to add a bit of extra edges to a small area. It's sometimes it's a bit, I don't know. Doesn't like that because it doesn't have a lot of space of travel to it, just ends up taking it but too much time for tweaking. So yeah, but I left this in. Just show I can show you that. Don't be too upset if it's if it gets a bit too frustrating. Now you can you can, yes, some of you out there will say, Well, yeah, but you can want to create like a loop and you can increase that or you can use the different poly groups so you can add. But I wanted this to keep it a bit simpler and not over complicated. The moment you start doing that, you need to make sure the loops are continuous and it's clean. And so you end up putting more work into it when it's just a matter of, you know, tweaking a bit with the move tool and wasn't happy with the shape. Think you've got used to it by now is I'll go ahead and add a bit of inflate so we can make these easier to see. Now for the rest of the video, I'm going to let you enjoyed the process of adding stitching. For the next one, I'm going to be adding stitching for the sole area. And then finally, just a bit of stitching details on the top where the SHE, the tongue is going to shoot. All right. Hope you enjoy it.
9. 08 Adding holes and laces: Now that we have all the stitching figured out, we'll go ahead and create the vent holes from the top of the shoe. So for this one I'm going to be using the same technique we did for the holes on the laces. So I'm just gonna go ahead and create a cylinder using the IMM primitive. So I'm just going to drag that in. And I'm gonna go ahead and increase the bottom and top edges using the Z modular. And while, once I have one created and set in place, I'll go ahead and duplicate it. And I'm going to duplicate that using the while holding Alt and just dragging, dragging the shape. So I'm just going to go ahead and do that. And now again, make sure to look at the reference, see how many, how many holes you need, you need to create for that one. So now I made sure to keep those as one piece. So now I went ahead and use dynamic subdivision. And I have lively and on. Make sure that you have the mesh, that it's going to cut out of the mesh underneath it. Because then it's not it's not going to it's not going to affect its only affects the meshes that are, you know, above, above it. Okay, so now that I have the first draw and I like how it looks, I'm gonna go ahead and select that, duplicate it, and rotate it into place. And then I'm just gonna do this the same thing for the for the other rows of a vent holes. Now, for these, I need to make sure initially I'm going to make sure all three are placed and they have a similar thickness. Because you have to think this is the handle of an oval, an oval shape. And then once you duplicate them, that thickness is going to be slightly different. So now it's just a matter of going in, duplicating and creating the main shapes. Once I'm happy with those, I'll go ahead and individually take each cylinder and move it in until I'm happy with how the placement of each one and if the depth is enough. But what I like about this technique is the fact that I have each cylinder separate. I can tweak any of them without affecting effecting the shape. And keep in mind, I'm not doing, I'm not adding any holes to the shape. What are we doing here? We're just doing a live billion. And only once we're happy with the model, we can go ahead and believed that shape and that shape. It's going to stay in that final and that final form. So once I'm happy with this, I'm going to go ahead and merge them. And then I'm going to do emitter. You notice that I didn't merge the middle one because I only Monday the emitter to the sides. And because the shape of the shoe is not symmetrical now because we edited this, I'm just gonna go ahead and edit the, the, only the cylinder that needs needs to be tweaking. So I'm going to select that one and just make sure that vent holdings a bit more into the to the shoot. And once I'm happy with that, go ahead and tweak. And again, just because I have that level of control and each one is separate, you can go ahead and tweak them. And just the fact that you can move around and you don't have to be perfect, just adds a bit of handmade look to this because just you can you can play around with the placement and and if you think the holes are too big, the fact that we have this and may have crease added to the both edges. It's not going to affect the cylinder. So you can go ahead and inflate or deflate. If you think the holes are way too big. Once we have that ready, the next step is to start adding some laces. And for these laces, I noticed that I needed to make the soul. Again, as I said, you can't see the my other screen, but my other screen I have like a lot of photos of the model that I'm trying to recreate. So when I'm working on something else, some because, because I've, uh, my attention is on some other part, I'll notice something that I didn't want working on. It's all tweak. You'll see me like jumped from one place to the other. Now that now that I'm happy with that one, we can go ahead and create laces. And for this one I'm going to create, I'm going to be using a curve brush that I, that I got that I'm going to leave the link below. You really should check these out because they're really, really good. And you'll notice that I'm going to start adding a couple because before I decide which one I want to, I want to go with. So initially I started with the cylindrical one and then I didn't like how that one looked. And then I selected one which had a more of a flat look as the a J's usually look like. And then it just about the matter of figuring out the size of what I'm going with. And I think that size is good because you can, even from this angle, you can actually see the texture. And I'm not going to go ahead and do like a realistic laces set up. You can do that. But it's a lot It's a lot of headache and you're going to waste so much time zone I'm doing is I'm just call it, I'm cheating of it. So I'm gonna do, I'm gonna do like to straight ones and then I'm going to do like an X shape. Just to I know I should have done like a couple on underneath. Just to sell that look a bit more. But honestly, it came out pretty pretty good. So I'm happy with how it looks. Although yeah, I think it about it now. Maybe I should have went in and added maybe a couple underneath. And just so, so it looks a bit more natural. Alright, so once I'm happy with those, I'm just gonna go ahead and tweak the curves until I have the placement almost, almost right. And then it just a matter of going in and selecting each one, doing auto groups. And you'll notice like each pieces separate discoveries was really, really nicely created. And then with the Move brush, I'm just gonna go in and just going to start moving some stuff around. Because what I want is I want that feel of the field that the actual lace is just going into those holes. Although the holes now or just live Boolean and they're not final, but we were still going to come back to these and tweak them accordingly. But for now, I just want these to look as if they are going inside, inside the shoe. So I'm just going to leave you with this so you can see how I'm gonna go ahead and pose this. All right, Enjoy.
10. 09 Finalising laces and small tweaks: Now that we have all the laces posed, and almost there, I'm going to go ahead and merge them because I want these to be a one piece. And then the next part is just going to be me going with a really fine comb and adding, making sure each part is, has dynamic subdivision. Even the laces, I'm selecting each group of laces and I'm adding dynamic subdivision to them. I'm just wanna make sure everything looks as it's supposed to and we don't have any stitching going maybe too deep into the into the panels or maybe because you'll notice some of them when you zoom really close, you'll see some of them are a bit floaty. And I really don't want to have any surprises when I start preparing this for 3D printing or preparing this for modelling for rendering, I'm sorry. Although for rendering is not a huge problem because you doesn't matter if you have that much space, but you don't need, You don't want that space to be too big. So it's obvious or it gives you like a bad drop shadow. But with 3D printing, you need to make sure the model is watertight and you don't have any those areas because they, they might, they might create some problems when you start DynaMesh thing and when you start decimating your model and you're just going to just going to add a bit of more headache when when he can just spend, I don't know, five to ten minutes going over your model and making sure although I know it's tedious work and it just takes time. But I think at the end of the day is just spending that much time on, on each piece. I know some of you might say this is a bit, a bit too repetitive, but I wanted to show you that the entire process and not just go over it. It's like, yeah, we're done with this. We'll want to show you like because it does take time to make something look good and perfect and ready for production or ready for rendering or whatever you're planning to do. So just keep that in mind when you're creating some something 3D model. And you want that to be, your hero shot are going to be really up-close or needs to have the details. Just make sure to spend that extra five to ten minutes to make sure everything everything fits in really nicely. So I'm just going to leave you with this. And you'll notice that I'm not using anything new here. I'm just using the Move brush, going over the, the shoe. Every angle, rotating it, looking at from almost every angle to see and to make sure I don't have any anything, you know, looking weird on any gaps or anything like that. All right. Enjoy. Now that we have all the details, the next step is to do something called a Boolean subdivision. So what I did is I went ahead and added all the parts of the shoe, but without the laces. So you're going to notice that the laces are their own sub tool because I want to make sure I have those final edits that I was always telling you about. So what I'm, what I'm doing here is Boolean was subdivided. The subdivision is, it goes ahead and merges everything, but it also uses anything that had a Boolean to it. And you remember we had the vent holes, we had the holes for the laces. And now I'm just going in with the Move tool and just each lace just going and dragging and moving inside the making sure it looks as if it's those laces are coming out of those holes. Now, you might say, Well, why didn't you leave a bit of gap? Again, this, this particular model is being created for a toy that I'm working on. And it has to be it has to be 3D printed. So I needed to make sure I don't have any extra gaps that I need to worry about. So if you need to because of the tension of the laces, if you need to add a bit of a gap on that side so you can free, go ahead and do that. And you'll notice when you start using the Move tool, especially on something that has a texture, the moment just start dragging it a bit too much and you notice it on this side, it starts stretching of it. So to fix that, just go ahead and just try to distribute distribute that so it doesn't look that obvious. So just just one thing to keep in mind. All right, so again, I'm just going in with the move tool, making sure each part. So I'm just going to bring those ends into the into the laces holes. And again, now looking at it, maybe I should have went in and added a couple on the bottom. Just so this whole thing of having the laces coming. But hey, maybe for the next one. All right. So enjoy. And if you have any questions, please let me know.
11. 10 Fitting shoes on character: Now we bring in the shoes so we can see if it fits the character. So what I'm gonna go ahead, I went ahead and merged all the shoe into one piece and I'm just going in and just adding it in. Although it's and I went ahead and DynaMesh this, so it's, it's actually made of one part. And this is not the final showed. This is just me trying to see if I need to make any tweaks or I forgot any details or something is not Not, not, not working properly. And then notice that I'm editing the volume a bit to see if the size needs to be tweaking, tweaked, or if I need to make any adjustments like here, I need to make the upper part of the shoe just a bit wider so the legs can fit in better. I'll tweak maybe the sole sometimes, maybe add a bit of weight. They're squished and so on. So tiny tweaks just to make sure because at the end of day you're, if you're, if you're creating the shoe for, for a specific character, you need to make sure that scale are those details work for the characters that you're creating good for? If your model is being created just for one hero shot, didn't you don't have to worry about this, but this, these shoes were created for this character and I wanted to make sure they fit right. So what I'll do is I'll start dragging some parts around at a bit of volume, tweaking a bit. And then I'm going to take these back into. So I'm going to import the same model that with the tweaks that I'm doing here in the final, final piece. And then do the edits that I need to do before merging into everything. Like when, while working on this, I noticed that I forgot to create the label, the outer label on the, on the tongue. So I'm going to be showing you how to, how to create that using the same technique that I've that I've showed you before when we created the panel for for the, for the shoes. So I'm gonna go ahead and select the top, the tongue. And I think I've only isolated that one. And now I'm just going ahead and creating a simple square mask that I'm going to be using to extract the shape. You'll notice that I'm doing that on the model. Not worried about making it, you know, because this is going to be a separate parts anyhow. So again, as I showed you before using the mask tool, the pencil mask, I'm just going to go in and, you know, mask this smooth edge with the control. And then once, once I'm happy with the smooth that control and click and then Control Alt and click. And then I'm just gonna do extract plus and just going to create, just going to give me that nice mesh to work with. And once I'm happy with the mesh, again, I'm gonna go ahead and inflate it. And for this one, I need these edges to be sharp. So I'm gonna go ahead and mask them. And I'm going to do polish to this Polish by features. And you'll notice that it's going to give me a really nice smooth piece of mesh to work with. And once I'm happy with that mesh, I'm just going to go ahead and do a panel loops with no bevel know Polish, only one loop and a thickness depending on the scale of Yule, your model. All right. And once I'm happy with that, go ahead and just tweak it a bit. And I'll add a bit of dynam dynamic subdivisions to make sure the shape is good. As, as I've told you before, sometimes when you do dynamic subdivisions, you'll lose a bit of that volume and I want to make sure that doesn't happen. Now one more thing I noticed, as, you know, where usually on the shoes you'll have that area. I don't know. I don't know how what it's called. Like a piece of cloth or sometimes it's if it's not, an extra piece of cloth is actually a hole in the in the shoe tongue. So what I'm doing here, I'm not creating a whole lot. I'm actually I'm doing as a separate parts, but you'll notice that I'm doing it differently. What I went ahead is I took the clean model of the, of the tongue and I selected the polygons using the Z modular with the ALT. So I made like a new polygon area. And this way I want it to show you that with this technique. You can get a really, really, really clean polygon, like a really clean mesh you can work with. So now masking the center of it, only the center and I'm inflating without affecting the edges. Now you'll notice that I forgot 11 polygon and effect that a bit too much. So inflating only that area. And then I'll go ahead and add a bit of a bevel just to smooth that transition between the the harsh edge and the bottom one. Now using the Move tool, I'll go ahead and break this shape apart because you have to keep in mind the shape is, is made out of cloth so it doesn't have to be perfect. And the more, the more, you know, soft look and not perfect look to it, just going to make it more, look more, a bit more natural. So I went ahead and deleted a couple of edges here using Z modular. Because when I did the dynam dynamic subdivision, it just kept, just felt that it's a bit too sharp. And I wanted this to feel a bit soft. Just went ahead and added a bit of a inflate because I want that to be sitting on top. Just with the move. And then once I'm happy with the shape, just add a bit of panel loop thickness to it. And and then do a dynamo and dynamic subdivision. See if that looks good. If I'm happy with that, then I can go ahead and add any other details like for this one, I went ahead and added a bit of edge just so it can hold that edge on the top because I want that edge to be sharp and I wanted the rest to be to just feel a bit soft. And I went ahead and added a bit of inflate. Because again, once you add dynamics of division to any part, you'll, you'll see how you lose a bit of that volume. Alright, now that I'm really happy how it came out, I'm just going to go in with the with a bit of a cloth brush that I usually use to add some detail and just go ahead and break. I'm just trying to break that because again, the species is made of cloth and it doesn't have to be perfect. Final detail, I wanted to add a bit of more stitching. So I went ahead and added a bit of stitching to the tongue label and the part that holds the laces using the same technique that I showed you before using curve brushes, just dragging that out. And once I'm happy with the shape, I'm just going to go ahead and do an inflate. So I'm going to leave you with the final, final edits. And I really hope you found this helpful. And if you have any questions, please email me or message me. And I'll get to you as I'll get back to you as soon as I can. All right. Enjoy it.
12. 11 Extract plus why: In this video, I want to show you that you're going to actually create the extraction that I'll be showing you using without using the Extract plus. And I'm going to show you what's the difference and why I highly recommend using this plugin. So I'm going to start with a simple sphere. So what I'm gonna do is I'm gonna go ahead and create a, just a rectangular shape. And then under sub tool, you'll find something called extract. And here you'll put the smoothness. So let's get one. And the thickness for the thickness I went, I think the default is one, so I put 0.01. And what do you do is you do extract and it's just gonna do that. But if you move it, it's just going to disappear. So until you tell it, except it's now going to create it. Okay, so I'm gonna go ahead and do accept. So now if I look into the sub tool, you'll notice that it created a new piece which is called extract. Now if I show the solo, this is going to show you that it's created three pieces, which is the top part, the shell part, the thickness, and the interior. And I only want the top part because I need to I need to clean this doesn't and I don't want this thickness. So I'm gonna go ahead and Control Shift and click. I'm going to go ahead and do to lead hidden. So now if I want to go ahead and clean this, I can go with Polish by feature, and it's going to do that. But at the same time I want to keep these sharp so I can go ahead and maybe mask, sorry, I'm going to mask these and do the same for these guys as well. And I'm going to do Polish by feature. And if I click on this, and it's going to turn the, the sphere like a into a circle. And then I'm going to do a Polish by feature until you get that. And if you look at the model, it doesn't look good because what it did it use the same model, less the same topology of the DynaMesh sphere underneath it. So what I want, I want this to be 0 mesh. So I'm gonna go ahead and just leaving 0 mentioned by default. And it's going to create this. Now, I think this is too much. I can go half and do and maybe do half again, right? And then it's, and then I'm going to get this clean mesh that if I go ahead as I showed you in my tutorial, if I go ahead and do inflate and then I do elevation minus 100 and no bevel know Polish, no loops, maybe one loop and then I'll do thickness. Maybe, maybe 0.05. I'm going to get this as I showed you in the tutorial. Now, I'm going to do the same thing. So this is the default. I'm going to hide it. And using the same thing I'm gonna do, extract plus and did all that with one click. So I don't have to go through all that that I showed you before. So now if I want to keep those edges, I can do this. So I can select these and I'll do Polish by feature. And it's going to do that to me. And I can go ahead and do an inflate now and maybe do the same elevation. 0.05. All right. And this is how clean it looks and this is how fast that was created. So you can really do it without the plug-in, but I really recommend you guys trying out extract plus because it's a really helpful tool. I think I'm using a user every time. And most of my projects and just helped me a lot and all of the projects and for $1.99. And if you are doing, if you want to get the commercial version, which is like $4, I think it's a really, really good bargain. And I think Art them do bravado, did an amazing job. And I think he released a new one now which I didn't have time to check it out, which is called, I think extract ProPlus and I think it has like more options like a polygon and thickness. And if I check it out, I'm definitely going to let you know. All right. I really hope you found this helpful.
13. 12 Sketchfab prep: One of the other softwares that are used to present my 3D models is Sketchfab. I really love using it and it's a really good tool to show off your 3D models, to let your clients give you feedback or edits, notes, or just if you wanted to show it in your portfolio just gives you that extra dimension as a, as a 3D modeler. Now, to do export in Sketchfab, I used to do decimation and would take a long time, but I found that there is a, there's a nice trick. If you go ahead and export it as FBX, you'll get a really nice clean geometry. Now, the only thing I want you to go over is to just to make sure your stitching doesn't have like multiple poly groups. Because when you export, when we're going to go ahead and export FBX, it's going to use is going to give us the option to add different colors for each Poly Group as its own materials. So I'm just gonna go in and just make sure everything. Because sometimes when he creates touching, you're gonna get the same procedure I told you about in Maya. You might get multiple polygons. I just want to make sure that doesn't, doesn't happen. All right. So once we're happy with that, I'm just gonna go ahead and do a merge visible. So we're gonna do merge, merge visible. And now instead of exporting this as an OBJ, what I will like to do is go ahead and on my desktop I'm gonna do AJ toddler. And I'm going to export this as an FBX. And as an FBX, you need to make sure you have S normals to a 100 percent. This is really important because then your faces will come out with edges. And then the other important thing is export poly groups as mats. And this is why I was telling you, make sure the stitching you don't have different blood groups and you only have one because we can add different materials and then just go ahead and leave everything by default and just go. Okay, so it's gonna go ahead and write the data and fall export it. Okay, so now let's go open up Sketchfab. And if we open up Sketchfab, just go and click Upload. I'm just gonna go ahead and upload the model. Now you know what before I do that, what I wanna do is go ahead and do just to make it more interesting, Let's do duplicate and let's do emitter. And I'm just going to move this here. And just going to have it like a, you know, a nice presentation shot for the shoes. I tried to when you're presenting something tied to, think of it as a photoshoot or a product that you're trying to, you know, sell or present or whatever. Instead of just because it's going to look way better than just having one shoe. Alright, so I'm gonna go ahead and I think these two should have the same. So if we do merge down, should have the same polygon. So if we go ahead and export AG toddler. Yes, please. Same things as before. Writing data. And should have the final exported. I'm going to go ahead and save. Depending on the model that you are importing. It takes longer. This is, I think, 500000 poly groups. So it would take awhile. So I'm going to pause this and get back to you once it's up. Now that we have the files uploaded, we go edit 3D settings and we should have the file upload it. Now, couple of things. First thing that I usually do when I upload something into Sketchfab is I'll tweak the camera so I'll go with a 20 degrees. I think something like this would look good. Then the second thing I'll do is background. I have a couple of backgrounds that I usually work with. And I'll go ahead and I'll do for lighting setup. There are a couple of really good ones. Don't want that I love is placed BGO. And then just gonna do shadows. You can do two different types of shadows. You can do round shadows with like the shape of the shoes. Or you can do baked IO and you just going to add a shadow underneath. Let's go with the shadow catcher. Because I think it looks way better for, for this one. You can do a border fade if you want. For, for these. And to have them like fade out a bit so it's not harsh. Okay, so what else? The next thing to do is start shading this now, to do shaders, we need to go to materials. Now this is what I was telling you about. If we click on this, you see how it's going to select each one. So for this one, I'm just gonna do a Chicago Cholerae. That's my favorite one anyhow. So we'll do that maybe a bit darker. I'm just going to save this so you can use it all over. So this parts as well. I'm going to do that for this one as well. And for the back. This. And I really like the fact that you can really visualize your models. I think that's one was read as well. For the lease is I'm gonna go black. And this is going to be maybe a dirty, I go, don't go white when you're doing rendering because it's not going to come out clean, it's going to blow out too much. So try to go with the bright gray. For this interior part, I'm gonna go black for the souls into something like this. The top or the swash is going to be black. Okay? For this one, this is going to be dark as well. For the interior, I'm just going to keep it dark, save us some, some headache. Now, the next thing is I'm going to do stitching. This is why I was saying about the stitching making sure there their own body groups and not each stitch because then it would have been a nightmare to select those. So I'm just going to go in and add the same red color that we used. And for this one we're going to do black. And this one we're going to do same red. Now, if you want, you can go ahead and I don't know, maybe maybe go with a with a darker red. So you'll have like a bit of, a bit of a different texture if you want. Just so, so it doesn't blend them which but I think I'm going to keep it I'm going to keep it the same color. Why? Because I'm going to differentiate between them by using shaders. So anyhow, it's not going to pay for this one. I'm going to go darker one. And these two like that. We have these as well. And this one, I think it was red. Now you can go ahead if you want what before export thing down of ZBrush, you can go ahead and do like multiple groups like that. Say, you know which ones. But I left it like this because if you want to do like a another colorway with different colors and multiple codes, then you do have that option. Okay, So now we select the the leather parts and under glossiness or roughness. You can go ahead and just add a bit of gloss to this. And I'm going to do the same. Yeah, Let's do roughness of 0.5.42.4. Sounds good. So let's do 0.4 for all the parts that are blue leather. Now you'll notice here, notice like the polygon is just break a bit. Now again, when you, when you're exporting like this, you, it's not going to be perfect, but keep in mind, this is a 256 thousand polygons. It's not, it's not a lot for how much detail that is. You can you can fix this, like maybe do. Maybe you can go ahead and decimated. And that might help. But it's going to take you way too long. This is, this is a, this is like a simple solution. And even for this I'm going to do a bit of the Tad so it can capture that nice, nice detail. Okay. I think I'm happy with that. Okay. Once and then you'll go ahead and I don't know, find a nice camera angle for your presentation, maybe something like this. And maybe rotate, rotate the light so you can get ligand nice, a nice light. Now what you can do is you can go ahead and save the view. So it saves that view for you. And then lighting and you go ahead and turn these off. And usually when I work with lights, I need to I need to work with each one on its own. What you can do is you can turn off environment. And this is a good, a good way to see your lights because the moment you have too many, you don't know how which light is affecting what. So then you go maybe I want to do like a maybe something like a rim light for these. And I'm gonna go ahead and cast shadows of course. And something like that. And then I'll turn on the dark, the warm light. I'll do or might be something like this. Maybe turn it off, just down and cast shadows. And then I can go back and turn on environment. And then it will give me that, that look. Alright, Now I'm almost done. So, but with Sketchfab, you can play around with more and you can do post-processing, which is really cool. So first we're gonna do sharpness, just makes it pop a bit. And then you can do chromatic aberration. Not that much through much. Maybe just to see you can, you can feel it's there. We can do vignette. And you can do tone mapping, which I really love if you do filmmaker going to make the image. So, so nice. What else? We can do? Some SSO and that's like as like a really nice contact shadows. But I'm going to turn the intensity to us the way down because I want it to be there, but I don't want it to be like really, really. All right, one other thing we can do grain and animate the grain. So it gives us a nice, a nice little, nice little look. All right, so once you're happy, say View, and you are ready, you can send this to your client. They can check it out from all angles. You don't have to send hundreds of screenshots in. And they can tell you what's what would they want to change and they wanted tweak. All right. I really hope you found this helpful.
 Oasim Karmieh, Sculptor & Toy Designer