Transcripts
1. Intro: In this tutorial, I will show you my workflow and how I create a gym bag or a defiled bag using marbles designer and ZBrush. I'll start by creating a reference bore and a couple of simple sketches just so I can use them as a guide. Once I have those, I can start creating the main shapes inside of marvelous, using a couple of color guys, just to help us understand all the parts that are going to create the final back. Once we have that done, we can start working on the hand straps and on the shoulder straps. Next, we'll move to the zipper. And I'm showing you how to create the zipper using the zipper tool inside a marvellous. Next, we'll move on to creating the upper flaps and any other parts that remain for our main body of the, of the gym back. Once we have that ready, we'll move into ZBrush and we'll start creating the buckles. And then we can bring the buckles back into x2, into marvelous and start or gain on the posing, the final bag. And it's final position for our hero shot. Once we're happy with the, with the pose, we can start adding the final details like the stitching and then prepare the model to be exported into, into ZBrush. Zbrush. We'll start by creating a cleaner topology just to make our lives easier when we start adding details and stitching. And also I'll be showing you how a UV map my models before I start adding any small or tiny folds here in there, we happy with the details in ZBrush. We can prepare the model to be exported for rendering. I'll be using Adobe dimension to render the final image have been using the, there'll be I mentioned for a while now and I love using this tool because it's really simple, it's really easy to use. And the results that you, that comes out of it is really fast for and the, and the quality is really good for how much time you spend on each image. And it gives me the ability to create multiple shaders, multiple looks, without too much hassle. I really hope you find this tutorial helpful.
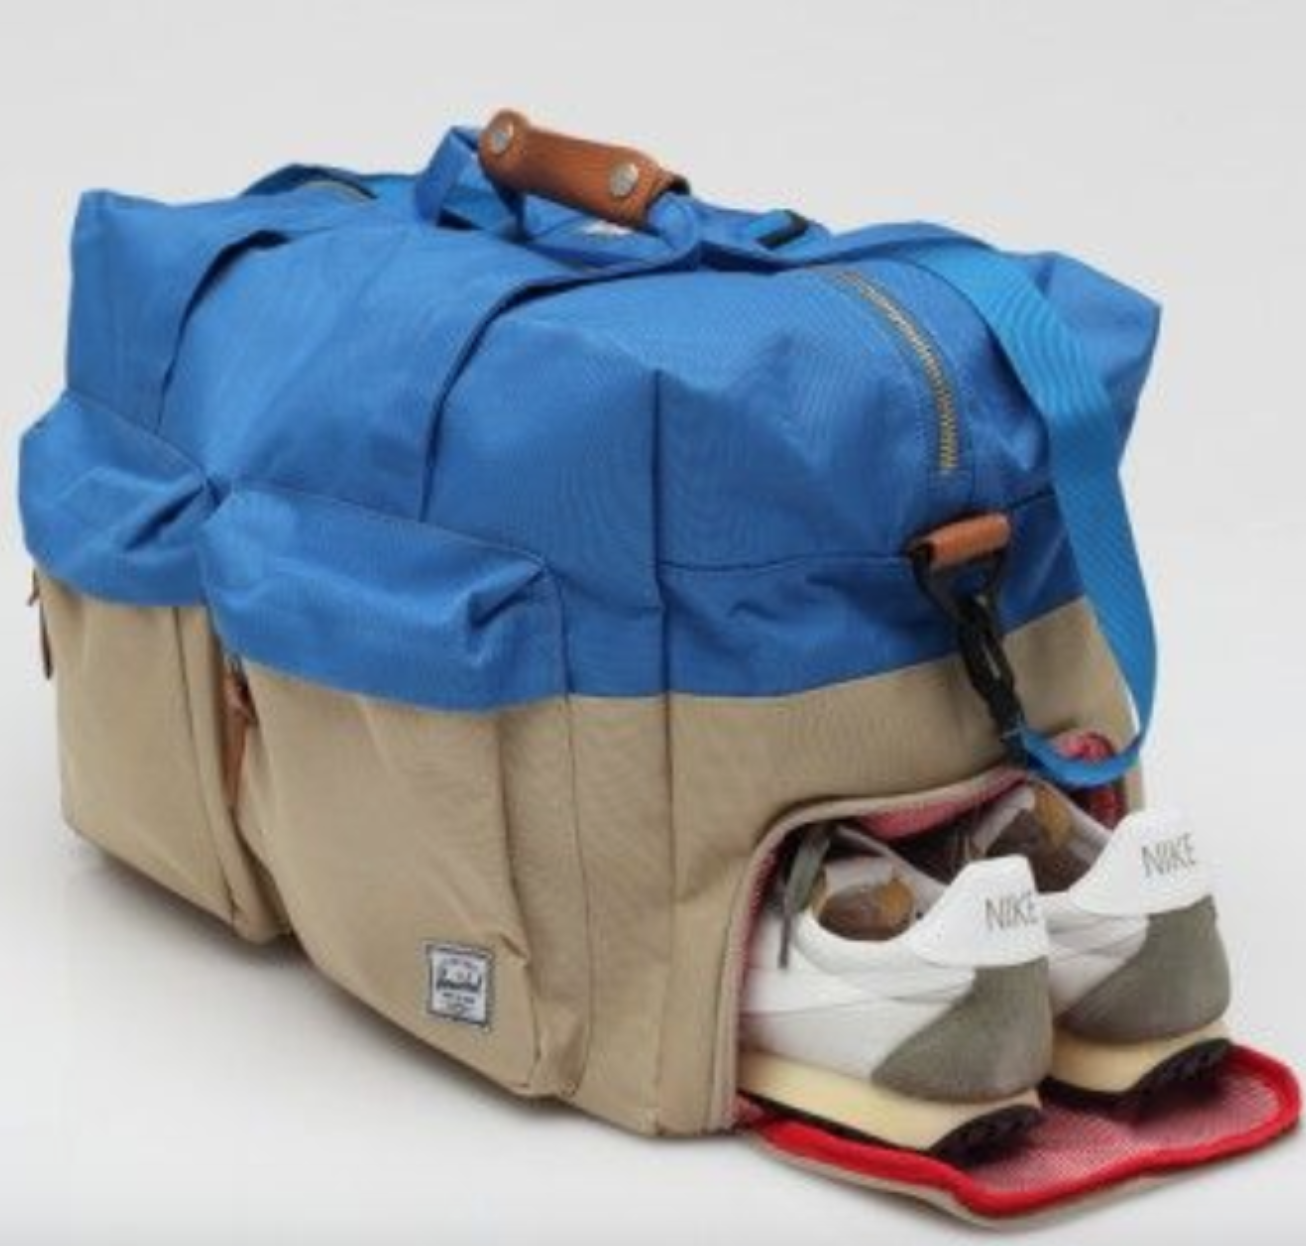
2. Lesson01 Planning and blocking main shapes: Hi there. In this course I'm going to show you how to design a sto defiled bag in marvelous designer. If you ever seen any of my courses before, you know that I love creating a Pinterest board and do some simple sketching and maybe research a couple of suing patterns just to know what I'm going to be creating. For this course. I chose to do a defiled bag. And while searching for some, some, you know, some models that I could, I could create. I found this bowing defiled bag, which I think looks really, really nice. And it has like a lot of elements. So we have those straps that go under it and we have this nice cover that covers the zipper. We have handles when you have a shoulder strap, we'll be looking at how we could create this n modulus is on an, I usually go ahead and Pinterest and I search for, I'll do a Google search or I'll do a pinterest search and I'll search for some other type of suing Patton's that's close to what I'm going to do. It doesn't have to be exactly the same one because rarely you will find exactly what, what you will be designing and marvelous. So I went ahead and I found a couple of, you know, just a couple of suing patterns just to showing you like how the shapes look. Feel free to go ahead and check out these and we use any of them. And this is a really nice way to get your thoughts together and know and make like a simple bland to know exactly what you need to follow to create the project that you're going to do, a bag, shoes, bands, whatever. I also went ahead and created like a simple pattern. So I know that I'm gonna be doing back and front. We can be doing a right and the left. This is just for me so I can keep track of how many elements I need to do. And then we can, doesn't have to be exactly like these. And then we're going to go ahead and tweak him in marvelous designer. Alright, so next one, I'm going to show you how we're going to create the interior of the bag. And then we can jump into marvellous designer. Alright, see you in the next month. So now before we start creating the bag and marvelous What I went ahead and I just did like a simple sculpt inside ZBrush of what I think the insides of the bag would look like. Now, I want this back to be holding like soft cloth and clothing and stuff like that. So if you want your bag to be holding little tin cans or boxes or whatever. So you want those like protruding out of the, you know, the silhouette of the shape of the bag. Then go ahead and do that. Alright. I went ahead and made the dimensions of this similar or close enough? Close enough to the bank that I'm the full bag that I'm going for. I just googled the sizing of the actual bank. Okay? So now I want to go ahead and export this into marvelous and open up this. Make sure I have the right one. And this is the model we're going to go work with. So you'll see this is protruding through the floor. So I wanna make sure this is raised a bit because we're going to have the bottom of the bag as well. Then we can we'll I'll show you how you can lower it to the floor so it looks like as if it's sitting down, but for now I want this to be just floating a bit so we can, we can do the stitching. So if you remember, I showed you like a simple plan that for all the parts that we are going to create. So for this one, we're going to create like a front and back and a right, left. So we'll start with, start with those off the bat. So you can go ahead. When you create an marvelous designer, you can take a shape and you can start drawing it. But because for this one, actually know the sizing of the bag that I'm going to be doing. So as I said, I just looked up the dimensions of this. So I know the the dimensions of the front and back is going to be 23 centimeters by 2020 centimeters, right? So instead of doing this and all Z and then trying to figure out the 23 centimeters and go like 23. No, I think widths is 20. So so instead of doing that, what I want to try. So make sure you select the rectangle shape, right? And then just double-click to create a rectangle. And here I want the width to be 20 centimeters and 200 millimeters is sorry. And I want the height to be 230. Okay. So that's the, the front side. Let's call it and just slide that into place. And now, because I know the other part is going to be the same size and you just go symmetrical pattern. For now I want to work with symmetry as much as I can. And then we'll, we'll tweak as long as we go. So now the other one again, select the rectangle, double-click. And for the long part of the left and the right is going to be 450, I think. Width and height, it's going to be exactly 230. So that's going to be the width of the bank and you see it fits like all our stuff inside. So I'm gonna go ahead and move this here. And I'm gonna do the same. So I'm gonna move this down. And I'm gonna do symmetrical patterns or the other side. And I'm going to just rotate and move that into place. Okay? Alright, so now what I'm gonna do is I'm in marvelous. Sometimes it's like when you start rotating your stuff, you don't know which pattern is which. So instead of, and I'll show you that in a minute, especially when you want to start Star stitching, we want to select when you add the stitching to it. What I wanna do is I want to color code some of my Bart's. So to do that, I'm just going to create like a couple of colors. Just different colors. Red, orange, green, and the blue one. Okay, so this blue. So now I'm going to select this and I'm gonna give it the red color. I'm going to select this and give it the orange color. And I'm gonna give it this the blue, green and this one that blue. Alright, so now here I know which, which pattern I'm working with. So what I wanna do now is I want to stitch these together. And then I'm gonna do, do the bottom. So you can either stitch this way. So you can do because you know this is the size, you're gonna go like that. Knowing that the line of this should be the same if you want the stitching to be straight and right. Because if you do the other way around and do this, and you go this line and that opposite, it's gonna give you this so it's not going to work. So always follow these lions. Or where you can do is you can stitch in 3D. So you can select your stitching, your soup suing tool and then go suing edge. And then just do that. Okay? So now you'll notice that these are acting kinda weird. So because it's, remember we kept these in symmetry so we can fix this. So I'll take this part that I'm just going to rotate it. And I'm just gonna move it down. So now it should be, it should be fine. So these parts still stay asymmetrical. And I'm going to do the same. You see we have the same edge here. So we know that Bart shouldn't be on the bottom because then we're going to get like a incorrect stitching or suing. So we'll do this, make sure the line is the same, facing the same direction. Just we use that as a, as a guide. Alright, now, for the bottom where we have the same, we're going to have the same signs. I think it's just going to have 20. And the, so it's electric tangle double-click. And we're going to have 450. And for the width of it is going to be 200. Okay. So let's give it another color for this one. So will do. This is like the easiest way, the fast way to know which parts you're working with. Especially when you have shapes, when you're doing clothing, you know What's partial working with. But because you have shapes that are mostly rectangular and the most similar in size and form. It's hard to know which one you need to be 20 meters is the length. So let's say this is the top one. And will I'm just gonna do control, didn't control C, control V. Because I don't want this to be symmetrical. They won't have the same stitching or they want to have the same detail anyhow, the top bar is going to have a zipper and so on. Okay, so now I'll take the suing edge and I'm just going to go ahead and do that going around the shape. It's easier doing it in 3D and the 3D view rather than the 2D view, because then you have to figure out which edge is going to which part. So this way it's like we easier to figure out. And we'll do that part. These. Okay? Now that we have all the edges stitched, can go ahead and just simulate. And you'll see, now we just have a box. This is what I was saying earlier. You can select or you're just do. Q. So now you've hidden them. And now what I can do is I can select this and just move it down. And notice simulation is still on. So now if I do select all of these and do shift q, see now the bag looks as if it's sitting on the floor, but I still want that to be floating, but I just wanted to show you. All right. And the next lesson, we'll start adding straps.
3. Lesson02 Creating the handles: In this lesson, we'll start by creating this traps for the hand and then we'll do the shoulder straps. And as you've noticed, these traps go around the usually the straps will be and I know stitch to the signed maybe the top side of the bag, but these ones go up and, you know, like science under an income to the other side of that we have these holding the straps in, right? So we'll start by creating the straps first. So you know from the, from the previous lesson that this is going to be the right size, our 230 in height, and this one and width is going to be 200. So two thirty, two thirty with 200, it's going to be 660. So because we know that double-click on this and we'll do maybe 60 for the widths, be 50 even, and for the height 660. So now this should go, so let's say this is the underneath, should go up around and then we'll do the connecting part. Okay, so now you'll see why we did the colored labels for each one because it's going to be easier for us to keep track of how how this was going to work. So I know that I need to start by adding stitching here. So I'll start, I'll start from this part that goes to this part and then it goes around, right? So we'll start by creating this stitch. So on this one, I can select the seam. It's no stitch. So this is this is the top. Saying this is the top. If it's easier, it's always, you can always rotate this. Okay? So if you click on this, you see, and that's the one we're going to have to work with. So I want this stitch, you look, always check back with the reference. I want this to be round here. So what I'll do is I'll do three lines where this is going to be. So I know I'm going to add a stitch here and I'm going to add a stitch here, maybe underneath that as well. So let's do the first one. I'm going to do an offset into the line. And I'm going to do like a maybe a five millimeter. Okay. And then I'll select them again and I'll do offset doesn't center line and I'll do 225 because I want it to be because remember the the edge is 230, so I want that to be five minutes on the bottom. And then I'll do the same thing here. So after doesn't sell online to five again. Okay? And then offset. And just do a 125. Okay? So now select these and just make them smaller. You don't have to make the step just, you just wanna keep things easier to select. If you don't like this, I can, I can select the edges easier. Okay. So now I'll take this edge copy and I just want to add it here. You can always, always tweak. So I just want these to be a place holder now so they can hold the straps and then I look good. And I'm gonna do that again. And I'm going to do it here. Okay? So now I can take these and rotate that over here. So I need to rotate this and add it on the bank. Like that. Okay. Just raise it a bit so it doesn't go through the floor because then it's not going to simulate. So now what I want, I want this to be stuck with that, okay? And I want this to stitch with this. Okay, so now if I simulate should do that. So now I have the first one. And because I have these color-coded, I know which one I have to do. So now I'll select the White I'll do faced. These don't have to be exact because we're not going to I'm going to use them. We just need them as placeholders now because we're gonna do the strap holders with them. We're just gonna make life a bit easier. Knowing that we check. Just need to move these just a bit to the left. Okay? So now I can take this and I can do offset. There's an internal line five. Actually, we don't need these to be, to be honest. So I'm gonna go ahead and just delete this. Honestly. I'll show you in a minute. And we're just going to use the, alright, so now because we did the symmetrical stitching without one, we, if we move one side, that's going to move on the other one. So what I want to do is I want to break symmetry. So I don't want linked editing. Each part is going to be a bit different. Just to the side of it. So now I want this to be stitch with that. Now one with the one on top. I guess I don't know if we simulate see this of all saying we don't need the, need the bottom part. Okay? So now we can look at this and see if we're on a good track. So now I'll copy this trap, Control-C, Control-V. And I'm just going to move it here. Now, it's easier to see where we're going to add this. If I simulate and just let it fall off, then I can do the same thing as I did for the other one. And just select the edges. Easier. And then just use the same thing and just copy these and move them to the signed. We can eyeball them for now. Worry about, I guess, exact placement in a second. So now, again, this one with this one and this one with that one with this I don't want civil right. Okay. So that's size. It looks pretty good. We might get away with a thinner trap. But for now, I'm just, I'm just gonna keep it. It's okay. So what I want now is I want to create the top part, so the part that connects these two. So let's do that. Just gonna create a new one, which I know is going to be 50 times we used 50 lengthwise. I'm just going to do 200 or 300 and we can treat it. Can just do 300 and just rotate it. If you hold Shift, it's gonna snap. Okay. So what I wanna do now is I want to take the edge stitch and one stitch this without one. Here, it will start to notice that we're not going to, we're not getting the, the edge knowing which, which one is, which side this should be. So here we're going to use the 2D. So I think it's gonna be this one with this one and that one. Okay? So if you simulate, okay, now we have the first part of this trap. Okay, if we think we need to be to make this longer and just go ahead and and do that. Just in case you want a longer, longer straps. And we're gonna do the same thing for the other side. Now in the next lesson, we'll start creating the strap holders.
4. Lesson03 Creating the straps : So in the previous lesson, we've finished creating the straps for the double bag. And this one will go ahead and create the straps holders. And you'll notice we have four on each side. So let's go ahead and do that. But before we do that, I'll, I notice that the straps are just a bit thicker. So what I'm gonna do is I'm going to just three signs them all to make sure you select all the parts. So this way when recent resize the old stay consistent. So I'll select all these. And I think I want these to be around 40, so they're 50 now. Can see the thickness of it here. For t should be fine. I'll perfect. Now you'll notice that also the stitching, the placeholders that we created are smaller now so that 33, you can go ahead and resize these if you want. Or you can just leave them because we're going to delete these once we once we create the straps because we want the feeling of that weight on the straps. Just some selecting them and just resizing them to show you how you can do it. Alright, so that should be fine. Go ahead and simulate that. Yeah, that looks way better. Okay, so before I do that, I'll just move this trap up. And if it's causing a bit of trouble, you can always select any part and just do freeze. So now if you simulate, you'll notice that straps won't go anywhere. Okay, so let's start by creating those those trap holders. That a couple of tests and I noticed that I like best sighs, I've found it would be around a 110 or something like that. So select the rectangle shape and double-click again and go a 110 and height 25. Because you notice they're bit wide. Not that high. Good way to check is just place stand in front of the bank to see if it looks it looks good. I'm flipping between the two, but usually I'll have this on my second monitor and check it just so I can show you what I'm looking at. Okay, so that looks good. I guess now for this one I'm gonna do a square with an X stitching. So you see you have a square in the next, in the middle. So we'll start. First thing I'm gonna do is you'll notice when you create interior shapes like it into your rectangle, usually their colors is red, so you barely can see the text. So what I'm gonna do is I'm just gonna select this and just add a brighter color. This is going to use green. So into your rectangle and whole shift, because I want this to be perfect. Square 20 should be good. And I'm gonna do a company based on the other signed love how it creates guides and that just shows you where you need to add these. So now I'm going to select both of them because I want them to move to be sure they're on the same distance, L, C. And ponder the orange first. See this is why we created those labels. So somewhere around there. I think we need to It's going to be around here. Yeah, just wrote data, so it's easier to follow some of these to look at the photo again, see their fair distance between the two, the lower ones that are closer. But again, you can always, you can always move these later on. Okay, so now I will use free searching. You can do edge searching, but free stitching is way better and faster. So I'll just sort of like that one. Shift Z. You can hide all the numbers because we don't need them. Because sometimes you have shifting and have a lot of lot of parts. It's like ease. It's hard to see what you're working on. So it was just shifting after focus. So we'll do Free Transform and I'll start from the top left corner, finish the loop, and then hold shift. And do that for the part that's on the orange. And then do the same thing, finished the loop. You always need to keep in mind where do you start? Because I told you I started with, you see, we have that edge that I told you about before. Because this way, and if you look into the 3D view, you'll notice that the lines are straight. If you have a line that's going in like x, it means it's not going, it's not going to assimilate the, well, it's not just simulate that. In C, we have the first trap and we're gonna do the same thing just a times. So copy that one, just gonna move it. I know from the photo this is going to be like way lowering just closer to the bottom of the bag. I'm going to select these two. Copy-paste. Just follow the guidelines. Again. I'm gonna do free stitching or free suing. Start left corner, do the loop. Hold Shift digit, left corner. There, the loop and shift digit always double-check. It looks fine. Simulate. So we have to now do the same. So like these two are if we should do symmetrical and I'll do some integral du, symmetrical pattern. Well, do you think I should have done instance pattern? Let me show you why. Because let's say at 1 you want to edit this? So I have to do it for all four. And we have one. It's not a problem when you have eight, just time wasted. So I'll do a symmetrical pattern and I'll show you in a second difference between the two. So now if I edit this c and you'll notice that they have like a little linked together. So this is, you know, that this is an instance of that freeze touching left corner. Do the loop shift. Yeah, you can do it the other way. It doesn't matter which way you start and just make sure you keep in mind which corners do you start doing the stitch. Alright, so now that the same thing. And go. Let's see if I can do to them. To instance pattern. No, so I have to do at one. So instance baton. And again instance baton. So you'll notice these are all connected and see the line between them is announced. Collect these, copy paste. Try to put them as close as possible. It's not a big deal if they don't align perfectly. Because usually with cloth you you have a lot of leeway, so okay. So do you zoom it again? Left corner. Do the loop, shift. Always double-check your stitching. I say that will check your stitching before simulation just because it's going to save you the undo and the headache. Sometimes some patterns will just screw up the entire model. So you would just check before you hit space to simulate, just saves you a bit of headache. All right. So I'll go ahead and do the other ones because you don't want me we'd want to look at me just duplicating and I'm gonna do the same thing. Just gonna do it on the, on the red part. Okay? All right, see you in the next lesson.
5. Lesson04 Shoulder Straps: Now that we have over strap holders created on both sides, we'll go ahead and create the on the hands traps. Usually you'll find this kind of fold because it's easier. It's easier to hold and it has more strength. So to do that, remember, in the last lesson we froze those just to make it easier for us. So now I'll simulate. I actually want them to fall down just to make it easier. Go ahead and do offset pins on a line five millimeters. And I'm gonna do another one here, offset the center line, five centimeters. I could have went ahead and drawn this, but I want to make sure it has the same distance on each side. So now it's like these to just scale now. So now with the edge suing to just what I have went ahead and stitch this one with that edge and now simulate. Look weird at first. But just move it just a bit around. And it should be just fine. Marbles does that because you have to keep in mind this is like a 3D low density mesh. So it doesn't have that many polygons to work with. Once we start adding multiple, like more density through the mesh, then it's going to look even better. So you see, that takes care of that Bart. And now let's do the other one. I'm just going to move this close. And I'm just going to copy these. Simulate. Let's give it a sec. If it doesn't work, just move it. Alright. So that takes care of the hand straps. Next we're going to start creating the holders. A width buckles hold the shoulder strap, and we'll have one on each side. Okay, for that one. And let's start with the green part. Just move that up. And I know the thickness of this trap is 40. You can make them Winder, but I'm just going to keep everything just to be consistent. So take the sandal tool, double-click and have maybe 40 millimeters. Maybe a 100. Yeah, it should be fine. Okay. So place this round here and just move it down. You can leave it in place and habits simulate from the top, but it just sometimes just makes, it makes it a bit weird. You can have like too many parts. It just takes longer. So it's easier if you just put it into the place that you needed. So it's going to be around, around here. So with this one I'm gonna do a square stitching as well. Same that we did for the strap older. We're going to add the X mark in the middle when we started detailing it. Okay. So that's one no, I'm gonna go copy paste. Just find the center of this. And I think somewhere around here. Maybe hire should be fine to do free stitching. Same thing. Bloop, left corner. And then it shifts hold. Double-check with good simulate and just pause it. Now what I wanna do, I don't need this to be as a double and goes underneath because we can do that when the end of it we can add thickness to this one. So what I'll do is I'm going to stitch the top edge here. And to do that, I'm going to select this edge, gonna do off citizen until the line five millimeters. I'm doing that just so I can have like a straight 40 mil line. Just put that above that just a bit. Don't have to put it exactly there. Delete it, and then I'm just gonna go stitch. Make sure it's straight. Answer might give it a second. It looks a bit weird again, because we don't have that much density. Because if you look at this, it's gonna see like we have like read a few polygons to work with. Okay? So now I'm going to do the same thing for the other side. So I'll do instance pattern. So when we get to work on that. So now one thing you'll notice because at the start we did a symmetrical pattern between these two. But because it was flipped, the bonds of the stitching went on the bottom. So to do to fix that is just going to move this to the top, more of these close to each other. And I'm gonna do move linked editing. And I'm just throw data, delete that. I'm just going to copy this. So now to do exactly the same thing, free stitch that one edge here. Right? So next we're going to be working on the shoulder strap. And if you remember from the photo, you'll notice that this trap has like two extended areas, usually like it has one. But this one has one on the left and one on the right. So to buckles. So to do that, jump into marvellous rectangle shape, double-click. We already know it's going to be 40 and height or length is going to be 200. Rotate this that the signed and just move it on top. So how do we go about doing this? So what I'm going to be doing, I'm going to create two of these that wasn't going to be on top and the other on the bottom. In marvelous, you don't always have to make stuff even though in the class this is one piece, so it starts here, goes under the buckle and ends there. You don't have to do that. You can always split stuff and then merge them after because it's easier to deal with them in parts rather than thinking of doing everything in one Barth and just struggling with moving parts around them and so on. So for this one, this is what technique that I'm going to use. So I'm just gonna copy this. I know this is going to be exactly the same size. And I'm just going to rotate this, making sure the normal maps, normals are flipped so you have the dark areas in the middle and not outside. It's, it's really important. Ok, so now what I'm gonna do is I'm going to stitch this edge with this edge. Make sure they're straight. But I'm not going to stitch this edge with this edge. And what I'm gonna do is I want to create a new edge for that one little bit offset with five millimeters. I should have been the other way here. And now I'm going to stitch these two. Ok. Just simulate them really fast. And just balls. I want them to be like a mid air. So you see what I mean? When we bring in the Buggles, I'm going to merge these two sort of feels like one piece. All right, then finally we're just gonna take this copy paste. I'm just gonna use the element. Just move that in. Now. Just ditch that edge with this edge. Okay? Now let's hook it up to the, to the bag. For now. We're going to just stick it in. And we'll worry about the vocals a bit later. So that's ditched. So now I can go ahead and simulate. And as you can see, this is what it looks like. So we're going to have the number, we're going to have a metal buckle here. And we're going to have a metal buckle between these two. So I'm gonna go ahead and do the other, the other side. So for the other side, I just need these two. Copy paste. Rotate this. Make sure you have both of them selected. And just move it on top of the band. Okay. I'm going to delete this one and then just stitch them before I went here. And I'm gonna do leaseholder stitch here. Copy that we noticed is going to give us a guide because we have the other side a line to it. So I'm going to stitch these two engines. And that takes care of R. Now if you want the middle strapped to be, to be longer than, just go ahead and resize this one. So that's the middle. But if you want to give it another color so it's easier to see. So then it's if you want this to look even more natural while you resize these, make these smaller. So you would go maybe, I don't know what's size, two hundred, three hundred, and then make these 150. So then you get what I mean, just more, a bit more precise. So it doesn't, doesn't look weird because the strap is longer and songs we can make maybe one side shorter and the other side longer. Just looks, it looks a bit more natural. Alright, so onto the next lesson.
6. Lesson05 Creating the zipper: So in this lesson we'll create the zipper for the bank and grading as heparin marvelous is really easy, but it's scanning quirky. So the tool is not perfect yet, so you gotta be patient with it. So the first thing we need to figure out where do we add the zipper? So obviously on this one is going to be on the top. So I'm going to simulate this. And I'm, I go ahead and just move the the strap on the side just so we can work easier with the, the top part. I should have done this trap after, but hey, so we'll select the top part. And we're going to split this into two, into two parts, right? So I'm going to go ahead and select the edge. And I'm going to, I know this is 200, so I need to select this edge until it offset as internal line and just offset it by 100. So it's being going to be like smack in the middle. So now I'll go ahead and I'll right-click cut and Sue what gotten sued does. You'll notice if you select these suing a stitching tool, you'll notice that it did cut this, but if you simulate, you see nothing happens. It just added a cut in the middle and it's true that together and it also created this suing for the other signs because if you just cut it, it won't create even for the other side. So you have to keep that in mind when you do it. So now if you go ahead and delete this and simulate, now, you'll see the bank is going to open up a bit. Okay, so now we're gonna go ahead and add the zipper to the bank. I'm going to take these. Take this and just move it to the signs. And now I'll select the zipper tool. And that's OK. So to do the zipper, you just select the edge you want to start with. So all I'll select this edge. And you can click as many times as you want, is now going to add multiple edges or anything. It's just easier for you. Alright? And once you've reached the final, just double-click and then go back and look at the starting point again, click as many times as you want. So it follows that edge. And when you reach the end of it, just double-click. Alright. So you'll see that creates the zipper for us. Now if I simulate, we're gonna notice two problems. First problem, you're going to notice that the zipper head or the metal thing he is flipped. And the other thing is, you see how it just looks weird at the ends. So if I start moving this part, see like it's created this edge, this mesh, but it's going in the inside. And zippers don't look like that. So what I'm gonna do is undo. Now, when I did this the first time I was like, yeah, but zippers don't. They might, you might draw it like this, but they, anatomically, they won't work like this. And by that what I mean, if you look at a zipper, you see there is a like a perfect gut. It's a gap. You see, you have this cloth on the side which holds the metal teeth. And then you have another piece of cloth on the other other science. So. What we need to do not only cut it, we need to add a gap between them. So what I'm gonna do now is just select this edge off citizens and align five millimeters and do the same for the other one. Offset doesn't turn on line five millimeter. So select both edges now and do cut and not couldn't sue because I don't want it to add any new stitching for me. So I can go ahead and I can delete these guys. So now if I simulate, you see it adds a nice gap which is going to be filled by the zipper. Alright, so now let's, let's try the, try their zipper again. So this time, you don't have to start from the exact edge. So you can leave a bit of, a little bit of space if you want. Sometimes I've noticed that if you go too close to the edge, it might cause a bit of headache. So now might be good. And again, do the same thing for the other edge. And keep in mind it's a bit quirky. Okay, so now when you get to the edge, you see it's gonna, you'll notice that it's going to add like a dot for you and that telling you like where it needs to stop. So double-click. And it created the zipper. And we still have a bit of a problem with it. Problem is, now there's a bird, looks good. Simulate those. Read in ice. You have a nice gap here in the metal, but the metal had this still flipped. So we need to start. We started from the green side. Let's start from the blue side. So let's say the starting point, it's going to be around here. And I'm going to move to start, click, click, and we end it in the green side. So now let's do the same thing. Click until we get to the and double click there. And we still have that problem. Until you try that like three times and each time it's either one or the other. So let's do it again. Let's try from the edge now. And finish it here from the edge, and finish it at the edge. Okay? So let's start from this side. Let's see if that works. So we start from the green and we end in the blue star from let's do like this, save that works. Now, if we don't do the same direction, it's gonna create like a satellite if you simulate that, they're going to just go crazy. So make sure you that's a no, no, even if it looks good here. Okay. So now let's try it again. And let's go from the blue. And maybe we ended here. And we will start from the blue and blue. Blue and yeah, and it worked. As I said, it has its works, but it's really great. Okay, check this out now. So if you go ahead and simulate, is just, you just have yourself a nice zipper. Now if you look at the UV, you'd like the wireframe, you're going to notice this just adds two meshes. So you have like two pieces of mesh and you have this buckle. So when you export this as going to export these as, as a two parts mesh I think. And you have the zipper inside. So you're not getting the teeth, but it's really good. And I'm sure I'm going to show you why it's really good. Let's say you want to open up the zipper now. So you go stop the simulation, select this and just drag it as. And just simulate. So it's going to simulate as if the bag is half-open or full open. So because of that, it's really awesome. Because I can add that these teeth later in in ZBrush or Mile, whatever you're going to be using. But having this simulation, it's really God gives us. Sometimes you just want to make it look, feel really natural and in all one habit like really close to the end. And have maybe, maybe a bottle of it open. You're going to get like a really nice fold. And let's say if you have the bag 3D full, you can have like maybe stuff sticking out and so you get what I mean. So that's how you create zipper. All right, onto the next lesson.
7. Lesson06 Creating the top cover: Now that we have the zipper done, we can go ahead and create the flap. So we have this flap that covers the zipper and then we have a strap that holds that. And finally, we just need to do to handle. All right, so let's go ahead and do the flap. Right. So for the top Bart, I know the size of this is 230 by 450, but as you notice, it doesn't cover all of it. So it starts maybe around here and goes to the end, to the end of it. You can notice here. So it's closer to the zipper. And then so let's go ahead and do that. Okay? So what we can do is we can take this and we can do control C, control V. Dash should create the extra part. And I'm going to lay that on top. Okay, so as we said, we are going to stitch this to the side and then make it a bit bigger. Can cover the whole thing. Maybe that's more. So something like this. Okay. And I think it's also smaller in width. So we're going to do that. And now let's go ahead and stitch this. So to stitch this, we can do it two ways. We can either create an interior line like this or I can always select the edge and do offset as internal line. And you can go on maybe 15. Let's try that. We can always move it. Okay. Let's move that a bit unsigned. Okay, now we can copy and paste this to the that part. And then I think I'm going to just move this just a bit inside. Okay, and now let's go ahead and stitch these two. Let's simulate. Perfect. So sometimes you'll see a bit of edges go in just if you just move it a bit. Okay, well, we can do here, we can actually create like a double-edge. I could double stitch. I'm going to copy this and just move it inside. The same this one. And then we can stitch these two. So then it's going to give it a give us like that double stitch. And I think looking at this, it has a double stitch. Yeah. So if you notice here okay. So now that we have that, you notice the flap has like rounded edges. And to do that, we just need to close the simulation. Just move this to this side. This a bit bigger. And just the liked this point. And then we just wanna do a round edges. So there's one most curve. And if you wanna make sure you have the same, you just make sure you keep in mind the number. So I'm just gonna go about a 100 for this one and hundreds for this one. So that should give us our flap. Okay? So now I think we can make this a bit longer and just move these. Alright, so now let's, you notice that this one is attached with this strap. Well before that, while looking for photos for the defiled bag, I noticed that the inside material is different. Now, you don't need to do this, especially if you're not going to have the flap open, but let's say you're going to have, maybe have it animated or habits simulated. And you wanna do maybe a different kind of material like a satin divert material for the insight. You can definitely do that in zebrafish or Maya like by duplicating that face. But you can also do it in marvelous. And then you can have like a double humiliation have, you can have the exterior material have one type of clause and the Interior have another type of clause. Now the thing about that is you, you might run in a couple of, of, you know, problems with the stitching and the how how these will overlap. Now to make sure it doesn't ruin that I'm, so what I'm gonna do is I'm gonna select everything and I'm gonna go right-click and just do freeze. So now everything will just stay in place. The only thing that's gonna move as this is this part. Okay? So as I've told you before, in marvelous, it's important to know which side you're looking at. So you'll see this one is a bit darker from the top. If you have double-sided on, you're not going to see it. But if you have simple, like just a thin, you'll notice that this is way darker from, and you'll notice this here. If you have the double, you're not going to do because you're gonna do like a double-sided material or a thickness. Okay, so now what I wanna do is I want to take the same one and I'm gonna do control C, control V. And I'm going to give it the same orange color. Okay, so now you can't just go ahead and add this inside because this is the actual face that we wanna see. So what we're going to need to do is, is we need to think we, we can rotate or we can do flip. Let's see if you can do if we can do a flip for this one. So right-click and I'll flip vertical and either flip normal, so to flip normals. Okay. So now we can go ahead and just want to make sure it didn't. Okay. So we're gonna stitch these and see if we stitch these two. Say, I know those are stitch correctly, but I don't want to stitch these two the outer edges because if you'll notice in this photo, you see the stitching is a bit on the inside. So what we're gonna do is we are going to, I'll need these stitches so you can remove them or we can keep this. Let's remove these and we'll we'll figure out if we need to add them later, but I don't think we need to. All right. So we're going to go ahead to move these just a bit on the inside. Okay. So now I'll select the whole exterior and just do offset doesn't tell a line. And then you just need five millimeters K. Now, if it goes over the edges that we had, we can just move these a bit on the inside. Ok. Maybe even five was way too much. So let's do let's do three, which should be enough. Yeah. Alright. So now we can either copy it or we can do the same thing for this one. So off citizens on a line. And we're gonna do three millimeters. Ok. So now what I wanna do is I want to stitch these. So star for that part. And I'm going to do the same here. We just need to make this a bit bigger. We have like so many edges here, which is going to not know which edge it needs to follow. Or you can do like each edge on its own. While making sure they're straight. Okay, so this would that. So now we have the stitching. If we simulate, this is where we're gonna get. Molas isn't like this is why we didn't go to the edge, but don't forget, we made this smaller. So the top part smaller. So you can see the stitching is way too close. So what we need to do now is go ahead and just like this one and move it to the front of it. If you want to make sure it has the same size, you can go ahead and just move this guy on top just to make sure. Ok. So now after we move that line, if we go ahead and simulate, you'll notice that marvelous plays. Really nice. So now you can, can even move. This can pose a differently. We have maybe if you want to render the, the defiled bag, something similar to this, you can now you can do that right? Now. If you move this to the side and the lines that a bit visible, you can always tweak that like maybe move, move the lines to the edge so it's more perfect. But for what we're gonna do, it's, it's, it's more than enough. Now we can if you want to take this even further, you can go ahead and add even a couple of labels. And to do that is it's really simple. So go ahead and we can do, maybe I'll do the y label here. And we'll give it like a little blue color. And we'll do another one. Square maybe here. Also. Keep in mind if you're working with marvelous try. This is gonna sound awkward with try not to be perfect. Like what about if one piece is not perfect? Perfectly centered because even when you're doing something custom and you're doing like leather work or, you know, you have a seamstress who works on a suit or something, you always have that imperfection which makes it more natural. So what I'm gonna do now is I'm going to add offset has an internal line, and we can do three millimeters. I'm going to copy this base to somewhere around here and do the same here for this one. Offset doesn't center line three millimeters Copy Paste, OK. And we can do that. You are a bit hard to see because of the color. Have parts which are really far when, before simulating and just get into the habit of moving them. Because sometimes you just mess up your mesh is because they're really far to place them exactly. But you know, try giving marvelous a bit of a helping hand. And it also helps to see if you know, if any of the stitching is messed up like here. I can select this. I can delete that. I can go back and watch this again. Okay? So now if I simulate, it should be fine. Okay? So now we also have a couple of labels to now see if we can turn this on without any problems. See low marvelous can give us headaches sometimes if you know how to stack stuff and, you know, be mindful about the edges should work just perfect.
8. Lesson07 Creating the cover strap and adding buttons: So before we add the final strap that it's going to hold the flap, we just need to go ahead and add these two pieces that hold the zipper area to be a bit stronger. So to do that, we just need to go in. And so I'm now going to add these exactly on the edge, Just a bit on the inside. So I'm going to copy this, paste it. And just no light gets smaller. You can have this. Go from side to side. And I'll show you how we can do that in a bit. So I'll move this up and it's going to be here. And that's gone. Alright? So that's going to be on top of that and just give it a green color. And that's going to be here. So let's do care of this one and then we can add the other. Okay, so let's do free stitching. So I'll do this part hold Shift. And I'm doing free stitching because it's going to give me exactly. So I'll do this one. And when you start, c gives you that blue dot. So I know exactly how it's going to take the exact size and I don't have to guess to guess work. Okay. So now the other thing I need to do is I need to add an edge on the inside. And I'm gonna do that by ofs or there's an internal line and to three millimeters here and off citizens and online. And three minutes and so here. I'm just going to copy these and add them here. This one makes sure these lines are between those two. So I'm just going over these a bit up. Select the monkey, the seam line, and then stitch to this one or this one. And this one. We'll double-check if all looks good. And now if we go ahead and teach, that, should be done. And now I'm going to go ahead and do the same for the other one. So I'm going to copy this. Not the edges whole thing. Ok. So concrete based or no? No. Let's copy it. I'm not going to do for some reason it's not letting me. Okay, so we'll do copy, paste and do free stitching again. Reverse. Let's go from this side to this side and see if that's correct. That's correct. And from this side, and again, I'm using free stitching, so it gives me that guideline. So I know exactly what it's what it's supposed to sit. And I'm going to copy these two control V. And to make sure just like the seam on and see if it's So that's here. So I need to move these just a bit up through that. And again, I'm lower than now R. So now that we have these two added, I can add this to chain and this stitching. And I guess simulate. And now we have that part added as well. So now if you want to simulate like how, because this type of material is Mike strong. So all we can do is we can select these two and have and do strengthen. Okay? So now it's gonna give us the same feel as that material. Go ahead and add this tiny strap that holds the, the flap. So let's go ahead and move the flap. Now, this is why I was telling you it's a really good idea when you're doing that just to go ahead and right-click and freeze. That's where we can move stuff around without a lot of headache. Okay. So this one should be like this and which are needed to be a bit stretched. So I want that's touched to be on the inside. Okay. So let's do this trap first. So the strap it should be on the orange side. Yeah, that one. And it should be a bit on top of these. So let's go ahead and do the square. And need these to be smaller. And if you'll look in the photo, it's a bit smaller than the other ones. That have to be perfect. You can't just offset by a bit. And then we'll add the trap. Let's make this. Blue. Let's copy this. Control C, control V. And let's go ahead and do. As I've told you before, is try and get in the habit of moving stuff before simulating. I don't want to simulate a like now, just make sure that the length is good. So we're gonna make it a bit longer. And for this one because that's round button I'm going to do around stitch. It's not crucial, but it just helps when you, when you have the folds just helps you with the look of so I'm just going to move the line, the whole thing. So make sure you select the whole thing and move it a bit down. Okay? So we go ahead and now we can copy this. Okay. And now we can do freeze to Jane and against Todd from the bottom and go like this. It might be reversed. We'll find out in a bit if it is, if it is or not. No, It's good. C, because if I go ahead and freeze this now, see simulated correctly. And now we can take this, unfreeze. Similarly. I think I can make this smaller. It's good. You can always play with the size. I'm just gonna move this to the side. And maybe just like these and move them a bit down. Just so it stretches that flat just a bit. So in this lesson, I'll show you how to add the button and it's super easy. You Can, you just have to go here, select the button icon. And you can either add it in the 2D or we can add it into the 3D in the three leads easier because I know exactly what it's going to be. So we're just going to add there. And the default one is this design, but you can change it. So you can use a leg, the button here. Actually here in the scene you have seen fabric button, default button. And here you can select the type of button that you want. So you do have a couple, I think that works. You have some genes. You have like a star one. You can even add, import your own design. And let's say you want this to be bigger. We can go ahead and just do 50. Let's go back to 20. You can even tweak the thickness of it. Or even the weight. Weight is more like if you're animating already doing simulation, then it makes more sense for us still as we are going to use, it doesn't make a huge difference. So I think for this one I'm just going to use this guy. Yeah. There's one works. Perfect. Yeah. Feel free to use any of the ones that you're like. All right.
9. Lesson08 Tweaking the shape of the bag: Now that we have all the straps and all the parts of the defiled bag ready. I just wanna go ahead and add a couple of details here and there, and tweak a couple of meshes before we start adding small details like stitches and buckles. So first thing you'll notice is that the main body of the of the defiled bag looks a bit harsh in my heart. I mean, if you look at the corners, you'll see like as if the the bag is made of paper or cardboard or something plastic and rigid and not something soft. And I really don't like how that looks because if you remember how the defiled bag looks, has this nice folds, doesn't have anything anything sharp. You don't see the stitching broken out because, you know, with with bags or clothing, the stitching is usually done on the inside and then you turn it over. So this is why you get that nice, nice effect. So how do we do that in Marvelous. So the first thing I'm gonna do is I'm going to move the elements, the main elements of the jacket, of the defiled back, sorry. So these down. Okay, now, do unfreeze. And then I'm going to select everything else. And I'm going to freeze those because I don't need them. And I'm going to I'm going to hide them by shift q. So now we're only left with these parts. All right, so how do we go ahead and add that? So first thing, what I wanna do is I want to move these parts. And I want to select the outer edges to do that. Double-click on any of the edges that most like the outer edge. And in the property editor, you'll see something called elastic. Turned that on. And strengths just add two. And ratio 90 should be enough. All right, so now if I go ahead and simulate and see if it down those stitching, those corners, right? We're still not there. So now what I wanna do is I want to make the stitching look as if it's folding in the inside. So to do that, go ahead and select all of the stitches. And under full strength with 35350. Okay, so now if we go ahead and simulate, we should get something like this, which you can't really see what's happening. And that's because the mesh that we're working with is really, really low. So let's go ahead and raise the density of this. And I'm only gonna do it for these parts. So I'm going to stop the simulation and select these guys and go under particle distance and just set ten. Okay? Alright, so now if I go ahead and simulate, I should get something like this. It's a bit hard to see. So what I'm gonna do is I'm gonna select all of these. And I'm gonna make them one color and I'm gonna give it that military Green. So now if you look at these folds, says exactly how I wanted. This looks way closer to the edges that we can see here. Now, once we have the whole bag ready, we'll go ahead and even raise the density even more. So we're going to, I think the final one, I'm going to use five millimeters, but we're going to discuss that once we're ready to export the model out of our marvelous. Alright, so now for the next lesson we'll go ahead and add, you know, small details like metal buckles, some stitching. And we should be done in the Parthenon Marbles. Alright, see you in the next one.
10. Lesson09 Creating metal buckles in ZBrush: In this lesson, I'm going to show you how to create the buckles for defiled bag. So we're gonna create this one. And the other one that holds the strap to the bag and the one that you can resize the length of it. Okay, we'll start with this one because it's simple and then we'll add an extra detail. I'll start with a ring 3D. I'll just focus on it. And it already has a lot of subdivisions you can do. You can lower these by creating initialized and create a new ring. But there's an easy way to do that. So you go to Geometry, go to 0, measure at 0.2 and this Jew 0 mesh. Make sure you have symmetry on so it gives you the exact same edges on each one. Ok? So once you have that done 1073 off and just pressing X, going to drag this here and then take these and drag that down. Okay, so that should be our first buckle. And if this is way too thin, you can go inflate. Now, this is my custom UI, but you can find inflate under defamation and you have inflate. So I think something like that should be good, right? So I'm going to center this now. Now for the next one, we need to create this part. So this has like a middle and an extra part in the middle and two widgets attacks attach would like two rings on this one. So I'm going to do is I'm going to duplicate this. So we work on that. And we'll, with the curved tube. I'm going to or we can add the cylinder actually. So do append a cylinder. Just rotate that hold shift so it get OK. Maybe smaller than that. Something like this. You can always treat this. Okay, so now I'm gonna go back to this one. So what I wanna do is I want to make this look as if it's coiling around or moving around the striping around the middle. So you can do that with a curved tube. Just make sure you select that. And while holding Shift, hold shift and think it needs a bit of subdivisions. So I'm gonna do, I'm gonna do one and just near match this. Okay? So hold shift and drag. Start dragging and then hold shift and it's going to create this snap on it, okay? And again, do the same thing for the bottom. Okay? So now I'm going to just split hidden. So with these two, we want to make sure they have the same thickness. You can move and so they can be center. And I'm just gonna go ahead and do inflate. And if you want, you can go ahead and merge these. So if you look dynam dynamic subdivision on this one, and I can edge these two down. So these are two buckles. So let's send these into marvelous. And I'll show you how we can work with those. So the only parts that I need to worry about now is the straps. So what I'm gonna do is I'm gonna just go ahead and freeze all of these. Okay? Now the second thing I want to do is all these. I'm going to Right-click and reset 3D arrangement. And you'll see in a minute why, because it's just going to make our life way easier when we start adding. The buckles. Wanna focus to a part, just press F. That's the main strap that into place. So I'm going to align these. Okay. I'm going to select them and freeze those as well. Okay, next let's import the Buggles. So I'm gonna go ahead and M four add OBJ. Notice I used import, add and not import. And I wanted to load these as an avatar because if I used the normal Import, it's going to replace the the box that we created to be inside the bag. So now just click on this and move it up. And we are going to move this inside. Okay? Now, if I go ahead and simulate, you'll notice that it's not following that line perfectly and because our meshes like really, really low. So if we look at the density of it, is. Have like eight to ten polygons there. So what I'm gonna do is I'm going to select only the straps. And I'm going to give these a density or particle distance of ten. And now I'm going to select the buckle again, simulate and move that while the stimulated emission is Onsager and see how it follows the bit down. Minus stretch them and steal just a bit too much. Okay? And now when I select these two and on trees to move here. And I'm going to go ahead down a bit and lead the temporary stitching that we had. No, we added that one here. So I'm gonna go ahead and delete this. Now if I go ahead and simulate, should similarly just fine. So now I'm gonna go ahead and do the same thing for the other one. So sorry. So import, add OBJ metal. Okay. Move down one here. Ten simulation on. Move this a bit up. When you add any extra parts and you want to move them, just make sure you're moving gently because if the movement is way too fast, the material can't keep up. So now do the same thing for the other ones. Just move this down, this here. Let's rotate this up it. So it's easier to, to simulate. And I'm gonna go ahead and unfreeze these two. And now simulate yeah, I forgot to forgot to remove the stitching on trees. And go ahead and remove this edge. And now if I simulate a should be fine. Oh, why? Do that again? Okay. Because the strap is a bit too far. It's gonna rip out of it. So to fix that, surely I'm going to freeze these two back again. And I'm going to unfreeze this. Okay? And then we freeze this back and freeze. And now that should be, should work fine. Okay, the other thing you can do is if you select this and you'll notice here in the property editor, you can actually select the type of material. So I'm going to just give a metal. So it looks like a buckle. Now, just it looks like a piece of cloth to metal. Now one thing that might help if we go ahead and add a bit of like same tapping to the edges. And go ahead and select the outer edges. And just turn seen tapping on a, Make sure it's about five. So that just adds strengthen to the edges. Notice we had that one on, on the small ones. We won't have those problems if we, if we, once we raise the density of the mesh, it's gonna be, it's gonna be easier. Okay, so I'm just going to add seem tamping where these two as well. And we should be ready for our final adjustments. Right? So in the next lesson we'll add final details and we are ready to Bose this and exported out of marvelous. Okay, see you in the next one.
11. Lesson10 Posing the bag: Now it's time to pose our bag. And the first thing I'm gonna do is I'm gonna take the mesh or the avatar that we created in z brush and I'm gonna bring it close to the ground, not to the end of it. And to do that, we need to select the mesh. And you can do that by either making the whole thing transparent and then trying to click on it. Okay? And make sure you have simulation on is I want everything to move with it. The first thing you will notice that the Rings stay behind. So what I need to do is I'm going to move this a bit and then I'm going to make sure the rings are moving as well. I should have added the rings at the end because I didn't have to worry about the remember we, we added them in as extra avatar, who was an OBJ. They're not connected to the, to our initial mesh. When you're doing this, make sure you have simulation on. I guess I'm going to lower these as much as I can. And then what you can do, actually, you can hide them. They're still there. Just easier to select. Alright, I'm gonna move this over to Jodi before when you're moving objects, they have cloth attached to them. Just make sure you keep your movements. Subtle. Because if not, then you'll have to go back and just move stuff around. So just more something like this and hides everything back to our uncles. And let's move this down. I'm going to rotate this actually because I wanted the weight of it to sit on the bag. Then it doesn't, doesn't make any sense. It should be, should be falling. We show our bang. You can see how it looks from the bottom. See the meshes really clean. Now that we have the interior of the bag sitting almost on the floor. So if you look underneath, you can see the straps are looking nice and clean. You feel that the bank has weight. Sitting on the ground. So now what I wanna do is I want to just pose the straps and I was going for something like this. I want this the shoulder strap to come from the front and it goes to the back. And I don't want these to be on top. I want these to be something like this. So they like as we have them now. So suppose this. What I'm gonna do is I'm gonna go ahead and freeze everything. Okay, so I'm going to freeze that and we only have to work with this. So it simulate and restore moving this trap. So I'm thinking I'm going to render this maybe on the floor or on a wooden table. And have had a nice nice feel if all the elements of the bag straps just to be a bit down. So I might try and maybe make this a bit longer. See if that helps. So I'm gonna go around and add a bit of detail. C. So we added a bit of detail to those edges. Think, impose on the edges. So I'm going to go 25 to 80. So that doesn't work. Sweet too high. So I'm gonna go five on this. And 150. It was raising that edge weights too high. What else? I'm going to add a bit of edges here. Offset an internal line, do five millimeters. And I'm gonna go bit 250 and see if that works. Thing is sometimes it might, might fold the edges way too much. So it's going to be, so gonna come harsh. And I don't want that. So I might go a bit lower. Actually. They just need these to be visible and should be okay. And I can use them to add a bit of stitching, stitching detail inside. And some marvelous. And I can do the same for, for this trap or the main strap. And for the mid b1. I might use something else before, before I do that. So I was thinking about we do part because usually when you shoulder strap has like a more of a kitchen area which is a bit softer. So something like this. So how about we split this into three parts? So let's do so like these two and do split. And we can do uniform number and have three. And do the same here. Split and three. So maybe we can cut out the mid part. So I'm just created those as a guideline actually because I can I can delete them after. So I'll do make this just smaller than those lines. And then I don't need them now. I can select these and do cut answer. I can give this another color just to easier to see. So how about we make this a bit bigger, but I don't want to, because, you know, here we have a stitching. So what about if we go ahead and we add one here? One here. And we can do the same for that sign. So now we can take this, move it up a bit, and do the same for the bottom 7.8. So it will give us that shape. So now what we can do is we can select this do offset as an internal line. So now that we have this one, I'm gonna go ahead and right-click and to copy and paste here. And just move it up. And what I'm gonna do is I want to have this to be the top. And now I want to be the bottom. And as we did before, right-click and flip normal. Ok. So now that we know these faces as we did for the flap. But before I start working on this, I want to make sure I have everything frozen. Freeze so we can we can focus on this. Okay, so what I wanna do now is I want to stitch the bottom one to the top one. So I'm going to rotate this and move it up just to double-check the edges, correct? Yeah, that's the one. Let's go ahead and do freeze to Jane. Click and then hold shift and do the mirror. Now one. And everything is straight, Looks good. To the same for the inside. Click. And then shift and do the mirror. Okay? Alright, well that looks good. Before we hit simulate or know what, let's go ahead and hit simulate. And don't want to I want to try something before, before we add any more detail. So that is what we have now. So to give this the look that I'm going for it, I'm going to select these two. And I'm gonna go to pressure and I'm gonna give it one. So what that does is adds a bit of air inside and you can barely see it. Now if I, if I exaggerate this to, let's say ten, t moved a bit, but I don't need to and I just need one. And I think I'm going to just raise the particle distance just a tad. So you can see what I'm, what I'm trying to do. Okay? So now it's a bit clearer. So you can see how that is a bit inflated now. And to make it stronger. And I'm gonna go ahead and select the interior edge. And I can give this 25250. And no, no, it's a bit clearer. Alright, so now let's add a, lets out a design element to this. So I'm gonna go on, God's gonna do something simple. Double click to finish the line. And I'm going to do emitter of that. Okay? So now if I select these copy paste and we can do click and I can do the meter of that. So there's one. With that one. I want to make sure your lines are straight. Just raise this a bit up. Yeah, it looks good. And then I'm going to do, I want this one. And by mineralized, I'm saying just the mirror shape of that. So now everything looks good. So if I go ahead and simulate, it should give us this nice shape. And you can go crazy. You can, you can even add a bit of lettering or complex design. Okay? And I make these a bit stronger. I'm going to select both 25 by 250 and simulate now. Okay, now to visualize this better and select these two. And I'm going to add a bit of rendering thickness, just one. And now I can do thickness. And this is what I was going for. Just have a soft strap in the middle of all that.
12. Lesson11 Turn patterns into Quads and final details: Now that we're ready to export the bag into ZBrush, before we do that, I just want to do a couple of tweaks, just so it gives us more option to work with and a couple of settings just to make our model is a bit better. Ok, first thing you'll notice is if you go to wireframe, you will see that our bag now is made of triangles, which works verifying you can export this into ZBrush. You can take each bar three, mesh it, clean it, add thickness to it, and it works perfectly good. But marvelous, has the option to turn all triangles into quads and that will give us just an extra strip. Because when you import that into ZBrush, you can take the model and add thickness to it, a bit of subdivision and you can show it to decline before you start adding any, any extra extra details. Or even just if you want to check it out or send it to all render so you can look at it and see if you have any problems with the mesh. So we're gonna go ahead and do that. So make sure you select All the mesh and go to property editor under miscellaneous. Just make sure you select quad. Just give it a couple of seconds. And you should see the triangles now turn into, into quad. Okay? So that's the, see, there isn't any any major difference to the bank. Okay? So now if you want, you can go ahead and simulate a bit just to make sure everything is just sitting nicely because it does change the mesh just a bit. I went ahead and also add it, made the hands traps strengthened because it is made of a strong material. Now, the other thing you want to try out is select all the all the meshes. Just added one material to everything. And you can start playing around with the type of material you are working with. Because now you were using the default preset that, you know, marvelous uses with, with any new project. But you can play around and see which one works better. Knife you Google what defiled bags are usually made of. They usually made of a material called Canvas. So you have cotton canvas. And if you change to cut them canvass. And you simulate, you'll notice that it starts moving about and it start, the false starts changing. And to view this correctly, what you need to do is you need to add more, more density to the mesh by selecting everything and just adding particle distance. Now, the other thing you can do. Let's say you're not happy with how many folds you have the disease. It's like, I would love to have like more tiny folds and so on. You have an option you can select. Let's see. Let's look at the side views, right? And you can play around with something called weft and warp. One of them is add details to the width and one of them adds more. Weft and, and, and work you have to think of them is like how many threads there are on, or how the distance between the threads on a, on a mesh. So to play around with that, what I want, I want I can do is I can go ahead and do, let's say 105. And now if I go ahead and simulate, you'll see that change the width of it. Let's exaggerate it with this one and do 120. And if I simulate now, you see it made it way baggie and you have more folds to it. I usually I don't go that harsh because it, it really stresses out the material way too much. So use you can, you can make the left and the Warp. But for this one I just want the height of it to be affected, so that will be the warp. And now if I simulate, it, just added a bit of extra falls to the side. So finally, before we send this into ZBrush, go ahead and select everything. And underneath particle distance, I'm going to select five. And this going to take awhile. So give it a couple of minutes until changes. Now if you want an extra kick to your simulation, where you can do is you can go under settings on our preferences and you have simulation properties. And you can change the simulation properties to complete. And then it will change this arrow instead of yellow, you're going to have a double arrow and it's read now. So simulate that. Usually I'll let it run for a couple of minutes on a two to five minutes, depending on how detailed you want the false to be. It just adds just, I don't know, a couple of, you know, wants 2% more detail to your simulation. Alright, so now that we have our bag and we are ready to export, just go ahead and select everything. You can either select everything and export selected or you can export all of them. Because you remember we have the buckles and we did import those as avatars, right? Okay, so one other thing you can do if you feel like, especially for big parts, if you feel the resolution is not enough. So you can always check your resolution with the UV, with the wireframe. You can always select some parts and raise them. So let's say I would like these parts because they're like the main body of our of our bag. How about we make those four millimeters instead of five, right? Just keep in mind, this will slow down the simulation, so just make sure you get, you'd be patient with it. Alright, so now go to File, Save As, sorry, export, OBJ, defiled back final. And now have select all patterns, select all avatars. Make sure you have all graphics and trims, and that means buttons, zippers. I don't want it as a single object, that I want this as a multiple object. And I wanted to be thin. If you want to add thickness to this, you can't select thick, but you have to make sure you will need to go into each pattern and add thickness to it. But I'll go, I'll go into that in a, in a different lesson. Keep it at millimeters and we're ready to export.
13. Lesson12 Adding stitching details: In this lesson, I'm going to show you how you can add stitching details in marvelous designer. And it's pretty simple and straightforward. What I did is I went ahead and I isolated the parts that will I know that they're going to need a couple of stitching details. So this way I can go ahead and select the other ones, right-click and just do freeze so we can worry only about those. So I'll start with the it's all part. To start adding stitching, you need to select free stitch. You have segments stage and you can have a free stage. So I'll start with free stitch. This one. Click and you'll see that adds the stitching to, to the piece. It's pretty, pretty simple. Now we need to do a couple of tweaks, so this is perfect. First thing you'll notice, this one is a bit far from the edge from our stitching, like actual stitch. So to do that, I'm gonna go ahead and select the default stop stitch. And here you're going to have a lot of options. First one is offset. So if I go ahead and just add 0, it's going to add it directly on the edge. But what I've noticed is sometimes marvelous will not doing it now, but sometimes you'll notice a couple of stitching just being a bit stretched out. So if you, if that happens, the best solution are found is just to go 0.1 and it just going to offset it a bit farther from the, from your edge. And it should, it should work just fine. Now, the other options you have, you can tweak the length of each stitch. So I think something about around 2.5. should be visible enough. You can tweak the spacing between each stage. And you can also add that thickness. So maybe you got 0.5 should look good. So zoom out, see if maybe increase the sizing. So go 1.5. So, so it's easier when we render it out, it's easier to see. From that distance you might need when we create the stitching for the small ones, we might need to make the city a bit smaller. So we'll, we'll see that in a second. Now for these two parts, I'm going to use segments such so I'll just click, click. And I don't have to do any tweaks because we're using the default top switch. Now, if we need to create another stitch setting, then we'll have another one exactly as we would have on a, on a fabric. So if you look here, this is this is what I was saying about sometimes the stitching just might go a bit crazy. So if that happens, just move it slightly off. Maybe a 0.2 if appoint one doesn't work. Ok. Let's do 0.05 to 0.3. Still on the edge. And it looks way better. Okay, so that's one. Now let's do the. Shoulder strap. And I don't wanna do the bottom one. This is not going to be visible for rendering anyhow. So we're just going to see which one is the top. I think this is the one. This is the top one. So again, I'm going to use three top stitch. Sorry, just for the interior, I don't need an edge on the outside. Click. And then we're going to do the same for the into ones. And now we have a couple of stitches here. Let's do edge touching on the long ones, like these traps. So segment stage 1234 and as them there, and we need to ask them to gene here as well. So OK. So we need to do the shoulder strap. Here is I'm going to use segment or this one as well. And you'll notice that I added an extra label, just you can add a logo or something on the, on the front of the bag. And use free stitch for this one. Okay. So now let's see if it, if it looks good on the small ones. Now, for the outer ones, I'm gonna use free stitch and for the interior I'm going to use segment. And it's looking pretty good. So I'm just gonna do a couple and then I'm going to pause the video because it's the same, going to do the same thing for the all of them. So now and I had an added all the stitching to all the parts. And see, you can see how much character to that and that adds to our piece. Now, we can start, well, we can tweak these if you think like any of the parts, maybe the stitching is way too small. You can create another stitch and I can show you that. So you just select this one and do copy. And let's say we can call this one smaller stitch. And let's say we make this one in size. And we can make this one. Yeah, let's do one distance and maybe the thickness 0.2. Okay? So now we can select segment and let's do it for the label because it's, so let's change those. So we select the edge, the stitch, and we just added as we would add a color and that you can see it changes. So now you have to, if you want to use the smaller one for the, for the tiny parts, feel free to do that. Alright, so now let's jump into ZBrush and see how we can, we can tweak those.
14. Lesson13 Importing the bag in ZBrush and preparing subtools: Alright, so I went ahead and imported the bag from marvelous designer for this version. When I went ahead and I selected all the patterns, and I used four millimeters instead of five. Just to get a bit of more detail. You can go lower. You can go three millimeters is I've seen some people use to, but keep in mind that it's going to take way longer to simulate. And don't forget that you can always add tiny details or tiny stitching or tiny folds in ZBrush. Now you'll notice this label that I added. I forgot to turn it into a quad mesh, but it's good because I can show you how, how I usually clean up triangles and then we can turn them into quad using 0 measure. So here's, here's all default back. Now, first, first thing you'll notice that some parts are looking transparent and this is because we don't have any thickness to the bag. So to fix that, just go to display properties and make sure you have double Long. And this way, it will fix it. Now, if you turn on poly groups, you'll notice that each part has its own bully group and this will be really helpful so I can separate each piece and start cleaning it up. So what I wanna do now is I'm going to start splitting, splitting this bag, and making sure they have the parts needed to start cleaning it up. You usually what I do is I'll gets rid of any parts that I don't want. So for example, just by clicking shift control, I can go in and I can isolate, hide these objects. And what I wanna do is I want to delete the, the middle of the bag because we don't need it anymore. And if you don't want to delete or you can keep it as a subtour. And also what I wanna do is I want to split this and isolate the stitching on its own. Does its own septal. Just so it's easier for us to make any tweaks to it or hide them if you don't want to use them. Because the while stitching, 3D stitching looks really good. I'll show you how how much polygons these simple stitches took compared to the actual bag. So I know that I have all isolated. I can go split hidden. Now you can find splits hidden under subtour split and you have split hidden, or is it yeah, it's written. Okay. Alright, so now I have bag here. I'm gonna go ahead. I want to keep the buckles. So because these share the same group, I'm going to do auto group and we're gonna just delete hidden. And now I'm going to put the buckles on their own as well. And I'm going to split them. So if you look at the just stitching, this is 3031000 polygons and the entire bag is 77 thousand. So the thing is, while stitching is really great, especially if you're doing like really up-close shots and you want to have that nice shadow hitting the bank. Sometimes. If, if let's say you're doing a render and the bag is like really far away ROA. It doesn't matter if you're using a texture instead of the actual mesh or so you always have to prepare before and know and plan ahead. What are you going to use the a model for it? And it's really important because if the client comes to you and says, well, we are going to shoot the model this close and the camera's going to, you know, pan and show the logo or we're going to show the stitching of the then yeah, sure. Go ahead. You definitely need to make them as mesh because it's different no matter how, how hard you try to make them with normal maps or displacement, it's not the same. It's just, you know, light won't hit the model the same, the same luck. But if you are going to have the model really far or just sitting in a corner and you just want the detail then I would just suggest using adding stitching with the normal with a texture. And then you can keep the mother like really, really low. Alright? So one thing you can do before starts cleaning it up is definitely save. And then what I like to do is I want to make sure the model doesn't have any problems. So I'll take the model as we have it now and just try to, you know, divide it. See if it see if everything looks good. So I'm going to solo that and divide it. Any first thing you'll notice is it's splitting, so it's splitting into multiple parts. And that's because it's not welded. We have the model now and nothing. Each piece it's on its own. It's not welded. So to fix that, what we can do is we can go under Geometry and we can do modified topology weld points. So now if I go ahead and divide this, you see everything stays in one piece and it's not, it's not splitting. Okay? So the other thing I wanna do is I want to add a bit of thickness to the, to this to see if of all meshes are correct. So I'm gonna do edge loop. I don't want any bevel, I don't want elevation. I wanted minus a 100 know Polish, keep the sickness. And then one loop. And I can do a bit of one divide. And I'll just go around making sure the, you know, the bag looks good. I know it's still needs a lot of work and still need screen up. But I like to do this stage. Because it helps me just know what I'm going to be up against. And also it's a good idea to test some differentiators. So let's start splitting the bag into the main parts that we were going to start adding thickness to it and so on. So first thing I'm gonna do is if you look at our reference photo, you'll notice that this part with the top of the bag is one piece. So I can keep the bottom as its own piece. And then I'm going to get this nice stitching edge and the signs, I'm gonna keep them on their own. So what I'm gonna do is I'm going to shift control and isolate the top parts and the side parts. Okay, so I'm gonna do split him. So now we have these on its own subtour. Okay? I can do control w and then they'll have the same, the same group or I can keep them. I always tried to keep my polar groups as much as I can because then you never know when you need to isolate an object, then it's way, way easier to go and see and do control click. And then you have an isolated rather than starting to mask it on a manually. All right, so that, that's one piece. And the next one is I want these I might keep these as one fees because it's not it's not going to be visible on the inside anyhow. So I'm gonna do splits hidden. And then for the top of the bag. Or actually let's do the, the handles. These will be one part. I'm gonna do splitter then, but I'm gonna keep the two separate poly groups. Okay, then let's go back to our bag. Let's make the flap on its own. Okay. I'm gonna do split hidden. And then we can do the shoulder strap. And I'll do the straps on their own and that thick one and leave that on its own as well. Here's split hidden the thick ones and top of the the zipper. And then these guys are going to be on their own. Like can I have the same? Actually, I can have these. While it's a good idea to split into multiple subtotals, tried to keep them as neat as possible because then you'll have a lot of them. Well, with the new one, it's not a big problem now because now you can add them in nice folders, which is just amazing. So because these won't touch. It doesn't have any edges which are touching or vertices. I can work with these as one part. And if you look at the topology, it's not bad, it's not perfect. So does need a bit of work. But for what I'm going for, and this is not a character, the topology doesn't have to be perfect. Now, if you need this to be really pristine, you can go in and you can tweak this and I'll show you how I usually do that just to make sure I have all the parts that I need. Buckles bottom. Going to add this on it's own splitter then. I think I'm going to split that. Have the button on its own as well. These are the interior labels. And split those exterior on its own. And this is the zipper, which we don't need now, but I'm gonna keep it just in case. Just I'm going to use the mesh to create the zipper inside of. Alright, so now here's the bag and you can notice it's all like all pieces are there. Just I just split them into multiple sub tools just to make it way easier for us. All right, so let's start splitting the bag into the main parts that we were going to start adding thickness to it and so on. First thing I'm gonna do is if you look at our reference photo, you'll notice that this part with the top of the bag is one piece. So I can keep the bottom as its own piece. And then I'm gonna get this nice stitching edge and the size I'm going to keep them on their own. So what I'm gonna do is I'm going to shift control and isolate the top parts and the side parts. Okay, so I'm gonna do split him. So now we have these on its own subtour. Okay? I can do control w and then they'll have the same, the same group or I can keep them. I always tried to keep my polar groups as much as I can because then you never know when you need to isolate an object, then it's way, way easier to go and see and do control click. And then you have a bart isolated rather than starting to mask it on a manually. Alright, so that, that's one piece. And the next one is I want these. I might keep these as one piece because it's not, it's not going to be visible on the inside anyhow. So I'm gonna do split hidden. And then for the top of the bag, or actually let's do the handles. These will be one part. I'm gonna do splitter then, but I'm gonna keep the two separate groups. Okay, then Let's go back to our bag. Let's make the flap on its own. Okay. I'm gonna do split hidden. And then we can do the shoulder strap. And I'll do the straps on their own and that thick one and leave that on its own as well. Split hidden. The thick ones and top of the the zipper. And then these guys, they're going to be on their own. Like can I have the same? Actually, I can have these. While it's a good idea to split into multiple subtotals, tried to keep them as neat as possible because then you'll have a lot of them. Well, with the new one, it's not a big problem now because now you can add them in nice folders, which is just amazing. So because these won't touch, like doesn't have any, any, you know, edges which are touching or vertices. I can work with these as one part. And if you look at the topology, it's not bad, it's not perfect. So does need a bit of work. But for what I'm going for, and this is not a character, the topology doesn't have to be perfect. Now, if you need this to be really pristine, you can go in and you can tweak this and I'll show you how I usually do that just to make sure I have all the parts that I need. Buckles, bottom. This on it's own splitter then I think I'm going to split that. Have the button on its own as well. These are the interior labels and split those on its own. And this is the zipper, which we don't need now, but I'm gonna keep it just in case. Just I'm gonna use the mesh to create the zipper inside of. Alright, so now here's the bag and you can notice it's all like all pieces are there. Just I just split them into multiple sub tools just to make it way easier for us.
15. Lesson14 Cleanup topology and add thickness: I decided to keep the body as one piece so I can have like a close shell and this way it's easier to manage and have to manage multiple parts for the body of the, of the, of the double-back. Okay, so as I said before, the topology is not horrible, but it's not great either. So if you, let's say you want to add a lot of detail and texturing. And this piece, you might run into some problems here and there. So if you want this to be a cleaner Topology, This is how I usually do it. So I'll go ahead and do clone. So this way I am working only on this subtotal and I don't have to worry about all of them. Just makes it easier to follow and also easier to work with so you can focus on more than one piece. So I'll go ahead and duplicate. Now we can scroll down to geometry and we go to 0 measure. And I think I'm gonna keep the default. So I'm gonna do 0 mesh. Now the first thing you notice is the topology is way better. It's really clean. But I've lost my poly groups and that won't want to For me, I really, I really want to have the ability to split these parts. May be I want these to have one color and this has a different color and so on. So to do that, just make sure you have keep groups and don't smooth groups, just turn that to 0. And then I can go ahead and do 0 measure. Okay? So now as you can see, it kept the groups that we had before and the geometry is looking way, way better. Now if you do have a couple of problems here and there, you can either like smooth them with the, with the smooth and the shift, or you can try to mesh again. Now, we're going to use this just as our low poly cage. And we are going to go ahead and, and take the details from that and project it on the bottom one. Now, if you are planning to have a bit of thickness to the, to the bag or the mesh that you're working with. Make sure you do that before you start projecting. So let's go ahead into Geometry. Edge Loop, thickness. I'm gonna keep it 0.01 elevation minus a 101 loop. It's enough. I don't need polish and I don't need any any bevel. So let's go ahead and do panel loop. Now, one thing you might get some times because you have different groups, is it will do the, if I go ahead and sub-divide Now, Control D, you'll notice that it split it in science and that's going to cause a lot of problems. You see, you can see it here. So, so to make sure that doesn't happen, just tell panel loops to ignore groups. So now when I go panel loops, it will keep the inside is going to be one. The inside thickness should be as one piece. Okay. Now, if you need this to be thicker, you can go ahead and play with this thickness. Let's say maybe 0.2 would work a bit better. Because we're going to have the zipper on top and okay. So once you're happy with that, I can go ahead and I can do Control D, Just to add a bit of more subdivision. And then I'm going to go to project. And I'm going to keep everything as default and just do project. All. You notice, it added some of that detail back. I'm going to do again divided. And it's going to add more detail. So now if you always keep in mind to go back and check with your original model. So if you can, if you can, if you need to, project more detail. So I think I'm going to do it just one more time and just do project. And you'll notice that it also added all those faceted faces from, from our model. Now, you can try to, before you start projecting or adding any divide, you can take the the original mesh and you can divide that couple of times and you can delete lower. So this way, you know, you have a way cleaner so you don't have any subdivisions, any fat faces. And now that I have a device that can do reject all. And then to again, to project all. I can do project all. You notice before when we had 900 thousand, we had a lot of faces on the on the mesh. But now because we cleaned the original mesh, you, we're not going to have that problem now. Now if you still have a couple of areas here and there, you can do Polish by features. And it will, it will clean, but also keep in mind if you have tiny, tiny details Do you might lose those. Okay, so now that I have that, now when you project and you add thickness asset that you might get some weird results like this on the edges. But it's, it's an easy fix. You just, you can just go in and, you know, and just smooth them just to make sure you have a clean a clean mesh. Next, let's work on the hands traps, the one that go around the body. And we're going to use the same thing. So to get a cleaner Topology, I'm gonna go ahead and do clone. And for this one, I don't need my need to duplicate it because it doesn't have any tiny details to it. So I can do 0 mesh. And let's say this is 7 thousand, let's keep it at 5 thousand should be. And this will give us away way more cleaner result. Okay, so once I'm happy with that, I can go in and I can do. Now before I add thickness to this, I want this to be relative to the bags. So I'll go back to our initial sub tool and append the new. And I get into the habit of naming my myself tool just go easier to follow. So side. Straps or handles defiled by k. So I can shift, click on the I, and I can hide everything and only show the bag and the straps. And now lets go under Geometry edge loop. And let's try the default minus1. See if that works, see if the thickness is enough. I think I can work with a bit thicker, so I think maybe 1.5 due penalty. Whoops, nope, sorry. Points we were 1-5. You can always go back and click it and check a reference. I think I think it's good because these are usually really, really thick. So I'm going to keep that like this. Now if you go ahead and do a dynamic subdivision, you can, I have it here, but you can do it under dynamics of div here. If you want the edges to be a bit sharper, you can either use Z modular. So let's say you want these to be like really sharp. You can use Z Mugler, go on an edge headspace and just go crease. And you can do edge loop complete. And it's going to add a crease to it. Now then when you, if you do dynam ash dynamic, it's going to be like really sharp. Well, you know, you don't want it to be when you're doing cloth, you don't want anything to be that sharp. But you can do level. And then it's gonna give you a nice, nice fall off. And if you do one Bevel and you click, then it's going to remember that the setting that you had before, dynamic, I think works, looks really good. And I'm gonna keep it without the bevel now. Now you'll notice that because this had like a two parts which was folded and it kinda went through it. Let's see if we can get a better result with the edge loop going elevation a 100 naught minus a 100. And that's not better. So I think that's due to 0.1. Ok, so I think that works. And this is what I was saying before. Trying to keep volley groups as much as you can because then let's say you want to select the the interior of your straps and you don't really want to give them another color. You still have, have that option. So always keep your groups as long as you can't like if you, if you don't need to merge anything, don't merge polar groups just keep them because they're going to, you only imagine how, how helpful those, those can be. So I'm going to keep those like that. If you have these, you can notice that there is a gap between them in the bag. I'm not sure if on the bag they're stitched. I think they go through those loops and they are not stitch. But let's say if you want these to be closer, just take the Move tool and just move those closest to the bank. Stupid. So you didn't have just quite a, quite a big that big of a gap. Okay. And and we can go, we can go and delete the old ones. And we can move up and we can start. I'm gonna do, is I'm going to do these. And we can do, again, clone all of these here. Let's see if we can get away with the same result without doing any projection. So I'll go in to 0 mesh and we're gonna give it to five. We have 3 thousand now. So hopefully it's going to keep all that detail in. And you see we have a way, way better. And you can always like if you don't, if you don't like the results, you can press alt and hit 0 mesh again, it's going to use another method to 0 measured. Now, sometimes you'll notice you have a couple of arrows like this. If that happens, just go in and you can mask that and just click and then flip the mask and then you can do Polish by features. And if you click this is gonna do the polish on the edges. Make sure you have it mask because then you won't mess up all your mesh. Again, if you do 0 mesh again, you should get a cleaner, cleaner version now. And here's what happened. We kinda lost all that detail. So I'm gonna go a couple of steps back and think I'm going to go to do this. And I'm going to see what happened there. Okay? Now I'm going to try to move these edges out so we don't get that problem when we did the first 0 mesh. Okay? I think here's the, here's the problem. Okay? Yeah, that's the one we're having one face missing or is it just, you know, we on top of it. So let's do 0 mesh again. If that doesn't help, just flip it into Polish. And to 0 Michigan. And that looks pretty good now. Okay, so now we do the same thing. I'm going to bring these n and a sub tool, do append and do strap holders. And I'm going to add a bit of thickness to these edge loop minus a 100 elevation. And I think we can go thicker this so we can do to I think even if they go through, it's not bomb if because when you start adding bit of subdivision, you'll have that soft fall off. If you think it's too much, you can tone it down. See if that's better. Yeah, 1 function should be working way better. Okay, so I'm gonna go ahead and do the same for the other tiny parts and then will continue in the next lesson.
16. Lesson15 Adding 3d stitching and details: Alright, so I went ahead and clean the other pieces using the exactly same method, doing 0 mesh and then just adding thickness. Now I've left the top and the side, the front label. Because as you remember, I left this as a, as a triangle part just to show you there is not a huge difference that you can, you can actually import from marvelous as triangles and it worked just fine. So you go to geometry that say this is 900, target of one should be 1000 polygons. And see it that into a really clean, clean, clean mesh. So then we can go here too. And that should work just fine. Now for the top flap, you remember we created two parts for this. And what I, what I actually want, I want this, these two to have like different thicknesses. So what I'm gonna do is I'm actually going to split these two into two parts. And the interior part, I'm gonna give it, going to go ahead and clean this up a bit. Let's see if we can get away with 0 measure. So let's do five because it's not gonna be that much visible anyhow. Okay, so see that works. And I'm gonna go ahead and do an edge loop and loop. But instead of see if we can see if that works, I'll do the other one. Okay. And for the top one, see it's thick, 6 thousand and we can go to 0 measure, and let's do a polygon count of 80 measure. I think we can do. And should hold the same detail just fine. Okay, and now let's go edge loop and do again to panel loops. See if that works. So now I need to either see if we can go up with that one and keep okay. First of all, we don't need to be that thick with this one. So I think we're going to do 205. Okay. And do the same thing for the bottom 100052. If we can do it like this, that works. Yeah, exactly what I want. I want these to feel and I might take the move, just move it slightly up. So now when I to a dynamic subdivision, you'll get this nice, you know. Detail. See elevation minus. And then we can raise this just a bit. Yeah, and see exactly what I want. So this way, we have a nice subtle edge just to show that these like, because the cover is made of actually two parts and not and not one part. Okay. And I wanted to do the same thing for the shoulder thing software. So do the same thing. On the top one. We're gonna do split head then. And I will do geometry 0 measure to k. And then I'm going to do an edge loop elevation similar to that. So sort of 0.5. And we're gonna do the same thing for the bottom one. So do 0 Mesh one and edge loop and 0005, lope elevation a 100%. Okay? So now you dynamic subdivision these two. And I can just make a little bit closer. You can get that look. Now if you want these to feel a bit more inflated, you can actually add a bit of inflate to this. So I mean that damage, but maybe one, just make it look a bit, a bit softer. Now let's take care of the stitching that we created, the marvellous. Now if you look at the stitching, stitching there we got into this. You'll notice that it's going through the mesh and it's not visible anymore. So instead of going in and actually using the Move tool and moving across the across the bag. What we can do is we can go under inflate and you can find them laid under defamation late. So under inflate I'm gonna go and due to too much, maybe 0.6 should be enough. Ok. And then I'm just gonna go ahead and round the the bag and just make sure the stitches look good from all, from all angles. And just using the Move tool. Because we added a bit of thickness and we move some stuff around. Sometimes these, getting these to align perfectly is a bit of a A bit of a headache. So I'll just go around the, the model and I'll start tweaking these. As I said, it's really, you really have to think well about what type of shot when you're creating a bag or anytime of clothing or anything modeling actually, you always have to think about, is this going to be front and center? This is going to be really up close to the camera. There's going to be really important for, for the shop. If not, because if the camera is not this close, it's not going to make a huge difference if you're using mesh or texture for the actual stitching. And because you always, you also have to think about what you're working. If you're doing this for games, it's not going to work. You, you, the only, you're only solution is merged these with the mesh and then extract a displacement map or a normal map. Just so you can get, you can get all the details. Now, this is just going to be a bit time-consuming. So I'm just going to pause this and I'll see you in the next lesson. So now that I have finished detailing the stitching and make sure making sure it's not poking through the through the mesh. Found, found one here. For the last bark Before I start UV mapping. Or sometimes I'll move them up and then I'll add the tiny details like small folds and a couple of maybe stitching details here and there. Here's one detail that I really love, love to add in all my models because cloth on the edge always has like a nice, make sure you have inflate and turn lazy mouse on and put a step of maybe 1.4 and drove size of nine, intensity 21. You can play around with the settings and see what works for you. And then I would go around the edge and I would just add a subtle, just the subtle detail. And if the gap is way too big, you can go back and go 1.25. And just so it breaks apart the, you know, the perfect edge and especially where you have where you have stitching because the stitching is like pushing the material in. It gives you that feel of bulging out just because because the pressure that the the stitching is making on the on the material. Just a just a subtle detail that I usually add on my, on my clothing models. Because it just adds that much, although it's really subtle. Ok, the other thing you can do is with the dam standard, you can go in and you can add maybe a line underneath the if you want to make the the edge underneath the stitching a bit sharper, just going to give you a bit of more depth that feels like it's sitting on top. It doesn't have to be strong or just, just subtle. And you can already see the difference between this part and that part because you don't want the the stitches to feel like they're sitting on top of the mesh because they're actually, I think in real life there actually going through the mesh and they were applying a bit of fair of pressure on the material. Two. So we've told the parts together. Alright, so I'm gonna go ahead and add this state detail around the the bag and then we can start preparing for UV mapping. Alright, see you in the next one.
17. Lesson16 UV mapping 3d bag in ZBrush: In this lesson, we'll start UV mapping the bag. So I'll start with the biggest part. Usually move, shift this arrow down on the, move it to the end of the stack. And i'm going to go ahead. And usually when I work I solo each part so I make sure I have I give H part the attention it needs. So now for this one I'm going to go all low. So this is gonna make all sub tools low. Now you remember when we created this, we re rematch this. We kept the Bali groups. But when you create thickness, it adds a new, two new polytopes, which is the thickness and the interior, and also the height of the thickness. So if I would go ahead now and let's say we're gonna go ahead and do the same as we did before clone. So I can, we can work on this part. And so let's say, what do you do UV mapping, you need to delete all your subdivisions because it's easier and cleaner to work on the lowest one. And then you can copy the so delete higher. So now if you go to UV master and I'll go pull it bogged groups because I want this to be separate and different palindromes. And I'll say unwrap. So it's going to go ahead and create all the, all the parts. So that's flatten, right? So everything, so this is the interior, the sides, the top, and this is the height. So if you need to add specific details for that, you can leave it. But I try to keep my UV mapping as clean as possible. So I'm gonna do on flatten. So I'm going to shift control the interior and shift control outside. And then I'm going to select that. So now we have the interior with the edge and I'm gonna do a control w. So now this one is one poly group. So if I go ahead and do unwrap now, they should work just fine. So now if you do flatten, oh, I forgot to select the element. And flatten because it actually creates separate ones, even if they look both of them purple. Okay, so Joel W, That should do it. Alright, so now I've got to go flatten, should be in the interior and the science. And you also make sure you go like zoom into it and see if you have extra parts like this. Because sometimes when you create 0 mesh, what ZBrush will do, it will close the holes with a couple of extra polygons if there are tiny holes, so you can go and flatten. And I think I know, I said like this. Actually, let's isolate these parts because I know these sports are on their own. And we can look around and see if we can find, oh, here's this. So that's the extra part. C if there's another one on that side. Yeah, so it's the edges of that one. So I'm gonna do control w again. And now we can do. And rap with Baldi groups. So if we go back flatten, now, make sure we're going to have any lost pieces. Because the interior, it's not important to me and I don't want it to take too much space. I'm just going to make it small. Doesn't. Because if I'm going to use like a 2k map or four K map is just going to take that extra space, which honestly add-on. So I'll move these. You can do this here or you can do it in any 3D software. You are going to be rendering this in and go in and you can tweak the movies. So you can either add them like this or you can actually take up the whole space. So you'll know like the body is going to sit on its own, is not going to. You're going to share that, you know, 0 to one area with another texture. And you can go ahead and I think I'm going to make this even smaller. Because if I'm going to add a texture, I'm going to just going to be like a color to it. Okay, so now I can scale it up. So it takes and that's about it. So that's our UV mapping for this part. So now I can go copy UV and I can go back to our tool. I'll do paste uv. So now I go ahead and do follow groups out of groups with UV. I know the metal now has one piece. Okay, let's do another one. And then for the rest, I'm just going to do the same. Now for the other one, I'm just gonna do these guards. So again, because we 0 mesh this and we added thickness to them. The End of the thickness has its own faulty groups and the thickness has its own volume. So I'm gonna do is I'm going to shift control the interior Usually it's the same. If that was one subtotal, Usually it's the same polychrome. And I'm gonna make sure I select this one as well. And I'm going to do control w. So this way, these, when we're going to tell you if you master to unwrap them, he is going to be adding our seams on this edge because this is, this will be different parts. So then we'll get a Hamlet who clean texture on this side. Okay. So let's go ahead and do you can do. If we do flatten, See, it's not allowed to subdivision. So to do, let's go clone. And I'll do delete hidden, not delete higher, sorry, and then unwrap. And if I go flatten, now, you can go ahead and clean these up. So because let's say you're going to add a texture to the bag and it's going to be, I'm going to do auto groups, so each one has its own group so I can select them. All. I gotta do w. So let's say you are going to add don, a geez texture or a pattern to your model. And that button is going to move in a certain direction. So if these going to be rotated in all directions, your pattern will not or texture will not look, look good. It will be all over the place and you'll spend more time fixing the texture and rotating it. Rather than having I know really, you know, it's, it's time-consuming. But what I've learned from all these years is it's better to put the time at start when you're working on a project and make sure you have everything clean then everything prepared, rather than spending hours and hours fixing and patching things up. And trust me, it's not as fun as it, as it sound. Okay, so move this here. Now, you want to see if we can see which ones are the inside. C. If I go to unflattering, I'll do control w for this and go flatten. You can take all these guys, you know, these are going to be the interior. And it can actually scale them, really them. Because as we said before, these are not going to be visible. I think only the ones is going to be visible. Just give me 1 second before is the interior of that, but it's not going to be. So we can get away with this. So I'm gonna select all that and scale these down. So and I think that's the interior of that one as well. Ok. So I'll do auto groups. And now I don't know people who do UV mapping for a living. Saying what the hell are you doing? You're learning so much empty space, especially people who work in gaming. But this is because it's going to be as still render idle. Really care. Honestly, I can leave this on. Okay, so that's copy UV light can go back and do base 2V. So now these Ru VDD, Okay, so I'm gonna go ahead and do the same for the rest. And I'm going to use the same technique and see you in the next lesson.
18. Lesson17 Adding fine details and final touch ups in ZBrush: Alright, so I went ahead and created all UV mapping for all the parts. But before we can send this to renderer, I will go ahead and just add subtle details here and there. One thing I forgot to add is the buckles that we created. So now I'm gonna go ahead and select buckles. And this one we're going to see just two simple buckles. This one with the line and the other without. So I can I can go ahead and append this as a subtour. What I'm gonna do is I'm gonna go ahead and do brush. And I'm gonna do create, insert mesh. And I'm gonna do a new. So now I'm gonna go back to my defiled bank. And I know I want to add one here. So you can't add two parts with hat which have subdivisions. So they're going to tell you it's free subdivisions or the lead them. So you can go ahead and I'll go freeze subdivision levels. So now I can just drag and it's going to add the the buckle on the model. I'm going to rotate this. Maybe a bit smaller. Okay? And I'm going to add another one here. Make sure they have the same size. You can, if you create a couple of brushes like that and sort of meshes, you can go ahead and save them so you can have them for future projects. So what I'm gonna do now is I'm going to isolate these two and split unmasked point. Sort of split to them. And now I'm gonna do free subdivision levels, so we get our subdivisions back. Okay? And I can go ahead and add a bit of subdivisions of this so you can get smoother and smoother look. Can always tweak these. So if you think these are a bit thin, you can always go inflate and tweak them accordingly. Okay, so now for the final thing, we can go ahead and always go back to the reference and see if you can add, I don't know, like tiny folds like this here and there. And I'm just gonna go and add sugar. I'm going to go to transparent. Just subtle, just tiny, little, tiny folds to strong, just too, just so we can break. So if you see here, look at this. These are really like how these look. So you can go in and I'm putting two inspires you on because if you add it like this, you might not affect the underneath. So what I'm gonna do is I'm going to go like this. And then maybe tiny one here. Maybe a bigger one there. Always go back to your reference each time because you're so focused in your project, you can click Keep, remember each and every detail so that it's always especially that you finish the project and you don't have to worry about a lot of stuff. Now you can go go back and just with a fresh eye. Like it, like, what can I do to make to make this that much better? And you can play all the intensity is so doesn't be strong when you see even those, like just taking the time to add those subtle details. Do you think it needs more subdivision? Because if you look at here, you don't have enough subdivision two. If it, if you have that fascinating and you can go in and you can add more. For me. It's enough because I really want to have, want to have these just, just subtle. It's just about breaking that surface so it doesn't doesn't feel like a plastic that doesn't feel perfect. That's the beauty of, of cloth. It's, it's hectic, it's all over the place. And marvelous does a beautiful job simulating those, those nice details. But sometimes just those tiny, tiny details get left behind. And as I told you, you can get a lot of details inside marvelous as well, but you need to spend a bit of it much time. And I think from my experience is way easier. And you have more control if you use, you know, ZBrush or blender to add those, you know, final touch ups in your favorite software. Rather than spending hours and hours when you can, you can do the same. You can achieve the same, almost the same effect. Just by doing a couple of, I might add, is to give it that feel of tension and just soften it back. You just want to see that.
19. Lesson18 Decimating subtools and preparing them for Adobe Dimension: In this lesson, I'm going to show you my workflow and how I prepare each and every mesh for dimension. Usually if I'm working in v re, I'll go ahead and you know, because we do have the model is UV mapped and ready. And usually you'd go in and you would use multimap exporter. But for this one I'm going to try something different, something just faster and we're gonna get the same quality. So one of the things you might really trying to do is, and it's a really good practice to keep your client updated if you're working on a project, send client updates, frequent updates of what you're working on before you start putting that many hours into something. So I'll usually download a couple of, you know, Mac apps inside of inside of ZBrush, just so I can have a couple of options to work with. So, and this one you'll see I added a couple of different math caps, you know, bronze, some, you know, something just so I can I can go ahead and if I want to show you this to the client that can go shift as shift s. And they can, they can easily see. This is the view from sob, here's the view from the side, here's the view from the other side. It's, it's really easy then to show this. And then I can go, and you can go like OK. So next step, I'm going to show you how the rendering would look because it's easier to tweaks. Maybe some fold is not the client is not happy with or you might ask, okay, how about we tried to make the stitching or Big Bear or maybe that area is not thick enough and so on. So you want to try to eliminate as much as possible lost time when you're working on projects. Okay? So for this one, I'm gonna go ahead and solve this piece when I want to try as I want to try to decimate each Bart and while keeping the EV map because you remember we did UV mapping for each part. So we would have, we would have that file ready to be rendered in V ray or whatever other software you wanna do, or if you want to render it in a, in a, in a game engine. So what I want to try now is I want to try to decimate this while keeping the UV mapping. So I'll do this in a master master. And we have something called KB movies. So in 20182019, I did think they added the presets. So what I'm gonna do is I'm going to, I think we're gonna give this to a 150 thousand. I think it's more than enough. So it's gonna go ahead and decimate the, the model. So this way I can take the model and imported into dimension. You can use key shot or whatever other software you're comfortable with. Why do I use dimension? First of all, the, you know, the price difference is pretty huge between dimension and key shot. And the other thing that I mentioned gives me the and software like key shot on dimension and give me the option to render something pretty fast because you have a big library of materials that really super easy to tweak. You can test out different looks, you can, and the lighting is done with one, you know, we have actually two lights. You have the sunlight and you have the background, right? So you can prepare something and you can try different looks and you can try different lighting effects, see which one works better. You can try different angles. And without putting in eight hours into, into that you can, you can, we're really spit out 3D something fast in like 30 minutes, maybe an hour, with all the edits in Photoshop. And it's a really easy way and it's a good practice to get into because you can show the client. Here's how it might look if we do a daily chart and here's how it might look if we put the the, you know, the bag on a on a table and yeah, you are, if you're doing follow rendering as I'm gonna do is we're going to use a photo for the background. Your, your might be a bit limited to the to the angle, but you can explain that the client okay, here's how it might look, but in when you do it in, we can, we can move the camera, we can try different angles and so on. So here you can see that we have the, although we don't have any policy groups anymore, which I don't need. I just need the UV mapping. And you can extract the poly groups after because you can go bowling groups are groups from UV. As you can see, now we have our ui's back because if you import, I don't know, I don't remember how was it in K-shell, but if import a model with poly groups in two-dimension, you can act. Each one is going to be on a separate electro separate mesh. So you can actually work on each piece separately. I don't want that. I want this to be one poly group. And you know that we have UV mapping because we extracted the UV, but let's go ahead and, and see it. So UV master and flatten. And here's our model. Okay, I'm gonna go ahead and load the decimated model because I went ahead and decimated the model before. Okay, so here is our decimated model. Okay? And now we're ready to go ahead and an export this into dimension. All right.
20. Lesson19 Setting up lights and shaders in Adobe Dimension: So here we are in dimension. And now I'm gonna go ahead and just create new. I'm going to walk you through my workflow. I'm not gonna go into every menu and every button, but I'm going to show you exactly how I work to set up my renders. So first thing I'm gonna do is I'm gonna go ahead and import the file that we created. So import 3D model. And we can start with the buckles. Open. Can do f. So you can see them that they loaded in both the monarch and do the body. Implore the handles. And then I'm going to leave the stitching to the end. Because usually if we have a file which has really multiple tiny objects, sometimes it takes a bit longer, like this sport. And then I'll do stitching. That takes as long to that one. Came out really nice. Okay, so now before, before I do anything, here's here's something to keep in mind. Name everything because it just comes in as these, you know, ZBrush groups and naming. So it's really going to be especially if you have, if you have many elements and you need to select them and get into the habit of naming stuff. So stitches. Ok, now one is going to be the zipper I think. Let's see. Shoulders, traps and the body I think. And this is the buckles step to select everything and put them on a folder. Don't move any of the parts without putting it in the folder because then you have to go into the part and you gotta reset each one. So make sure you have them all in one group and make sure you move. You move the group. Ok. So now, see, as I did here, just du and let's focus. Alright, so here is how, how dimension works. Now you can render this and it will just render on a white surface. And you can import this into, into Photoshop because it actually exports a PSD or PNG depending what you want to do or you can actually render this on a photo. So I went ahead and I bought a couple of backgrounds that I though that work with this project. Let me see if I find the one that I need. Yeah, let me just import it. Import images background. And for this one, I'm going to be using this for oh, where is it? Yeah, this one. As you can see, just a simple green simple table. And actually, this photo is actually not a photo because these files usually I've done with the table is a photo in the background is just a blurred image with a bit of OK, so I think it's a digital file. And you'll notice that if you go to match image, and usually it creates the environment light match the sunlight and matches the camera perspective. If, let's say we go ahead and we use this image, which is actually a photo, right? And I go match image. It's gonna go re-size, create environment and match should match camera perspective with C. Why isn't doing that? Let me try something else. Let's try. Let's try it. This one. C. And if I go OK, it's going to take the light from the scene and it's going to match matching perspective. Now then you can, you can go ahead and you can move it around. Do and see which which angle angle works for you. And then you have, you have the option to rotate the photo, which is this. So you can actually rotate the light or the environment. Light is subtle. So you can, or you can also play with the intensity. The other thing you can have is you can play with sunlight, so you can rotate the sunlight. So now if you think about it, this image or this photo of the sunlight should be coming from the back. But you can, because you're using environment, you can use the sunlight as your second second fill light or something like that, like a studio lights. So pseudo light, artificial light and you can play around with the intensity just to get some shadows. Don't, if you're going to use that technique, don't go too crazy with it because it's not going to affect the background. It's, it's, it's going to do a drop shadow for you, but the light is not going to fit your background. But because, so if you use this technique, just use it really subtle. Usually you would, you would like to keep the sunlight match to the image. And feel free to play around with what I love about this is you can, actually, if you link this to your library of There'll be stock. You can actually take photos which still have, you know, there'll be stuck on them. And you can try them out. See if, see if the if you like the, you know, the perspective, if you like the lighting, if it works for you before, before buying it, right? So as you notice, this is how fast it just sets up everything. Like sometimes you need to tweak a bit. So if you look at the lines, they're not, you know, you can see that not actually perfect. But. It doesn't take that long to get the results that you're looking for. And you see how beautiful that light is now because this is a more, you know, artificially lit kind of image. You can play around with the sunlight and, and use that as your, as your key light. And maybe have the light from this side or have it from this side so you can whatever works better to catch the, you know, the details of your bag, right? And you can play around with the environment lighting. You can the intensity, you can rotate that baby gets some subtle. If you look at the look at this area, if you rotate, you see it becomes darker or brighter depending on on what you're working on. Okay. But unless it for my, for my image and we're gonna use the green one because I'm, I'm going for a moral, moreover like nature kind of kind of look. So gonna go image background and I'm going to use this. And I'm gonna go match image. Okay? So what I want to make sure, I want to make sure this line matches the the line on the table. So that's gonna be my, my guide. And you can also just get it. Okay, and then a move that maybe you zoom in a bit. I want this lecture to be really big. Ok? The other thing I wanna do is I want to be something like that. I want to select the group. I'm going to raise it up. Just make sure there's a group. Make sure it's sitting on the floor and then just raise it up just a bit. So I think 0.1 just gives you a better shadow if you just have it not, not directly on the surface, it just a bit over it. Levy on nice, a nice contact shadow underneath it. Alright. So let's start setting up the lights and the shaders. So we go to environment and here we can play around with the, with the sunlight. For this image, the sum, if you look at the background, the sum should be coming from the right side. Okay, so I can go ahead and I can rotate this and maybe play around and have the sun doesn't have to be exactly because it's just from the right. So you can play, you know, with different look, see wood, whatever works for you. Kinda like this. This has a nice shadow here, a bit dark, so you have a nice contrast between the two pieces. The two parts. Something like that should we shouldn't be working. Okay, so now that we have the lights that said you can lay out with this, but it's not going to be a huge effect. And you can play around with the intensity. But I'm actually, I'm happy with. Because once we add the shaders, you might need to tweak of it. Now. First, let's go ahead and use the assets that come with the, with the software. And for this one, I'm going to try the leather first. So we're gonna go ahead and just so just drag and drop. Okay, not that one, I'm going to draw the other one. Okay. So that's the first first leather that I'm to work with. And you'll notice it's already selected the Shiva for us. And here we have the edit, so we have repeat. So how many times you want the students to be needed? I think something around three should look fine. And here's the roughness. So if you think this is way too shiny, you can turn it down. And then you can have the scale of the leather detail. If you want the scale to be smaller or bigger, or the details density. And how if you want random detail rotation, just gonna play around with these, with these tiny vanes. Okay? Here underneath we have technical Panama bottom meters so you can play around. It's like tweaking the, you know, the, how bright you want this, how contract, how much contrast. Let's say we going for a, for a, you know, a red kind of leather. And you want this to be less saturated, you can tweak that. So instead of, you know, tweaking the actual texture, you can play around with this. Now, this has color, but some, some of them have instead of code, they have texture. So you can still tweak these here. So let's say we're gonna go with luminosity of 0.5. And maybe not that much contrast, maybe something like this, unless saturation. Okay. What else? Under miscellaneous, you can have the resolution. So when you're setting up everything, leave everything at one 1K or lower. Once you're ready, just go ahead and do for k for that, okay? Which is just going to leave it now. And you can also do a randomizer. So we're just going to change the texture. Now we're gonna go back and I'm gonna do the same thing. Or what I can do is you can select the straps. Okay? And I can actually color, pick the texture. And you actually color pick the texture, not the color. So you go ahead here and just click on that and it's just going to, now you have to make sure if you start tweaking this. So let's say I want to go and I'm gonna make this a blue leather or whatever reason, it's going to change all of it, right? So make sure before you do that, you have this chain here and just say. Okay, just give it unlock. Just gonna give this to 1K. And then what I want for the straps, I wanna try. Let's see if a brighter leather my work. And then we can, we can play around with this. Maybe more contrast. And if you think you would like to have this repeat less, you can just play around with this. Now I'm going to do the same for the other ones. So it's like the straps. I'm just gonna go call it pick. And I'm going to use this because I know that it's going to be the exact same color. So you'll notice this one. The detail is like really small. Now you can start, you can zoom in. Well, before you do that, let's say you have your cameras set up. Just go ahead and bookmark your camera. So you go bookmark one and just add, you know, Cam one. Ok. So now I can go in. Okay, this is, this details we too small so I can select that. And I'm gonna go, I don't know, thumbs in like one I think. See, we forgot to unlink it. So let's go back to three unlink. And for this one I'm gonna use one. And if I zoom out, maybe too big, I think too. That works. And I'm going to go back to our camera. So we already have a reading ice, you know, shading and the lighting is looking really good. So let's go ahead and add a bit of a metal to the buckles. So let's go ahead and use maybe it uses a darkened. Okay. Let's try this scratched one could add more texture. You can, again, you can play around with these. This is the, this is the best thing about the software is you can just try looks before worrying about creating shaders from scratch or, or anything. I think I'm gonna go with that one just, just fits the leds I look. And finally, what I wanna do is I want to add a bit of Shader. I don't need the shader. Actually. Just select the stitches. And I'm just gonna go and give it a color. Maybe. Something a bit brighter than the leather. Yeah, that looks good. Okay. Camera one. And now we're ready to run there so you can test out the render here. And it's going to give you like a render preview. And you can see that we have some nice shadows. You can see the lighting looks good. The gifts. We can actually see the shape of of our, of our bag. Okay? And you can make this bigger so you can see the details and you just let it render for just a couple of seconds. And here's the beauty about this, is if you go ahead and move the he's gonna update here. You can zoom in. And I'm going to stop this for a second. Go back, go back to our camera. And then make sure you have handles selected, click the arrow to go to the shader and makes sure you have 4K. And then do the same for the others and go body. Click on the that was already 4K shoulder straps. Ok. Yeah, for the stitching, leave it okay. So that's good. Now render here, it's really simple. You have Kierkegaard's view or you can select camera, let's say you have multiple cameras selected. You can actually render those. And here you name it. So I'm gonna game this bag. I mentioned 01. And here you have low, medium, and high. I don't I rarely you I never use high and I really used medium for for the purpose of what I use this just to test out some looks. I always yields low. It's really fast and rendering and the quality is really not that bad. So leave it at 16 bit. If you want that you two bits, you can go ahead and render 32-bits. I'm going to turn this into eight anyhow. So I'm going to leave it at 16. And just And once you're ready, you can render. Now, you do have another option of rendering this and cloud, but I'm going to leave this for some other time. So the local, I'm gonna go ahead and start rendering this. And you'll notice how, how fast that start, starts rendering. Because if you think about it, we don't have anything other than the bag. So it's creating a plane to catch the shadow, right? And the background is telephoto, so it's still going to use the same photo. The, the photo is, if the photo is 4K is you're still going to have the quality of 4K photo, right? And it just gonna render the bag. And you can see this is, this is a really good, a really decent rendering. It's a really good friend there. So you can, you can easily see what works, what doesn't work, and you show to the client or if it's your own project, you know how, you know how much time you need to tweak what other things you can and you can try stuff so you can, instead of having like setting up a couple of shaders and doing 2-3 and just taking them much long too. You can test out, you know, 1010 to 20 different looks. Okay. Now I'm gonna go ahead and cancel all because I forgot to show you one thing which is really important. Let's go back to environment. And you notice the render which have, has finished. The Render was really low. So to tweak that, just click in the gray area. And here you have the canvas size. So you can go ahead and do 2048, okay? And you can try if you want a resolution of 300, you can go ahead and do 300 pixels. If you're gonna do a render for print. Ok. So I'm going to leave that a 2K. And I'm going to go ahead and render this again.
21. Lesson20 Rendering final image: Finished rendering and it took four minutes and 41 seconds. So that's nothing. So I can go back now and I can try different looks. So I'll go fit. Or if it canvas and let's go maybe make this darker brown. And maybe let's go ahead and make the straps maybe more. Just going to lower the contrast. Just gonna make these bit more red and saturation, gonna keep it back, bring it back to 0.5. Thank urban brighter, something like this. And now we're going to change the color for that one as well. And we'll just select this as the same color, maybe a bit less saturated. So it's good to saturation like 0.3. Just make sure to link this and to three. Ok. Now, maybe try a different, you know, for the buckles different color. Let's go with a, with a clean gold. Too bright, or maybe you can make him make that less shiny. So instead of it's go make it a bit rough. Okay, let's go ahead and render that one. I'm going to go over to render that and pause it and get back once it's done, four minutes, 30 seconds. Alright, let's go ahead and try another one. And for this one I'm going to try something different. Let's go ahead. As I said before, we can use the, use the actual sunlight as, you know, an artificial lights. So let's say our ambient light and the bag is sitting under more shadowed area and you can use the let's say we have a reflector. And for that I'm gonna go sunlight and I'm just going to rotate the sunlight for the other side because I want to catch these folds here and this, and maybe here on the strap. And for this one, let's try something different. Let's make the body of the bag cloth and lets keep this traps as leather. So select this, just going to scroll down and I'm going to use this called striped. And I'm using that because I want to show you that because we have UV map. Now we can, we can play around with this. We can, we can have the repeat and still gonna look really good. So let's say maybe 33 is too big. Five, maybe five looks good. So here's what I love about this one, this tribe fabric, you can actually tweak each color of, of each stripe. Actually, there are only three colors. So let's go for this one will do maybe a green, less saturated green like this. Maybe for this we're going to use something. Let's use the same one. And just Play around with the Yeah, let's make that light. And for this one actually I like the blue and you just make it a bit brighter. And here's the lovely thing about this. You can actually tweak how rough Do you want this material to be. So let's, if you want to add a shine, you see is going to add to shine only for that stripe. Here it's more subtle. And maybe for, let's see, for this one, you see the only ads for the stripes. So maybe, maybe we can, we can all will make only the stripes a bit reflective and keep the other ones rough and maybe have this really rough. Then we have different, different kind of texture. And this is why I moved the sunlight just so we can capture, capture that. And maybe for this traps, I'm gonna go with a more of a chocolate color and we can do that with, with contrast. So okay. And now let's do the picker. It's easier to just going to unlink. And I'm gonna make a size two. Okay? And let's change this to something else. Let's go. Maybe you'd be silver. Now for the whole bag. I'll maybe just do solar for that one. Vocals or maybe a scratched. Yeah, I like that. Okay, so now let's go ahead and maybe it's changed the colors of the stitching for this one. Maybe have the stitches. No black, darker brown. Actually, I think the brighter one looked better. And maybe it let's go with this. Oh, I like that one. Okay, so let's go ahead and read this one as well as native this three. So here's the cloth and leather render. Now, the other thing that I really love about dimension is once the render is done, you click on this and you go edit in Photoshop. And it's going to open up in Photoshop. I wanted to convert the document to work with colors of my working space. Because dimension, when it renders something that friend is same y, k. So if you need it for print 3D, helpful because the colors are really good. But I want to work in RGB. So as you can see, and notice here you have a folder called additional layers. And inside you're gonna see material selection, objects selection, and you have something called depth information just if you want to add some blurred to your model and so on. But we'll worry about these in a bit. And the other thing you'll find is the rendered image and the photo. So the photo is exactly as you have to just add it into smart object and that's it. And here's your model. Here's the photo. Alright. Here's how I, how I worked with this. Now, here are the other ones that, you know, we rendered. And this one has this one we move the light. And for that one. These two, we have the light from the side. So here's how I, how I usually work. The first thing I'm gonna do is I'm gonna make the contact shadow because I like my contact Charles to be a bit, a bit stronger. So I'll go ahead and do control j, control j, and I'll duplicate it twice. And then I merge these two and I'm going to move them down, right? So, and then I'm going to go ahead and do multiply. Or you can do Color Burn. Multiply works for me. So now without width and just adds that extra. When you do this, the only bad thing about it is if you look at the edges of the ads like a black edge here, to fix that, just go ahead and add a mask and they take gradient. Make sure you have black and white selected. Make sure you have mode exclusion, and then have the white color and just drag down. So now the black line only appears here. Now if you want, you can have that till here, but I want that shadow to be hitting in the back so it's not that it's not visible. Now. You see, I really like to have that extra touch of shadow. So I'll name this shadow extra. Ok. Now, second thing you can do is you can go ahead and add curve and maybe play around with the contrast. I think being a contrast would be more than enough. And then I can go ahead and add a column lookups, which I love using. Then first thing I'm going to add is film stock. When you added like this is really harsh, but I don't want to be strong. I can go ahead and maybe 15% without, with C, it just adds a bit of touch to it. And then we can do is you can go in and you can just go over this. The best thing about this, you can actually load lots. So if you have a library of floods, you can just go ahead and just do low 3D loved and you can import it. And what's a good idea is just select the first one and just, you know, scroll between them and see which one. Because you might find one that really, really good. Like, for example, this crisp winter, it doesn't look good, but if you go and you lower the opacity to something like ten, just add a bit of, you know, bluish tint to it. And then I'll go ahead and add another one. And we'll do maybe fall colors. Know already have that one. Fujita RNA. Here's one I love, which adds a bit of atmosphere to the ten. And then maybe I'll add another one. Let's see. No, I think I'm going to add just soft warming. And I really like using this one would be 15%. Okay. Now, what else? We can go ahead and duplicate this again and go soft light. And this is going to affect only the bag. And again, don't forget, you can, you don't have to use the full effective ad. You can just use, you know, just to have a subtle extra, you know. Contrast to it. Now, select everything, put them in a folder, and just go control j and then control ie to merge them all. So now we have the, have the mother photo, and now we can do control all to you. And this gets rids of this aggregates the saturation and just wanted to lower the saturation and then go Filter Other and just go high-pass. Ok. Bear with me. It looks weird now, but if you go and change the to overlay, you're gonna get way away sharp image now this is way too sharp. Again, I'm just going to lower it. Estimate. Now here's the difference without, with C. You can barely notice it here and, and especially in the stripes. So that's add a bit more punch. Now the other thing we can do is we can take the group and actually turn it into a smart object. And then we can go filter and Camera Raw Filter. So if you've ever taken a photo, you must have run into this at least once. So here you can play around with as if you would, you're tweaking a photo. So maybe add a bit of more temperature, maybe a bit of more green because we are outside. Add more contrast. Here's one I really love is the texture just brings that texture. Here out on the table. We play with around with the vibrance. If you want, you can go, go and add a bit of, you know, just to make it a bit more interesting, can add a bit of vignette to your shot and maybe add a bit of grain. Is going to leave that. Maybe the contrast was wait up. Ok, and now maybe the yellow here is a bit too strong. You can go in and you can tweak this. So maybe the yellows are just going to bring the yellows just a big town. Maybe join just as well. And okay, so here's because we added it in a smart object. Now we can turn these off if you don't like them. It's subtle, but it just adds a bit of extra to it. Okay, now let's do the other ones. So we have the first letter and the second one. So I don't want to, you know, uses two files. So I'm just gonna go render the image and I'm going to Control a to select everything, and then control C to copy that. And on top of the render image I'm going to do control V. So then I'm just gonna, I'm just gonna have to drag it down. If you hold shift is just going to snap to it. And maybe leather 0-2. Okay. So here's where these come into play because we tried different and the lighting, you notice I don't a little tried with this one because the lining and this one is different. We have the same lining and both of them. So let's say I would like the straps honestly, I would go, would go with a dark one. Now instead of jumping in two-dimension and re-rendering again. Didn't take long, but bear with me. You can go here and maybe select this purple, which is a material selection. Just select the one. Click here, and then just create a folder. Add the mask to it to the folder. Hide these, we don't need them now. Now I'm gonna go ahead and duplicate this one and just drag the layer into inside. So as you can see, now, I have this traps from that one on top of this. Ok. So I can, I can see this looks better. If you go in, you can, you'll notice it's not perfect. But again, this is just for testing outlooks. But here's what you can play around even more with this. You can go, maybe if I go soft light, and if you zoom in, it doesn't look that bad because you can play around with the, maybe the feather. It looks better. So now I have an extra and extra option on top of the ones that I had. Okay. Let's go ahead and select the other ones. I'm gonna go and select the straps for this. And I'm gonna do another folder. And I'm going to add a mask to that, hide. These are going to take the same one and just drag and drop here and add a bit of feather. So now we have this option or this option and this option. And already we can, we can try some new looks before even going back into dimension. You can try different looks here. Okay, lets say we, how about we take the leather seat again because we we have the other one and we put the other one on top, we can use that or maybe let's take the body of this and play around with the soft light on that one. And if we turn the opacity, we have a third, third option. And I really like how this looks. So let's say this is the level that I'm going for. I'm gonna go ahead. And you can do the same here. If you don't like this, you can use the golden one. So you can select that. Sorry. That one. Okay, and it's going to select the buckles and everything. And let's say which one had the golden one. Thinks this one. So I'm going to duplicate this again. Do a folder atom at the mass to it. And just duplicate this again and just gonna go clear. Yeah, this one has the golden. So now I can drag this inside. And now we have two options of gold or bronze, or maybe something in between. So you have that extra option. So now I'll go ahead and let's select everything, group those. And let's do the same thing. Let's do color lookup. And I'm gonna go ahead and just play around with these crisp winter, love the look of that. So just adds, makes the sky a bit. And I love how it affects the table. Okay, let's do that again. Now. Maybe add the film stock. Again, too harsh. Maybe 10% represented into just, just right. Okay. And then do, let's see. Can go around and play with these. Love this one. This one looks better. So let's go. And maybe finally tried to see if soft warming works. Alright, so I'm gonna go ahead and put all of these in one folder. And without, with C, just this ads. And you have the option of turning these off. So if you don't like them or you can send to the client different, you can send them an option like this. You can send them one with a bluish light and so on. And again, if you want, you can control j, merge these, and you can do the control alt, you, he was saturation and then go filter other high-pass. And he go set of overlay. We can go soft light. Just makes it. Because if you, if you, if you export this into Photoshop and sorry, into Facebook or Instagram, you, you're going to lose a lot of details. So it's better to have that extra sharp and then lose a bit of softness to it. Or you can always have the option of going, you know, maybe 50% of that is exactly what you need. And don't forget, you can select all of these. Control j again, merge them and you notice I'm not destructing everything, I'm keeping everything. It's layer. If I want to go back, I can always go back. I need I need that level of control because I can always tweak and make it better or, you know, arrange stuff because before merging everything, so now I've merged those, but still it's, it's on its own. And if I go to Filter and Camera Raw filter, I can tweak this even extra as a photo and maybe have this bit of green to it. Maybe more contrast. Yeah, why not? And we raise the texture bit more vibrance, just a touch. Let's see, you could add a bit of vignette. Okay, and that's, that's a render. I went ahead and added even more renders and you can actually download these. I. This is similar to the one that we've done just because I took more time to select the colors that I really liked. And as you can notice, the touching is a bit more desaturated. And I went ahead and created like a, like a nice label for this just to catch the light of the sun. And this is actually, this is what's created all of all of it in Photoshop. And I also created one with just cloth so I can go ahead and and hide these. This is just two different colors, no leather, just different type of synthetic cloth and is teaching for the stitching. I went with a blank look. And you can see this is the exact workflow that I work with. And you can, you can actually check these and see, see if you can, if you can learn something from them. And the other one, I went for more darker, kind of a more serious look and so on with a greenish gray color. And for the leather, I've tried a different type of leather for that one. Now, this leather is not included, I think in the starter pack for dimension, but you can download a couple from Adobe stock or you can actually create a couple in substance designer and import them in into two-dimension. Alright, I really hope you find this course tutorial and if you have any questions, please email me.
 Oasim Karmieh, Sculptor & Toy Designer