Transcripts
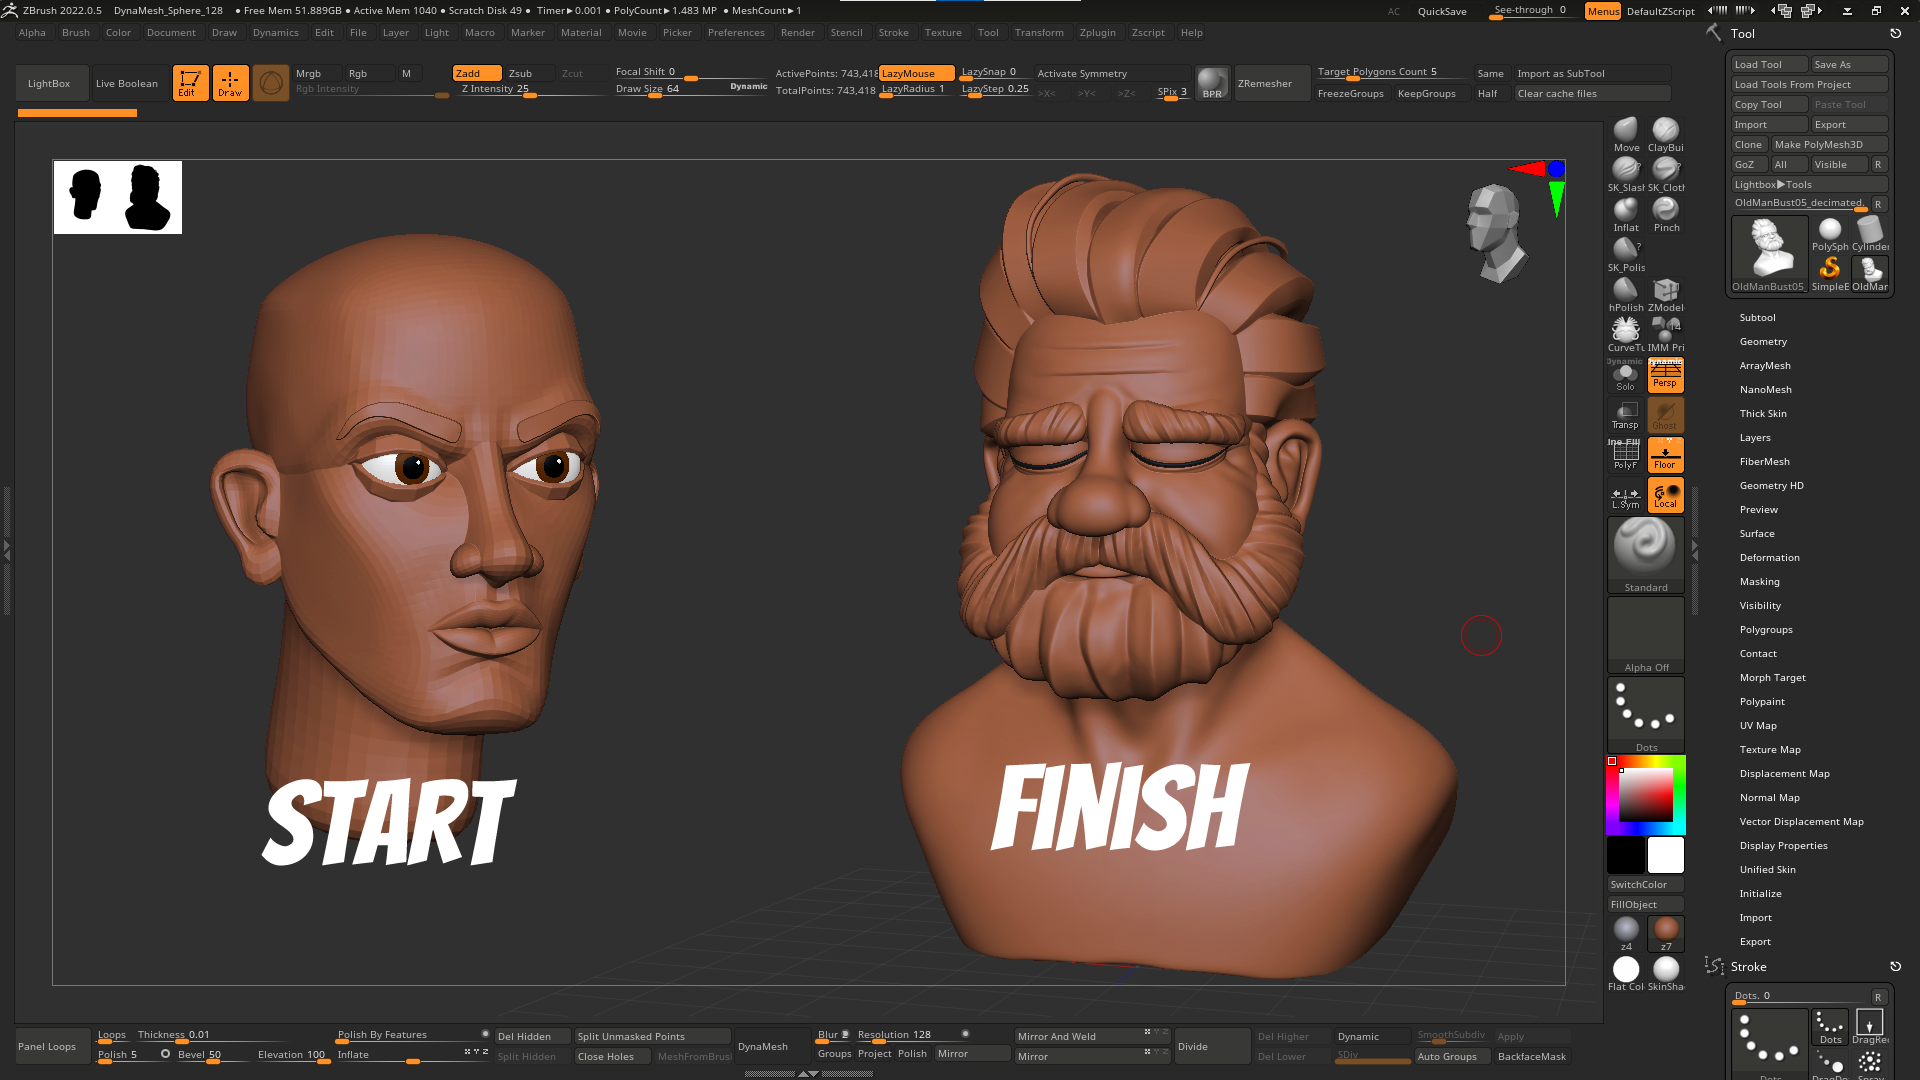
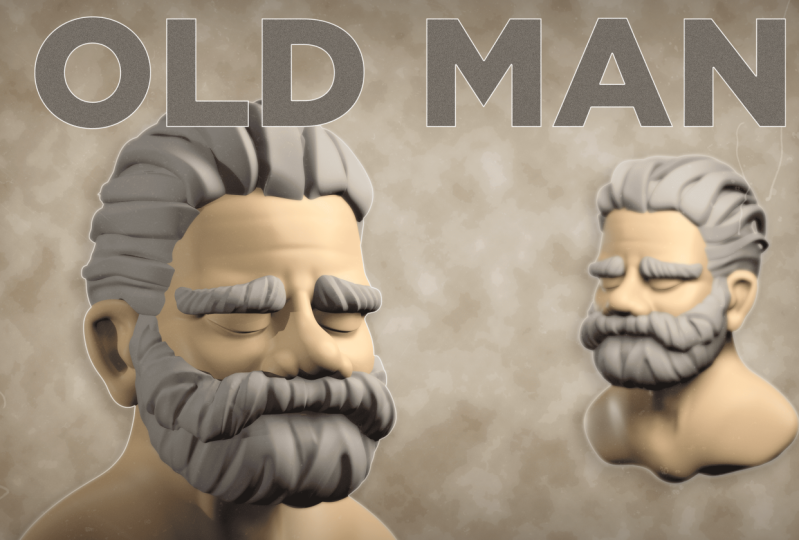
1. Intro: Sculpting a stylized bust in ZBrush: In this course you'll be
learning how to sculpt and Old Man Bust using ZBrush. We will be starting the sculpt using something
we call a base mesh. And a base mesh helps you
create your sculpt faster, but it also helps you
understand how to break up ahead into the element
at the main elements. And also helps you
understand the flow and anatomy and how to
simplify your designs. And also helps you edit your
character is faster so you can try different styles
of facial expressions. By the end of the scores, you would have learned how to create stylised old man
bust inside ZBrush, taking it from the blocking
stage, too detailed, and using it for your own personal
projects or client work. I really hope you
find this course helpful and I can't wait to
see what you come up with.
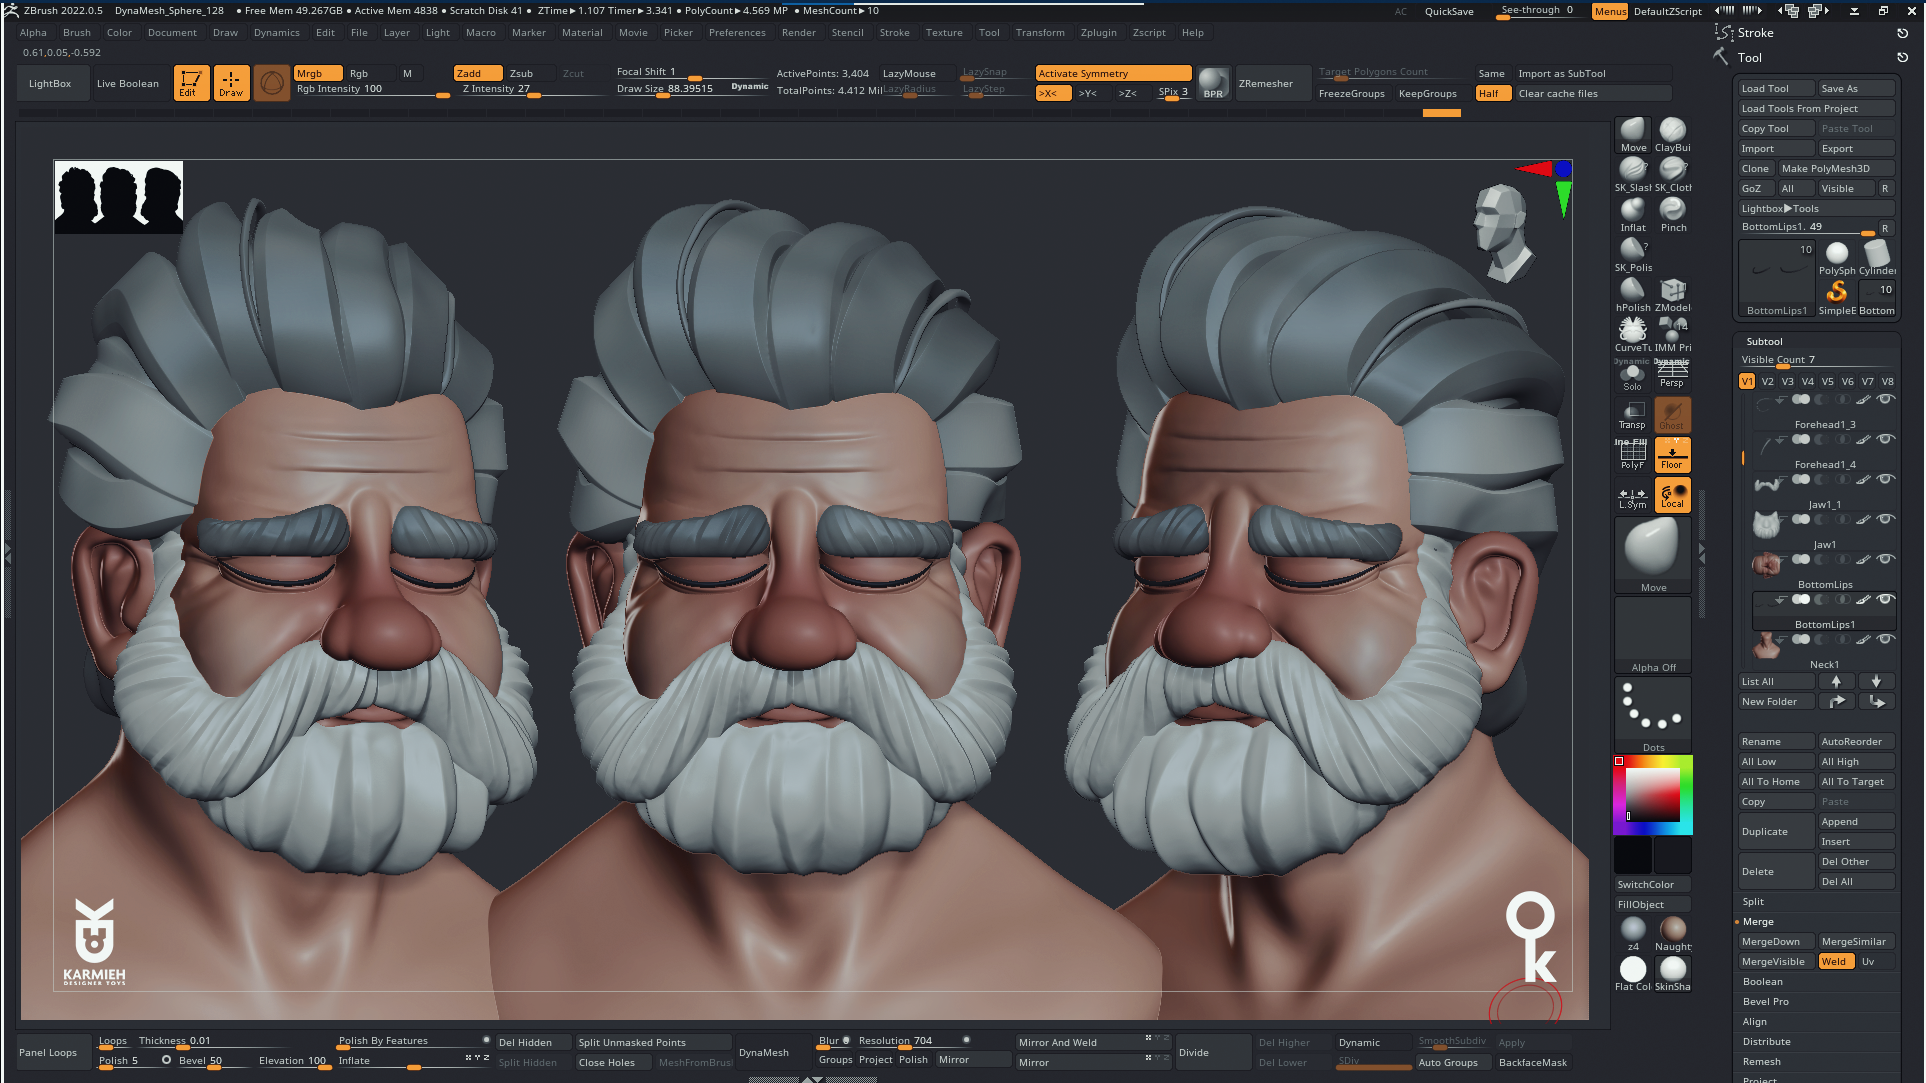
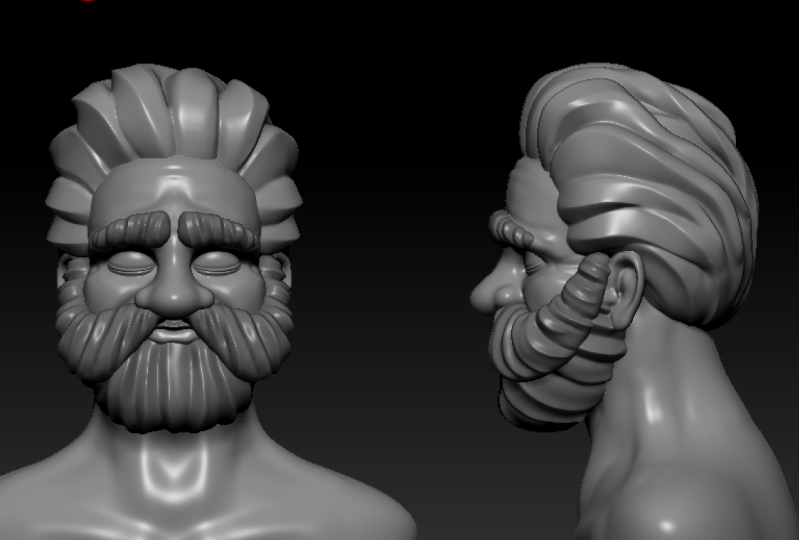
2. Lesson01: Blocking in the main shapes: So we'll start the sculpt using the base mesh that you
can find in the zip file. I like using base meshes just
makes the sculpt go faster, but at the same time, it just
helps you visualize the, the main areas of a head or the body and just make
it easier to move stuff around and tweak them
to the character that you're going to
be to be creating. Now, I'm starting
with the forehead. My characters forehead
is really shows his age and how tight or there is this character
I was going for. An old man who's went through
a lot are just tired. They're just going
through some some, some painful emotions. And I wanted to see
if I can do that. Create to character.
And just that shows emotion with his eyes closed. And you'll notice
with the base mesh, I decided to have the upper
lids and the bottom lid separate just to make it
easier to move stuff around. And you notice that I'm
using the move brush just to the just to move stuff
around, scale them. I'm just rotate them just to get them in the
spot that I want. The other thing you'll
notice that with the nose I decided to have the
bridge of the nose, the tip, separate
from the nostrils. If you've used base
mesh as before, you'll see most of them were
have the nose as one piece. What I don't like about that is the moment you start
tweaking the nose, maybe having the tip a
bit bigger or point here, that will affect the shape
of the master as well. So then you kinda struggling of taking about keeping
a balance between the nostrils not being affected this way you can make
them nostrils keep them and give them their shape
and have the nose separate. And once you're happy
with the shape, you can merge them
down and just, and you'll see when
we get to that part. So for the most
part of the sculpt, the most important part, I think it's just
blocking the shapes out. So don't be afraid of exaggerating and
moving stuff around. And just because the fact
that you have everything separate just makes it way easier to try different
shapes and so on. Now for the lips, I
did the same thing. So the upper lip and the bottom
lip are separate pieces. And again, just to have
that much control, if your character
has a fatter lip on the top border or a thinner
lip on the bottom or so on. You do have that effect. For this guy has a small chin, like how old people, because they lose their teeth, you kinda lose a bit
of a bit of that jaw. Bite. The jaw bite is a bit smaller. And here I'm just
going in with the, with the clay brush
and just adding a bit more meat around the cheeks under
the under the jaw. And just moving stuff
around and seeing what what fits and what looks good work
that other character. Now, for this character, I don't have a
particular drawing. I just have a couple of
photos of old people that I gathered
around and I'm just trying some, some stuff. So I'm kinda free styling this. I know that the character, we're going to have a Beard. And you might be asking, why am I going into the
trouble of moving stuff around if the whole face is gonna
be covered with the Beard, you've seen the render. The thing is, you'd have
to think of your character as a living being. So maybe, maybe
you want to shave his beard or
anatomically speaking, you can't get those
shapes if you don't have that beard and then the volume of the face
and volume of it? Correct. Because then the moment you
start adding a beard on top, it just going to
look a bit weird. Now, you'll notice that I'm keeping stuff,
really read it off. So i'm I'm not worried
about how clean it is. You'll see me jumping from doing the jaw than jumping
to the forehead. For the forehead, I
went ahead and just add it to rough lines. Just a bit of age lines on the top just to the
moment you start, here's the thing when you
start adding wrinkles, the forehead or the face, always keep in mind to
add volume as well. Not just go with the dam
standard and just make it line. Because if you look
at a face the moment, if you have a wrinkle, then around that there is
meat that has wait to them. So it's really,
really important. Now, here I'm going, you're gonna notice why it's really important
to have for me at least to have the lips
split into two parts, bottom lip and the top lip Because I can I can move it, I can try stuff and the
fact that it's separate, the mean moving the bottom lip, it doesn't affect top lip, doesn't affect the bottom
lipids and vice versa. And it just gives
me that option of trying stuff and
seeing what works. The other good thing
about having them separate is the moment you
start moving the upper lip, it doesn't affect the face
and the mustache area, the meat underneath the
nose and the bottom lip. Again, you can move
it, make it thicker, not worry about that's
going to affect my mind, jaw line and so on. So it's all about giving you
that control over each part. Now, we're the dam
standard here. I'm just going going in and just adding a bit of rough wrinkles. Again, keeping it rough. I'm not worried about
anything clean. I'm just want to see if the overall look of the faces good. Now, duplicating the
bottom parts of the face, I'm going to isolate it and just gonna go ahead
and smooth it. So I'm going to be
using the same part. You can go ahead and add a
new sphere if you want to. But what I like doing
that because it keeps the same
shape of that face. What I have to do now is
just go with the Move tool. Just have the parts that
don't want to be seen. Just sync them into
the face and how the parts that I want
them to stick out, just move them out
and you can see it as if it's as if the
beard is drawing. And this way you can
establish like where and how big and the volume of the
shape of it and it's going to follow the shape of the phase. Because if you think about it, the Beard grows on
top of the face, so it has to follow the
same shapes of the face. Now with the clay brush, I love doing this because
you can go in and just add volume and it just looks like it makes
it look so natural. Again, don't worry about
making it looking clean. Just draw lines as if
the hair is growing. And then with the dam standard
that you can just go in and add deeper creases. And then if you press Alt, you can get those
creases reversed. And then it just going to add
a nice edges on the hair. Now for the mustache, I'm
going to be using curve tubes. Now, make sure to
select the piece that you want the curve
tubes to appear on. The curve tubes go
through the face, just make sure to go to picker. And you have depth, and just make sure you have
continuous Z selected, then it will, the curve
is going to appear on, on top of that part. Now we'll go ahead
and split that part. And then with the with
the inflate tool, I'm just going to inflate that shape what I want
it to be a bit thicker. You'll notice that
I'm working only on the half of the face. Sometimes I'll mirror it before
I start making the edits, but sometimes it's just, it just works to add, to focus on one piece. Once I'm happy with that shape, I'll just go ahead
and duplicate it and just to get the
overall, overall look. Now at the same as the beard, I'm just gonna go
with the clay brush, just go over it like
really rough and try to think of how that hair would move on the
phase just to make it. So I just don't make everything
vertical going down or in one direction and don't be
scared to overlay it on top just because what I
love about clay brush, if depending on how
hard you press on it, you can get like
really soft lines and it just going to
add that much texture. Again with the dam standard. Just go in and just
add a couple of lines. And with the Alt, you can just
do have a reverse and have those lines go poke out
instead of just digging in. So now I'm jumping in-between
the beard and mustache. And now that I'm happy
with the overall shape, I'll just go ahead
and emitter it. And now I can, again, I can move on and
work on the hair
3. Lesson02: Sculpting the hair: Now with the hair, I'll
do it in the same thing. So I'm duplicating the
head part, smoothing it, and then I'm just going to move, move the parts inside. And if you have to think about, when you're sculpting hair, thinking about the overall
shape of the hair. Don't worry about hair strands, don't worry about details
of the hair and so on. Just think of it as
if you're squinting at a photo and you'll see
the blob, which is the hair. And just move stuff
around until you get the, the, the big shapes. And then once you have
the big shapes and just go in with the dam standard as I shown you four
with the beard, the same the same process. Again, you'll notice that
I'm not even worried about having stuff poking out at the back or overlaying
or anything. I'm what I'm have to be worried about
when you're working, especially at this stage, is just getting that volume in, In worry about is this
looking, the overall look? Is it good? And then
then then we'll worry about making it to clean or making him look good and so on. You noticed I'm even
using symmetrical. Now here's a strict
about with hair. You can do the sides symmetrical because
nobody is gonna be looking at the same two
sides of the same time. Just, you know, and,
but for the middle, just hit click off symmetry
and just add extra lines. It just going to add, you
make it look more natural. And with the dam standard where I'm going now is I'm going in and without symmetry, I'm just going to
adding a couple of sharp lines just
to give it that, you know, that hair look. Now. Now that I'm happy with
the overall volume, I'll just go in with
the curve tube. And you'll notice that I'm
not even worried about, I'm not using any
fancy hair brushes. I'll show you, I'll share a
couple of with you that I think that I really
love using in ZBrush. But for this stage and for Blocking curve tubes does
a great job of doing that. Now again, if the curve tubes going through
and through that, now that you have the
picker set, it shouldn't. But if you close
ZBrush and open it again and still going through, just make sure to
have depths set to Z. Go to Picker depth and
have continued Z selected. Now, once you have that
initial shape of the curve, just move it around
with the Move tool. And then here, what I'm going, I'm doing, I'm
going to Z modular. And I'll go and delete
a couple of the edges that I don't need because I want some parts of that strand to be sharp and the other
parts I want it to be soft. So when I go ahead and add a dynamic subdivision to it and mix, make
them smoother. It will give me that
strand look and you need, you need that sharp edges soft so you can get a bit of more dynamic shapes
between them. So now that I have
one shape looking, okay, I go ahead and duplicate it and
just move it around. This is a fast way
of creating hair. Just, just seeing just
seeing if it if it, how it looks, if it works, you need to add if you like
the hairstyle and without worrying about use brushes, or is it looking
perfect and so on. And just duplicate one of the strands and
just move them around and try to try to have those shapes as
different as possible, like make him fatter, wider, smaller, and
then you can make. And then once you think, and I think this
piece is trying, is starting to repeat itself. Just go in and just
create a new curve tube, an inside Z modular. I'll, again, what
I'm doing here, I'm deleting the the lines
that I I don't need. And you'll notice
I'm not worried about the shape
breaking or anything. Just want to figure out the shape of my
character and just block that and as fast as I can. And without. Because the thing
is when you start putting too many hours
and too much time into one detail and you either
get bored with the project or if you're if you're working with
the client and they asked for changes, You're not gonna be happy
of doing changes when you spent like four
or 5 h into it. But if you block stuff really fast and it just show it
to a client, say, okay, this is the hair
cutter I'm going for what do you think
you liked volume and explain that this is just rough and we'll come
to clean it and so on. So you'll notice here again, the same thing is I'm
using curve tubes, adding the main shapes. So I'll draw the main
shapes just like, I don't know, rough, like really rough
like 60% there. And just then i'll, I'll split that part
as its own sub tool and then using Z modular just to remove a couple of the
edges that I don't want. And just to have that
nice sharp shape Here I'm just metering
the side one that I did. And again, you'll notice
that once I duplicate that, I'll go in and just
tweak it a bit so it doesn't look exactly
alike that one. Now, as I said, they do look rough now. But the moment you start
dynameshing them or this morning you start adding more subdivision or
Dynamics subdivision. You'll see how
nice though those, those trends read 3D look. So again, I'm duplicating
the same strand that I did, rotating it, moving into round. I may use in-flight
just to give it more volume or I made use pinch. Just to give it more. If you want the ends to
be a bit more thinner, just use pinch and that
should work just fine. Again here, selecting
the same one. I'll just go ahead and
MIT or the sub tool. And again, doing the same thing, you'll notice that
I'm using the same, same tools and keeping
things really, really love and 3D simple, just moving stuff around,
duplicating them, creating. And always remember two steps, step back and look at the
overall shape like Look, look if the volume looks
good and what I love, the latest edits of
updates of ZBrush. You have that small you have that small thumbnail of a
silhouette in the left corner, which is really helpful to help you see the silhouette
of your character and see if that looks good and
if anything sticks out or maybe something
that you haven't noticed, because we spent so many
hours working on a piece, you stop seeing the errors. And this is why you'll
hear a lot of artists say, when you're working on
something, just take a break, go do something
else, or come back. Or another trick that
I really love is just take the same photos that I didn't flip it
and do a mirror because it's kinda does like a
refresh for your brain. And it's like, okay, look at, now, look at this
with this angle. Now, I'll jumping into Z
modular and under edges, selected edge and make sure you select crease and
that what does. And also make sure you
have edge loop selected. So if you go space
on an edge and then crease and you have single edge loop or
multiple edge loops. You just need a
single edge loop. So that adds like a, a crease line on the
edge that you want. And you'll see when you start doing the dynamic subdivision, you see how smooth that looks, but it keeps that nice edge. And this is why I
kept those edges when creating the curve tubes. Just because because
I knew that I want the top part to be
soft and smooth, but I wanted the side to be, to have a nice sharpness
to it with a nice edge. And this is why I left two edges on the signs and not just one. Because you have
also to think about how it's going to affect
when light hits that part. And you'll see that this is
why some parts are rotated and just go in and it
gives it a nice look. Especially when
you're doing hair. And we're doing polygon hair, which is simple without worrying about doing strands
or realistic hair. So now I'm going around the head and
selecting each strand and adding those creases to
the edges that I left in. Now you would ask why haven't
added the creases before? Like, I need to keep my workflow as simple as possible and screens
as possible. Because you, while working, you might move stuff around and, or skew and edge
or it doesn't look where it doesn't land
what you want it to. So I don't have to
worry about does that Chris is gonna be effective
or it's going to look good. So I'll, I'll do the
main shapes first and then I'll go in with
the crease edges and just add the creases, whatever whatever I need them. But you can do that. You can add the
creases before or while posing it if
that's easier for you. So again, here's just going, going in and moving
stuff around, just tweaking them
just to see if it if everything looks good. And you'll see that we're
going to go back to these and in a bit now for the, using the same techniques
that I used before. So curve tubes and I'm just going to lay these
over the forehead. Now. When I did the first shape, I don't like how thick it was ending the
ends of the curve. So to tweak that, just go into stroke. And when you open that up, you have curve modifiers. And I'm the intensity. You can select. How, you know how the
side just make sure you have size selected and
you can select how thick, how much it tapers down
to the end or the start so you can taper it
either way, right? So again, rough shape. Once I'm happy with
that, I split it into its own sub tool and then I'm gonna go in
with the move tool, just move stuff around. Once I'm happy with the shape Again, dam standard
cut that board, going with the clay brush, add just small lines just to
give it that that volume. So now I'm just going
in selecting the parts that don't have any dynamics
subdivision because I want to see the overall look of the entire sculpt because you'll notice that left a lot of stuff. Steels are still without
any subdivision. And now you'll notice What's the benefit of having
each piece separate? Because you can go in and
you can tweak volume of each and every individual
part if you would like to make the neck thicker, just to make it proportional to the body is not going to affect, it's not going to
affect the head until you decide to merge it. You'll emerge it just to. So I'm just going in. Now one thing I
highly recommend is have some anatomical reference. If you can have a structure
of an anatomy male, female on your desk,
that's even better. I can share a couple
of things that I have and I'll show
you and you can get, you can get some
really, really cheap. So again, when I'm doing
here is just going in selecting the years because the hair was
sticking out of them. Just moving them out, making small tweaks
to the strands, then jumping back to the neck. Now for the neck, I wanted
to add a bit of muscle. This is why I said just keep some anatomical
reference next to you. Just so you can add a
bit of neck muscles. Adam's apple, just
to make it look. You don't have to go
into detail, even if, even if these are
rough and subtle, the fact that you win in just
gave them a bit of volume, just make them look more
realistic and that more relatable even if
you're doing something cartoony as this character is. So I'll go back to
the selecting parts. Even though with the
beard and mustache, I kept them as separate pieces because I wanted to have
that control of moving. Maybe I want the beard to be larger or have more
volume and I wanted, I wanted it to be more
slang AGI and have it go over the neck more. Maybe have those,
those back by candles, go into the hair or
whatever you're tweak as. And here you'll notice that
that I'm using transparent. So you can select a part, have transparency
on and you can see how that are looking underneath. And if something is taken out and notice that the beard wasn't covering all that the underside
of the of the jaw line. And just gives you
that control of tweaking stuff and
not affecting it. But the same time you have to keep in mind the fact
that they're separate. You might end up with
gaps or you might end up with something
not continually looking? Correct because because
they're separate, so you always have to to keep that in mind
to go back and check. Okay. I move that year. The the meat connecting to it or the muscle
connecting to it, that move as well. Does it look good? And you can solo each part
on its own and add any, any deep wrinkles or more volume like here
with inflate brush. I'm just going and giving him
a bit of more of a puffy, Puffy cheek to them. And finally, what I'm doing is I'm showing the character
from all sides. You can do that. We shift S so you can see the character from
different parts.
4. Lesson03: Cleaning and detailing the head: This part, we're going to start Cleaning and why Cleaning? We're going to go ahead
and select each part and merge stuff and clean them. And you'll notice that
I'm starting to hide stuff and I'm going to
keep only the stuff that what I'm doing here is
actually focusing on each individual piece and how that piece is going to connect
to the other sub tool. And usually I'll start with
the bottom part of the face, with the lips, because these usually are the trickiest
to get to get right. So I'll start by jumping between the upper lip
and the bottom lip here just to get that
proportions in volume, okay? With lips, it's a bit tricky and make sure you have
a lot of reference of, because it really depends
from a person to person, female, male, old, young. It's a lot of, lot of differences
between the two. But all in all, when you're making
something organic, just remember that
even organic boards and especially
like blips or any, any body part you'll see
you'll have 3D harsh edges like edges that creases, wrinkles or the edge when some part and
start some other ones. So this one you'll see I'm
softening the bottom lip, but then I made sure the bottom, especially in the
middle because then it tapers off on the sides, made that sure it's sharp. Now, I selected the face, added some dynamic subdivision
because I wanted to see the softness and
then I start by merging. So here you notice that I'm
only merged the top lip with the face and then I'm softening it with holding Shift
and you just soften. Then I go in and add that sharp edge just still
holds the shape of the lips. You'll notice that I
don't go to the end of it is because if you look
at reference photos, you'll notice that it's sharp
edges, sharp in the middle, but then it tapers
off to the science, then have the edges
underneath the nose. I don't know how
that part is called. Then it's just a
matter of softening using the flattened brushes. Well, just so I need
that area to feel like it's with a bit of inflate. I just want that area
to be to feel like it has more meat underneath it. Then I'll go in and I'll make the the wrinkles around
the start under the nose. So I because initially when I sculpt with I forgot
to add the line. Because usually these
start at the end of the nostril and then they
go down, down the face. So I made sure those are a bit deeper and I'm still going to tweak those once we
start merging the nose because then we have a
big gap between the, the nose and the the face. So now I'm gonna go ahead
and soften dynamic, add some dynamics of the nose, and then add subdivisions. And then I'm going to merge
the nodes with the nostrils. And before merging, just
make sure the shapes are almost there and I don't
have to be 100% there, but just make sure they're almost there
because then it's a bit difficult to start
moving stuff around. So then merge them, dynamesh and then
I start softening. But as you notice, I don't go. I don't soften it perfectly
because the nose, the more closer to
the face it is. Those lines become harsher
and stronger, right? And also in the
front of the nose. Just to get that. Especially if you
have if you have like a big round nose, then you'll, you'll see that
those lines actually make the shape of
that, of that nose. Then again, just jumping around from
part one part to the other, just making sure it's everything
just flows just flows. Next. I'm gonna go ahead and merge the forehead part
with the bottom. So one thing I love about when you're working
in separate pieces. I love when dynamesh, when you dynamesh
two pieces and it's create like natural creases. Between the two. You'll see the line
between the forehead, the top part of the
head, and the bottom. That's created like a nice, nice wrinkle that I want to
keep their and it has like a nice volume to it
because it's between two parts and it has a nice, It's sharp are the same
time just goes and soften. Here with the dam standard. I'm just going in
and just adding, just making those
lines a bit sharper. And as I said, whenever
you add a sharp line, just go in with the
in-flight brush. Just so it adds a bit
of meat because if you think of those wrinkles there, they dig into the skin but the same time
everything around it, it's still, still has
its weight and fill. It becomes even more stronger. As you see. When I start merging stuff, some parts pop and you start tweaking and adjusting
to the merge because The moment you start
merging stuff, some shapes need to, you need to fill in
some space or you need to remove some volume. Again here you'll
see the same thing. So I'm adding a
dam standard line just to make those
wrinkles stronger, especially the ones
on the forehead. And again, I'm on, once I do that, I'll go
in with inflate Bush, especially the top
line because the top, you have to think of gravity just has a weight to it
and it just falls down. And then at the end, make sure you soften those. So they have like
a crease that just softens out and just
the merges, Merges in. One thing you can do is you
can also use the pinch brush. And if you think those lines
are not strong enough, you just take the pinch
brush and just pinch those creases and wrinkles. Just gives you a nice it gives you a volume and
it keeps that sharp cut. Next, what I'll do is
I'll merge the nose. And because of the bridge
here, what I've done, I could have made the nose
just tape, just fade in. But I know that the moment
that I start adding, what I love adding
when I add with the clay brush is it makes, it feels like it's actual meat. And here, the smooth brush
isn't strong enough, so I'll go into the and just
choose the stronger smooth. Just makes it easier to
smooth those creases. I'll add a bit of highlights, the creases that I
want see here on the nose because that
goes into that line. Just make sure they're
connected and a bit stronger. And whenever you do that, just make sure you
always go back with a inflate or the pinch. Just make sure it's
not only align because it's not a cut even
when you do a scar. If you notice when you do
scars or stuff like that, you still because that
tissue when it heal, that added like another
tissue and so on. So you still have that small bumps and it
just makes it more, I don't know, just adds
a bit more meat to it. Now, the thing that I
do is when you work on a piece and you feel that it's
not there, just leave it, leave it and just jump on another piece because you'll
get frustrated with like, you start moving stuff
around and you go like, I'm not, I'm not
getting the shape and you'll just use just
frustrate yourself. If that happens, just jumped
on another piece, just go. Do work with the forehead, work with the eyes, took
the nose or whatever, and just come back to
it because what happens is you've been staring
at it for so long. You don't know what
works anymore. So here you'll notice now I'm merging the bottom
parts of the lip. And as I said with lips, it's a bit weird because if you don't get the
proportions right, the start looking,
looking a bit off, like you see, this
is still here. I'm not happy with
with the shapes because like every tweak
you make just makes, makes or breaks the Character. Now, you might ask, why am I doing this? Because the guy
has a huge beard. But again, it's one, it's an exercise for you. That's one thing too. If the client decides to not
give the character beard, then you have to
sculpt that beard. Or were you decide
for your character, your one point,
you're like, oh my, I wish, wish I wanna do this guy without a beard
because I think it looks cool. And again, if you treat
your character as like a living character
that then you'll, you'll Design him differently, like you'll think of
all these aspects. So after I've merged
and softened, I'll go back with
the heart branches. Because when you start
smoothing stuff, you might end up smoothing those edges that you
need to be sharp. You have to keep in
mind everything. Everything has a contrast. Like if you look everything
in our body from our fingers, face, eyes, everything has a
contrast of software pieces. They, there are a lot
of sharp, sharp pieces. Now, next is jumping
into the ears. I'm gonna go ahead and
do the same thing. I'll inflate a bit the
parts that I want to be a bit bigger at some
dynamics subdivisions. And then I'll merge
it with the face, like with the ear. There's one trick
that I learned. I don't remember what
I learned that one is, if you want to Sculpting year, just use the curve, the tube, brush and just
make a question mark. And then inside
the question mark, just draw and a Y,
like a simple why. And at the end of it, just put a small sphere and then merge all the
thing together and it just comes out nice. It's not realistic. But for this one, I'm
not going for realistic, but I'm going for
something more stylized. But it just, it just works. So now, again, I did before. Once I'm happy with the
shape, I'll merge it to the head,
smoothing the parts. Sometimes you need to
add a bit of more meat. Because if you look at, again, try to look as much
references you can. You'll see that
when you smooth it, you still have a gap. But when you add a bit of, if you need to add a
bit of meat, just, just makes that line a bit the curvature just
flow in a bit nicely. Now, as you see a jumping
back to the eyes. Now because I added a bit of more meat between the
nose and the cheeks. Then now I have to
tweak the eyes, the eyelids, the upper eyelid, and the bottom eyelid just, just still have that line that starts from the move from the
end of the nose to the end. And again, tweaking
them slightly, moving some stuff around, adding some more subdivision. And then here I'm also
tweaking and adding. I thought, well, because
this guy is an old guy, I'm gonna go ahead
and add just slightly a bit of wrinkle on
the island just to give him that age
appropriate feel to it. And you'll see, although
I merge some stuff, I'm still jumping around
between them and tweaking. And I'll jump back. And again, whenever you
get frustrated with the piece and it's not working or it's not
coming as well. Just leave it as it is and work on another piece
and then come back. There's nothing wrong
in coming back and just tweaking and tweaking
and tweaking until, until you're happy
with the result. You'll notice that when I
finished working on any piece, I'll start moving the
head around or zoom out and look at it overall. Because especially when
you're, you've been working on small pieces you to get
lost in the details. And it's a good measure
to like each time you work on anything or
tweak it or to add, it's just, just
take a step back, just zoom out, look
at the overall. And my eyes is always
looking at that silhouette. Just to see if because that small size just
tells me if jumped, some slumping jumps
up in the flow of the shape or is the
proportion of the shoulders. Working with the neck? Is the neck too long and so on. So you kinda jumping in and tweaking between
between the two. Here. Again, I'm going back adding a bit of more muscle definition. I'm still, I'm still having decided is like how muscly
I'm going to make this guy, this guy is old, but again, it's like he's like a strong do than or like an
old fisherman or something. So I tried to imagine like a small story for my character in my head,
just, I don't know, It just makes it FUN
when you're working on your character to have something in your
mind is just like, I don't know, your
while working on it. You're trying to know
who your character is and understand more about what makes them tick
with the live and so on.
5. Lesson04: Cleaning and detailing the Beard: I need to worry about
the beard and then I'll know if the proportion
is correct. So again, what I'm
trying to say, it's like don't be afraid to drop a piece that
you're working in, a piece from that model and
just do something else. Because you might come back
to ends like, Oh yeah. Now understand the volume
better because I need to figure out the how the beard is going to affect
the look and so on. And you'll notice
that because I merge some stuff and it
adds some meat and I moved some pieces around. It. It actually just modify
the shape of the face and it, the beard wasn't aligning. So you just have to go back. Because we kept all
the shapes simple. They're easy to edit. Like you can easily go back and edit them and add any
detailing, clean them. So now I'm doing a bit of
dynamesh with polish on. And I'm going in with
the dam standard. Adding more detail. Again, I'll do like a
crease and then I'll make a hold Alt and just do the opposite
of that, just give it. And here you see I'm now
working with cemetery anymore because while in blocking
stage symmetry is amazing, it's great for blocking
out shapes really fast and getting your
volumes and so on. When you're starting to detail, take the time to work
in asymmetric will take the time to make things not look symmetrical
whenever you can, like even a small tweak, move the lipid a bit upward. The the I make it a bit crooked
or the nose or whatever. Because if you
look at any phase, no faces, it is symmetrical. So here are just going
round making some shapes. Sometimes I'll just, I'll
just let the mess of the shapes that I had before
guide me or when I want, what I want to add and
where do I want to add that small detail
and all that stuff. So it's that messy
blocking that you did. My actually help you
make a flow for, for the hair of the character. Go around, see if I can add
or any to move any stuff. Because the moment
you move the camera, you might notice
that I don't know, it needs a bit of more volume
or here I noticed like, oh, it's covering the
lipid bit too much. Because the moment to
reveal other parts, like the mustache here, I noticed like, okay, wait, the bottom lip is not showing
as it's supposed to, right. So maybe I need to drop
that part of the bit down. So now the next step is to take them mustaches,
dynamesh them again. From that blocking that we did the same
blocking that we did. I didn't do anything
extra to it. The same blocking dynamesh did. Then I'll go in with the sides. As you can notice, the
symmetrical now is on because I want to use, for the sides, I can
use symmetrical. And you'll notice that at
the end of it, I'll go, I'll turn off symmetry and just go back and
just do a couple of small ones and some symmetry
on the sides as good. So once you start
going to the middle, it turns symmetry
off because then you're viewing the
character from the front, you're gonna notice
what the side is not noticeable
that much, right? So then you're going
to notice that, oh, it's a bit too symmetrical. So then you can just go
in with the dam standard, adding a bit of crease and then just alternating
in-between up and down, up and down, just, just getting. And again, using the same flow over the Blocking
parts that we did, that rough shapes that we
did actually can guide us to know I like
how that one feels. I'll just going to
add a sharp line or this is gonna be my, my valley and this
is gonna be my, my, my hill and so on. So I'll keep tweaking the shapes to get the
look that I'm going for. Once I'm happy, I'm just gonna
go in and do a dynamesh, but I'm gonna do
it with bullish, with the polish is
just adds a bit of softness and sharpness
to the top parts. And it just blends
really nicely. Again, just tweaking it. Tweaking. So you have a nice flow between the mustache
and the beard. So it just doesn't
feel like it's just like to parts on top of the other just makes it feel like, oh, the hair of the moustache is just flowing
over the beard, right? So, you know, although they're separate parts and you want them to feel
like separate parts, you just have to feel like they're pieces of
the same beard. Now. See now that I have the
beard and mustache settled, I'll jump back to the
shoulders and neck. So now I'm ready to
merge the shoulders with the neck and now I
can decide, okay. Is the size or the shoulders. How how much muscle do I add? How much details
do I add to the? So now just merging the two, dynameshing them
and then smoothing, smoothing out the shapes, the connections to use shapes. And then with the clay brush, I'll just go in and add
those muscle details. It doesn't have to
be crazy details. But the, I noticed that if
you start adding a bit of detail to the muscles
and then soften them up. Even if they're not visible. You can actually feel
them like you can actually feel that
there is some, there is work done
underneath because you feel the flow of the neck in the silhouette and
how posture helps, helps the character cell the character even more is you
can see I'm keeping a really, really simple and
I'll say it again. Try to keep reference, photo reference of
an anatomical body. Or if you can have a, I have two statues on my, on my desk that I just I love having them on my desk
because I can just look look, look at them and know if I
need to tweak that a bit, a bit and just add
some muscle here. Or I need to make the neck a bit because the flow is
not correct and so on.
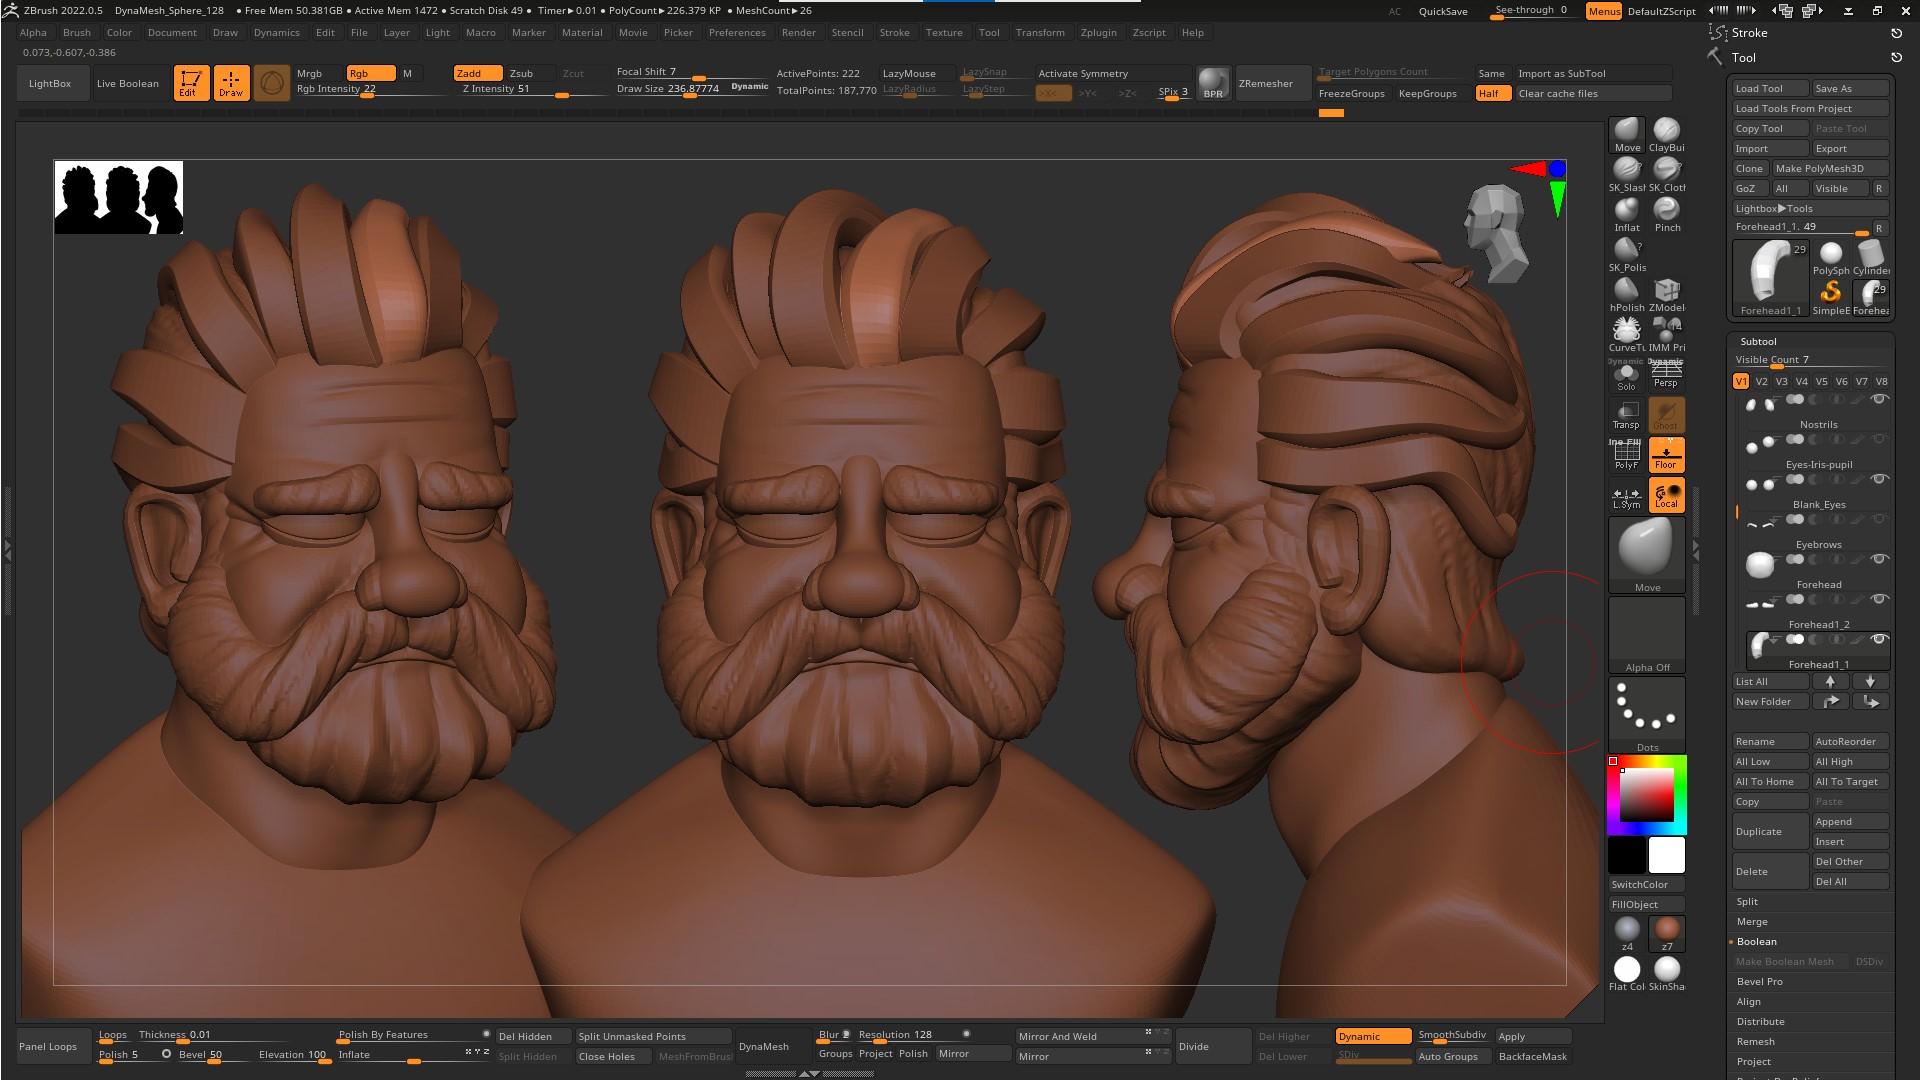
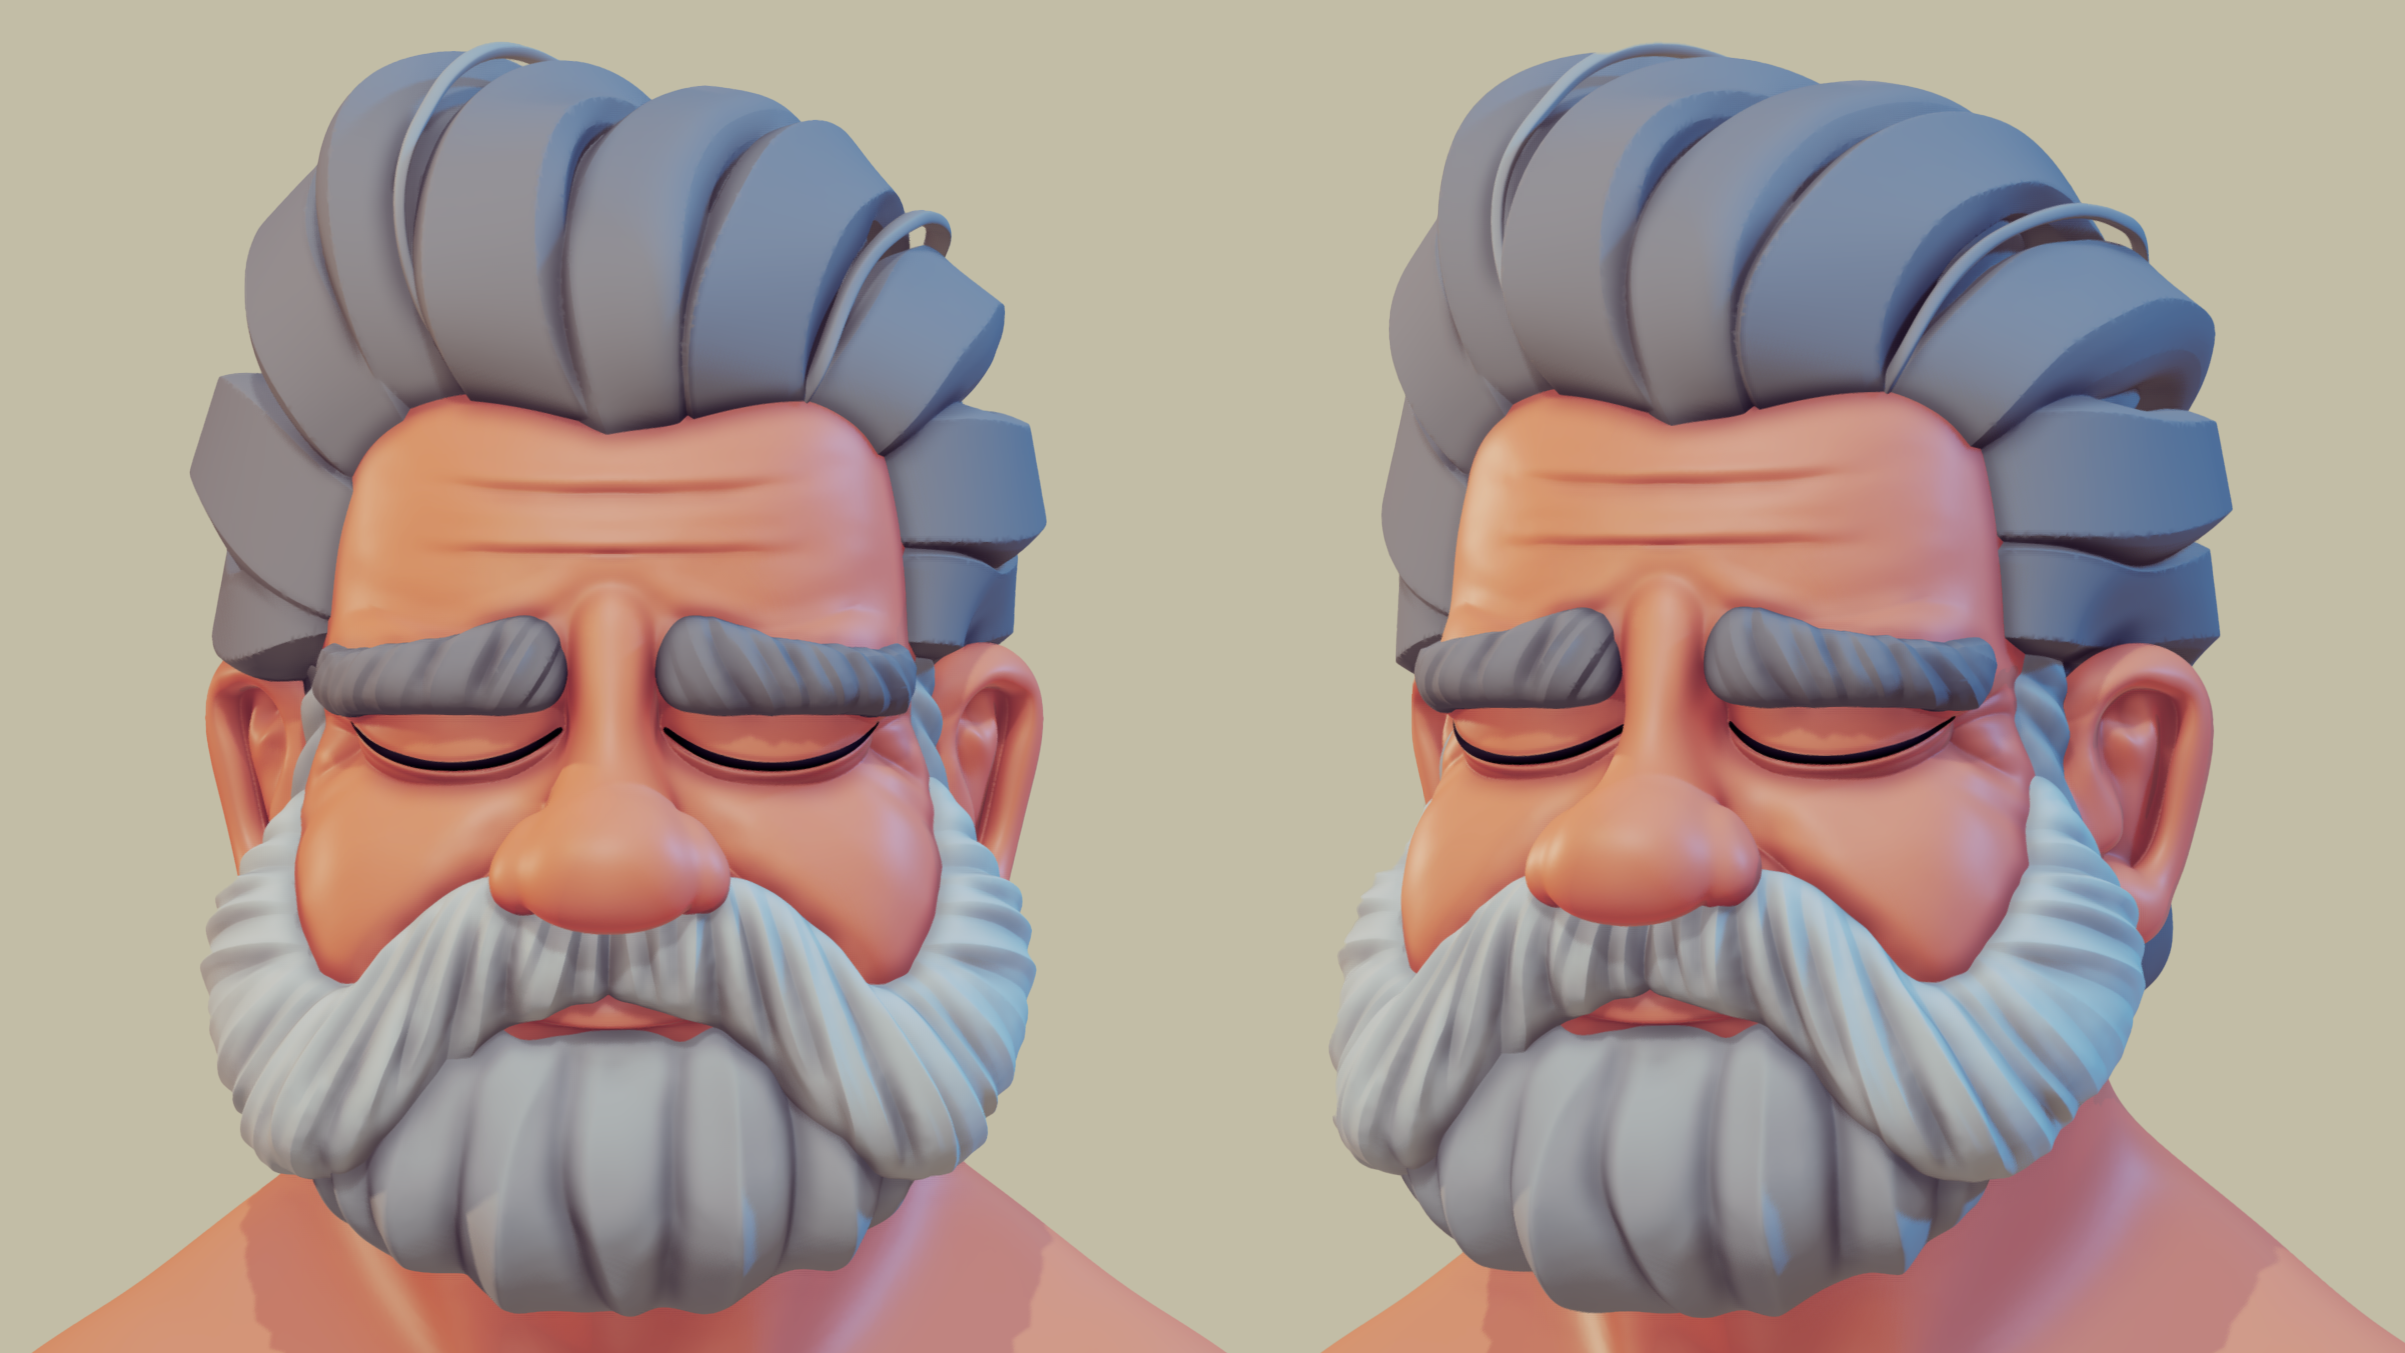
6. Lesson05: Detailing the hair and adding final details: This is the shape that we
took and duplicated the head. So now remember we added those rough lines
with the clay brush. So now I'm going in and doing
the same thing with the, with the Beard going go with
the dam standard than just going over and
adding sharp edges, a bit of creases and just
going in using the same flow, I know I'm repeating
myself again, but it's the same
thing actually. It's like you notice
like once you, once you use a technique
when with one-piece, it's just reusing
it again and just making sure what
you're trying here, try to keep the
style consistent so don't don't make him a bit
too large then the beard. So try as much as
you can to look at, oh, this is how I did
it with the beard. I must use the same flow
with the hair just so it feels like it's from the
same same style and so on. Dry. I don't know. You block
the beard and a polygon and then you go crazy
detail with tiny hairs. The head, it's gonna look weird. I'm not, I'm not
saying and doing it, try it, but it's still
going to look weird. Try to stay, follow the
same, the same lines. Because you'll notice once you, once you start
doing it for each, each piece, you'll, you'll, you'll kinda create a
workflow for yourself. You're like, oh yeah, so what I'm gonna
do is I'm going to add whatever the Blocking had. I'm just going to
add the crease here. You're going to add
a sharp edge here. Then to soften that. Now I don't like how that looks. You'll notice that now, although I'm doing all of
these, and you might say, well, they're covered with
the the bottom and top hair. This is the bottom. I know, but at one
point I need to merge the bottom part of the hair
with the strands that I did. So it looks and if we do this, it's going to help
us have a nice flow. So it's going to look
way better when, because if we have
left this soft and we have the strands going
into that softness, it would've looked so weird. Who's going from sharp edges, strands going into the head. And then you'll have to
sculpt hard edges. This way. You're preparing for that merge. Your like preparing because
if you think of, as I said, you have to think of hair and hairstyles as volumes
as like shapes. Because if you're
making your haircut, when you're arranging your hair, you see like you have the back of your head,
the sides and so on. And then you have
like, I don't know, in front of the head you have one curl which goes up or over the forehead or goes
back or whatever your hairstyle hairstyle
are going for, right? So you have to think, okay, So this is my base
body of the hair. And on top of it there is these strands that they
need to flow, right? This is why I worked like this
because it adds a bit of, it just makes it full. See, so now what? I'll start taking those strands and tweaking them and I'll move stuff around so I can get I don't have anything
like poking through. And you'll notice
because you see how those strands look
weird now, right? So they just look like
tentacles, to be honest, like they're sitting on top of the head
and you don't want that like you can get away with it if you're just
doing it on Render, you're not, you're
not going to view the model from any sign. But this model, you'll see, I want to upload it
to Sketchfab so you can look at it from all sides. So because I went ahead and
created the bottom lines, now what I'm going to
do is I'm going to take those strands and make them
follow the flow of that. I'm hope, I hope
I'm making sense. So I'm just moving those
and making them flow. And you see like
how I'm trying to align the hard edge
that will go into a soft edge or I want to
strand to go underneath a strand just makes it
a bit more natural. And it's not as tedious
as you think is. This is not fast-forward. This is like
real-time. I haven't fast forwarded or anything. So you'll notice that
doesn't take as much time. It just tweaking, moving
stuff around, right. And just just trying to follow the lines
that you had before. And again, you'll see me
like now I'm jumping to the bottom part
because I noticed that this part was
a bit too flat. I'm gonna go in and
just add an extra line. Or see just, just to have that contrast between
smooth and a bit of edges, smooth and a bit of
edges and so on. But you'll notice that
some of the edges, I don't blend them,
I keep them out because think of hair. Sometimes you'll have, I
don't know, strangest, just going up that strand
just it's not merging with the overall shape of your head or the
overall shape of the, what's the goal to your
hairstyle that you're going for? So Again, when you decide to, i'll, I'll merge these and you have to do it
for all of them. Again, contrast is
really important here. So merge a couple, leave a couple out. Just makes it more
interesting to look at. And especially with hair
because hair is messy. Like the beautiful thing about like you want to know how to make hair look natural.
Don't spend too much. I'm making it look perfectly. Just block in the shapes
as you've seen me to. And then just go over with a couple of strands,
move them around. And you should be,
you should get really good, really
good hairstyle. Now I'm just going
in and tweaking each hair strand and
just making sure it flows nicely with the
bottom sculpt that we did. Just go over each one. I know it's it might look
less tedious process, but trust me, it's really, really important to get those shapes clean and
nice and have a nice flow. So the merged nicely
when we start, when we start merging them
with the bottom part. So now what you see here, I'm taking that
strand and I'm just, I want that strand
to go a bit down. But also I'm looking at the lines that I sculpted
and how that's gonna be, how that's going to
flow with the overall, although overall shape, right? So it's just a matter
of moving strands around and just making sure the, the, the harsh edges and
the soft parts are looking. We have a nice
balance between them. And you notice like again, when I start working
on something, one part too much, I'll just switch
to another view. So I can see if, if, if, if it looks
good from that side. But again, I know the
back of my head is like, Oh, I've been I've been
working on this part. Wait too long and I
need to switch it up because you'll just
taking that I don't know, 10 s or 15 s from it just shows you when
you come back to it, there's just you
just come back to it with fresher, fresher eyes. So here That's strand. I want that strand to go to
the bottom because I thought, I thought it would
look like really cool. And it also has a nice merger
between between the back, the back parts of the
hair with that flow. And honestly, the
only thing that I'm doing here is
just going over each each one of
them and just making sure the flow of each
of each hair strand is, and you'll notice
each one now it still has its own poly group and I'm still having dynamesh
to any of them. So these are still in
dynamic subdivision. So we can always go
back to the rough. These are the same rough ones
that we did at the start. So I haven't created
new ones or anything. So now, once I'm happy, now that I'm happy
with the shape now I can go ahead
and dynamesh them. I can go in and
sharpen some edges. I cannot go in and
soften some edges. So these are the final
tweaks that I do before I merge each strand to the hair. Now, coming from a toy
designer and 3D printing. I always also have like this. I don't know. It's like a I need to make sure my models are watertight so
I don't have any overlaps. And this thing can be, can be easily taken to, I can, I can 3D print this
the same time. I can also render this. So for me as a toy designer,
that's really important. So when I'm working
on something, I have that in the
back of my head is oh, I know how I need to
split this, right? So what I need to make
this, to print this, and I need to make
sure I don't have any parts underneath
that's going to cause a problem where
printing and we have overlaps or we have some
gaps which are not prepared. But that's not this discussion
we can go over on how to prepare a model for making sure it's perfect
for 3D printing. Now going back to the strand, now, I finished one strand, so that's trends is done. I might go back before
I, before I merge it. So you'll see me like I'll
jump to the one before. And if I notice like, Oh,
that's a bit too soft. Or any the extra edge there. Or I mean, to make
this a bit harsher because when you start adding, as I said before,
we start adding a new stuff or make
new stuff appear. Those stuff needs
to, those parts, need to react or
with those parts. So now I have three strands
merged to the hair. And you'll see how
nicely they flow. And I just need to go in now
and just smooth some parts, even the front parts that it's
connected to the forehead. I'll just go ahead
and dynamesh them. And then I'll smooth out the, I don't know the edges that. Now you'll notice that when you, when you start
merging stuff, again, The parts underneath get affected so you need
to tweak those. Start to move them as one piece. Here I'm deciding, okay, so this strand is going to be overlapping with
that or you want it underneath because you
have to think hair is not like you do have a hairline,
but it's not perfect. Like you have a
couple of hairs which are to make it a
bit more natural. Don't be afraid to
experiment and I'll move just this one millimeters off, or I have that a bit skewed on top of the other one, right? So now I dynamesh
this softened up the edges because you can see
the edges look a bit harsh. As I said, I didn't
spend any time making the surface smooth because I don't have to
worry about that. I'll worry about
it and I'll clean it when I'm getting
to this point, which is now now. Now I'll spend the time
Cleaning my parts, making sure they don't
have to do that. What I'm blocking because
what I'm blocking, I'm just figuring
out that Blocking. I'm figuring out how do
I make this character, how do I make to this
character look cool, look sad, or emotion. I'm agreeing for how, what's, what's his body type
with the proportions, how the silhouettes
is going to work. That's what's important
when blocking. And once we have that, the rest is just just busy work. It's just making sure everything looks
clean and looks nice. But if the blocking stage isn't done properly
and it's not, you didn't you didn't
spend the time making sure everything looks, has a nice flow
and a nice volume. No matter how many
details we added, still not going to look a
little, look good here. Because when you merge stuff, the poly groups,
you still have them so you can select
the body group. And with the in-flight brush, I can go in and I
can move some stuff. As I said, I need I
need those parts. Two don't have any
overlapping parts just to make it easier for if I, if I decide to 3D print this guy or and just, I don't know, it makes it look cleaner
if all the pieces of the, of the model are clean and you have a nice,
nice flow to them. So again, here I'm just
going in and just moving some some strands
and just making sure the flow of each one
is supposed to be. So it just flows nicely
with the bottle, with the base hair that
we have underneath. And that's the part
where I dynamesh. And then I'll go in
with a flattened brush or the dam standard. And once I'm happy
with the shape, I'll just merge it
to the bottom part. I went ahead and jumped a bit
because as you've noticed, it's I'm doing the
same thing and I don't want to
bore you with that. So just moving strands around. You'll notice one
thing, I forgot to record this when I
add those strands, but I use the same technique, so the same tubes, just tiny tubes made a shape
and then you can add them. What I love about
those is they give a feeling of strands. And again, you have to go with that mess is
like messy hair. There's always one or
two strands which are not behaving or sitting
where they should. Now that the haircuts is done, I can jump in and work on our final piece, which
is the eyebrows. And you'll notice here I'm doing the same thing with
the move tool. I'm just moving the
eyebrows a bit because we merge some stuff and we added some move some stuff around. Just needs a bit of,
a bit of tweaking. So same thing, dynameshing
the parts with polish on. I'm going in with the dam
standard and just adding, adding those creases
and those lines using Alt and just using the, I'm using the same volume
from the blocking. So this way it just
gives me a nice flow. And I'll repeat that again. It's, this just shows you
how helpful Blocking is. Even even when we're
detailing because it helps us not have to guess
what we're doing. He's like we using, oh, I really like how when we, when block that 3d
fast it came out, gives us a nice shape to it
and advice volume to it. And just as you notice here, I'm not using symmetry. So just because eyebrows, you mostly see them
from the front. So you don't want them
to be to look identical, just makes it look weird. With the dam standard just
going in with the ALT. Went up, one down. Just play around with
it out of an ad. Like you can add subtle ones
on top of them as well. She won't like to
have a nice small, tiny hair look look to it. And then once I'm
happy with that, I'll just go ahead and
dynamesh with polish on. And I'll just go in and I noticed I haven't
added any to the top. Just makes the flow nicer because you don't want have
like a super clean line when we're with the part
that with the hair that connects to the flesh, just makes it look, look a
bit more natural when you have that line, line break. So this is exactly
what I'm doing here. I'm just going in
breaking that line. So the connection with
the forehead flesh, it's not it's not perfect. It, you have that. The waviness or you want
to call it to the shapes. Now just zooming out, making sure everything
looks well. I'll select some other parts. Sometimes I'll, I'll
just go ahead and use another material shader. Just to see fine. Notice something. Here I noticed like the nose needs to be a bit, a bit like a nice
curvature to the front. Moving the nostrils
a bit around. I thought the hanging
a bit a bit too low. And again, even at this point, I think even before I
finished the model, I went in and I did a
couple of extra tweaks. Because if I get to this
stage once it's cleaned, I'll leave it at least
one night and I'll come back the other day and see where did I mess
up because you'll definitely forgot one place or you didn't clean clean
it up or something came up. And again, Shift S to
view it from all angles, which makes sure just like a nice ending
presentation for you.
 Oasim Karmieh, Sculptor & Toy Designer