Transcripts
1. Introduction: We're going to trade in our
brush pen for a file liner. Now, if I put them
next to each other, you want to see the
difference right away. Fine and rough. Alright. Now, working with a file liner is a bit different. And the file liner,
because it is fine, has the tendency to draw you
into details. You see a lot. You can do really fine, intricate work with it,
and before you know, you're lost in details. We want to avoid
that. We close it. So in this module, we're going
to learn to ignore things. Now, that sounds
strange probably, but once we get going,
you understand that. With quick sketching,
you just need to discover how
to ignore things. If you look at a flower, it can be very pretty with
a lot of details, all kinds of nuances, little shades and very nice. But if you want to
do quick sketching, you just need to
ignore those things. You just need to use your
fine liner effectively, just as we've done
with the brush pen, we're going to use the
fine liner effectively. Now, that doesn't
mean that you can't create very pretty
impressive artworks. You're just not going
to do all the details. The chances are that perhaps you never used a
fine liner before. So we're going to
start really simple. Even work with regular pen. Regular pen you can
do great things with liner and create some
simple shading techniques, hatching with a pen, sketching with the pen
and going on from there. Now, until now,
we've done flowers, very simple like
here from the site. We're going to do that a
little bit more advanced. And we're going to attempt
to do flowers also from angles because not every flower is from the top or
from the front. No, they're always
under certain angles, and we're going to discover
how to do that two together, working with that fine liner. We're going to create a
decoration in three parts, and literally, we're going to create a decoration
in three parts. Once we've done all
the practicing, we're going to create
something really nice. And I've got it
here, and you say, Oh, wait, hang on.
That's one part. Now, there are actually
three parts of this artwork. We're gonna draw a rose
together in three parts. And as you can see, that
looks pretty impressive. Once this lesson is done, you're going to do that
impressive work, too. Alright, I'm gonna stop talking. We're gonna start working.
See you in the next lesson.
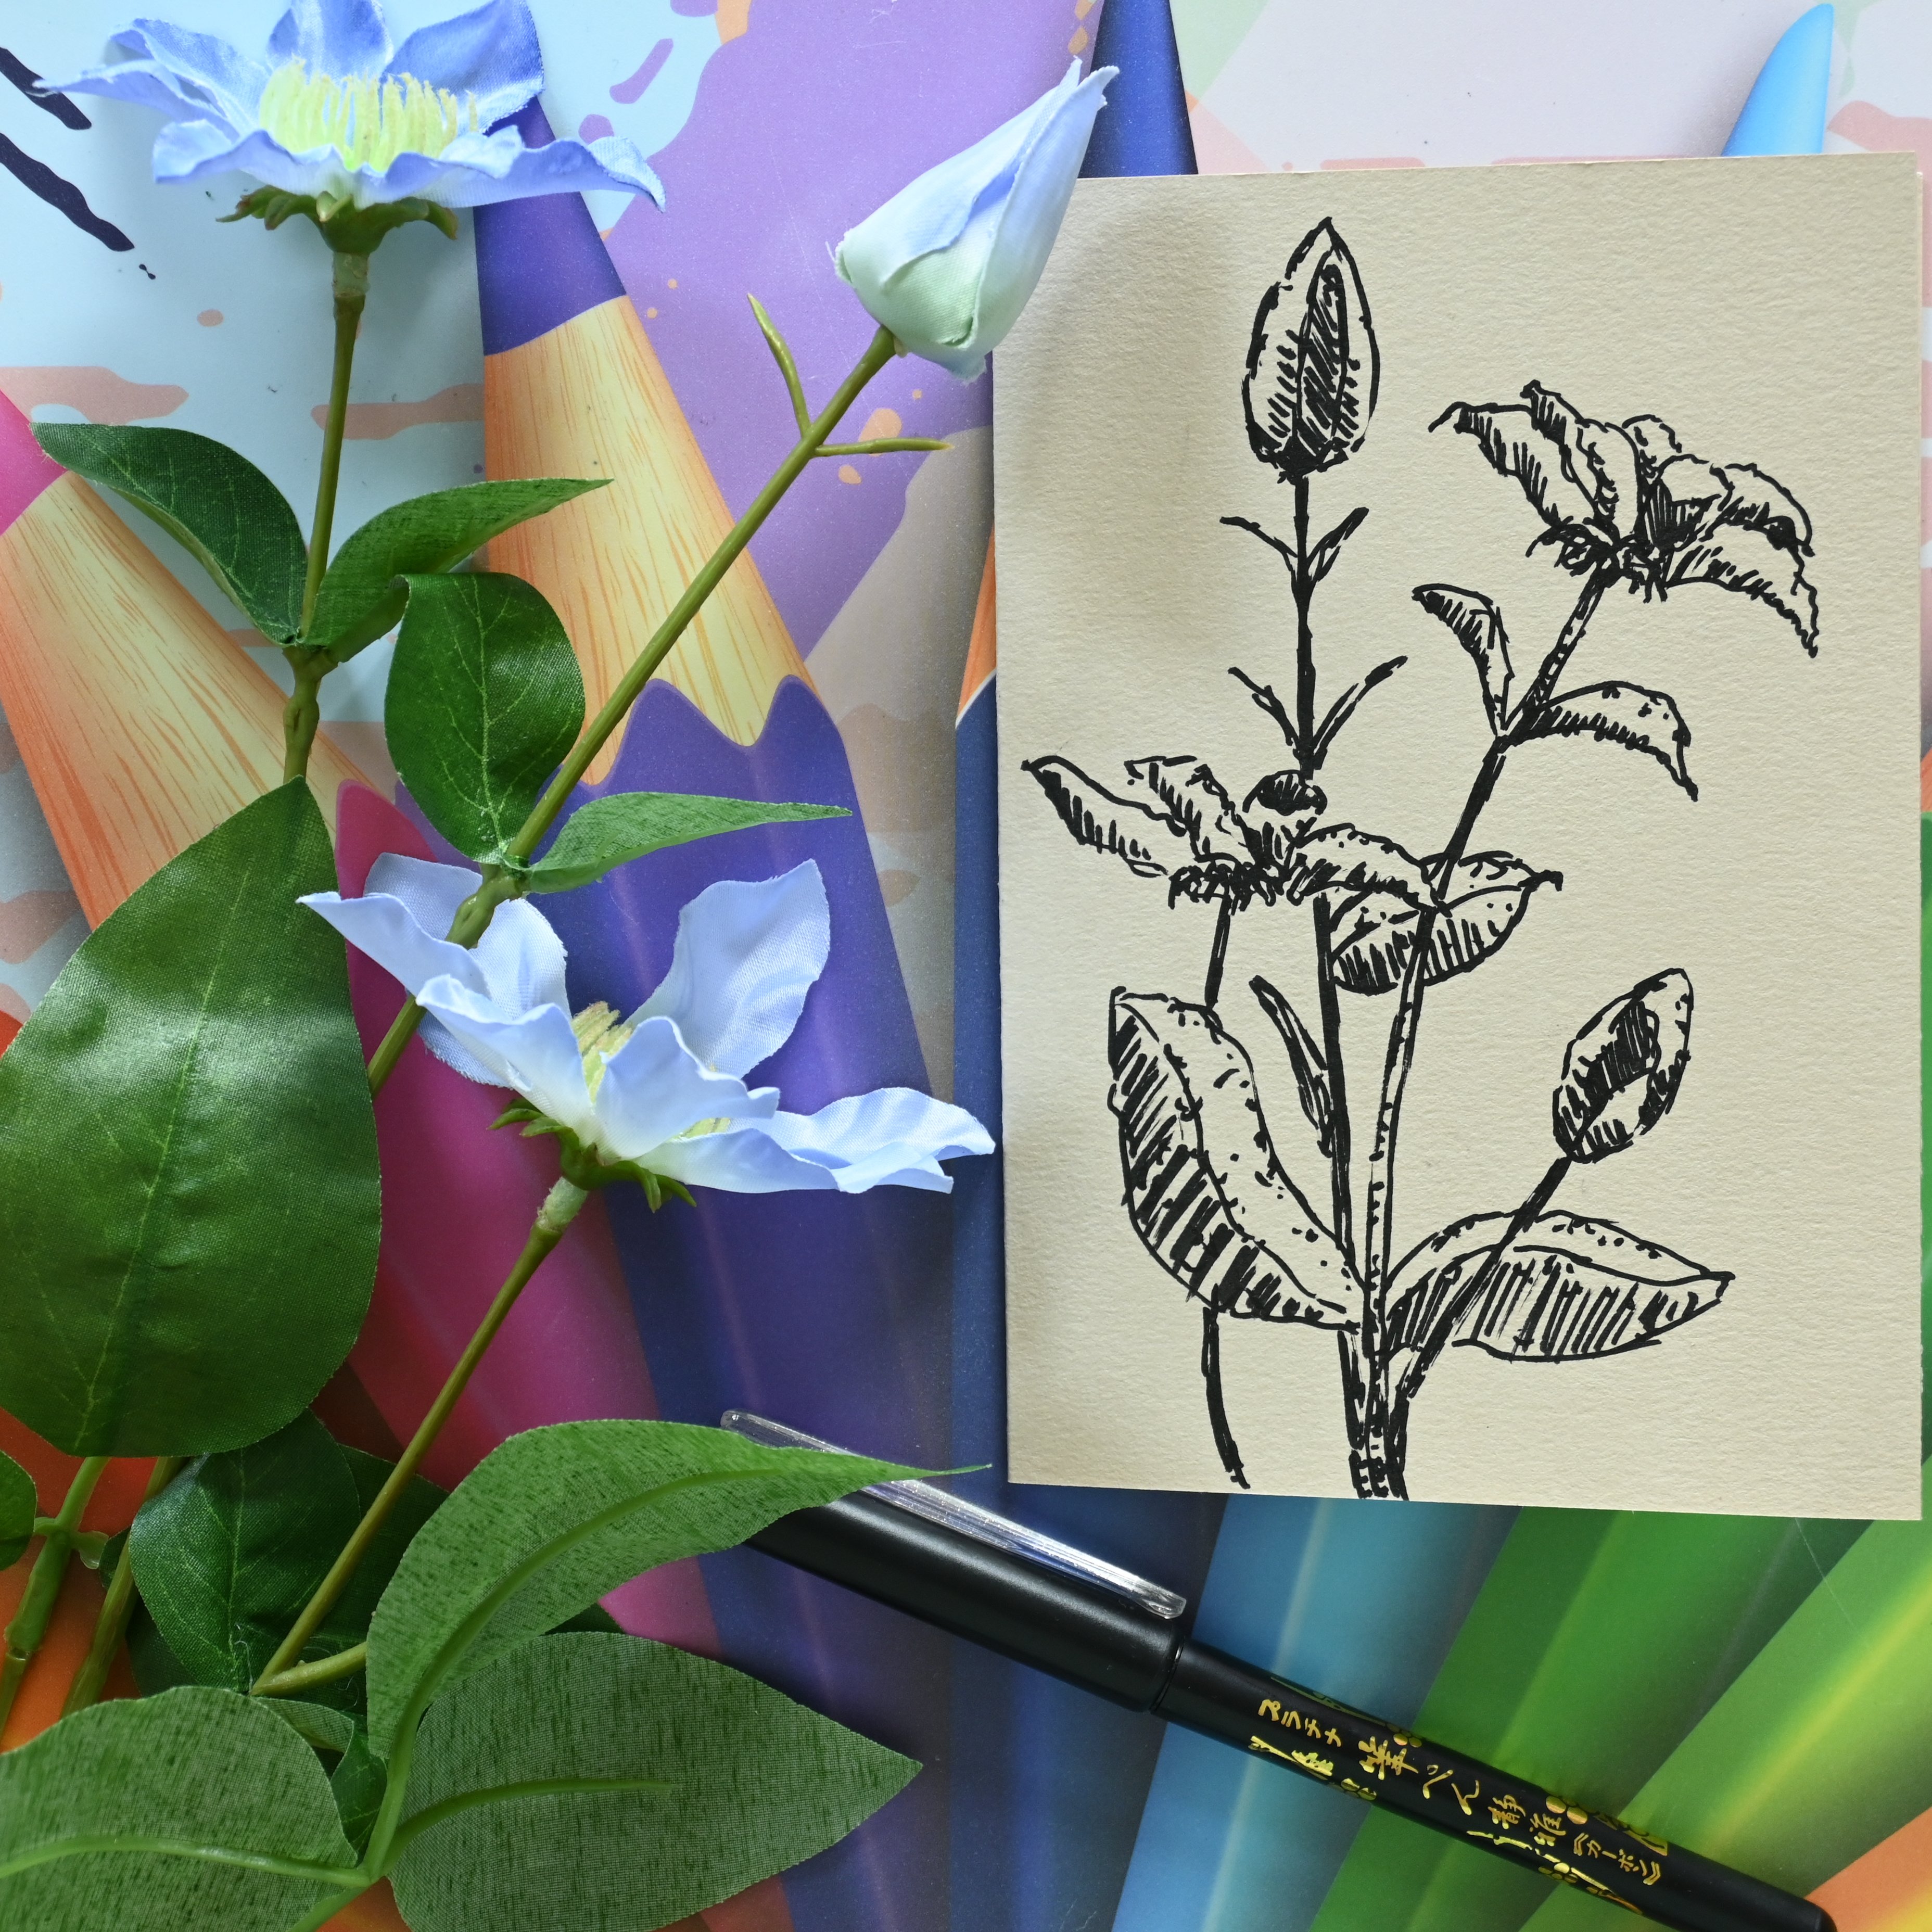
2. Some things need to be ignored: Welcome to this lesson. Now, before we can make our
decoration in three parts, I trology, we need some
practice, of course. We're going to work with a
different material today. We're not going to work
with the brush pen, but we're going to
work with fine lines with a regular pen
or a fountain pen, whichever pen you have. Alright, that brings me
right to the material. So let's go through it. You need today a pencil. You're going to need, then,
most likely, an eraser. And that pretty brush. You need some paper?
We're going to start out for this lesson just with
regular sketch paper, whatever sketch paper you have, use that, and you're
going to need some pens. Now, a little bit under pens. There's various
pens you can get. You could use, for
example, a regular pen. Yeah, just a regular
pen would work fine. If you want to do that,
I'll demonstrate that. You can make pretty flowers
with a regular pen. You could do
something more fancy. Get a fine liner. Now, fine liners, you can get in all kinds of sizes
and even colors. We're just going
to use black ones. And I've got a box like this. These are my favorites. And let's see. Today
we're going to use 0.3. We're going to stick to
one. Fine liner for today. Now there are various sizes, and the danger of the sizes, the smaller they
go, the more you tend to it doing details because you can do
fine things with it. If you don't have a 0.3, 0.5, something like that, 0.4 is good, too. I think the road
rings come in 0.3. So yeah, whatever. Cope
all kinds of sizes. Now, aside from a fine
liner or a regular pen, you could also use
a fountain pen. Now I'm going to go a bit
closer with the fountain pen. Hopefully the
camera picks it up. You want a fountain pen work that has a little
ball on the end, and you can get them in
medium and fine extra fine. Go for a medium, I would say. And there's pens
like these, too. And fin not fine liners, fountain pens, great for inking. Now, this one comes with a
cartridge, you press into it. Well, this one comes with
what they call a converter, and you can put in ink. And as you probably see, there's a different
kind of color in here. It's a Sepia ink
instead of black. Alright, came. Well,
that's for the materials. Do we need something else? No, for now, we said, Okay, so you don't need
all these pens, of course, h. Just pick whatever
pen you have, whatever pen you like, or whatever pen you would
like to experiment with. Okay? I'll demonstrate a
couple in this lesson, but you don't need all of them. Okay, let's get started. We're going to draw
with these materials, so let's switch cameras
and get it going. First thing I'm going to do. I'm going to find
myself an empty page. We've got some nice
sketches already. Here's a nice empty page. Now, I'm going to demonstrate
the fine liners and the pen because that's
slightly different than what we've done
with the brush pen. Now, fi liner, this is a 0.31. I'm just picking up
whichever one is closest. And let's draw, again, a box. Now, you see right away
why these things are called fine liners. This is 0.3. Now, see how thin that is. Now the problem with fin is that you tend to go
towards details and notice all the details and
want to draw them because you can draw really fine
with a pen like that. We need to learn to ignore that and only draw what is important so that we can have
a real quick sketch and not get caught
up in details. Now if I pick a different
one, this is 0.5. I'm going to draw a line,
and now you're going to see that is already a bit thicker than
what we had before. Now, if you want to go worse, this is what they call a
0.05. And look at that. That goes so small. Such a thin line. This is
great for working details, but let's put that
away quickly again. Okay, now, a pen, a pen, just a regular pen is
always a bit thicker. Now if the pen is going to work, it is and there you go. And as you can see, I'm still
sketching with it. See? And that's a bit vigor, so you're not tend
to go to details. And then, well, let's
do this one, too. Fountain pen. Now, fountain pen is a bit like a brush pen. You want to work from the
top. And from the left. This way I'm drawing now. And you don't want to go
over it and smear things. Now, this is quite different
than the brush pen we used. And with this to shade, we're going to use hetching. Now, what you're going
to do is just pick your favorite pen and just
start practicing a little bit. And hetchings just same as
we've done with the pencil. You make these motions,
and there we go. So there's nothing new and
I'm in the wrong box, really. But we're mixing colosy. And more practice we really
don't need with that. Let me get that pen, huh? Okay. And there you go. Now, let me show you one little
thing with a file liner. And what you can do with
fi liner, most fi liners, this works for now
we're just picking it up like a regular pen
and we're drawing it. And as you can see, I'm
not drawing straight. I think that's very
uncomfortable. I'm still using that
same relaxed grip. And what you can do with
a fine line or two, now, this one is hatching
like that again. You can put it on its side too. And then you need to
find the right angle. And there we go. Now that's a bit tricky, but as you can see
what happens now, you get really faint thin lines. See that? That's a difference than what we've done here when
you put it more straight. Y. Now, that should
work with a pen too, if you cut it under
the right angle. And there we go, see? With a pen that works too. And see, you get a faint. Instead of this fig line,
you get this faint. Line. And that would work well for transitioning
from light to dark. Yeah, instead of
going really dark, you could use a
shadow or mid tone. Even with a pen, you
can create a mid tone. Alright, do I want to say more? No, I don't want to say more. I think about this. No, we're just going to
go into drawing a flower. Alright, as said, we're going
to work with a flower now. This lesson is titled Things
that need to be ignored. And that is very important
with quick sketching. You just need to
ignore certain things. Okay, I'm going to
get the flower. We're going to use a
chrysanthemum today. Now, there will be pictures in the book of notes
and references. And we're going to
work with this. Now, if I put this a bit
closer to the camera, you can see there is a
lot of petals on here. And if you look in the heart, you see, even the heart has
some different things in it. Now, with a flower
dye like this, it is very easy to
get lost in details, and we want to prevent that. So what we want to do we want to do a quick sketch of the flower, so we have to ignore
some details in it. Alright, let me switch to the
camera and work with this. Okay, we're back to the pencil
now. Here's that flower. And what we've done before is we create that construction box, remember, to find the circle
because this is a circle. But now I look at this flower
and I see actually one, two, three, four, five, six layers of petals. That's going to take a while. What we're gonna
do we just want to have a quick impression
of this flower. Now, what I would do with this flower and I'm
going to draw it here. I'm going to first of all, get my box and say, I
want my flower, and I'm going to try and
get a bit of a square. I want my flower to
stay in this box. Now, for you, you can do I want to find the
middle. That's for sure. There you go. So I
want to go the middle. Now, we can draw
the whole circle and the whole construction as we've done in the
previous lessons. I'm not going to do that. If you need to do
that, please do that. Yeah. Create the construction so that you can create a circle. What I'm going to
do, I'm going to create that outer circle first. That is the more easy circle. And then I know roughly where
I want my flower to be. And now I notice I don't have a perfect square so I extend
my square a little bit. All right. That's
the first layer. That is the outer layer and
I'm going to just keep that. Now I'm going to do
the inner hard layer. And I want that inner
hard layer there. The next thing, what
I'm going to do, I'm not going to draw
all these petals in. That would take a long time. But what I'm going to
do, I'm going to give an impression of these petals. And I'm going to start with the first let's do
that layer around it. That's a bit like
this. There you go. And what I'm going to do next, and I'm going to look
closely to these, and I'm going to draw
that in like that. Now, again, if you
need a circle first, I'm going to let me demonstrate
it on the outer circle. So I've got the outer circle. And what I'm going
to do on that, I'm just going to
make these petals. But give an impression of
these petals and here too. There you go. That's my
impression of these petals. Now I'm going to do
that inner circle here. And that's my impression
of these petals, and I'm going to put in between, definitely
another layer. And that's it. Now, when
I want to with the pen, I can add in this
case, with the pencil. Now I'm going to add some
lines just a bit random. But I'm following
more the pattern. So this one would go straight. This one would go
under an angle. This one under an angle, this one would go
straight again. Yeah, following the
bit of the pattern. And there you go. Now, that is my quick
impression of this flower, see? And when I'm going to work in pen with this and
erase the rest, then it's going to look
like a pretty flower. All right. So what I do next, I'm going to leave this
here as an example, and I'm going to
draw another box, and I'm going to speed
this up this part, and quickly redraw this again. Okay, so now I've got
two of these flowers. And what I'm going
to do with the one, I'm leaving one as an example, and the other one, I'm just going to take a pen, and
I'm going to ink it. Alright? Let's do that. Okay, I'm going to use a
regular pen for this one. I'm going to leave
this example as this. I'm going to do this
one. I'm going to start with the heart.
I need a flower bag. I'm going to look at the
heart. Now, the heart is all very little hairy things. So I'm going to draw all these little hairy things
in and then around it, it's more like some circles. And I'm going to bring that in. There you go. I might go
even a couple outside. And that's it. All right. And now I'm going to
draw in the rings, following the pencils, but keeping it nice
and loose, you? And do the second layer. Oh And the last layer. Now I'm doing free
layers only to just quickly show this is
a layered flower. As you can do, it's more almost becomes
scribbling like this. And now I'm going to
put in these lines Okay, and now the outer lines. And I've got this flower gone. All right. And there you go. Now, that is nice, and that is pretty, but
it's a bit flatter. We got to shade it a little bit. So before we go to shade it, I'm going to erase,
first of all, all the pencil markings. Okay. And there goes the brush, and there we go.
That looks great. All right. So that is
this flower from the top. Now, it's a bit flat. So what I'm going to do
get that pen back. Yeah, there it is. And
what I'm going to do, I'm going to add some shade and especially in let's
call it the valley. So we have the petal and then
there's a petal under it. And in these triangle parts, we're going to add our shading. And that shows by doing that, I'm just coloring it in. I'm not hatching or anything. I'm just coloring it in. And by doing that, you
get the idea right away that there's a little
bit of depth going on. I'll leave this
flower alone for now. Now, with a fine liner
or a fountain pen, this whole process would
be pretty much the same, just to show you can
create something pretty with a regular pen, too, and now even
on the outer ones, let's just add that to it. Okay, and there we go. All right. I'm thicken some of these
petal lines a little bit. And there we go.
Now, look at that. All right. Now, we could
do shade a little bit. We could say the sun is
coming, let's say, from here. So opposite would be
shaded a little bit. Or let's first of all, add then some shade around here and on purpose
only on this side, okay? Not on that side. Even a bit thicker. And
what we're going to do now, I'm going to hedge some of
these petals really quickly. I'm just following I'm just
doing a straight one now. See, but a bit following
the contour, rotating it. And there we go.
No more like that. But now we need to do these two. And I'm just using a
different angle for these. There we go. Alright, and let's add then some
shading in the heart, too, and there we go. Now we just need to
do the outer ones. The light comes from here. So these would be shaded. And might thicken some of these lines, too. Okay. I'm going to
go uptill there. And there we go.
There's a flower and what I want to do
with these down here. I want to cross edge these a
little bit to give the idea that this is a deeper shaded one so more on the bottom
than the other one. And there you go.
I'm not going to do more on this
just a little bit. Here, and there we go. And there's a flower
from the top. Alright, so there's this
flower from the top. And but ignoring all the lines, the depth parts and
things like that, just quickly putting it in. Now, you can keep
on going with this, but this is good. Alright. Now, to make it
a little bit more pretty, what you can do is I'm going to do it with the pen right away. I'm going to add a stark to it. And put some markings
on the stack. Sk, yes. At one side. To be a bit figcker, there you go now. Come while we're doing it. Okay. Let's do one leaf
then. Just quickly. Some nerves veins, it
were in English in it. No. A little bit of
shading down there. Bit more there, and
there you go. Alright. That's it. We're gonna leave
it like that. Alright. So there's a flower from. Now, it was from the top, but we turned it a little
bit now it's from the side. And with a regular pen. Okay,
so ignoring things, yeah? Not drawing every
little petal you see. Not every hair, not
every little part here. Not every shadow, just
a quick impression. Okay, and that concludes
this lesson, too. So we've drawn one of
these flowers with a pen. Now, you don't have
to work with a pen, although I would challenge
you to just take a regular pen and have
some fun with it, too. You'll be surprised what
you can make with it, and a pen is often accessible. Wherever you go,
there's pens and paper, and you do good just start sketching away wherever you are. Alright. But, of course, you can use the fine liner and fountain pen if you want to. Oh, and do some boxes, too, do some hatching,
get used to the pen, and once you're used to the pen, then move to the next lesson, where are we going to go level
further with all of this. All right. Have fun and see
you in the next lesson. A
3. Sketching complicated angles: Right. You're ready
for the next lesson. Yeah, otherwise you wouldn't. Watch this video, I guess, huh? Alright, so if all is well, you have practiced
now a little bit with the pen and are a little
bit comfortable with it. Now we're going to go
to the next level. Now, so far, we work
with flowers from the side and from the
top, and that is pretty. We even turned them from the top to the side a little bit. But not every flower
is like that. A lot of flowers are angled, and now already now you're looking at all
kinds of different angles. Well, that is what
this lesson is about. We're going to sketch
more complicated angles. Alright, what do
you need for this? You need your sketchbook,
a pencil, eraser, and stuff like that, and
you need a pen, fine liner. I'm not sure what
I'm going to use. I'll decide that when
I start drawing. Okay, well, let's start drawing. Okay, so we've got a
blank piece of paper, and I've still got
these flowers, and I'm gonna angle it. No, we're going to draw
that from an angle. Now, I've got to
look at the camera, just to see what you're seeing. Okay, you're seeing it
more or less from a top. I'm seeing it from an angle.
Let's try it like that. We're not gonna see
exactly the same angle. So what we do to
solve that problem, I'm gonna put this flower away. And I'm going to take
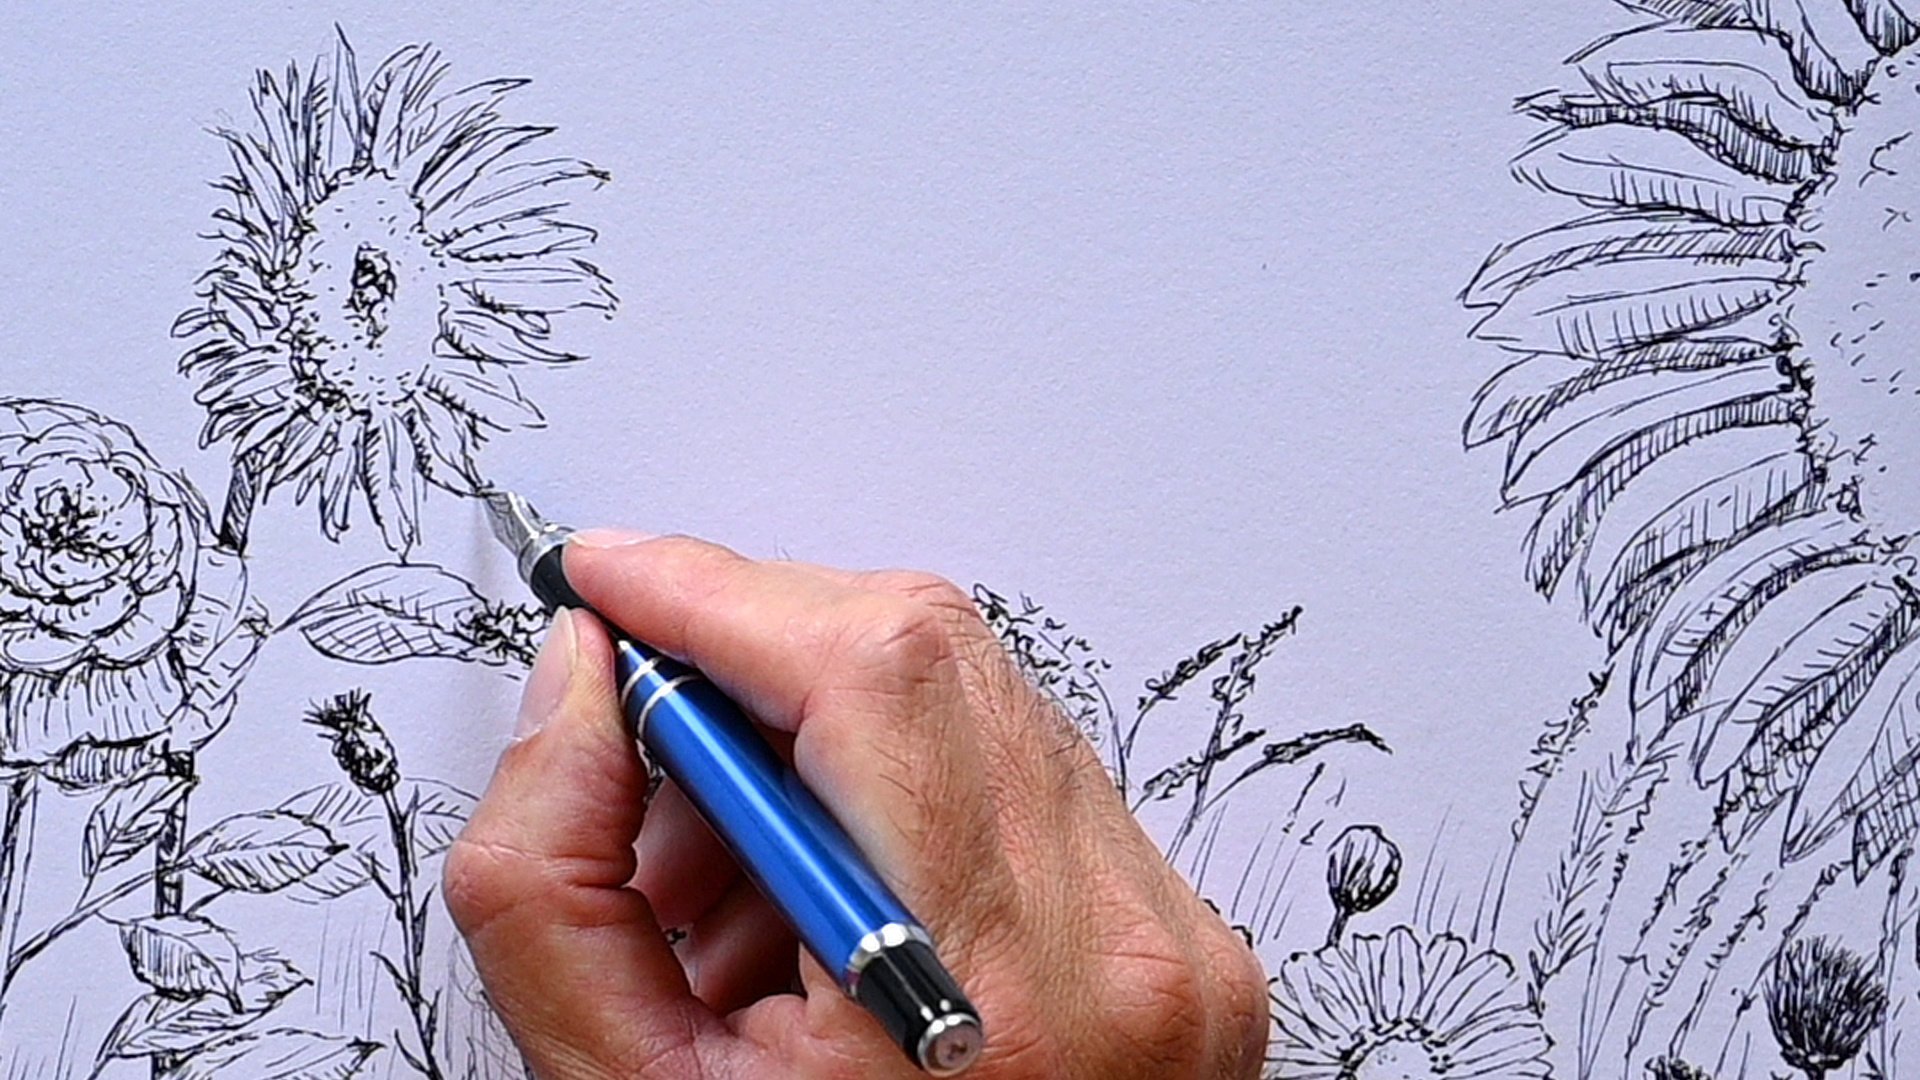
this photograph. Move things over a bit. No, that is not the same flower. That is a sunflower. Right? I folds well, you can see the
sunflower well, too. The sunflower is under an angle. It's not straight anymore. So we need to draw that. Now, we're gonna start the
same way as we've done. We're gonna draw the box around it and see
where the box goes. I want the sunflower, the total sunflower
to be in this box. And then I'm noticing
that the stalk is further away already
outside of the box, and then we have the flower. So the flower goes here and I'm going
to look at this box. I'm going to say
that is a rectangle, not a square anymore. That is definitely a rectangle. And I'm going to go for
a rectangle like this. I should fit in this flower. Now, as with every sketch, and as I said before, we're not going to do an
exact one on one copy, we're going to give
an impression. Now, if I find here the
middle, everything goes wrong. Because the heart is
definitely not in the middle. So I need to define where
I want the heart to start. Okay, so we've got
our basic boxes now, now we need to find out
where to draw the heart, where to draw the petals and look a bit at the perspective. Okay, now, perspective,
perspective can be really tricky. And what normally would
perspective would do? Let's say I would draw
something in perspective, I would draw this flower. I would use vanishing points. So vanishing points are simply, let's see if I have
an horizon line, I would put a dot on it
and if I draw a box, here's my box, then everything would go
towards this perspective. Now I have drawn my box. No, not everything
has one perspective. Sometimes you have
two perspective and then it gets
really complicated. We're not going to do that,
what would normally happen, but that will take
a while to set up. We're going to
look at the flower instead, and we're
going to say, Okay, what do we notice that the heart is definitely not in the middle. So what I'm going to do, I'm going to just guess
where the heart is, and I'm going to
say that probably the heart is somewhere here. Now, bigger, of course. What I notice right
away is that the heart is not a circle anymore
because it's angled. And as soon as you angle things, they don't look
straight anymore. Let me pack this box for you. Okay, so the box straight. And once I start turning it, you see a tar starts looking
more like an ellipse. Now it's round, and now
it's like an ellipse. Okay. We said the heart will
start about here, and I'm not going
to draw an circle, but I'm just going
to draw an ellipse. Ellipse, is it?
Yeah. No ellipse. That's Dutch. An ellipse. There you go. Not an eclipse. I know that that's
the moon and stuff, but an ellipse. There you go. Right. Now, that looks like
that part, doesn't it? Then there's the bigger
one, and I'm just going to draw a bigger one. And what I notice is that
this part where I'm looking at viewing it is smaller
than where it ends. So I might just put
a guideline there, a little bit of a line there,
and the bottom and top, I would guess they're
about the same width. So now I can draw
an ellipse in that. And get that a bit. Now, it's a bit exaggerated too far, but there you go. See? So we're guessing,
instead of doing a whole construction
with all kinds of lines, we're just guessing
where everything is and we're noticing shapes. We're not noticing
shapes and we're saying This is an ellipse, this
is an ellipse, too. And now the petals, now, what I'm going to do
these petals go there. I'm going to pick this petal
that goes there to my box. Then there's this
petal going straight, and then we've got the
petals going towards me. I'm just picking a
few random petals. Here's one there. Okay, I'm not going to do
all of them like this. I'm just going to
start with this one. This one I'm going to draw in. That is an easy petal. To a bit of a point.
There you go. Looks good. This petal,
I'm going to draw in. What do I notice? Well, it's pretty still almost
the same as that. Now, this petal here, that one I noticed that has
a bit of a curve to it. So I'm going to
draw in that curve. And here, too. So now I'm just noticing what is happening. It is a bit of a curved. It's not straight anymore. This one right here,
which one was that? Let's pick this one for that. Doesn't got back as that. That would be this one. I
want a more straight one. So let's go with this one here, that one, that will be this one. And I'm going to just add a
little bit of a fold there, and now the ones there,
just thick short ones, and then there's even some here. You hardly see, and then
I can draw in the rest. Oh, we do this one, too. That one goes a bit like that. Alright. And now we
already see that, you get this perspective
automatically. Now the rest, I'm just going
to draw in very roughly. That one here, there's
one behind there. And then we have this one here. There's one behind it. There's one here.
Doesn't go all the way. Now, what you could
have done too is draw that same
ellipse you have here, draw it in around here so that you get an idea how far
you have to go here. I didn't do that. So let's correct that and do
the same here too. We're drawing in
that ellipse, see, and then we need to cut
that one off a little bit, so that we know where
we're going to go. Yeah. So we've got the hard
ellips the outer ellips, and then we got
the outer ellipse for the drawing for
the flower itself. Yeah. All right. So
sorry about that. I didn't explain that,
but there you go. And then I know how
far these petals pretty much are going. And now I'm just drawing
in some of these petals, as you can see, and I'm
doing it rather quickly. Some shorter ones,
some longer ones, even some behind it. So in between here, too. And then I've got
to do. These ones. All right, then there
we setting it up. Okay, and there we go. I'll bring in a little bit
of a heart on these petals. And you can even curve the hearts a little
bit, those hard lines. And then you get the idea
more of a sunflower. Alright. Now, this
one definitely needs to be shorter otherwise. It looks just strange
outside of perspective. And there you go.
Now I've drawn this. Let's add some petals quickly
behind that, alright? Okay, so now I've drawn
the flower itself, and now I need that stock, so I'm going to
work on that now. All right. Well,
stark is about here, goes all the way there
and goes straight. It's a bit thick. Not that thick probably, but
that would work. It has some markings on it here and there and
here. There you go. Make it slightly more
interesting, and that's it. No, that's about
the idea of drawing something from a different
angle, you know? And we could spend a
lot more time on this, but yeah, we're going to add a little bit
of these edges to it. And in here, create a
little bit of a black part. Now it looks more
like a sunflower, and we need some petals
in front of this. Alright, good. Okay, so
that is the sunflower, at least a quick impression
of the sunflower. And now you get an idea how to work a little
bit under an angle. But let's not stop here. Let's do the original flower
we had the chrysanthemum. And let's try that one, too. So it's back. We're gonna
do that under an angle. Now, a pretty angle for this is like where we're
looking at now. And it would be a bit
more like this for you. That would be a nice angle. But I'm going to tilt a little
bit so I can see it good. Now, the same here.
Now, what is close? Now, it works a bit different. So if I look at it, I
have here the close part, and the further away is indeed a bit larger because
it's further away from me, but slightly larger,
but not too bad. And this is not a
circle anymore, but I'm drawing that. It's more like this. This shape it becomes now. Yeah. Then you add some
dimension right away. The sunflower had a hole here. This one, not this
one comes out. And I'm just gonna do that. And that's the first shape. And from there, I'm going
to draw the outer ring. I'm going to say, first of all, how big do I want it? I'm going to just draw a line
I want it about this size. And then this is going away a little bit, and there you go. Now, you could have
drawn the box around it. I'm going to look at the bottom, and I'm going to correct
that a little bit. This will be my main shape. Now, what we've done in
the previous lesson, we're basically
going to do again. I'm going to add all
these markings to it. That befriends me from going
into all these details, all these little petals. No, I do want this quickly. Now I need a second one that's
going to go around there. And then I'm going
to need that third one bit further away, and that's what I'm going to do. Yeah, free layers I'm
going to do like this. And on these layers, I'm going to get these
edges of the petals. Hands. There you go. And as you can see that
goes rather quick. Now, and I'm going to draw. Stop behind it. Angle
it a little bit. Let's do. Just a
little bit of a leaf. Which one I'm going
to pick DT one here. It's a nice big leaf here. Let's go for this one. But I'm going to angle it a
little bit with the flour. Pat the stalk goes like that. So I'm going to angle this
a little bit with and I'm going to give a quick
impression of this leaf. And I'm trying to
follow with the lines, this angle, narrowing it down. See that? That looks good. See? You could go bigger leaves, but this looks pretty good. Small like that. Alright, and
that would be this flower. Now, we just need a couple of
lines in it for the petals. And make sure you follow a
bit of the contour around. So you got to imagine that a little bit how this
would go or just look at it very closely and try to
determine how it all goes. And there you go, see? And that is how you draw
a flower under an angle. Alright, now, I
understand that is all easier said than
done, probably, so that is why you need
some practice with this to get this into the fingers. We say that in Dutch,
get it into the fingers, then you really have mastered
it to speak like that. But I'll show you a
little bit of a trick you can use for this
to help you out. Alright, let's go there.
Okay, so I've got this now. I'm not going to shade. I'm not going to actually use the pen. Yeah, I just while I'm talking, I'm shading just a little
bit to get a little bit of an impression to show you
what I actually would shade. There you go. Now,
that looks already. Much prettier. I
wouldn't do that side. I only would do the side
that's closest to me, add some lines here
and there. All right. And then get some impression
of some darkened light. We do that on the back too. And let's do this. All right. Okay. There you go. Now, it looks pretty good, huh? Okay, well, quick
sketch of this flower. Now, to practice what
we've done before, but in perhaps a bit easier way, what you can do is you
can take the photograph. What I'm going to
do is I'm gonna put the photograph here, yeah? So you actually have to
get a photograph for this. I'm gonna frame it. So I'm
just basically drawing right. Next to it. There you go. I'm gonna put the
photograph here. And what I'm gonna do?
I'm gonna take a ruler. I'm gonna put that. This
would be my top line. This would be my bottom line. This would be where
the heart starts. This would be where
the heart ends. And the next thing you
can do is put then the photograph down
here because let's see, this is where the star
goes, so that would work. Well, now this is
a bit more tricky, and the heart would be there. The heart would be there. The inner heart would be here. The inner heart would stop there and then put
this photograph back. And I'm sure you're already getting the idea what I'm doing. And there you go. Now, I need the
back of the flower. Put that here. The back of
the flower would be here. The petals would stop there. And do I do that
for the front, too? Definitely. Got to put that straight with that
line and in its box, the flowers, the
petals would stop. Right there. Okay, now I got
some construction lines. Now I just need to
remember. What is what? Now, I know what this
is. This is that heart, and I'm drawing in
that hard helips. Yeah, that's the first one.
Then the second heart. And drawing that
in. There you go. That's the second part.
Now, I know the petals, where they're going,
they're staying inside. This frame, the petals, then I can just let me
draw this petal in again. This would be in the middle. It goes to there. I'm doing
this now rather roughly. The top petal, this
one would go there. There you go. Now,
these smaller petals, the first ones would go there. And a bit more there
and then like that. And then there would be
some petals, behind it. And let me do this petal, too. Now, this petal,
this is the top. The other petal, I
want these petals here to go for a line two. So then we would have
this petal here. So petals there, here. And I'm doing this
very rough now. And then we would
have the petals going right there and then
the long ones under it, and there you go,
and so on and so on. You could do the same here
to measure to where they go. They go until there, put this photograph
in the frame, and it goes up till
there and not further. And then now I know
the distance of this. Now, there you go. Yeah. And you could keep on
going and so on and so on. I'm going to end that here.
You get the idea. Yeah. Right. And then the stark would
come out and that would be, you could measure that again. That would come right there, so the stark would go. Right there. Bit thicker. Okay, and I'll let you figure
out the rest by yourself, and some of these
petals go deeper in, of course, and so on. Yeah, so figure that
out a little bit. That's an easy way if
you have a photograph, just to get a bit of an
idea of perspective. Alright. Well, that's
it for this lesson. Now let me get that
flower with it. Now, this method,
what I've shown you, works for flowers that
are like this one here. Oh, where can I point that? That is this one
then on the front, but also for a flower that you would look at a little
bit like from the top. Or really from an
angle like this, yeah, all kinds of angles work. You just need to figure out the angles and where you want
your boundary box to be. Now, you could take
some photographs of flowers and just do the
method I showed you, copy these lines and then
try to fit the flower in. And once you get
experience with that, you're starting to notice angles and depth
too a little bit. And again, this is
not exact science. We're just estimating
we're quick sketching. Okay, practice this. And
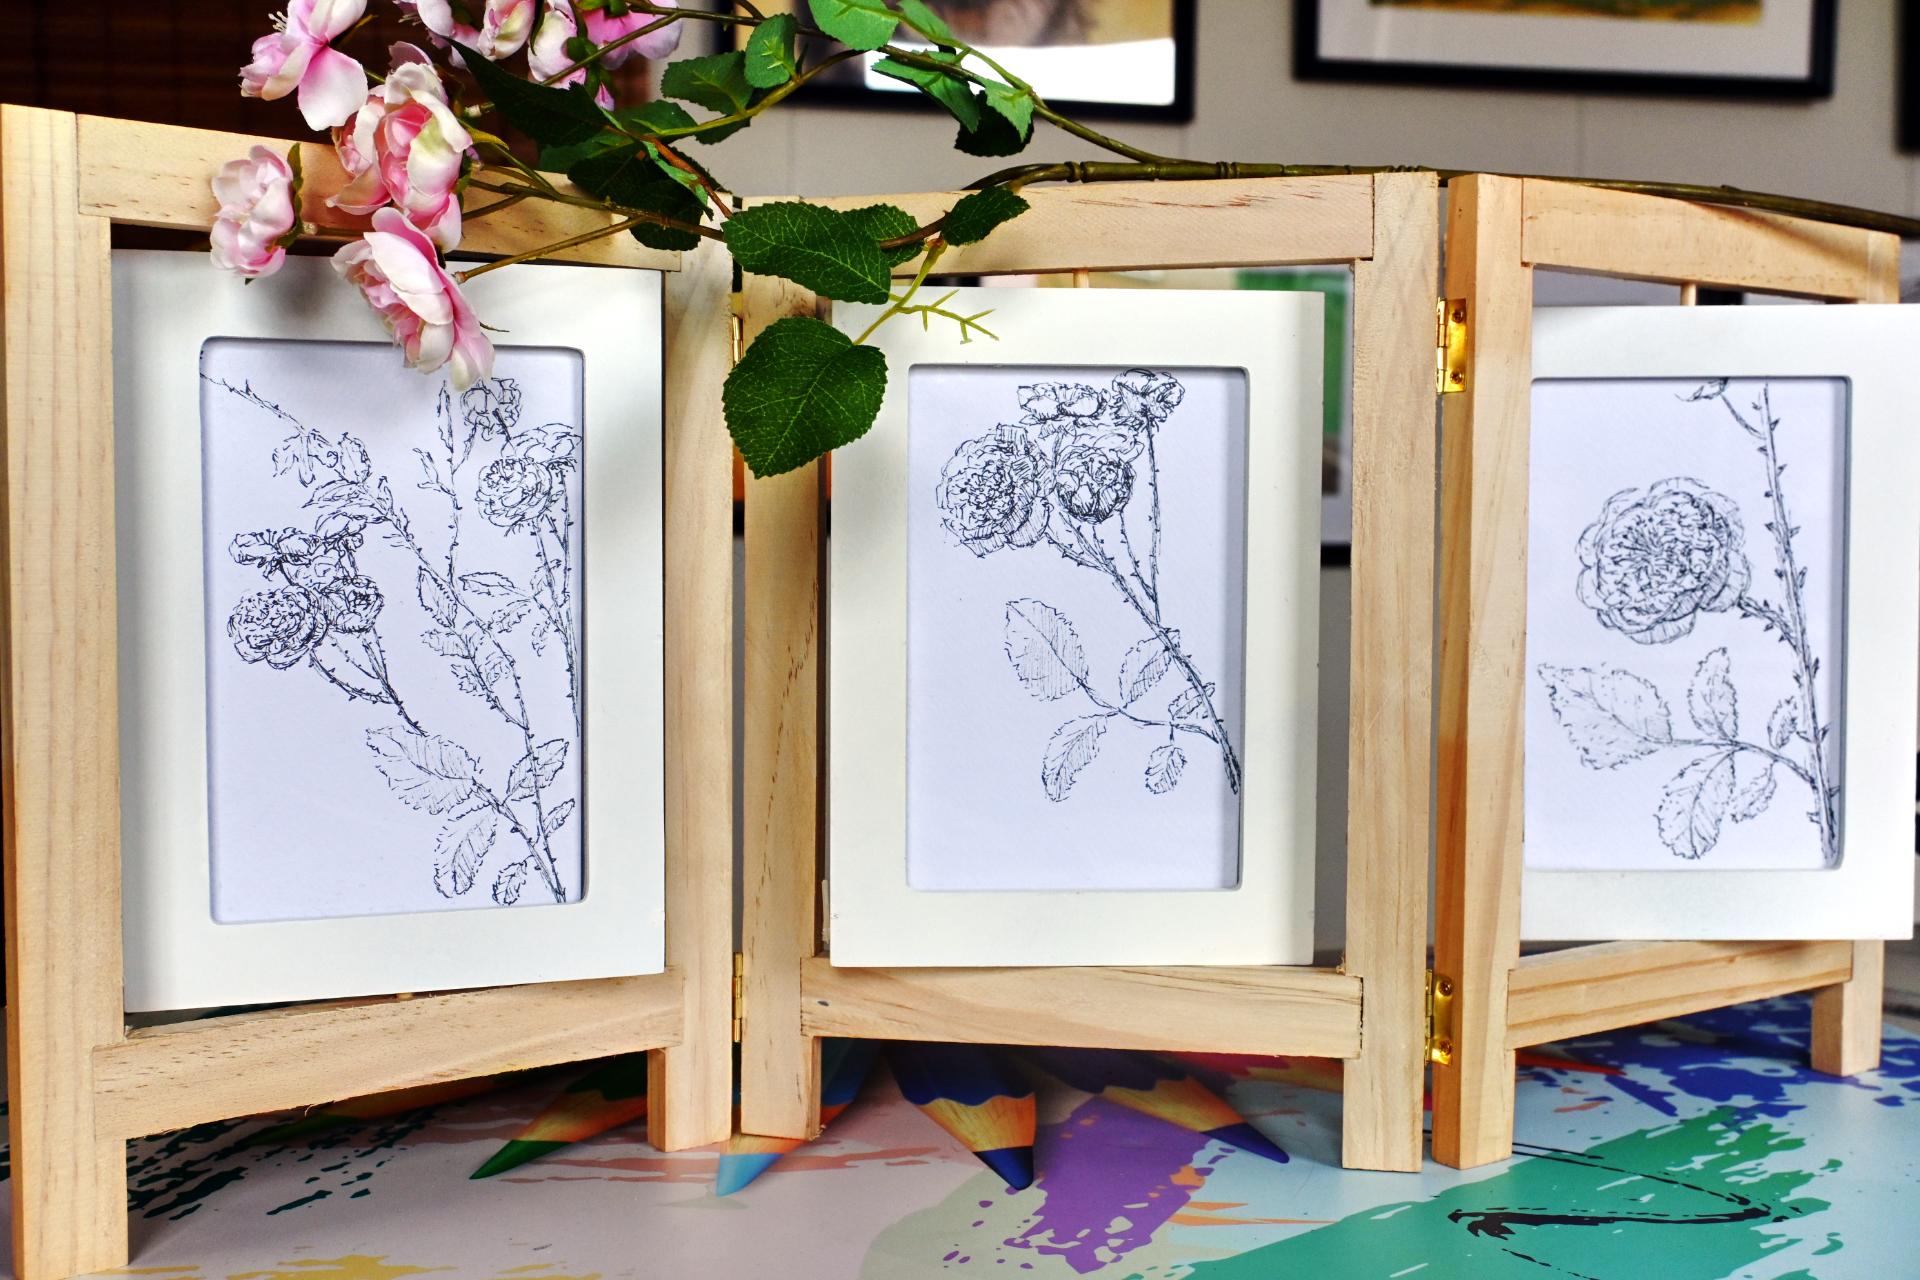
once you've practiced this, we're going on to the triology. We're going to make
three frames of the same flower in
three different ways. Okay, well, enjoy practicing, and I'll see you in
that next lesson.
4. Project - A framed Trilogy: Okay, so you've practiced
some complicated angles now. Hopefully, you've put the
flower in some positions and just played with
it. And don't worry. The more you do this, the
better you get at this. What we're going to
do in this lesson, we're going to
create a triology. We're going to create free
pictures from the same flower, but in different ways. Now, let me show you the
flower first. There you go. I've got a rose, a pretty rose. Now, as you can see,
there's a lot in this rose. We're going to do
it in three ways. What we're going to do first,
we're going to focus on only one of the roses. Then we're going to take
one of the branches, and then we're going
to create the whole. So we're going to get from
a close up further out, or depending on how
you would frame them and hang them on your wall or whatever you do with them, you could go from zoomed
out to zoomed in. Yeah, you get an
interesting effect. Now, that will become clearer
once we start drawing. Alright, what I have for that, I've got a frame like this. Now, that is very interesting. See, frame in freeways. Okay? I'm not sure if you can get it, but you can get also
just regular frames and frame it and hang it on
a wall next to each other. Play a little bit
with the composition, bit high, a bit lower, straight. Yeah. But I'm going
to use this one, and when we're done, I'll
show you the results. Now, what do you need for this? Now, you need a pencil,
eraser, and so on. Paper. But for the paper, you need the size that
your frame will be. So I just measured my size, and this is the
size I need ten by 15 centimeters,
something like that. Your frame could be different. If you don't want to frame
it, that's okay, too. Then just create exactly
the same images. Now, not images, exactly the same size paper so
that you can use them. Alright? And I've got
some thicker paper, but use any paper you have. This one got a bit of
a structure on it. It's more like watercolor paper, but use any paper you
like Watercolor paper, Bristol paper, smooth
paper, bit rough paper. Even your sketchbook
paper would work as long as you get it in
the size that you need it. And what you need, else, I'm going to use fine minus for this one. I think
that's about it. What we need for this one.
Alright, now, let's get going. Okay. I've got my paper
and I've got my flower. And I said I want to
do it in three stages. So I only need one of these
papers. Let me get this one. I have my fine liner. Now, you can set it all
up first with a pencil. I'm not going to do
that in this lesson. What I'm going to do? I'm just going to
draw right away with my fine liner, yeah. Now, if you're not onto that stage, you don't
want to do that, please by all means,
use your pencil. Alright, I zoomed in a little bit so that you
can see the paper better. I'm going to put this aside. So I want to make three images. So I'm going to start
with the first one. And for the first one, I
only want this flower, and I want to do
that a little bit at the angle I'm looking at now. So I'm going to take my pen. And what I see is I'm going to notice I'm going to
start with the heart, the heart is just Got
to hold the paper. Okay, I'm swapped it around. Now I can see the
flower a lot better. For my first frame, I'm going
to do the whole flower. So I've put it under
a certain angle. And what I'm gonna do, I'm
just going to sketch that now. If you need to set that up with your pencil and
everything, do so. But I'm going to start
with this, okay? I want the leaf with it,
and I want the flower. I got to look at the flower.
I'm gonna say, Okay, we're not gonna throw
that mini tiny flower. I'm gonna do that
pig, of course, so I gotta make it big. I'm going to start
with the heart. And the heart goes. Like that. But it has
some things on it. And now as you can see, I
am really quick sketching. Now I'm going to draw in
some of these petals, the first line of petals. Now, there's photographs of this where you can see that
better and zoomed in. So if you not see it now, right, then that
is not a problem. You can take that
photograph with it. So here's my first line of
petals. And there you go. So as you can see, I'm doing it roughly because
I want this to be, of course, a quick sketch. Now, there's more defined
petals around it. I saw one. These petals in
here a little bit more. Clear. There you go. And under here,
I'm going to give it some shade right away. And now I'm going to
do these Oh, wait. There's some shade
in there, too. Now I'm going to do
these big petals. God, I look like that. And they're going right
around coming there. Okay, now, the angle, of course, difference from
where you view a little bit. I need that second petals. And there we go. And now we need those really
larger petals around it. And definitely
around there, too. And there you go.
There is our rose. And good. Nice. Now, these petals do need some hard lines
in it, a little bit. And there you go. Now, that
would be the close up one. The next thing I want to draw is the leaf. I'm going to draw. With the stalk first that
comes from right here. There you go, and I'm going
to connect it to the stack. And I let that run here, put my paper like
this a little bit. And my light comes
from there, obviously. All right. And bit on the
bottom, there you go. And now I've got that
first flower in. I want some shading
under the petals. Where they overlap. Other parts. Not on there, really, only here. And there, too.
Now, look at that. Good. Bit more shading there. Now, it would be really
tempting to do a second flower, but as I said, I wouldn't
wouldn't do that. But what I'm going to do is I'm going to do that leaf there. And when I let that come out
and what I'm going to do, I'm going to do basically
this leaf here, if you can see it
well, that leaf. But what I'm going to do, I'm going to let it go around here to fill up the empty space. So I'm going to not go all
the way to the bottom. I'm leaving a little
bit white there. And what I'm going to do
I'm gonna do it like this. And now I'm gonna
throw that leaf in. And that leaf has a
lot of checked lines. And there's my leaf. Now should've gone a
bit rounder probably. There's my other leaf. There's the leaf
coming towards me. And then there's a smaller
leaf and a smaller leaf there. Get that jagged line
in. There you go. That smaller leaf into
here a smaller leaf. And now I just need
that last leaf in following the
contour a little bit. And there you go. Now,
some of those fins in Two lightly here too. And look at that.
Now, there's my rose. The first one. Needs
some connection there. Needs to go there. So
connection there. There you go. Now, to make it a rose, we need some ferns on it. Even on the big star That's too close to
the edge, most likely. So they are there, but you probably can't see them. Now, what we're going
to do with this one, I'm going to extend that
up shade it on one side. Some forms on it.
And there we go. Alright, so that
is. The first one. Don't fall. Stay
where you are. Okay. Now, you could do up here, for example, make it
interesting. Do a branch. And do a little bit of petals, get the idea, see, that
there is more there. And now I'm calling this done. Alright, let's see
about the shading, at least for the drawing. Now, for the shading, my light comes from here. Then I'm going to shade
this very lightly. I'm hardly touching it. And as you can see, I'm
using hedging to do that. Trying to follow a little bit of the contour now here a bit stronger to get a nice
depth effect here too. And there, too.
Now, look at that. That looks very
pretty, doesn't it? Some shading around there still. Thicken that a little
bit, and I'm going to let the rest be basically more or less
be in full light. Okay? The branches. And the branches, not the leaves, I mean, okay? Light comes from here, so this
leaf turn my paper around, I would lightly shade
this and shade that part. Now, that's nice. Same here. Shade this. Lightly
shade that part. This one I shade all the way. Since it's under
there, this one, half again, and this
one goes very lightly. And there we go down here
a little bit. All right. And that would be
the first rose. Now, a few more thickened lines. Under there. All right. And that is a pretty
rose, isn't it? Good put some dots here
and there to make it more. Just a bit lifelike,
but that's it. Okay. Alright, so that's my drawing. At least that's the first
drawing of the close up rows. Now we're going to
do three of them, one of the complete one, then one of a branch. But I'm not going to
draw all three of them. Yes, I am going to draw
all three of them, but I'm not going to
demonstrate all of them. I'll leave you to
figure out one, and I'm not even going
to show it on camera, but it will be in the book of notes references.
There it is. Yes, I'm going to
show the result, but I'm not going to take
you through it step by step. I'll let you figure
that one out. But what I do, I will
do the whole of it, and I'll do that right now. Okay. So I need to sicken paper. And I need I've got
that paper, right. Now, the paper is on camera. The whole rose, as you can see, I'm not going to get on camera. So you just more or less
see me drawing this rose. I want to put it in
the position I like, and I like it this way. And what I'm going to
do, I'm going to start, put it closer again. Perhaps you can see
a little bit of it. Yes, you can see a little bit. I want to start with
that same rose again. But now, of course, since I want only certain part, I'm going to draw it the heart. A lot smaller. And
there's petals coming out of there and there's petals
going out of here again. There's petals behind it. And there is petals right there. Okay. And I'm going to bring in some larger
petals right around it. There you go. And now I'm going
to do those large petals. And as you can see, again, we're still quick sketching. So this goes rather
quick. And there you go. That would be the impression
of my first rose. All right. Now, that is
a very rough impression. So now I'm just
putting it right away some shadows here and there so that I get some
definition here too. And I want to signify
these layers. The rose is layered
and by adding just some shadow at the
bottom of these petals, you get that whole idea
right away from layering, see? All right. Good. And that's it for this one. Might do some
shadow in a minute. Okay, now I see the next one. Right behind it on top of
it, there is one here. But that one is in quite
a different angle. And there we go. And it has that leaves coming
out. There you go. And I can see the heart in it. Alright. And there needs to
be something in the back. Now here, too, on some
of these overlaps, I'm going to do some shadow
right away. There you go. Now, this one goes. Like that. This one
goes. Like that. And now there's some more
behind it. There's one here. That is a bit sued
squished squished in. And as you can see, I'm tackling this one
slightly different. I'm going with the
outside first, and now I'm moving to
the inside. Alright. And I need some there. And there I go.
That's my next rose. And I'm going to connect
them right there. This one goes in the middle. And there you go.
I need to define that heart a little better and I need to
do this a bit dark. All right. That would
be the next one. Now, there's more in
it and what we can do. We can play a little
bit with this. Do I want more or do I say, I like this and I might
just do one here. No, we'll keep on. We're
going to do these leaves. We're drawing this
stark that is here. And let's see.
There's one behind. There's one on top here. Goes there. There you go. And that one is quite
different from the angle. See, now I got pretty
much all the angles. All right, so now
I've got the rows in different angles,
looking right at it, looking from down under, and some squeezed in from the
side, all kinds of angles. And that makes a drawing
very interesting. Okay, let's continue this. And there we go.
I've got my roses. And there's one in
between, I notice. I'm not sure if you
can still see that. Probably, there's
one in between. I'm just gonna squeeze
that in a bit like this, give an impression of
that there's a rose, and that is See, it. That's it. Just an impression and then get start going and not
define that anymore. Alright, now, as I've
done with this one, I probably got to extend
these leaves a little bit. And let's do the
fans on it first, L. Then I need to define this a
little bit better. Now, it looks like
a pretty rose. All right. And what I'm going to do now, I'm going
to look at this one. So I had this one,
this style here, so around here, I
would say around here, I had these leaves, and I'm going to basically
do them different, let them come here and I'm going to start
doing the leaf first. This leaf, I'm going
to draw right here. So I'm going to take
that middle part, make these edges
that's the first leaf. And then there's
that going here. Then there's a leaf towards me. There you go. Then there's
that leaf going up, but I don't want it to go up. I don't want it
to go towards me. And then there's that leaf. Back there, and I'll
let it go behind. It's going over, but I'll
just let it go behind there. There you go. And then there's
this small leaf. And I'll let it go behind too. Now, look at that.
Nice composition, huh? Alright. Some of
these veins in it. And that would be
this one. All right. Now, I got it thicken.
That a little bit. VienTh a little bit. A little bit sense of shadow. There you go. Now, let's see. Look at this. Now, the light
we're keeping the same way, so I'm going to just
barely hatch this. And I'm doing one side of
every leaf I'm hatching, except for this one, but I would have the full
light more here. So I would hatch two sides in. There you go. Now, that's nice. Okay? And now I'm going to
do some of these leaves. And there's a leaf
there and this one. I'm going to do a
little bit thicker again and add a little bit
of shadow, and that's it. Alright, now I need
to look at this rose. Going to do the shadow there. We're getting pretty
advanced with it yet. Just a little bit of shadow, and then we should be
done with this one too. That's in the back. That's
getting some shadow. What I'm going to do with
this. I'm going to give a bit more shadow on purpose
to show that's on the back. Now, the one that is under there, I'm going
to leave like this, but this one, I'm going to give just a little
bit of shadow. And that leaf especially to make it look a
little bit better. Now, this one would
be all in shadow. Let me do the contour
first, a little bit better. And now stark more clear. And now let me carefully in
one go, crosshdge that one. Alright. And the rose
I'm not gonna do except for on that bottom, a little bit. There you go. Now, good. Alright, so that would be my second
impression of this. Alright, so I'm
done with this one. Now, let's take a look at it. And you can clearly see that
the focal point is up there. This is all a bit more faint, and also what is in the
back is a bit more faint, and that is on purpose because if you play a
little bit with dark and light and put more pressure where you
want the people to focus, that is where they
will focus because the darker parts will catch
your attention right away, and later on, you see
the lighter parts. Alright. Well, that
concludes this one. Then there's one more left, but I'm not going to
demonstrate that one. So I'll show you that
when I'm done with it. Alright. I'm done. Here is my total overview. Now, as you can see, if
you compare the two, I left out some details
because with quick sketching, I don't want to spend hours
on doing the whole thing. So I picked the main
important part. I also brought in a focal
point right here and a little bit there so that the viewer has some interesting
things to look at. So, now I've got three of them. And all has left to do
for me is to frame them. Now, the important thing with quick sketch to remember is, don't go into the details, only do the important stuff, which makes for a pretty quick
sketch, a pretty picture, convincing yet not overly detailed and spending
hours on it. So this is the complete flower, and there's way more on it, but I just picked the
most important parts and drew them on these cards. Now, there's only one
thing left for me to do, and that is frame them.
So let's do that. Okay, I framed it, but I'm not sure if I can get the whole thing
on camera. Why can. Nice. Well, there you go. There it goes from. Away.
So totally zoomed in. So this is what our
triology looks like. Pretty, isn't it? Okay, well, and that concludes
this lesson, too. So I've demonstrated to. The third one is up to you. Now, the photos are
in the book of notes. You can pick a
different flower, too, if you want to, but just
create something pretty. Yeah, this is a
nice frame to have. You can also use
loose frames and hang them on the wall or put them in these picture stands. That is totally up to you
what you're gonna do. That concludes this lesson. We're done. I've
got my triology. It looks really pretty. So now it's your turn to create something
beautiful. Enjoy.
 Benjamin A, Art Teacher, illustrator Art by Benjamin