Transcripts
1. Introduction: We're going to do some
quick sketching with pens. We're going to make
beautiful things. But I can hear you say, Help, I've never drawn before. Great. That is what
this module is for. We're going to start
with basic steps, and you see me holding a pencil, and that is what we're going
to use in this module. I'm going to take
you step by step through everything that
you need to start drawing, to start quick sketching. Now, we're not going to make
detailed elaborate sketches. We're just going to
make quick sketches. But for that, you
need some basics, and this module will cover all the basics. So what
are we going to do? We're just going to
start very simple. We're going to draw a box, circle, flower from the side. Flower from the top. And
Galla turn that page. Once we've done that, we're going to look at some shading, how to shade with a pencil, and that is very
valuable for later on, when we're going to
shade with a pent. And once we got that
information down, we're just going to create
something pretty together. We're going to do a graphy
sketch just like this flower. Yes, after one lesson, you're going to have this
beautiful flower ready to go. And this is the base for what we need later on when we use pens and create something
even more pretty than this. Alright. Well, I would
say let's start drawing. So I'll see you in
the next lesson.
2. Taking the first steps with a Pencil: Welcome to this lesson, taking the first
steps with a pencil. And before we're
going to get into ink and learn to draw with that, we need to learn to sketch a little bit
with a regular pencil. Now, let me show you
what you need for this class, this lesson. You're going to need, obviously, pencils, regular pencils. You can use any cheap
pencil you have. You can use fancy pencils,
whatever pencil you have. You can use these
things, clutch pencils, the cold, and there is graphite in it if you press, and
hopefully it comes. There it comes, yes. Now,
this is a two millimeter one. Don't use the 0.5
millimeter one, the really thin ones because they're not going
to work for sketching. They're for technical drawing. So if you use a clutch
pen, two millimeter, and there's some advantages of this, I'll show that later. But a regular pencil will work. Now, aside from a
regular pencil, what you need is sketchbook. Sketch paper. Now,
mine has some nice, little bit textured paper. And that makes working with graphite and later
on ink very nice. So I would recommend getting
a little bit textured paper, but if you can't find that, the regular cheap
sketchbooks will work. You don't need fancy,
expensive sketchbook, I'm just using a
really cheap one, and they work great. The next thing you're
going to use, most likely, is an eraser or just something like an
eraser, pen, pencil. Sharpener, and a little brush. And the brush is, this
is a makeup brush, and we're not going
to do makeup. I'm not really into makeup, perhaps you are, but not me. And what we're going to
do with this brush is just to get rid of the
rubble after erasing. Now, another thing
you could use, if you have it, electric
erasers, great things too. You can use that. Fine. I think that's about it, what
you're gonna need. And you're going to
need a few photographs. Let me see. We're going to use. These photographs, they're in the book of notes, reference. These two we're going to use. And I've got the flower, which I photographed with it. We're going to use
that. And there's another photograph
we're going to use. That is this nice one. We're going to use
this one, too, and I actually do
have that flower, too, but I might not
use it for this lesson. But we're going to use
this to show something. Okay, I think that's about it. Yes, I think we've
covered it all. Yeah. So pencils. Yeah. That's the materials. Pencils. Now, how
do you use pencils? No, most people, if
they take a pencil, what they do, they
grip it like this. Yeah, at the point. That's great for writing,
terrible for drawing. Now, this is quite short
pencil, as you can see. Then we pick a longer one
to demonstrate something. When we're going to sketch,
what we're going to do, we're going to put the
pencil slightly different. We're not gonna hold it up there, but what
we're going to do? We're gonna take
a hand like this. We're going to rest the
pencil in it and grip it here away from the tip, further away from the point. And depending on what's
comfortable for you, either like this or
do very far away. Now, if you have a
short pencil like this, what you do instead, you top it into there between the thumb and the point finger, and you hold it like
this, basically the same. And what this does
is it takes off the pressure up the point and
gives you a lot of control. Now, if you hold it like this, we intend to put a lot of pressure, and we
don't want that. We want to sketch, take a
little bit of pressure, and slowly build up our
lines and things like that. So pencil holding it like this, if you have a short
one or simply putting it there and then
holding it like this. So avoid doing it in a tip. Now, as you can see, my
pencil is reasonably sharp. And you don't need a sharp
sharp point for this, but you do need some lead exposed. We're
going to use that. Now, the pencils I'm using
I've got for drawing. HB one, and later
on for shading, we might use a two B one or
even a four B one like this. That gives us nice shading. Okay. What you see here
is a pencil extender. Now, if they become
really short as this, that we get it out, see, I can't go with that,
so a pencil extender, you put it in there, lock
it, and then now I can. Also with this one, hold
it like this. Alright. Good. So that's the basics
into sketching with a pencil, but we're going to do some
sketching, of course. Now, this is the explanation, and let's move to
different camera. I'm switching cameras. Once
in a while you see me, and then once in a while
you see things from the top because if you just keep
on looking like this, you won't see what I'm doing. So let's switch cameras now and go to the overhead camera, so you see what I'm
doing in my sketchbook. Alright, my sketchbook, I'm going to move
some stuff aside. Let me go to my sketchbook. Basically, find an empty
page. There you go. There's an empty page in my
sketchbook. Okay, the pencil. We'll start with the
HB pencil, yeah. So I'm holding it like this now. And what you're going
to do with sketching, I'm just going to sketch a box. Now, if you would write, you would do this and put
a lot of pressure on it. We're not going to
do that. We're going to let gravity do its work, and we're going to go very
relaxed holding it like this. And we sketch with sketching, what we're going to do is we're going to make short lines, and we're going to
start with simple box. Now, with the box,
what I'm doing, I'm looking at this line here as a reference and
the top and that helps me to create a nice box. Now, that's the first
step into pencils. That's all you
really need to know. The same technique
we're actually going to use with
the pencil later on. So there's two ways drawing
and most people if they draw, let's say, I would
draw a circle, most people would start. And like that, now you see
right away what happens, you get a really thick, kind of, perhaps
even unnatural line. Now, let me draw the circle
the same again with pencil, but then doing it like this. Not putting it on its tip, but putting it bit
more to its side. And look at that. You
get a nice circle. And what I can do with this,
I can go over it a few times and create some
nuances in this. Get some stronger shaded part, some less shaded parts, and we're all going to make
use of that. All right. So we're sketching. So
no continuous line, so not like this. If I need a straight line, I'm going to start
and do like this. There you go. See?
So that's sketching, and that's all the
basics you really need to know with a pencil. Alright. And that's it. That's already it
for this lesson. So what I want you to
practice is just draw some boxes like I've done,
some straight lines, even try a circle,
although we're going to do some techniques later on to
draw a circle more properly. But the first steps into
using graphite pencils, just regular pencils
is the grip. So mainly the grip,
make sure you have a relaxed grip so that
you also draw relax. That's the whole thing. If you go tight, you're
going to draw tight. Yeah. If you hold
your pencil tight, you're going to have an uptight
drawing if you just let it relax and then
sketch loosely. Don't use too much pressure, then you're going to end
up with lovely sketches. Okay, that's it for this
lesson. Well, practice that. And once you feel
comfortable with that, then I'll see you
in the next lesson.
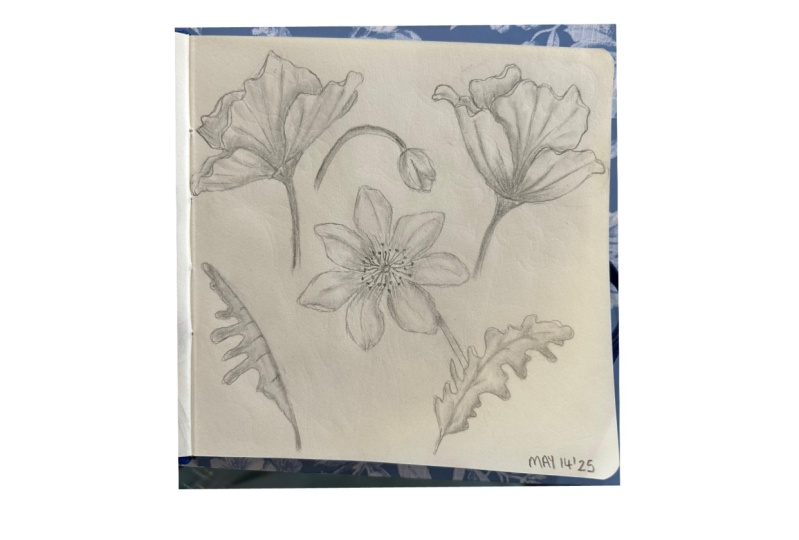
3. How to Sketch a simple Flower: Welcome back. If all is well, you have practiced the
pencil grip a little bit, and you have drawn some
boxes, some lines, and now we're going
to draw a real flower because that's what this
course is all about, isn't it? Okay, what we need for this is, then of course, the pencil. And I got to find the right one. We're going to use the
HB pencil. That's fine. If you have a to B, that's good. He. We're going to need
these photographs. These two photographs
of the same flower, but in a slightly
different position. We're also going to
need this photograph of the clematis from the top. We're gonna use
that too. And I'm going to use the flower again. And there's photos in the book of notes and references
of this flower, too. Okay. That's it
for what we need? You might need an eraser and sharpener and
things like that. And, of course, you
need the sketchbook. Otherwise, we can't sketch. Okay, so well, let's
dive into this lesson. Now, before we start drawing, we need to determine
what to draw. Now, we have here a flower
with certain elements, and we're not going
to draw all of them, at least not in this lesson. We're going to focus
for now on this one. And for that, there are some
petals we're going to draw, and we're going to draw
a stack, and that's it. Now when we draw, we need to determine how large
our frame is, what we're going to
draw and for that, we're going to switch
cameras. I'll show you. So we're going to work
with this flower, it's the same as the photo here. And what we're going
to do, we're going to draw it like it is straight, and we're going
to draw this bit. Now, the first thing you need to do is to frame your image. Now, if you have a whole
page available like this, you could do the whole page, but we're not going
to do the whole page. We're going to do it partly. We are going to
draw a frame here in which we want
our flower to stay. So what I'm going to
do, I'm going to say, Okay, say, there's a
width, there's a length. We're not going to measure
everything exactly. We're just going to be
estimating a little bit. And for the flower, I would say I'm going to
sketch my rectangle, and I want the flower to basically stay in
this rectangle. That's going to be
my flower rectangle. I don't want it to go
outside of the rectangle. I want it to be in here. The flower is a site for now. I'm going to look
at the photograph. That's a little bit easier
to work with for now, you have the same photograph. And what we see here, we need to divide our frame into two parts, the part where the
stark is going to be, that is rather long, of course, due to the flower. And we're going to need to establish the top of the flower, the petals, the flower itself. Now, what we can do with
this, we could measure this. I'm going to take
a second pencil. And what I'm going to do is
let's say this is the width, and I'm going to
measure the width, and the width would be
almost the whole pencil. Now, the height is going
to be up till this point, and that would pretty much
be half of the pencil. So if we go back to this one, our frame is now do
it this way around. The frame is this big, and I'm going to use the
numbers until the eight there. So half would be. If
this is my pencil, half would be around
here until the R. Now, you could take
a ruler for that, but that takes time,
so that is why we're more or less
guessing everything. We're estimating
where everything is. Okay, so I'm saying about
till the R is the half of it. A bit till the P.
We're going for the P, so I'm putting this one here, and up until the P, that is where my flower
is supposed to go. So the length and half of it is here and I'm going to
draw in again a line. Now I'm still making use
of the reference here of my edge of the paper and edge here to get my lines
a bit straight. In here, my flower needs to go. Now, I'm going to look at
the flower and I'm going to say this stack here isn't in the middle and I'll
show you that it isn't. I'm measuring the length till here and now moving
up till there. Stopping around here, see,
we've got this bit left. The stack isn't in the middle. So if we would
determine the middle, that would be around here, we're going to go a little
bit outside of the middle, and here I'm going to
draw in the stalk, and I'm going to give
it a bit of a curve, align like that
with a nice curve. Now, if you look at this flower, this is, of course, a silk
flower, not the real one. The real one does have a bit of a different connection here. And if you look at
photographs of the real one, you're going to get
a little bit a pot, kind of like that, and I'm going to draw that in. That's where the connection
or not that bit here, but a bit more like that. And there you go. Now, I might as
well do the stock a bit thicker so that it looks like a real stark and not just a fin line.
And there we go. Now, you see him
make these small sketching motions
the whole time, and that gives me real control. I'm not pressing really hard. I'll just pressing lightly. I don't need this to
be a strong sketch. Because later on when we're
going to work with ink, we don't want to have a strong
sketch because that will be hard to remove because
we're going to ink over it, and then we have to
raise what's under it. And if we press really hard, that will be hard to remove. Back to the flour. Now, I'm
noticing a couple of points. This point here,
which I could draw in bit in the middle of
the starch. There's that. I'm noticing the far end here, that side here, and
of course, the top. That are the three
major points, well, really four major points of this flower. Let's
start with this one. Now I've got my baseline, so if I would draw
the baseline here, I would say this is
quite a way down. Perhaps even from
the total flower, about a third, so I'm going to guess about a third
is about there. This one, if I would
draw the baseline, put the baseline down
there, that's up top, not on half, but well
above half around there. And then the middle of this
one, that point there. This is the middle.
This is the far end. So if this is the middle
of this stalk here, then I'll divide this in two, but it's not really in the
middle, just off the middle. And I would say around there. So those are the
three major points, one, two, three, and now I'm
connecting it with that. And there is my flower. Well, bit strange weird flower, you would say, you're
right about that. We're going to
sketch in the rest. Okay, now I've got
my major points, and now I'm going to draw in the flower, and I'm
going to say, Okay, this goes up a little bit, but pretty straight, and it
has all these small curves. So I'm just drawing in
these curves like that, and now I'm going to
draw in this line, and that would be
the first petal, and it goes down a
little bit like that. And that would just be my
first petal. There you go. Now, the second petal
goes till there. It goes pretty much straight
for a little while, and then it curves
off like that. So we're just noticing
the curves, the lines, everything, and we're
roughly sketching it in. Then the bottom here, and that goes pretty
much straight down. That would be this
one and this one. We got our first part
of the flower ready. All right, let's go
for the next point. This one. Now, I'm bringing that in here. This
one goes down. So I'm just quickly
drawing that in, and I'm going to go till about, let's see, that would be
around here. This would go up. That would and this would be just adding those curves and loosely drawing
it in. There you go. Now, there's one
growing out of it, going a bit like that. There you go. And now
there's that bit behind it. I'm drawing this in, and
now you get a whole flour. Now, you would say
it's kind of boring. It's kind of flat, and
you're right about that. So we need to draw in some of
these lines you have here. Some of these folds the flower
has, but not all of them. And we're going to just quickly
draw a couple of them in, and that just brings. Now you see that shape right away to this
flower. See that? Just do here one, two, and let's do this one to like that. And this one needs
a couple here. Alright. And now fold there. Good. Now not going to
do behind there. Right. And that would be basically
our first flower. Too high. Wasn't
too hard, was it? So now we've done the first one, and we've done this one, and we've done it
pretty straight. And now, if you take a look at the second photograph
on the top, that one is under an angle. So let's try that one, too. We've got the
straight one, which is the easy way to start with. We're going to do it
a little bit tougher. So let's do that. Alright, so
we have the first one now. Let's go for that second one. That one looks pretty nice. We're going to do basically the same and draw another frame, and I might just keep it about the same size as
the previous one, but with one slight
difference because this one, and I put it under here, So the difference is this one, the bottom one
that was straight. This one is under an angle, and the star goes
under an angle, too. So we got to bring that
information over to here. Now, as we said, we're just
going to guess a little bit. We're not going to do
it totally. Perfect. And what I'm going
to do, I'm just going to bring in this
line, and I'm saying, Okay, right, that
would be this line, and I'm going to translate it. So see I'm doing that
imaginary, that line, and now it's in my fingers, and I'm going to bring it
right there, and there you go. Now, about the height
of it would be I would go outside of my
box now a little bit. But eventually that will
work out. There you go. That would be that
box, but we're not going to use the whole box. We don't have to go outside
because we're going to use that point there is
about there. So, right. That's it. Now, this starch, let's see. It's pretty much the same flour, but let's see if things moved. We're going to measure a bit.
We're measuring till here, and we're measuring
now until there, and I'm going to
make it myself easy. It's almost in the middle. So what I'm gonna
do, I'm going to do that starch in
the middle, too. And let me draw in the stack. And now the prettiest
thing is to do to go out and then bring it back with a nice
curve bit like that, something like that. Yeah,
you can make that up. Actually, nobody has
seen your flower, huh? So you can add things to it. You can take away things of it. That's the beauty
about quick sketching. You want to create a
convincing drawing. Alright, so we have that one. And I'm going to do the
rest quite quickly. Bring in that pot
again. There you go. And we're following the same
system really as before, doing a stark a little bit, noting the major points, I would say go up a bit higher, a bit lower, bring
that one around there. That would be good. And we're going to just do
pretty much the same. But as you can see, I'm
going rather quickly now. And there you go. And
you can take, of course, some more time for
this. And there you go. And now this bit goes out again. But since we're on a different
angle, slightly different. There we go. Now, bring
in some of these lines. And some of these lines here, some lines there
and there you go, All right, so that is that one. Okay, later when we go shade, we're going to bring some more
form and shape in to this, but that will be the
next lesson. Alright. That's that. So that would
be the second flower. Done rather quickly. And that's the whole thing about
quick sketching. We want to do this as
quick as possible. Now, not every flower is,
of course, from the side, we have flowers
from the top too, and that's why we have
that second image we're going to do now. And we're gonna just learn
how to draw it from the top. This one here, what
we're going to do, we're going to draw a circle. Now, I notice that this petal is a bit shorter
than the rest, but we're just going to
pretend that each petal is about the same length
or we can shorten it. But what we want to do is we
see two major things here. We see a heart, and we
see all these petals. Now, imaginary
around these petals, I could draw a circle, and right in the middle, I could draw a circle for a heart. Now, as I demonstrated before, you could draw a
circle, loose hand, but I'm going to say
nine out of ten times, if you're going to try
that, then probably your circle isn't going
to be circles like here. We need to have a
method for that. The easiest way to draw a
circle is to, first of all, imagine a box around here pretty much square as
square as we can get it. So I'm going to
draw, first of all, straight line like that. Secondly, I'm going to go down, and now I need to make sure that this line is about
the same length. So what I make it myself easy,
I'm going to measure it. And that's the length, and I need to go around there, and I'm putting it here, and then I'm marking it
there and I'm going to say, Okay, I need a way down, right. And here I'm going
to go straight down, too, and here I'm going
to go straight down. Now, if you don't have a
perfect square, no problem. As long as it is squarish. Now, I've got this square. The next thing I need to find
is the heart of the square, and that is quite easy now. If you need a rule for
this to take a rule, but what we need to do is to connect this point
to that point, a diagonal line like that. I'm going to just bring in
that diagonal line like this, and I'm going to
do the same here. And there you go. And now I pretty much found
the middle and that is there. But that doesn't
make a circle yet. Now let's start with
the big circle. If I want a circle, what I can do next is now I
know the middle, so I can divide this into
four pretty much equal boxes, and I know the middle here too. So I've got four tiles
now four squares. And what I do with
these four squares, I'm going to put in each square the same diagonal cross
lines as I have in that one. So there we go. There we go. And there we go, and that would be that. So we've got that. Now, that doesn't
make a circle yet, but what we're going to do now, we're going to look at this
line and we're going to find the middle that would
be there and just above the middle, put a dot. Same here. The middle
would be there, just above it, put a dot. Same here. The middle
would be there. We're going to put a
dot just above it, find the middle
and in this case, under it, put a dot, and now the next one
comes the trick. We're going to start
at this point and I'm going to show
you draw a circle, go up a little bit, go with a curve.
And there you go. And we do the same here, go down a little bit, go with a curve and
connect it there. And what does appear now? Yes, there you go. There is our circle. Now, of course, you could
take a compass or a tool like something
like this created, but that would perhaps
not be the size you need. So that's why this method is
quite handy and quite easy. But if you do it a
couple of times and practice this a bit,
you get handy in it, and you might be able to draw circles without having all
these construction lines. Well, back to this one. That
would be the outer one. Now, the inner circle,
we're going to say, let's say, if I would
measure this, roughly, I would say I would divide
it into three parts, and I would say about there, and I'm going to
draw a straight line there until it meets
this diagonal, draw it down, draw it down. I got a second box, and I'm basically doing
the same now again. And now here I'm going to put it around about on the half because just above
is hard to find. So I've constructed the
same as we've done before, and I'm drawing in my circle, and that would determine
where the heart goes. So petals go here, heart goes there, roughly, huh? Alright, the petal.
Now the first petal. It isn't straight, it's
just off straight, so I'm just going to put in the first petal that
would be there. The second petal would go
pretty much along this line. This one, I'm going to put straight that makes it
easy. This one goes. Along this line, this one is
pretty much off like that. That one is there and this
one goes around there. So that would be where my
petals goes and the petals, I'm just going to
look at the petals and I'm going to draw
in that shape I see. Oh, that's too far. Uh, unh unh. Now we need an eraser. Right, let's erase this bit. And now you see why
I have this brush. I can get rid of the rubble without
doing it with my hands. If I do this with my hands, I'm going to smear
all of my graphite. Alright, I'm gonna do
that again. The petal. Going in like that or need
at larger petals probably, but we'll do it for now. Leave it like this. Okay. I'm going to
extend them a little bit because this is a
heart that is not close but a bit
open. This one here. We're just drawing that
in and also a bit longer. Then we're going to do this one, and we're going to do this one. This one is pointy. And this one is slightly
pointy on this side, close to that one, but really
bulging out at that side. So there you go. And now, this one I did that might go, and we're going to
do this one here. All right. And that goes there, and this one we would need
to bring out a little bit. Now, there goes that flower. Alright, that would
be the petals. Now you could draw in a bit
of a line on the middle. And look at that.
We got our petals. This one we need to extend
a little bit like that. That one to connect them. Alright, now we're bringing
in the heart in the middle. I'm just going to
add some stripes, and now these are all little
almost branches like, and let's draw them in like this from the heart
going outside. There you go. Add a couple more. Okay, now, observe
pretty much what we see, and there would be a
clematis from the top. Alright. And that shows how to draw something
from the top. Okay. Now, some flowers might
be from the side like this, and of course, there's
different angles, but we're going to talk
about that later. All right. Okay. And that's it. That's the lesson for this one, drawing a flower from the
side and from the top. Now, that's not all
you're going to do. I would say practice
a little bit with that and find yourself
some examples, try to draw them from the
side and from the top. And there's one in the book. Of notes. That is this one. I'm going to say
on the side of it, this one is in your
notebook, too, and I would say try that one, practice with it
and see if you can draw that circle or drawing those petals is a
bit more in it, drawing the stark in
this one has a stark. And I would give
away that the heart the width of the heart is about the same width as a petal. So that would make it a bit easier. Try that
one, I would say. After practicing what
I've shown a little bit, try this one and see how
far you get with it. Okay, that's it for this lesson. We've done now some
construction drawings, and that's what
these are called. And learning this will help
us to quick sketch later on. And once you develop
this and practice this, you get good at it. And once you get good at it, you just start doing
this in your mind, not even on paper anymore,
but in your mind. And once you're
comfortable with it, we draw it in pencil, and then at a certain point, you even do it without pencil, but just go right in with a pen. Okay, well, that's
it for this lesson. Practice it, and
then I'll see you in the next lesson because
so far, it's a bit flat. We want to add some depth to
it, some shadows, lights. We'll do that in
the next lesson. H
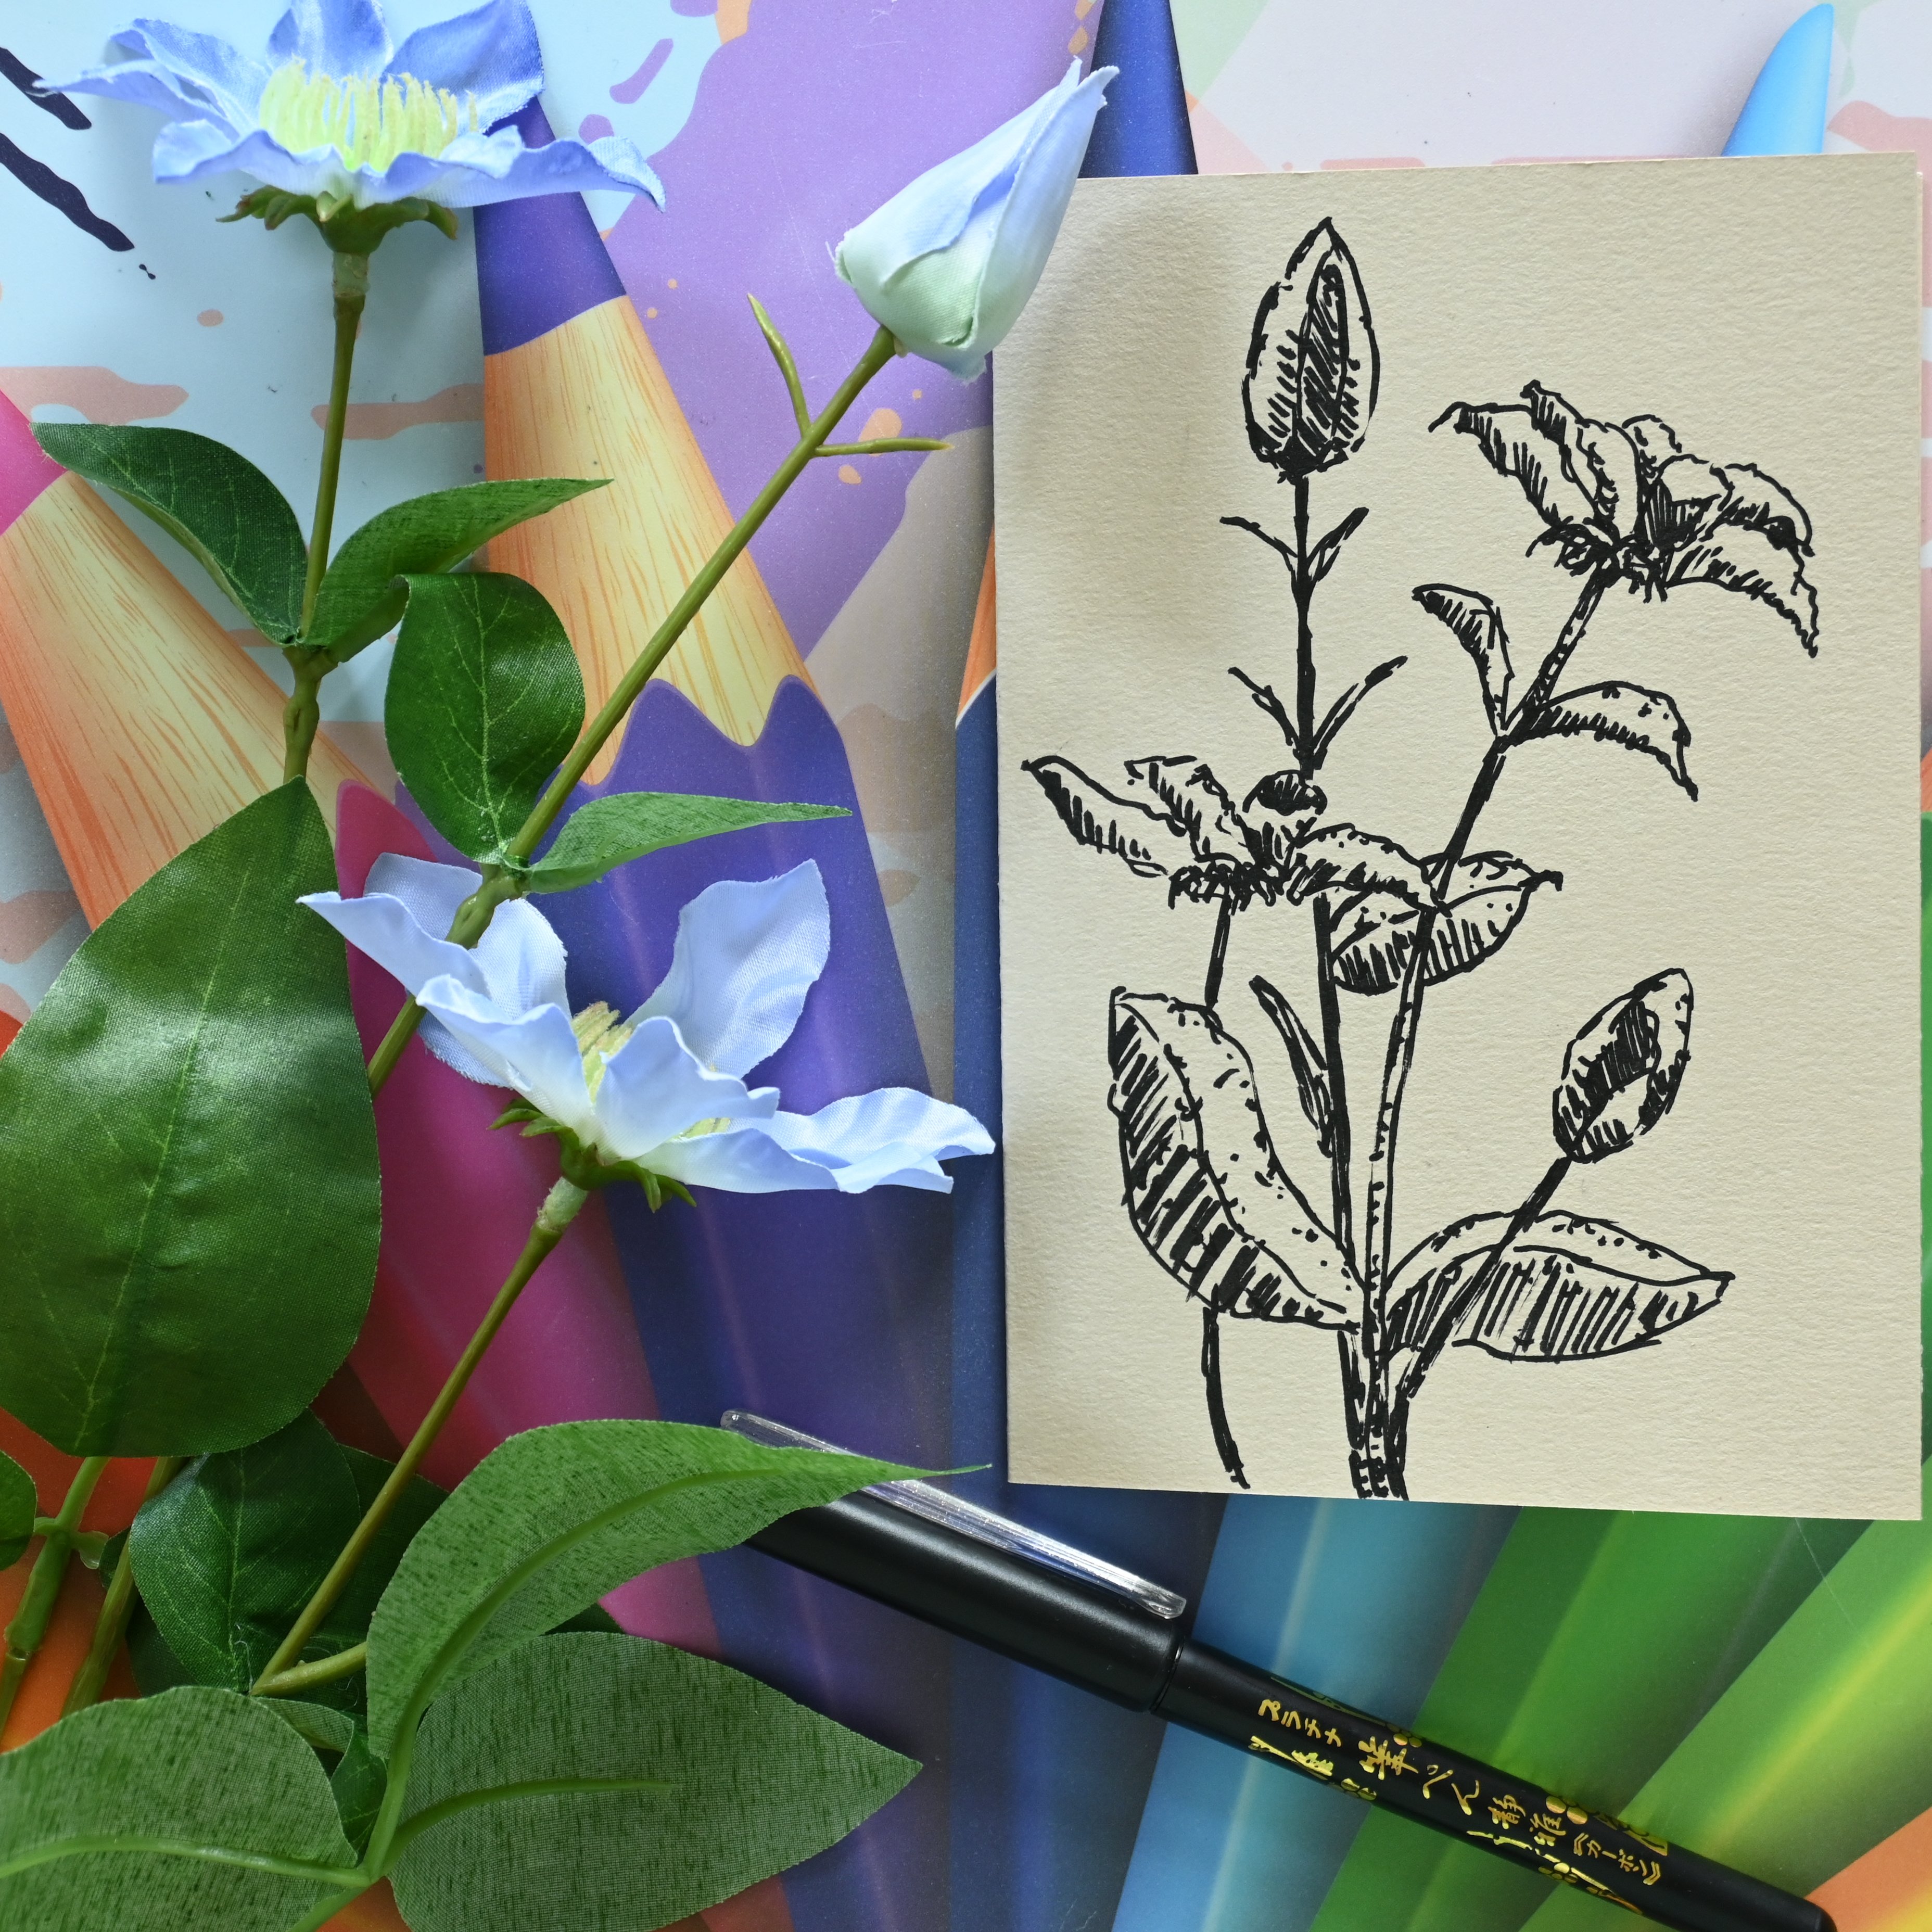
4. Two Ways of Shading: If all is well, you
get some flowers from the side now and from the top,
but they look a bit flat. So we need to add some shading that's called shading
in our terms, and we need to do
something with that. So what I'm going to show you in this lesson are two
techniques to shade. And one of them is
used in inking. A lot. But the other one is
used more with pencil, but also in inking, and we're going to
get to that later on. Alright. Shading brings
in information of depth, form, but also light and shadow. And the main thing we
want to focus on with quick sketching is light and shadow and a little bit of form. What do you need for this
class you're going to use? Pencils, of course.
Now, for now, if you have HB and a two B or even a four
B, that would be great. But you need at least
two different pencils, HB and two B or a four
B or three of them. That's up to you. And you
might need your eraser. Who knows? Sharpener.
And of course, paper. That's pretty much all
we need, and, of course, I like my trusted brush
for the rubble I make. Well, let's dive into
the world of shading. I don't need this paper anymore. I need a blank
paper. There you go. Here's the blank. Paper. Okay. The easiest way to
demonstrate shading is, again, drawing a few boxes, and I'm going to do that
with the HB pencil. I'm going to draw a
simple box right here. Not too big, not too small. Okay. Now, imagine
this is a box, you know, and there's
light shining. Let's imagine there's
the sun shining. Here. Now, if the sun shines, it cast sun rays, and they would go like that. Like that. Like that. Now, the easy thing to remember
is and it's very obvious, closer to the sun is lighter, further away from
the sun is darker. But of course, not everything
is only light and dark. There's some nuance in
it, some shades in it. So what we're going to do is the easiest thing for this box, now the first practice we're
going to do is we're going to divide it into
a couple of parts. Let's say this part is the first part where
the most lights hit. Then we're going to
go for a second part. There's less light
hitting there. Then we're going to go for a third and automatically
a fourth part. And now we have four parts. And the least light would be here and the most
light would be there. Since we're going to
work with ink later on, the easiest way to bring in that information of light
and shadow is to hatch. And that is something
what is called hatching. And let me demonstrate hedging. Hetching is very simple, making under an angle some
lines close to each other, you may have seen that like that trying to keep the
distance about the same, and you can do that with big steps and with
very little steps. Yeah. And already this shows you that if this
would be lighted, then there would be
a lot of light here, there would be less light
here and even less there. Now, a second
technique, let's say, I want this part to be
even stronger in dark, I could crosshatch and
crosshtch basically is, if I put them on the
one angle like this, I'm just going in
a different angle, and that would be
called crosshatching. See, and that makes
it quite dark. Of course, that needs
a bit of practice. I'm just doing that easily,
but you have to practice. So what you practice is
draw a box like here again. Don't make it too large and just start hetching from
the top to the bottom. There you go. Then
draw a second box. And do the same hatching again, but now bring them way closer
to each other. Like that. Now, you don't need to go
perfect from side to side. This is totally fine. And I would suggest a third box. And let's go with that one. And this one starts either
very close to each other and gradually going further away or start further away
and move closer. That's up to you, yeah. And then once you've done
that, make a fourth box. All right, four box, and just hedge and
then cross head ****, so go the opposite angle. Yeah. And do that like
that. All right. And then you have practice one, two, three, and four. Yeah, good. Okay, well, that's not all we're
going to do, of course. We're not gonna hedge,
we're going to shade two, but first we need to
do something with the first box I drawn
with the sun and, of course, hedge that a little
bit. So let's do that now. Alright. So this box here. Now, the full light is here, and I'm not going to hedge that. Now, the second, what I'm
going to do is I'm going to do the rest of them with
a very rough hedging, putting the lines pretty much
far away from each other. I need one there.
Okay, that's one. And I could have chosen a different angle. That's
totally up to you. Now the second one, what I'm going to do is I'm
going to do this again, but I'm going to
bring the lines in a bit closer to each
other like that. And for the third box
the fourth really, I'm going to do the same again, but bring them really close. Now, look at the effect of
this. What do you get now? You get a fully lighted area. You get a light an
area that is bit less, less and the least. You get a nice
gradation of this. Nice tones going from
this way to that way. Now, in real life, these
lines aren't there, but we're now constructing and we're having
some help lines. If I would do it without lines, without these help lines, I will basically
do the same again. This is my box. I'm now imagining that the sun
comes from this site. So that means this
site is not shaded, and I'm going to first of all, start with the very
rough hedging. Then I'm going to go
for second layer. Some closer hatching, and I
would go for the third layer, but the fourth section
and bring them in close. And if I want this
really to be dark, I might as well use
just a little bit of crosshatching on the
bottoms here and now that looks way better
than it did before. Yeah, you get some gradual ways. Let me do another box here. And that's a small one. I'm going to use the same
setting, but I could also, of course, hedge
roughly like that. Stop there, do a second layer. But stop there,
do a third layer, which is now going to be really close and
stop there, yeah. I need some there. Okay. Good. Now,
that's hatching. Yeah. And you could crosshatch
and do anything with it. So that's hatching.
And with inking, hetching is used quite a lot. But with pencil,
people rather shade. So we're going to
do some shading to do simple shading, okay? You can make it
very complicated, but we want to do it
quick and simple. So I'm going to
demonstrate that now. Alright, we're going to do
pretty much the same as here, but now we're going to shade. I'm moving this up a little bit. And I'm going to
draw a box here. Now, when I want to shade, shading goes slightly different, and that needs some practice. Alright, before we go to shade, this one, the sun
comes here again. Now, you could put sun there, there, wherever you want. And for shading, I'm going
to hold my pencil at the end like this because I want it
to be as flat as possible. Now, the first area I
wouldn't get any shading. And what I'm gonna
do with shading, I'm make sure that I'm touching as much graphite as I can, and I'm just going
to shade lines, not really lines,
shade a whole area. And the first layer I'm doing
on purpose with this HB, and the HB doesn't put
off much graphite, so I get a nice light layer. And there I go. Right.
Now I could do a second or third and
the fourth layer with the HB, I'm not
going to do that. Put the HB aside. I'm switching to a two B, and I'm going to take
a clutch pencil. Now, the easy thing with
a clutch pencil is, I can expose a lot of graphite, which makes shading
a lot easier. Now, a two B pencil is darker, so I don't want to do
that first bit again. I want to shade
and let's say I'm starting here, very gentle. I'm going to do the
same again, see? And that is because this pencil is quite a bit
darker, you get this. No. There you go. Now, I got a harsh line here, so I'm just going to use very little pressure and
work that harsh line away, and there you go. That's nice. Now, you can continue with this pencil and do we have one, two free the fourth part
that would be around here. And apply a bit pressure
and just and at the end, do a little bit less
pressure, and there you go. Now, that looks different,
then, because this is graphite and that works
really well with that. Okay, now I could have also
switched to a four B pencil. Let's see. Is this a four B? Yeah. And I'm doing the same. I'm holding it like this. This is longer pencil, as much graphite
exposed as possible. And if you see this one
going over it, see, that is again, I need just to
work away that line a bit. A bit stronger now, see? That look nice, see? That
makes a nice drawing. That's all there is to
shading with a pencil. Yes, you can do a lot with this and make
it as hard as you want. But this is the easy way. And
since we quick sketching. We just want it the easy and quick way and do it like this. Alright. Now, there was
a quick demonstration, of course, and I understand
this needs some practice. Now, contrary to
what we've done, make sure you pick this pencil a lot further away from
the point where you're comfortable so that you
can put it as flat as possible and as much graphite
exposed as possible. And then you can shade
in a lovely way. Now, we're not going to
expand on this anymore. This is enough and
practice this, ah, okay? Practice the hatching and the cross hetching
draw some boxes, even some circles, yeah, figure out, see how that works. Then do we did the
first ones here, practice a little bit, closer, closer closer and mix
them a little bit. Once you are a bit comfortable
with the crosshatching, I would say move on to the
shading like we've done here. Alright. Good. Well, okay, I could talk a lot longer about
this and show a lot more. We're not going to
do that. We want to have some quick
sketching, quick shading. In this case, it is quick. So I would say practice this and then move to
the next lesson, the last lesson in this module, where we're going
to draw a flower, and we're going to shade it. So everything we've learned, we're going to
apply to one flower and make a pretty flower. Alright. Good. See you in
that next lesson then. O
5. Project 1 Filling up a Sketchbook: Well, I hope you had
fun with the shading. I find shading very relaxing. Somehow, it's really relaxing
to crosshatch and to shade. Now, I understand that is
just a practice for now, but we're going to do
something with it. We're going to shade a flower. We're gonna draw a flower,
and we're going to shade it. We're going to use the
pencil shading techniques. So the bottom one I used. We're going to use that
one. And the hatching will come back later on when we're inking, we're
going to use that. So for now, we don't
forget about it, but we leave it at
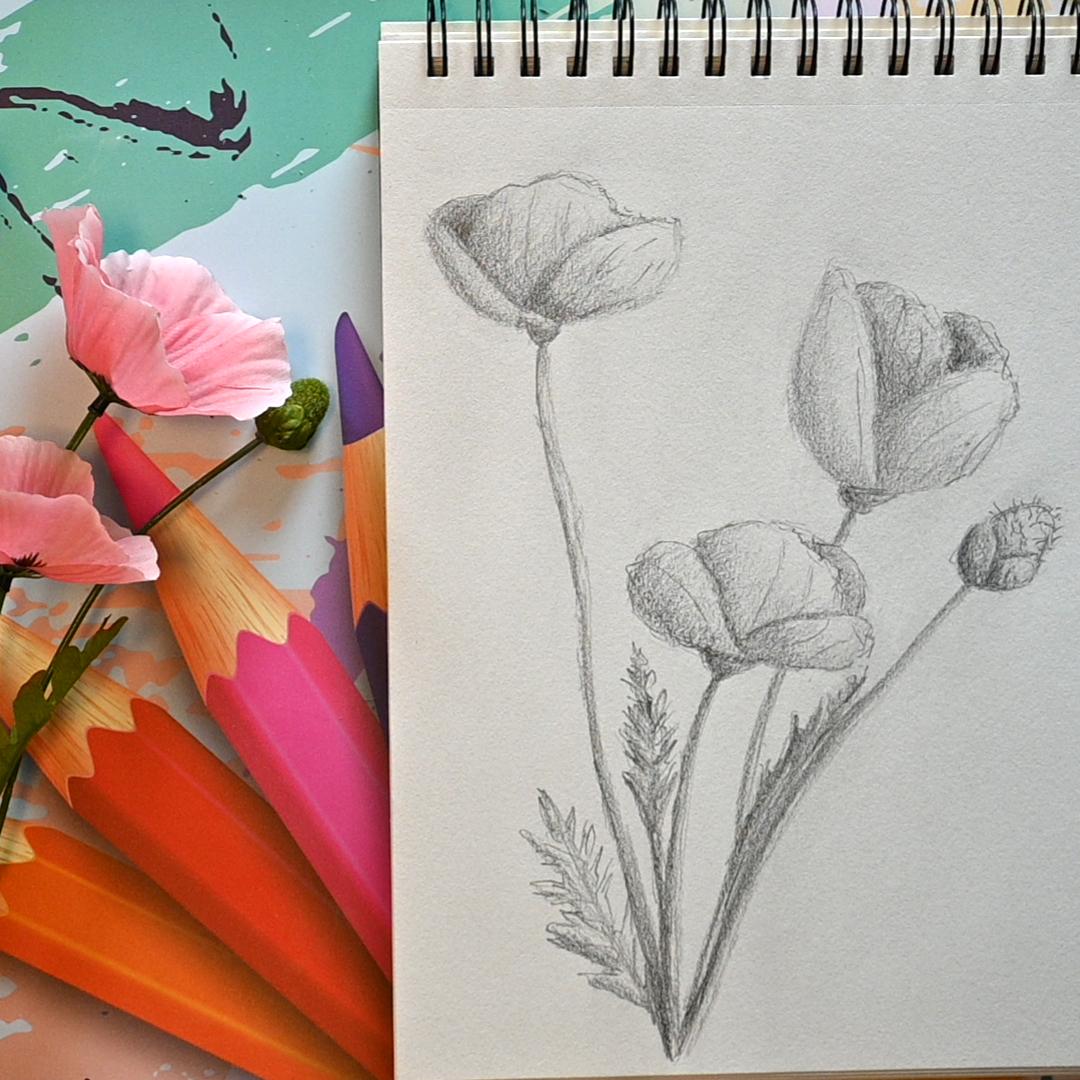
this, but we're going to use the pencil shading. Alright, the flower. We're gonna draw the puppies.
What a surprise, huh? I think you figured it out
already from the beginning. Now, in the book of notes and references, there
are photos of this, and we're just gonna
draw this yeah, we're gonna have
some fun with this. Okay. First, we're going
to set it up in a drawing. So let's go to that
straightaway. Oh, no, we can't. Hang on. What do you need? You need those
photos, of course, and you need your pencils, the free if you have two, an HB 2b4b, if you
have all free. Great. Yeah. You might need your eraser and your sharpener, and, of course, you're gonna
need sketchbook paper. Okay? We're going to do that. Now, for the sketchbook, what I'm going to do,
we've done landscape. We're going to turn it
into portrait mode. Yeah. And that makes this
drawing quite a bit easy. Alright, let's swap
to the other camera, and I'll show you what to do. I'm going to draw these
puppies on the piece of paper. I'll do it on the
landscape, sorry, on the portrait because
this is a long tall one. Now, the first thing
I want to determine, of course, is my frame, but to be honest, I'm
not gonna frame it because I'm just gonna use
the whole paper as a frame. Now, what I want to
make sure I don't want to draw all the way to the edge, I want to keep a little
bit of white there in case I might want to frame
it or something like that. Yeah. Okay, so I've
set up my Workspace. And the idea is now to fill up our sketchbook with sketches. Now, that's going
to take a while. And if I'm going to do
that in this video, in this lesson, you will have to watch me
a long time doing it. So I'm only going to do one, but I encourage you
not to do one only, but do a couple more, too. So I have this puppy. I have these puppies, and I'm going to
actually draw one, two, three, and I draw that bit. I draw everything, even
some leaves in it, but make it myself easy
and do it quickly. So I've got the whole sketch. Now, the first thing
I need to determine where all the elements go. Yeah? And how large I want them, and I'm going to
start with that one. Now, if I take this
as my main guide, this is the straight one. And now we're having
a slight issue probably because you're
looking from top. I'm looking from this angle. So it might not totally
be what you see, but we're going to make
it ourselves easy. We only want to draw
this more or less from the side and forget about all the information that
you see back there. So we want to draw this side. We'll make sure of that.
The first puppy goes here. Now, first of all, we
have the stark here, and that is pretty
much on one side and it goes out to this side.
So let's start here. Let's start with this fourth
this first poppy there, that's going to be my guide. The first poppy, I
want to have drawn, and I wanted that to
be my major guide, and from there, I'm going
to go for the rest. So if I draw it this large, that would be the poppy. And I'm using the HB pencil
for this by the way. Later on, we might raise a
little bit. Okay, that's it. Then if I look at the
second one, yeah, it's a little bit away from it, this one would fit more into a square and then
halfway cut off. But I'm going to draw square
a little bit away from it. And that would be my square. The second one I want in here. Now, then we have
this bit here that is under there and I'm
going to draw that. I want that right there. Okay. And then the next bit
is this poppy under it. Now if I would have a stalk, it would go over that stalk. Probably I would have needed to brought this one in
slightly closer. But let's go with it for now. Let's look at it and
it's going right there. It's not as big as that one. It's smaller. So I need to make sure it is
smaller a little bit. I'm going to get it into there. Right. This one is
a bit longer now. Yeah. That's good. This one is slightly smaller.
That's my element. So I now determined where all the major
elements are going to go. Now, we have here a leaf. I'm going to draw that,
but I'm going to leave that to later. All right. Good. Now, the idea
is with drawing, if I start here, draw and I'm right handed. So I'm drawing here
and move on there. Then I'm going to
smear all of this. So I want to start at the left. If you're left handed,
you want to start at the right and work
your way to the left. If you're right handed,
you want to start left and work your way to the
right, that's the easiest. So I'm going to start with this. Now, the idea is, of course,
to quick sketch this. Yeah, you practice this a
little bit with the pencil, so I don't want to spend ages and I don't want to
think too much about it. So what I'm going to do
with this first one, I'm going to say, Alright, I'm going to just put it in the middle,
and there you go. And I'm going to draw the starch in and bring it all
the way down to there. Now, that's my major shape following along here
a little bit, yeah. And from there, the
second one comes. I'm going to draw you
in the middle too, because you're pretty
much in the middle. This one, I don't know
yet where it goes because I need to determine that
because it's under an angle. But this one I can
draw in pretty much straight until
it meets up there, too, and make sure I don't go
all the way to the bottom. And then we have this one here. That goes around there and meets actually comes there
and goes with an angle, but you wouldn't see the
rest of it most likely. Alright. Now let's do this
one a little bit better. That one is under an angle. So let's remove this
box completely. Alright, and draw in an
angled box right away. Okay, yeah, sometimes
even I make mistakes. Everybody makes
mistakes, and that's why we have the
eraser and the brush. We clean up our mistake
and we just keep on going. Start over again. All right, so we're starting over
again with that one. We know it's going here. That might be too close. No it's going there on top
of the other here and there, and now we're drawing up the
rectangle under an angle. There you go. Now,
that is better. Now I can determine that I want also this bottom
there in the middle. And then we can do the line and that one goes
through it again, like bit like that. Right. Okay. Now I've got that. Now I know where my
stalks are going to go. Now I can do the
leaves. Now, let's see. I'm going to draw this leaf in. Yeah, this one, I'm gonna
probably ignore this leaf. Let's see. That leaf is on here. And goes out a little bit
bit lower. Now, let's go. Since we shorten this because I don't have the total length of
this one on the paper. So I shorten this
so I need to draw that leave a little
bit different. I'm going to put the leaf
here and I'm going to do one side of the
leaf and like that. And I'm going to
draw in that leaf, as you can see, rather,
very, very roughly. And let's see where
the poppy ends. And then the second
leaf this leaf, I'm going to not do all
the way at the bottom. This leaf here. I'm going to
bring it up a little bit. And I'm going to bring
it out slightly. There goes that leaf, and I'm going to draw that in. And then I'm turning it a little bit so we all can
see it very well. So you could draw the branches
like that from the leaf. And then bring in
roughly that shape. Okay. And that same
we're doing here. Go in front of that one. And there we go,
see, very quickly. Bit jacket, bit rough. That is our leaf. Okay. And this would be my main composition. Okay, we've got all
these elements, and now I'm just going
to fill them in. So what I'm going to
do, I'm going to draw this one and I'm going to let you figure
out these two, right? So I'm going to draw this, and I'm going to
take you through. Now, I've done this one. I'm not going to
draw the top one. Let me do this one for you because we have
done the top one. I'm going to draw this one here. Let me see where that goes. This will be the bottom. Goes from here all
the way there, and then curves back
nicely like that. Then there's one coming out, goes here, and then it
has a fold, a curve And I need to bring that
in. So there you go. Then what we're going
to do that one, the back one, I got to
lift it up to see it. You could see it easily. I can't see it well. All right. Lo going to be one from there. And then there's going
to be one there. And that is that one, right? I'm going to leave
that one like this. And then I'm going
to bring in some of these lines, these folds. And I got to lift it again, these pretty much go
down. And there you go. Alright. That's that. Okay, now, let me do this one, too for you. And I'm gonna move that
around a little bit. And I just see that
it comes around here. There's a leaf.
There's a leaf there. There's one there.
And then there's that nice middle part in it. And there you go. Okay. And that's it. All right.
I've got them now. Now, these two, I'll draw in. And once I've drawn
them, I'll show you. I'll continue drawing.
But what I'm going to do, I'm going to speed it up. Yeah. So you will see this next beat sped up
without me talking, and this is just quickly draw. I draw them all in so that
you see what I'm doing, but I'm not going to
talk you through it. Alright, let's go. I Alright, that's my drawing. Now, the next step
we're going to do, we're going to shade this. Now, same with as the drawing. I'm not going to
show you every step, but I will do one
or two elements and leave you to shade the rest, but I'm going to again speed it up and show you how
I'm shading it. Yeah, then it will
be sped up then. But I'm going to
first of all, show you a couple of them
how to do them. Alright, let's do that
now. Okay, so I got this. Now, I need to
determine one thing. Got all these stalks and things. Where where, where, where? Do I want the sun to come from? Now, the nicest thing
is just from this side. So the sun would be
here casting its sun, then some elements get nicely lighted and some get
not too nicely lighted. They get the shade. Alright, so what I'm gonna do? I'm going to do this one. I'm going to do this one,
I might do the leaf. Okay? Let's start with this one. Now, this one is
obviously, let me shade. With the HB pens I'm
doing that part behind, I'm going to roughly
slowly shade. This petal, too. I'm going
to shade this petal. Leave this a bit lighted, I'm going to shade in here. Leave that lighted, and
I'm going to shade. This part two, bit higher up. That is basically the
main information. Then, of course, this
needs to be shaded. And the stack I'll
show you in a minute. Now, to avoid that I'm
smearing all of this out, what you can do just
take a piece of paper, put it on there, cover it, and then now you can
focus on this bit alone. Alright, so I did my
first lay with the HB. Let's switch to
the two B pencil. I'm going to now pick this
contraption that should be my two B. I'm just doing the same. I'm
holding it like that. Now this is a lot longer, as you can see, so
I'm holding it here. I'm going to do now
the darker parts. Now that would be pretty dark. This one would be dark. I'm leaving that line a little bit perhaps around that edge, now here around the
edge a little bit. This part would be dark and that part would be
dark. A little more. Now with this pencil, what I'm going to do carefully, not point, but on its side, bring back some of those line which are now slowly disappear, and I want to make
sure that doesn't happen because then I have
no clue what I'm doing. There you go. From there, I'm going to shake these
lines a little bit. Just to make it
look a bit nicer. There you go. There you go. Now, if you have a four B, I should have a four B, then use it with this one, I'm going to do that
really dark part behind. Shade that shade the bottom
of this one, a little bit, definitely shade this one
there a little bit and bottom, just a little bit of that
one, maybe inside here. And that would be it. All right. Now, look at that,
see? That's nice. Going back to my HB, I want to extend this layer
a bit also along the folds, just a little bit here too. And there you go.
Now, here was a fold. Going to bring that pig back in. And with the HB, go to darken this a little
bit so that that stands out. Now, look, that looks like a lovely graphite drawing.
Done really quickly. Let me do the stark. I'm going to go to the two B for that. I'm going to get the
clutch pencil that's a bit less long. Where is it? There it is.
That should be it. Yeah. And the opposite side so
the sun is from here. So the opposite
side of this one, I'm going to draw back
in that line again. Bit there, here to down, and then carefully
shade in the rest, but very lightly so that it
becomes a bit of a stack. And away from the light. I'm ficking it a little
bit, see? That looks nice. All right. Looks good. Okay. Well, let's do the leaf. I'm gonna move that paper away. I'm going to get that
HB pencil again. The leaf. I'm gonna
not shade these parts, but the rest opposite
of the middle. I'm definitely going
to shade all of that. Hold it a bit further away. So I'm starting with
that, and as you can see, we're shading because
it's quick sketch, we're shading rather roughly. I'm trying to keep the
pencil as flat as possible, and now I'm going to
shade a little bit here a little bit there. And there you go. I'm switching now to that B pencil again. That's this one. And not
this side I'm not touching, but I want this
side to be darker. And And there we go. Now let me bring in that
hard line a little bit, and also these branch lines. Not really branches.
What are they? Nerves? Veins. That's the
word I'm looking for, right. I'm bringing in the veins. And opposite of this vein, let me make it a
bit stronger, see? Now something nice
appears. All right, see? Now it looks like a great leaf. And with the four Bee, I'm going to now shade
the bottom parts. Under the nerves.
Sorry, under the veins, they're called nerves in Dutch. That's the whole thing.
Neovan. That's the Dutch. But in English,
they're called veins. So under the veins, I'm shading, see, and on
this side too a little bit. And look at that. Now, that's
a nice branch, isn't it? We just need the HB pencil
back again a little bit on this side of the vein and
under here a little bit. So that it becomes clear. Do the stock a bit there
again and there, too. And that's that. Look at that. Now, carefully with the brush, don't go too wild, then you're gonna
smear this too. Alright. There you go. That looks good.
Now, one more? Yeah. I'll do one more. Wait,
we need something there. So the HB we're going
to do this one. Now, this one is
shaded right there. And, of course,
these are shaded. And the branch would be shaded under there would
be a bit of a cast shadow, and there you go. Okay, switching to
the two B pencil. That's my dear. This
is a bit shorter. Let's see. We want to have. Definitely. This one
shaded. Definitely. That one shaded. I want to bring in a little
bit of a shadow there. And under there, and I'm
switching to the four B pencil, let's do the bottoms
of these a little bit. I'm not going all the way up. There you go and let's do. Start a little bit, and
that's it. All right. That's it for my quick
shaded quick sketch. All right. The other ones, I'm going to do exactly
the same as before. I'm going to speed that up, so you can see still
what I'm doing, but I'm not going to
talk you through it. You have to figure
that out by yourself. Alright. Enjoy it. Yeah, it's kind of
enjoyable to watch, and then I'll be back in
a few seconds. We'll see. All right. Okay. Okay, I finished my drawing,
but not completely. We got to do one
thing about it still. So let me show you
what we're gonna do to just clean it a bit up to tidy the bit up. Okay,
I'll show you that. Alright, so mine is done. I've done some shading, so
we're the darker parts, darker parts where
no light comes, where the light comes, and then filter that
in a little bit. Looks nice, but one thing I
really don't like The boxes. We got to get rid of
those boxes, don't we? Yes, we actually do. So that. Of course, an eraser. And I'm gonna carefully
erase those boxes now. And that means I might
have to restore something. But the main the big parts, I'll do with this one. And then when I need
to get in there, really, I want to switch
to the other one. In between that, that
little box needs to go. Okay, now, let me get rid
of the mess carefully, especially with that
four B now on it. If I do this too hard, then I want to smear all
the graphite everywhere. Okay, now, what I
could do is but use carefully the side of
the eraser to do this, or if you have one, let's go for this one. That makes it slightly easier to control and get
into those small spots. And there's also pencil erasers that are just pencils
in the shape. Now, the other way around. Erasers in the
shape of a pencil, and those are very handy, too. You can just even
with an eraser. Now, what am I saying? With a sharpener,
even sharpen them. Right. Okay? Let's see. Box there, in there. A little bit, too, and I need to restore some of
that in a minute. There you go. So, cleaned
it up a little bit. No, that looks a lot
better, doesn't it? Okay, our first project
is almost done. Perhaps a little bit of
touch ups here and there. Let's get rid of this.
Ah, that's good. And there we go. Ah, right. In there? A little bit, and there's
a line I don't like, and the rest I'm
fine with. So here. Okay, good. There you go.
Now, that looks good. Now, let's go with
the HB pen up here. Carefully. Restore
that a little bit. And there are two little and around this edge
and around there. Now, with this one, I want to have
more in real life, it is this pot is a bit hairy, so I'm just going to
bring those in right. So there you go. See
if I shade it enough, and now, let's say, this one goes, but I want to have that leaf on the
line bit stronger. Now I got to see
where this one goes here and draw that one in. Okay. And now we're
pretty much almost done. Let's do this one. Right. Okay, let's see. Now
only this leaf here. Let's add a little bit
on the bottom there, so it becomes a leaf. Alright. Well, that is that. We have finished the drawing
from this puppy here. These poppies huh. We've
made a nice drawing. See? Well, you can follow this
one along pretty much, but then I would challenge
you create your own too. There's plenty of
space in a sketchbook. The more you practice this,
the better you get at it. The better you get
sketching with a pencil, the more it will benefit
you later on when we start inking and using pens and
things like that. All right. That concludes this lesson. We've got a nice, lovely project at the end
of this module. Practice this and once
you're comfortable, then it's time to go to the next module where we're
going to pick up some pens.
 Benjamin A, Art Teacher, illustrator Art by Benjamin