Transcripts
1. Introduction: [MUSIC] Hi, I'm
Elaine Vitikainen. I'm an illustrator and an
entrepreneur from Helsinki. I love to draw, whether it's for
work or for fun. Drawing every day gives me
a lot of creative energy. I also love traveling, both for work and for holidays. I've visited almost
50 countries. [MUSIC] And to illustrate my travels is something that I truly enjoy. However, as we have all experienced during
the COVID times, traveling has not been possible. But this time has given me the opportunity to explore
the city where I live. I've created maps of Helsinki. Appreciating the city where I live makes living
more meaningful. In this class, I hope you
too will find a time to explore your cities and to appreciate what your
cities have to offer. It's not all about the grandiose monument or a place with
significant histories, but it could be those places that are close to your heart. Whether it's a small cafe around the corner or a restaurant where they cook the best ramen, or even a place where you
have visited often but maybe haven't even realized how
special it is up until now. Together, we'll explore these places and see how
we can represent them creatively into fun and simple illustrations and turning
them into guide zines. These guides zines can
be shared to friends, share on social media, it could be gifts, it could be given
out to tourists, or it could even
be distributed to your local shops as a
quick guide of your city. You will be self-publishing
in no time. [MUSIC] This class is for everyone who would
like to explore their cities and to
create a guide zine. I will be illustrating
using an iPad, an Apple pencil, and
a Procreate app. But you can use
anything that you have, whether it's a pencil,
pens, crayons, watercolors, as long
as you remember that we'll be using thin
paper for easy folding. If you are going to follow
this class using Procreate, it would be good to have the basic knowledge of Procreate. I will also be sharing
with you some of the fonts and the brushes that I've created to use in your
project if you wish. I will also be sharing with
you the zine template. Let's have fun, and I
hope to see you in class. [MUSIC]
2. Class Project and Resources: For the class project, we will be exploring and appreciating the
city where we live. We take photos with
our phones of places and things that inspire
us for reference. We will plan our zine setup, what places to include,
what's the title, what text to write,
what stories to tell. Then we draw fun and simple
illustration on the zine. We fold the zine, and now we have a
finished product. Appreciating the city where you live makes living
more meaningful, and completing the project means you have
published a guide zine. Zines are low costs
and are easy to make. All you need is an A4 size paper
and your drawing tools. I will be illustrating
on an iPad using an Apple Pencil
and the Procreate app. But you can use any drawing
tools that you have. Just keeping in mind
that we'll be using a thin paper for easy folding. If you will follow this
class using Procreate, it would be good to have the basic knowledge
of Procreate. In the resources section, you can download some
of my Procreate stamp brushes to use in your
project if you wish. There's also a link to download fonts that
I have created. Also, you will find a zine
template to use as a guide.
3. Finding Inspiration: Now it's time to wear
your comfortable shoes, head out, and explore your city. [MUSIC] Remember that it's not all about the
grandiose monuments or places with
significant histories, but it's also about the usual, close to your heart
places that matter. Take photos of things and
places that inspire you. We will use them as reference when we create
our illustrations. It could be a view, a
monument, a building, a park but it could also
be a cup of coffee, a piece of cake, or
even a plant or a tree. Anything that catches
your eyes and something that you would love to illustrate
and tell a story about. [MUSIC] Don't be afraid to explore places where you
haven't been before. Don't be afraid to go far
and walk that many steps. I did walk 7.84 kilometers here, or shall we say 12,100 steps. It was cold and windy yet a
beautiful, sunny Helsinki. Don't forget to share how
your exploration went, how you felt about it, and the photos you took in
the project gallery section. For the next lesson, we will be planning
our zine setup. [MUSIC]
4. Planning The Zine Set Up: Before we start illustrating, it would be helpful to
have the zine guide with you just so to
help with the setup. Let's try folding it. [MUSIC] You can cut the middle slit
with scissors like this, or even better to use
a cutter with a ruler. At least I have a
bit of a problem making the slit straight
using the scissors, but maybe it doesn't
have to be perfect. [MUSIC] We then label the pages. We have a back cover, a front cover, and
six pages - 1, 2, 3, 4, 5, and 6. [MUSIC] Now we'll fold another paper where
we will draw on. [MUSIC] For those
working on Procreate, let's upload the template. Lower its opacity, [MUSIC] then create
another layer. Now we can start illustrating. But first, let's plan
what to illustrate, which places to include, what's the title,
what text to write, what stories to tell. [MUSIC] Take a look at the photos you took
during exploration. What do these photos talk about? Are they mostly about walking? Are they about food? Are they about nature? Are their histories or personal
stories related to them? What do you want to tell
about these photos? This will help you decide which photos to include
in your guide zine. [MUSIC] Once you have
chosen the photos, think what is the central theme? Then decide on the title and what to write about
these photos. For the next lesson, we will start illustrating. [MUSIC]
5. Illustrating: [MUSIC] Before we start illustrating, I would like to show
you one example. This one is really simple, but it brings a lot of
beautiful memories. It also tells us about
what people can do when they visit the city of
Davao in the Philippines. For example, they can
eat lots of fruits, go to the beach, and maybe
try the local snacks. For those working on Procreate, let's go back to our Canvases. As a tip, it would
be good to draw each illustration on
different layers. We can then resize them to
fit the zine. But always make a copy or duplicate your illustrations
before resizing. It's always good to have the original in case
something goes wrong. Also, you might need to use this illustration for
other projects later. As you can see, I draw
simple illustrations. However, that really
depends on your style. You can decide however you
want to represent your city as long as you have
a consistent style and the same colour palette. For example, for the landmarks, I just drew them
quickly as I decided to just create a simple
outline of this places. You can also trace from
the photos you have taken. Lower the opacity,
add another layer, then just quickly draw them. It doesn't have to be accurate as it is just a representation. I also added characters
in the scene. This girl is a character that
I created some years ago. She is called Emiko. I also added a cat named Kai. I just thought that
it's fun to add some characters and I'm also
being true to my style. I also place my illustration
on a Polaroid frame. You can find the
Polaroid frame and different borders from the
class resources section. For the next lesson, we will place the
illustrations on the zine.
6. Placing Illustrations on The Zine: [MUSIC] Before we place the
illustrations on the zine, let's go through each
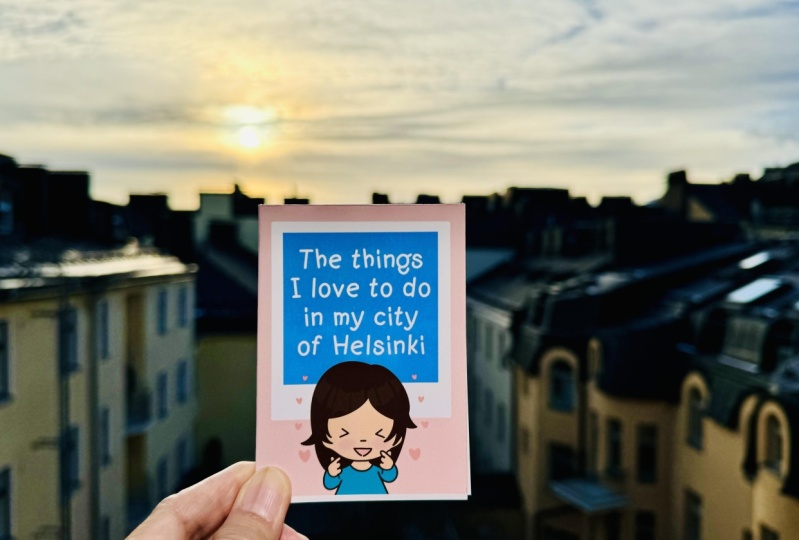
of the illustrations. I chose the title,
The things I love to do in my city of Helsinki. Here it says, Helsinki
is a small city. You can walk to many places
of interest, which is true. I would really
recommend putting on comfortable walking shoes
when exploring Helsinki. Rain or shine, warm or cold, you can say no to
bubble milk tea. It's just because I love bubble milk tea and in the
main street of Helsinki, you can find places to enjoy it. I love the Esplanadi Park because I love to
take a stroll there. It's always beautiful. It doesn't matter
which season it is, it's always a good place
to enjoy the outdoors. The Helsinki Cathedral is one of the tourist
spots in Helsinki. But what I love about it
the most is the sky above. Here I say, always look up when you visit the
Helsinki Cathedral, they're always
beautiful clouds above. Roberts Coffee Jugend
is my favorite place. Not only because they have
good coffee and Chai latte, but the place is beautiful. It's Jugend house built
in the late 19th century. Then there are
these structures in Amox Rex that they're hard
to resist not climbing them. Here I'm telling people that
it's okay to climb them. Also it's true, there is a pathway with the
Helsinki written on it. It's a fun place for a photo and visitors
should not miss it. Why did I chose these places? Because I love this
places and I also know them well to really
recommend them to visitors. Once we have all the
illustrations ready, we can now place
them in the zine. Here we have our zine. We have the back cover,
the front cover, and six pages - 1, 2, 3, 4, 5, 6. Now let's place
them in the zine. [MUSIC] I also chose the background colour. Don't forget to hide the zine template
layer before printing. For the next lesson, we'll print and fold the zine.
7. Printing and Folding: Now that we're done
with the illustrations, we're so close to have
the final product. [MUSIC]. If you created your
zine digitally, it's now time to
have it printed. To have it properly printed, send your zine to your computer and print it out from there. Be sure to have the
right settings, both in your computer
and in the printer. [MUSIC] For those
who illustrated on the paper be sure to photocopy
your work before folding, as it would be good to have the original version with you. [MUSIC]. Now, let's fold. Next, for the final product. [MUSIC]
8. Final Product: [MUSIC] Now we have
a finished product. Completing the project means you have published
a guide zine. Creating zines can
also be very addicting. Now that you have done it, you can easily create
zines on different topics. Examples are the illustration I created for organization about COVID-19 and oral hygiene
turning into zines. I also created an
informative zine for my clients about the process of creating explainer videos. Or just for fun, like this cute K-pop zine, or a quick Christmas
recipe zine. Keep creating and publishing
your amazing zines.
9. Final Thoughts: [MUSIC] Thank you for
joining me in this class. I hope you enjoyed
exploring your cities, illustrating, and
publishing a guide zine. Please don't forget to share your project on the
project gallery section. Thanks again. I hope
to see you again soon. Bye. [MUSIC]
 Elaine Vitikainen, Illustrator from Helsinki