Transcripts
1. Welcome: Hi, my name is
Christine and welcome to this relaxing
Procreate course. In this course, you will
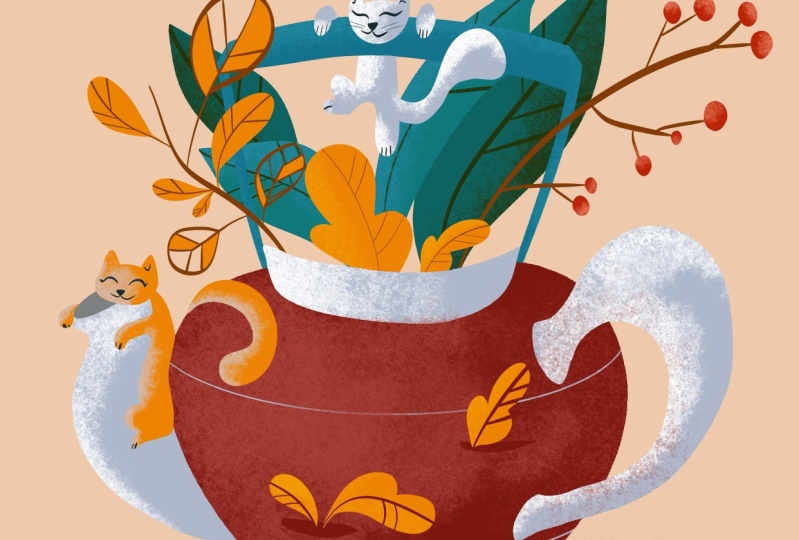
create an illustration of a whimsical teapot and a couple of cats
playing around it. This course is designed to
be very easy to follow. You will learn how to build your illustration with
the help of the layers in order to create a
beautiful composition for this wonderful course, you will need the iPad, the Procreate app,
and the Apple pencil. You will get
step-by-step guidance. How to create every
beautiful element. Even if you don't have any experience creating
digital illustrations, you will find how easy it is to use a couple of
tools and brushes to arrive at a gorgeous resolved if you are ready to give
life to this teapot, welcome to the course.
2. Teapot: For the illustration,
you will need to create a new canvas that has
4000 by 4000 pixels. The color palette you will
use for this illustration is the coffee time color
palette that you can find in the resource
page of the course. The brushes you will use the
inking brush called Armand, and the texture brush called KV. Both of the brushes can be found in the resource
page as well. For the beginning, you
will want to go to the layers and selecting
the background. You will want to choose the
light badge from the bottom. After this, you will go to the layers and selecting
the first layer, you will want to select the hormone brush
from the inking. And then you will want to
go to the color palette and select the burgundy nuance
of red from the middle. And after you have increased the size of the
brush to about 50%, you will draw an oval in the
lower middle of the canvas. After that, you will
hold the pencil down until the oval
becomes uniform. Then you will press the edit
button from the top and you will shape your oval so it can be centered and uniform, maybe a little bit taller. After this, you will
go to the moving to and set it on uniform. You will make the
oval maybe a little bit bigger and place
it in the center. Now, let's select the
wrap tool and drag the right corner of the oval to the top right corner
of the canvas. And then you'll do the same for the corner from
the left side. Just made that up a
little bit more squarish. Now, from the bottom
middle you will drag the oval a bit lower so it can sit better and drag the bottom corners
of the oval inward. So the form can be a
little more graceful because you will want to make this teapot nice and elegant. Now that the main form
of the taper is done, you will firstly go to
the color palette and choose the gray from
the bottom right side. Now you will move to
the right side of the teapot and you will place on the top and the bottom two lines indicating
the base of the handle. Now you will draw
shaped like a near linking the line from the top with the one
from the bottom. And then you will add one
more line doubling the first. After that, you can
drag the color from the top right corner
and fill the form. Firstly, filling the big
form and then the spaces that remained red on the
bottom and on the top side. Now let's get a
little bit closer and make that form
little bit smarter. So let's go around
that shape and make the corners a
little bit more smooth. Then you will go to the
bottom of the handle and add a little curve
to the end of it. And now let's go back
to the top and make that ending as well
nice and curvy. And then you can simply fill
the space with this color. Now that the shape of
the handle is done, you will make the top
entrance of the teapot. So you will create two lines on the left side and
on the right side, going a little bit to the
top corners of the canvas. Now you will add a curve to
the bottom of the two lines, and then you will
hold the band down until the curve becomes smooth. Now let's edit the shape and
make it a little bit wider. Let's go to the top and
add one more curve. And if it transforms
into a line, you can change it into an arc by pressing the
bottom from the top. Now you can grab the
color from the top and added inside the
forum you've created. And now let's fill
the two corners so you can complete the form. Now let's get a little
bit closer to the corners from the right and make that
line a little bit smoother. And now let's move
to the left side and make sure the edge
is nice and smooth. Just add a tiny bit more color. Now with the same gray, you will move to
the left side of the teapot and create
the spout of the teapot. This you will create a new layer and then
you will select. So let's firstly place
the mouth of the teapot. Now you will link
the top of the oval with the teapot with
a reverse S-shape. And then you will make the same for the bottom of the spout. Now before filling the form, let's make sure the
shape is closed. And now let's fill this
beautiful shape of the spout. Now let's adjust the bottom
of the mouth and the top. Now you'll zoom a
little bit out. And after this, you want to select this belt of the teapot. You will go to the color palette and pick the light
gray from the middle. And then you will
get a little bit closer and go into the brushes. You will select the KV brush. Getting closer, you will increase the flow
of the brush to about 90 percent and the
size to about 15 percent. And now you will apply this slide on the left
side of the spout, making sure the top
side is nicely covered. Let's accentuate that beautiful curve
round beneath the mail. And now let's zoom
out a little bit and make that light a
little more bright, just going a little bit across the little
neck of the mouth. Now that the light of
the spout are placed, you will go to the layer. And, and selecting the spout, you will move to the
layer of the teapot. After this, you will use the selection tool
on the handle of the teapot and picking up
the brush from the top, you will play some light
on the top of the handle, where it means the teapot. Now you will move to the
inside of the handle and place this wonderful
saturated light, making it a little
bit more thick on the top side of
the inside part. Let's make the line more bright on the top side of the handle. And then you will make
sure the inside is nicely covered by light and there are no more spots of gray left. After the handle
is nicely covered, you will move to the top
entrance of the teapot. So let's undo the selection and make one more on the
form from the top. Then picking up the brush, you will place some
of this beautiful light gray on the left
side of that edge, fading it in the middle and accentuating it
on the left side. After you've placed this slide, you will pick up the eraser
and unselect the form. Now let's move the canvas
so you can get rid of that red edge of the part
left on the top herder this, you can zoom back out
and now you will want to use the selection tool on
the belly of the teapot. And after that, you can select
from the color palette, the light burgundy color. So you can play some
beautiful light on the left side of the teapot. So you will decrease the flow and increase the size
of the brush to make a wonderful round shape between the top and the
spout of the teapot. You can spread the light with a circular motion until you made the middle
of the teapot. And then you will
focus on getting that spot of light a
little bit more intense. Now that'll light of
the teapot is done. You will insulate the belly of the teapot and then
you will go to the layers and drag the layer of the spout on the bottom of
the one with the teapot. Now you will create to their corrective curves across
the belly of the teapot. Let's select the layer
and now preparing deal mom brush and the dark
gray from the color palette, you will select the belly of the teapot after the
selection is done, Let's decrease the size of
the brush a little bit. And now you will add this curve, living from the Spout and going towards the
bottom of the handle. Now you will hold the pen down until the line can be edited. And now you will just the
line dragging it down from the Mendel and adjusting
its horizontal position. After this, let's add one more line across the
top side of the belly, a little bit more
exaggerated so it can suggest the round
form of the tea pot. Now let's edit the shape so it can nicely surround the teapot. And after this, the
teapot is done, Let's get into the next step.
3. Green Leaves: For this step, you
will want to firstly make them mouth of
the teapot darker. So let's get a
little closer to it and then you can select it
with the Selection tool. Now you will pick from
the color palette, the gray from the bottom, and going to the value, you will make it a
little bit darker, lowering the brightness
to about 50 percent. Now you can simply fill
the form with the brush. After this, you will
move to the layers and add one more on the
top of the teapot. Then you will go to the
color palette and select the middle green from
the top left side. After this, let's select the
own brush from the brushes. And now you will create
a couple of leaves. Firstly, decreasing
the size of the brush. Now for the first leaf, you will make a long
line from below the top androgens of the teapot and going up to the
top right corner. Then you will add the
right side of the leaf, and then you will make the same for the left side of the line. Now you can zoom out
and drag the color from the top inside the two
sides of the leaf. Now you will create
another leaf on the left side of the mouth with a curved line
on the left side. Little pointy middle, and another curve on the right side, making the live a little
thinner on the bottom. You can get a little
bit closer and adjust that tip of the leaf so it
can be a little bit smoother. And now let's get
closer to the other one and the same after these
shapes of the leaves are, then you will add two more. So let's firstly
create one more layer and picking up the light green
from the top left corner, you will create over
the one from the right, another one similar
with two curves on the right side and a white
curve on the left side, closing the shape on the bottom. Let's zoom in a
little on the top of the leaf and make that point
a bit more pronounced. After this shape is done, you will add one more below the one from the left,
intersecting them. Now that the two set of
leaf shapes are done, you can select the two shapes. And after that, you will
go to the color palette and pick the light blue from
the bottom middle side, and from the brush, you will pick the Kivy brush. Now let's get a bit
closer and increase the flow of the brush
and decrease the size. And then you will add this beautiful blue
on the left side of the light green leaf
and a little bit on the right side of
the leaf from the left. After this, you will move to the layer of the
other two leaves. And then using the
selection tool, you will pick the
two dark leaves. Then he will go to
the color palette and pick a dark green from
the top left side. And using the QV brush, you will place a shadow on the right side of the leaf from the right and on the left side
of the one from the left. Let's place a little
bit more shadow on the one from the right. And then with the same color, you will use the Oberon brush to create some beautiful
veins, grass leaves. So you will start with Leslie placing a line
across its middle. And then from the middle, you will add a couple of inclined lines to the
edges of the leaf. Now, you will move to
the one from the left, that beautiful line and two more parallel lines
on the right side. After these leaves are done, you can move to the layer of
the light-colored leaves. And using the selection tool, you will pick the two shapes
of the leaves and then using the brush and making the size of the brush
a little smaller, you will want smarter create
that line across its middle and the couple of parallel lines going to
the edges of the leaf. Then you will zoom on to the next leaf and give
to this next as well, that line across its middle and a couple more lines
on the right side and the left side
of the middle line. Now that the two sets
of leaves are done, you can go to the layers and
move the two layers below the teapot layer
so they can seem like they come
outside the teapot. And with that,
this step is done. Let's move into the next one.
4. Handle and Branches: In this step, you will create the second handle of the
teapot on the top of it, and a couple more branches
with leaves and berries. So let's go to the Layers and create a new one for
that teapot handle. Then you will go to
the color palette and choose the dark blue
from the bottom middle. And now you will move to the
top entrance of the teapot and add to its left side a
line that goes to the top, then you will move
to the left side and the same two lines are done. You add a curve to the top, linking the two lines. After that, you will double
this line below the first, and then you can
drag the color from the corner and drag
it into the form. The top right corner
is a bit too algae, so let's grab the eraser and make that corner
a bit more round. Now you'll move to the
left side and do the same, cutting a little bit
with the eraser, that extra edge then that the shape of
the handle is done. You will want to make
a selection of it, and then you will go to the brushes and going
through the textures, you will pick up the TV brush. You will pick the lighter blue from the bottom of
the color pellet. Now, let's start applying
this wonderful light, decreasing the size of the brush and then
increasing the flow. Now you will apply this slide on the left
side of the handle. Then you will move on the
top side of the handle, applying the light on
the top middle of it. And then you will descend on the right side of the handle, placing some of this
wonderful light blue on the left side of it. After the teapot handle is done, you will want to undo the selection and
then you will go to the layers and
move the handle of the teapot below the
layer of the teapot. Going on the layer
of the teapot, you will add one more
layer on the top of it. On this layer you will create those beautiful
branches and twigs. Pick from the color palette
that beautiful light brown. You will select the
hormone brush and you will play still
beautiful twigs. One on the right side going with a white curve to the right
over the handle of the teapot. And one more beautiful
branch on the left side, placed at about 45 degrees. Now you can get a bit
closer to the one from the right and
place on its lower side some beautiful short
branches that will hold a couple of barriers to branches on the
bottom right side. Three more on branches going
a bit on the top side. Now you will place two
more branches on the left and two more on
the end of the branch. Now that you've finished
creating the branches, you'll want to add on
each branch one big, beautiful red berry, increasing
the size of the brush, you will start to place
these round and be berries. You can make them
of different sizes. Now, let's move to
the branch from the lower side and add one
more big, beautiful Barry. And now let's add a couple
more below the branch. Look at how beautiful
these berries look with a wonderful
Burgundy teapot. Now you will want to make a
selection of the berries. So let's activate
the selection tool and select all the berries. After the berries are selected, the user wants to sell at
the beautiful pink from the bottom right corner of the color palette
and the KV brush. Let's get a bit closer
and add some of this light pink on the top
left side of the berries. Let's move to the ones from
the top and do the same. As you can see, the
selection tool is very useful when working
with multiple elements. After you have finished creating these lights
on the berries, you will deactivate
the selection tool and move to the branch from the left side to create some beautiful
transparent leaves, we will select the brown from the color palette and
the hormone brush. And then you will add a little tweak on the bottom
left side of the branch. And then you will create a
circle around the line with some beautiful lines
going from the middle to the sides like
some leaf veins. Now let's move to the
top of the branch and create one more
leaf just like before, with the little to live
in front of branch, a circle around it and some lines living
from the main vein and going to the
circle trying to make them as barrel as you can. After that, you will
move to the top of the branch and create
one more leaf on the top right side
of the branch with a beautiful circle
as its culture. And those lines that cross
the halves of the leaf. After these leaves
counters are done, you will pick from
the color valid, the beautiful orange
from the bottom middle. And then you will move
a bit closer and add just some accents of color on those beautiful
segments of leaves. You don't want to add too much, just a couple of color accents. Now, you'll want to create
a couple of orange leaves. One leaf as a teardrop size
as the ones from before, and another one a little
smaller on the bottom of it. Now you will move
to the left side of the top leaf and add a beautiful orange twig and another leaf shaped
as a teardrop. Now for the last orange leaf, you will move to the
right side of the branch. And in between the two leaves, you will add one more, a little bit, Baker
and elongate, and then you can
fill it with color. Now, as for the other leaves, you will want to create
some beautiful brown veins. So you will make a selection of all those wonderful
orange leaves. After that, you will select
the brush and begin to create those veins starting
with the fame from the middle
crosses the leaf. Then you will add a couple
of parallel lines on the right side and
the left side of the line move to the
leaf from the top. And now for the last
leaf from the bottom, you will repeat the process
with that middle line and three more lines going
to the sides of the leaf. Now let's zoom out
and see if there are any things you
want to modify. If the two
declarations are done, you can undo the
selection and then go to the layers and
move the layer of the two declarations below
the teapot so they can seem like they come outside the
top entrance of the tea pot. After this is done, you can move to the next step.
5. Orange Leaves: On this step, you will add some more leafy decorations
for your teapots. So let's firstly go
to the Layers and create one more layer
below the teapot. After this, you will go
to the color palette and pick the orange
from the bottom middle. Now you will want to pick
the hormone brushing, get a little bit closer to the free space from
the top of the teapot, from below the handle
between the green leaves. Let's create a
beautiful curved leaf directed to the left
side with three arcs. The two from the
sides being a little smaller than the one
from the center. Now that the shape is complete, you will create one more leaf on the right side over
the green leaves, a little bit smaller
than the one from before and directed
to the right side with those small leaflets on its sides and a big
one in the center. Now, let's do some veins. So once more you will go to the color palette and pick the wonderful Graham
from the bottom. And then you will make a
selection of the two leaves. After this is done, you will pick the
brush and create one line across the
middle of each leaf. Then from the line
from the middle, you will make three
parallel lines that go to the right side. Now let's move to the
leaf from the left side and once more on the
right side of the leaf, you will add three more
beautiful parallel lines. Now, let's create some
lights on these two leaves. So you will firstly peak from the brushes,
that kidney brush, and then he will grab
from the color palette, the beautiful yellow from
the bottom left side. Then you will bring the flow to about 60 percent and the
size to about 20 percent. Now you apply this
beautiful light on the left side
of the two leaves, crossing a little bit the
half of beliefs and focusing on covering the left edge of the leaves as
good as you can. After this is done, you will
under the selection and zoom out and see how you can improve
the look of the teapot. These orange leaves
look very beautiful together with the red
color of the teapot. So let's create
some more for that. You will pick the beautiful
dark burgundy color from the color palette. And with the oman brush, you will go to the layers and select the layer of the teapot. Then you will create
two beautiful pockets. One on the left side of the teapots barely over
the beautiful light, and another one a little bit
higher on the right side. Now you will go to the
color palette and peak once more the beautiful orange from the bottom middle
of the color palette. And with the hormone brush, Let's create a new layer
on the top of the teapot. Then you will make a middle stem going to the top right side. And then from near the
bottom of the leaf, you will create as before, to beautiful small leaflets on the sides and the big
one on the center. After you have fill the shape, you will get closer to the
bucket from the left side, where you will draw two leaves, one going to the top left with a very small leaflet on
the bottom left side, and then you can feel the shape. Now let's create a droopy
leaf on the right side of this pocket with the main
stem shaped as a semicircle. And then you will create
the beautiful leaf with one smaller
leaflet on the top. And then you can fill the
shape with this orange. After these leaflets
are finished, you will bake them with
the selection tool. After they're selected,
you will go to the color palette and pick the beautiful yellow from
the bottom left side, and pick the TV brush
from the textures. And you will add on its left
side a bit of this light, and then you can move to the
other two and do the same. Let's add a little more on
the one from the right. And after this is done, you will do some brown veins. So let's pick up the
lighter brown from the color palette and
the hormone brush. Now once more, let's move
to the leaf frontal right, and create that middle vein and three more parallel
lines on the right side. Let's go to the other ones
and repeat the process. The middle line and two
curved lines on the bottom. And for the last one as well, with two lines on the right
and another one on the left. Let's zoom out and
unselect the leafs. And with that, this step
is finished as well.
6. Two Cats: In this step, you will create
the two beautiful kids. So you will firstly
go to the layers and add another layer on
the top of the teapot. After that, he will go
to the color palette and pick the dark gray from
the bottom middle side. Now let's get a little closer
to the top of the teapot. And with the home brush
you will create firstly, the head of the cat over the
top side of the handle with two beautiful ears and a
generous space between them. And on the bottom
you will create a wide oval and
complete the shape. Then you will fill the shape
of the head with color. Now let's get a bit
closer and draw on the left side of its head
one pore as an inland oval. And let's make the
back of the bar. So it seems like the cat
is holding the handle. Now let's move to the
right side of the head and place one more simple oval. After this, let's move
below the handle and draw the belly of the cat and
the leg from the left, shaped by two curves. The first wider and the
other a little bit tighter. Now, on the right side, let's create the last leg has an elongated oval that continues with the
back of the cap. Now you will close the shape right below the teapot handle. After the form is closed, you can drag the color from the corner and fill the shape. Now for the tail of the cat, you will create an S-shape
living with a line from where the right leg is ending
and going up and then down, then following the line, you will go back to
the bottom of the cat. After this is done, you will want to pick the eraser and make some corrections
over the cat spore. And now let's adjust that
shape from where it's meeting the handle so it can seem straight that the shape
of the cat is done. You can make a
selection of its body, selecting the head,
the two powers, and the rest from below. Now you will go to the
color palette and pick the white from the top
right side of the canvas. Let's pick the Kivy brush
and now you will start to add some light on the
left side of his body, starting with the belly and highlighting the
left half of it. And then you can go
over the knee as well. And on the leg from the
right just a little bit. Let's add some more underbelly and unless
create some light on the left side of the tail and on the top, that
beautiful curve. Now you will create some more light on the
left side of the head. That's called the power from the left with this
beautiful light. And on the right one as well. A little bit more light on
the face and on the belly. And let's make sure all the left sides are
beautifully and uniformly light. It. Take your time to make
this kid super shiny and nice. Don't be afraid to accentuate the lights a little bit more. Let's bring out the left ear and place sunlight on the right one. And now you will create some features for
this playful cat. Firstly, you will go to the brushes and pick
the hormone brush, and then you will grab from the color palette to dark
green from the top left side. Now let's lower the size of the brush and make on the middle left side of the face and
little triangle for the nose. From low the nouns, you will make a white
curve to the right and another one
on the left side. Then let's make the two
eyes with one wide curve on the right side and
one a little bit tighter on the left
side of the nodes. Now that the faces then let's give this playful cats on little close so it can grab tightly
to that teapot handle. Let's place to Little Falls
for the two years of the cat. Now you will lower the size of the brush and you
will make a couple of whiskers on the right side and the left side of the cheeks. And now let's move to
the bottom and give some beautiful close to
these balls as well. Now, the first
sketch is finished, so let's make the next one. Firstly, unselect the cat, and then you will grab
from the color palette the wonderful origin
from the bottom middle. Now you will get
closer to the mouth of the teapot and plays on
the top right side of it. And over it a beautiful wide oval covering
half of the male. After you have filled
the form with orange, you will create the
first part of the chat glazed over the neck
of the tea pot. Now let's place a line between
the head and the teapot. And now let's make a contour on the top of the spout. Hand. Place the second part on
the left side of the mouth. Now let's move a little bit lower and place
the last leg over the spout with two curves and with another angle
curve on the top. Now let's close the shape of the back, continuing that curve. And let's close the
form on the neck. After the shape is closed, you can color it with orange. At last you will draw the two ears of the cap
shaped as two triangles, the one from the right
being a little bit wider. After you have filled form, you will create the shape of the tail on the top
of the teapot Valley, coming from the back
of the teapot on the front and then
doubling the line on the bottom and
closing the shape and the back after the shape of
the cat is done as before, you will want to add some highlights to
the scatter as well. So you will firstly pick the light gray
from the middle of the color palette and then make a selection of its entire body. After that, you will grab the TV brush and then you
can get a little closer to start placing this
wonderful light over the left side of the shapes
starting with the tail, placing a little bit
more light on the tip of it and where it goes in
the back of the teapot. Now you will move to the face
of the cat and highlight the left side of the face
using circular motions. Let's reduce the
flow just a bit. And now let's give
some lights to the left side of the two parts. Let's make sure the top of this ball is nicely highlighted. Let's create the
highlight on the knee of the cat and over it's four, take your time to make sure
the light is uniformly placed on the left side
of each shape of the cat. Now, after you have finished
creating the highlight, you'll create the
expression of the cat using the hormone brush
and the dark green from the top left side
of the color palette. As before, let's place a little nodes on the middle
left side of the head. Let's place a wide curve
for the right cheek. Let's now make a little
curve for the left eye. The left cheek, a little
shorter than the other one. And the white curve
for the eye from the right side with a
little flick at the end. Let's place a couple more
details making a little angle inside the ER
to signal a fold. Now let's move to the
paws and MP4 create some parallel lines
on the ends of the pause for some
cute little clause, one more on bottom. And now the two
cats are finished. Look how beautiful they
play around the teapot. Now let's get into
the last step.
7. Lights and Shadows: For this last step, you will want to make
some researches for this, Let's go to the layer of the
teapot and then you will make a selection of the
burgundy belly of the teapot, gradually selecting each of the three segments
of the teapot. Dragging the pen
slowly to the right to make the full selection
of the segments. After the selection is done, you will pick the
textured KV brush, the beautiful light burgundy color from the middle
of the color palette. Now you will get a
little bit closer to the part and you will accentuate the light
from the teapot, increasing the flow
and the size of the brush using
circular motions, you will go over the light plays before focusing a little more on the middle of
the teapot just to make its shapes seem
a little more round. Now you will pick the
dark burgundy color and your mom brush, and then you can
make once more and those small pockets from
below the little plants. So let's get a bit closer and make that little
pocket wider. One more line on the little
bucket from the right side. And then you will
create one more layer, which will be placed
below all the other, right, on the top
of the background. On this layer, you will create a little shadow created by the
teapot and the background. So let's select the color of the background and then
you will want to go to the colors and make
it a bit more dark to about 65 percent and
a bit more saturated. Now picking up the
textured cookie brush, you will move below
the teapot and create the white
shadow below it, making sure the
shadow is a bit more concentrated near the
bottom of the teapot. And with that, the beautiful
illustration is finished. Thank you so much for
taking this course. If you enjoyed it, make sure you leave a
review and of course, share your beautiful artwork
with the rest of the work. Thank you once more
for your interests in digital art and see you
in the next course.
 Cristina Handrea