Transcripts
1. Introduction: When fall arrives and nature
takes out its paintbrush, it really lights up my heart. And seeing all those
pops of colors is exactly what inspired
me to create this class. Together, we'll make a beautiful
mixed media print series and learn a new technique to see your drawings come to life. Hi, I'm Cornelia, and I'm an abstract painter
from Austria. I love exploring
color, contrast, and experimenting with
mixed media processes. In this class, we'll take jelly plate printing
one step further. You learn how to combine
acrylic paint with charcoal or soft pastels and
turn simple drawings into layered smudge
free teleply prints, full of color, texture,
and personality. Let's get started.
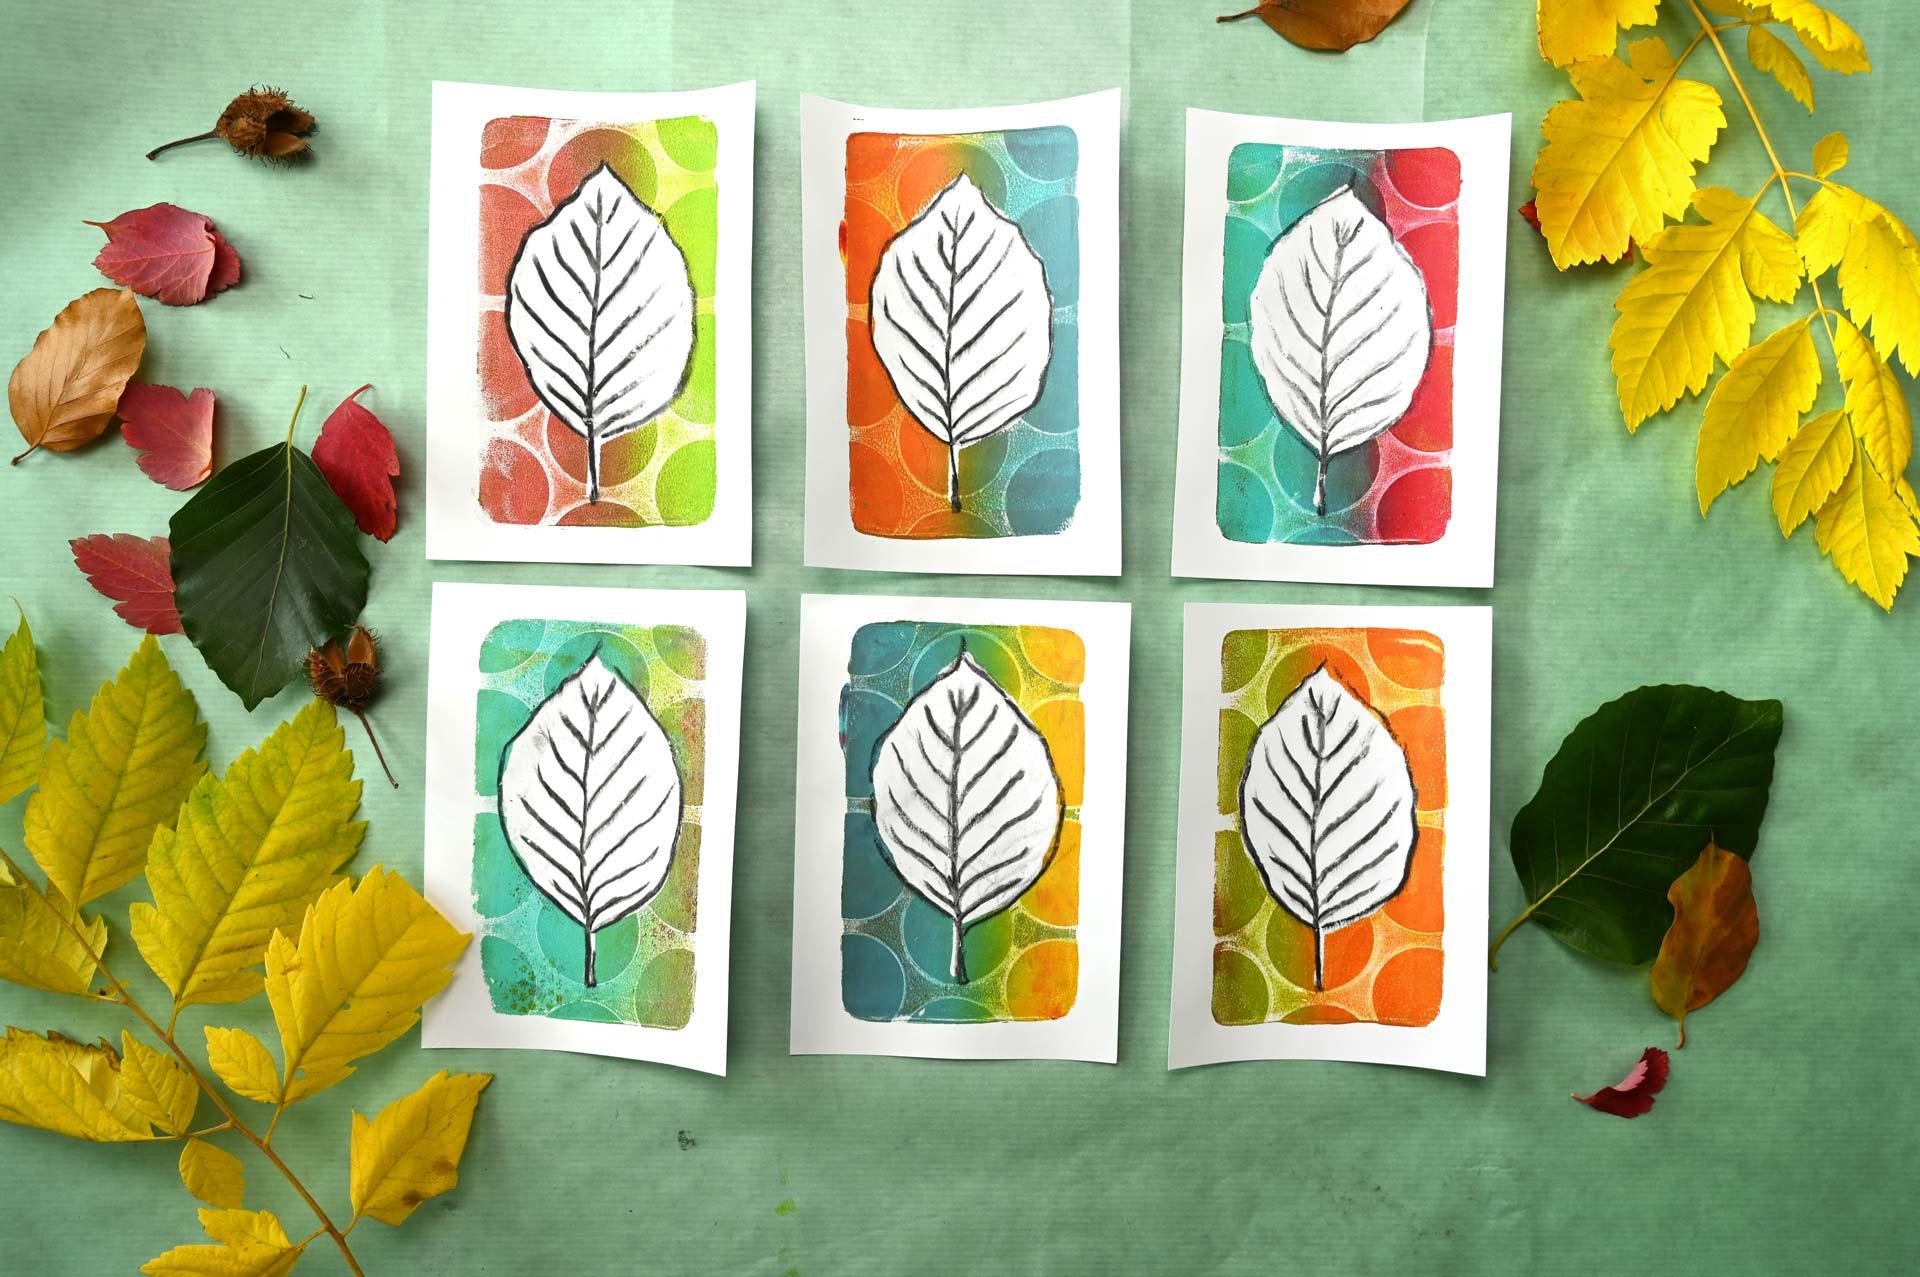
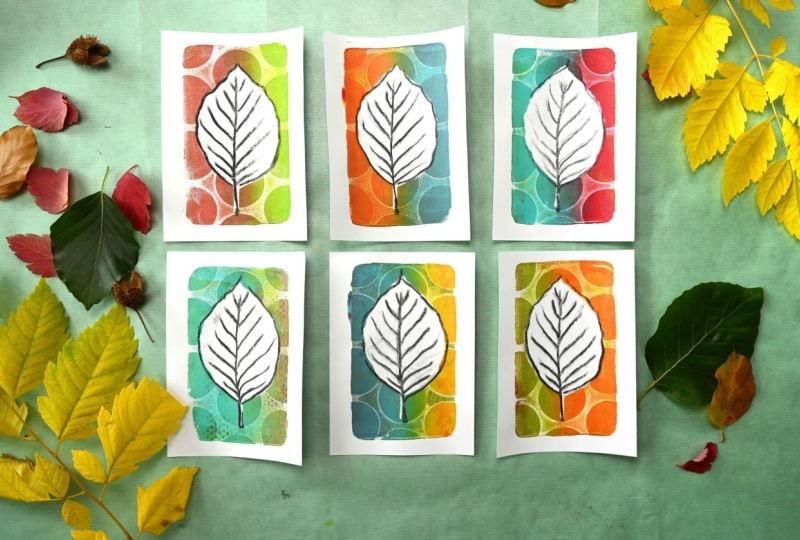
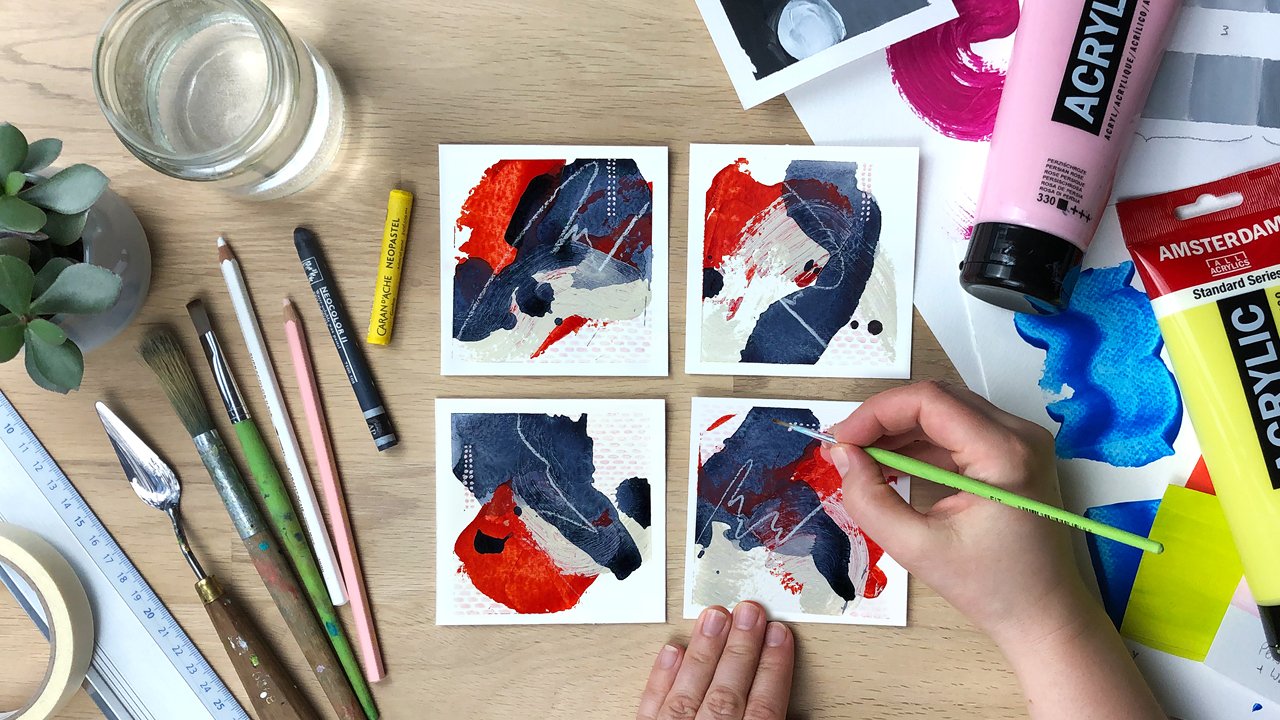
2. Your Class Project: Leaf-Inspired Print Series: Welcome to this class. As a class project,
you're going to create a series of leaf inspired jelly plate prints combined with your own charcoal
and pastel drawings. Let me give you an
overview of the steps. We'll start with a
simple leaf sketch. You can draw directly from life, use a printout and
trace over it, or do a rubbing of a real
leaf and trace from that. We'll discuss how you can create a simple yet
expressive drawing by focusing only on the main shapes and varying the
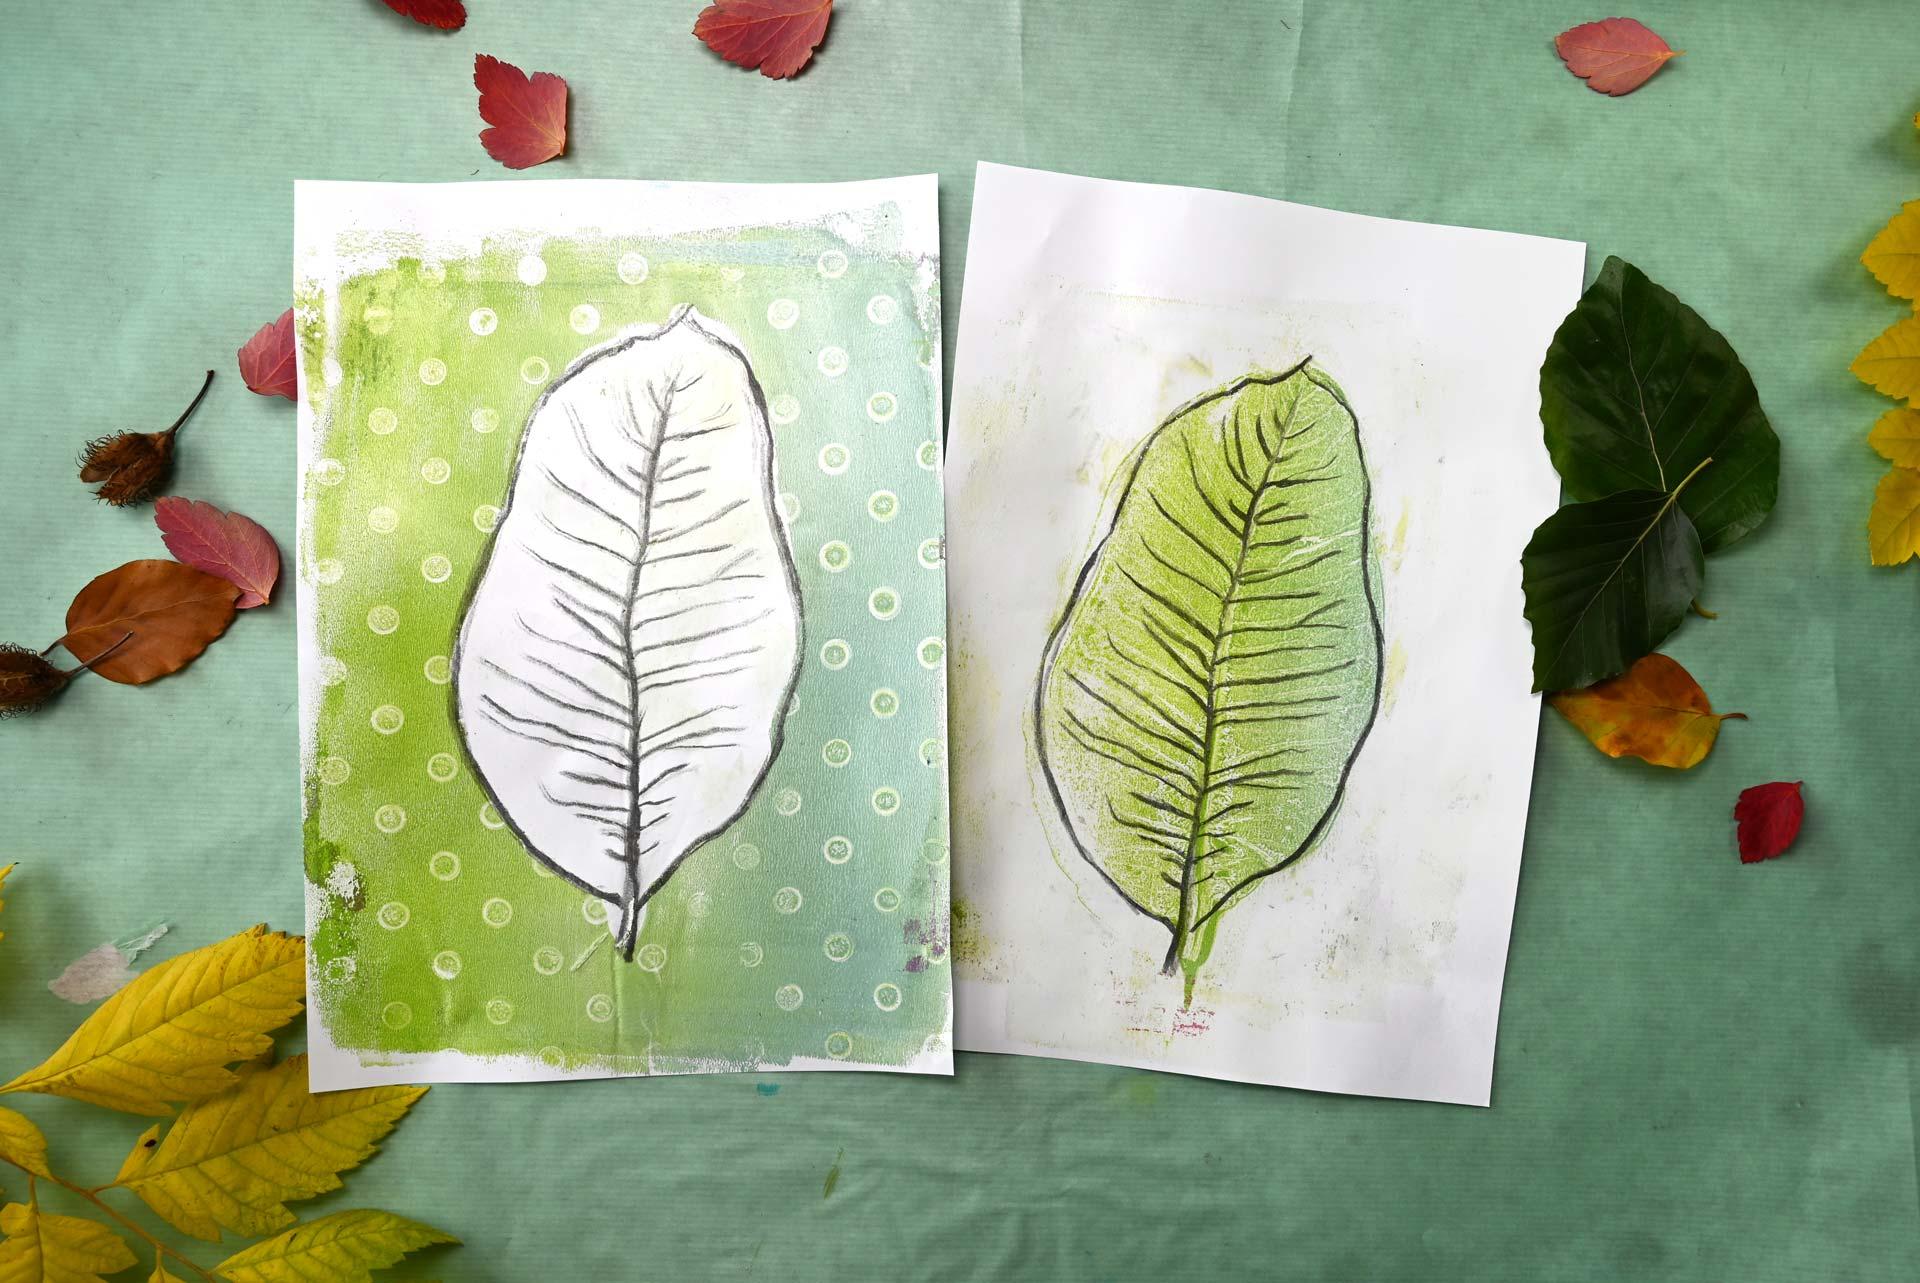
quality of your lines. Next, we'll move to the jelly
plate printing process. We'll create two kinds of
prints a negative print, where the background
is filled with color and a positive print, where the leaf shape
itself holds the color. For the background, you can
create a simple gradient or experiment with
textures using stencils, bubble wrap, or other materials
to add visual interest. Once your backgrounds are ready, we'll transfer your charcoal or pastel drawings onto the prints. You can reuse the
same drawing for multiple prints usually
two to three times, though it will get lighter
with each transfer. If you want a bold, dark transfer each time, it's vital to refresh the
drawing in between prints, but you don't have to
start from scratch. Also consider whether leftover
pigment or residue on the chali plate is acceptable
for your next print, since it may show up slightly, or you clean your plate each
time for a better result. By the end of this class, you'll have a few
beautiful prints that look great on their own, but even better when displayed
as a cohesive series. Once you finish, don't forget to create a
class project and upload a picture of your work
to the projects gallery. I can't wait to see your
mixed media prints.
3. Materials & Tools You’ll Need: So what do you need
for this class? You need a jelly
plate. It doesn't have to be a huge one like this. If I would buy a new one, I would probably
get half the size. Then you need a prayer. You need a palette knife or something to get out the medium. You need some kind of acrylic
medium. This is mad medium. I like it because it gives you that mat toothy surface
after the transfer, which makes it really cool
to keep working on it and adding more drawing
to your print. But you could also use gloss medium if that
is what you have. What works really well, and I just have that in a
huge bucket is the heavy gel, but this one is gloss as well. So that's a little bit
the downside of this one. But having the heavy gel, it makes it a little
bit less humid because it's thicker and it's easier to get a thin layer of medium with paint that has some kind of a substance
than with fluid paint. For example, you could also not use fluid paints so well
with cheli printing. For cheli plate printing, the regular basic acrylics
are fine and are good. The most important thing is that you have some
kind of medium because our transfer process involves layers that are transparent. That is important, but then
for the later process, we will combine it with color. A acrylic color that you
have is totally fine. When it comes to paper, what you need is
you need some kind of paper where you can
roll off your prayer. This can be any scrap paper. It's just necessary as a part of your
workspace organization. Then my prints, I usually do
on just regular copy paper. But you can also use this is some kind of a
textured paper. I think it's some kind
of mixed media paper. You can use watercolor paper. Any paper that you would
normally use to jelly print on, it really does not matter. One thing that's
also handy to have is a piece or a few pieces
of transparent paper. Because we will use a
tracing method as well. Now, because this is
a mixed media class, we will combine dry
media with wet media. So when it comes to dry media, you can use soft pastels, you can use charcoal
of all kinds. These are hard pastels. They are compressed. They are not as soft. These are somewhere in between these hard ones and the
extremely soft ones. So everything's possible. You can use, you know, soft pencils that works as well. You can use charcoal pencils. You can use sepia. I think this is can
use SPIA pencils. But with SPIA, you have to look for the ones that are dry. There's also a version of SPIA that's greasy, that
wouldn't work. We will have a lesson where I show you all these
different materials, and I would highly advise
that you try out what you have before you go and start your project so that you
don't get any surprises. What you also need is some
kind of source material. I will show you different
ways how you can get to a finished
drawing very quickly, we'll work with a re
leaf and do a rubbing, just like here and
use that when you mix up to get a drawing or we just use a printout of a photograph and
draw right on this. If you have something
in your sketchbook, let's imagine this
was my sketchbook. Then you could very
easily, you know, use transparency and just trace
over anything you have in your sketchbook and then use this transparent paper to transfer your drawing
to the jelly plate. In a later part of the process, we will also bring in textures
in the colored areas. There's tons of options
that you can use to create textures in the paint before you
create the transfer. So any fabric, crumpled
up plastic foil, bubble wraps, anything goes and can be used to create texture. Of course, also stencils
and things like that. When it comes to cleaning, it does help to have a
wet rag or in this case, it's an old sock where
you can, you know, wipe off your fingers once
you have used the charcoal or the pastels because
you will be a little bit dusty
and we don't want to have the fingerprints
everywhere. So having a wet rag can
come in really handy. And then to clean the chelly
plate will need two things, to clean off the acrylic
from the cheli plate, we can use a wet kitchen towel. If it's, you know,
sometimes that's enough, you can use baby wipes or
if it's already dried, packing tape is a
really great way to get off the dried paint
from your jelly plate. The charcoal and very often the pastels don't come
off with these methods. For the charcoal, you need either mineral oil or baby oil, and this is mineral based. So it's, um, Papenum liquidum. So that is what you want to
look for, and, you know, you use that together
with ihumTwel to rub it off and get your
chilly plate clean again.
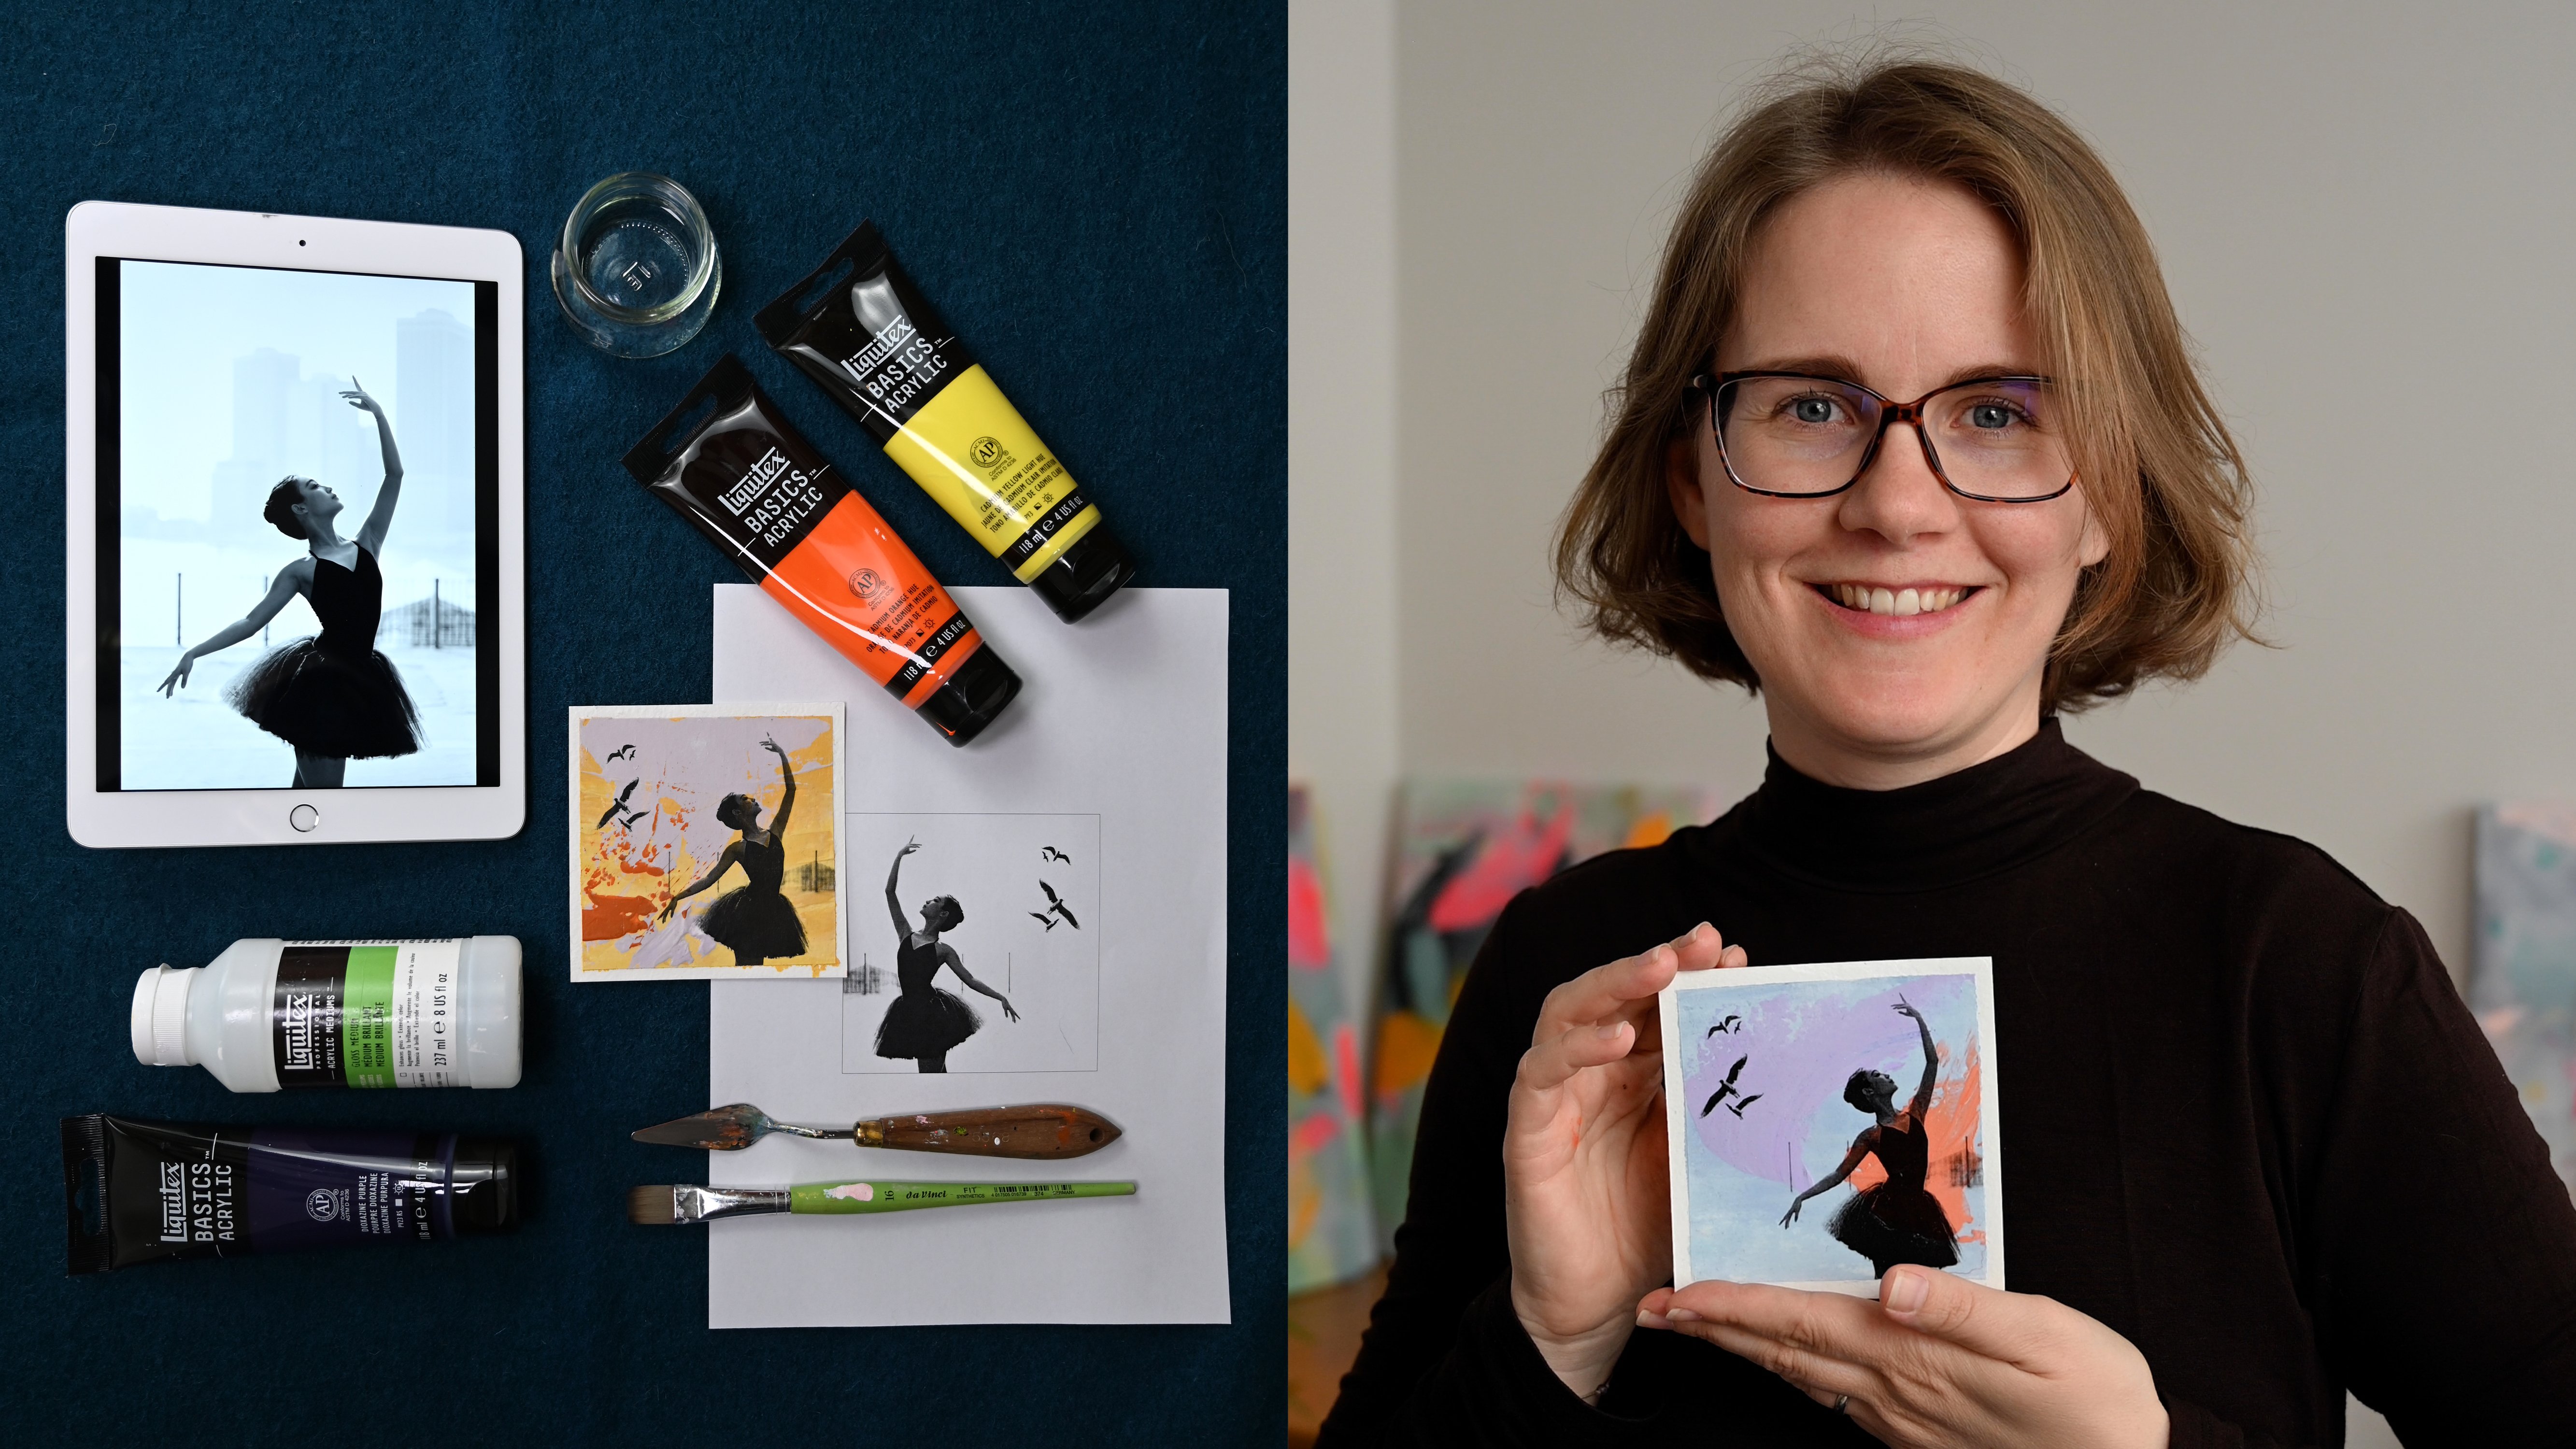
4. Sketching Options with Charcoal and Pastels: In this lesson, we are exploring ways in which you
can get your drawings done. So one of the most obvious
options, of course, is going through
your sketchbook, looking for sketches
that you already have, and then taking those,
making a photocopy, or taking a piece of transparent paper and tracing
from your sketchbook page. The other option if you have a real object like a
leaf, for example, is to take a photocopy and then work directly
on this photocopy. If you don't have a
real leaf on hand, you can also print out
the templates that I have provided
and cut out a leaf from a piece of cardstock
and then use that on your jelly plate to mask off
the area of the leaf shape. The last option that
I want to show you is one where you don't need any
additional copy machines. You just have you know, found a leaf and you
want to start creating. What you need is dressing paper and some kind of
other paper if you want to. We are making a frottage. Fotage means a rubbing. And for this, we'll put
the leaf under our paper, and then we'll take
some kind of, you know, soft pastel or charcoal, and we'll just rub over it. We just, you know, go over
it with your charcoal stick. And you might have done this
before when you were a kid. I did that with
coins all the time, making my own toy money. Okay. So we could now take
this and actually print it, but it's a little bit messy. So what we are now doing
is we're just using this as our image to trace from. So we do have some
double lines here because it was like
it's a thick leaf with thick veins
and so there was a little bit of sliding
around involved. But that really doesn't matter. It does help if you have some kind of tape
and you want to tape down both the rubbing
and the tracing paper, you don't have to worry about that sliding around anymore. And then you could work
with a charcoal pencil. You could work
with soft pastels. I'm just going to
take this piece of compressed charcoal
because it's really dark, and I'm just going
to draw that leaf. I can also look a little bit at this at the same time so that I don't get confused
like here in the middle of the
it's not very clear. I have two lines, so
it did slide around. So I'm just deciding on
having one line here. And in the end, what's the tip, you might want to fade
it out a little bit, but really it doesn't
matter so much. Just following the outline, just as with drawing in general, does make sense to vary the
thickness of your lines. It feels right now a little bit wobbly because under this paper, I have a painted table covering that's a
little bit uneven, so that's actually,
I do like that. I do like things that take the control
out of the process. Because we're not just
creating a copy of nature. I'm more interested in
creating my own interpretation and making this feel a
little bit more unique. So, you know, where there
are the thick veins, you want to press a little
bit harder and then you can, you know, fade it
out a little bit. We are not doing all of, you know, all the lines. We're just picking the
most conspicuous ones. It's really up to you and your style if you are more into, like, making this really
intricate or not. So I can see that here I have one more here more vein
here on this side. So I'm going to add that. It's actually quite
interesting how these veins connect
here in this leaf, creating these
segments, actually, which is quite unusual. I want to give this a little
bit more dimension here, so it's not just a
line, but actually, you know, the stem is
a little bit thicker. So now it always helps to have a wet break somewhere
because now you have the charcoal on your
fingers, and now you have, you know, the we've
finished drawing, so we have taken, you know, these two steps. We have taken a reef. We have done a rubbing of it, and then we have traced
from the rubbing. If you want to, you could
of course make a sketch directly from the real
thing without the rubbing, just sketching from real life if that is what you're into. If you're more interested in the mixed media process
like I am and you want to speed up the
whole process and don't spend an hour drawing a leaf, then this is a real
quick workaround. So if you happen
to have access to a copy machine and are able to create a
copy of your leave, you can of course work
directly from this.
5. Transfer Your Drawing to the Gelli Plate: Now we are ready to transfer
our sketch that we've just created and transform the smudgy drawing into a permanent print. Because if I would go over
there with my finger, I would have smudges
all over the pice. But once this is printed, it will be permanent. You need to have
your paper ready, like the paper you
want to print on. I will just put this
to the side for now. Then you want to have some paper where you can roll
off your brayer. You need the jelly plate, and you will need
medium, or in this case, you could also use any acrylic
paint that you want to use because we are not yet relying on the
transparency of the print, so you could use any color. So what you now want to
do is you want to put your charcoal drawing face
down onto the cheli plate. Oh This looks as if it
doesn't connect everywhere, so I'm just going to
wrap over it lightly. Actually, you don't
need any pressure. It's just because
of the air bubbles that I feel I need
to press it down in those areas so that
charcoal actually has some contact with the paper
and we are already done. We have a beautiful transfer
on the pallet plate, and now it's time to
add the acrylic medium. This is MT medium. And it works beautifully. You don't need a lot, and then we are already
spraying this out. This is probably way too much. It's really, you know, I'm sliding around crazy, so I'm removing some by
picking it up with the brayer and getting it off to a paper that I've prepared
for exactly this purpose, and now I have my paper
ready to the side. I want to put it down. And now it's just like any
other chilly plate print. Most of the time, you can
lift it up immediately. You could leave it here
to dry completely, as well. That wouldn't matter. What I like to look out for is a slight some kind of
wrinkle in the paper, which shows me that the
moisture, you know, from the paint or in this case, from the medium has
been sucked up and, you know, that's a good sign so that the paper and the
paint connect well. This happens more with the medium in not so much
with the heavy gel medium, which is, you know, a little
bit less order in it. I think we're already
fine to pull the print. And here we go. We have the super nice chocol print that is now
completely permanent. So and what's nice
about the mat medium is that it gives you
that made surface that's more like paper surface. If you would use a gloss
medium or mid gel medium, which is also glossy, it would shine a
little bit more, but this gives you a
very toothy surface that makes it really easy
to keep drawing on that. And what we don't see right here is that it's
actually transparent layers, so I could have done that on a piece of colored
paper as well. Let's see. Now I will take
the second print from this, which will obviously be lighter. Me two prints usually
work well enough. Then it starts to become
really light and then it's time to clean up the plate, and then you could reuse that again because there's still plenty
of pigment on it. So you could just
transfer that again. If that becomes too if there's too little
pigment on your drawing, you could freshen
it up by adding a little bit of charcoal
over your existing drawing. If you want to make motels,
that's totally possible. Now let's pull this
from the other side. Like compare with the
real one, you can see, this one is lighter already, and this is even lighter. But what you can do, you could just add
some more charcoal or drawing with any drawing tool and then fix that again
with your ali plight.
6. Fix Too Light Transfers: So I can now go in and, you know, draw over this
with my CVA pencil. So what we now want to do is
we want to put a little bit of medium onto the cheli plate. And this is, you know,
quite the same process. But now we are just using it to fix the
drawing to the paper. And then it almost left no
print on the child plate. Now, let's see if we have
managed to actually fix this. I will just try to smuch it. It's always exciting when you do that while you're
filming and then. For whatever reason,
it doesn't work, but it did work, so
I'm really happy. So this is a way to, you know, fix those drawings as well. And what you can
see here because I haven't dusted off my drawing, I have transferred some of those dust particles
from the sepia, so it does, you know, make sense to blow lightly over your paper
before you do that. But anyways, we do have a
super cool drawing right now. Oh
7. Quick Cleanup: Removing Charcoal Residue: There is medium over the pastel. We're first want to get rid of the medium or acrylic
paint, if you have some. I like to use those
packing tapes for that. Just put them on
and in this case, it took off the pastel as well. Doesn't always happen. Now it's already not
sticky enough in a mi. What do you need for
the charcoal is this. You need to use baby oil and
spread it over your drawing, let it soak in, love it. Then you can rub it off. It does take some
pressure to get off. So now you can see I've taken off all the charcoal residues, and now before I can print again on this
because now it's greasy, I need to rinse it with, I use just soap, dishwashing
liquid, actually, just leather it in a little
bit and rinse it off, and then it's ready to use again for the next
charcoal transfer. A
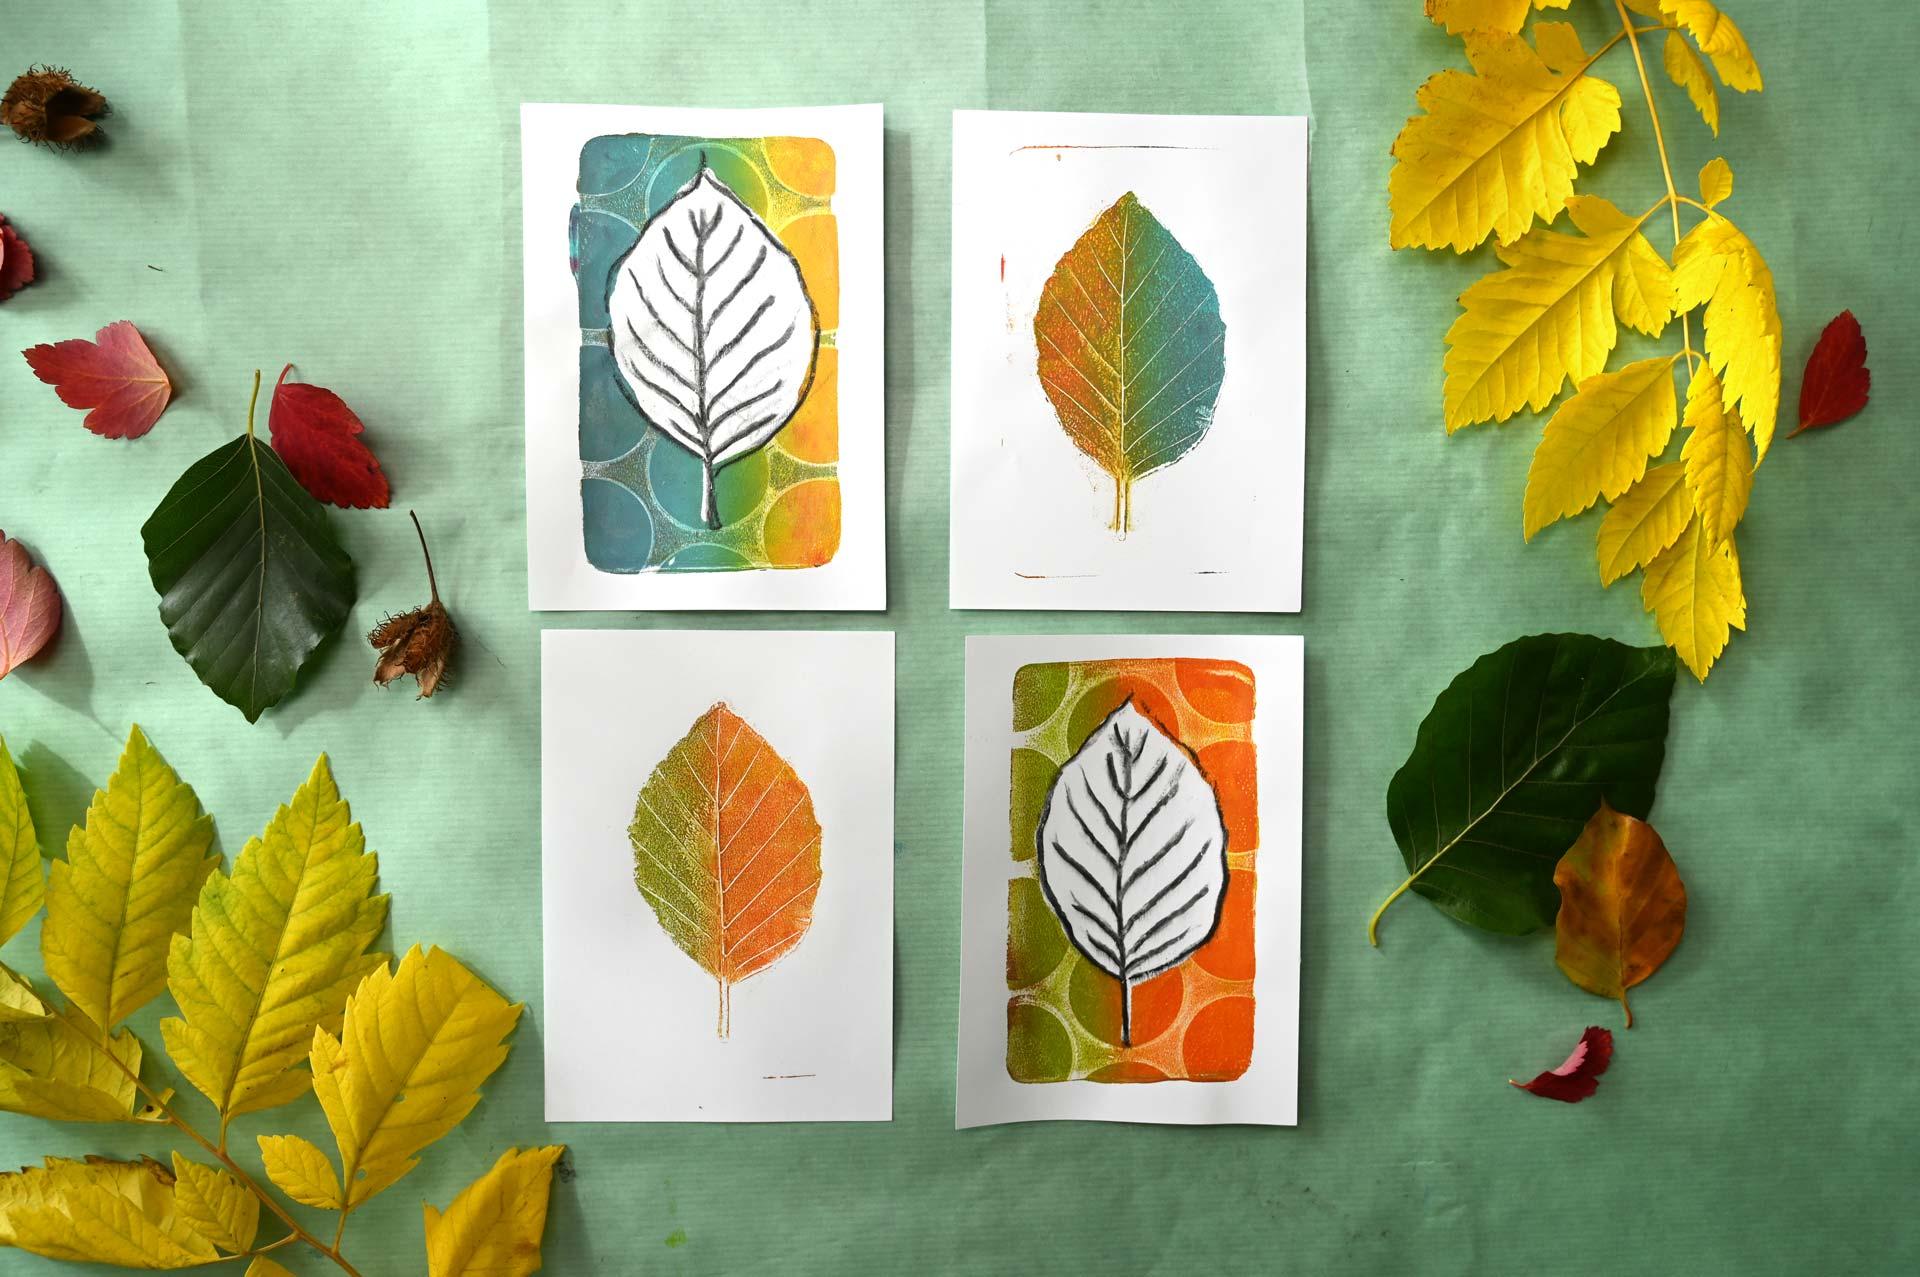
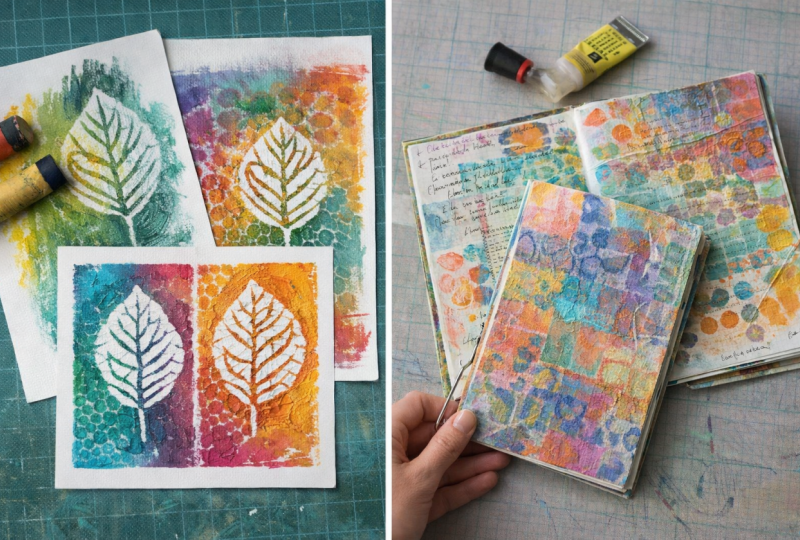
8. Start Your Series: Positive & Negative Leaf Prints: Now that we've covered
all of the basics, let's move into combining the charcoal transfer with a regular chelly plate
printing technique. So we'll create a positive and a negative
print of this leaf. In the next step, we will
add our charcoal transfer on top and we'll also create variations of this
background layer because we can also bring in some textures to make
it more interesting. But before we start
using our paint, we need to have a
copy of that leaf. Because I don't have a
copy machine in my studio, I will do a rubbing. For this, I'm going to use my small jelly plate because
it's just a little bit easier to use when creating so many prints in the filling area
that I have here. This one I store with paper
on top and on the bottom, which is actually what's
the best way to do it according to the manufacturer because then you don't
get any air bubbles. Now, what we'll do is we'll
put a piece of the paper below this is going
to be the final size, and we'll just try to
center this approximately. I'm just eyeballing it. This
will help us layer for, you know, registering
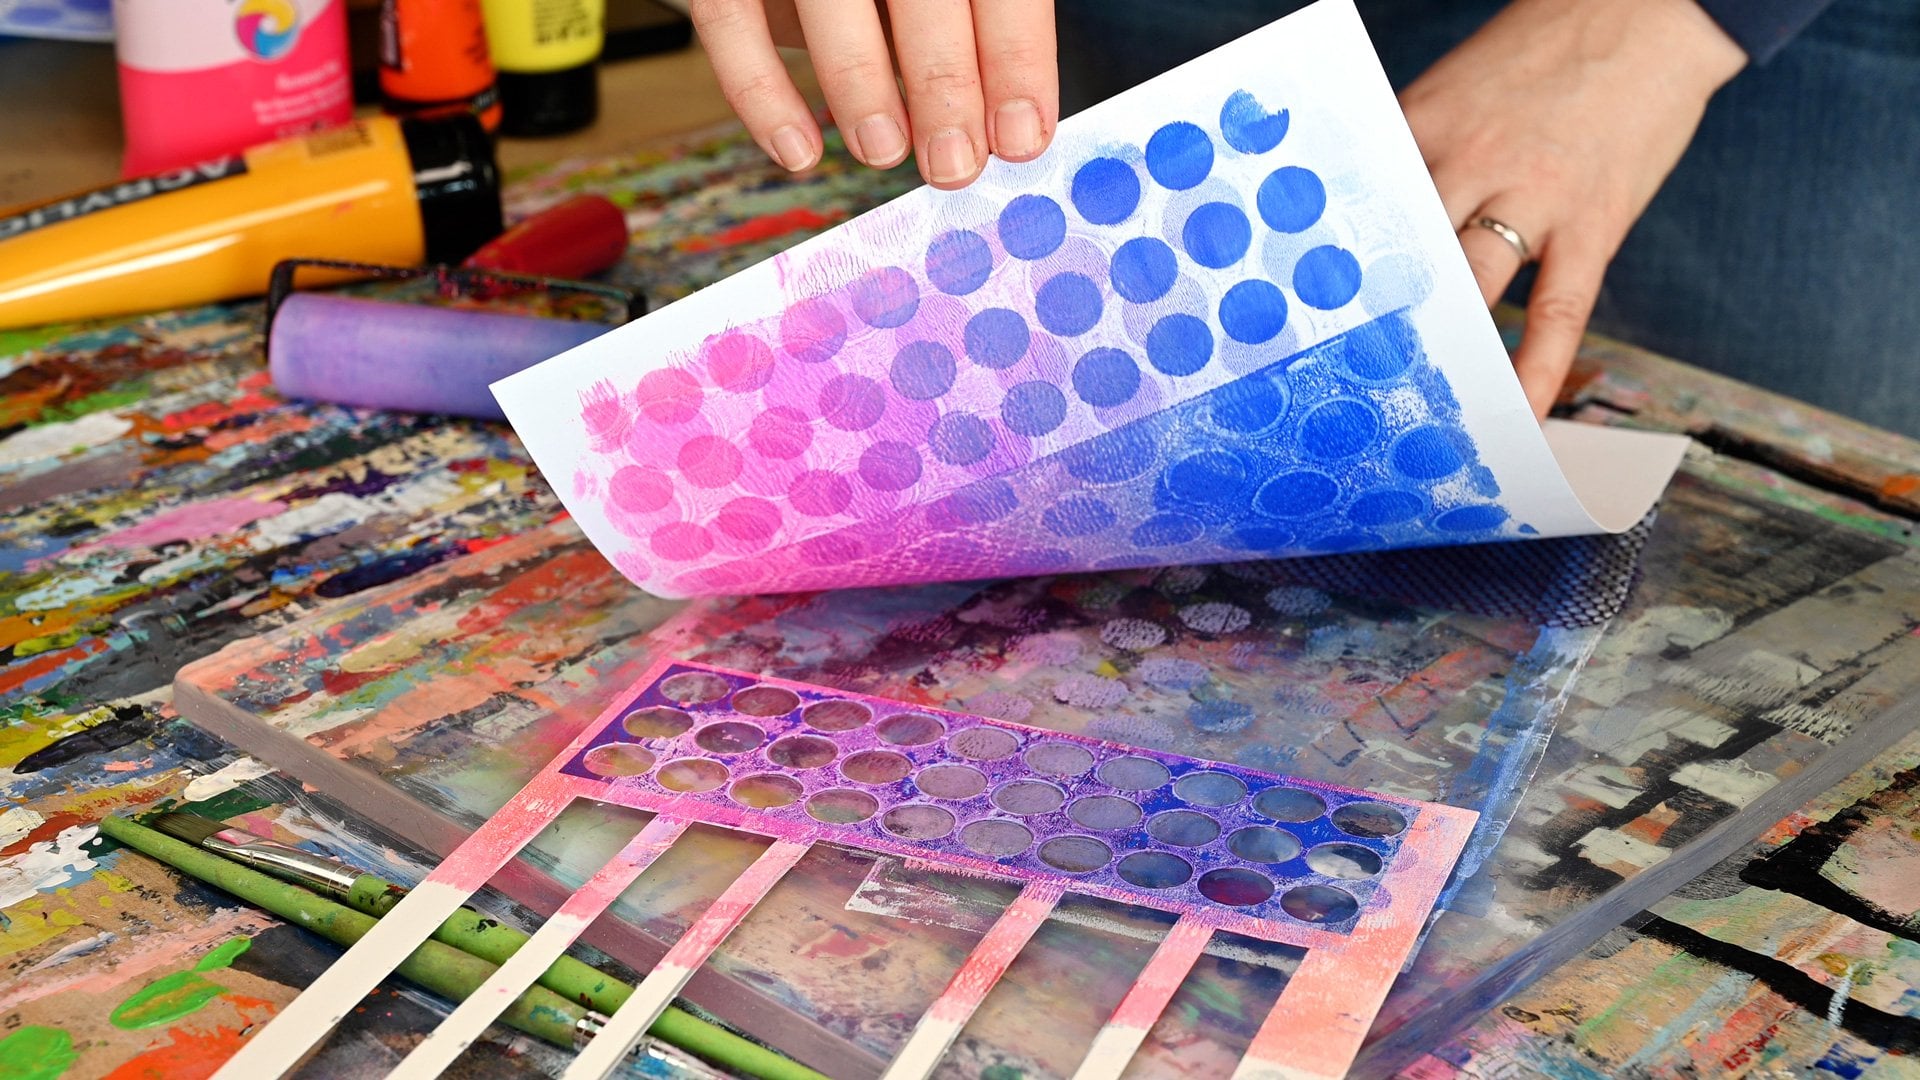
the charcoal over the chilly plate print. So first, I need to add some paint to this cheli plate because the cheli
plate is so small, I don't want to just, you know, squeeze it on because I want
to get a couple of colors, and if I squeeze it on, I'm pretty sure I will have too much paint
on my chelly plate, and even might sound
like a broken record. Having a thin layer
of paint is really the most vital thing with
chilly plate printing. So I think for the first one, I will pretty much use
almost the pure color. So just adding the screen
and then moving into this. I think this is probably
already too much as always. Let's put this to the
side and spread it out. I just want to go up and down right now and
not criss cross because I'm creating some
water off a gradient here. I do move a little
bit left to right to mix the colors,
but not too much. And then I'm rolling
off the brayer, so it's clean, and
I can put it down. This was the side that I rubbed. So this is the side that
I will put down here. And now we'll need the sheet. We are pretty gone, and
I'm standing up right now because I want to put this, approximately on top, that it aligns with the paper below. And with the paper, I'm also
pressing down the leaf. And now it can't slide anymore. Here where the stem is,
I need to, you know, press a little bit more
firmly because the paper doesn't want to go and pick up the paint
next to the stem. And again, I'm just
waiting for a few seconds, and I can already remove that. I have a beautiful print. Now I can I'm
preparing my paper. Sending up again because we don't want this
layer to dry on us. It down again. Then we can lift it up again. And we have this print. So I removed most of the
paint, which is good, so I don't have to
do a lot of cleaning before I do this again. So now I want to add
the texture layer, and what I need now is a
piece of paper that's, you know, lung
precious that I don't need for the printing process. It's just, you know, to pick up some of the paint. Actually, I've not
picked up the paint, but this has picked up the paint and I've just pressed it into. I didn't really pick
up a lot of paint, but that's what you could do. Not to be quick because I keep talking, this
is going to dry. The paint under the leaf is
fine because it's covered. It won't dry so fast, but was You see, it's already been too dry, so it did not transfer, but we don't need to
worry about that so much. Okay, the leaf was still good. And this is going to pick
up with the next layer. We'll create a few of these now. Okay, so this time, I'm going to take the steak on. Going to press it
down, picking up some round spots.
Oh, that looks fun. And again, being quick
to put my paper on top. And pulling the print. See some of that came off. So let's do the second one. Oops. Okay. So there was a lot
of paint left, so I do have some of
that residue here. What do we do now?
We do the opposite. So the other side of
this, which will be fun. Okay. That looks nice. I can see that there's
still some paint, so just, you know, see if we can pull it up so that we can get
a cleaner second part. All right. Again,
there's some paint left. Let's see if we can
pull it up moving. So we don't have to clean
in between, which we could, of course, I have some
co inspiration here. Now, let's do this shelf liner. Again, I'm just picking up
some of that paint. Mm hmm. Okay, you have another
fun object to use. It's from a game.
Oh, that looks cool. Again, there's still
wet paint here. I want to just pull
off here on the step. Until we get a clearer print. That's cool. I always get mad
when I get these splotches, but in this case, they
are actually fine. Because that's how leaves look. I mean, they are just like that. So I want to give this one
another try. That's good. Again, poking up the residues and Now we start to get interesting
results because there's all this texture
that's building up on the plate and also on the leaf. That's pretty cool. I want you to create
another one of this. I like that the
most at the moment. So what I just realized is
while I was working on this, trying all these
different textures, and I had, you know, all of these and this one. And I really liked how the
symmetric pattern looked. Whenever I find something that
really resonates with me, I try to, you know, wean in a little bit deeper. And, you know, play
with the possibilities. So we do have that.
And I'm thinking of, you know, having
this as a series. So I will try to maybe get one that has the yellow
and has the light green. So we'll just experiment a little bit with the
colors and see what works. And here the yellow and
see if that is enough. Sorry for the noise. Okay, so
that was too little paint. I would call that a field print. We can No, we don't even
want to take this one. So in this case, Okay. Nice. Okay. Red and green are
complimentary colors. So when I'm mixing them, I'm going to get some
kind of a brown color. So I will try not to
chew mix them too much. Actually, the brown
is super fine. It's almost the same
color as the leaf. We like that combination. Mm. That is beautiful. Mm. Nice. Oh, I like that. So with my last sheet of paper, I'm going to show you one
more variation of this. So we'll start out
just the same way, but now we are just
using one pet of paper. And now thing is, I want to register this pretty
much exactly where it was. I just looking at
the papers aligning. So it's probably not going
to be 100% registered, but I'm fine with that. Because when it's not
completely registered, it actually looks pretty cool
because you get that edge, which is actually
really nice as well. Now I've run out of papers, and I've created,
lots of prints, and now it's time for the next
stage of this bringing in the charcoal line drawings. I
9. Finish Your Series: Add Your Drawing to the Prints: All right, so we have
created all these beautiful, colorful prints, and now it's time to create
the charcoal transfer. So you want to take your rubbing or the photocopy of the leaf, whatever you've been using. So if you have worked
along with me, you probably have a rubbing. And now we are going to trace that and
create our drawing. Okay. We don't want
to go right up to the edge of the leaf
with our lines, lifting it up a little bit, lessening the pressure
of the charcoal and, you know, just creating
the drawing here. Actually going to put something
underneath the course. As I mentioned, my table
is a little bit wobbly, not wobbly, but uneven. Let's try another one. I'm not particularly
keen on this one, so I'm just going to give it another try with another tool. Sometimes that's what
we need to make things work I I like that much better. It's not as wobbly because
this is actually a leaf that, you know, doesn't have
those zigzag lines. It's more rounded. So as you can see the
drawings, you know, here started, I do
like this one still, but here I, you know, captured, I think, believe more
in its, you know, what it really does look
like characteristically. So you can easily give it a few tries till you
get something you like. Now, we'll just dust it off. Maybe not over your typod. Okay. Now we'll just, you know, gently
transfer the charcoal. And now let's get ready
for the transfer. And because it will
be really hard to, you know, put the paper
on top and center it, I'm usually doing it
the other way around. And I'm putting the jelly
plate onto the paper. It's not about being 100% exact. Then we can turn it
around again and, you know, pull the print. There was a little
bit much medium here. It does look a
little bit blurred, but it still looks nice. Now, we took most
of the charcoal, so there's hardly any left. Um, also on this one. This was the soft jug
so it's mostly gone. Probably not be able to pick up a lot more
from this drying, but maybe a little. We'll see. I'm just going
to try it once more, but this time was a
little bit less medium. Now I'm going to
print on the i set. All right. So that's
my opposite. One. A
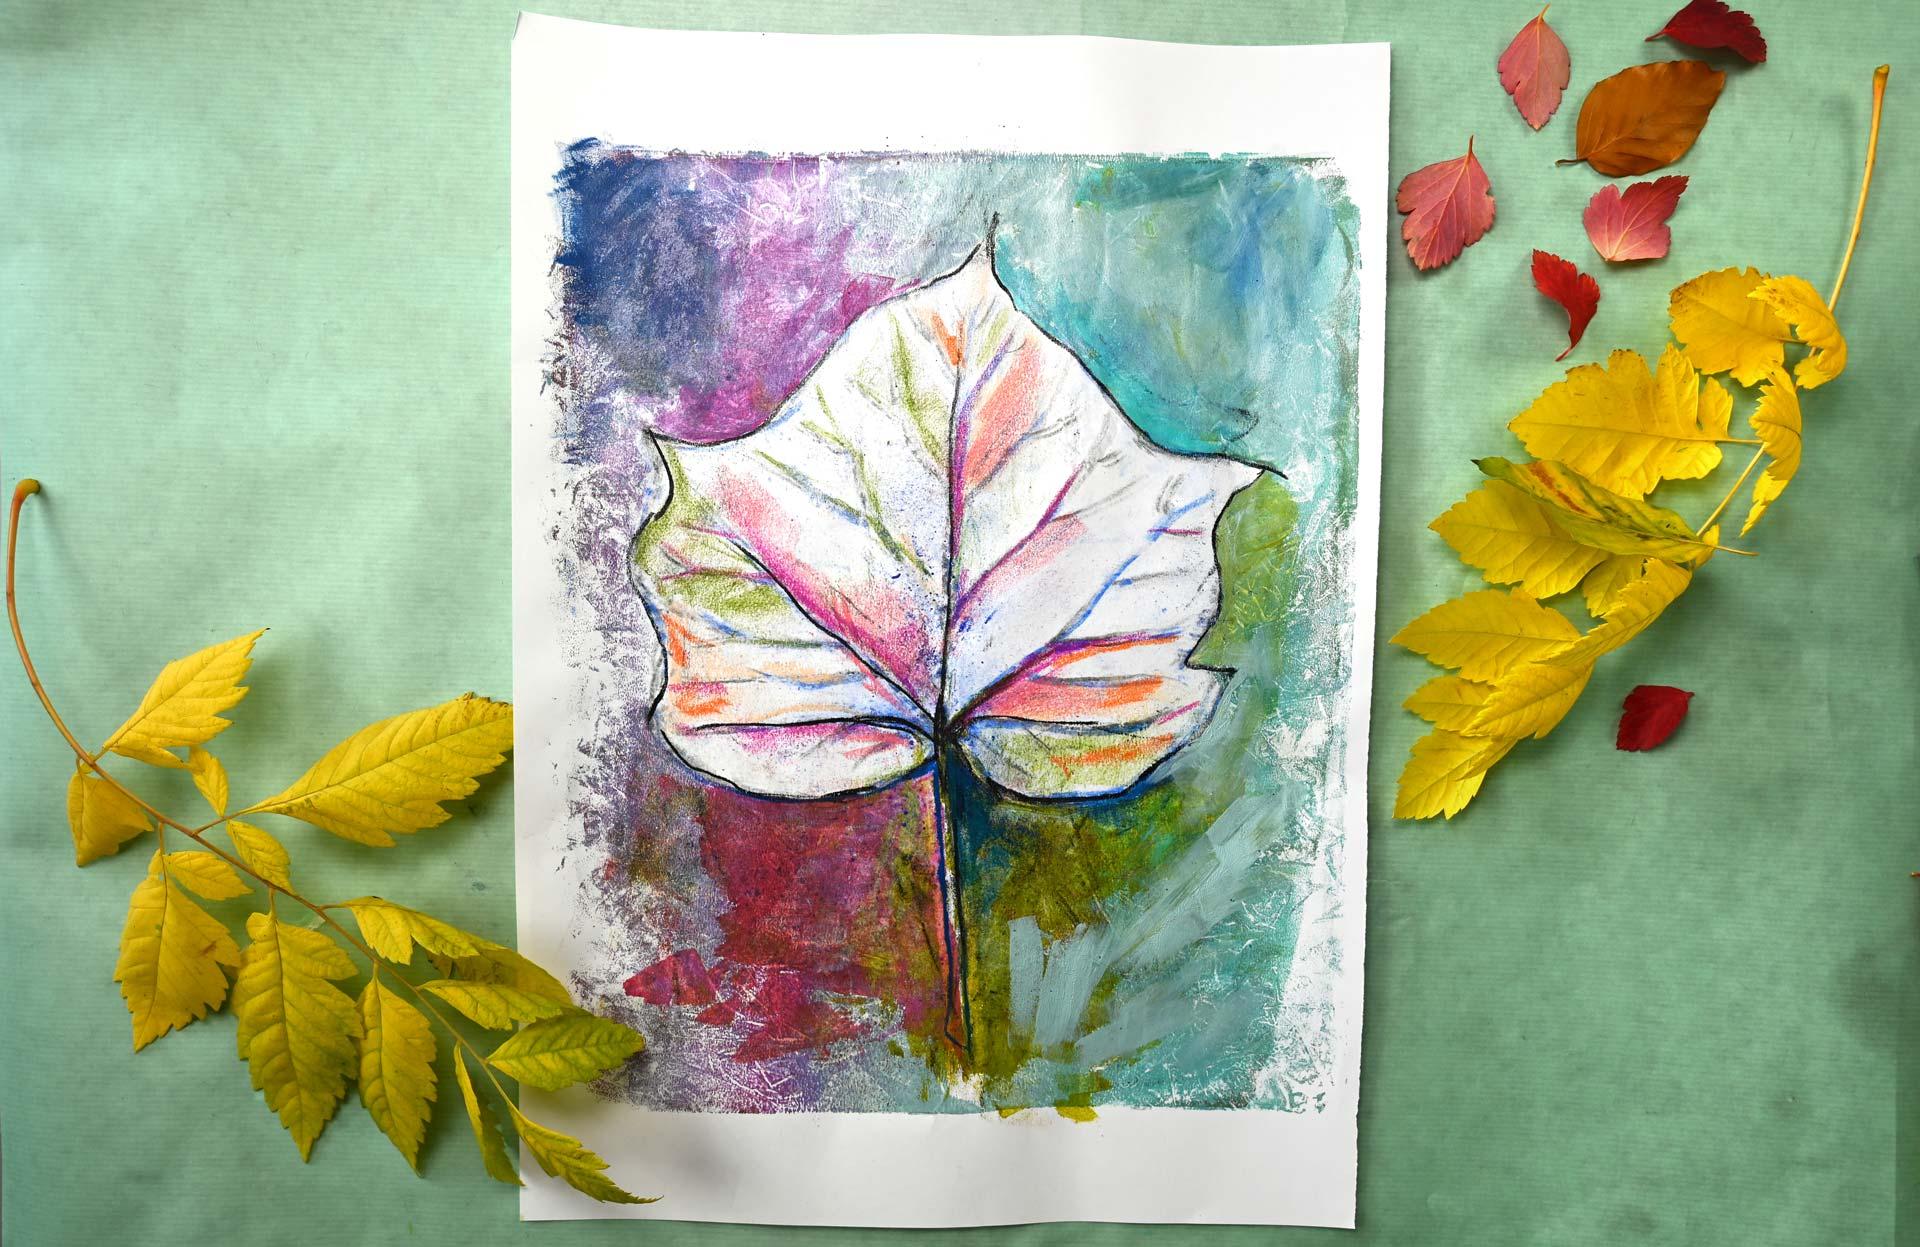
10. Final Thoughts: I hope you have enjoyed
this class and discovered a new way of bringing
your drawings to life by combining them with
acrylic paints and these colorful textured
jelly plate prints. Let's do a short recap
of what we've covered. We started by sketching simple leaves from
real ones, printouts, or wrappings and
turned them into expressive charcoal
or pastel drawings. Then we move to the
jelly plate where we created both positive
and negative prints, experimenting with
color and texture. Finally, we layered our drawings onto those backgrounds to create a cohesive series of
permanent mixed media prints, each one unique, yet
part of the same family. I hope this process
has inspired you to look at your drawings
differently and see how even the simplest
drawing can become something vibrant and
bold and lasting. From here, you can
keep experimenting. Try different drawing tools,
explore new backgrounds, use other motifs, layer
several drawings in one print, or even paint over your prints. And remember, this process is all about play and discovery. So please don't worry
about perfectionism. If you enjoyed the class, please take a moment
to leave a review. It really helps other
students find the class and it's valuable feedback for
myself. So thank you for that. Don't forget to upload your class project to
the projects gallery. I'd love to see your
leaf inspired series or whatever other motifs
you have created. If you'd like to explore more
jelly printing techniques, check out my earlier class from jelly prints to
handmade art journals, where we go back to the basics, explore paint ways to work with the plate and
create an art journal. I hope this class has inspired
you to keep creating, experimenting, and
turning your sketches into beautiful works of art. Thanks so much for joining me in this class and I hope to
see you in another one. Heavy printing and bup now.
 Cornelia Zelinka-Bodis, Mixed Media Artist