Transcripts
1. Introduction: If you are out of ideas, feeling overwhelmed or
stuck in a creative rat, waiting for inspiration
won't help. But taking 10 minutes every day to do a small exercise will. Hi, I'm Celia, a mixed media artist with a
background in advertising. I know the pressure of having
to be creative on demand. And for me, pressure
and creativity don't go together and often
result in creative blocks. In this course, I'll help you release these blocks through clearly defined painting prongs that help you to just
focus on the process. And it really doesn't
take a lot of time. I've also created
printable prompt cards to have on hand whenever you
need a little inspiration. This class isn't
just for painters, but for anyone who needs a jump start to get their
creativity flow again, and you will walk
away with a wealth of exercises that will not only help to get you out
of the creative wrap, but also expand your skills with a range of
painting techniques. So let's get you painting
one prompt at a time. See you in class.
2. Class Project: The painting prompts
in this class are designed to be entry points
into the creative process, and they are divided
in five categories. Let's play easy techniques, line in shape, color and
texture, and mini projects. Each prompt should not take
longer than 10 minutes, but once you got started, you might want to
keep going longer. For the class project, I would like for you to pick
five exercises five prompts, and upload pictures to
the student gallery. You can choose one prompt from each category or you can combine them in
any way you want. Of course, you can do
all the prompts as well. I always love to see your work, and I'd love to be your
accountability partner. Speaking of accountability, We want to practice that getting started again and again
and really getting into that creative flow very easily, and that comes with practice. Don't wait until you have done all the pronts
to start a class project, give yourself some
accountability by starting a class project right
after you have done the first pront and setting an intention of
what you want to achieve. This can be anything
from I want to do these five prompts
over the next five days, or I want to create
prompt ABCD EP, whatever, over the next ten days, or I want to do all the
prompts over the next month. The more specific you are, the more likely you are
going to achieve it, and the more likely you're going to come back and
actually do the work, which will give you the results, the progress, over time, starting and getting into that creative flow will
get easier and easier. To make this a
little bit more fun. I have created a set of cards to print out and you can then pick and choose even with closed eyes and do
whatever the card says. Now, let's take a look at
the materials you need.
3. Overcoming Creative Block: When it comes to overcoming
creative blocks, it usually boils down to moving past that inner resistance
to getting started. That initial resistance
is often caused by either lack of time,
overwhelm or perfectionism. Let's tackle these
from the start. Let's be honest. Here
sometimes once you create something and you are just too busy and
keep postponing it. This often has to do with a
real lack of time. I get it. But sometimes it's also a
perceived lack of time, and you will probably have
heard it 100 times before. You just have to make
time for it, right? Yeah, easier said than that. But when it comes
to making time, it helps to reconsider what is a successful
painting session for you, a successful creative session. Because a couple of years ago, I still had the
misconception that I needed an uninterrupted chunk of two to 3 hours so that it's worth get all my add materials
out and get started. Honestly, now that I'm
a professional artist, I still am a mom of two and I have other
responsibilities, and these extended sessions don't happen on a daily basis. They are sometimes
quite unrealistic. While I still value having
such large chunks of time to really dive into the process and make
a mass in my studio. I have also come to value small exercises that I can
do from the dinner table, from my laundry room, wherever I have a
little space to create, and they keep me in
the creative process, even if I just have
a couple of minutes. This is why I've created
the painting proms, which are designed to be
completed in under 10 minutes. And doing this gives
you the opportunity to exercise your creativity to grow your creativity
just like a muscle, and it will, and you
will make progress if you keep taking
those little steps, and not only that, taking
the time to sit down for just a few minutes to just do
something with your hands. We'll leave you with
such an amazing sense of accomplishment and
calm and happiness. And new inspiration
with every session. Let's look at the second
thing that sometimes happens. You have taken the time,
you're sitting in front of your computer, your canvas, your piece of paper, whatever your medium, and
your mind goes blank. You have all the
possibilities of the world, but you just can't
think of anything in particular that you want to
do and create right now. I know that from my
times in advertising, I need a good brief. I hated these moments when
we had some spare time, and I was told to
think of an award winning idea in any medium
like TV or ads or whatever. For any of the clients
that we have and I'm like, D, that's too broad. I mean, Oh my gosh, I can't think of anything. Where should I even start? You go and you make
yourself your own boundary. In a broader sense, Creativity is not about
creating something beautiful, like a beautiful painting, but it's about problem solving. Without a problem and a
clear problem definition, there's nothing to solve. This is why the painting
puns are helpful. They give you a framework within which you
can be creative. It's not so restricted, but it narrows it
down and that really helps you to get started
and to be more creative. The last thing that shows up is, I want this to be amazing. I want to create this
beautiful painting, this thoughtful illustration,
this award winning design. And that can really block you. It's a very goal oriented
outcome, focused mindset. That is not helpful to get
your creativity flowing. It puts so much pressure
on you that you shut down. In the beginning, it's
all about being playful, about allowing everything and only later you can bring
this to a focus again. That is why the painting
prompts are these quick, simple exercises designed to stimulate your
creativity without focusing on the end result. So let's sum this up shortly. The main hurdles
to getting started are time overwhelm
and perfectionism. If you struggle
with time issues, it helps to break things
down into small easy steps. Give yourself a clear,
achievable time frame. Let's say, I will make something for 10
minutes and to create some kind of accountability like Sherry class project and posting images of
your exercises. If you struggle with overwhelm, it helps to do easy exercises. Tackle things step by step and set restrictions
and boundaries, such as materials,
subject matter, or time. If you struggle with actionism, concentrate on simply getting started and focus on the
process, not the result.
4. The Materials You'll Need: For this class, you don't need any specialized art materials. But just some basic things that you very likely have
at home already, paper, paints, drawing tools, and some everyday objects. While many proms can also be done digitally in tools
such as procreate, using actual materials and having the tactile
experience with real materials will stimulate your brain and your creativity
in a multi sensory way. If you can give it a try. Now let's take a look
at what you will need. When it comes to paper,
really don't overthink it. We're not going to
create final artworks, so you can try with
whatever you have in hand. I primarily work on white
paper in this case, but you can also work
on colored paper. You can use printed paper, you can use mixed media paper, you can use affordable color
paper, packaging papers, magazine pages, whatever you can find, envelopes,
anything goes. As for paints, you
can use acrylic, gas, inks or watercolor. I just wouldn't use oil
paints because they take longer to dry and we're focusing on quick
drying techniques. When it comes to
drawing materials, you can use anything
that you have on hand. We'll be using markers, we'll be using
pens, fine liners. You can use colored pencils
or regular pencils. You can use crayons, either water soluble
or non water soluble. You can use charcoal or pigment. This's not a pigment stick
border like a pigment block. Whatever you have on hand, just just use it. Also gather some basic items
such as scissors, acoustic, a ruler, a container for water, and a few sheets of kitchen
paper to wipe the brushes. We will also clot different
brush techniques. Together a couple of brushes that you can find in your home. They don't have to be
specialized art brushes, but can be just
regular paint brushes from the hardware store, calligraphy brushes,
whatever you have, it can be synthetic hair or bristol brushes, sponge brushes. It's just about
having a variety. We'll also use a palette
knife or a painting knife. If you don't have that
find an credit card, old plastic card that
will work as well. We will also incorporate various household objects
and packaging materials. Having things like cotton swaps, cling wrap or a thin
plastic bags, fruit nets, bubble wrap or some
packaging materials, kitchen sponges, or old toothbrushes and old comps will actually
come in useful. For one prompt, we'll
also use a white candle, but you could also
use a white crayon. But make sure that it's non
water soluble because that is important for the technique
and for the last, we'll need a needle and
thread and a paper clamp. But the best thing is actually to take a look at the materials
list and download it because probably I've forgotten something and I will
make sure that you find all the materials
for each prompt in the materials list
so that you have the possibility to get
everything ready in advance. The goal is to make the creative process as easily
accessible as possible. You just have to do whatever
works best for you. There are a couple of options. You can watch all the videos, go through the materials
list, gather everything, put it on a table or in a box so that it's very
easily accessible, and you don't have to
go into the trouble of putting it away and
getting it out again. But you could also just like, take one prompt, gather the things you need from
this one prompt and do that. It really is about making
this as easy for you as possible so that it's just about sitting down
and doing the work. And you don't have to
think about anything else. So let's get started on this
creative journey together, one painting prompt at a time.
5. Turn the Music On: This prompt is called
turn the music on. We're going to explore how music can influence your mark
making and what you create. All you need is a
couple of papers, like a marker or a
pen, and some music. Pick two to three
pieces that are quite different
different music styles. And then start mark making, and you can observe
how the music will influence that
if it influences it and you can do a
continuous line or you can make pick up the
pen and go down again. It's really up to you. It's a really interesting
thing to explore, and it's not about creating
something finished. It's just about letting loose
and getting into motion. So now it's your turn. Pick some music and
just start creating. It really doesn't matter
what it looks like. It's just pro fan, and I've also used
different papers. This is like a
more smooth paper. This is not that smooth. This is transparent paper. So I was just trying
how that would influence how the pen would
glide over the paper.
6. Go Back to Kindergarten: This prompt is called go
back to kindergarten. And it's all about
using your hands, letting out your inner child, letting it play and
feeling really loose. I have already put out
some acrylic paints, and I've prepared some
gloves because like I want to get really tile and
sensory with the paints. So it's not the ideal situation to have them all
over your fingers. And I have a roll of kitchen paper in case I
need to clean up some mes, and I have also
collected some papers, like normal printer paper. This is a piece of inexpensive
watercolor paper that I've already used for exercise, and this is a sketch book. I have something to choose from. These are the paints
that I've used. They are cadmium orange hue, cadmium yellow light hue,
and fluorescent pink. But it really doesn't matter
which paints you choose. These are just like some colors that speak to me at the moment. I feel they energize me, so I want to paint with them. Without further ado,
let's get started. First, I want to explore, like, different
marks I can make. I mean, this would be much more fun to do with
your actual hands, but I don't have any
finger paints on hand, and I really I
really don't want to get my hands full
of acrylic paints. So what I've done now,
basically is just making prints with my fingers. And it's actually funny
with these gloves, you get kind of like greased
prints from all these folds. And now I can take a
second piece of paper. And I can introduce movement. So now I will go in and I will not only
make a pri but I will also move So this gives me a different feel and
a different mark. So I can really now start
to blend the colors, and this is really fun. I really enjoy that circular
movement right now, so I'm just leaning into it. Of course, you could
make this more dynamic. I'm just putting
a piece of paper below so that I can
go over the edge. You can already see how these different techniques
get a different feeling. Here it's like a swirly thing, and here's a more
expressive of explosion. I feel that you get And as long as the
pains are not dry, you can kind of
blend them together. But with acrylic pains, it usually doesn't take
long for them to dry, so you have to
work kind of fast. If you really want to blend. But in this case,
we're just exploring, just just exploring,
making soft blends, making more expressive strokes. These are the two pages
that I've created. On by just making prints without moving my
hands, just putting them down. The other one by moving
in different motions, and you can create a lot
of different effects with just your hands as you can
see in these examples. Yours can look
completely different. You can also if you feel like, you can do a pattern, you can do this more orderly. This is really personal to
you. It's your expression. Whatever comes out of your hands flows
out of you is okay. So it's all about having fun, and now it's your turn.
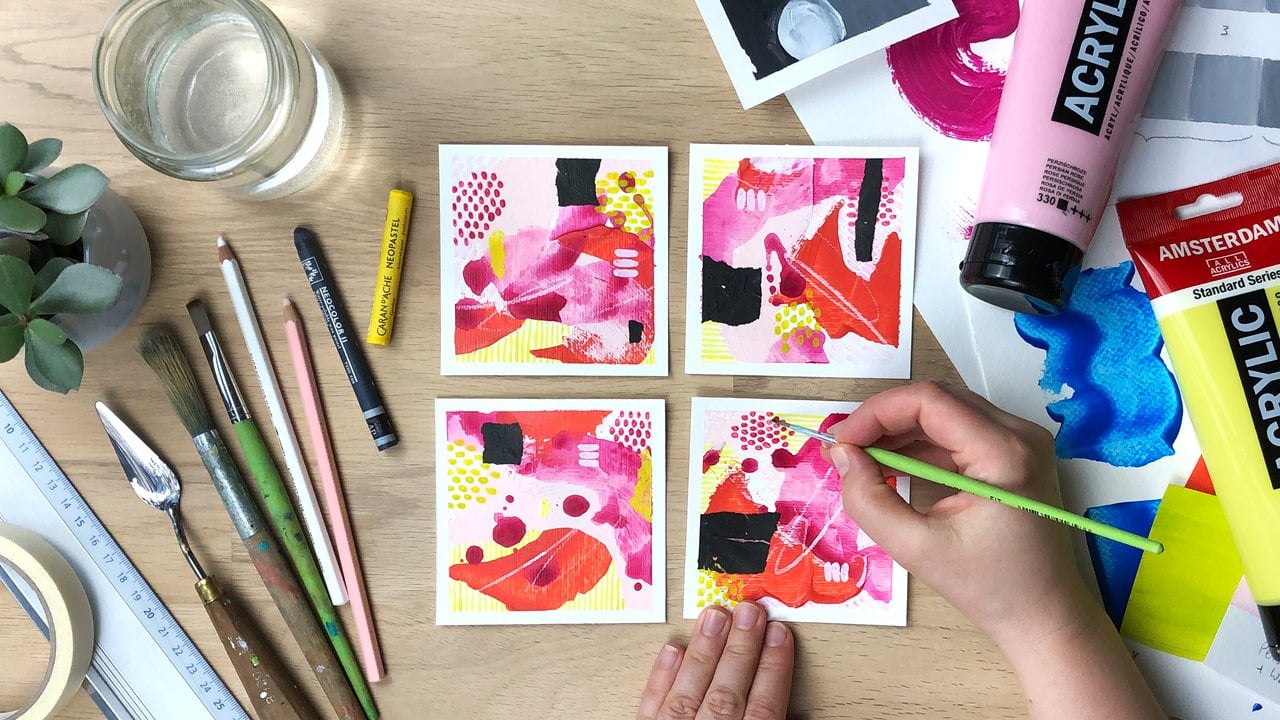
7. Create Blob Monsters: The next pmt is
called blob monsters. This can be super fun, but it can also be super
overwhelming when when your perfectionist kicks
in and you want to create some three
dimensional fancy monsters. I will just use black paint. I've used pages from magazine, when I put this on
top, make the blobs. Larger and see what I get. Okay. Now I will have
to leave this try, and then we can add a
couple of features. My blob monsters
have tried overnight and are ready to turn
into little creatures. This can be quite a challenge. Now you have this
blob, what to do. I struggled myself on the first page and I didn't
have that many ideas, and I was a little
bit hesitant when it came to putting
in the features. This really shows that it takes a while to get into a process. At the beginning, you don't
really know what to do, but then when you
get more used to it, you can become more playful. On the second page,
it went a lot better. I mainly focused on
bringing in differences. Differences in number, in size, in shape, like in the length of the arms and
all the different features. So I found the more
you do this exercise, the more you get into it and the more ideas you
will generate because creativity is really a muscle that you can and have to train. So if you're doing this for the first time,
please take it easy. There's no shame in having
to look up features, like some facial features, just google it or take
inspiration from what I've done to get your
side into this process. And now it's your turn.
8. Write Secret Messages: A. This prompt is called
write secret messages. If you've ever done
that as a child, this will remind you. What you need is a candle, ideally a white one because
we're using a white page. But if you don't
have a white one, you can use any color. It's just that we
are creating areas that resist the paint where the paper doesn't
take the paint. I will use watercolors, as you know, when you have
used watercolors before, if you have pants, you need
to drop a little bit of water in them or spray them so
that the color activates. But you can also use
thinned out acrylic paints. They have to be really fluid just like as if they
were watercolor, or you could also
use gage paints. But again, it has to be really fluid the moment it's
not fluid enough, the resist technique
will not work. What we are now doing is
we are just making marks. You can write
something, of course, like a real message to you. I could try to write something. And also make some marks. You have to press fairly
hard so that paper is really like the pores of
the paper really closed. Again, this is not
about creating a super sophisticated design. It's just about having fun and experimenting with
this because again, you cannot really control it. Who can draw really
perfectly with a candle. Also you can hardly
see what you do. You can look from side and it has a little bit of a scene, but you cannot really
see it very exactly. So let's just see
what I have written. I will take a brush and
pick up some paint. You can mix them or you can
use them right out of pen. Now we'll just go over this. I think now this brush is okay for picking up the
paint out of the pens. It's a little bit too
small for spreading it. We'll use this one. And and reveal my *** to. That's it. If you want to, you can leave this to dry
and then when it's dry, you can repeat the process
actually again and again. You can take the candle again, cover some of the
errors that are now a blue or blue green, and then add another layer of paint in a different
color on top. And that way, you create
different colors because you preserve all the
colors that are below the wax that are
protected from the paint. And this technique is called
a resist technique and is also very useful in painting
or in illustration. And now I would see
your turn, have fun.
9. Connect Your Brain Sides: This prompt is called
connect your brain sides. And what we're doing is we are painting bilaterally that
is worth both hands, and not only that, but we're
doing that simultaneously. So at the same time, and theses version that I like
that I find eases and more relaxing is to mirror your
making with your hands. So you can fold the piece of paper in
half and imagine that in the middle is like the
line where it's mirrored. But you don't have to hold it. You can just do it without. I'm using regular printed paper, but this would also be a good
idea if you use watercolor, that you use watercolor paper, but I will just use
the regular paper. And It feels the
best if you have two brushes that are exactly
the same because then you have the same feeling
on both hands. If you have different brushes
that react differently, it feels a little bit more
I feels a little bit weird, but it's also fun to experiment. If you don't have the
same brush twice, just use two different
ones and just cry. I want to wet my brushes. Of course, you can use different
colors for each brush. I will start with using the
same color on each brush, and I will start
with Watercolor. I'm not trying to create
anything realistic here. I'm just like concentrating on making my strokes
and letting loose. Okay. And also what I want
to do now, I almost forgot. I will take my paper to the table because
since I use both hands, I don't have a hand
to hold it down. And you can do this
with music or without, you can do like one
continuous line, at least as long as you
have paint in your brush, and then you start
a new or you can do a lot of lines.
It's really up to you. It always tends to look
like after a while, like an animal face, and you can go with that or not. I feel a lot more awkward
at sing my left hand. And it feels more
natural to get from the inside out and go
from the outside in. But I will challenge
myself to do this a bit. We'll also try to hold the
brushes in a different way. See how that fs. And I think I will
use up some of that glass pink that
I still have here. All right, so I really was getting into flow
state with this. It's so calming and relaxing if you don't put yourself under pressure of
creating something. Like just go with the flow. It feels a little bit weird if you're doing this
for the first time, but it's a really cool challenge for your brain coordination, and also the results are
really fun to look at. So now it's your turn. Ohh
10. Draw With Closed Eyes: Oh. This prompt is called
draw with closed eyes. It's really a good practice. If you have a hard time
letting lose and you really want to be in
control of what you make. You can do this different ways. You can just doodle something abstract,
just make movements, or you can try to draw
something from your memory, but also with closed eyes, not looking at what do you draw. I will try to do
both on this page. I have taken a piece
of great tissue paper. That I had lying around, so I don't feel
precious about it. But I also feel maybe I
can use this later on as a collage piece or
for another project. You can do this on
regular copy paper, on packaging paper, like
I have on my table, like the brand one, anything
that comes into your hands, it can be used papers, it can be new paper,
whatever you want to do. You can use any drying tool. I will use a pencil
and I also have a a new color oil pastel here. So I might switch my tools for
some additional interests, but you can use
whatever you have. If you have colored
pencils, you can use that, you can use pens, you can use markers, whatever feels good to you. You can also do a couple of pages because it will really not take that long so that you can
compare different results. One more thing that I
will do before I start is I will use a little
bit of washi tape and just like tape it down to my table so that
it doesn't slide around. So I don't have to
worry about it moving around and I can really
concentrate on the marks on it. Okay, let's get started. I'll close my eyes,
grab my pencil, first, I will try to draw a paint tube like the one that I saw standing in front
of maybe before. And this is really hard. It's a really easy object. You shouldn't if you
want to try that, you shouldn't pick
anything that's very u That's very complicated. So, I don't know what I've done. You can already see I can. So I will just go on and
now will just make marks. That's really strange. I feels a little bit strange. L if I will get dizzy. Now I will experiment with holding my pencil
in a different way. I can hold it from above. I can hold it more to the end. This is a rather short one. I don't have that much
control over what I do, and I can make all kind of
movement with my hands. It's really about
leaning in on a feeling. Of the material, listening to the paper and the
scratch on the paper. This can be really meditative. And you can do this
as slow as you want. You could also do
this as fast as you. It's really about, you can go through some emotions
and try to let them out. Well now try to get my other pet tool and
see what I can do there. I feel like I want
to do a few circles, and maybe do something
more dese here. Maybe I'll switch my hands, and go with my non dominant
hand, which is also fun. You can do this as long
as feels good to you, but it can also be just
like you can do it just for one or 2 minutes and put
yourself a time and then stop. I think I will stop now. It does feel different
depending on which hand I take. Here, I will it doesn't feel
so natural to make circles. It feels more tentative. Okay. So I'll just open my
eyes and see what I've done. Oh, f. I thought I would have been all over the place.
This is really fun. If you feel that this
is not like enough, you can close your hands again and continue working on it, or you'll just leave
it the way it is, pick a new page, do this magazines or
wherever you want to. Now, it's your turn, have fun.
11. Explore Blot Art: This prompt is called
Explore Blot art. This technique is
fun for all ages, and it's so easy. Maybe you've done it before. All you need is paint, and this is a great way
to use up leftover paint, but it's also really fun to
explore test on its own. You can use test regular
paper, or in this case, I've got packaging paper, some colored packaging paper that I thought would look nice. The first thing
you want to do is you want to fold
the paper in half. Now you need to apply
the paint either on one side on both sides
or just in the fold. This is really up to
you, and I need to put something down here so
that it doesn't roll up. I will use up my paint and I
will just put it down here. You want to make
sure that there is really a blob of
paint on the page so that you can spread it by squeezing or
pressing on your paper. So let's see how this turns are. Now you want to
fold this together. You can just fold it like
that and open it up again. But it's a lot of fun. If you just do a
little bit of pressing down and moving around so that the paint is
allowed to spread. If you've ever heard about the Rosack test,
that's the same. This is an psychological
test where you are supposed like to
see different things. One thing you want to make
sure and I've almost taken too long is that when you
use acrylic paints, especially, but I think this
is true for all paints. When they are very thin, they very fast, so the paper
tends to stick together. So you don't want to leave
it closed for too long. So this is sticking
a little bit, so I'm really opening
it very slowly. Doesn't this look cool? Looks like a big, colorful
moth or a butterfly. So I didn't expect that, and this can give you
so many cool ideas and make such cool
patterns like shapes, and it's really fun to explore. So now is your turn. Oh.
12. Brush Exploration: This prompt is called
brush exploration. It's all about finding out what unique marks you can
make with different brushes. It doesn't have to be the art supply fancy art
making brush that you use sometimes like
those two brushes from the hardware store are also great and you don't need to feel
precious about them. I've just picked a
couple of my brushes. These are two synthetic brushes, around one and flat
one. I have one. It's some kind of a painter brush from
the hardware store. It's a foam brush, and this again is something
from the hardware store, not super expensive, but interesting in
terms of ma making. I'm also using black
acrylic paint. This is soft body
acrylic from liquid tax. It's a professional grade paint, so it has really good
um pigmentation, which is really important
for black because there's nothing more frustrating than having a black that
doesn't cover up. Usually, I don't have
super expensive paints that for some colors like
for white and for black, it's really valuable if you
have the really good stuff. Because it's just more fun. Here, I also have a
little bit more gah pain from the previous prompt, but I just don't care, it doesn't matter if
it's still there. What we now want to
experiment with is using the brush
and making marks. You can use a brush like this and you can lift
it up, make thinner marks. You can press it down
harder and make. Again, a lot of different marks. Can be very careful with it. Can make straight lines, can use the small side and make thin lines
with a flat brush, can press it down hard, and use it to make
marks like that. Again, now we can see
when we dilute the paint. We'll make different
marks again. Well this one. Just
turning it around, letting it swivele
With acrylics, you always want to wash out
your brushes immediately, and keep them wet until you
want to clean them properly. Let's try the foam brush. The foam brush makes a
little bit different marks. More rough marks depending on
how much pain I have on it. Of course, I can
go back and forth. And I can also do
this in a liquid way. I think I will leave
it in the water. Then with a round
brush like this, you can use it to step down. Could be really bad to your brush because
it's just like cheap one. I wouldn't do that with a
expensive watercolor brush, but with a cheap one, you can make really
expressive strokes. Really put some pressure in
it and express yourself. The same with this,
well, obviously, if you have a large
pressure. It's pretty cool. You can make very
cool rough marks. Again, you can stamp on down, see what kind of marks you can make running out
of space already. When you have more space, you need to have a new page. So just see because there's
very little paint on it. I can make some really
cool marks with it. As you can see, I really hold them in a lot
of different ways, just as I want to express, but usually when you have a
very small and fresh brush, you hold it more like
a pen or a pencil, and then you get more
deliberate marks, but when you have
something larger, I, I couldn't even
hold it like that. It's just so heavy.
Alone through the act of holding
it differently, you will get different results. Just play around with
it, hold it differently, hold it really
close to the front, hold it very far to the back, move it fast, move it slow. Like put it down with a lot of pressure with a lot of pain, with a little pain, with a
thick pain, with bin pain. There is a lot of
combinations to try, and it's really fun. It's an ICO turn.
13. Palette Knife Adventures: This prompt is called
palette knife adventures. Palette knifes are also
called painting knifes. They are not only for mixing
paint on your palette, but also for painting. They come in various
shapes and sizes. I think the most common is
this diamond shaped form. I actually like them the. Normally, they should be clean, so you should write
them off with a piece of paper like every time you use them because it's not super cool if there's a thick layer of
paint on it that has dried. But honestly, I often
forget to do that. I've tried this one. This
is a very cheap one, and it's very, very stiff. I I don't yet know
if I enjoy that. Actually, I enjoy the
more flexible ones more. You just have to
experiment a little bit and you can use them
in different ways. I've put out two acrylic colors, and this one is called
turquoise green, and this one is called
cadmium red deep ue. Just in case you're interested. Now let's just strike what marks we can make
with a pet knife. So I will just pick up the paint as it is
right out of the tube. Now when you apply
it, you want to hold the knife from above. And you want to have it
in about 45 degree angle, and you can just slide
it across the surface. You can do this slowly
and you can do it fast. When you do it fast, you
might come to the point where it doesn't
take the paint or it makes a more
loose edge faster. If you move it slowly, you might have more control, but it also depends on
how much paint you have. Here I was slowly
tilting my pelt knife towards the paper because the pain was already
almost gone. You can also make circles. When the pressure is a
little bit differently, you have different
amounts of paint depending on where
it is on the knife. Here I have more pressure. There's a thinner layer and it creates a ridge at the edge. You can also just stab it down. There's a little bit paint, but depending on how
much paint you have, you can use it for mark
making. Use the edge. It also depends like
how thick the paint is, if if you have thinner paint, it will obviously be hard
to have it on your knife. But you could like experiment
with that as well, O. You can use it to blend
colors into each other. Yeah, you might want to
wipe it off in between. Okay. So you get kind
of a transition, but a very wild look or not
a very smooth transition. But something that's very
typical for a painting knife, and you can do a whole painting with just a painting knife, even like the way you put
it down and lift it up, so I lift it up like that, I will create a ridge. I want to if I lift it
up like an aeroplane, it ends like this. As you can see, there are different ways to
use a pellet knife. You can explore the amount of
paint that you put on top, the viscosity, the speed
with which you apply it, the pressure with
which you apply it. You can make some plans, you can make some kind
of stamping marks. You can experiment with
how you lift it up. If you lift it up like that, or if you lift it up in
a, like, curvy motion. So it's really fun doing that with a palette knife
and now it's your turn.
14. Splattering Fun: This prompt is called
splattering fun. This can be really a lot of fun, but please take care to
protect your surface and your surroundings because splatters can get everywhere. What you need is like brushes, a bristle brush, a tooth
brush, or an old com. I will use gush paints for this purpose because I
will use my fingers to tech paint and why I also do that with acrylic
paints and inks. I don't want to get too
dirty on my fingers today, so I will use glosh, which is not
waterproof went dry. I also need a
little bit of water because splashes are really depending on the
pain consistency. This is a really high quality gh and it's highly pigmented, so gives a really strong
color even when I diluted. Now, I have the paint
pre fluid on my brush. Now one technique that
I can do to create splashes is to just tap
the brush on my finger. I start very lightly and
then when it doesn't work, I do it a little bit harder. But you want to build up the intensity because if you go like that
for the first time, your slides might like appear in places
where they are not. Not intended to be. So just go like this. You can see, but they also go
upwards and then downwards, sometimes they just
go where they want. Depending on how much
pain you have in your brush and how
fluid the pain is, the drops are smaller or bigger. Here the pain was a
little bit more fluid. The drops were a
little bit larger. So now I will try to
dry off the brush and find a consistency. That's a little bit thicker. See if I can get
even smaller ones. Those are even smaller ones. The size depends a little bit
on the paint consistency. Now you can also experiment
with other ways to do this. You can also run your
finger across the bristles. In this case, I get
a very fine mist. When I have more
paint in the brush, probably will also be
a little bit larger. This is a little bit
easier to control. Because all the paint
only goes downwards, while with tapping it
may also go upwards. You can do the same thing
with a tooth brush. You also want to run
your finger across it and just straight down
and the same with a comm. You want to use brush to fill up the spaces in
between with liquid. Then when there's enough, it should come out when you
run your fingers across. This makes a little
bit wilder slashes goes in all directions. You can of course also use
a bristle brush which has stiffer bristles than
these synthetic brushes. This is also a
great way to do it. L et's try this one
with the tapping. See how it does. Not so well
because bristles don't move. So see out to tap really
hard on my finger, get out some splashes. So this really is a very very cool way to bring some additional
interest in your paintings. Of course, you usually wouldn't make a whole painting
just out of splashes. But add them as some
points of interest, you can also cover up areas so that they
don't get everywhere, but just in places that
you want them to do. Just have fun and explore this, and now it's your turn.
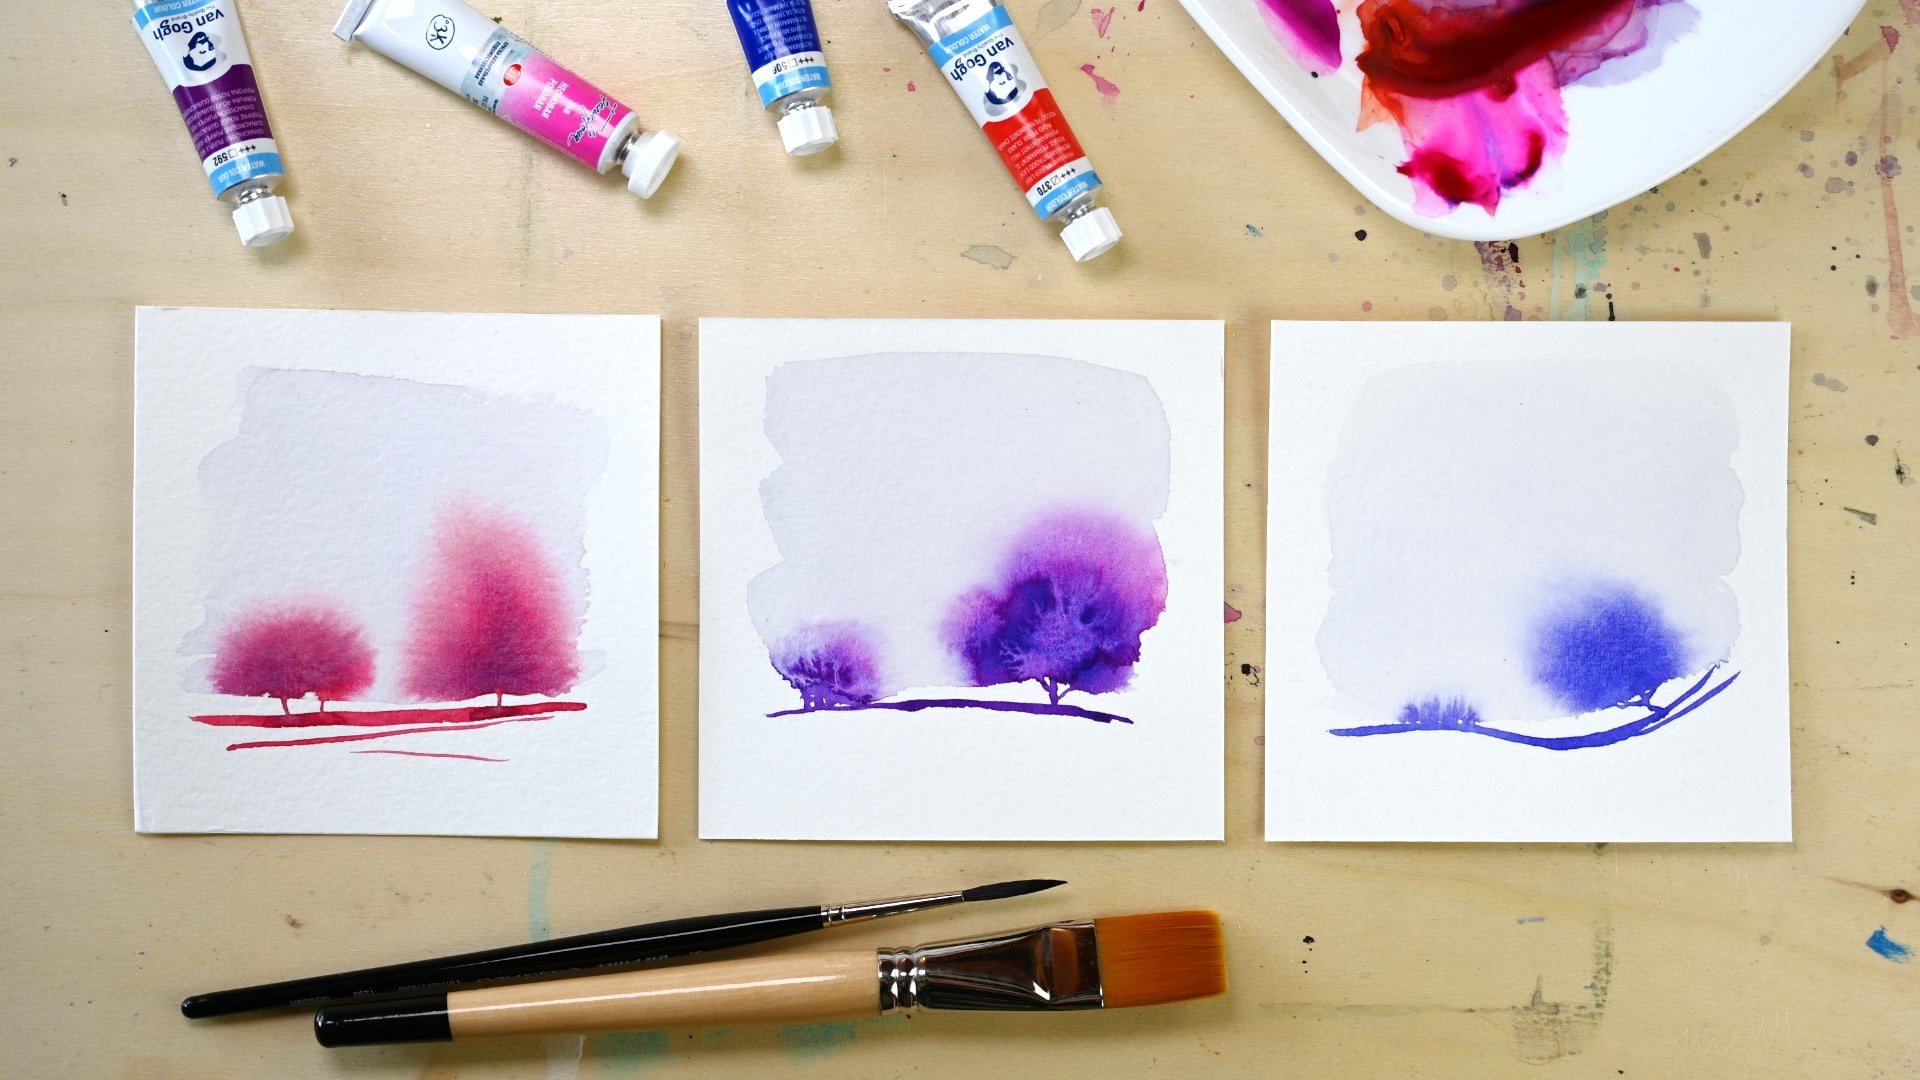
15. Go with the Flow: This prompt is
called go with flow, we're exploring fluid paints. You can do this with
acrylic paints, like diluted acrylic paints, or you can take acrylic inks, which are more liquid acrylics. You can use watercolor, you can use squash, but also highly diluted. It has to be when you use anything but
inks or watercolor. You have to use paints that
have a certain quality. You need some pigment
load in the paints. If there is not enough pigment, this will not work
as beautifully. We'll first start by painting some water circles like just any shape, it
could be any shape. You want to experiment with how much water you
put on the page. This here, you can see because my water is not
super clean anymore. Here, I have a whole pool of
water and it's really shiny. This might be a little bit
too much water already. Let's not wet it again, just use the remaining water
in the sprash and make a drier circle and
make a third one. That is even with less water. When you drop in your paints, it will depend on
the water level, like how well it can spread. And not only on the
water level, but also, like if you add more water, this will need to spread more. I'll add a little bit of ink. Usually ink spreads really well. So I'll add a little
bit of white ink. Now we can just leave this to do its thing and we can
move on to circle touch, which is also a really
fun thing to do. Create a circle. I have too much water in here, so I wipe up my brush and now I have a thirsty brush
and it really picks up the water and we'll just
make it touch very lightly. S. And now I will put in
the ink on this side, and let's see what they do. Look at that. The ink
is a stronger one. I goes upwards. Now, when you're in a stage
that it's almost dry, what you can try to do
is drop a little bit of water in and see it's too
dry, nothing will happen. But if it's not yet
completely dry, it might push the
pigments a bit the way. You can of course go in
and make it wet again, see what happens if you
don't like the result. But of course, the acrylic ink when it has
dried, it is waterproof. It will not activate
in all areas. Let's try to drop in a little
bit of the white here. I think I will make it
wet again here so that the water color has a chance
to at least layer over this. You can just play around with this forever or until it dries. If you have areas like this
where you have pulled paint, can make bridges and
connect those together. So this has already dried. But I will just
go over it again. As I said, the ink will not reactivate so much like
here it's not dry, but here there, the white
one is a little bit thick. So it's not spreading
just pulling this ad. And now I can pull it over here. As you can see, you
can get really lost in this process and as we are not aiming for
something specific, we're just observing
how the paints react with each other and this can be different from
pigment to pigment. Also this is already mixed media because I've used acrylic
ink with watercolor, but you can use just
one medium or you can use three different ones. You can use drawing ins, liquid watercolors, anything
that you come up with. I just wanted to show you the dr version of
this piece because here a lot of things happen in the drying process and it's fan to see the final products. When you have a lot
of polling border, it will create these blooms that where the pigments
get to the sides, and you get some really
interesting effects, and you actually only see the final result when
it's completely dry. So as long as it's
not completely dry, things might move around
and change. A nice turn.
16. Mixed Media Magic: This prompt is called
mixed media magic, and I really love mixed media, it basically means that you mix all kind of things together. You're not sticking
to conventions. You're not doing
watercolor where it's not like you're not supposed
to use like gas or white. You're just supposed to
use the paper white. With mixed media, it's fun. You're just experimenting. I mean, if you get a
combination that doesn't work. For example, if you use oil
pastels and you use them very thick and then you paint acrylics on top, it can peel. Acrylics don't
stick to ly stuff. There are some things
to keep in mind, but apart from that, you could just try it. And as you can see,
it doesn't stick. Now, what happens if
I add a little bit of the gold watercolor
into this mix? Add in a little bit like that. Let's see what the ink it does. This is pressed pigment,
it's water soluble. We can just draw with it. Then when you make it wet, it will start to dissolve. Also the watercolor reacts
to the spray obviously. Let's put in a bit
more of the ink. Adding a bit of acrylic paint. How does it react when it
comes into wet? Paint. See I can go over the oil sells, but when it's not too thick, it will stay, but I can
scrape it off again. I can show you later. I do have the tumbo
brush markers. I don't want to go
into the acrylic because that would
ruin the marker. But I think I'm just going to
add some lines here maybe. Go into the water color. And then when I add
water, let's see. I don't think it's
waterproof, yet. It's not. Adding a little bit
of charcoal here. Smearing this around. They can get the charcoal to
stick with the oil pastel. I've never done that before. Try it again. This is fun. You see where I have the
cell it really darkens it. That's something that I've never done before, for example. This is really fun and exciting. I think I can maybe move a
little bit of that pigment. No, not really. In
connection here. Letting that flow over there. Let's try what the
marker will do. Let's see what happens when
we drop water into it. This is water resistant,
nothing happens. I think I have a little
bit more guage paint, so I can use that,
put it in here. I diluted. Should maybe
spread a little bit in here. That's gage with tumbo as a combination I've
never done before. You can see that the oil
pastel still repels the paint. Here, I think I have acrylics, but I can mix it with gash
and here I have watercolor. This also mixes very
well with gash. I am making this a little bit more wet because I want to try one more time to drop in a little bit of
that acrylic ink. I think I will also
add some more of the tumbo here and just use
it as pigment to spread. Just leave it at that.
I think I've put everything in this that
I had on my table. Yeah, it's just an experiment. It's just a way
of trying things. I think I've mentioned
that we can scrape it off. So some things don't
stick like on oly stuff. You have to be a
little bit careful because when you
go over it again, you can see that in the
areas where the marks were, you can scrape off the acrylic
or gh or whatever it is. So you don't want to
have a huge area of that o surface and then paint on top because
that will not adhere. But otherwise, all the
dry and wet mediums are able to be combined. It's really fun to
just experiment and find out what works
and what doesn't. Now it's your turn.
17. Building Your Toolbox: Now, let's explore some
different painting tools to add to your atestic toolbox. We're going to use a palette
knife or painting knife. If you don't have
that, you can use a plastic card like
an old credit card. We'll use a brush. You can use any brush. This is a bristle brush, but you can also use
a synthetic brush, which has softer bristles. I will also use a sponge. This is from some packaging, but you can use a
kitchen sponge as well. And I will also use my fingers. I have just regular
printed paper here, and I'm going to divide
the page roughly into four sections
and now I want to compare like how how the different tools interact
when applying paint. Let's get started with
the palette knife. When I want to fill
the whole thing with a color with the palette knife, I get a fairly thick coverage. If I want to cover everything, I have either to apply a
lot of paint or I have to go over the errors for
a couple of times. I can also go in a
different direction. I realize it's
fairly easy to make a halfway straight line and yet. I feel very clumsy when I
use my non diminan ten. All right. So with
a pallet knife, you always want to wipe it
off when you're done with it. So now let's use the brush. If I use it rather dry and
I don't like it was humid, but it wasn't really wet, and I don't dilute my paint. I can see the brush marks. So now I will use a sponge. And depending on how much
paint you have on the sponge, you will make different marks. This is actually pretty
cool because it's round, makes almost a scale from a
fish, scale like pattern. But of course, the I go over it, the more I will
get even coverage. Here, it is fairly impossible
to make a straight edge. Okay. And then I will
always use my finger or so it's almost my finger. That's it. Let's
take a closer look. So it's still shiny
as you can see with the pallet knife because you have a lot of
paint on the surface, and here you can see the
brush strokes from the brush, which are parallel
lines with the sponge, you obviously get
this fuzzy feel, and you also get a little bit of a three dimensional
structure from the sponge. This was the the
finger or the glove. It's a little bit similar to the brush, but more irregular. Brush has more of the
bristle lines in it, and here it's just
without those lines. When you use your
hands, at least I tend to go more
in circle motion, and when I use a brush, I usually go more
in linear motion. This is something really nice to explore so that you
get a feel for what you like and how each tool influences the outcome.
Now it's your turn. A.
18. Explore Line Variety: For the next prompt, we are going to explore different drawing or painting
tools to outline shapes. This prompt is called
explore line variety. We're trying all these
different things and see how the line, the character of
the line changes. We're drawing a very simple
shape like a circle, triangle, any organic shape, and we're repeating it. But what we can play
with in addition to different materials is a size. We try to make as much variation as we can within
these parameters. Let's get started. I think I will start with
my dry materials. I have a piece of charcoal here and I'm going to
make this almond shape. And then this is
something similar. It feels a little bit different. This is an oil pastel. This water soluble oil pastel. Very similar to the charcoal. Now, I have a pencil. In pen. Parent marker. Now, that is
different. Brush pen. Irregular brush
and acrylic paint. Okay. So that is
really different. And I also have ink. And the round brush this time. Now, I have made a lot
of different lines, but actually I haven't varied so much when it comes to size, so I will just go ahead and
add more different sizes. Let's see how each tool might differ when it
comes to different sizes. I can also go over the edge. Oh, I could also use the
dropper for my acryl. That also makes a
different line. Actually a very interesting one. Make an one here.
And a tiny one here. I think I could use this
actually on the side. I would make it
really large mark. I can also use this
one on the side. I'm just adding a few more. So I think those make at it. More interest in this. So
this is what we're doing. You can also do this
in different colors. And as you can see, like in
the process of doing it, you learn how to make
more different shapes and apply the materials
differently because at first I was like applying
it just like a pencil. But all those materials that
have alongside can also be applied side ways and
make a very wide mark. You can see that with
different sizes, you will get di a different
feel from each tool. You can see how overlapping the different
things look nice. You can recognize some line
quality that you may be like because like this is
a little bit wonky and the line width varies a lot. This was the this is really something that you can then
take on to other projects, or it just helps
you to really get your creative
thinking into flow, to get it going and really
start thinking about it. You can go on as long as you want to or as short
as you want to, there are no roofs, and
now it's your turn. O.
19. Explore Shape Variety: L et's explore shape variety. Not exactly like
variety in the form, like the shape of the shape, but in the way the
shape is filled. We're not making outlines, but we're making a filled shape. In different ways. You can do this in so
many ways and I will probably not think of all
of them. Let's get started. You can do this with paint with drawing materials
and with collage. I will start with
collage because, when I have wet
paint on my page, I don't really want
to clue something on top, let's start with that. I will create test squares, and I will use different
kind of things. I will use a book page,
an old book page. I have a magazine page. In this case, I'm also
playing with typography in different sizes and
different type of typographis, and
different skills. You can also use
un colored papers. You can use patterned papers. You can also make your
own pattern papers like just making a pattern on a
piece of. Any other paper? Now, I will just use a glut
to glue some of that down. I'm going to do that here. Like having the glue stick on your page might make the
paint here differently, Now we have explored one way. This could be a prompt
in itself because you can really get
last in collage. Oh my gosh. I really
love collage. Let's just go ahead
and see how else we can make a filled in shape. Of course, we can use paint. I can use paint. I can use a maker and
draw a shape like that. I can use my ink to do the same. I really like to use
this as an outline. If your patient can also use this to create an interesting
fill for a shape. It doesn't have
to be 100% solid, but it should be considered a shape and
not just an outline. You also have those markers, maybe a gray one. I can use a soft pestil. This is a neo pestil
from cent dash. It's a very soft one and
it's not water soluble. Now, I will cut out a kind
of a stanfill from this now. And now I can use
that as a way to draw in a pattern that really
does go over the edges. I don't have to worry about the edges just creating
a shape with a pattern. Now, this will also
read as a shape. We can also make a smaller one. Can you also use charcoal or a pigment stick to
create a shape? I can also create a transparent shape
when I water this down. Make this more transparent. I've created a lot of shapes from these things,
and of course, you can also create
a shape through the negative form like this. I create also a shape
when I glue this down, here I would also create
shape in the negative. That is also another option.
Now it's your trust.
20. Expressive Lines & Scale: This prompt is called
expressive lines and scale. We're using one type of paint like I'm
using acrylic paint, and I'm in the beginning, I'm using just one brush, and we're exploring how to make expressive lines and what
happens when we scale. Let's start out by just
picking up some pain. I have a fairly dry brush, and I'm making some lines. The dry and the brush, the
more rough the lines get. Here they look
okay on this page. Now what happens when I do
that on a larger scale? Well, here it still
looked cool because the lines were way large, but here is already
looking very stripy. What do you want to
do when you scale up, you actually also want
to scale your tools. In this case, to get
the same effect, I would use a larger
brush for this one, and I would use an even
larger brush for this one. That way you can scale and still get that bold
effect because otherwise, you get a more stripy
effect in this case. But that not only has
to do with stripes. I'm just using stripes
to demonstrate this. But it's a thing. When you make something
small and use a big tool, it would be even cooler. If I have a very small format, and I use a very large tool. I mean, that's, that's bold. Okay. So that's really bold. But Like the larger the
tool the ball if this is. So here it still
looks kind of k, but that would be really bold. Then this is not ball at all. This is just stripes. So you have to
keep that in mind. When you go larger, you
have to enlarger tools, you have to make larger marks, you don't have to,
but if you go for that expressive ball effect, then it's really
helpful to scale up. So now it's your turn, have fun. Oh.
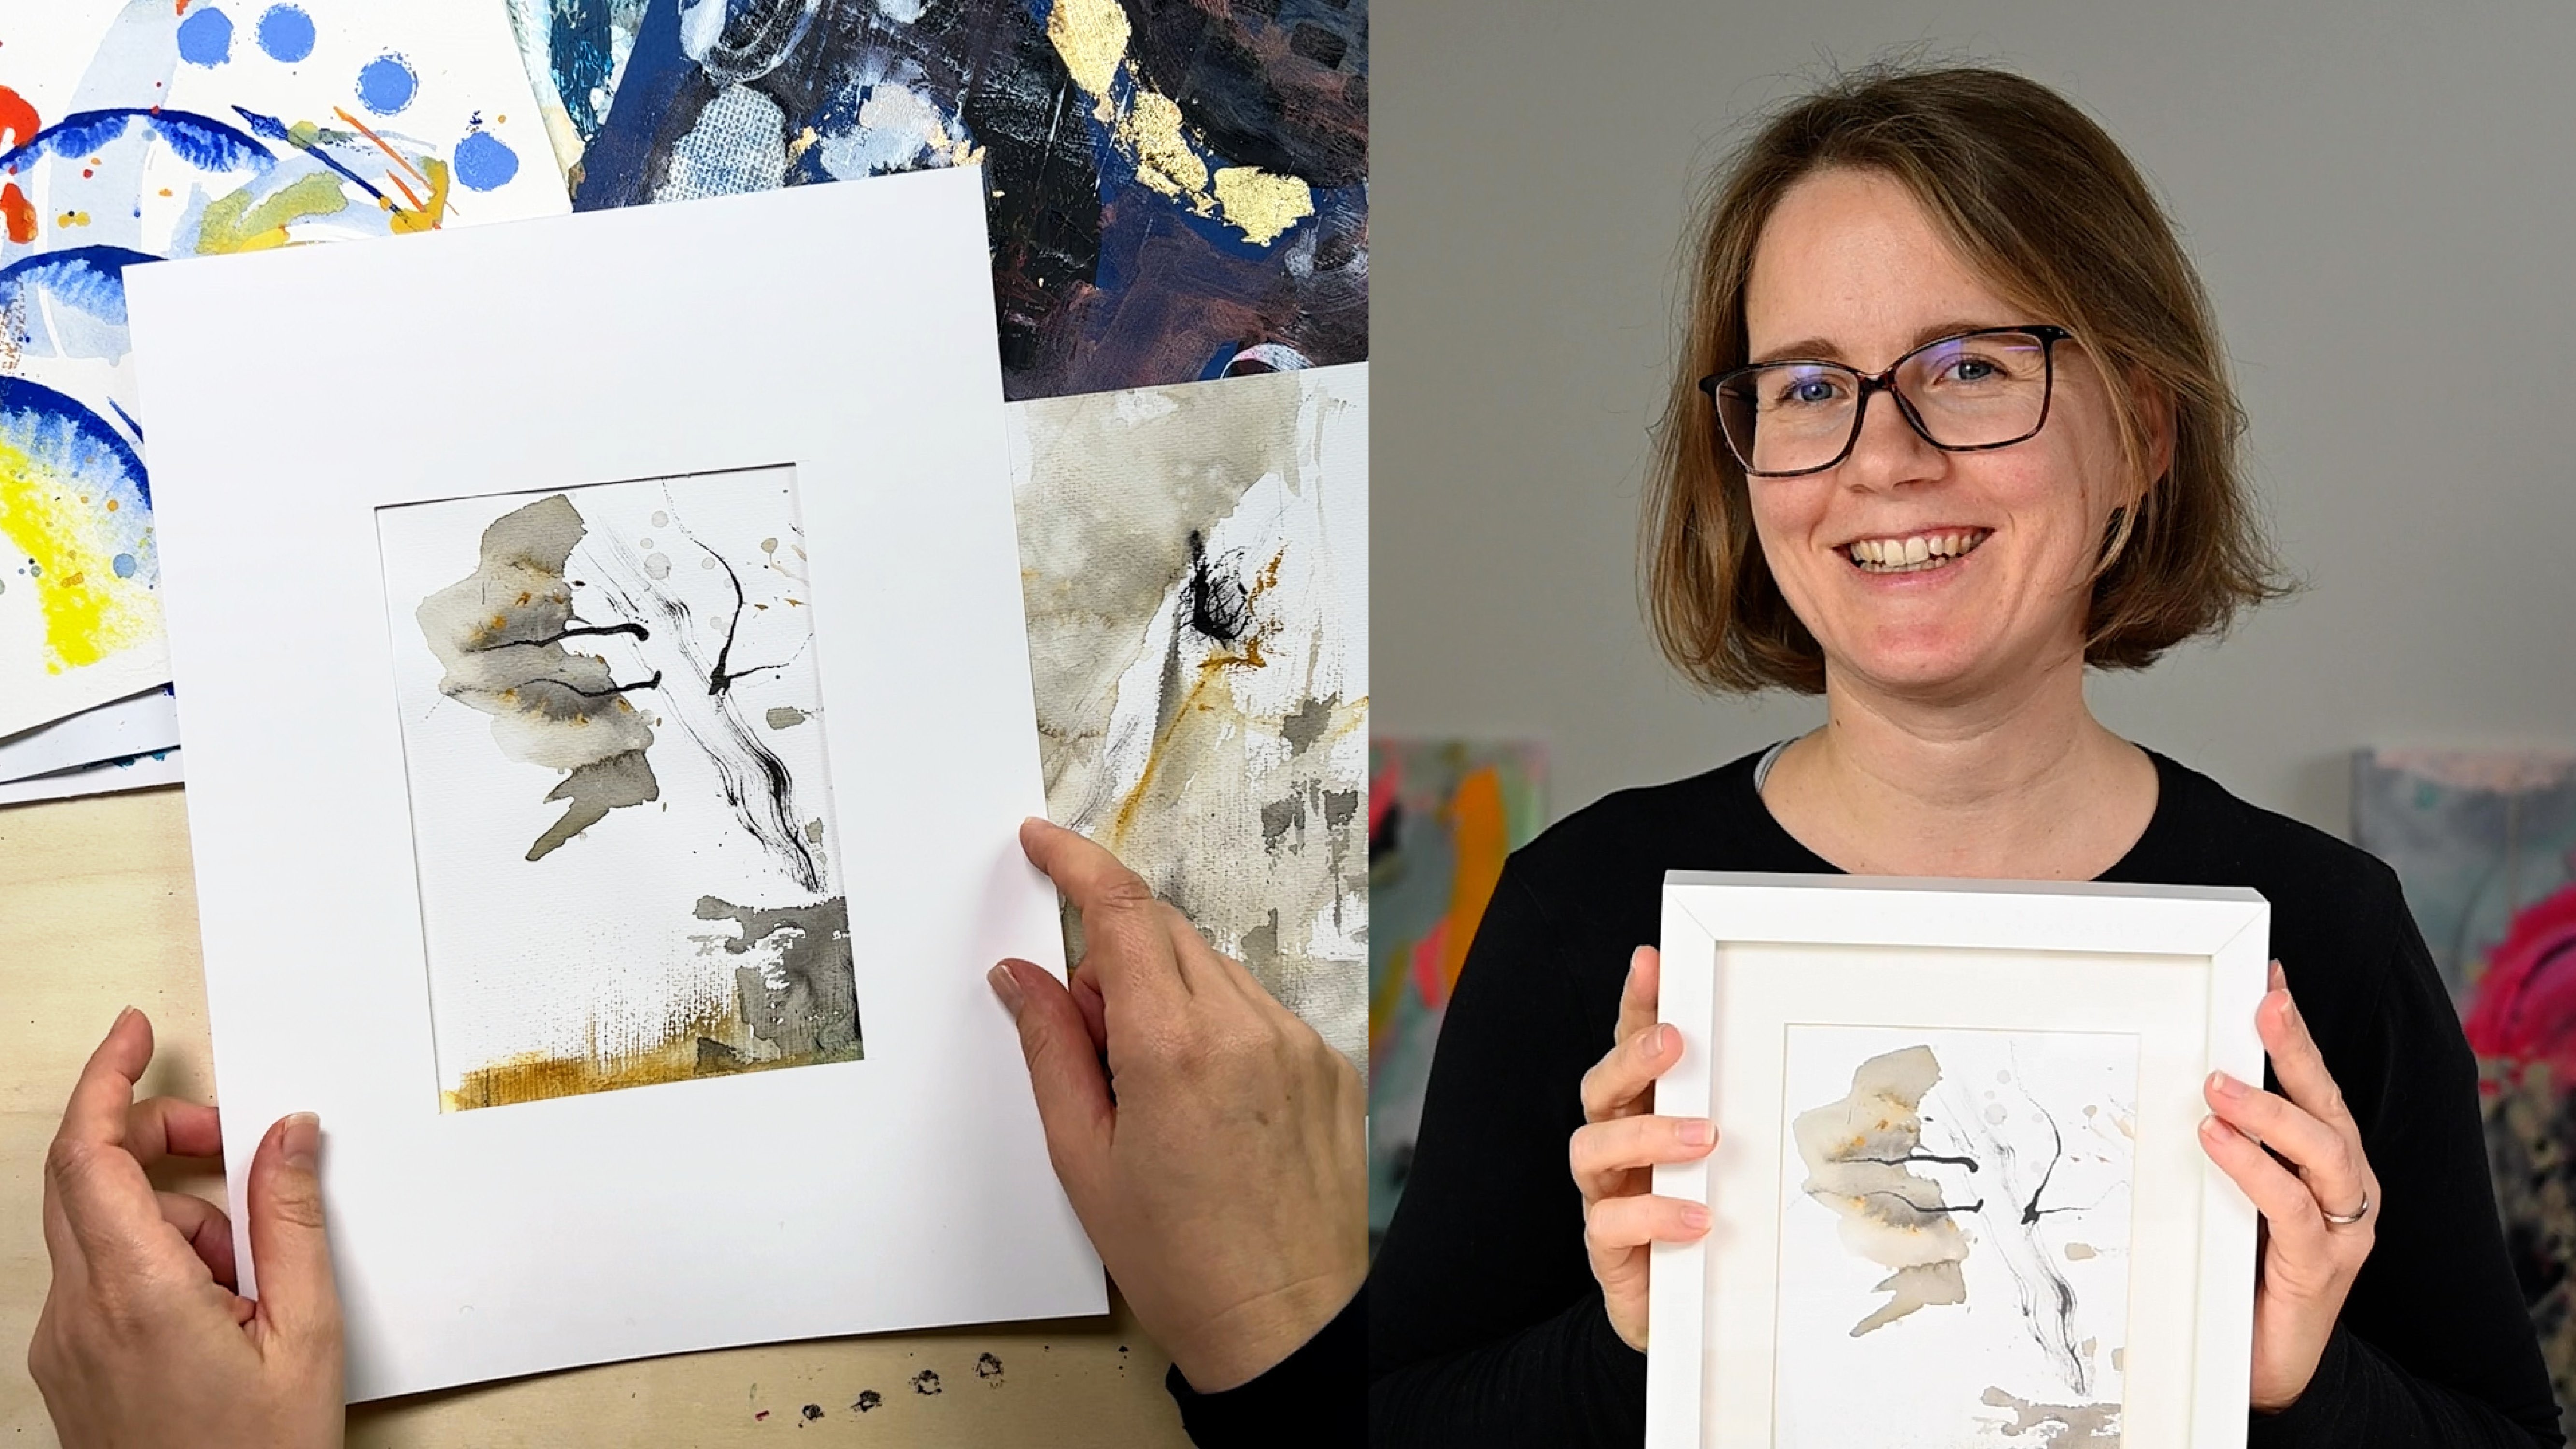
21. Meditative Parallel Lines: So the next prompt is called
meditative parallel lines. This is a great exercise
to calm you down and to relax because it is not very
easy but also not hard. It requires you to concentrate on the process
that you are doing, because when you want
to make them parallel or almost parallel and maybe even focus on them not touching, you really have to be in a moment and watch
what you're doing. And also this repetitive
movement is really calming. What you can do is you
can use fine liners like any pens that you have this is a brush pen,
scripting quill. You can use any of
those together with ink or liquid watercolor,
whatever you have. Here, I've done a
similar project where I have done
all these lines, and this obviously takes
longer than 10 minutes, but you don't have
to do it in one go. And I've allowed myself I've allowed the
lines to touch slow. I was making a few lines, and then I was filling them in and making it denser and denser. I've also used two
colors, obviously. So you can do this in
whatever way you want to. And in whatever
size you want to, the larger it gets, the
longer it will take. Without further ado,
let's just get started. So I have this
mixed media paper, which is fairly smooth, so I think that will work fine. And I think I will tape
off the edges just to have a smaller area and also to have a white frame
around my piece. So I will use black acrylic ink and liquid watercolor
for this and I will use a writing quill just because I don't use that very often and it's a fun challenge
for me to do that. Now, you will have to find out
what works better for you, going towards your body or
going from left to right. But you can try that. This is about 10 centimeters wide, but it's already too wide. You just do this
out of your wrist. You want to move your
whole arm with it either to your body or
from left to right. You could also do this
maybe in an angle. You just have to try
what feels good for you. You can do them a
little bit wider and then try to fill it in, which is an extra challenge. I'm going to leave a wider space here and fill that
in with the gold. As you can see,
I'm getting faster already because getting
more used to this. I thought that was a
good movement for me. Let's try it again upset
from the top to the bottom. I also feels good. Let's try
to make them even closer. So as you can see, this is
not really about perfection, so they are obviously
not completely parallel. They are wonky lines, but this also makes
the charmer this. And if you feel like
you need to shake out your hands in
between, that's okay. So I'm kind of really concentrated and I'm gripping
it a little bit hard. So just, like, shaking out my wrist and trying to take it a
little bit more easy. So I actually don't have
to grip it that hard. I'm like, almost squishing
it. That was a straight one. It's also a really good exercise in brain hand coordination. I think now I will wipe
it off because I want to use gold as well. Let's see. This feels a little bit thick. The thing is, I don't
want to smear this. Probably just turn it around
because this is more dry. See how it works. I don't know if
you can see this, but it's a very slight color. Let's try another one. This
is a liquid watercolor ink. It's a lot more fluid. Just use that. I
thought it would have been so nice with the gold. It just doesn't want
to flow like I want. So, the closer you get, the more you will obviously, like, go over some lines and
create some thicker ones. But you can keep
going if you want to, to create some areas of
dense, more dense areas. When you remove the tape, do it slowly and pull
it to the outside, not towards your piece, but away from it at an
angle like 45 degree angle. And if it sticks, use a hair dryer to heat it
up while you pull it off. So if you have a
glued paper pad, use a butter knife
or a palette knife, it should be clean
here on the edge. Otherwise, you will maybe get a little bit of dirt
on your next page, and then you just slide
it across the edges. To remove your piece. Alright, so this is
the final piece, and you really can go as long or short on
this as you want to. I have gone longer
than 10 minutes, to be honest, because
I just couldn't stop. When I get into
making those lines, it's really meditative for me, and I hope you
feel that as well. This one, for example, I've
not done in one sitting. I had it sitting on my table, and every time I felt like I needed to do
something with my hands. I needed a short break
from some computer work. I added a few lines and over the course
of a couple of days, this page was built. If you use a pen to do this, you don't even have to have
water or any other tools, have your office
supplies and add a few lines and just use this to relax to zone out a little bit and have
fun. Now it's your turn.
22. Pattern Play: Let's play a little
bit with pattern. Pattern is something really
fun to do, at least for me. For this, we will do
three iterations. So you need three
sheets of paper. We don't need any special paper. I'm just using regular
printed paper. I will also use your
brush and acrylic paint, but you can also do
this with crayons, markers, whatever
you have around. Let's start by randomly painting or drawing different
shapes like triangles, circles, lines, dots,
squiggles, whatever. But we're doing them all in one color and approximately
the same size. So let's get started. So that's about it.
That's my first draft. Let's do another one. And now we're bringing in
different colors. For the purpose of
making this easier, I will use a second brush so that I don't have to
wash it out in between. So let's get started. I'll just start
with a few circles. Then I'll go ahead and just
mix in a little bit of the red into the orange into the yellow to
make an orange. Then I'll make the squibbles. This color, and now I think I will use my red
brush for the last one, maybe even add some
red into this mix. Okay, and then I'll
just make my triangles. Okay, so that's the next step. Now we have added more variety. We have not changed a lot, but we have changed quite a bit. We have changed the colors. In our next iteration, we will again use
different colors, but we will also change
the size of the elements. So I will start with
the triangles now. All right, so here we have
our three exercise sheets. And what this exercise demonstrates is bringing
in variety and difference. First, we do have a
difference in shape, but only in shape
because we have used the same color and
approximately the same size. Then we introduced the
difference of color, and then we went further and also introduced the
difference of size, and I could even
take this further, now that when I make the
red circles so small, they are not really circles,
but they are more dots. I could also use
a different tool, a different brush size and bring in a difference in line quality. This is really a great way
to not only build patterns, but to think about whatever you make that bringing in variety, bringing in differences
will usually improve your outcome.
So now it's your turn.
23. Get Inspired by Nature: So the next prompt is called
Get Inspired by Nature. And inspiration is
really all around you. You just have to look for it. So I would love for
you to go on a walk and pick up some things that, like, spark your interest. This could be leaves,
flowers, stones, twigs, whatever you find that I
would like to take with you, take it with you to your studio, to your home, and
just play with it. All we need for this
is some kind of paint. Paper, I will use this packaging paper and maybe a brush to mix
and apply the paint. So let's get started. I will use acrylic paint, but a very good paint
for this is also quash, but you can try whatever
you have on hand. And one way to do it is to just apply the paint
to your object. And you could even,
like, go over the edges like that
on your surface. Because then already
you have made a negative shape
like with a stencil, which is cool in itself. So I will then put this
down somewhere else. And maybe I'll take
your second sheet of paper to just help me press this down without
breaking the leaf. Right. So I'll put this away, and I'll just take another one. I'll just dip this
one in the paint and, like, just make some
marks with it like that. Then use the stone. And also use the other side. Mm. That's cool. Okay. I also have these. Let's
try them with the pink. Now for the flour, I think I
will make this a little bit more fluid. Spread it out. A As you can see, there are a lot of
things that you can do with found natural objects. You can stamp them. You can use them as stencils. You can use them as stamps. You can roll them. You can use them like
a brush or like a pen. And it's really fun to
experiment with that. So have fun, and
now it's your turn.
24. Everyday Objects: I love painting with
everyday objects because it's so freeing. I just helps you to get rid of all those preconceptions
that you have when you pick up a brush because
when you pick up a brush, usually you tend to hold
it like a pen and you feel really that you have
to follow the rules. You don't want to
ruin the brush, and there's all these
things that come with it. But when you use
everyday objects, like an old
toothbrush or a comp, it really challenges you to explore the tool to
observe what marks you can make and to be really free and creative
in your approach. So let's try a few of these. So let's start with
the toothbrush. The toothbrush is pretty
close to a regular brush, but you don't have
to be precious about it because you would have
thrown it in the trash, right? So you can just, like, pick up paint and
you can splatter, which I will not
show now because I don't want to get
my hands black. But you can also use it
like a really cool brush. Can be really,
really mean to it. See what you can do with it. You can also use a con and see what you can do with
that. You can make lines. If you make the painful fluid, you can actually really make longer lines. Got to try that. You could use cotton buds. Just experiment with
different ways to use them. You can stamp them. You can roll them. You can use such things from medical packaging as a stamp. Just put it into the paint and then stamp it onto your pet. You can use all credit
cards or any plastic card. Make lines, can slide them, put them down like that to just stamp and you
can also use sponges. Can use sponges to
stamp, of course. You can also use them and smear, make really cool
marks. Like that. All right, so just go
around your house and pick a few items
that can get dirty. Like when you do this with
acrylic paint, you of course, have to make sure
that it's either something that you would
throw away anyways, or you will clean it up
immediately if you want to reuse it because acrylic
paint will dry permanent, and then the com
would be ruined for future use because like the small things
would stick together. And it would not
work. So you can also do this with gouache
paint, for example. I really like to do that
with gouache usually. With watercolor,
yeah, you can try it. The more fluid the paint, for some things, maybe
for the stamping, it will not work so well, but you could try or
for the credit card, it has to adhere
somehow to your item. But please feel free to try all the different
things that you find and really have fun experimenting.
Now it's your turn. O.
25. Color Therapy: This prompt is called
color therapy because colors can evoke
moods and memories. Like, think of that
beautiful turquoise that just brings you back that wonderful vacation
at the sea or that lush, yellowish, spring green of fresh leaves that just gives you the spring feeling that is just that uplifting feeling after
the long dreary winter. We're just going to mix some colors and then
find a color that speaks to us and cover
a whole page with it just to immerse
ourselves into that color. The easiest thing to do is in the beginning to just use two
colors, like, for example, yellow and turquoise or yellow and magenta and
add white because that will give you a more
reliable effect because the more colors you mix, the more likely you will get muted colors and muddy
colors, grays browns, which are beautiful in itself, but like if you want to
have more pure colors, like vibrant colors, it's easier at first to start
mixing just two colors. So let's just do that. I'll just mix that turquoise and that yellow to apply that
my palette knife. And then let's add a
little bit of white. And you can also do
this with a brush, of course, but I really like to do that
with a pallet knife. We getting stuck here. So now I'm adding no
white and no turquoise. Okay. So this is
not properly mixed. Man, I will also try this with macenta and yellow. Let's see. So when you don't want to
get a very reddish color, you want to have
more yellow in it because macenta is really
stronger than the yellow. And I think I will want to
have more white in this. This is not very much lighter,
but just a little bit. Now I want to make some
more pinkish colour. Now I will go into the
Magenta and blue combination, see what I will get here. I'm a beautiful blue. Let's see. Let's add white. Alright. So all
these colors I've just mixed by mixing
two colors and white. So they are all very
well fitting together. And now I will just pick
one that I really enjoy. And that really feels
what I need today. And I think, although there
are many cool colors, I think it's this
turquoise green that I really like the most. So I will just try to recreate
that on a separate piece. And because I still remember, like, the colors that I've used, which is, in this case, very useful, it's easy for
me to recreate that again. So it was just a turquoise
with a little bit of yellow that maybe was
already too much. Let's see. Mix it through. I think that's too
green. No, maybe not. And I think I've added
just a tiny bit of white. I want you to have a
little bit more turquoise. Let's compare it. Yes, I think that's approximately
the color that I had. And now I'll just fill
my whole page with it. I'm going to use
my palette knife to transfer the
paint onto the page. So, of course, now you can use a palette knife
to just spread it around and you can make this
just like a random thing, or you can also use a
brush to spread it. Okay, so just spread it on page. I'll make a whole green page. Feel this is really coming, and I'm doing this fast, but you can do
this as slowly and as accurately as
you really like, feel when you want to. So what this exercise is
doing for you is it's helping you mix colors that
really resonate with you. Sometimes you have to see that and then you can say,
Oh, I like that. It is really hard to imagine a color in your mind
and then paint it. So thinking it in advance, like how this would
look is really hard. And especially how this would
look if it was really big, if it was really large,
it's hard to imagine. And when you see it
in front of you, you can say, Wow, that color really resonates. That gives me a good feeling that feels like
me at the moment. And then you can use that. And what we've done here is just a start. You
can work on this. Of course, you can
take a canvas and paint it just in one color
and put it on your wall. It's like a bold statement, and that would look pretty cool. But you can also
continue painting on it. The next time you feel like
doing something creative, you don't have to start
form a blank page. You can react to the color
that's already there. For me, color is one of the biggest inspiration that
I have when I start to work. It's really the first
choice that I make is the color and I
pick it intuitively. Around what I like what speaks
to me, what I feel like. I don't really think like, Oh, I'm feeling so calm, so I will pick blue. So it doesn't have to do
anything with color psychology. It's just like I go through my studio and
then I say, Okay, I will paint I will start the painting with this
and this and this color, and then I just start and
then I will go from there. So I hope you have fun
with this exercise, and now it's your turn. Oh.
26. Fun With Swatches: In our next exercise, we are going to create
color swatches. So what I like to
do is I like to use inexpensive
watercolor paper, but you could also use mixed
media paper or card stock. I like this size, which is eight times
10 centimeters. And I usually divide my my paper just with a line so that I can
color in the top part, and in the bottom part, I write down the colors that I've used. You can start by
just swatching out all the colors you have all the premixed
tubes that you have. But then you can
also start mixing. When you start mixing,
you want to take note of which colors you use
to create that color. Of course, you don't know
the exact proportions, but when you know
the ingredient you are more likely to be able
to remix it later on. This exercise is not
just fun to do because you learn a lot about
color mixing and you create all these
beautiful colors. But later on, when you're working on a project
and this can be any project from a painting to an illustration to
decorating your room, you can pick up those
colors watches and you can play with combinations and find a color palette
that you like. So without further ado,
let's get started. What I like to do is when I
have some leftover paint, I like to use that up and
paint a color swatch with it. In this case for the green, I maybe have a little too low. I don't have enough
paint, basically. So you usually want to
have a very even coverage. But of course, some paints are more transparent
than others, and then you will get this
a little bit splotchy, but you want to have a
good impression of how the color looks
in a solid state. You don't need to be
super exact in this. So when you are finished, I usually go over them just in one direction so that I'm not
distracted by any texture, and then I would write down
the colors that I have used. So in this case, I'm not
quite sure if I have some like what colors
I have in this mix. I know for sure that I have this blue and I
have this yellow. But I think from my
mixing experience, I probably also have
a little bit of that neon pink in it. And yeah, maybe because
my brush was dirty, I also have maybe a little
bit of black in it. Then you can just switch
those colors out like that or you can actually write
down the names of the paints. Okay. And then I would write
down this is cadmium yellow, deep, plus fluorescent pink. Over time, you can build up a whole library of swatches and these can come
in really useful. But it's also just
a good exercise to just acquaint yourself
with the paints, if you have a YouTube
of paints or if you are not very experienced
in color mixing, you can just play around, start mixing the colors, start with just mixing
two in the beginning. That is a lot easier. Then
slowly bring in white, black or like a third color. And yeah, I hope you're fun. Now it's your turn.
27. Color Blocking: So the next prompt is
called color blocking. And for this, I'm again using a piece of
mixed media paper, not too large because
we want to have this done in a short
amount of time. And I've already put
out some acrylic paint. You can do this with any
paints that you have. I will just use acrylics because that's what
I use the most. Use whatever brush you have, I like to use a flat
synthetic brush. But if you have an old
bristle brush from school or you have
a round brush, if you use watercolor,
it just doesn't matter. Like, some brushes might be easier to do than with others, but it's not about perfection,
it's about having fun. And what we want to do is
we want to draw a grid on and then create tints
and shades from this color. So we're going to take just
one color, like one hue. And mix it with white
and black and see how many different
tones we can get. First of all, let's get started by drawing a grid with a pencil. You don't really have to
draw a grid, but yeah, I'm just doing one, and you can do this as neat
and as wonky as you want to. It's really not
about perfection. I think I'm just doing
this a little bit lopsided and a little
bit irregular. So that it just
looks interesting. I'm going to paint
each of the squares with a different mix
of these three paints. I can also combine some
sections if I feel like it. Let's just get started. And if you feel like you want to go into a darker color again, just wipe off your brush, make it wet, wipe it off again. Don't have to clean
it out completely because we're mixing
everything. Anyways. This is basically it. Another option for this would
be to start with just one color black and
white and fill in a couple of those areas. When you have brought down some variations that you can get on the colors
that you have here, you can bring in another color. I bring in the blue
and I'm just mixing it into what I already
have here on my pad. And you can always decide to go over some areas that you
have already painted, is also quite interesting. Alright, so this
is a variation of the first one that
gives you more variety in terms of color because
now we've been using pink and blue and the
white and the black. And I have started with
just using like one color, and then later after coloring
in a couple of areas, I have extended my palette, but you can extend it
right from the start. But I think it's a good idea to start with your colors and then go further and explore
more. So now it's your turn.
28. Lifting Paint Texture: This prompt is called
lifting paint texture, and it's an easy
painting technique that you can experiment with,
and it's really fun. It depends a little bit
on what you work on, what pens you use,
how it will react. But you can try with all the
different paints you have. What I wouldn't expect
to work is inks on paper because they immediately say in the paper fibers, so
that might not work. So what I've done is I've taken a sheet of
mixed media paper, and I have painted one side with acrylic paint and one I've left open just as
the paper comes. And what we now want
to do is we want to cover the whole
surface with paint, and then we'll sprinkle on water and leave it
to dry like that. So here I've got gouache paint, and gouache paint
dries really fast. So we have to be quite
quick to do this. And I will also use some
more acrylic paint for this. So this is almost dry. So now I have to be
a little bit quick. Just spritting it with water. I will try to hold it up
and see if I can tilt it in a way that you can
see the drops. And yeah, now it just
has to sit like that. For a few seconds, a couple of minutes, it really depends on the
surrounding paint. You want the surrounding
paint to dry. And obviously, in places
we have the water, it will take longer to dry. So we'll use that to create
an interesting effect. So this has now
been sitting for, I guess, around 2 minutes. It could be taking a
little bit longer, but just for
demonstration purposes, I think, it's also
interesting to see what happens if not everything
is completely dry. Either you can
take a paper towel or you can take like tissues. They are good because they
don't have the texture, you will see that texture maybe in when lifting up the paint. So because this is
also small enough, I will just put my um, tissue on top and you
can already see there are these spot like marks, and that's because here
the paint couldn't dry. I'm pressing it down, letting it soak up the liquid. And then I'm pulling it up. Okay. You can already see that it
works a lot better when you already have a coat of acrylic because it seals the surface. Acrylic is plastifying
the paper, so it doesn't pick
up the pigments and here it soaks into the
paper immediately. So we can again do this
from the other side. I'm just rolling this
over now because I don't want to get all the
dots on my fingers. And you can do
this a second time to pick up the rest
of the pigment or even a third time when
you feel there is some area where you could
still lift up some pain. Yeah, this is basically it. So here you can see
how well it picked up, like, all those spots, and it worked really well. It was acrylic on acrylic. So that's really the
best combination. This was Guag on acrylic. And this was like on paper, acrylic and gouache on paper. So it has a slight
effect as well. But it's not as pronounced as it is when you have sealed
the paper first. What you can see
here a little bit is that like there's
around the spots, it lifted up the paint as well because it was
not completely dry. So when the paint around the water droplets is
not completely dry, it will just lift up
a little bit as well. If you don't want that,
you just have to watch out for the sheen to disappear, and then you're ready to
do this lifting technique. And this is really fun to do and can give you great effects. And of course, you
cannot only do splashes, but you can actually, paint like circles or any shapes into the wet paint with your brush and make it a
little bit wetter there, and then you can lift
that up as well. So now it's your turn, have fun.
29. Overnight Texture: The next prompt is called
overnight texture. What we'll need for
this is some kind of thin plastic that is flexible, so it shouldn't be stiff. And I have some eco
plastic fruit bags here that I have from
the supermarket. And I also have some, like, more sturdy, not
really very sturdy, but, like, harder than this one. Foil. I think it was the
packaging of a canvas. And I've cut this a
little bit smaller, like these two pieces because, yeah, I just don't
have so much space. So you don't need to cut them exactly to the size
of your paper, but approximately,
like, just don't have a whole trash bag because it will be just a little
bit inconvenient. For this, I use a
mixed media pad. That is glue on the sides, which comes in handy as
it keeps the paper flat. But if you don't have
that, you can also tape any paper to a piece of corrugated cardboard like those boxes that you
get in the mail. Can also use washing
tape to do that. And this just helps to it doesn't really
prevent buckling. If the paper is thin,
it will buckle, but it helps to dry flat again. I will use a mixture of
different paint you can use. All kinds of paints I have here, acrylics. I have gouache. I have watercolor, and I
have liquid watercolor, and I have a spray
bottle with water, which just helps me
to humify my paper. And also, I will just use it to dilute the
paint a little bit because I don't have clean water in
my water char at the moment. So I'm just adding
a little bit of water here to my paint. And now that you've seen them, I think I will put those away. You can now wet your page
with a brush or you can do this like this if you
have a spray bottle. We want to have the
page pretty wet. You don't have to wet it all. You could wet just
patches of it. But then you will have edges. If you apply the paint
in the pure state, it will not really, like, move. You will have the spot here, and it also depends on
the quality of the paint. If it will bleed out. This is a very high
quality gouache and it has a high pigment load, so it tends to spread
like watercolor. But what you want
to do, in fact, is to dilute it on
the palette first and then bring it to your page
in an already diluted state. Same here with the acrylic. When it's not diluted
enough and also the paper is not wet enough, it just will not spread. This is not really
about the spreading, but we want the paint to
be able to move around, so we really need to
have this pretty wet. You can also dilute the
paint right on the page. Okay. When it dries
in some areas, you just add water again. And we want to create
some variation. First, I will add a
little bit of gold. This would also have
to be diluted in advance because it's so thick, but I will just do
it on the page. So we want to have this so
wet because we want to give the pigment the ability to
move around on the page. So my whole paper pad has warped a little bit because
I've used it before. And now the paint is
kind of pulling here. But it is really very wet. Let me show you real quick. So there's a lot of water on it. And if some spots
are already dry, so just in case I will just spray on it so
that I have everything wet, and then I will put
on my my plastic. You can just put it down and
leave it the way it falls, but you can also make
some kind of wrinkles. You can twist them a little bit. So this second one will give us a different
texture because it has a different stiffness, so it doesn't wrinkle
in such small wrinkles, but rather enlarge ones. I feel that I could add a little bit more color
here, lift it up again. As long as it's wet, you can add paint. But you see the moment
I lifted it up, the texture that was
here, it disappears. So you really want to leave this sitting until
it's completely dry. So let's reveal the
overnight texture. Everything has dried properly, and now I can peel
off the plastic. Wow, look at that. Doesn't
it look beautiful, like all those lines. And yeah, there's a
different texture depending on the plastic. And here, the paint was
a little bit thick, so it kind of has a three
dimensional effect now. But it's really
beautiful. And there was another example.
Now it's your turn.
30. Texture From Packaging: So this prompt is called texture from
packaging materials, and packaging materials
are really fun to use, and they are easily attainable, like you have them everywhere. You have bubble wrap. There are different kinds of bubble wrap. We usually have this
size around here, but I've seen larger
ones, smaller ones. So they are really
fun to experiment. You can use, like, bags from, I think this is called
burlap in English, where there were
some fruits in it, and you can use
all kinds of nets. We have at least around here, we have these fabric nets for potatoes,
oranges and lemons. So these are really fun to use. Can also use shelf liners and
plastic bags, for example, sometimes you might want to have a piece of cardboard
where you want to wrap that piece of fabric or the shelf liner around so
that you have better grip, and you're kind of
creating a stamp. In other cases, you can
also do that with nets, but you can also just try to
press it down and print it, but have an extra sheet of
paper next to you so that you can press it down without getting all of the
paint on your fingers. So let's just experiment
a little bit with these. So I still have a hot mess
of paint here on my palette. I will just mix this
all up a little bit. And now I will show you, this is a burlap stamp
that I've used before. Like, just use the backside now. You want to paint it and just try how much
paint you need. I'm not sure if this
will print at all. Let's just try it.
Oh, yes, it will. So depending on how much paint
and water you put on top, you will obviously get
a different results. So I've now added
more water here, so we'll probably get a
splotch, but we'll see. No, I did not get a splotch, but it was, like,
more pronounced. So it's really fun to experiment with the different materials and see how they print and what kind of texture you
can create with them. You can also put your materials
right onto your palette. Just pick up the paint, put it down again, and
just create a print. So with the next, it's a little bit more tricky. We'll just see if we can pick
up some paint like that. I tend to soak them in
the in fluid paint. Okay. So I've picked
up some paint, and I will have
to press it down. Right. Cool. So what
else have we got? Yeah, we also have the plastic
bags and you can use them, put them over wet media and
leave it to dry like that. But you can also use
them in another way, when you crumple
them a little bit, then try to pick up some paint that don't have so
much paint here right now. Just do it like that. I think I need a little bit
more water on my palette. That's a really weird color. Okay, so you can get
all those wrinkles. Well, let's see if this kind
of plastic gets more stiff. We'll get different results. Yeah, so this is more stiff. I can't actually really get just more lines
line like textures. And the harder you press, obviously, the
more plot you get. And if you press
just very lightly, you just get where the paint is on sitting on the on the riches. So that's it. It's really easy. You just go and look what
you have and you can use all those materials and just
try how they will print, how they will stamp, what kind of texture you
can grade with them. Experiment a little bit with
the viscosity of the paint, like the thickness of the paint, having it read out of the tube versus having it
a little bit more fluid. So this is really a lot to try and have fun with,
and now it's your turn.
31. Masking Tape Magic: This brand is called masking tape magic,
and it's a lot of fun. I have a pretty large sheet of watercolor paper that
is glued on the edges. But you can do this
any size you want. Obviously, if you want
to do this larger, it can take a little
bit more time, or you have to use, like, larger brushes, and then it
goes pretty fast as well. So what you need for this is
some kind of atrsive tape. This is masking tape
that's used for painting walls, and
this one is well. This is called a sensitive one. It's a little bit less sticky. And easier to remove
from your page, but you could also
use washi tape. We're going to create
some kind of a grid, some kind of segments
with the tape, and then we're going to
paint the whole thing. If you don't have a paper pad
that is glued on the sides, just go over the edges with
your tape and just hold it down on your surface so that
it doesn't slide around. And also if you work with rather wet media like
watercolor or ink, it will buckle, so
having the tape go over the edges will
help to hold it down. You could also tape it around
the edges and stick it to a piece of corrugated
cardboard or a piece of wood, if you want to do that. Okay, so let's get started with just putting down the tape. And you can go crisscross. You can go all the way across. And just for
demonstrations sake, I will also use
RotinaO so I will have different whoop,
thickness of lines. So let's see where I
can put this one now. But you can do this also in a very regular pattern
all the same size. This will also look super neat. What I'm looking out
for just a little bit is that I want to
have the angles, not either I want to
have them parallel, or I want to have them
definitely a different angle, not just like having
it almost parallel. So I feel that's a
little bit weird. If you make it different,
make it really different. One more thing that
I look for is that I have different
sizes of segments. Okay, and I think we will
leave it just like that. There's no need to overthink. Either paint each
segment in one color, just make this unique color, like make this
yellow, this blue, this red, whatever you want to. This looks super
neat. My daughter has recently done one like that, but you can also, paint over the whole surface as
if there was no tip. You can do this with
acrylic paints, with gouache, with
watercolor, with ink. I'm going to use these
watercolor inks. So don't ask me how they differ
from liquid water color. I feel they are more permanent. I think I'm just going to wet
this a little bit before, but you don't have to do that. This is just because
I want to have something that's pretty
loose that spreads around. The brush I'm using is
actually a calligraphy brush. It's very useful because
it holds a lot of water. So if you want to cover
areas with water, a pretty fast,
that's a cool thing. You can use a dropper
to get out the paint, but at the moment, I don't have one here, so I'll just do it that way. As I said, you could just
color in this one in this color and the next
one in another color. And do it like that,
or you just go around and paint this as
if there was no tape. Now, before I go into the yo, I will wash out my brush. I'm not super
precious about them. This is saying that the only way to waste out materials
is to not use them, and I'm definitely guilty of wasting out materials
in that way because I have so many at home
that some feel a little bit precious and I'm waiting for a perfect time to use them, and then I don't
use them at all. So Okay, now there was too
much water in the brush. It didn't pick up any color. When I mix in red into the
green, Oh, this is not red. I think it's magenta, but it
could be a complimentary. So I might get a little bit
of dirty colors you see. Like when you mix the
complimentaries, you create mud. Let's see how that one works. Oh, that one's a little
bit thick already. So it will not spread. Okay, you can just play around. Oops. But if you make splashes, they will go everywhere. I think I will just
use the acrylic ink. Okay. I also have these
very old and can dash. They still exist, but this is the one that
I have sil firm. I think elementary is cool. Just going to make a
few lines in here. You can draw with them in water, like in wet media, but you can also
draw with them on that dry page first and
then paint over it, they tend to dissolve. I'm dropping in some
water in some areas, see if I can get maybe some
interesting blooming effect like where the water
pushes the pigment away, can also tilt this little bit. I do have a lot of colorful colors here.
This is pretty cool. I think I will add a
little bit more of white just to have a little bit more neutrals and also a little bit
of value contrast, that is the contrast between
dark and light areas. Now, I will leave this to dry. This has to dry completely
in the case of watercolor. When you use acrylics, for example, and you
use the pretty thick, you will want to pull
off the tape before it's completely dry because when
it goes over the tape, then you will have
to cut through that plastic film
to remove the tape. But as long as it's
still a little bit wet, you can remove the
tape immediately. But in our case, I will just leave it to dry
completely as it is. Very often you feel
that you can just pull off the tape and
everything is okay. But sometimes it's not, and it will tear the paper. So when you feel that
it sticks too hard, one really neat trick is to use a hair dryer and heat it
up just a little bit. And while you heat it
up, you pull it off. So I will just start without the hair dryer and
see how it feels. Here it does have that
feeling of ripping the paper, so we'll just use
the hair dryer. So that's our final
mini project piece, and you can leave it like that. You can cut it up
in small areas. You can continue painting on it, hang it like that on a wall, make green cards out of it, whatever you want to or
repurpose it in any other way. And I hope you have fun. And now it's your turn.
32. Finger Painted Artwork: Let's do a finger
painted artwork. So, when was the last time that you have painted
with your fingers? Probably a long time ago. And actually, I
sometimes use my fingers like when I'm in the process and I have to fix
something really quickly, I just use my fingers. But usually, I don't paint the whole artwork
with just my fingers, but I've seen it done, and I think it's a good thing to challenge
you a little bit, and also to take
out the pressure because using your
fingers is like, you cannot really be
very precise and exact. Pick something rather
simple like just a flower, maybe, or you could try to do a port
word, but, of course, keep in mind that it
will be looking very childlike because you cannot
put in a lot of detail, or you could pick a
simple landscape. I will just try to do
this pot with this. I don't know. It's not a bonsai. It's some kind of
plant, whatever. And I will just take this as
an inspiration very roughly. First of all, I need
to mix my paint, and I'm like, not sure if I actually want to do
that with my fingers. I will probably use
my palette knife just to mix my paint, and I will try to mix some kind of a rather neutral color. Neutral colors are mixed by
mixing all three primaries. I don't have very exact
primaries here on palette, but like approximately
the primaries. So I already see I've
started a little bit too far on the top, like, to get in
this whole thing. But yeah, it's really
not about that. It's just an inspiration. So that's my pot. And I will mix some kind
of a green with the blue and the yellow. And I also need a little
bit darker of a gray. I'm not sure if I can get
that with these neon colors. Probably not so we'll just
use a little bit of black. All right. So I'll just bring in this tree like structure here, and it's already a lot of fun. Really love it. It's making
me really loose because, you know, I really can't
influence it a lot. So now I'm taking a
different finger, just adding some
of those leaves. Actually go from outside
in like if I want to replicate the form of
these type of leaves. So this was just learning that I had when you go from
the outside in, you have a round
kind of leaf shape. It's actually a pretty
cool way to paint leaves. Use your fingers. I think
that's already almost enough. Add a few more here, make this a little bit
more dense here. And then I will again, use a different finger, maybe my left hand.
Who do is scary. I'm not really used to using
my left hand like that. Just like dabbing these in. Not really worrying about what the original shape of
these flowers was. And I see they will have
some white in them. I want to do that and
a little bit of white. See if you want to go in again. Right. So what else
do we want to do? Maybe add a little bit more
of that white in the in this branch thingy Also bringing more of color
into this vessel. I'm kind of losing
the screen color that I have before
the greenish gray, bringing it in again. Give me something
to sit on. M darks. Adding a little bit more
of a different green here. Enough yellow. Adding
that a little bit into my pot here. All right. I'll just leave it like that. I think it looks fun. It was a really
interesting process. I actually haven't done
it in that way because I usually paint abstract
and not realistic. But I found this
really interesting to take some inspiration
from a photo from something realistic and then abstracting it a little
bit by limiting the way like your ability to
make this exact by having to work with your tool like your fingers in this case. So now it's your turn. Have fun.
33. Segment Exploration: So the next prompt is
called segment Exploration. And I have here a piece
of printer paper. I think it's for color printing. It's a little bit
a smoother one. I took this just because I
want to use my copic markers, which are alcohol
ink markers that I still have from my time
as a graphic designer. I will fold the paper in half
so that it's not as large. So what we want to do is
we want to explore value, so different lightness
and darkness, so different shades
of gray basically. I have a couple of different markers that are
from very light to black. You can do this with
any kind of paints. You could also do this with a pencil or charcoal
or something. But it takes a lot of effort if you just cross hatch
or use a pencil. So what we're going
to do, we're going to divide the page and how
are we going to do this. I'm just giving
myself a rule that I want to follow so that I
don't have to overthink it. How will create these segments. So what I want to do is I want
to go from left to right, from top to bottom
in different ways. I want to make one
straight line. I want to make one curved line. I want to make one sixeggi line. And I want to make
one like snaky line. Okay, and now I
have my segments. And you can make this as
complex as you want to. Of course, you can
make more lines. Now, I will take my different shades of gray
and I will color this in. And if I want to, I can also, like, combine the
different shapes. I think I will start
with my darks, so I just use this side, and I think it will make
this shape, the dark shape, so I'm just going
to color it in. And with markers,
you can see the more you go over them,
the darker they get, so you don't really get even
covering, but that's okay. So now you can decide if you
need more different shades. This is now almost the
same like the white. Connect that more
with the darks. It's almost as dark
as the others, which creates a large shape. Actually, I still
don't like that. So I think I will
make that even more like the others so that
this groups is one shape. This is a very good exercise
in composition, actually, which is approaching it
in a very playful way and by doing these
lines in the beginning, getting our brains out
of this and just like getting started with making these studies kind
of these images. And then you just color it in. You try, how can I
arrange the elements, the darks, and the
lights so that they alternate, and
then you see you. Maybe it doesn't really
work to alternate them. I want to pull some
areas together. I want to bring in
more shades of gray. I want to connect things so that they don't have that much
of a value difference. So it's really fun to play, and then you end up with
this interesting piece and you can turn it around
and see what you like best. And, in the beginning, it also makes sense maybe
to make this even smaller so that you can do this
repeatedly and be really fast. I hope you're fun with it,
and now it's your turn.
34. Black & White Patterns: So for this prompt, which is called black
and white pattern, we're doing a mini project. It's going to be a card with
our design on the front. I'm using a five
mixed media paper and I fold it in half and I will also tape off a section on the front where our
design will then sit. If your tape is rather sticky, you can stick it on your cloth and remove
it again a couple of times so that it loses that stickiness and then you
put it down on your paper. So I think I will just use those overlaps to
stick it down here. And now what I want to
do is I want to segment this in any random segment. So I will just take a pencil and go for this in
one continuous line. I will then later on erase these again so I can
already do it now. This is just for us to feel loose and not think so
much about the lines. And I do have some very
small segments here, so I think I will
combine a few of those and not make a different
pattern in each of them. Right now you can
use any pen that you have like this is
a tumbo brush pen. This will obviously be
a little bit too large, but I also have this micromaker
markers, fine liners. And I think they are good, but can also use those
rollerball pens. And now you can go
ahead and start filling in patterns into these sections, and I will start up here, and I will make a
line pattern here. This can be super meditative. I think I will make
circle pattern here. Okay, now my waves are
getting even larger. Instead of making more waves, I'm just making them larger.
Yeah, but that's okay. Just going with the flow. I will make a pretty
dark one here. Doesn't look dark right now, but I think I'm doing
negative shapes. So I leave those squares white, and I will now fill
in the surroundings. So what you can learn
from this is you can create really dark areas and you can create
really light areas. And I can also do
really large ones. Like imagine there was
this large doughnut, like shape going on
in this pattern here, and maybe those doughnut
shapes have stripes in them. Now we can remove the tape. If the tape sticks a
little bit too hard, you can use a hair
dryer and heat it up. Well I think I'll be fine. So now let's take a close
look at our finished card. So there are some pencil
lines still here, and you can erase those, but I would wait for
the ink to really dry thoroughly before you do that because it might
smear otherwise. So here you go. You have
your finished card, and now it's your turn.
35. Observe Negative Space: This prompt is called
Explore negative space. So the negative space is
the space around an object. So if I would be the object, everything around me would
be the negative space. So you can take a
picture and look at it. I could try to draw the
chair just as it is, but I could also
draw the background. So this is really
hard to do, actually, and it takes a lot of
practice and a lot of doing. So I would draw in the
inside here under the arm. Then I can see that here, the next shape is here,
goes with an angle. Here I have an oops, here I have another
angle like this. Here I have a small triangle. Then here. It goes like this and
here it goes like this, and it will be a
pretty wonky chair. But I'm just focusing
on the outside. Because this helps
to abstract it and to look more closely because
when you look at the chair, you're like, oh, or
your brain is like, I know what a chair looks like. It has four legs. It has
something to sit on. But when you just focus
on the negative space, it could be that you
are more accurate even. So I was just drawing
the negative space. Now this is negative space here. Everywhere around here
is the negative space. This can be quite interesting
to do when you do this also with natural
items like leaves. It can give you cool
abstract compositions and a good starting point, and then you could zoom in
and just take a section of this and see what you like. So it's a cool way to
start a composition. If you don't want to
do this freehand, you can also just put a piece
of transparent paper on top that would be my object, and it gets the feeling of
a chair, but in itself, when I would not know
that this is a chair, this would look maybe
a little bit abstract. So this is a great way to form, find shape for your creations, for any designs that
you want to make, but just looking at the
negative space and then using the negative space as the
main subject of your work. So now that I have these
abstracted lines and shapes, I can continue working on this and forget that
this was a chair. It was just a starting
point for me to get going. And now I can, like, do whatever I want to All right. And this is just how you could continue
playing with this. It's just one option. You
can do whatever you want. I have just used a photo
as an inspiration to jump start the creative process and then go into playing with paint. So now it's your turn.
36. Create a Mosaic Collage: This prompt is called
create a mosaic collage, and it's basically about deconstructing and
reconstructing an image. I've taken an image
from a catalog that we got in the mail and I
also have a piece of paper. I have picked a black one because this picture is so dark, but you can also use white or
differently colored paper. What you also need is a
bluestick and your hands. So first, we'll start by carrying this up
in a random way. So I think this was here. So we are kind of finding
out way as we go. This really forces you
to look at what you see. And it's kind of a puddle. Obviously, I could put this
together exactly as it was. But that's not the point of it. So it's a little bit a
challenge to how I can put this together in a way that is interesting in a way that
creates a cool effect. What I want to try is I want to have some
kind of an outline, like a straight edge. This is not the one
that's fitting here, but I do like that
there's a line that kind of speaks to this
form to the shape. And also have a round from here. I will continue it over here. I So I think it will add the lettering in
here just for the fun of it. It says summer 2024. I think I will add
more red here just to have that repeat a
little bit more up here. Maybe a tiny, tiny segment. My even have a
sharp edge here so that kind of reminds us of how this all started
as square image. Alright. So I have not used
up all of my iba scraps, but I've used up most of them. And now it looks like some
like fun collage that um reminds me of
the summer where everything was so lush and growing so much that
it grew over my head. So it was, like, almost a mess in my
vegetable garden. And this could represent
that feeling and that of that abundance and that jungle vegetable
jungle, so to speak. Of course, you can try to
put it together, like, almost the same
as it was before, just with these little
lines in between, the stairs in between. But you can also mix
it up completely and give it a completely
different look and feel. So now your turn.
37. Start Your Art Journal: So this prompt is called
Start your Art Journal. It's kind of a mixture of
a diary and a sketchbook. So you put all these things inside that interests
you that you play with. It's basically a creative
playground for you. There are no rules on how you can create
in an art journal. It's just a book where
you can really explore some stuff where you can
just stick stuff in, like, staple it in, draw it in, write ideas inside,
paint inside, draw inside, whatever
you want to do. And if you have done a few
of the prompts already, you might have
amassed some papers. We will now use these papers to create our own art journals because doing them ourselves makes them feel less precious, like, less precious than when you buy an
expensive sketchbook. But even if you get, like an like an
inexpensive sketchbook, it has all these
blank white pages, and sometimes this feels a little bit hard to get started. And when you use already
papers that you have made yourself that you have painted on and drawn on and printed on, whatever it is, there is already something
here to respond to. I'm going to use a selection
of papers that I have created in the process of these prompts to create
my own art journal. What you need for this is
ideally a cutting mat. You need some kind of a
utility knife or a cutter, some yarn, like this
is just cotton yarn. You can also use waxed
thread or stitching yarn, something that's
a little bit more sturdy and doesn't drip. And you need a needle that has
a pointed tip and is large enough for you to
thread the thread. I think that's how you say it. You just have a dull
pointed stitching needle. If you have something
some other item that has a sharp tip. This is called in
bookbinding O, AWL. This is actually from
a sewing machine. I don't know, maybe it's used to make some holes into the fabric for
buttons or whatever. If you have a bone fold, there you fold, that's good. If you don't have, you
have your fingernails, that's all you need. Yeah, without further
ado, let's get started. So first of all,
you want to have your papers in approximately
the same size. This one's a little bit
larger than A four, that's the usual size here. So when you want to use this for a cover,
it would be fine. I think I will use this one for a cover because it doesn't have any dry media on
it that can smear, that this has something
that can smear. So what I want to do is I
want to fold this in half. Can use bone folder as I set
to make you get more crisp, but you can also use,
like a plastic card, a ruler, or just
your fingernails. So I'm just using this piece
of transparent paper as a stencil to get the size because I need
to make these smaller. Now, I will cut the thin
paper with scissors. I find it a little
bit hard cutting tissue paper with
a utility knife. It really tends to
rip on the edges, so So once you have your papers in approximately the same
size and fold it, you can just fold
them into each other. And you can overthink
this, but you shouldn't. So I will have this as my cover. So let's open this up. And then there's just one thing for the most inside piece, you will also want a
more stirty paper, not maybe so I wouldn't take the tissue paper
as the inside spread. Now, I have these larger ones that I haven't cut to shape, so I'll just try to center
the smaller papers. And as I said, you don't need to have them all in the same size, but you want to have
an area where all of the papers are so
you get all of them. If you have some
kind of paper clip that would come in handy, so you can clip it anywhere
where it grips all the pages, and I think I'll need a little bit longer
thread than this. No, actually, that is fine. So now we need to bind it together with a piece of thread. And you can do this two ways. One way you have the knot
and some thread outside, and the other way
you have that in the middle fold in
the center fold. Okay? And you can cut those a little bit
shorter if you want to, but you have this
double knot here, so you don't want to have it super short unless
it might open. When you have it outside,
you start outside. When you want to have it inside, you start on the inside. So I think I will
start on the inside. And now you can
measure this to have approximately the same or
exactly the same distance. But I will just eyeball it. So for the first one, I will just make sure
that everything is really centered into the
snuck into the fold. And then I will just put this in the middle parallel
to my surface, and then I will close
it and I will try to, like, stitch through it. In a straight way. Let's see if it works. So it's a little bit
hard, but it works. Oh, it's hard on my fingers. You can do this in advance
for each piece of paper. But when you do it in advance, you really want
to have the holes in exactly the same size, and I also want to
cut the paper to exactly the same size so that then everything
fits together. I will also make a second and a third one a little bit above and below.
Here's my second one. I could actually use this tool, see if it works
better than needle. There's this maximum
amount that you can go through and I will make approximately the
same distance here. Now I want to have my
not in the middle. What I want to do is I
stitch from the inside out in my pre stitched hole. Make sure you leave
some thread inside. Then you go back through an
outside hole, either one. Now you go right to the
other outside hole. Whoops. I pulled too hard. Hopefully, it's
still enough here. Then you go back
through the middle. Now, ideally you want to
come back on the other side of this thread that goes
from top to bottom. But if you don't,
it doesn't matter, you just have to end up with one piece of
thread on each side. If you end up like this, you just go over there. So it's no big deal. Then you just pull it tight. You don't need the
needle anymore, and now you make a double
knot over this middle one. Okay. Now you can
trim the thread like you want to have
it like the same size. And remove the paper clip, and your tunnel stands. So if you want to,
you can cut, like, just use the ruler
and put it down, press hard and really
cut the edges, make it all the same length, or you can just leave it
like that to have like different sizes,
which is also cool. Because look at that. What how cool is that effect
of having that frame? And it doesn't matter if
you have some ribbed pages because this is also some kind of interest
that you can work with. If this looks really cool now, it's actually not
the best thing to happen because then
you again feel pressured to keep working on it. So really don't overthink
what you do and take this as a starting point and then you can work in this. Sometimes you have you have some leftover pieces from the
pages that you have used. And then you could go
ahead already and start to glue those in wherever
you feel like it. Like, for example, I
might glue it in here. And I would do that with glue stick because
at the moment you get wet media into this paper, which is not especially
made for wet media. I will all start to buckle. So for collage, I would rather
just use the glue stick. Then, of course, when you
have it all over the place, when you didn't use
an extra sheet, while you apply the glue, you obviously have to be a little bit careful now
when you close it. And yeah, you could just, like, go ahead and add some
bits and pieces here and there to get started
into this process of towing. And this really is a
whole a whole big thing, the whole thing where you
can really experiment. Basically, you're just
making this notebook, this sketchbook for yourself from your own practice sheets, and then you can keep
practicing in it and making some really cool stuff by
adding whatever you want. You can also put in photos. Like as I said, you can
write something or you can just make some marks as if
you would write something, really, really, really feel loose and not precious
by this thing. It's just a place to experiment. So I hope you have
fun with this, and now it's your turn.
38. Final Thoughts: Congratulations on
completing this class. If there's just one thing that I want you
to take away from this class is that it's all
about getting into motion. If you manage to get started and to keep
a playful approach, you will surely gain momentum and everything
else will follow. Once you have
completed the prompt, you have the tools to
get yourself out of a creative slump and get
your ideas flowing again. You will also have the
mindset and knowledge of how to craft your own prompts or
expand on the ones given. Don't forget to download the prompt cards because
they are a powerful tool whenever you feel stuck or uninspired if you haven't
created a class project yet. Now is the time to do it. If any questions come up, you can ask them in your
class project or in the discussion section and
I'll be happy to help. If you have enjoyed the class, I would highly appreciate if you take the time
to leave a review. This is not only valuable
feedback for myself, but it also helps other students find out if the class
is right for them. Lastly, I want to invite
you to take a look at my profile and check out my other classes
here on skill share. It that follow button
if you want to be notified whenever I
release a new class, have an exciting announcement, or run a giveaway. Overcoming creative
blocks involves addressing issues of time,
overwhelm and perfectionism, breaking tasks down
into small steps, setting yourself a
clear time frame, and focusing on the process
rather than the result. Lastly, use the painting
prompts regularly to strengthen your creative muscle and boost your creativity. Thank you for watching
and participating, and I'll see you next time.
 Cornelia Zelinka-Bodis, Mixed Media Artist