Transcripts
1. Introduction: Would you like to turn your favorite photo
into a painting? But the thought of painting
realistically scares you bit? Then this course is for you. Hi, my name is Cornelia, and I'm an artist from Austria with a background
in graphic design. I want art to be fun and
accessible for everyone. As a multi passionate artist, I love to explore and discover
new things all the time. In this class, I'll share one of my favorite techniques
so that you can create stunning artworks that immortalize your
favorite memories, even if you are a complete
beginner at painting. You will create
eye-catching contrasts by combining hand
painted background with bold energetic marks, and a highly detailed photograph using an image
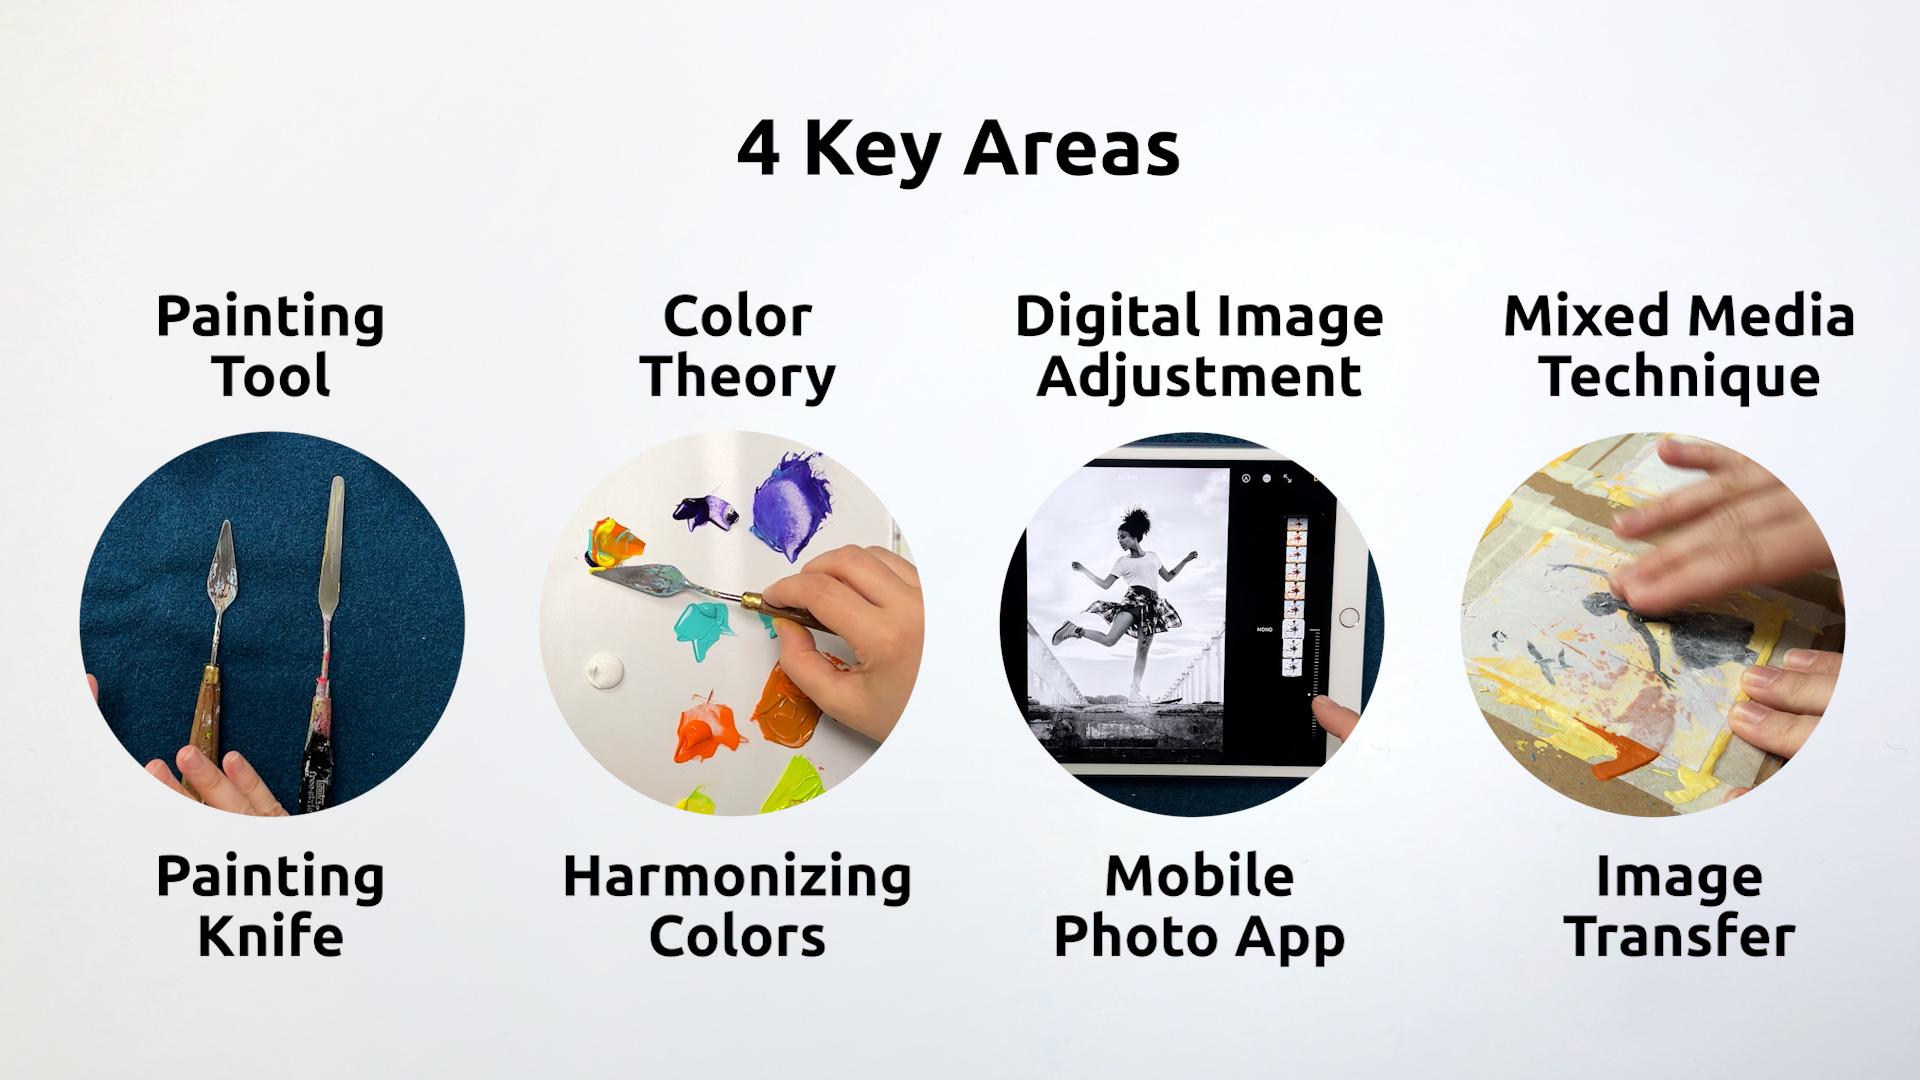
transfer technique. Throughout the class, we'll focus on four key areas. You'll learn to master
the painting knife, enhance your art by
harmonizing your colors, create a stylized image using
your phone's photo app, and then transfer a
printout to your painting. You need acrylic
painting supplies, a cell or a tablet, and access to a laser
printer or photocopier. This class is perfect
for beginners who want to get started
with acrylic painting, but also for those wishing to expand their knowledge of
mixed media techniques. You'll walk away with
improved technical skills, so that you feel
confident to use the palette knife in
your next art project. A better understanding
of color so that you can easily put together a
cohesive color scheme, and a set of beautiful artworks
that you can be proud of. These paintings may be perfect little gifts
for your loved ones, help you preserve your
fondest memories, and beautify your
very own space. Are you ready to
turn your photos into stunning mixed
media painting? Then let's get started. I can't wait to
see you in class.
2. Class Project & Overview: Welcome to this class. I'm so glad you've joined. Are you excited to turn your
photos into a charming, a little mixed media art works. I know I am. As an artist, I'm always
looking for ways to convey emotions and what I love
to use is contrast. That's exactly what we're
going to do in this class. We're combining
both energetic hand painted marks that
convey like a movement, and energy with an image
that is very detailed, because it's based
on this photo. This creates a very interesting
and strong contrast. How is it going to work? Let's take a look
at the process. We'll start by
gathering our material and practicing different
palette knife techniques. Then we'll select and adjust the image we want to transfer, and decide on the
size of the art work. Next, we'll take a look at the colors we want
to use and learn how to harmonize them to create
a cohesive color scheme. Using the painting knife, we'll work in layers to create a bolt background with
three different colors. While our background is trying, we'll have time to practice
the image transfer technique. Once we're confident,
we'll transfer our chosen image
onto the art work. Finally, we'll add a
protective layer of medium, remove the tapes, and fix any areas
that may have torn. Now you have a set of beautiful mixed media paintings
that you can be proud of. I recommend for you
to start small, because that allows you to practice a lot and repetitively, and you will make
the most progress in a short amount of time. Remember, knowledge is nothing
without implementation. I really want to encourage you to not only
watch the lessons, to not only consume the content, but also to implement, and to do the work. You can either
work along with me or keep watching a lesson, and then doing the work. A great way to keep
yourself accountable, is by starting a class project. You can do that right
at the beginning. You don't have to wait for
the finished art work. You can start the class
project right now, and then upload your first step. I'm really looking forward
to seeing what you create, and let's get started.
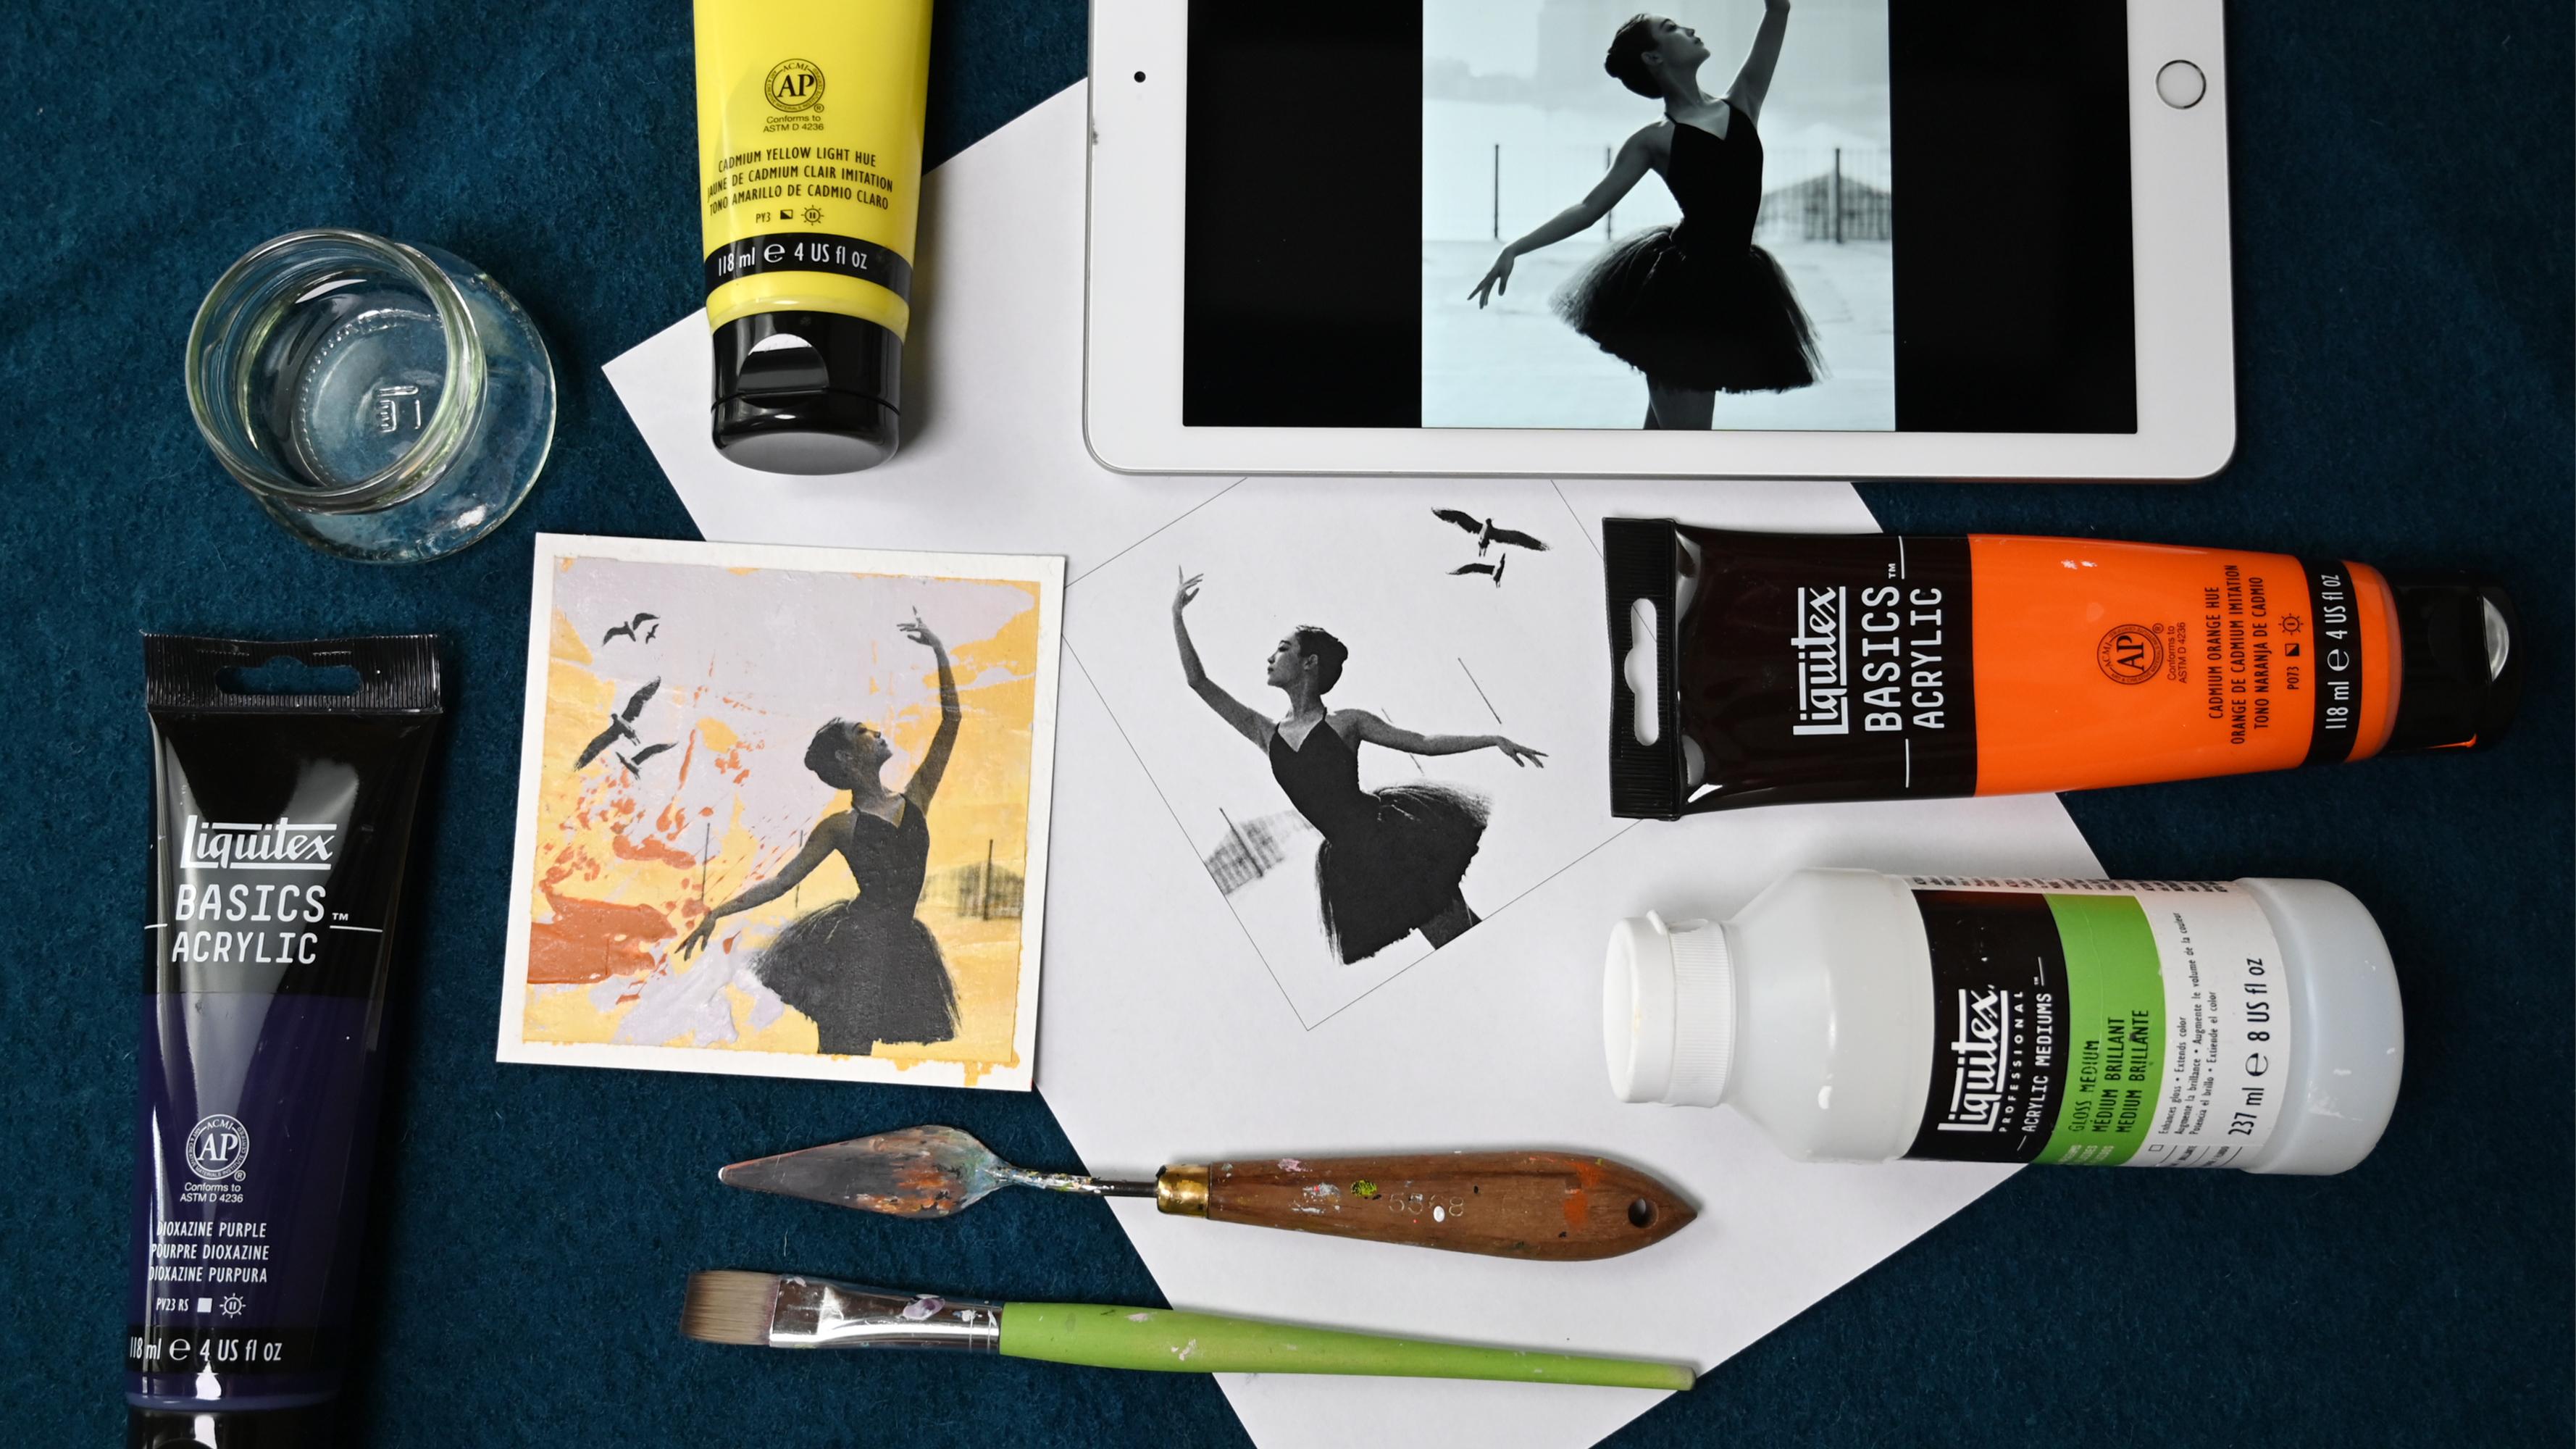
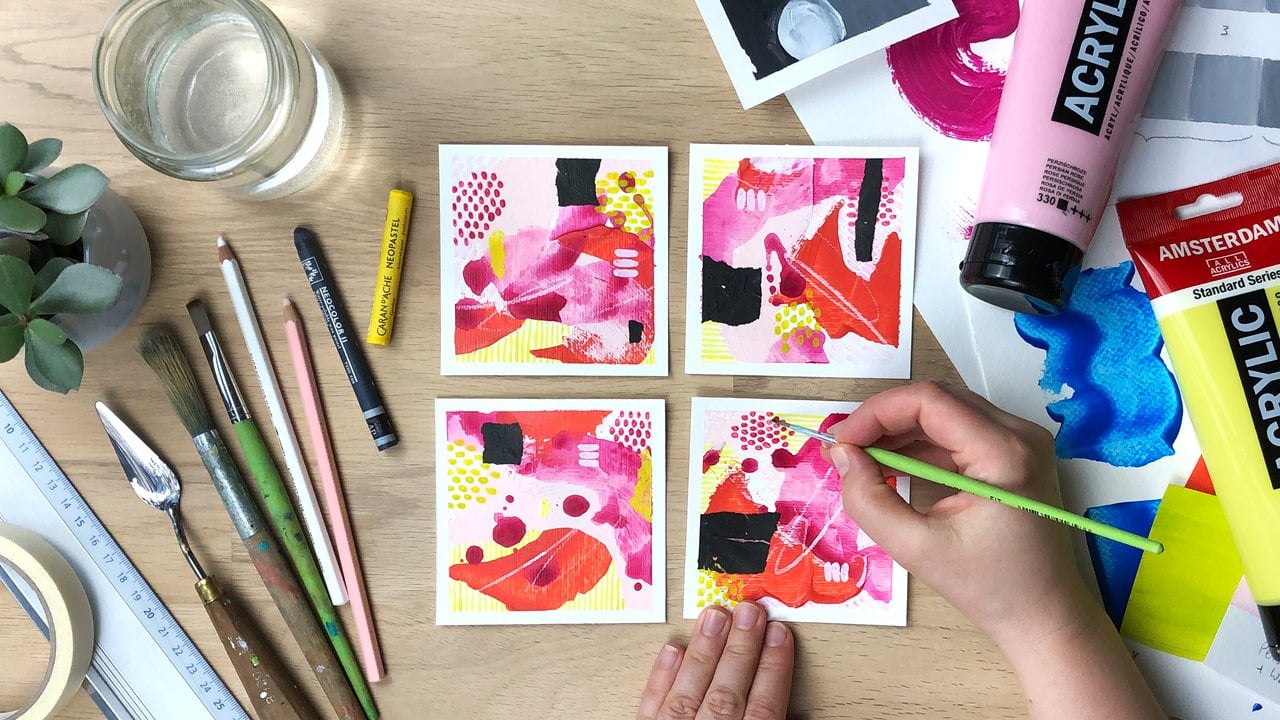
3. Gather Your Art Supplies: Let's take a look at what
you need for this class. First of all, what are
we going to paint on? I'm going to use paper, but you could also
use this technique on canvas or on wooden boards. When working on paper, you want to use thicker paper. You can use mixed media
paper like this one, this is 250 gsm and
it's pretty smooth. Or you can use [NOISE] acrylic
paper like I have here. It's 400 gsm is really sturdy and I have separate
sheet I think it's below. We're going to work small because then we can
experiment a lot, and therefore, we will need
to cut up the sheet of paper. I like to use a
cutting mat [NOISE] and a marking ruler and a
heavy knife to do that. Then when I have my
small pieces of paper, I tape them to a piece of sturdy cardboard
like this is the one that comes with the big
boxes but go through mail, and I use a regular
painter's tape to tape the paper
to the cardboard. This prevents it
from buckling and also from sliding away
while I'm painting. Then of course you
need acrylic paints. You can use any acrylic paint except high-flow and fluids. Because obviously, when
you are painting with, where's it? There we go. When you are painting
with a palette knife, it's hard to pick
out fluid paint. Then you can use basic
studio you don't need are this grade and anything goes. Now, we're doing
an image transfer. We want to transfer a printed image onto
a painted surface. How do we do that? We
use acrylic medium, that's something you need. You can use gloss
medium or matte medium and you could even use like
this is heavy gel medium, but I would only use this
if I have nothing else. Because you want something
that is very easy to spread evenly, because
that is important. To spread the medium, you will need a brush and a flat brush works
very well for this. You can use either a bristle
brush or a synthetic brush. I would just go with
an inexpensive one because once the medium
dries on the brush, the brush is ruined. You always want to
have a water container ready where you can stick in your brush if you
don't use it for a second. You want to have a second water container
that has clear water in it, that's what you're
going to use then for the transfer and you want
to keep it really clean. We're going to use
medium and thick the image onto our painting. The image has to
be tone of base. It can be colored, but we're going to do
with this black and white for design reasons. But it has to be printed on a laser printer or a
photocopy machine. In my experience, I have a regular and not too
expensive laser printer at home or just prints
black and white. When I was using
the cheapest paper, the transfers didn't
work so well. For me a little bit better paper worked better for the transfer, but it's also the
thicker the paper, the harder it is to get it off. You want to
experiment with that. It's also useful to have a piece of kitchen
paper because you needed to wipe off your painting knife
and also your fingers. When you're doing the transfer, it's very useful
to have a sheet of plastic that you can put on top because you want to
use a spatula or a plastic card to
smooth things out. Usually you squeeze out
some of the medium, and you don't want to have
that access medium on the card or on top
of your paper. This keeps everything clean. You don't need that, you
just need your finger, but you have to do a
little bit of rubbing. If you're a sensitive and
also if you use your finger, to unlock your phone, you don't want to rub
off [LAUGHTER] on your skin that you
might want to use a piece of cloth to go over the tip of your finger and
then you can remove the paper. I will show you the
technique later on. What else do we need? We need the palette to mix paints on and
it has to be flat. Obviously because
if it's like one of those pods with the dips in it, you will not be able to pick up the paint with
painting knife. You want it to be
flat and you can use this tear-off palette that is coded paper that you can even reuse because you can peel
off the dried acrylic paint. Or would I like to do is I make my own patch just using
a plastic folder, putting a sheet of white
paper inside so that I have a white background and then I mix my paints on top of that. I put it in a tray. Sometimes when I'm using
little bit more liquid color, I don't want to go over the
edges and onto my table. That's the only reason
that I have the tray. Just one short note
about palette knives. They come in different sizes. I like to work with the
diamond shaped ones that are about the size
of my little finger. They have a flexible tip
like the smaller they get, the less flexible they are, and it's really useful when
they are little bit flexible. Obviously, the larger they get, the more flexible they are, and you want to use a size of a palette knife
that fits your painting. Depending on the size
of your painting, you might [NOISE] want
to use a big one. This is one that I use
for my large canvases. Just wanted to mention
sometimes it's called a painting knife
because you paint with it and sometimes
it's called the palette knife because you use it to mix
your paints with.
4. Master Palette Knife Techniques: Let's take a look at a few techniques that you
can do with a palette knife. As I've said, I like
to use the ones that have a little bit
of a flexible tip. Here you can see the difference between the basic paints, and this is a soft body, so you see it doesn't
have the form. It doesn't keep the form,
it's just a bit more runny, and this is a bit harder
to pick up with a knife. I'm not a fan of calling the techniques
some special names, like scumbling, and
impasto, and whatever. For me, it's about thinking what you can
do with this tool. What can this tool do for you? You can just observe it, it has a flat side, it has the small
sides, it has a tip, so we can do a lot of things
and it also helps think of about contrast differences. You can use little paint, you can use a lot of
paint. Let's get started. When you pick up the paint, you can either, if
you go like this, you have it on the whole
palette, and the whole knife. If you want to just get
a little bit of paint, you do this with the
side of the knife, and you just do it like this. You slide it and move
it away a little bit, and then you have the
small amount of paint. Then you can apply
it to your page. Now I have applied
a little paint. Can also do this
with a lot of paint, and I have a thicker layer, I still have enough paints. Now I can do this
in a fast movement, and I can do this
in a slow movement. The difference that
I also used here, when I'm moving fast, I was pressing harder. You can see the texture of
the paper coming through. I know when I was going slower, I got a thicker layer. You can experiment
with these movements, and of course you can
move in any direction. Then you can also
not move at all. You can just go and
dab and create prints. You can just dab with the tip. What you also do is
just use the side. Don't have enough paint. You can make lines, it works easier if the papers are already
covered with the paint. Here we go. That's
a straight line [LAUGHTER] It's pretty cool. We have colored little paint, lot of paint, fast movement, slow movement, a lot of
pressure, little pressure. We have used thick paint. It's not heavy body, but you can also use a
little bit thinner paint, but as you see, it's
hard to pick up. But you can spread
it very evenly. See you can get the
line more easily, and you also want to
play with the angle. You can put it down
completely flat, and you can put it down
like angle to the paper, so it's 45 degrees or something, and you can spread the paint. If you have very thick paint, you can also do a
lot of structure. Those paints are
not really thick. What I can do is I can add the heavy body gel to my paint, and then I can put really lush and thick marks,
we use it a little bit. This will dry elevated. That's something you can do. I have used just one color, I could also pick up several
colors at the same time, and use them together. Here I've made pretty straight
lines, but as you see, you can also go in curves. What I also wanted to
show you is that you can actually use this
technique to blend colors, so we come down. When you want to blend them, you can do this
right on the canvas. You just slide it
back and forth, and you go a little bit up, and a little bit
down on your slide. What else? That is so, when you slide like this, I don't have enough
paint right here. Now, you get a really
smooth surface. That's really almost shiny, but pick it up slowly. But when you pick
it up straight up, you get some texture. I think I have to show
you that close-up. See that. It's really smooth. If you grew up slowly, but if you give up 90
degrees to the paper, it makes this smacking sound, and then you get this
texture that's like a print. Could you also see
this thick texture that you get with
heavy body paints. There's one more thing
that you can also do. This was all additive painting. You're adding paint, but you could also use the palette knife
to subtract paint. That would mean, you
use it to scrape. I can use the tip, and make a line, just scrape off some paint. Can also use the
side, cut into it. Or you can use the long side, and it's still wet, remove some of it. [NOISE] Here we go. Here I've used the
side removed it. I've just scraped a bit, and you can hardly see it, but I've cut a line
through it like this. That it, concerning
palette knives, just play around a
bit try how it feels. All the differences
that I mentioned, like pressing hard,
not pressing hard. Using a lot of paint,
using little paint, going fast, going slow,
and things like that. Additive paintings,
subtractive painting, maybe even blending. Then I'll see you
in the next lesson, where we will select an
image and adjust it. We will do that before we
actually paint the background. Because we want to
have a little bit of an idea of what
colors we want to use. I'll see you in the next lesson.
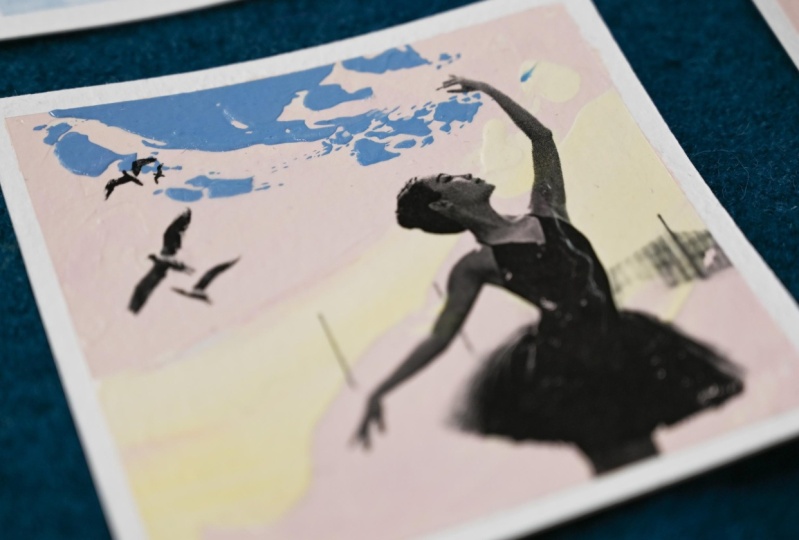
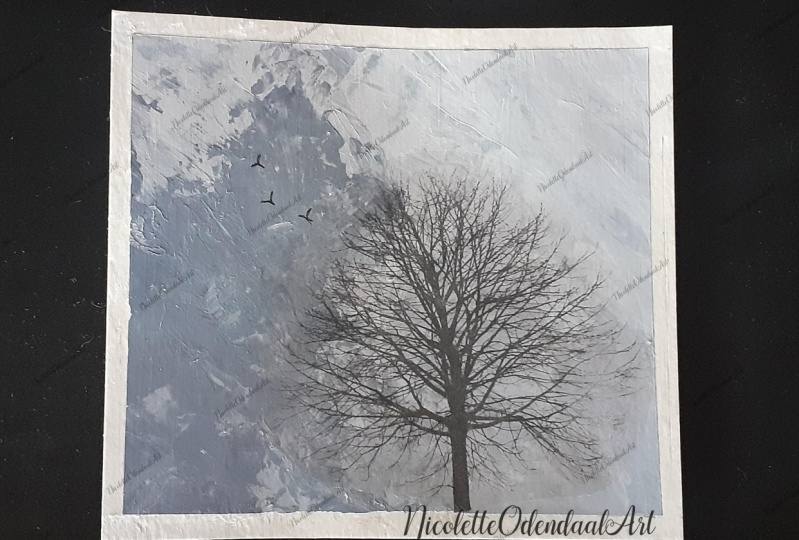
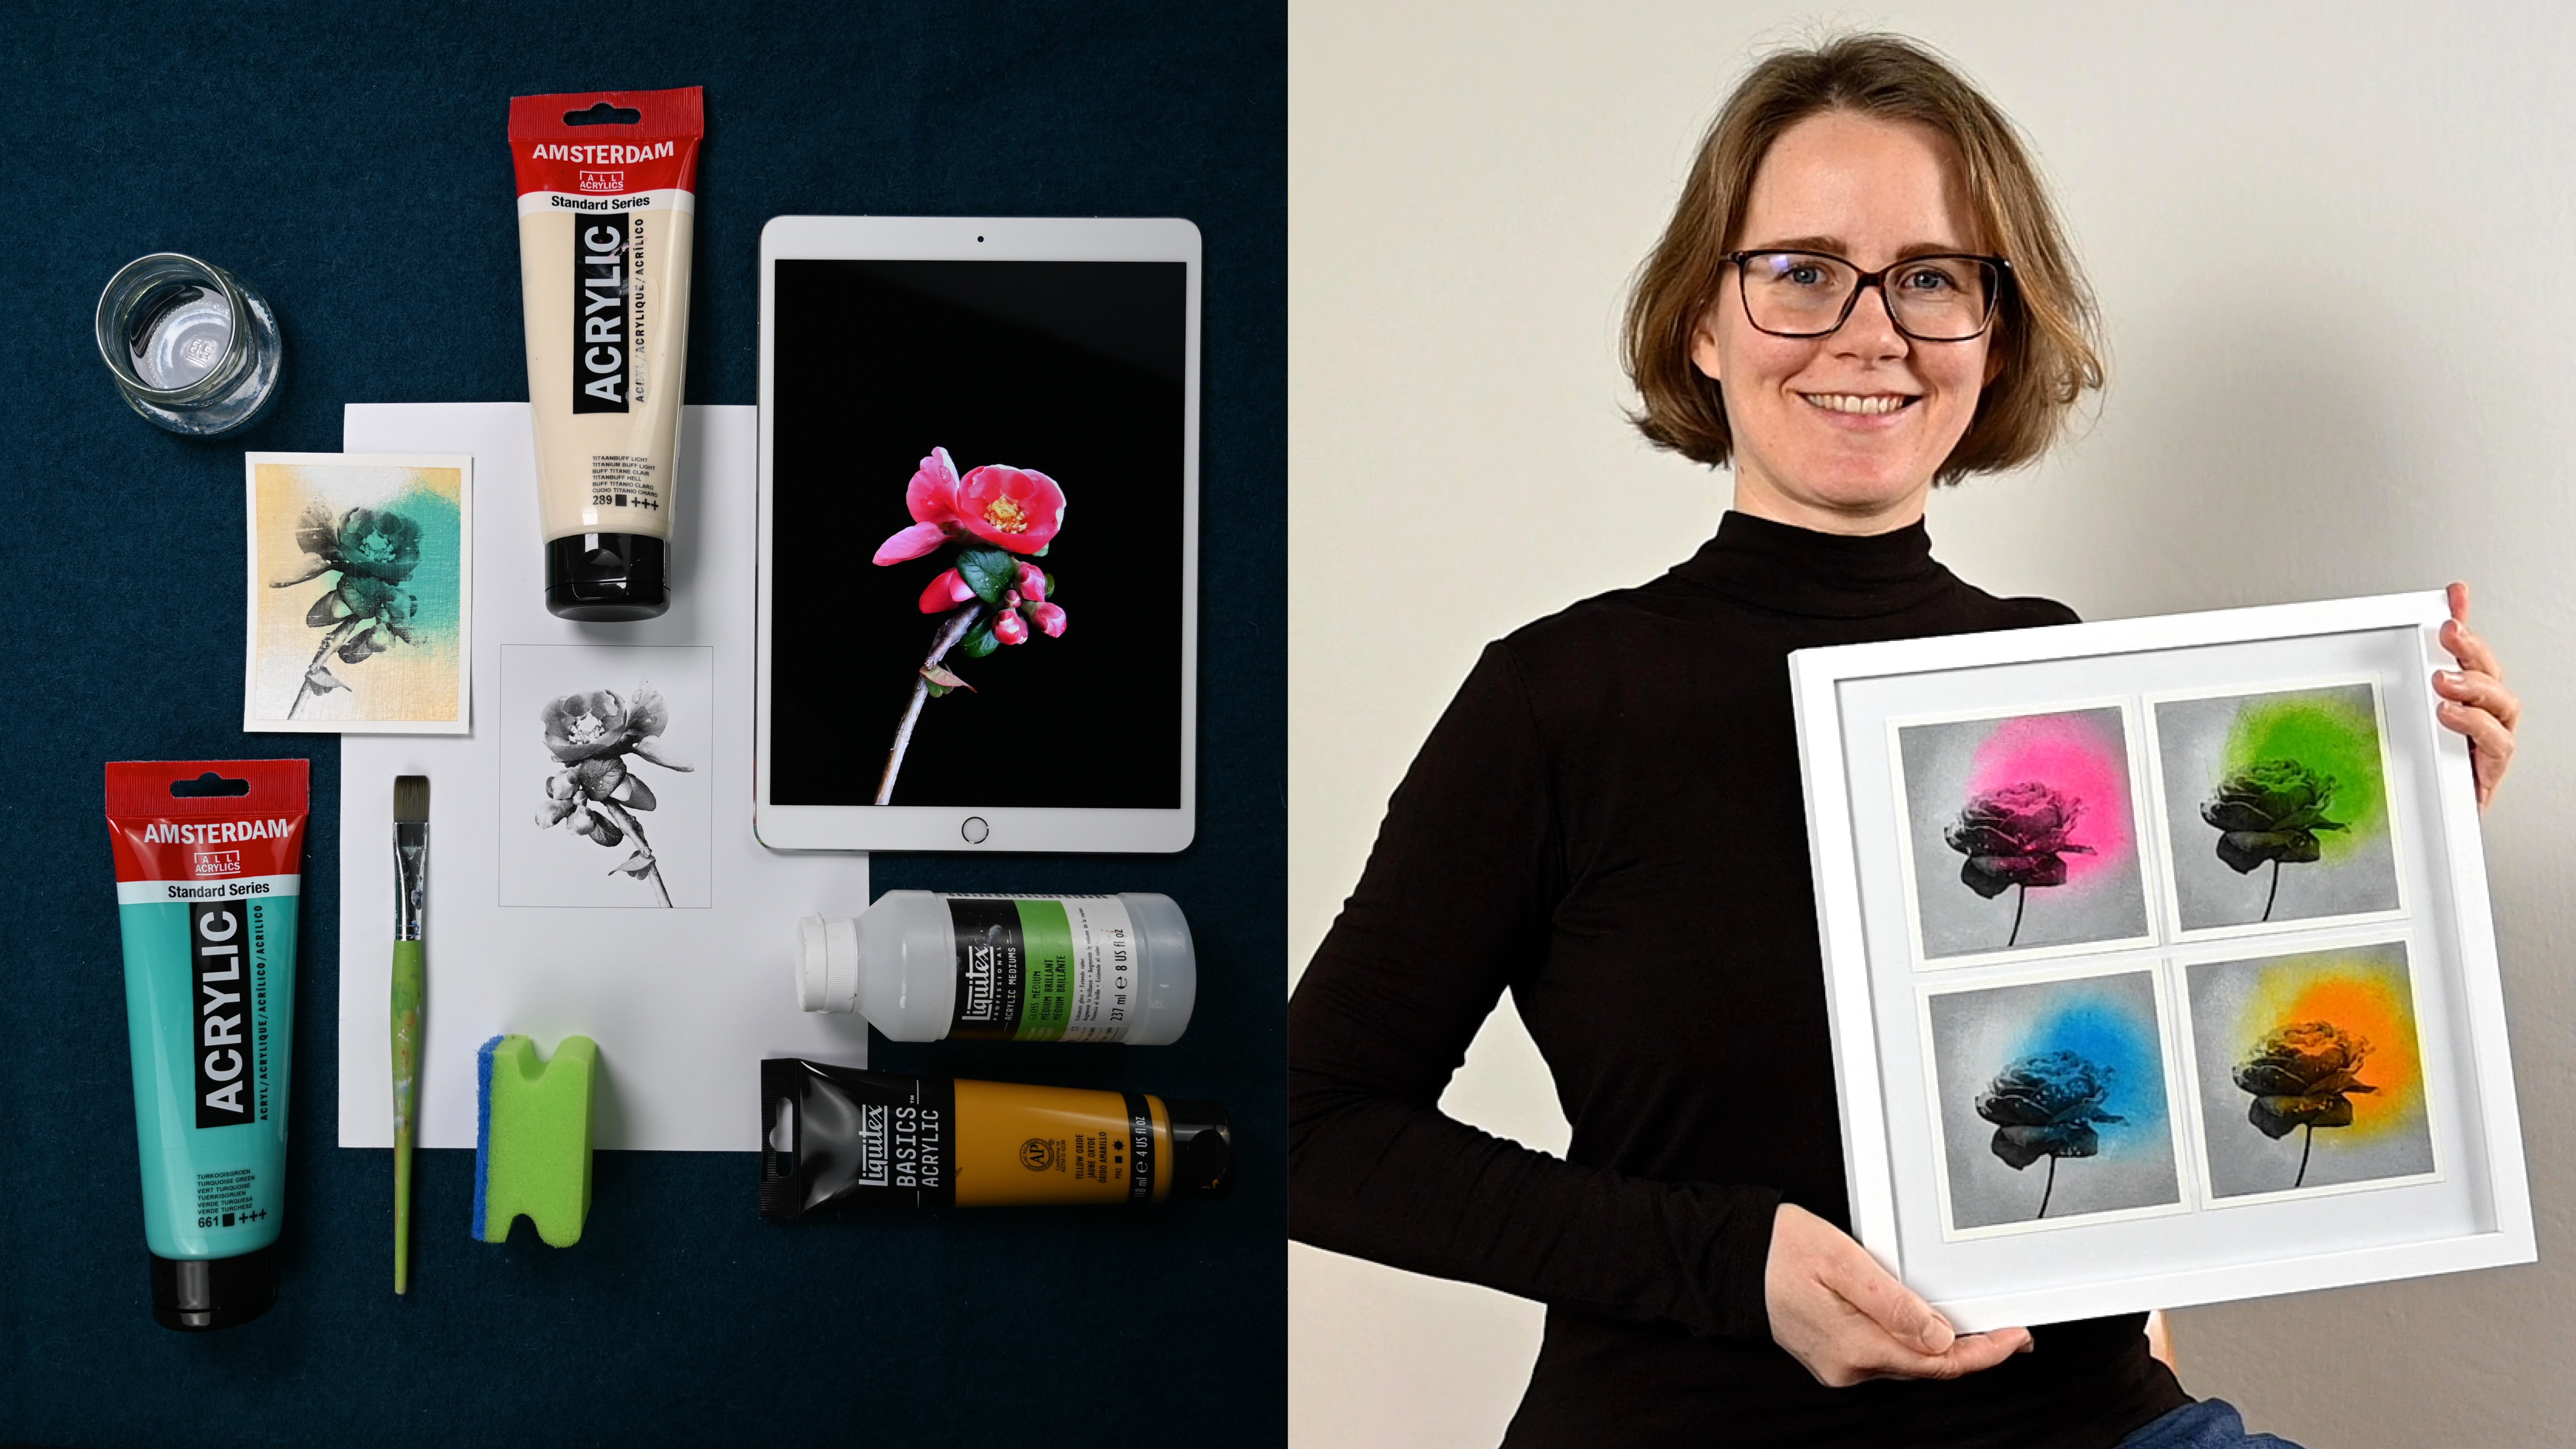
5. Select & Adjust Images for Printing: When you're choosing images, choose images with
a high contrast, and clearly defined subjects, like this one or this one. You get the gist of it. This one is clearly defined, but still there's
very little contrast between the background,
and person. It's hard to remove the
background on a phone or an app. This is what I'm going
to show in this class. You want to have images
where the background, and the subject on it, only clearly defined, but
also have value contrast. Why are we doing this? This is actually
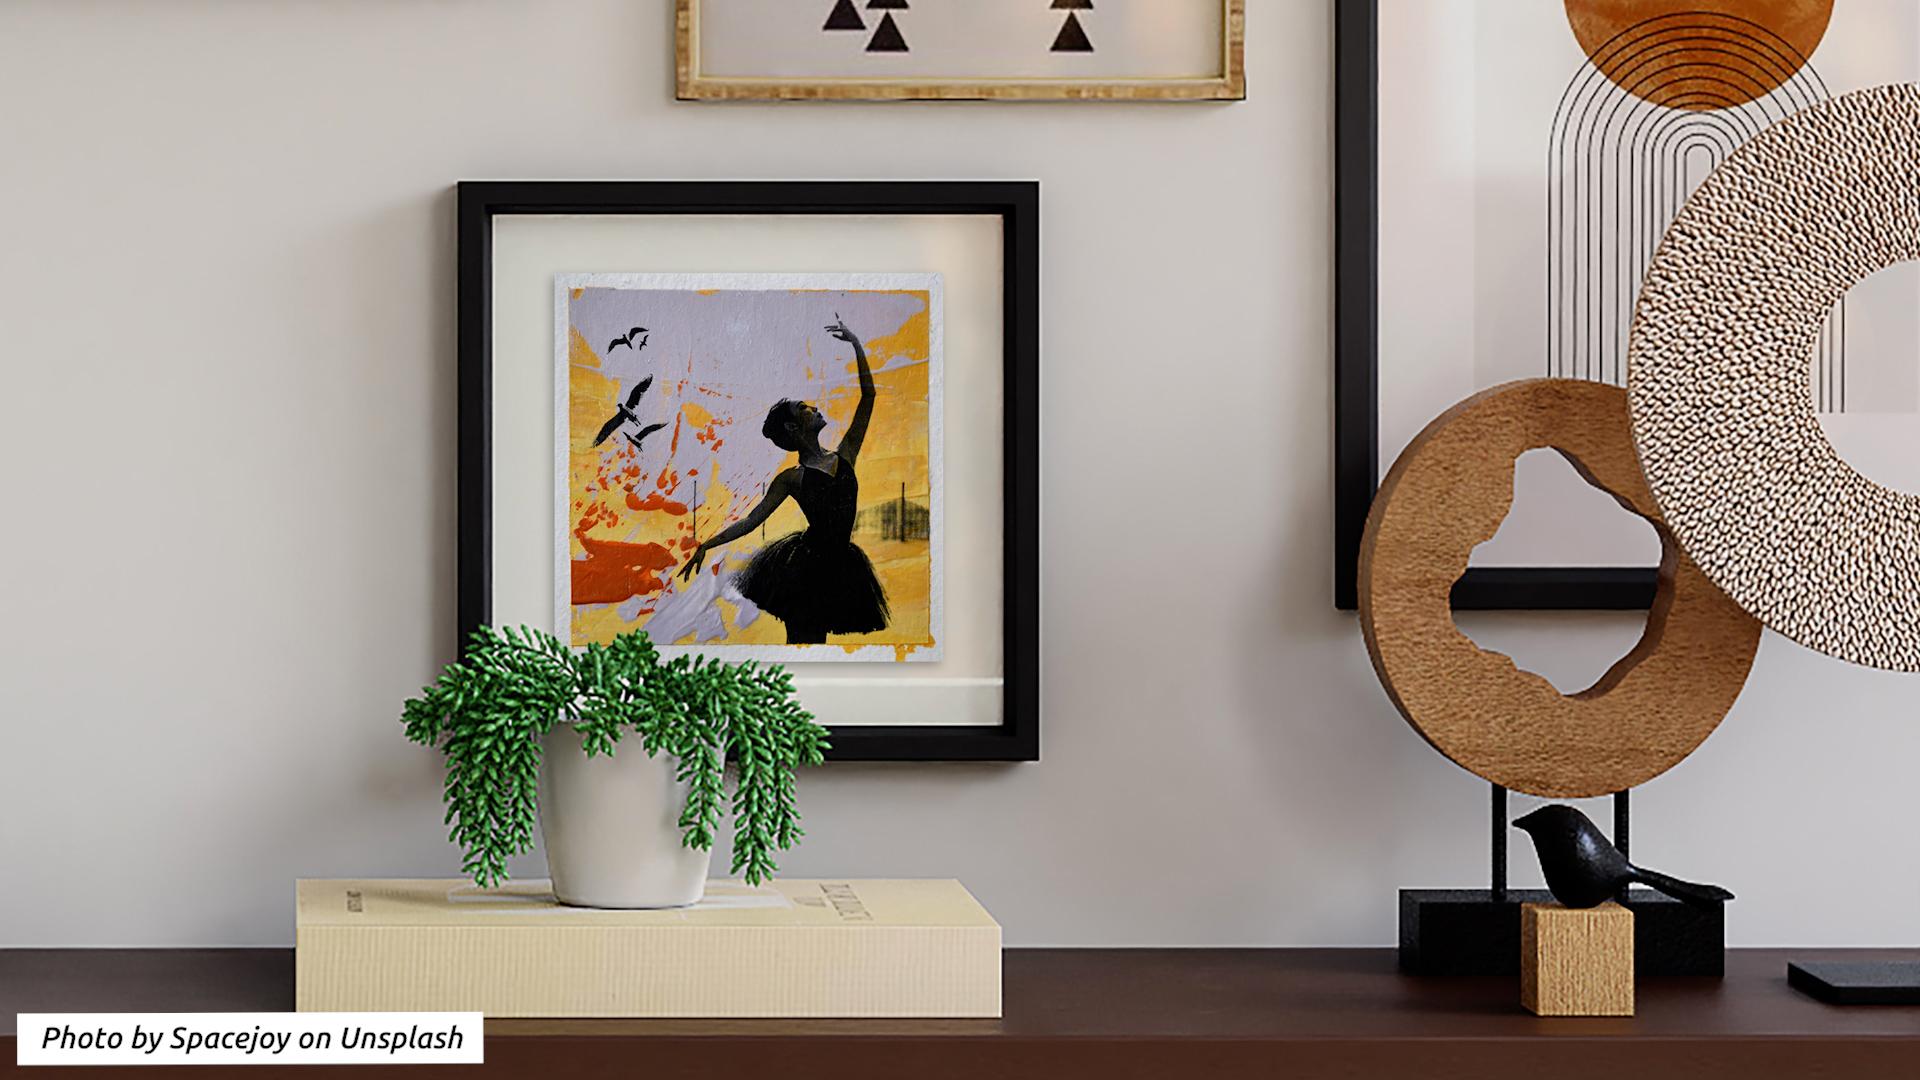
for style reasons, because we want to remove as much of the
background as possible, so that our painting
shows through, and it doesn't look like
a colorized photographs. Because obviously you
can also transfer a collage photo
or the grayscale. You don't necessarily have to make sure that high contrast. On your phone, you
can go into edit. I think all of the
modern phones have that. I'm just showing
this on my tablet, because it's the same
as on my iPhone. First of all, you want
to go into filters. There you have all
the color filters, but then you also have mono, or maybe you have grayscale, or something like
that.That's grayscale. Then you want to go
into color adjustments. I like to work mostly
with contrast, brightness, and also exposure. Usually I start with contrast. You can just slide up, and down to see what it does. What contrast does, it
makes light areas lighter, and darker areas darker. With brightness, you just
make the light areas lighter. There's also another one
that's called black point. This is making the dark
areas darker, or lighter. It's two things that contrast does in one, separated
into options. Now, I'm not getting rid of the background
with these options. That's where you
can use exposure. Because what exposure does, it makes the whole
image brighter, but especially the bright areas, like how an overexposed
photograph looks like. That's the way how I can
get the background off. Now I can go back into
my other options, and see if I can reduce them. Contrast is obviously not
necessary now. Let's see. If I make that, the background comes here, don't want that, let's see
if I can play with this. That's the way you can do
this with your phone app. Then you can save the photo. Let's take a look at this one. Again, I'm going
to duplicate it. Then I'm going to edit it. This is one black and white. Let's see if I can do
something with exposure here. Exposure already gives me the result that I
need for my transfer. Everywhere you have white, you can see your painting, and everywhere that is
black, you cannot see it. It's pretty opaque, and the grayish are
semi transparent then. When it comes to size, you can do it two ways. Either if you're proficient in photo edting, and
Lottie software, you can decide on the size
of your final artwork, and then prepare the
image accordingly. But if you're not, it is better to print it
out to take a look, see if it's the right size. Then print it out again at
at a different percentage, like 70 percent or 80 percent, and just do this with
trial and error, until you have a
size that you like. Then you prepare your paper
background accordingly. I'm going to see you
in the next lesson, where we will cut our paper, and mandate to cardboard.
See you there.
6. Cut & Mount Your Paper: Now that you have chosen your image and you
know the size that you are going to print it or the size you want to
have your artwork, we can cut up the paper. Let's do this. I know
that I want to have my artwork in the size
of 10*10 centimeters, but I need a little bit of space around the paper so
that I can tape it. So I will cut 11*11 centimeters. So here we go. I have
two different sizes. One is portrait format
and one is square. Now I'm going to tape it
to a piece of cardboard. This helps it to dry flat again. If by some chance
when you're using wet paint or too much wet paint, the paper will
bend a little bit. It will also keep it in place. So I will go over the edge. I will do it about five
millimeters and I board it. The reason why I'm doing many is that you have
the possibility to practice a lot because
if you just have one piece and it
doesn't work out, this is really frustrating. That if you have several tenses, the chances are really
good that you will get one piece that
you really like. Also when you have
small formats, you don't need large tools. You can work with regular brushes and
small painting knives. The last reason why a small size is really
useful when you are learning image transfer is that you
have to do a lot of rubbing. You have to rub off the paper
and the larger the area, the longer it takes. You're ready to get started. In the next lesson, we can
take a look at the colors. Then we're mixing colors. We have this already prepared so that when we get a
color that we like, we can get started
on the background. See you in the next lesson.
7. Enhance Art With Color Harmony: Now that you have chosen
an image to work with, you can either take
reference from the colors that were
present in the image. But in my case, it was black and white, so I can take any
reference and I will be freely exploring a color
combination that I like while I show you
how to harmonize colors. Maybe I will come up with a
color palette that I will use in this project and
maybe not, we'll see. I've already done this
with two colors schemes. One more with analogous colors
that are really similar, and one that uses basically a triadic color scheme so you have all three
primary colors. You have a yellow, a blue, and a reddish tone. So let's get started. When you're picking colors
that are wildly different, they may or may
not fit together. What you can do when you
have colors like this, you can harmonize them
and harmonizing colors really elevates your
paintings to the next level. It is a skill that you will
be able to use from now on. It will really make your
paintings that much better. It takes a lot of
the thinking away which cause fit and which don't. Because then when you do it, you can make any
color fit together. So let's get started. So when I'm mixing
colors on my palette, I like to use a palette knife. I will also prepare a sheet of kitchen paper to wipe it off. Because like with
a palette knife, you don't have to wash
out the brush in between, it's really easy and it's
very good to mix colors. So let's do the first
methods that you can use. There's one color
that it's the mother, and it's in all of
the other colors. So let's see what can we
take as a mother color. I think it will take
turquoise as a mother color. Then I will put a little bit of it in all the other colors. So I will take a little
bit of each color. So now I will take
a little bit of this turquoise and put it
into the other colors. This is a little bit too much. So I mark the orange. We still want this
to be orange and not some brownish color. So now let's watch this out. This dioxazine
purple is so strong, you can hardly get it
any different color. So now you can see this is a
little bit more turquoise. Though, it doesn't have
to be a big difference, but you can see that now these colors all have
something in common. Now, like one step further, you could have all of the colors like in
the other colors. So you will have
turquoise, orange, and yellow in the
violet and violet, orange and yellow also
in the turquoise, but the ratio would
be different. So we will mix a color that's like a chromatic black or
you could call it mud color. It's going to be a
brownish grayish color. You actually want to aim for
a grayish mud-ish color. Now you can put this color
into all the other colors. So I will mix the purple with this color. I will actually apply it because it's such
a small amount. It will probably
dry on my palette. I took a little bit too
much for the orange. See. When it's too dark, it's really hard
to lighten it up again when you want to use just a portion of it
because you would need a lot of colors to
lighten up a dark color again. This is the advanced
step and you can see that these colors fit
together really well. They have something in
common here maybe I have too much of the mud color so it's not really that violet anymore. You have to try how much
you can add and if I put the original colors
really up close next to them so you can see
how different they are. So this is just adding one color into all
the other colors, which makes it a bit better
but like adding all of the colors in the other colors makes them really
harmonize very well. I didn't really end
up with a color that I can use for
my background. So let's leave it at that. I will now take a look
at how I can make this fit for my
background because I have worked with
really saturated, strong colors and I will now
need to add a little bit of white to go into
the background.
8. Create a Bold Background: I have already made
one color scheme. When I was mixing the
rest of my paints, it actually inspired me to make another one that is
a little bit more colorful because I'm
always going into this cool pastel-y colors, so I'm trying to do
something more vibrant now. Let's see how it goes. I'm just applying this. I want the first
layer to be covered very thoroughly because when we're doing the image
transfer later on, there will be water
involved and you don't want the paper to show through. You can go for more
smooth appearance, or a rougher one. When you press harder,
you will see the paper, don't really want to
do that but it's okay. We'll see it later on. Right here, I'm already
blending a little bit. That's okay as well. We're done. I'm going to leave this
to dry now because the paper is whopped
a little bit. It buckles. It's held down by the tapes
in a dual drive flash, but right now, it's like this. I will leave this to dry and
I must not forget to clean my palette knife
because we don't want to have the dried paint on it. My first layer has dried now and it's time to
work on the second one. Now we can take a
little bit into account what kind of image
we're going to put on top. But remember, and I
forgot that very often, that it will be mirrored. The birds will be here and the girl's head will be here so you have
to think of that. Maybe when her head
is going to be here, I want to lighten up this area so that I have a good contrast. Maybe I want to put some
color below the birds. You can think of
things like that, or you just go for it and have a surprise in
the end how it turns out. That is always nice. Like my colored mix, the mix out of all
the colors has dried unfortunately overnight, so I just mix a little
bit of color together. Picking from each of those
that I have on my palette, I think I want to add
a little a bit more yellow into this to mute it. Because violet and yellow are obviously
complimentary colors, so they are going to
become actually gray. [NOISE] I'm going to let
this dry and then come back with a third color. But I will put something
over my colors like this because then they
will not dry so fast. Now let's do the final
layer on this one. I'm going to add here, here, here, and here. [NOISE] Yeah, I think I'm
going to leave it. I always want to go
in and adjust it. But usually, it just makes it less spontaneous and you want to
have that movement. You just have to go
for it, and that's it. This is now really going
to dry until tomorrow, and then I'm going to
do the image transfer. When you see the
sheet of paper from the side and then you
have the paint on top, you want it to be flat. It doesn't have to
be completely flat. But if that's the pain. If it goes like this, then the paper can go into
the dips and up and down. Here it works as well. But if you have something
like this in your paint, the paper will not
go into this area here and there will
be no adherence. There's no contact. When there is no contact, there's not going
to be any transfer. If you go like that and up, then here in the
pane you have this. Here is the door like this and you will never
get the paper to fit into the nooks and crannies. It's okay if you have the
wavy one, it's like this. But you have a ridge but it's more rounded
and it's not too high, then it's okay you
will get a transfer. But if you have these
very spiky areas, it doesn't work so well. In the next lesson, I will talk to you about
the image transfer and what do you have
to look out for and board can be tricky, and then we'll finish off our class project.
See you there.
9. Practice Image Transfer Technique: Let's get started
with image transfer. I've prepared a print that
is on two different papers. One is a little bit
thicker and one is standard copy paper with
ADTSM and this is 100 GSM. It's also a bit more
smooth and shiny. The thinner the paper the
easier it is to get off, but from my experience like
the prints that my printer make tend to work better
if I use a better paper. First of all you need to
apply the medium pretty evenly and you put the print on top and you smooth it out
with a plastic card. You have to clean the plastic card each time
because if you don't, you will get medium on top of your transfer paper
and that wouldn't be ideal because it makes
it waterproof and you want to work really fast
because it has to be wet. You can also put the
sheet of plastic on top, smooth it out, but you have to remove it pretty fast unless it sticks to
the paper and then you have like the ridges of
the squeezed mediums, so I usually just try to work as cleanly as possible
with my plastic card. Now when you pull
it off immediately, you can do that
between a minute and a half and three minutes. I think we can try it here. What do you want to do is
you want to try to lift an edge and see if you can pull off
the top layer of the paper without the
print coming off too. I can try to peel this off. When you have done that, you want to let it sit for
half an hour or 45 minutes and then you can continue
to remove the paper. What happens when you have uneven coverage of
acrylic medium, when you are trying to get
off this top layer and you come over an
area where there's a lot of medium and
it's still wet, you're going to smear
the medium on top of the paper residue and then
you will not get it off, so that's why you want
to have a really even covering and a thin one actually because you want to push
out all the excess medium. Now let's take a look
at our practice sheet. What I want to start with is
I want to wet the surface of paper and I will let it sit for a few seconds
or maybe a minute. Here the paper has already
soaked up all the water. This paper is a
little bit coated. It takes more time until
it's soaks up the water. I think I can maybe
start here already. This one worked out very well and if you have the time
to let it sit overnight, I would rather go
for this technique because when you pull
it off immediately, it really takes a lot of
experience and trying until you get it right and I think this one is
the safer version, but you have to be patient. This is a version for the
impatient with people. Let's see if I've made
this humid enough. I don't want to make
it too humid because then I will not be
able to get off large pieces of paper and if nothing else comes
off very easily, we can now start to re-wet it. The best tool to
use is your finger because it's a little bit sticky and really gets those
paper fibers moving, but after a while your
finger gets sore, so you can use a piece of cloth and just
wrap up with that, but you have to be a little bit more careful
because you don't have so much feeling
in your fingertip now as for the pressure. You can go in circular motions which is probably
the best options, but you can also go
in linear motions and I prefer to work from the inside of the
image outwards. It just tends to work
better and you can rub harder where
there's no transfer. When you feel that it
looks pretty good, you want to stop and continue
working on another piece. When it dries, it
will show you where there's still paper
that has to be removed. Sometimes I like to
go over them like this with all my fingers
when it's almost dry. That's a good way to get
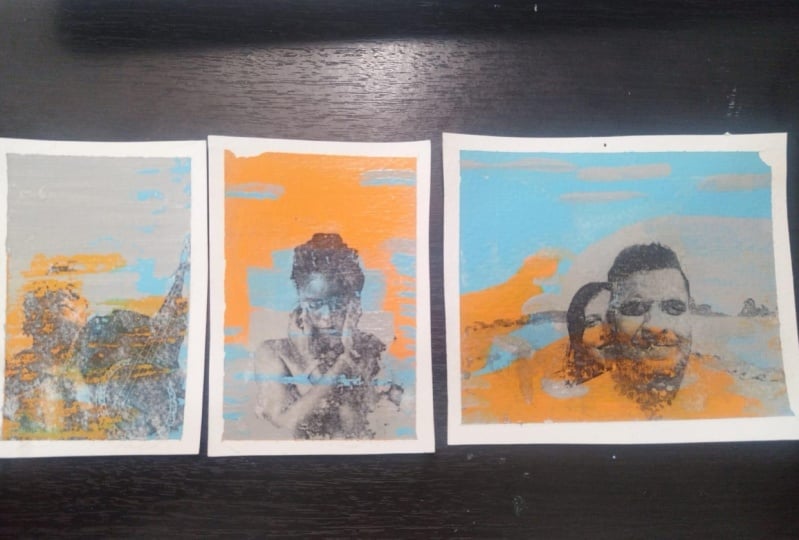
off the last paper fibers. Here we have the
better paper like the one that I expected
to work better. It did not work very well here. I do have lost a
lot of the bird. It worked better in the
overnight, even better before. I just a second ago wrapped over this again with
my piece of cloth. When it's humid, you really have to be
careful to not drop too hard because now I made all that texture in the
bird like these tiny spots. This is the thin
paper overnight. There are some mistakes. They are not really mistakes, but sometimes the
transfer doesn't work, but it's part of the charm of it that it looks
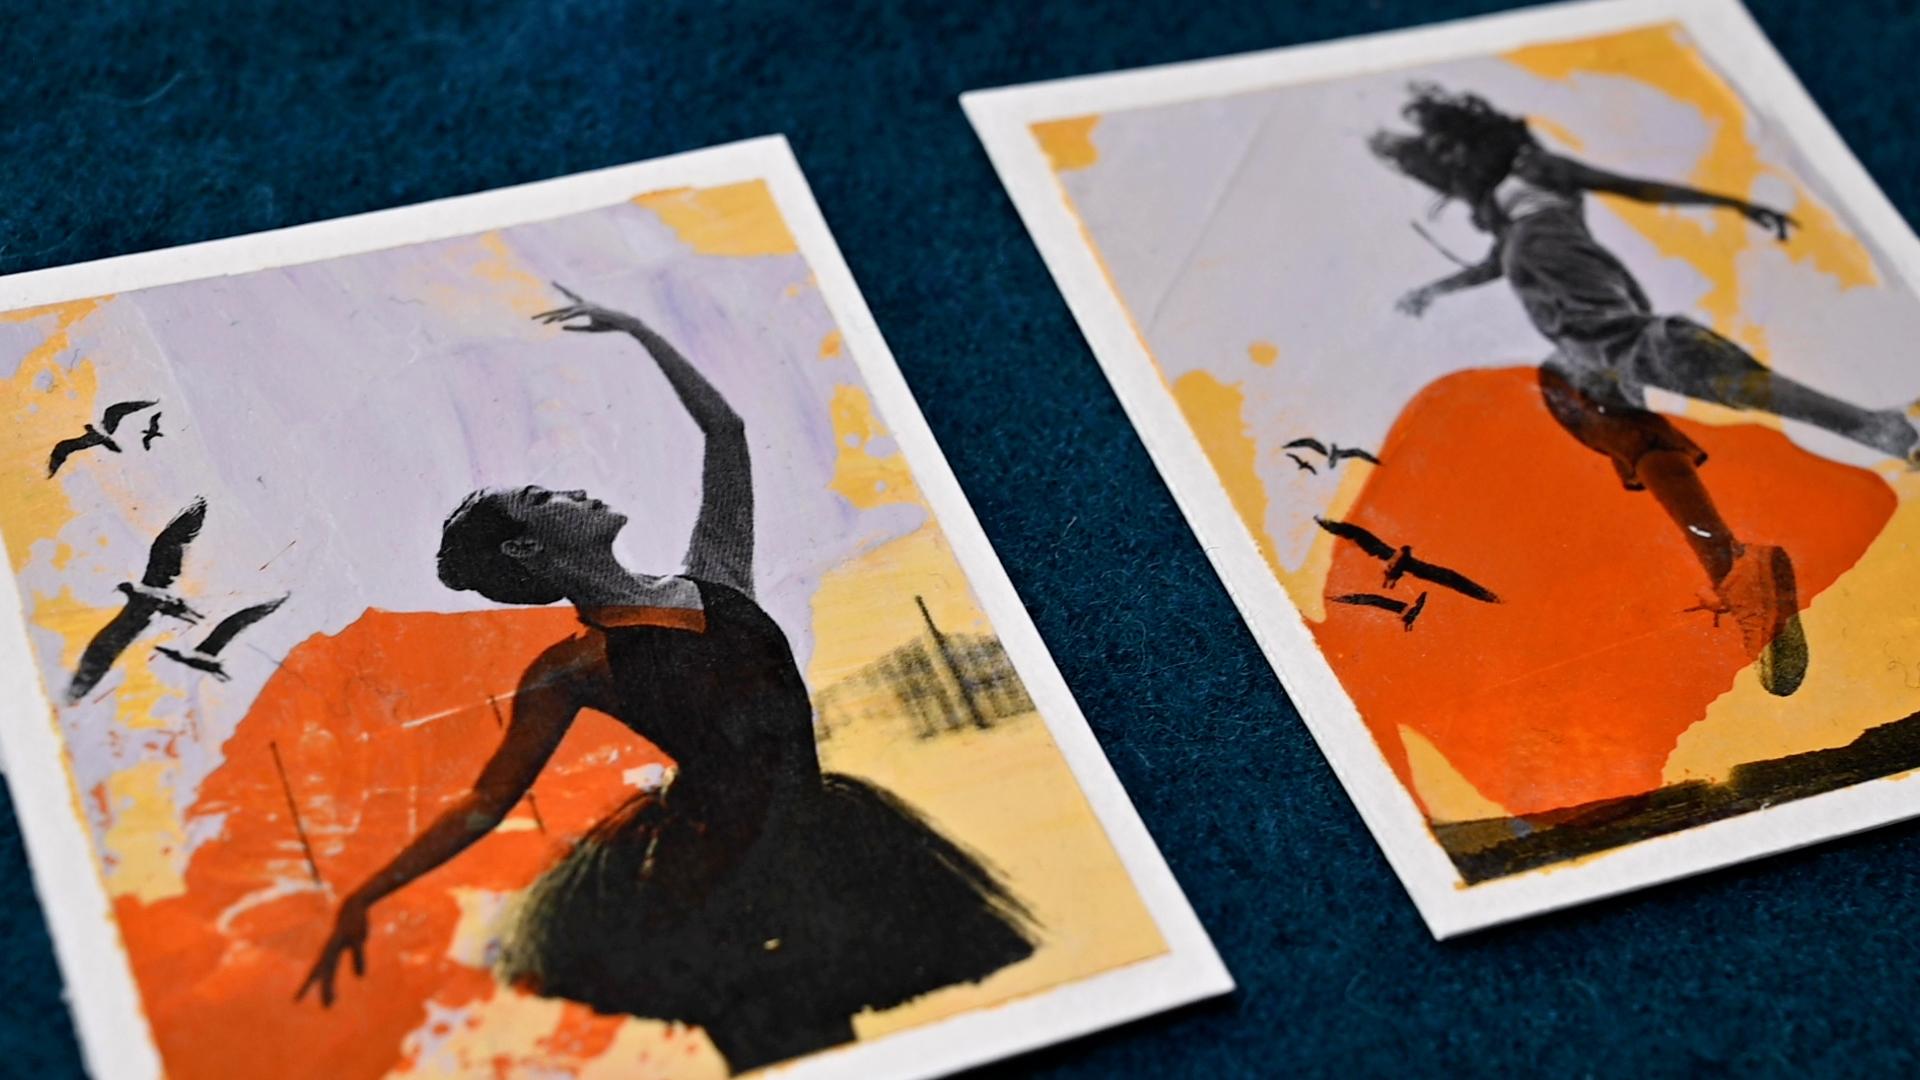
a little bit distressed. Let me show you a few examples. This was also the thick paper
and it worked pretty well, except for the edge here and
a little bit on her neck. This one was the
cheap printer paper and I did have a lot of
problems here with her skirt, her legs and also her arm
didn't really transfer. I made the conclusion that
it has to do with the paper, but it also has to
do with the surface because here I am doing the transfer on acrylic paint and here I was doing the transfer directly
onto the paper, and I think this works more reliable because
I've done this before in another class
and I didn't have those problems that the
transfer was coming off while rubbing not as much as I had now when I was doing
it on acrylic paint. Now that we have
removed all the paper, there are still areas that are a little bit grayish that
have paper fibers on them, so that's one of the issues. The other thing is
that we don't have a uniform sheen where there was the transfer
the papers more matte. Around where you have
the gloss medium, it is really shiny. To make that uniform and also
to seal in our transfer, we will now cover it
with matte medium. I've had people say
that they do this, write that and
then it clears up. For me it doesn't, so
what I do is I wet it and if the paper like the image clears
up when it's humid, this is the sign for me
that I cannot seal it. First, you want to remove all of the paper fibers that are loose. Also we don't want to
have it super wet, so it's just a little bit humid and the image
has cleared up. That's the important part. Then you just seal it with the medium that
you use for the transfer. In my case, it's gloss medium. Now it should stay
clear when it's dry. You might have to add a
second layer once it's dry to really get this uniform. What I want to leave you
with for this lesson is that you have to find
out what works for you. You have to try
different materials, different media and
just do small samples, just small things like
these birds or even smaller and see how
it works for you. In the next lesson,
we are going to put what we have learned
into practice and transfer our images onto our painted backgrounds.
See you there.
10. Transfer the Print to Your Artwork: Now it's time for the transfer. Let's get started. I'm
going to use gloss medium. We need to cover the
surface generously. We don't want to have
any blobs of medium, but have it covered evenly. But still we don't want any dry spots because then
there will be no transfer. This one that I'm doing here
has a pretty smooth surface. I'm just covering my background and then I'm applying
the image on top. I'm just moving it
out with my card. When I go over the
edge like this, I will remove some
of the medium. Then I want to clean
my card before I go back because
I don't want to have matte medium
or plus medium on top of my transfer paper. With this one, we
have a ridge here, a lot of texture. What do you want to do
when you have that? You also want to cover
the image that you are using with medium. That helps to make
the paper more flexible so that it can easier adapt to those ridges and dips. You will get only so far
with a spatula in this case. Because the surface is not even, so you want to use
your fingers as well to make really
good contact. You can also use a
foam roller for this, like a brayer with foam on it. I don't have that, so I'm using my finger. The finger is almost
my the best tool. You want to make sure
that you don't have a lot of gloss here in the dips. You can see that there
are some shiny areas. This is where I
still have gotten some medium on top of the
paper. But that's okay. It's just small areas. We will be able to
work with that. What you don't want to have
it have large areas of medium on top because then you will not get the
paper off again. There is this method
where you can peel off the first layer
after a few minutes. But since I have
all the texture, I'm sure that I have
different amounts of medium here and not
an even coverage. So I don't dare to
pull it off right now. I will let it dry as it
is and do this tomorrow.
11. Rub off the Transfer Paper: The transfer has now
dried overnight and now we're ready to remove
the first layer of paper. But this you need to wet it. Now, we will let it sit for
a minute or two so that the paper soaks up the
water and we can continue. Now let's try to pull
off the first layer. Here, you can already
see that I've lifted up all of the paper. But as I don't have
any image here, it's okay to continue to pull. What we're doing now is the same process that we
would have done if we would have them move the
first layer of paper immediately after
doing the transfer. We have just waited
overnight so that we can make sure that
everything is evenly dried, and even if we have different
amounts of medium below, they have all dried thoroughly. I think it was too little water. [NOISE] Just go and
add a little bit more. I didn't want to have it too
wet because if it's too wet, I'm not going to get on
large chunks of paper, like pieces of paper. It's just going like this, then I'm getting a
lot of small pieces. Obviously here I have
some gloss medium on top. Now, this paper is not
really getting wet. I am still hoping for
the perfect home. Let's see. It looks good here. You can see the image. That would be ideal. This is perfect for
the first pull. I think it worked
better because we let it sit a little bit longer. Let's see if this
one works as well. [NOISE] Probably I didn't wait long enough on the
first image on the top left. It wasn't wet enough
and there wasn't enough time for the
paper to get wet. here again, we have some
areas that would come off, so let's let it sit
a little bit longer. I'm always careful
when it comes to these corners because I have pulled off the transfer
very often in the edges. I'd like to go from the inside out and not from the outside in. [NOISE] These have
now dried again for about half an hour. I just like to do this
because when I wet the surface so much and
it's really soaked, then it's easier to
rub off the transfer and it's always a
good idea to just take a step back and just
let it sit little bit. When you make them really wet and you move your
finger over them, nothing will come off. It has to have a
certain humidity. If it's too wet,
it doesn't work. Either you apply a
little bit less water or if they're still
excess water, you can just remove it and
then you can start to wrap. I like to go from
the middle outwards. Here we have a large problem. Why is it happening? She has this major thing
going on her shoulder now. When you do the areas
where there's no transfer, you can of course go a
little bit harder and also use the cloths to
protect your fingers. [NOISE] He was just using
the elevator lot. If you hear that, in case, that's the sign of the elevator. Now what you want to look out
for is areas where you can still see the paper
fibers like here, on the edge and here, and you really want
to get those off. Because when you can see
them [NOISE] while it's wet, you will also be able
to see them forever. When it's dark as this, then you are free to stop. Because then we will seal this with medium and it
will stay like that. It will stay cleared. Even now when it dries it has maybe a slight
grayish sheen to it. But that's not important. Important is the
fact that it has to look like that when
it's a bit humid. You can see that now that I wrapped over this
with the cloth, it came off as well. [NOISE] You want to be really careful when
you have an image like that. They was something. Maybe it was too dry. The medium was too dry. This is really frustrating. I would love to show
you the perfect thing, but I think there's value also in showing you
that it doesn't always work out
perfectly for me as well and that this
is part of process. Because I could only show
you the perfect one, the one that worked out
like I've thought it would and just don't
show you this. [LAUGHTER] But I rather
be honest and tell you, sometimes it doesn't work out. You might not have
done anything wrong or [NOISE] it just really depends
on really tiny things, tiny differences, what
you did differently. Let's see how the
other two try it out. Now you can see on
this one that it has dried and it's
really gray again. Let's see if we still have to
work on it or if it's okay. You can see the difference here. Here it's turned black
and here it's still gray. I can see in the black, I can still see some grayish. [NOISE] I think we
have to make it a little bit more humid again and just get off some more paper. Without the in-between drying, you might go further
than you need to. Then you always risk that
you take off the ink. Just go in small steps. Take a look, take stock
of how far you've come. Then if necessary, do another round of
wetting and rubbing up. We want to get off
all the loose paper [NOISE] that we have ripped off because we
don't want to seal it in. [NOISE] Now we're
ready to finish this off and I will show you how to do it in
the next lesson.
12. Finish & Seal Your Artworks: Now we're ready to finish
off our paintings. I'm just going to re-wet
my pieces so that they become clear again and I don't want to have
them soaking wet. I just take off
excess water and then I will use my gloss medium
and cover it generously. This is obviously
too much for one. When you are finishing, you want to just go
in one direction so that it has this even appearance
because with glass medium, you can see the brush
strokes when it's dry. I'm just applying
a thin layer and I'm rather going over it
again with a second one, then trying to apply a thick
one with our brushstrokes. That doesn't work.
Now you want to put the brush into the water and leave this to dry for a few minutes and then you can already apply a second
layer of medium. This has now dried
sufficiently and first of all, I try my brush a little bit. I spread it in both directions. But when I'm finishing
it I just go in one direction all the way and I just touch the
paper very lightly. The paintings have now dried
and we're ready to remove the tape to finally
reveal our artworks. I find this one of the most
satisfying things to do. What you want to look
out for is areas where there's thick paint going over the edge of the tape, and it can also be like
can see a fine line. This was a line from
my image transfer. I also know that my image transfer paper was going over the
edge of the tape, so I might have a hard time
tearing off the tape here. What I will do to
prevent it from going wrong is I will use a ruler. You need to align the ruler exactly at the edge of
the transfer paper, and then you can very softly
let the knife glide over it. That way you're telling the paint where you
want it to tear. Don't worry if some
paper fibers come up. This always happens when you leave the tape
on for several days. Maybe if you have a very
special artist's tape, it will not happen. But I haven't yet found
a tape that it's not too expensive and still works. I haven't tried all of the brands that are
available obviously. Here you can see I'm
not going through this thick area and the pain
is a little bit coming up, and when it comes up, it starts to stretch. I will use the ruler once
more to go over this area. Just try to cut through
the paint and not so much into the paper and then I can again start
to tear off the tape. You want to tear upwards and
outwards away from painting. You can try it without cutting. But as soon as it gets too hard, you feel that resistance, then I would immediately
cut before something happens that you didn't
intend to happen. What happened here is
that the paint is too thick so the tape
couldn't keep going. If that happens, you want to
start from the other side. But before I start again
from the other side, I want to make a
scratch again to show the paint where it has to tear. l was just tearing upwards and I lifted up a little bit of the transfer because
obviously there were still some paper fibers that connected the
painting with the tape, so it's really
essential that you make that scratch
with your knife. Now, this is coming off exactly where we
want it to come off. Now here we lifted up
the transfer paper, so we have to fix that, and also there are
some paper fibers here that have torn and we will fix that with matte
or gloss medium. What you want to do is just pick up a little bit
of medium and go over the sides and you have to
try little bit in which direction the paper
fiber has been lifted. When you find the
right direction, you can move it, you can move your brush
and smooth it down again. This was the image where I
have lifted up the edge here. I want to fix that as well. Just put a little
bit of medium below, then smooth it down. These have turned
out very nicely. Apart from the problem that I obviously had with this one, where something came off from Hoshola and I have no
clue what happened. It actually doesn't
look like there was a chunk of medium
below that wasn't dry, so I really don't know
what happened here. There's one more thing that
I want to add at this stage. If you want to put
these in a frame, I would not put glass on top, at least not so that
it touches because acrylic medium and acrylics in general tend to
stick to glass. Now that we have covered
the whole paper, even the frame around,
it is protected. You can actually
wipe it off with a humid piece of cloth if
it is really necessary. But you don't need
to put glass on top. Here I've used matte
medium for the last layer and we get a pretty
matte surface. Here I've finished off
with gloss medium. It's not only shiny, but gloss medium
makes the colors more vibrant and brilliant. Look at that black. The black looks really black on the right one on
the gloss medium, and it looks more like a dark
gray with the matte medium. That is something that
you want to keep in mind. You can use matte medium, but I would only use it as
the last layer if you go for that matte look and not
use it for several layers, because every time you use it, you will lose a little
bit of your color.
13. Final Thoughts & Recap: Congratulations, you have made it and
finished this class. I'm so glad that you have
joined me on this journey. During class, we have
focused on four key areas. You learned about
different ways to use a painting knife and
used it to create a background with
dynamic strokes that convey movement and energy. We took a look at color theory
and you learned how to use color harmony to improve
your color choices. Then we took a trip into
the digital world and used our phone's photo app
to adjust a picture and create a stylized
image for image transfer. In the end, you mastered an image transfer
technique and created a series of very
personal images. I hope you enjoyed working
with the palette knife or painting knife and are happy
with your final results. Things don't always
go exactly as planned with image transfer,
but that's okay. Remember, it's an
abrasive technique and it's only natural that you will get a maybe aged or
distress-looking result, and that adds to the charm
of the physical artwork. If you are looking for a
perfectly pristine image, then you're probably
better off going digital. However, if an
important area is last, I know it can be
totally annoying. That's why I recommend
working in a series, working on two images at the same time so that way you
always have a second shot. If you're having any
issues or questions, don't hesitate to reach out. You can post a question in the discussion section or
in your class project. But make sure to upload
an image that shows the problem and explain
exactly what you have tried, what materials you have used. It's also very useful for other students who might
be in the same shoes and have the same
issues because they are using maybe the same
brand of medium. If you love the analog
process like I do, and I love doing
things with my hands, then keep at it. But if you'd rather go digital, there are plenty of
palette knife brushes available for Procreate or
Photoshop, or other programs. Just do a quick Google
search and then you can take this
process digitally. Don't forget, you
can always bring those two worlds
together and start off with a hand-painted
background and finish off digitally. This is also not restricted
to using photos, you can also use your drawings or any graphics that
you have designed. You can also transfer texts
but makes sure to mirror it, it's really important with
texts and all kinds of things. Just have it printed on a toner-based printer
and then you can use it. If there is one thing, actually two things that I want you to take away
from this class. It's that small
steps make progress, and implementation of what you have learned is what matters. If you want to learn more
about acrylic painting, I recommend for you to take
my more comprehensive class, Acrylic Painting For Beginners. If you liked this class, I would love for you
to leave a review. A review is like the applause at the end of a performance
and your feedback is very valuable to
me and also helps other students find out if
the class is right for them. I highly appreciate you
taking the time to do it. That's it, thanks again for joining and I'll
see you next time.
 Cornelia Zelinka-Bodis, Mixed Media Artist