Transcripts
1. Class Intro: Hello, nice to meet
you. My name is Marcus. I am Messino, designer and
animator based in London. And today in this class, I will share with
you how to design these three posters
using a illustrator. I will take you
through setting up your document, preparing
your workspace, and using a illustrator treated tools to create
stunning visuals. But besides tools, we
will play with letters, play with words, and immerse
ourselves in typography. As we progress in the lessons, we will dive into composition. Learning how to play and
interact with elements in our art ports to create
harmonious and impactful designs. I've designed this class
for any experienced level. I will explain each step in
detail by taking this class. Besides the new technical
skills you will learn, you will also have
these three new posters to a geographic
design portfolio. As a class project, I will invite you to design
these posters with me. Great, this is it. Let's
design, share, and inspire. And I will see you
in the first lesson.
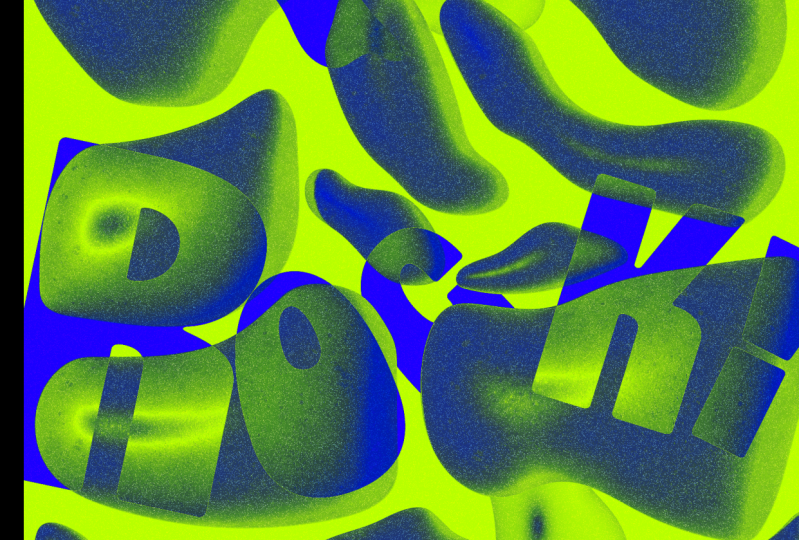
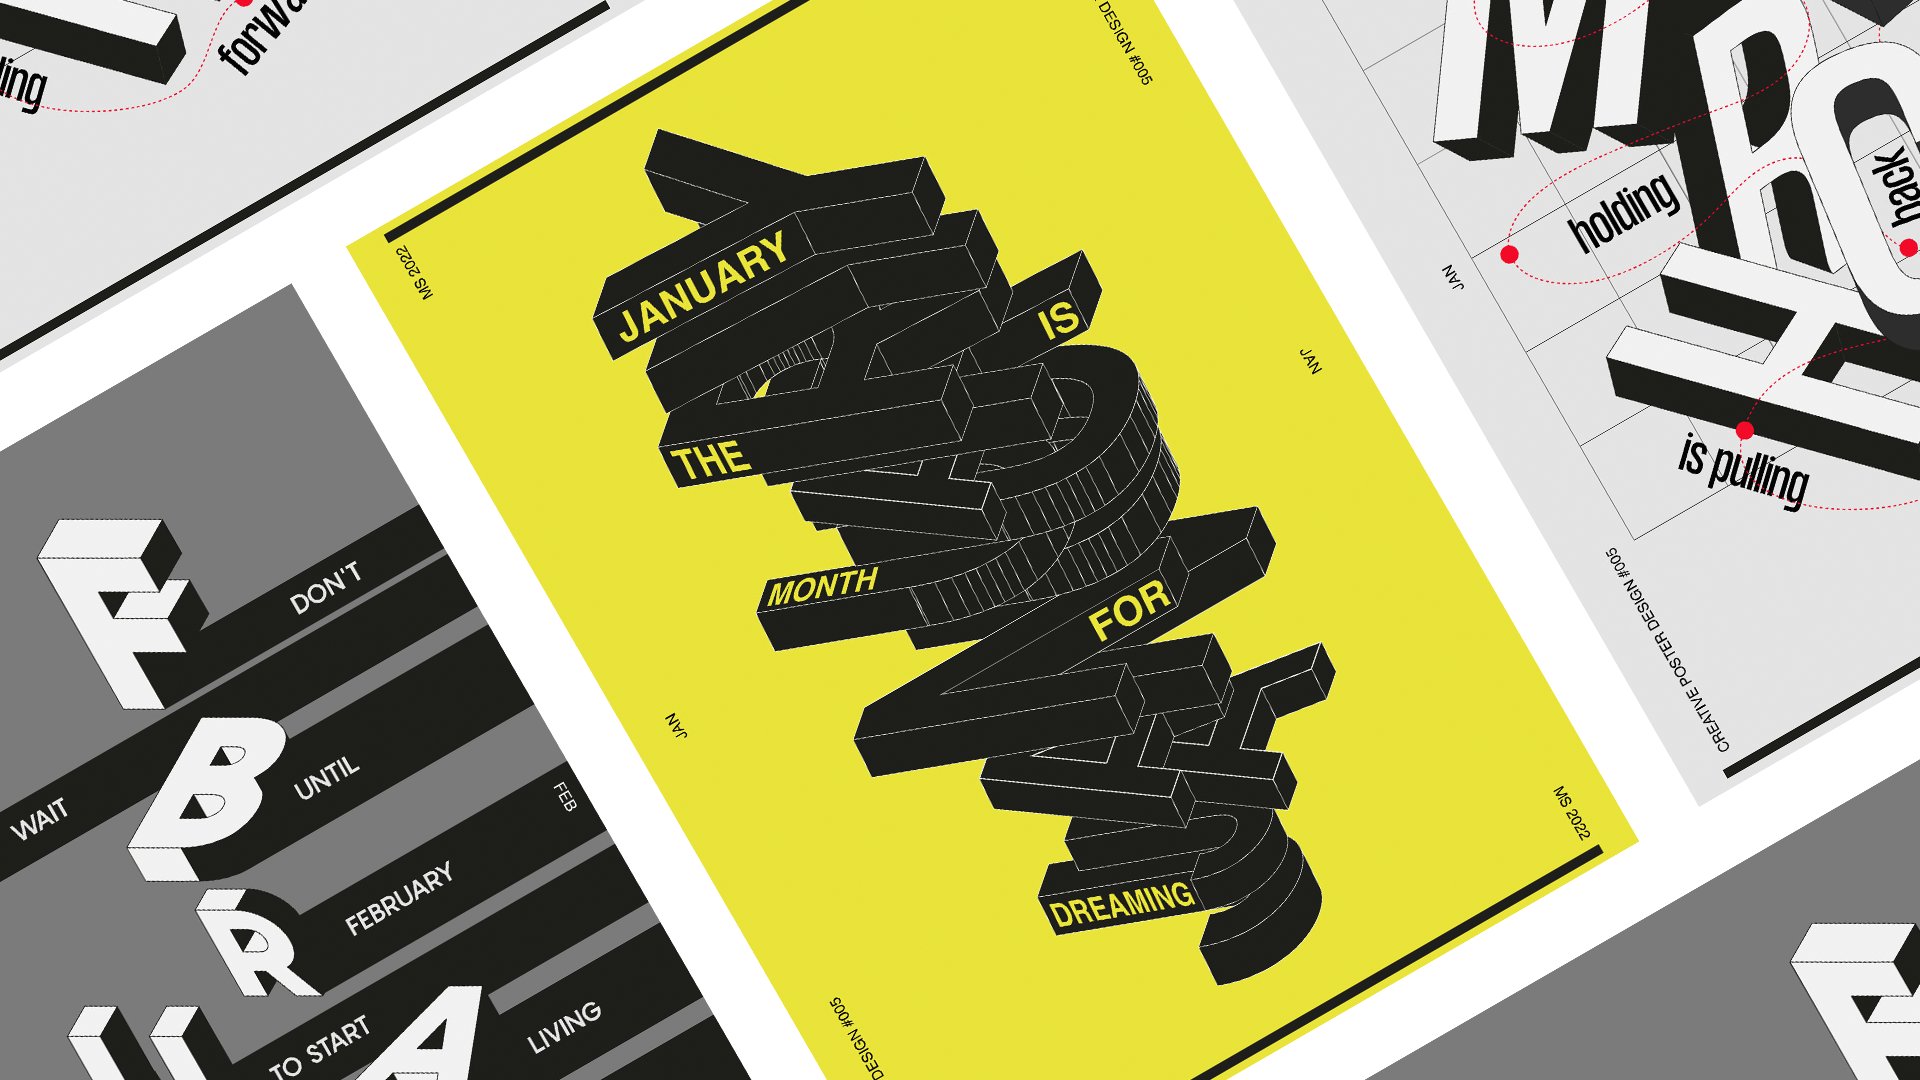
2. Lesson 01: Poster Design - Aesthete: Hello and welcome to the
first lesson. Let's start. The first thing to do is
to name more document. I will call my document
poster one stat. After that, we will
need to set up our size and resolution for this poster
and the following ones. We will use 1,700 width by 2,400 height and be
sure to be in pixels. The orientation will be vertical
with only one art board. We will use a color mode
in Argb color and for the raster effects
will be screen 72 PPI. And the preview mode,
we can leave it as default with
nothing else to do, we can just click
Create. Do not worry. The following two posters, we'll use the exact
document specifications, so you won't need to
watch this part again. So as you can see
in a class trailer, this is a topography poster. And we need to choose
two main things, a typeface and a word. In my case, for the world, I will choose state, but you can use anything else. A name that could be yours, or someone else, or really anything that
has a meaning of sort. If you need inspiration,
I've prepared a list of beautiful words that you can choose or just use
the same as me. The important part
is for you to learn the techniques throughout this class with your word of choice. The next step is to
choose your font. I recommend using a
sensitive type phase. They are easier to
work within creating and designing dynamic and
playful compositions. In my case, I'm going to my
two go type phase Lv, can U. It's simple, minimalistic,
and works well in this type of posters in case you need some
font inspiration. Here's a list of my favorite
type phase websites. Great, you have chosen the word and typeface
you want to use, so let's get started. First, let's select
our type tool. Choose our type phase Vet can, and increase the text size. Now let's click on an art
board to activate a type tool. And let's write our chosen
word in my case is Stat. With our words selected. Let's press to activate
the free transform tool. And while holding
the shift key scale, the text slightly
holding the shift key is essential to keep
the scale proportion if we don't want to
distort our text. Excellent, now let's make sure
we have the word selected. And let's write, Click and
choose Create Outlines. This will convert our text
from edible to a vector shape. Cool, now let's write
Click once again, and this time let's
choose Group. This will allow us to move
each letter individually, which is essential
when designing the composition
in the next step. Now let's start our composition. Before we start, let's have
our smart guides activated. This will help us
align the letters without using any
rulers in our artboard. The trick here is
to play wrong with the position of the letters
and the rotation and scale. Be playful, play with
sides, contrast, make sure some letters are bigger than others
and rotate them. Hence they face each
other differently. But be careful
with our position. We still need to have
a specific order of the letters to read it. If we randomize the
order too much, it would be very hard for
the person looking at a poster to understand the
message or the meaning. Spend as much time as
you need in its part. I even recommend making three different options and
choose your favorite one. The important part
is it needs to be beautiful and
exciting to look at. When you finish, select all of the letters of your
topography composition. And let's go to the top menu and select Objects and
group them all. Now let's line them
again in art part. And then go to the two bar. And change the field color of the letters from
black to light gray. It's when the coup part starts. Let's add some three
dimensionality to our topography composition. With our text selected, let's go to the top
menu and go to Effects. And select three D Materials. And choose Extrude and Bevel. This will open the
three D effects window, where you can configure
geographic in a tree space. So let's start setting
up paro graphic. Starting with the depth,
we are going to use 450 pixels with zero
twists and 100% taper. Let's activate the bevel
and leave the width at 5% We just want a
slight edge because when we had some
nice light effects, this edge will make our
graphic look legit. We can leave the height at 50%
and the repetition at one. And that's it for the
bevel side of things. Next, let's jump to rotation. Here we are going to use
already made preset, the isometric right view. This is it on the
object settings. Now let's go to materials. On the materials, we are
going to do something simple. Let's leave our base material
as our primary material. And on the properties,
let's make sure that the roughness is one and
the metallic is zero. It's pretty simple
and straightforward. Now let's jump to lighting. This part can be trickier and require more
experimentation. But anyway, I've done this
experimentation before, so I will share some values I recommend for this exercise. Let's start with the intensity, and let's leave it at 64. And then let's move to
rotation of the light, and let's make it 160 degrees. Let's make the height at 30
degrees and the softness at 40% and the ambient light
activate it at 50% strength. When you finish, go to
the top right corner of the True D and Materials
window and click on a little cube to activate
the rate trace render. So we can see our true
detect in better quality. If you click on a
little Donward Chevron, you can choose the
render quality and add few other options. I need to tell you though, the higher the quality
of the render, the longer it takes. Sometimes it can even crash
your other Illustrator if you move your graphic around as it needs to calculate
the render, every time you
change the position of the three D illustration. So only increase it when
you finish your design and you are ready to export
the final version, cool. With that said, let's
close this wind. Now what we want to do is
scale a power graphic. I want it to be bigger
than the art port, so the art port crops
parts of the design. This helps creating a
good sense of scale. We're going to use
the artboard size to contrast with the
size of the graphic. And as you can see, our graphic is overflowing the art port now, so we must create
a clipping mask. So let's go to the
left side toolbar and select a rectangle tool. And let's make a rectangle the
same size as our art port. We can always go and check on
a property tab if the size is correct and also be sure
if it is aligned perfectly. Then select a rectangle and a topograph composition
altogether. And then right click and
select Make Clipping Mask. Amazing. Now let's get our
layer tab. Name this layer. Let's call it something like
treated text, unlock it. Then let's create a
new layer and name it background and move it
under the layer one. Great. Now let's go to
the left sidle bar and create another rectangle the
same size as our artboard. Check the spec and see if
it is perfectly aligned. And let's change
the field color to dark gray. Unlock the layer. The poster is like 98% there. To finish 100% let's create a
new layer and emit texture. Then let's select the rectangle two and make another
rectangle and be sure it's field color
is black with that tone. We go to the top menu and go to Effects Texture and Grain. And inside of the
grain settings, let's make the intensity at 20, the contrast at 50, and the grain type at stipled. Just press Okay, now we must
reduce the layers of Pacity. Let's reduce our Pacity to
12% And the blending mode, let's choose Overlay Screen. And overlay blending
modes work very well if you want to add a noise
layer to your design. The last thing I want to
add to this poster is a little signature or
even a little line of copy with some
extra text context. In my case, I will add the word I've chosen
in the beginning. So let's create a new
layer and emit copy. Let's put this layer
over the three de text, but under a little noise layer so the noise also affects it. Then let's select
our text tool and write what we planned to add
a little bit more detail. I will use the line tool to design a little line to my word. Then I will select both
the line and the word. And whilst holding the old key, I'll make a copy and
drag it to the top of my design and then
adjust it accordingly. And that's it. We finish
our first poster. Now just take a minute to
appreciate the design you just created and all the fantastic techniques
you just acquired. So to export our poster, let's go to File Export. And select Export Us. And choose the file format, I usually use PNG. The files are good quality
and not too heavy in memory size compared
to Pec format. Let's click on a check box to use Artboards and press Export. Here you are going to have a few options in the resolution. In our case, we are going
to use high at 300 PPI. And the anti eyelesing, we're going to use art optimized and the
background color in black. And just press okay and
wait for it to be exported. And that's it. Our first
poster is finished. I hope you enjoy this first
lesson and I hope you are excited to start the next
one. So I'll see it there.
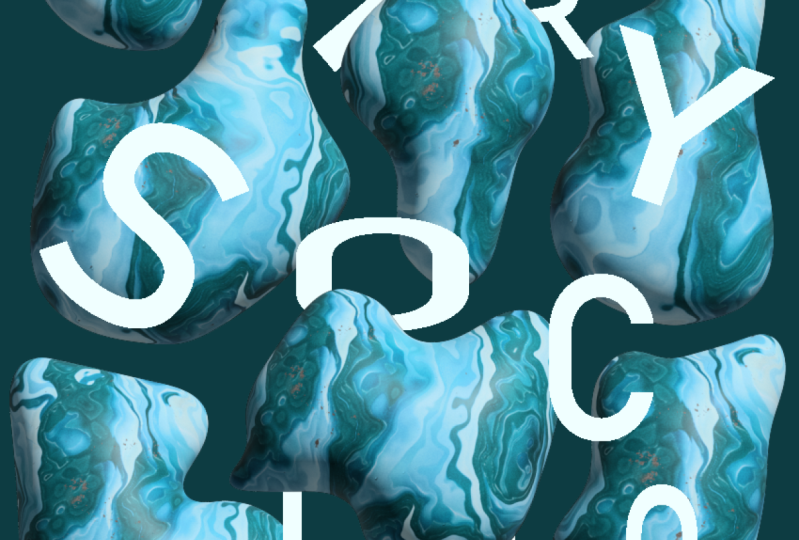
3. Lesson 02: Poster Design - Hello You: Hello everyone and welcome to lesson and poster number two. So let's get started. The first thing is to
create our new document. We will use the same specs as a resolution as we use
in our first poster. So let's give it deny
a new name poster two LOU and press create. For this poster, I will
use a specific font. The name is gigantic. And you can download this
font in a dub fonts website. Although in the exercise before this technique will
work on any type phase, I use this one because its form helps me
achieve the visual I was looking for in this
message. Let's get it started. First, let's get a type tool. Change our type phase
to the gigantic font. And increase the size so it's
visible in our art part. Then let's click on an
Artboard, Write Hello. And press the letter E to activate the
transform tool and to scale our word until it almost reaches the
edges of the art part. Cool, now let's set our word. And while pressing the
Shift and out key, let's drag it down,
making a new copy. With that done, let's
go to the top menu and go to Object,
Blend and Make. Then let's adjust the
spacing between our copies. The last thing we need to do
to this plant is to expand it so we can have each copy
as an individual group. Let's return to the
object once more, and at this time let's expand. Let's have it as expand object and fill. And just press okay. As you can see there is a bit of space left on the bottom
of the art board. We will use this left over space to add another
text detail. Let's return to the two bar and select the text
tool once more. Click on our artboard
and write hello, you or something else. It's totally up to you
and just the size. This is to add
another detail and context to our design.
Awesome, This is great. The first part of our
poster is almost finished. Now let's select all of our texts and quickly
change the color. Let's change it to a dark gray, something like
208-20-8208 Correct. Now let's open our layer
tab and name this layer. Let's call it text and lock it. Then let's create another layer. Let's name it background. We will do it in the same way we have done for
the poster before, using a rectangle shape and adding an excellent color to it. So let's do it first. Let's change our field
color to 000 000. And then go to the two bar
and select the rectangle two, make it the same size
as our art part. And you can always check if the sizes are correct
in the properties bar, make sure the solid is perfectly
aligned and that's it, we are 50% there. It's time to make
our balloon letters. We will use the same type
phase, the gigantic one. But this time we will use the tre effect to
inflate the letters. Crit is really cool,
balloon like visual. Let's go to the layer tab
and create a new layer. Let's name it balloon text
because we are already here. Let's talk the
background layer two. Let's return to the toolbar
and select the Text tool. With our Textook selected, let's increase the
size to 300 pixels. Click in character and
change it to all caps. Then let's click on
Art board and write. Now let's change our text
Feel color to white. And let's put our mouse
pointed over our text. And then right click and
select Create Outlines. And right click again
to group the letters. Now it's time to select our first letter and
make it a balloon. Let's go to Effects T, the Materials, and
select Inflate. Let's make the depth at zero and select
inflate, both sides. And let's jump right into custom rotation and play with
the rotation composition. Do something really
quick for now. We will adjust this per, when we have all the
letters in treaty. Cool. Now let's jump to
materials as our base material. We are going to use
the default one still. You can definitely explore
the others in the library. Let's use 0.6 in the roughness
and one in the metallic. This will create a very
lovely balloon look for our letters when we
do the tracing render. And with that done,
let's go to lighting. Here we have a few presets
which are amazing. It's a speedy way
to look at your to the object in a
lovely light setup. But for our custom design today, I recommend self exploration. Our objects will be placed
and rotate randomly, so these light presets will only help a little,
but who knows? It all depends on your
electrical orientation. But do not worry. I will share the settings I will
use and feel free to follow the same or do completely different.
So let's do this. On the intensity I'm
going to use 35% and on a rotation I'm
going for 145 degrees. And the height at 90 degrees
with the softness of 85, We want the abient light, turn it on at the intensity
of 50% and no shadows. And that's it. If you
want to check it or how it looks with the
red trace render, just press the top
icon to render it. Now you must be like,
oh, God, Marcus. Now we will need to
make all these settings all over again for
the other letters. And the answer is no, because we are going to make
a graphic style. If you don't know what
a graphic style is, I will quickly explain. In a illustrator, a
graphic style is a set of reusable appearance
attributes you can apply to an object. Think of it like a preset
containing multiple fields, strokes, effects, and patterns. And by saving these attributes
as a graphic style, you can quickly apply the same look and feel
to any other objects in our artwork without having to individually apply
each attribute. Again, it's really nice. I will see. Let's do this first. Let's go to window and
select graphic style. This will open the
graphic style window with a few presets
already there. This come already installed with the illustrator.
Have a look later. To create your own
graphic style, we must select a graphic with the loop that we want to
apply to other graphics. And drag and drop
it over the window. And that's it, graphic
style created. And if you want to
give it a name, just double click over
the graphic style icon. This will allow you to
name this layer style. I'm going to name mine, balloon. Cool. Now let's apply our graphic style to
our remaining letters. Select them both and
click on a graphic style. And yeah, here we go to
adjust the perspective, the light on materials
of our treat letters. We can just go to
Appearance panel and click on a Tre D
and Materials effect. And here you can
change the rotation, light and everything again. So now let's create an excellent composition with all letters. First, let's kill them up
roughly the same size. Let's overlay them
over each other. To create a sense of
depth in our design. Let's use the attributes panels to adjust a rotation in light of our objects until we are satisfied with the
visual. And that's it. The only thing left on
this poster is to add a noise layer and a
few other details in the corners of the artboard. First, let's create a new layer. Unlock our balloon text one. Then select our text tool. Again, let's change the font
to something more sober. Something like
Olveka will do it. Let's click an artboard and
then let's write something. It could be your name or just what is written
in a poster. I'm going to write
what is already in the poster. We'll be Hello, you. Let's change the
color of the text. White and put in a
corner of the art board. If you need to adjust the size, just press a letter on your keyboard to activate
the transform tool. And while holding Shift, scale it up or down, depending on your visual
need, then select it. And while holding
the option key on a Mac or the old
key on the Windows. Let's make a few copies for
each corner of the art board. With that done, let's go back
to the layer panel name. This layer text
detail, unlock it. Let's make a new layer,
let's call it noise layer. Now let's go to the tool part. Select the rectangle
tool once again, let's make a rectangle the
same size of our art part. Be sure to check the
size and the alignment. Then let's make sure the
field is black at 000 000. Let's go back to Effects
Texture and grape. And as you can see
here, the specs we used before are
already loaded, so we just need to click okay. Then let's go to Opacity. And let's reduce the
opacity to 15% And let's change the bleeding mode
to screen. And that's it. We finish our second poster. You can export it like we
did in the first lesson. You are good to go.
Yeah, that's it for this one and I see you
in the next one. Cheers.
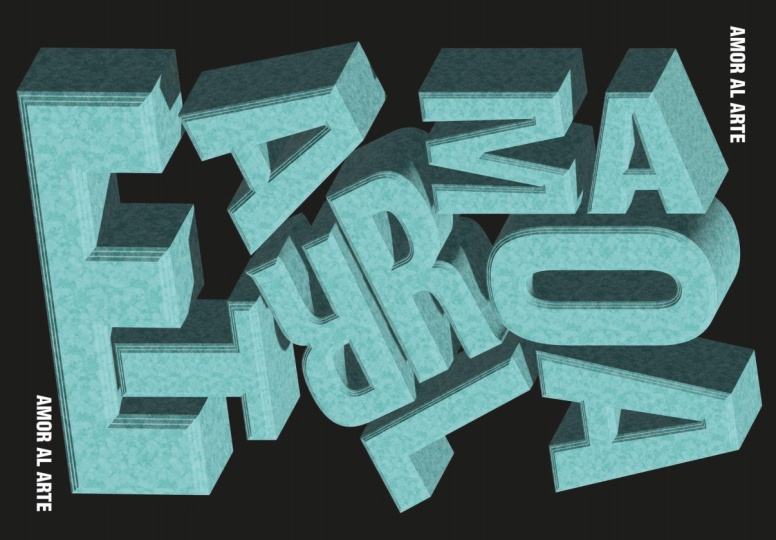
4. Lesson 03: Poster Design - Solid State: Hello again. Welcome to lesson number three and to
our last poster. Let's do this, the
same thing as before. Let's create our new document. We will use the same specs and resolution as
our first poster. So the only thing we need to
change is the poster name. In my case, I'm going to use poster solid state
and press Create. To your surprise,
we won't start with a text tool this time,
but with the pencil. That's right. But don't worry, we will use a text tool later. Let's go to the left side
to bar the pencil tool. And there are a few
organic shapes in your artboard as if
you were drawing like silhouettes of
stone that we can find on a bash and fill
your artwork with them. Play with sizes and try to
fit them nicely together. And always be sure
to close the shape when you finish it,
select all the shapes, remove the stroke and
apply a light gray field, something like 888, Cool. Now let's turn from these
shapes into 3 stones. Let's go to effect, turn the materials and
select Inflate. And the way it first
appears is perfect already. We won't need to change
anything in the object tab. So let's just jump into
the materials one. And this time we
are going to use the Adobe substance materials, and we're going to select the
spotted concrete material. And visually, we almost turn. Let's jump to the lighting tab. Move our light point a little, or you can just
leave it if you are happy with the look
and with that tone. Let's just close
this treaty tab. Now let's go to our layer
tab And name our layer, let's call it stones. Then let's make a new layer, name it background and move
it under the stones layer. Great. Now let's make
a quick background using the rectangle tool. The same size as our art
part. Same thing as before. And let's change the
feel color to dark gray, something like 1111. And let's go back to the layer
panel and lock this layer. Now on the stones layer, let's lock the text tool and change the phone to
something not too crazy. I will use Lv size and click
outside of the art part. Now what we want to do is we are going to write something, in my case is solid state to match the vibe of the poster. Let's change the field
color of the text to white. Then we write, Click
and create outlines. And write Click a clan
to one, group them. Now what we need to do is
making astonished composition. Using these letters play with size, rotation
and position. But mix only a little bit so the sins of the
letters makes sense. Orever, be sure to
have fun doing it. When we finish, we'll move
some of the stones in front of the letters to create
this cool depth effect. This will make our design
way more interesting. Let's let the feel of the
stones and then write. Click and go to Arrange
and choose Bring to Front. Be sure to choose the ones that don't affect the
letter visibility too much so we don't make it too hard to read which
letter is that one. When that is finished, go
back to the layer panel and then block this layer
and create a new one. Let's make a new noise
layer as we've done before. Create a new rectangle the
same size as our art board, make it black, got to effects texture and
grain, and press. Okay, then let's go to Opacity, Reduce it to 25% and make it overlay or screen depending on your taste for grains.
And that's it. We finish our third
and last poster and we are ready to
export it as well. And with that said,
let's resume and catch up in a conclusion
lesson. I see you there.
5. Lesson 04: Conclusion : Hi everyone. First,
thank you so much for taking a class and
making these lessons. I hope you enjoyed and
learned something cool today. Remember to make these
posters, your own poster, change them, play with them, and add different colors
and perspectives. And push them further by adding your personality,
taste, and creativity. Remember to review this class
and add your posters to the student gallery
and to follow it to get notified every time
I have a new class out. That's it, I have a
great day, a great life. And I will see you in the
next one. Cheers. Bye bye.
 Marcos Silva, Designer & Animator