Transcripts
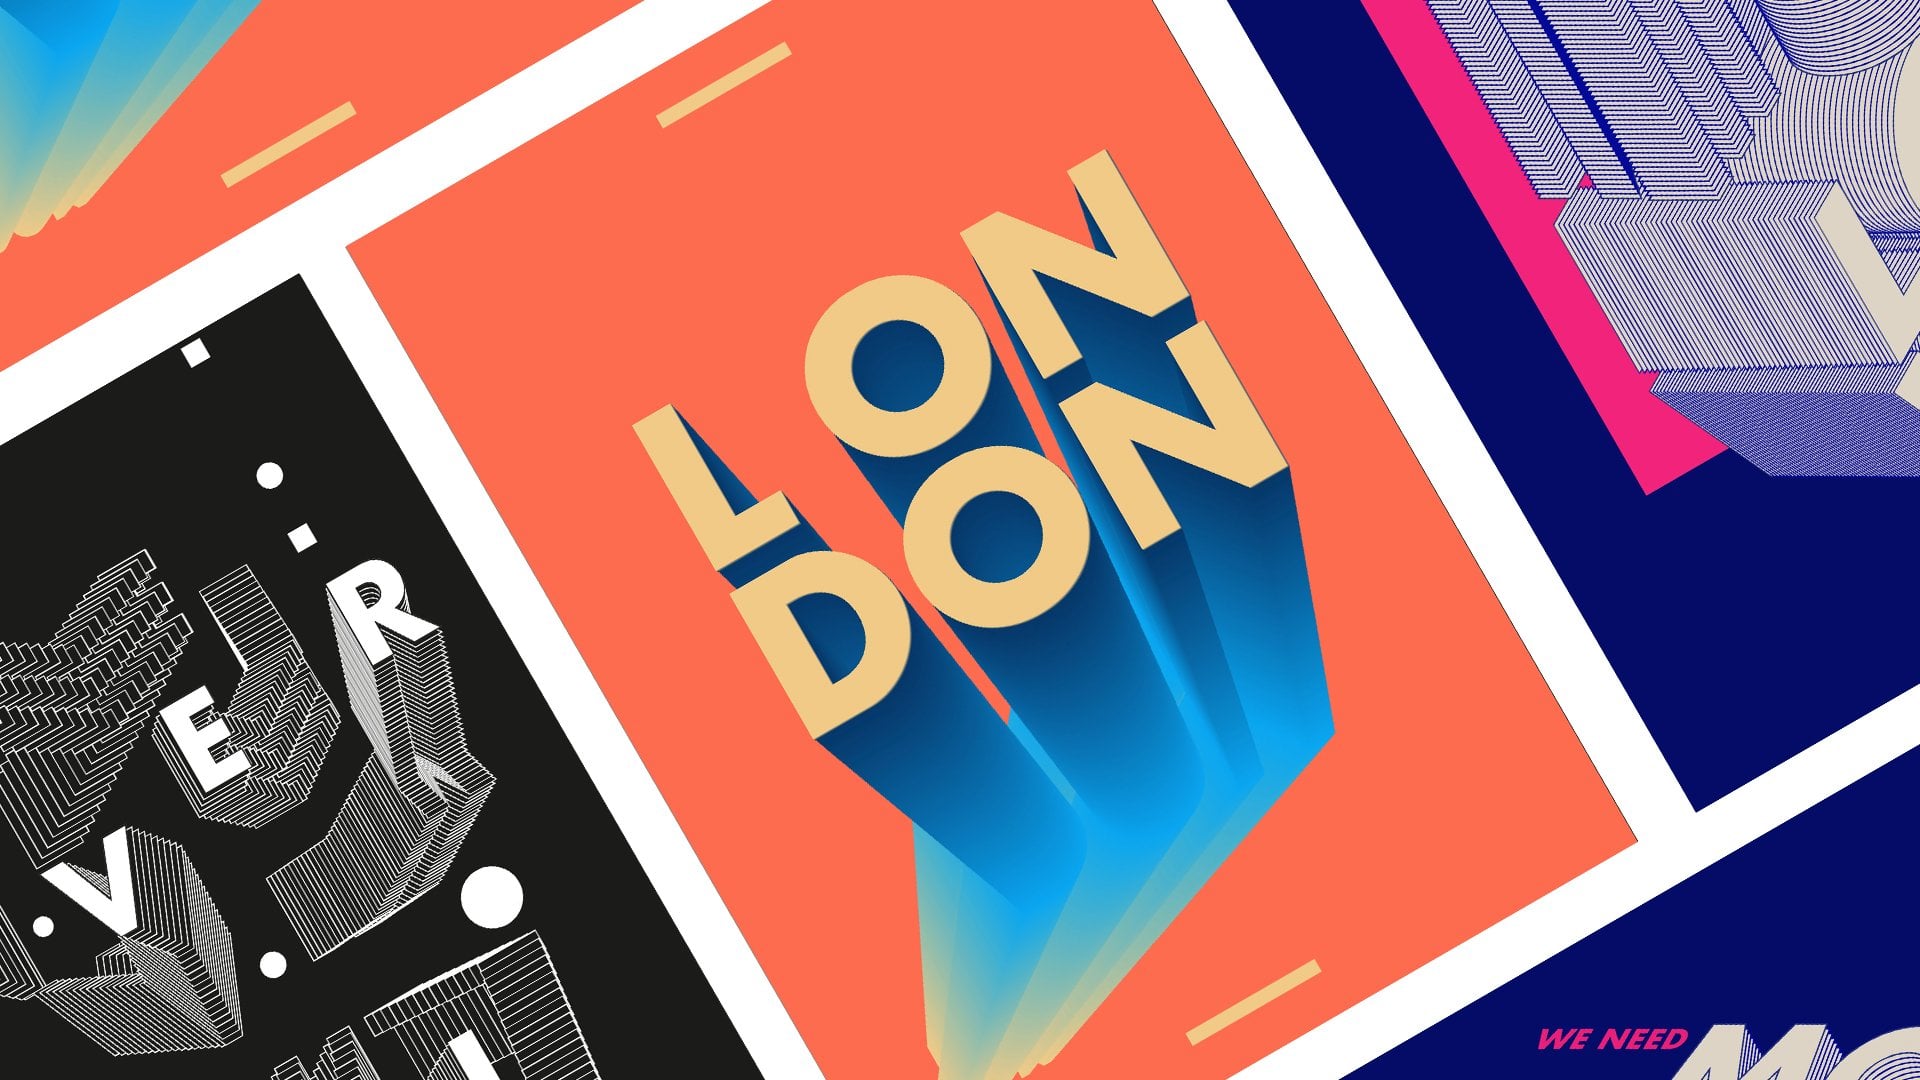
1. Intro to Graphic Design: Poster Design #003 In Adobe Illustrator - Trailer: Hello everyone. My name is Marcus and I'm a senior designer
animator based in London. And today in this class, I will share with
you how to create these three posters
inside Adobe Illustrator. I will go through
all the process to achieve this 3D look using Adobe Illustrator
tools like Extrude and Bevel for
distort and others. To help design is compelling
visuals very quickly. This class is designed
for all skill levels. I will make sure to explain
each step in detail. We don't miss anything. And by the end of the class, besides having trainee posters to show off your new skills, you'll have a great
understanding of Adobe Illustrator's
powerful treaty tools and how you can use them in
different ways and projects. And as a class project, I will invite you to
design these posters with me using the new techniques
you just learned. With all of that said,
let's get started. I see you in the first lesson.
2. L01 - Poster 01: Document setup and Design: Everyone and welcome. So let's start. The first thing we need to
do is going to file and new. Let's set up our document. I'm going to use a trig
1600 by 5,400 pixels. And I want to live in RGB
and just press Create. Now what we need to
do is just select the words that we want
to use for our poster. Just using the text tool. I want to just
scale this at least a little bit so I can
read what's there. Maybe I'm going to scale
it a little bit more. I'm going to use churn Newbury. Perfect. Now we have our words. Let's let a really nice font. I'm gonna use Ben Graham. Let's select our font here. Let's just right-click
and create outlines. Let's right-click
again and ungroup it. Now we want to select our font, change it for like
a lighter gray. This done, let's just
drag it outside of the art board for
now. Unless flux J. Let's go to Effect 3D and materials to really classic
and Extrude and Bevel. Cool. Here we are able to
change the perspective of our object and see how
the extrusion is working. Here on extrude depth, we can actually adjust
how much depth we want. Maybe I want to use 100 and
just press Okay, Perfect. Now what we want to do is
just select the letter J, go to object and
expand appearance. And let's drag it down
a little bit here. Now let's select a and go to effect and apply,
Extrude and Bevel. This time, we already
chose up our perspective and our depth of the extrudes. So we just need to apply it
to all the other letters. That will be really quick. Let's just drag off
them right now here. Let's just select all
these letters again. And let's go to Object an
exponent periods. Perfect. Now we want to do
is just select, just zooming in into J. Selected and change here
on the question mark. Let's change the
fill to a darker gray and the stroke
to white. Like this. Let's do select all
the other letters. And using our high drop tool, let's just copy all the colors. Now selected all the
ideas together again. And let's change the
stroke to four. Perfect.
3. L02 - Poster 01: Design layout & Final Details: Hello everyone and welcome back. Now what we want to do is select our letters and make them
a little bit bigger. Let's just start with
j. I'm going to hold, I'm holding Shift while dragging the corner to expand
a letter size. And I'm going to the same tool. I'm going to start pairing
them together like this. To add a little bit
more definition to the words I want to just, you can just duplicate. For example, let's select
a while holding Alt. Let's drag one up. We duplicate the
shape a little bit. Now we have two A's
and let's do the same. We do something like this. Perfect. Now with our computation made, Let's just select it. And let's go right-click
and ungroup it. Now let's go to our layers and create a new layer
for our background. Let's go to our shape
tool rectangle here. Create a really nice rectangle, the same size of the artboard. And changing to a color. I use really bright, well, yellow for my example, which is like kind
of a neon color. I think it worked really well. Want to keep the same color, and I'm just going to
scale this a bit down. The next thing we're going to
do is create another layer, lock these two layers. And let's add our
code. I used the code. You can just select it, right-click and create outlines. And then right-click
again and ungroup it. Now select our January
and go to Object Ungroup. And do the same for ease. For the rest of the words. You can jog soldiers
selected and then just press
Command or Control G, which is a shortcut for
grouping objects like this. Like this. Perfect. Now what I want to
do is just select our texts. Just copy the we're
using high drop tool. Just copy the background color. Gonna remove the stroke
because we don't need it. Perfect. Now we're gonna just January and
dragging to places. I want to stick the word too. Perfect. So now more or less I know
where the cytosol fits. To start fitting, seeking
newsletters to the object. We are going to use
our distortion tool here, the free transform. And we're going to
use a free distort. The Free Distort selected, we're going to select the
corners of the letters J, trying to adjust into the same size of the
sort of the object. And then using our distortion again to start to scale it to make it at least
proportional. Unless clearly
down a little bit, do the same thing until it matches the perspective
of the letter. Maybe you scale it
a little bit down, so it's not very, not very big at that moment. And let's do the same for is. Let's just check it's
closer to the edge. And just select is then the free distort. Perfect. Again, using the free
distort tool here just to scale this a little bit down, trying to match the perspective
as better as we can. So we already match
it to the world. So the perspective,
which is really cool. Now, we're going to do
just had some signatures. I actually like to add
a little graphic CV on the bottom just to create a little nice
composition as well. To balance it a little bit of
verticality of this poster. And just going to make a
copy for you on the top. And then it's just
going to paste one of my signatures of
my posters here. This is it will be
finished really soon. Yeah. This is the first
poster I hope you guys enjoyed. It's been really fun. I think I love this technique of using the treaty tools to create really nice perspective.
I see when your next one.
4. L03 - Poster 02: Design & Isometric fonts: Everyone and welcome
back to another poster. Let's start the
first thing again. Let's just start with artboard. I'm going to use the same
resolution as before, 2600 by 5,400, eroding the right and
press Create. Let's start. First, let's get our text tool
and let's select over it. I'm going to use February
and then we're going to get a really nice font again, I'm going to use been
gram selecting our font. I'm going to right-click
Create Outlines. Again. Let's just
select this font and change the color
to a lighter gray. So let's just drag
these on the side. Let's right-click
and ungroup it. I'm going to start with the
letter F. Then let's go to Effect 3D and materials to the
classic Extrude and Bevel. Perfect. Here on the position. Maybe I will start
with isometric. Clarify. I'm going crazy here. The extrude depth to 100 C. If you see a nice
proportions, it looks, it is. Just press Okay, perfect. This time, instead
of just going to are all Window and apply the
effects straightforward, we actually need to do it by, by n by hand because
in each case, every letter we will have
a different perspective. So every time we need
to apply the 3D, we actually need to
go back to Effect and apply a different
perspective to it. So let's look at letter E. Go to Effect. You can just go down a little
bit and just extrude and bevel in only two all
the way as before. And here let us change
this, maybe two. Maybe I will keep
it isometric cleft. My example before, I'm
going to select b and b, I'm going to Extrude and
Bevel, select another one. Maybe the top perfect fab are going to use
isometric right. Now, isometric left. Perfect. So now we have
our letters and they have, all of them have a different
perspective, which is cool. Now we just need to do
is select them all. And let's go to object
and expand appearance. And that's it.
5. L04 - Poster 02: Long shadows and final design: Hello everyone and welcome back. So now, as our
letters are expanded, we can scale them
up and down without affecting the width
of the extra. So to start, I'm going to
start scaling up my letters, creating a nice composition. Just going to play
a little bit with contrast of the sizes as well. Also read some position, trying to create a very
dynamic composition with them. The next thing I'm going to
do is select operators again. After we want to select 1 first, Let's select the letter F. Unless press D. What D does, it resets the colors to black
and white on the swatches. With the letter F selected. I'm going to go and change the stroke to
something more tick. Maybe four, maybe five. Perfect. And I'm going
to click on stroke. And I'm going to on the corners gonna
make a round corner. Perfect. Now, what I'm going to do is
select the other letters. This, and using our
high drop tool going to copy the effect on this case, we're going to apply
some shadows here, so we probably don't need to collapse these
shapes here yet. Let's just start heading
some shadows on the letters. Let's imagine we have our
light source on this side. Imagine this is a sun
and the light is going to heat these phases
of the letters. If these phases is
late by the light, this one will be black. And let's just change
the color here to black. Something like this
and do the same for the other phases that are
interfacing the light. For some shapes, you
actually need to connect some of the
shapes so we can, because when the extrude app and we actually need to
connect the sides of the B because the dextro
critical a little point here. So we just need to use
the Pathfinder tool, which you can find
on Window and then Pathfinder and just collapse them with the Unite option here. Let's just continue here. I think we are most finishing. The shadings of letter f is
missing a few phases there. Let's just do it really quick. The next thing,
Let's just organize least composition a
little bit better. Maybe something more like this. Pull the F little bit further. So the next step we want to
do is just create a layer, which will be our
background layer. Let's just name it. Background. Perfect. Let's just
close this step here. I like to keep my layers tab here so I can always
access it easily. And let's go to our
solid tools here. Let's just zoom out a
little bit and let's create a background the same
size after our artboards. Perfect, Let's just remove the stroke because
they don't need it. Let's make a gray
a gray background. Something even more
brighter than this. Yeah, something like
this. Looks perfect. Great. Maybe I will scale
this be a little bit more to create a nice
contrast in between the E. Let's lock the
background layer. The next thing we want
to do is actually add a lot of very long
shadow on his letters. For that, let's go back to
our rectangle tool here. Create a new layer. And let's just draw a
rectangle like this. And let's apply the same color of the shadows off the ledgers. Right now that is
something here happening, which is the stroke of the letters is
actually not fully black. So we probably need to
get the colors from the from the shadows to
apply in the strokes. Let's just do that. We won't have that
problem. Perfect. Let's just draw this like fake. You can say it's fake
because we don't know if this is a way though
I would react. But for the DC, just
for the effects. I think we are okay if you
just go a little bit more creative than then what
would happen in real life? Just select this face as well. Perfect. Now let's
do the same for B and E. And there
are many managers. Perfect alter shadows is done. And this is basically
usually eat or nowhere will do
only thing left to do. As per the example of my poster, it just has some words here. Perfect. So with
my accent is done. I'm going to just right-click
and create outlines, same technique as before. Just ungroup it. And let's go and group
this specific word slide just using the command
Jerry shortcut to group the letters together. For the final one. Then we just can just scale
this a little bit down. I think it's a little
bit too big for the for the frame we have. And let's just drag and drop it. Perfect, Yeah. Basically it is a really
simple technique and actually really the visual
is really interesting. That's why I really wanted to do this tutorial because
I really liked it, this technique and I really like using distributed
tools and the way we use the stroke and we fed these shadows we can apply to a lot of different projects.
6. L05 - Poster 03: Design & dynamic type: Welcome back to the last
poster of this class. Let's get started. So to
speed up or legal process, I already have my art board
here is the same size of the art boards before
I'm going to use March, which is the last month, are gonna use earnings exercise. I'm using a very condensed font, which is perfect for these exercises and for
what we're going to do. You can just find any type of condensed font and any other
font will work as well. Let's talk. Let's just
change it to gray. Perfect. And let's ungroup it. Let's Create Outlines first. And ungroup. Perfect. Let's drag it on the side here. M. Then let's go to 2D materials toward the
classic and X2 then bevel, Let's just start moving our
perspectives like this. Let's head one hundred percent, one hundred deaths
and press. Okay. Let's do the same thing to a, effects to them bevel, Let's create a really nice
perspective for a as well. Let's apply 100 on extra depth and press okay,
then do the same for the R. Excellent bevel. Change the perspective
a little bit like the main trick of fixed exercise you
just tried to make as most dynamic
perspective as you can. I always don't forget,
don't lose, know, make it so dynamic that we actually move the
shape of the letter. So be careful to
make it interesting, but not losing the shape of the letter so we
can still read it. So let's let C and let's go
to Effect x within bevel. And just not this one. Just rotate this a
little bit like this. Press Okay. The same thing for
H next to them, bevel. That's rotate. Age. Perfect. This is it for
this first exercise. Let's just actually expand. And let's go for our second
lesson of this poster.
7. L06 - Poster 03: Final design & details: Hello everyone and welcome
back. Let's start. Now what we want to do
is select our letters, press D. We can reset the stroke and fill
to black and white. Let's make the stroke a
little bit thicker like for. Let's go and find these
little bits here. Where do we need actually to collapse the shapes together? Let's double-click. Select these shapes. Let's use our Pathfinder tool
and collect them together. If you want to find
the Pathfinder tool, I can just go to Window. And Pathfinder. I'm going to just select
this one with this. Connect them perfectly. Like this though
there is something, there is a small bone
here you're missing. Let's select perfect. The same thing here. And try to find all these shapes that now what we want to do is create a really,
really nice composition. Let's just go a connect, carry a little bit closer to our two m and then get are
a little bit closer to a. Get C and H. Something like this. It's
nice when you actually play. We just have position
of the letters like if age is actually
behind of the R and the C. To critically
read off like a little bit of more interest
on a visual and let's scale see maybe a
little bit higher. Luckily, we'd like this. We can also play with
the scale of age. Just keep playing around with this computation
a little bit more until we are
happy with the result. I think, yeah, I think it's
a nice composition work now, I will scale this up
a little bit more. Something like this. Maybe I will actually make the stroke a little bit
thicker like to six. Now relaxing. So really, really think is a
really powerful topography poster already. Now let's just select our
letters and go to stroke. And make the corners wrong join. Perfect. Now let's just
select the 2D sides of our letters like this. Let's actually make them black. Let's just go and make it black. On every side. I'm
just double-clicking. And this way I cannot sue
select the layer that's grouped inside and make
it easier just to instead of just ungrouping and then need to
group them again. Perfect. The first one is done. Now we want to scale this
a little bit up again. Let's get our layers here, and let's make our
background layer. Let's just go to new layer. Let's name it to background
and press. Okay. Let's go to our rectangle
tool on the toolbar. Undesired a perfect rectangle. Let's just remove this drug. Had a really light gray,
something like this. Perfect. Just select
these letters. Let's group them together so
we can align them up here. Let's create a new element
for the background. I really like to use grids,
rectangle, great tools. I think they had something
to design sometimes. Even if it's like some sort of structure behind it,
which is really cool. So let us say I had
a grid like this. Maybe we can even make
a little bit bigger and make the stroke
a little bit lower. Like something like tree. Let's just see if maybe something like
four, it looks nice. The next thing we want
to do is actually add some words again
on our poster. Perfect, So now I'm going to
do the same thing as before. I go on Create Outlines, then our group these letters, and then group them again. Same process as before. When you have all
your words grouped, let's just place them in
individual, something like this. Let's try to create
a really nice dynamic composition
as well with them. Perfect. As soon as you have
your electrodes placed, we can just maybe
demo little bit like scale them a little bit down if they are looked to big. Perfect as soon as you
have realized displaced, the next thing we want to do just had a little
more graphics just to help our viewer understand that the
order of the words, he doesn't like too
much trouble for them. Let's design a little circle
using the ellipse tool. Let's make it great. Let's make it red. Perfect. Let's just put it here
around our words. This will be like a connect the world's kind of situation. And for that, let's just actually reside with
our pen tool here. Really nice curve. To guide these slides. Let's just start from here. Try to something like this. Just aligned to help
guide our eyes. Something like this. Now maybe I'll make it
a little bit thicker. Stroke. Right-click. Simplify helps us to make the slider
little bit more smooth. Perfect. Let's select the line again. Go to stroke and make
it the dashed line. I'm using 12 dash and 12 gaps. So it creates a really
nice effect like this. Yeah, Let's just basically it. Let's just push this
a little bit for up. Lets us add a few more
graphics on the bottom, on the top like we did
in the first poster. Make it black like this. This is basically it. I hope, I hope you enjoyed
doing this poster as well. Assuming conclusion class.
8. L07 - Class Conclusion: Final thoughts: Hello everyone, and thank you so much for
taking this class. I hope you enjoyed
experimenting with Adobe Illustrator,
classic 3D tools. They can be really useful
for many projects and mastering them can help you
improve your designs a lot. Off course, please don't forget to submit your
classic projects. It always makes my day
when I see student work. Also, if you can leave me a request review,
it will be awesome. I always read them and I
learn a lot from them. And if you liked this class, please don't forget to check my other classes
and to follow me to be the first one to know when are my new classes online? I promise I'll be posting
more classes soon. That's it. I wish you a great
day or a great night. And I hope to see you
in our next class.
 Marcos Silva, Designer & Animator