Transcripts
1. Introduction: Hey guys and welcome
to another video. My name is Cory J, and I'll be your teacher today. Today's project is all
about paper marbling. And I'm so excited because this project is so
much fun to do. And you can create some really,
really awesome designs. Here are a couple of different
designs that I created. Let me get some really,
really cool effects. And the interesting thing about today's class is
that we're going to be using shaving cream. So it's a different technique. And it works so well. And I can't wait to
show you how to do it. Stick with me here. So the first thing
that we're gonna talk about is supplies.
2. Project Supplies : Okay, so to start off
today we're going to talk about what supplies you
need for this project. So the first thing
that you need is a couple of different
colors of paint. However many colors you
want to use is up to you and you really don't need that much paint
for this project. We're just going to be using little bits of different colors. So just pick a quarterly
to what colors you like. The next thing that
you're going to need is some little cups to mix the colors in
because we are going to be mixing the
colors with water. I used this plastic
egg carton to mix. But what I didn't
realize is that some of the little compartments
here you can see here at the
bottom are connected. When I went to go mix
some of my colors because I added water to each of them and they've made
them quite fluid, they ran into each other. So this wasn't the
best for mixing. However, if you do have one where the little areas
aren't connected, like there are some that aren't
connected to each other. This is amazing, so
it's really up to you, but you can also
mix your colors in little condiment
containers like this, or even just shallow cups. And even if you have
a Styrofoam cup, you can cut off the top
and just use the bottom. So there's a bunch of different
things that you can use, but what you want is
something that has a room for a little bit of paint and a little bit of water, and that's what we'll mix. The next thing I used was a little water dropper
to drop the colors. But if you don't have one
of these, no problem, you can easily just
use a plastic spoon. This is what I like to call it a secret ingredient up today. It's a really awesome process
and you use shaving foam. So any type of shaving foam will do if you're sensitive to send, I suggest getting one
that's unscented. I actually am sensitive
descent and this one is sent it and it was totally fine and actually
smelled really nice. So just letting you know that's fine too.
If it's scented. You're going to want
something to mix in the shaving cream
and the paint. I use these palette knives here, they're just plastic
palette knives. You can also use a plastic
knife or a popsicle stick, really anything, even
a toothpick will work just to move around the
pain and the shaving cream. Next you're going to
need is some paper. What I did was I use nine by
12 inch watercolor paper. And I took four sheets and
I cut them each in half. And so I came out with eight
pages that were this size. And the reason why I
did that is because you also need a dish. You want to grab a baking
dish or a plastic dish. I use this glass
Pyrex dish here. And you want to make sure that your paper size fits in the dish that
you're going to use. Now, also, I didn't want to get my dish full of paint
and shaving cream. What I did was I covered it with a plastic bag just
to protect it. And that way you
don't have to worry about washing paint off of it after I could just throw
the plastic bag out after. You do want to grab a
garbage bag as well. Now you're also going to
need a container water. I suggest using a tablecloth as well to cover your entire table. And you will also
need some rags. So this project is quite messy. So make sure you
grab a couple of different rags to clean up
any masses that might happen. Then one thing that we also need is some form of plastic card. I just used an old gift card. You can use an old credit
card or gift card or even just a piece of plastic covered cardboard from
packaging from something, anything like that will work. And that's gonna
be to scrape away the thumb and reveal our design. Now that we have our supplies, Let's get into the project.
3. MarblingTechniques: Okay, So I'm gonna start
with these colors here. So I just put a little bit of each color into the cartoon. As you can see, I'm not
using that much paint here. Then what I'm gonna do is
I'm going to add water to each color to make it
a little bit more watery. And then I'm going
to mix it together. I'm going to use this
dropper to add the water, but you definitely
do not need this. You can just use a
spoon or even pour the water into each
little compartment here. I just thought it would be
easier to use the dropper, but it turned out that
it didn't really matter. It could definitely
just use a spoon. I'm going to cover each of the
blobs of paint with water. I think if you bring
the water level up to just above the paint, it'll be a good mix
of water to paint. Then you're just going
to mix it together. I'm just going to use this
palette knife to mix it, but you can use a plastic
knife or plastic spoon, whatever you have,
even a popsicle stick and just mix each of
the colors together. Then this is where I
went wrong because the colors didn't realize
they were attached, so they started bleeding
into each other. But I'm still going
to use it anyway because it won't really
matter in this project, everything's going to get
mixed together anyway. Then you're going
to grab your dish. So I'm using this to Pyrex
dish and I'm gonna cover it with a plastic bag,
garbage bag data. That way, it won't
get all messy. Then I'm gonna grab my
phone and I am going to spray this foam shaving cream
all over the inside here. I'm just going to
use a nice layer. You don't have to use a crazy amount like you
don't have to layer it up, you just want to do a
single layer of it. And then I'm going to
grab a plastic card. So this is just an old
gift card that I'm using. I'm just going to smooth it out. You just want to take
the card and run it from side-to-side and just smooth out the shaving cream so it's in a nice even layer. It doesn't have to be
too thick or too thin, just like one layer of the
shaving cream smooth out. These cards are really handy because they're easy to clean, easy to wipe off, and they work really well
to smooth everything out. I'm just going to
go ahead and make sure that the layer
is nice and smooth. And you want to make
sure that this layer is bigger than the
size of your paper. So keep that in mind. You want the dish that you're using to be
bigger than the size of your paper as well as
a layer of shaving cream. Next, I'm going to
use this dropper again and I'm going
to drop little drops of color all over
the shaving cream. Now, again, if you
don't have a drop or just use a spoon, anything, even you can even pour the paint on into little drips
all over the place. This part is really
easygoing and carefree. There aren't many rules to it. You just want to
go ahead and drop a bunch of colors all over. So I'm going to start with, I think about four
colors and just drop them in randomly all throughout. I do find that it's nice to have a darker color mixed in
with some lighter colors. It gives a really cool effect, but you should try
a whole bunch of different color choices as
you go through this project, we're gonna make
a bunch of these. So this will be the first go
and you can always add in colors and take away colors as we move through the project. So now that I have all
my colors and then I'm gonna take my
palette knife here. And I'm going to go through
and swirl the paint. Now you can even do this with
the back of a paintbrush, the backside of
that paint brush, or even a popsicle stick, anything really plastic cutlery. You just want to go
through with something. Even a toothpick would
work really well here too, and just swirl all
the paint together. Now however many swirls
you make us up to you. But the more swirls you make, the more intricate and
interesting the design will look. So it just depends
what you're going for. If you want a more
dramatic design, then you want lots of swirls. And if you want a
more muted design, then you can try different
techniques of moving the paint around in
the shaving cream. I'm going for a more
dramatic design here. Lots of swirls. And then I'm gonna take
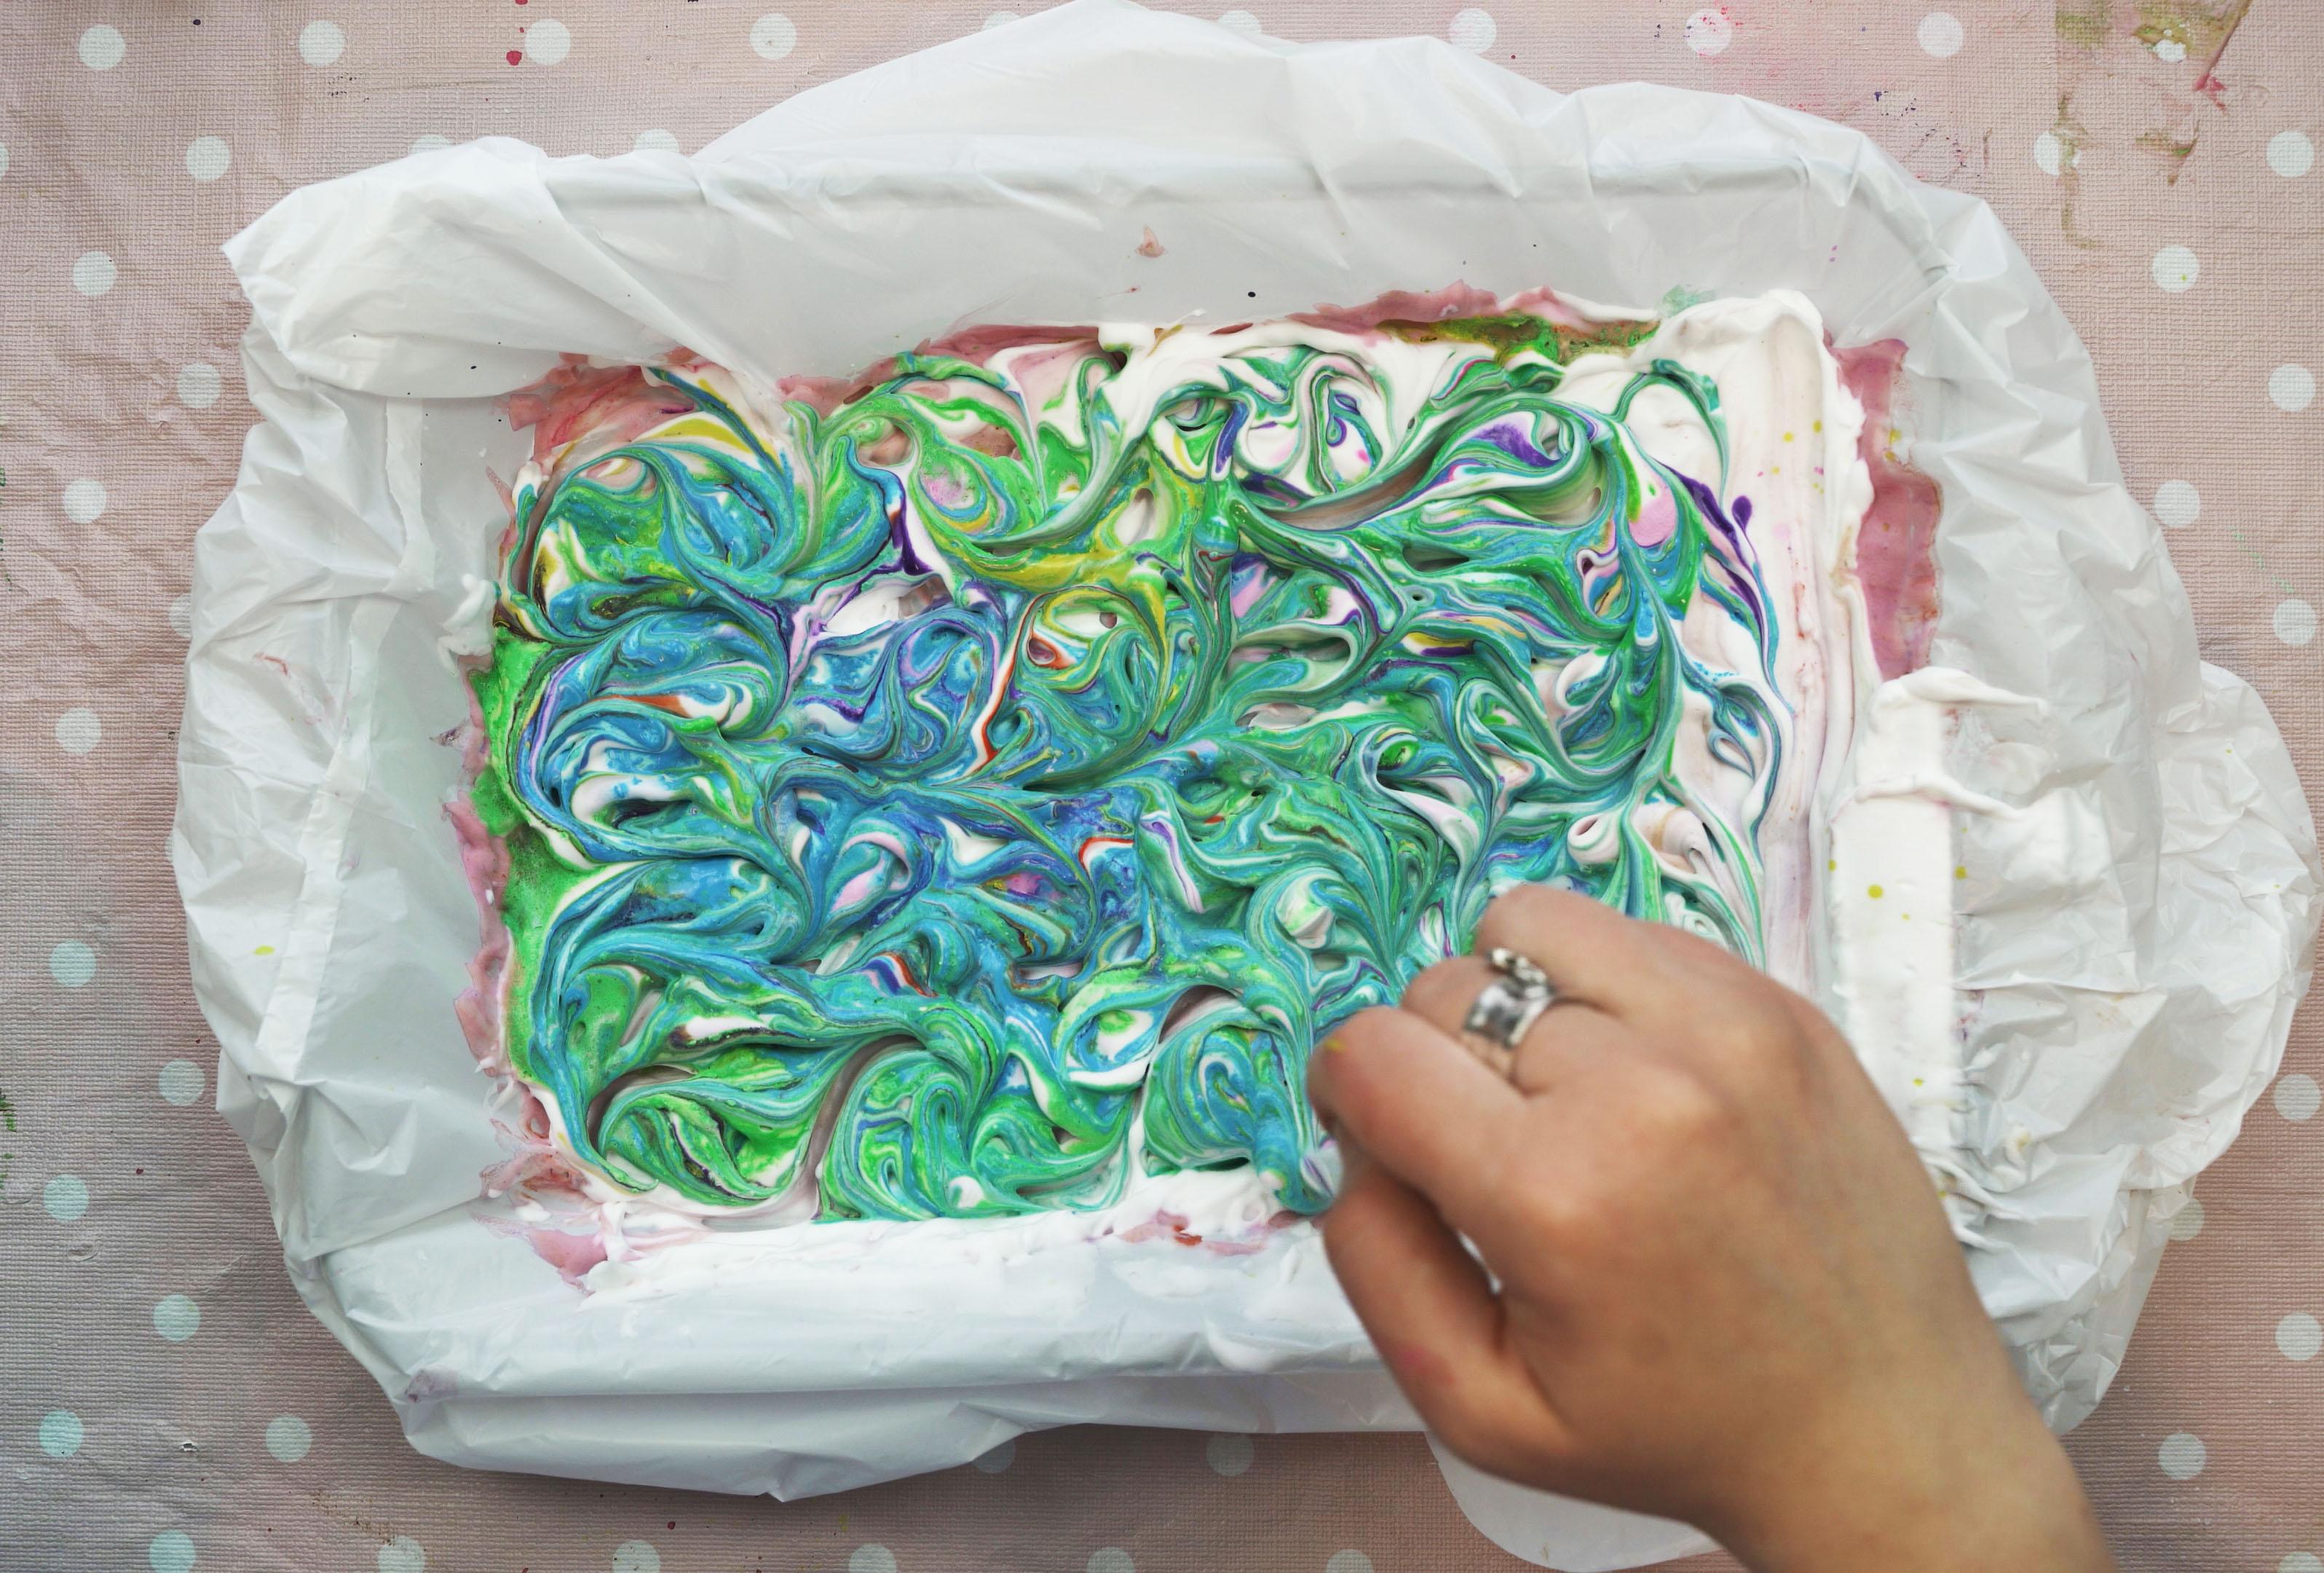
my watercolor paper and drop it in here. Now you want to make sure
that when you press it in, you press it in everywhere that the watercolor paper is
touching the shaving cream because you don't want
any extra spots or extra paper where it
didn't quite touch. You want to go through
and really move your hand on the back of the
paper all over and just make sure that every
single side or every single area of the paper has touched
the shaving cream. And then you just
want to peel it up from the corner nice and gently. Peel it away and then you'll get something that
looks like this. Your paper will be loaded with shaving cream and the paint. You want to put that
down on a surface. And then you want to take
any type of container. So I'm just using my paint container because
I'm not going to use it anymore for the
discarded foam. And then I'm going to
take the card and just lightly scrape across
and reveal the image. It's so beautiful to see what
comes out underneath here. This is my absolute
favorite part. You just want to
hold the paper on the corner there
and just lightly pull across and lift up the shaving cream and then discard it into your container. You want to keep
doing that until the entire surface of the paper has no more
shaving cream on it. Just make sure that you
get off any lumps or blobs and the paper
after is nice and smooth and just
discard everything into that extra container
that we pulled up there. Make sure there's no residual. And then you can
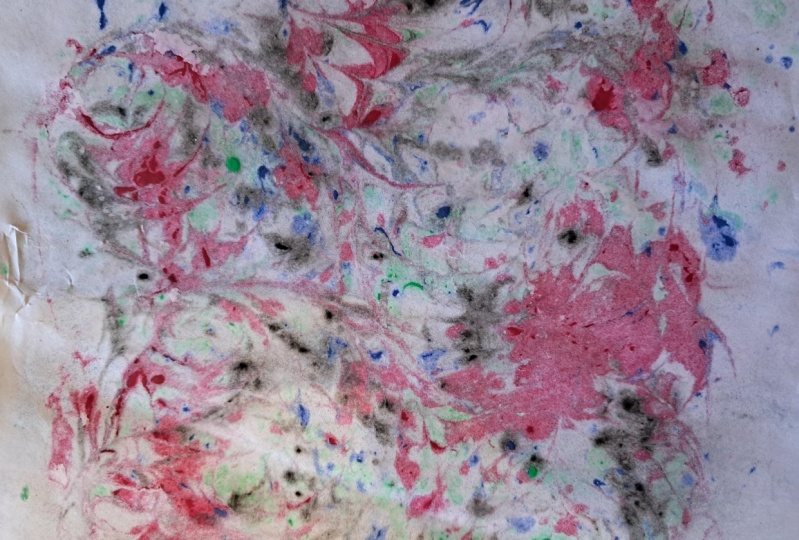
put your card down. And this is what I got. So such a beautiful
marbled paper image. So nice. Then you want to just
lay that down to dry. And then we're gonna go back
into our baking dish here. What I'm gonna do
is I'm gonna take that container where I discarded all the phone when I'm
actually just going to put that phone right back
into the baking dish. So all the foam
that I've scraped off of the card there
with the paint on it. I'm going to move it back into the baking dish and then I'm
going to smooth it on out. I'm gonna take that
plastic card and smooth it out to get it nice and smooth and you'll see the colors will melt together, okay? And that's totally fine. You'll get whatever
color that you're, the colors that you use
mixed together will make that I'm gonna use this as my background
for my next piece. I'm going to go back and again and drop some more colors here. I've tried to use
a little bit of a different color
palette for this one. Then again, I'll go back
in with my palette knife and swirl everything
together again. Then we're going to
pull another painting. Once everything is swirled altogether and you
feel happy with it, then you're gonna go ahead
and grab your paper, pop it in there, and then make sure that
it's pressed down all the way so that everything
has touched. There's no areas of the
paper that happened. Touch the foam and then you want to pull it
up from the corner again. I always like to
pull it up slowly. But this part is
really interesting, even just the visual
effect of pulling it up. It's so nice to see. Then you'll get
something like this. Then again, we're
going to lay that down on a table surface. And we're going to use
our same technique of scraping off the foam with plastic card and then dumping the access into
a little discard container. As you can see, this
one's quite different, so it has that kind of background color that
we started with. But then all the beautiful
paint colors on top. Now try not to press too hard when you are scraping
off the foam. Is watercolor paper,
and watercolor paper is sturdy but also
delicate at the same time. So you want to keep the
integrity of the paper intact, then just scrape it off there. And this is what you get. Another really beautiful
piece that's totally unique and different
and mobilized. Okay, Next I did the same thing, so I put the extra back
into the container. Now I'm gonna try
some new colors. So I mixed a green and a blue. And I'm going to try a couple of different colors here that
I used in my next one. I'm going to use
this yellow color. That's really nice. And then again, same process. Swirl it on through. Once you're ready, you
want to pop your paper and then pull it up gently
to reveal the print. Now you'll see here
there are little bits of areas that didn't connect. The paper is still dry there. So I'm gonna leave
those and just show you what happens when that happens. I'm going to place
down the paper here, grab my container, and
then do the same thing. So start on the very
corner here and scrape the paint and the foam off. You'll see that that white
area really isn't so bad. When I scrape everything off, you can still see
it a little bit. It kind of adds to the design
and I really don't mind that once the shaving cream and the paint has
split across it, you really don't
notice it that much, so it's not an issue
if that happens. Another interesting different
piece that we pulled here. Now for the next one, I'm going to take that
container that we just used just as it here. I'm going to go and
just use it right away. For this one, I didn't add
any extra shaving cream. I didn't add any paint. I'm just going to go into
the exact same container a second time and pull
at another print. This one looks like this here. It still had quite a
bit of paint on it. So I just thought
I would just go right back in and
pull it right away. You can see without
swirling it as much with the design
a little bit muffled. It creates a totally
different paper. So you can always go back in a second time into your container if you
feel like there's still enough paint
and shaving cream in there and just pull
another print right away. So now we're here. So I just pulled two prints and now my containers
looking kind of empty, I'm gonna go back in and just add some more shaving cream. If you feel like there's not enough shaving cream
and your container, that's when you can
go ahead and add more or if you feel like
the shaving cream in your container is too
tainted by the paints that you're using and the
colors gone a little bit MCI. You can always go in and add
some more shaving cream. That's what I did right here. Next, I mix these
new colors here. I'm gonna go through and
play around with them. So here I'm just going to drop them straight from
the container. So you can drop them
straight from the container. You don't need that eyedropper
that I've been using. You can just really
pour the paint right on to the shaving cream
like I'm doing here, and just use whatever
you have available. And then I'm going to add
some darker color here, some of this darker purple, because I really like how a lighter color and a darker
color mixes in together. And a little bit of pink. Just really make a nice
multicolored piece here. We're going to add in quite
a bit of colors to this one. Then I'm going to follow
our same process of going through and swirling it all around with my
palette knife here. This one, I'm going to
swirl around quite a bit. You'll see that this one has lots of swirls going on here. And then I'm going to grab
my paper and pull it up. You can see here as I
pull it up slightly, there's lots that
didn't connect, so I didn't push it down enough. I'm just going to
repress the paper into the shaving cream and the paint mixture and push it a little harder and then
pull it up again. And there we have
much better coverage. And this looks so nice and
like earthy and sea foamy. I really, really love
this color palette. And then I'm going to
go and reveal this, a really beautiful design. This was one of my favorites. I just loved the color palette. I love how it came out, and I love the effect when you
swirl it lots so this one, I had lots of swirls and yeah, just looks so beautiful. So many nice colors
mixing together, kind of like a
greeny blue palette. Then for this one again, I'm just going to go directly
back into the paint tray. There were still
lots of swirls and lots of paint and lots
of foam in there. I decided instead of swirling anymore or adding any more foam, I would just go
right back into it and pull a second
marbled piece here. As I pull it up. Look so cool. Even just freshly pulled with
kind of looks like waves. And then I go through and do my same process of
revealing the design. This project can
get a little messy. So you should make sure that
you have a rag with you, wet rag and a dry one just to wipe your hands
in between polls. I don't mind that my
hands get a little messy, so I just went with it.
4. Outro: But yeah, that's the
idea of the project. I hope that you learned a lot and that you really
liked this technique. And I really can't wait to see what type of different
papers you guys pull. I'm sure they're gonna be
so beautiful and so unique, and I can't wait to see them. That's it. Thank you
guys so much for watching and we'll see
you in the next video. Okay guys, that's it
for today's project. I hope you enjoyed and you
thought it was really fun. One thing I wanted
to tell you is that these do dry very quickly, so they would dry
fully within an hour. But one thing that I
want to note is that if your paper starts
to curl like this, just wait until everything is
completely dry and then you can stack the paper
under a stack of books. Just lay the paper
is flat and then put a bunch of heavy
objects on top. So I use a stack of books, just pile up a couple
of heavy books on top of it and then
leave them overnight. And then when you
come the next day, they should be nice
and flattened out. Thanks so much for
being here today and I can't wait to see
what you guys come up with. Feel free to post some pictures
of what you created in the class discussion and we'll
see you in the next class.
 Cori Jaye Ettienne, Artist and Creator About Vivid Color