Transcripts
1. Introduction and Supplies: Hi guys. Welcome back to another video. My name is Cory J, and I'll
be your teacher today. In today's class,
we're gonna be making this really awesome
geometric painting. I am so excited about this
because I've used this type of style and a bunch of different paintings
that I've done before. Let me show you a couple. There's this
painting right here. This is a painting that I did have a little
friend, She Dog. And I use this technique to
do the entire background. Or we can take a look
at this painting here. This painting is called
G0 fly and it is a geometric piece
with these birds on the front with the
twigs making a heart. I also use this technique
for that background as well. It's a really awesome
technique that you can use in your art practice for backgrounds or just
standalone paintings. For example, this painting is just perfect, just
the way it is. Or you can take
this class one step further and paint something
on top of it just like I did. To create this PPE supplies
are pretty minimal. You're gonna need some
acrylic paint of your choice, as well as some painters tape. Now I use this painter's tape, which is my favorite
painters tape. I get it from Dollar
AMA here in my area. But also if you
have this type of Painter's tape
that's a little bit thicker, that's okay too. What you can do if you
have this Painter's tape is just cut strips and use a combination of thinner and thicker
strips in your work. You're also going to
need a paintbrush. This is my favorite
paintbrush here, so I'm gonna be using this one. But you can also
use a paint brush that's a little smaller
if that's what you have, any type of flat
paintbrush Goldberg. One other thing I used
were these foam brushes. But if you don't have
these foam brushes, you can also try using a sponge. Or you can just leave them out totally and just use the brush. They're totally optional. You're also going to
want a painting palette. So I really liked to use
these takeout container lids because the paint will peel right off of them
after you're done. When you're done, you can just let them harden and then you literally just peel
the paint right off. As you can see, it
comes right off. So I really love these
because they were usable, your recycling and also the paint comes off so easily that you can use them
again and again. For this project, I used a
nine by 12 canvas board. So it's just a board that looks like this covered in Canvas. But if you don't have this one, you can also use a stretch canvas or
canvas paper as well. All will work perfectly
for this project. Then lastly, for this piece, you're going to
need a water jug. And I always recommend having a rag on hand just in case
things get a little messy. That's it to start, let's get into the project.
2. Layer 1: Okay to start,
we're going to grab this nine by 12 inch canvas
board and some painters tape. My favorite painters tape is this thin painter's tape that just comes from
the dollar store. It works amazing. And we're just going to
start to create a design. Now when you start to
lay down the tape, you want to create geometric
shapes with the tape. So I like to create triangles or rectangles and just kinda
keep it really geometric. Now if your tape is
thicker than mine, you can always just
cut strips of it to do this project or you can use a variation of thick
and thin lines. It's really up to you, but you're just going to take
different strips of tape and lay them down
to create a kind of geometric design where we're creating different shapes that we're going to fill
in with the paint. Now you want to tuck it away
that the ends of the tape, when you get to the end
of the canvas board, make sure you tuck them under. One other thing to note is
that when you rip off a piece, you don't want to leave
any jagged edges exposed. So as you can see, all the
jagged edges I'm using at cross-sections here to
avoid a jagged edge. I'm just going to put
that piece away and grab another piece so that there aren't any jagged edges
that will create a shape. You can layer the tape on top of other pieces of
tape and that will create these thin lines all
around your geometric shapes. You want to create. I don't know, just
a few shapes to start, nothing too intricate. Then once you have
all your shapes down for your first layer, you're going to go through
with your finger like this and just make sure that you push down all of the tape around the edges so no paint
seeps underneath. Next you're going to grab
some acrylic paint of your choice and a foam brush
as well as a painting brush. And then we're
gonna get started. Now there's a couple
of different ways that we're going to fill
in the shapes. The first shape I'm
going to fill in. I'm just going to
fill it in with flat color and just make
sure that I have lots of paint on my brush
and that I'm doing some nice light strokes all in the same direction at the end of the shape to have
a nice flat color. Next, I'm going to grab
the foam brush here. And I'm going to create a
bit of a different design. Here. I'm gonna go and I'm
going to start to fill in this shape with some
pink color here. I'm just gonna make sure
I have quite a bit of pink on the palette. And then I'm going to go in with a little bit of purple and I'm gonna start to do
an ombre effect. So ombre is when one color
turns into another color. And gradually with a
gradient or a fade, I'm going to start by
starting with the pink. And then as you can see,
I added a little bit of purple and I'm mixing that together and I'm just
going to keep adding a little bit more
purple as I go. So that the gradient or the ombre effect will be from the light pink to deep purple. You can always grab a
little bit more pain and go-between the seems to. But basically I
take a little bit more purple and
then I mix it into the same spot until I
get a color that's a little bit darker
than the one before, and then I lay it down. It's nice to blend this
all in the same direction. So as you can see, all my brushstrokes are
going in the same direction, up and down, up and down as
opposed to side-to-side. And then I'm just going
to add a little bit more of that deep purple and darken this color a little bit
further on my palette and then transferred over
to the Canvas board. And as you can see, it's starting to create this really beautiful gradient from the pink color all the way
to this deep purple color. Then when you get
to the end here, you can even grab more purple. So that's nice and deep. There you have it,
your first gradient. Now for this project,
I'm gonna do a mix of a whole bunch of
different types of design. So one is flat color,
one is gradient, and then the other is this speckled dot effect
or the sponge effect. So you can get this effect using just a regular sponge to, but the sponge tip brushes are really useful
for it as well. But basically I'm just
going to take two colors, so I'm going to use this lime
color as well as the green. I'm just going to do
like a speckle effect all through the shape. Keep going back
and forth between the two colors and
doing little dabs. And I always like
to spend my brush around as well when
I'm doing this so that all the brush
marks aren't all in the same direction and
just fill in that shape. It just makes for a really
interesting, beautiful shape. When you take the paint off, you just want to finish doing all of the
shape and makes sure that it's all filled in and that you can clearly see the
two different colors. And yeah, it looks really good when you take the tape off. I'm just finishing up here. Then also you want to make
sure to do the sides. So this goes for all the
shapes that you're doing. Make sure you pull them down to the sides of the cameras board. A good tip also for if
you're using stretch canvas. Then I'm going to
go through and use this really beautiful
light blue color. And as you can see, as I'm filling in the shapes, I'm making sure that I put different colors in different
areas of the canvas. And that's going to create
a more dynamic design. I'm not going to have two
purple squares right beside each other to purple triangles
right beside each other. I want to make sure to kind
of move the color around the board and put
different colors that opposite sides are a little bit away
from each other. You don't want to have the
same two colors touching. If you do, it's okay. It's not the end of the world, but it just tends to look better if the colors are spread out. I'm just going to go through and keep adding different
colors here. Make sure again, don't
forget to pull the color onto the side of the
canvas panel here. And at the end of after
you lay down the color, make sure you go through
with the brush and do all the same directional strokes and that'll give you
a nice flat shape. Next time we're gonna
go in with this pink here and fill in this
shape here at the bottom. I like to use quite a bit
of paint when I do this because it'll make it easier
to create a gradient. I'm going to start with this
pink on the left side here. And then I'm going to grab some blue and just
lightly go into it. Now this is another
way that you can create a gradient is just by fading two colors into each
other right in the center. I basically lay down the pink and then I
laid down the blue. And then I do some really
light strokes with my brush in-between them and that blends them together
really beautifully. Then again, make sure
that you paint the sides. Yeah, that's another way to do a gradient or fade
or an ombre effect. Then I'm going to go in with the pink that I still
have on my brush. So sometimes if you still
have one color on your brush, It's good to use it in
multiple places before you have to change
it or put it in the water to clean it off. And then lastly, I'm just
going to go in with this green and finish off my first
layer of this panel. Once you're done
with everything, you want to make sure to
put it in front of a fan. Or you can even use a blow
dryer to help dry it. If you want. You can also just
leave it to dry by itself. You don't have to
use assistance. I often put it in front of a fan just to make it go faster. And then you want to really
carefully peel off the tape. So you can see I'm
peeling off the tape. All directions here. I just want to be as careful
as possible and only makes sure to start
peeling it off once everything is
completely dry.
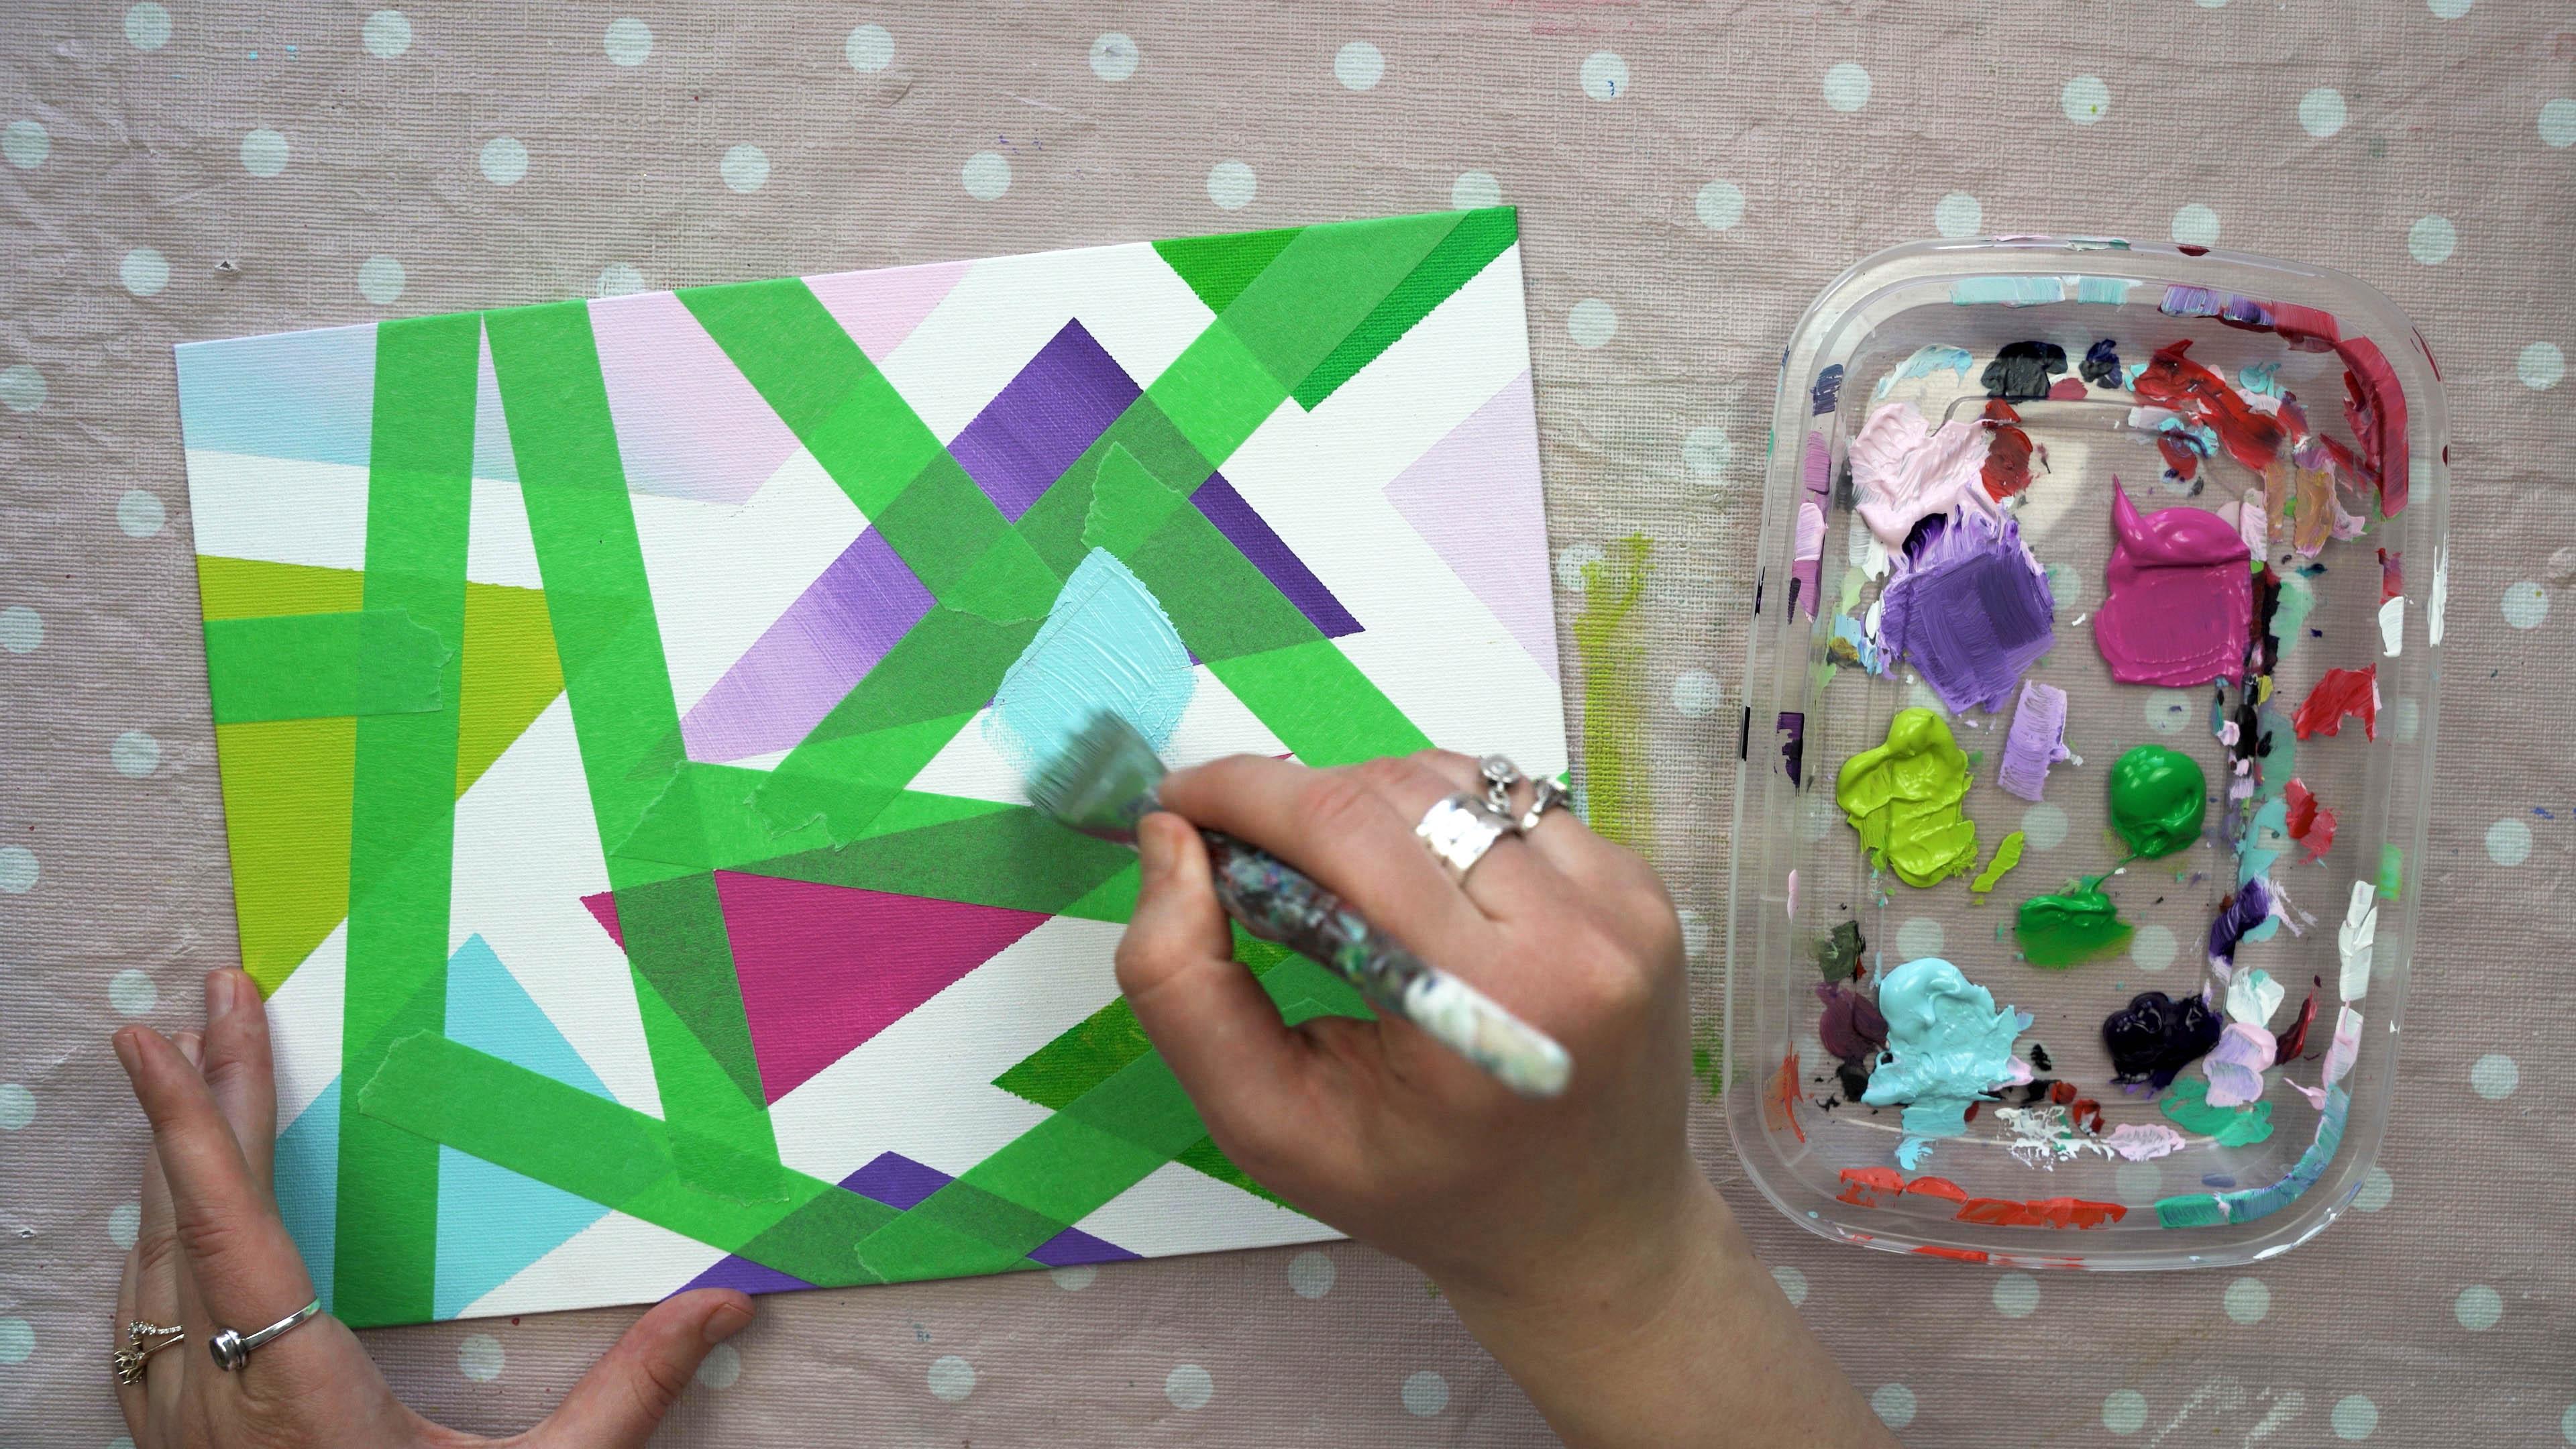
3. Layer 2 and 3: So now I'm going to do the same thing a second time
and repeat this process. When I lay down the
second layer of tape. Now I want to make
sure to be a little strategic about where
I'm laying down tape. I want to go and cross through the shapes that
I've already made. And then I also want to
make sure that I'm creating new shapes to fill in using as much of the whitespace
as possible. I'm going to go through and do the same thing I did before. Where I am creating shapes, triangles and
squares and kind of oblong shapes all
throughout the piece, just by creating
different sections. And what we're gonna
do is once we have all our sections together again, we're going to fill
them in and start to create a more dynamic
layer design. One thing again, you
want to remember when you're doing the
tape is to make sure that you're not putting
any jagged edges of tape out to complete a shape. Makes sure that those
edges get put on top of another green space and then get wrapped around to
the back of the board. That'll just create
some nice strong angles and some nice strong
shapes when we fill it in. You just want to go through and create a similar
amount of shapes. Or actually if you
want to create lots of shapes this time
it's really up to you. You could really make
your piece your own. But I'm going to make
a similar amount of shapes that I did
on the first layer, on the second layer here. Then once you have
all your shapes on, you want to go through and make sure that you do
the same process of pushing them all down
with your fingers here just to make sure that no
paint seeps through the edges. Next, we're going to grab our color palette
again and our brush, and we're going to start
to fill everything in. Now as you can see over
here, I have blue, so I'm going to
create some blue on the other side of
the canvas panel. This is just to ensure
more dynamic design. I'm going to try and keep the
blues away from each other, at least not touching. So that it just says more interesting when
we take the tape off, when you're putting your colors down for the second layer, you want to look
at what colors you have wear and then decide what makes sense for you to lay
colors on top of them. Now here I'm going to
do another gradient. I'm going to grab a little
bit of the blue and then I'm going to grab a
little bit of the green and mix them together and
start to make a fade here. Just want to be really
light with the brush and also loaded up and
use lots of colors. The more paint that
you have on here, the easier it will
be to blend it. Obviously, you don't want
to put too much paint because then you'll have to be scraping it off
or lifting it off after and it will
take longer to dry, but you want to have
a decent amount of paint on here when you are fading it so that the paint has some other paint to adhere
to and mixed together with. If you don't have enough
paint on your Canvas, it'll be kind of dry brush and scratchy and it won't
blend together nicely. So I'm just going to
grab a little bit more green every time blended into the same
spot on my palette here. And then drag it down. And this will create a really beautiful gradient
for my piece here. You also want to be very deliberate with the direction
of your brushstrokes. Don't forget to do that. And then you want to just
continue filling in shapes all around the canvas with
the different colors. You can do a mix of
the ombre shapes. You can do a mix of flat shape. You can even do some of
that speckled shape that we did with the two different
colors on the sponge brush. Really, you want to
just make it your own and fill in the second layer. In whatever way that you think makes sense and whatever way that you want it to come out using whatever
colors you like, and just really trying to make the piece exciting for you. And then I'm just going
to do a gradient here for this last shape that I'm
filling in with the blue. Just adding a lot of blue at the top to take away that purple. That will be my second layer. Now as I said before, I like to use a fan to dry between different layers because it just helps it go faster. And then once it's a 100% dry, you want to remove the tape. Again. Now when you remove the tape, you already have a layer
of paint underneath. This tape is really good for not lifting up the paint underneath, but you want to be very careful. Anyway. You want to pull the tape
off really gently in one direction and just be really careful with it so you don't
remove any of the tape, the color from below, then you're hearing a
really beautiful piece that's coming together here. We want to take this
piece one step further. So I'm going to do a third layer and I
suggest three layers, at least for this project. However, you can do
as many as you want. And we're just
gonna go ahead and do the exact same process. So first stage is
laying down the tape. Once you have the tape down, you want to make sure that you
smooth all the edges down. And then you're going to
go ahead and fill it in. Now again, when you fill it in, you can use a combination
of the ombre technique, the gradients from
one color to another. Or you can just do flat shapes, whatever you would like. As well as you can try that stippling
technique that I'm doing here with
the sponge brush. This is really fun and just add some nice texture to
the piece as well. But you're just going to
go through and again, fill in your third layer
just like we did the first to make sure that you have
all the layers filled in. Then once your piece
is completely dry, we're going to go ahead
and remove the tape again. Now we have this third layer, two layers underneath the tape. Just be very careful removing the tape and
just make sure that everything is completely
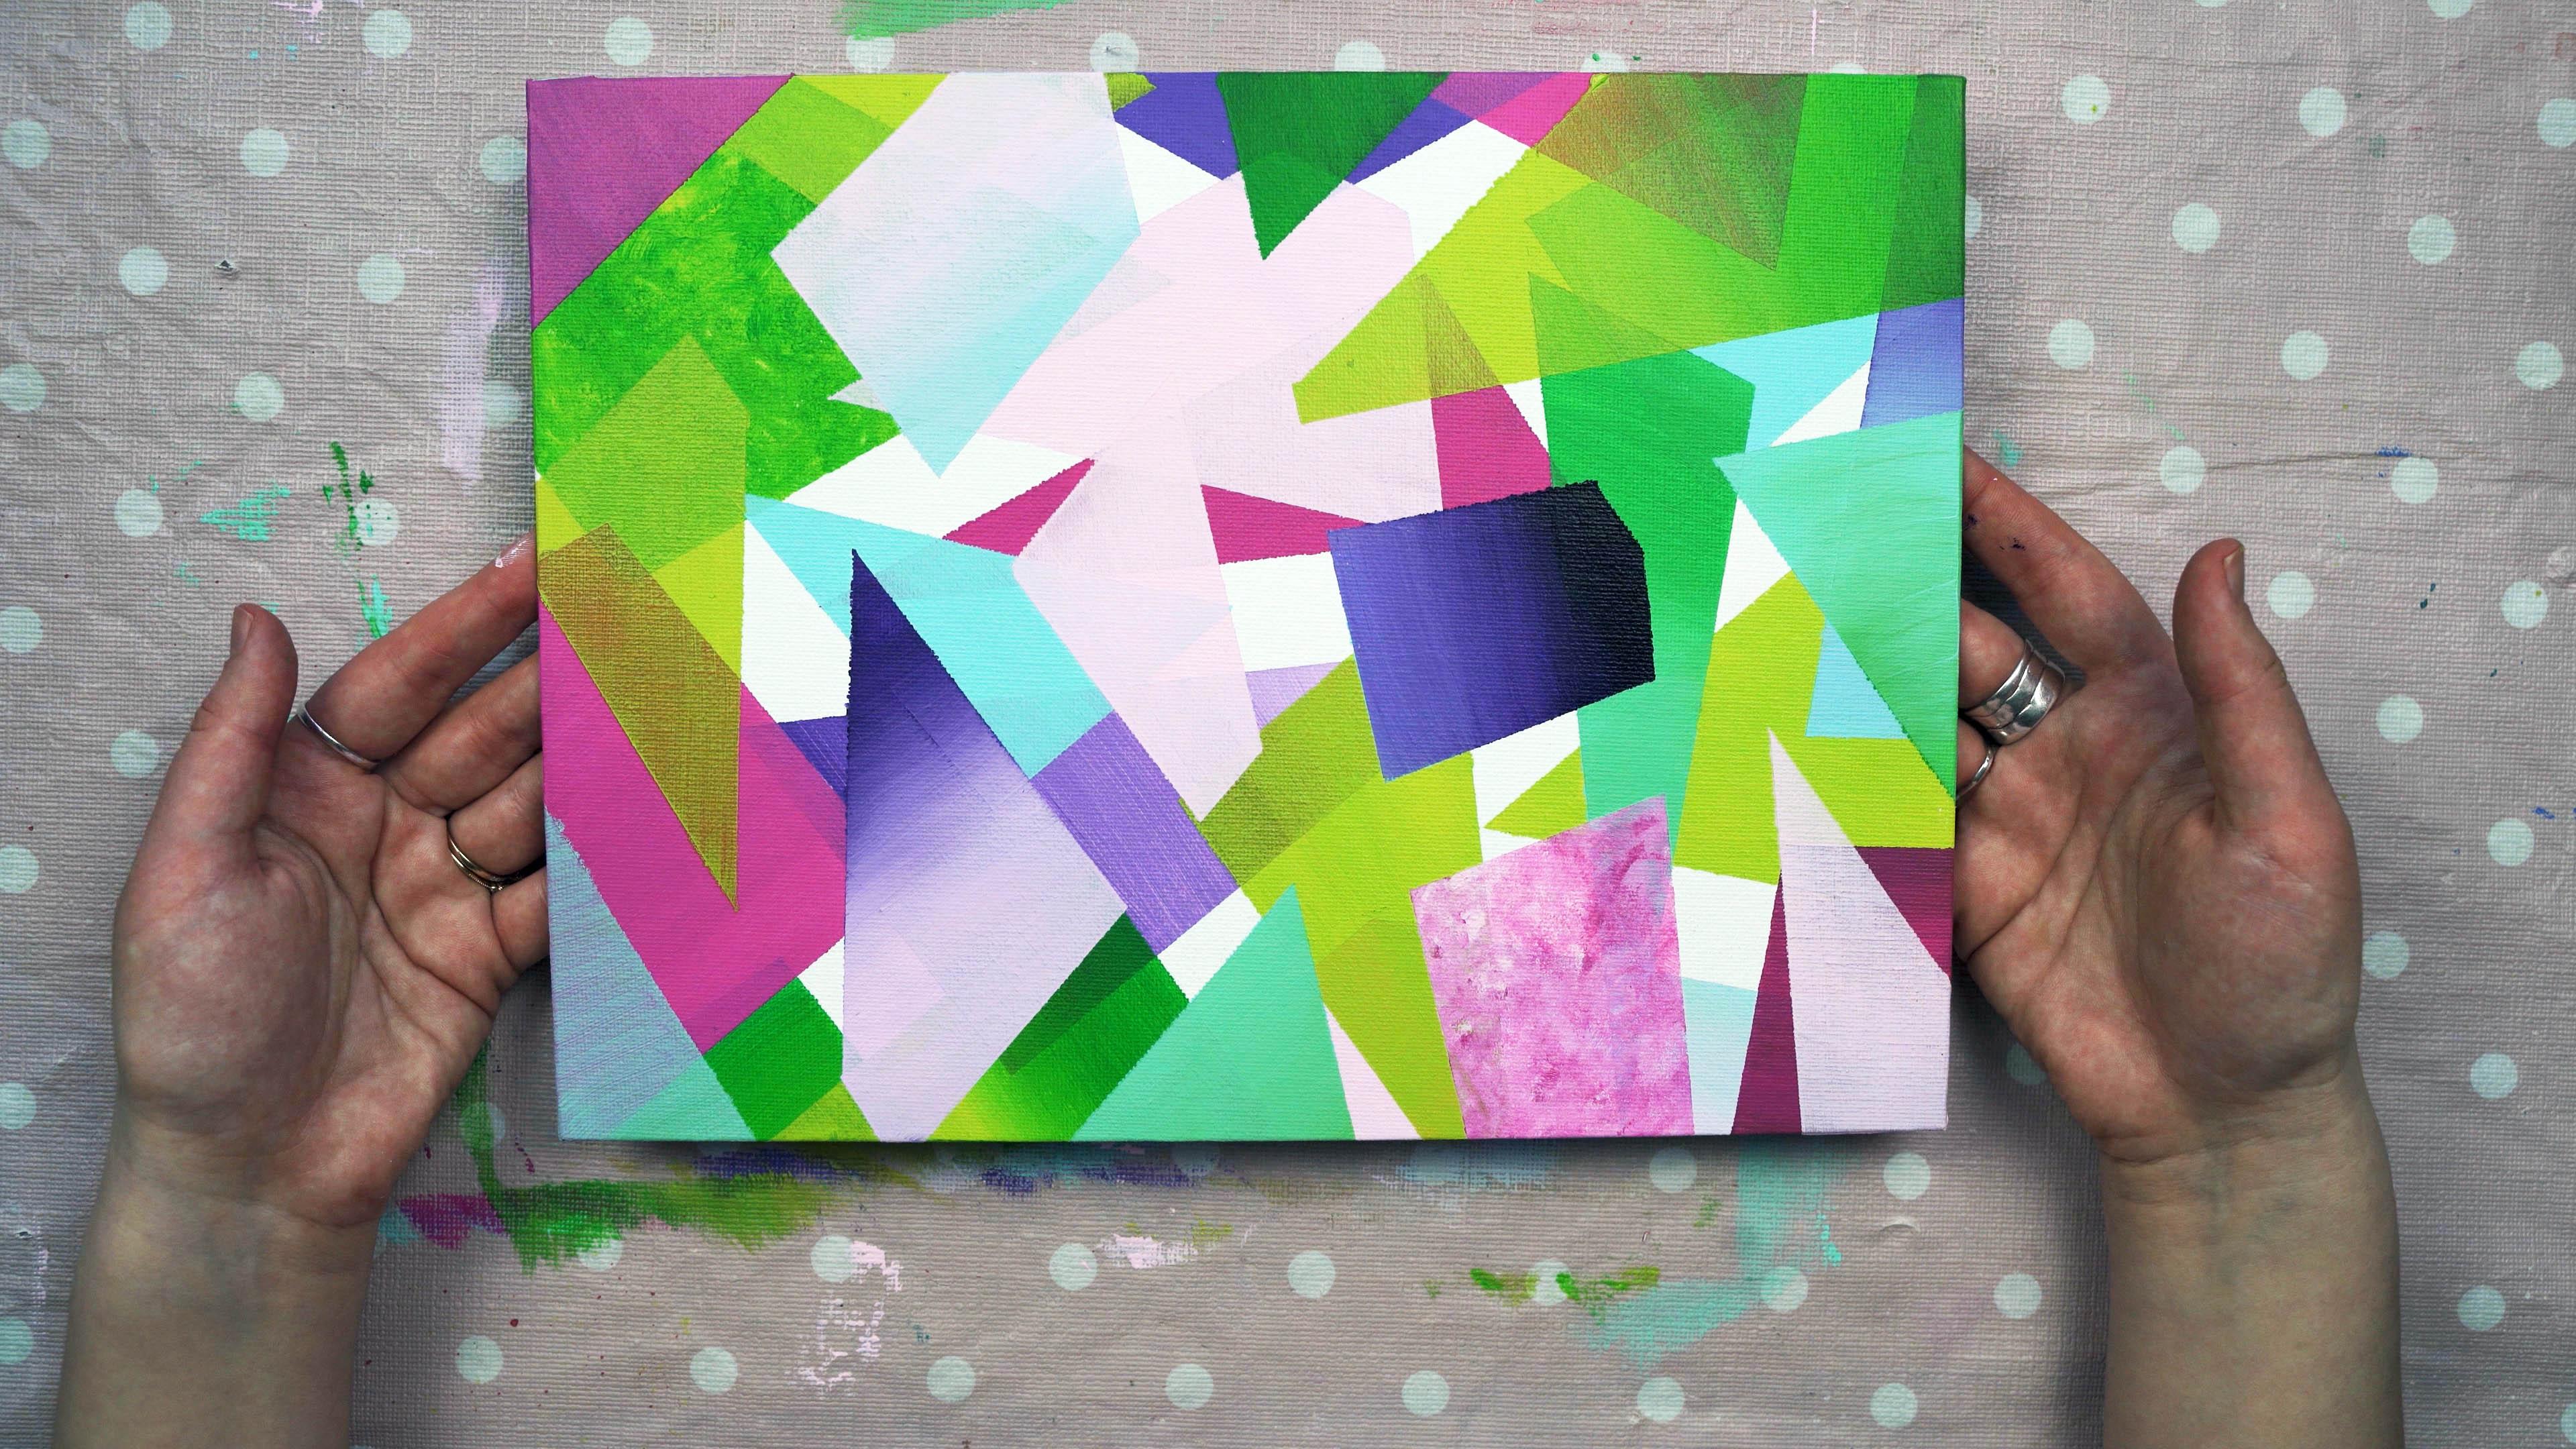
dry before you remove it. And this is going to reveal our final geometric design on this awesome
canvas panel here. As you can see, I just have
a few pieces left to go. And this is my last piece, just peeling it off so gently. And this is the final design. Creates this really
beautiful geometric design on your canvas. And I really, really
stunning art piece. Now you can always take it one step further and paint
something on top of this or just admire it and
enjoy it just the way it is. This is a really good
technique that you can take into further art projects and use as geometric shapes or to create geometric
backgrounds. Thanks so much for watching. I hope you enjoyed this video
and learned something new.
4. Outro: Okay guys, that's it
for today's project. I hope that you enjoyed
it and you learned a new technique
that you can bring into your painting practice. Don't forget to
leave a picture for every one in our discussion. And I can't wait to
see what you create. See you in the next class. Bye.
 Cori Jaye Ettienne, Artist and Creator About Vivid Color