Transcripts
1. Paper Crafting Chocolate Holders 01: Hello and welcome to my paper. Crafting course creating chocolate holders. I would like to tell you a little bit about myself and a little bit about the project will be creating in this course. My name is Kimberly Smith. I'm also known as the paper Chief. My website is the paper check dot com and I have a YouTube channel, the paper Jeff, in which I show lots of inspirational tutorials on carfare ideas uses of stamping up products. Because I am a stamping up demonstrator, and I also show how to use the brother scan and cut machine extensively. So please check out my other courses here on skill share to see what else I'm up to. Okay. Now, for the project will be creating these course we're creating chocolate holders. These are actually little mini envelopes, and they have a little pocket to hold the Ghirardelli chocolate. Okay, depending you're gonna learn how to make these, and depending on the size you make them, they could hold note cards. They could hold letters, and you could even make him tiny toe hold smaller treats case. Because all you're really making is a pocket envelope or a pouch. for your for your Ghirardelli chocolate. Okay, so we're using paper by stamping up called painted seasons. And it has No, it's double sided. So that's what you need to gather in the next video. Talk about all the different materials you need for this project, but you definitely need to gather double sided paper to make these just look fantastic and whatever coordinating stamps that you have. Okay, these air. Great little gift to give to someone. And they're good for all year long, depending on the pattern. Jews. Okay, we'll see you in the next tutorial where we will start to gather the materials you need. And then after that, we're gonna get crafting. Thank you.
2. Paper Crafting Chocolate Holders 02: hello and welcome back in this video electric over all the materials you would need for this chocolate holder project. The very first thing you're going to need is designer Siri's paper or some kind of double sided pattern paper the paper will be using is is called painted seasons by stamping up and noticed that it has. It's double sided and the dish patterns on each side. That's important because the patterns are going to show through when you fold it, and we'll put the main pattern that you want on the outside showing. And then they'll be a little bit of the inside showing as well. Okay, let's put up this off to the side now because we're gonna be doing a little bit of embellishing to these, so we're gonna put a little bit of embellishments on them. We need a stamp set, and in this case I'm using this lasting Billy stamps that I'm just using a couple of small sentiments like wishing you well and I adore you. And the other reason I chose those is because they go with my punch. This is the classic label punch by stamping up and the stamp said is by stamping up. Okay, so get whatever coordinating punches you have and whatever stamps that you have. Whatever paper. Okay, Coordinating Inc. I'm using a coordinating color called Call Me Clover. And you you could do You could follow along with this project. With whatever materials you have, you need a stamping block. Or if Unless you're block. Unless you're stamps are already mounted on wood. These air acrylic. I see. So you're gonna need to put them out the month or block before you stamped with those. Okay, you're gonna need some adhesive for your paper. And this is just stamping ups now, adhesive. Or I may use my ruling O T g rolling. And he said, Just come kind of 87 or globe. Okay, then you're gonna need some kind of spatula or bone folder or something. These are my little specials that I have for my brothers can and cut. This is just a little cricket special. I have. This is really good for folding. Increasing your paper when you do your crafts. Okay. I don't think you'll need any scissors unless you have a little, you know, issue with your sentiments where you need to trim. And sometimes you need, like, you know, if you want to embellish, sometimes you use like a glitter pin. And I have that as well, but we're not sure we're gonna get to use that. OK, so the last thing is just a paper trimmer which will start within the next video. We're going to trim the paper down to size, and the paper trimmer I'm using is by cricket. Okay, So you just want something recon, Measure your paper and term it up so that all of the papers are equal squares. Okay, so I'll see you in the next video where we start to create our chocolate holder project.
3. Paper Crafting Chocolate Holders 03: Hello. And welcome back in this video, we're going to cut the pieces we need for our chocolate holder project. Okay, I'm taking my cricket trimmer, and I'm opening it a opening it up. OK, so we're going to have six inch by six inch pieces. I'd like to do at least one of each, so let's just go ahead and cut the pieces we need. So you're gonna slip the paper into the trimmer, and I want six inches. So that's what the six is showing. I'll give you a closer look at that. Okay. And then six, we just want six inch squares. Exactly. Okay, So there you go. I'm gonna go ahead and do I'll have eight pieces cut, and then you have lots of choices. You can put some flowers on the outside, or sometimes this great grip color on the outside. It's It's up to you. I like doing everything at once, and you'll see that in the next step. I'd like to do the first part of the folding at once, and I liked it. I liked to do assembly line. When I'm crafting, it just makes everything more efficient, and it makes it all go faster. So like I said, we'll make it least one of each. And then we'll have a lot of variety. And then we can get a lot of practice and get embellish those and they'll be really fun chocolate holders to put your to put some gear Delhi's in or other treats of your choice and you'll be ready to go. I think these items air not just great for gift giving, but will be great for craft fairs as well. Okay, so in no time we have eight pieces cut and then we also have from six by 12 pieces we can use for other things later. I think I'll start with the pattern paper in the next video. And what I'll do is well, we'll just separate. We're gonna use the patterns, this pattern on the outside of each. So I'll just do one of each. Unless we mess up, these other for pockets will be making any out. And this is the part that will be showing on the outside of each of our pockets, one for each season. Okay, See you in the next video.
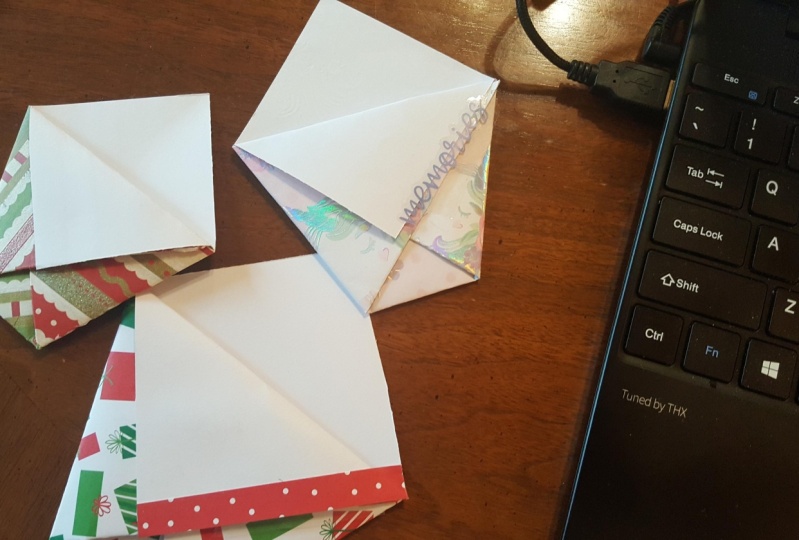
4. Paper Crafting Chocolate Holders 04: Hello. And welcome back in this video, we're going to do the first fold for our chocolate holder. So you'll need some kind of bone folder or little spatula. Okay, Now you're gonna take your piece of six by six. Designer Siri's paper, and I think that one had a little bit of glue on it. No big deal. We wipe that up, and I haven't even got on there. Probably on the trimmer. Okay, now we're going to just put that we're gonna fold the paper and we're going to hold our fingers right on the edge here and put press down on that. Let me just move the 70 cc. So we're pressing on this point. Very important to keep keep this part from slipping. Okay, so I push my finger on there, and then I take my especially that I said you needed or bump voter, and I just I just sort of Okay, so Well, that's it. You have a six by six piece of paper and now you have a triangle. OK, we'll do that again. It's good for reinforcement. Not only that, when I craft, it's always assembly line. I always just do everything at once. All the steps, the stamping, the folding everything because it just makes everything go faster. You can have a lot more done that way. And even if you're not like sure, when you're gonna need these, you can make them. And then just they store flat very flat. Your enough to put the chocolate in them yet. So you can put the chocolate in later. Fold this. Let's make sure at least one of the pattern just going up because you need to make sure one of the pattern. Yet this one's OK. It's going up in the right angle. You'll see what I mean when we make a pocket because you want no one of the mushrooms facing down. Okay, that was a little bit off, but that's OK, because these air double sided Okay, that's 123 and four. So we're pressing that I sing her finger there on okay and increasing it. Okay, so now we're gonna just just face all of your triangles upwards like that. We have four done, and we ready for the next step, which is the next fold. So keep going. Keep this tool handy because you're gonna need it again in the next step. Okay. See you in the next video.
5. Paper Crafting Chocolate Holders 05: Hello. And welcome back in this video, I'm going to show you how to do it. Diaper fold on all four of these little chocolate holders. And the way you're going to do that is like this And what? Don't worry if you're a little lost, because we're gonna do it enough times now, I wouldn't go. I wouldn't actually increase this yet, because here's my little trick. We're gonna fold the left side over and then the right side over. Okay? I like I like the side on top. It doesn't matter, though. Okay. You see what I'm doing? I'm holding the sides. Okay. C just like that. So that I have this so that this parts horizontal. Okay. And then I can sort of pinch them before I put a crease. And then I know I have the fold. Right. Okay. So let me move that into the view of the camera. I'm holding the sides, I've pinched him, and then I take my little spatula or my bone voter. Whatever. Any press down? Okay. And it kind of looks like a little diaper. Right? Okay, so let's do that a few more times, okay? I'm just again I'm just I'm folding overnight, and then I'm folding this way some phony left and then right, and then I'm wiggling the paper until I see that Both points. See? That points down. This is horizontal. Okay, I have a good It's good horizontal on the night crease. The's creases make it so almost make it so that you don't almost don't need glue, because the creases practically hold the project together. Now, if you made a large one of these pockets, you you could hold a lot more than chocolate. You could hold, like, note cards and things put little notes or gift card holder. So just again, do you just starting with the square And you could do the same thing with any size paper. You just experiment with your square. Okay, so that's pushed that down. And for this last one, I'm just gonna use my spatula just to show you how. How about a work the same way? Because you just have to use whatever tools you have. I mean, you can really even use your finger if you have to. So let's just pull that down across. Okay, so that's it. I'm pinching the sides and you always gotta put it on a hard surface. When you when you do your here's your bone floater. It's wrong. That especially. Okay, So this is how I crease it. Okay, so there are four pockets, and now we will do the less step or we're going to do in the next video. We're gonna hear these together and do the last step of of creation of these. So see you in the next video tutorial.
6. Paper Crafting Chocolate Holders 06: Hello. And welcome back for this video, you're gonna need some adhesive, some rolling adhesive or glue, because we're going to hear these these up sides of the pockets together, and then we're going to do the top flip. Okay, so that's just you open it back up, and I'm just putting a little bit of a he sieve on this flap and flipping it over. And don't worry if you missed it, because I know I'm doing it quickly, but then I'm gonna do I'm into just four times. Do you get to see it? Okay, so open this back up, put a little bit of adhesive here, and that's just so it doesn't come open and put a little bit of adhesive here on the points of that. And there's little flaps. Okay, let's do the last person goes up there and do these less too. Again. Open it up. You could use a blue dot You could use a depth of blue. In fact, you really don't. We need to glue the inter flap if you're going the outer flap. I'm just doing it for extra reinforcement. We're paper crafters. You might have your own flow and I mean, it's a personal preference, but I like this flap to go over the top. I mean, it's that's just up to you. This is where you want the sentiment to be, So I'm gonna put my sentiments usually on the right side. Okay, so we have it here, we've adhere them together. And now the last step of making the actual pocket for the chocolate is going to be to take this top flap. And this is now you get to see why you really need the double sided paper, right? Cause when you flip it over, you could see the inside. Okay? And I'm gonna put a little bit of a piece of here. Now, don't worry that you can see that little flat, because sometimes you can. But that's OK, because that's where I'm putting this intimate casing out again. We're just slipping that over. Look how pretty that looks with the inside showing. So first you make first you make the crease, and then you're gonna put the adhesive on it. So you make the crease, and then you put the t sit down and again you could be using You could be using respectful But you don't really need you for that last lap because we're hearing it. Okay, so there you go. We have our foot pockets. So let me just get a piece of chocolate just to show you where we're at so far, and we're But we're not gonna put the chocolates And until leader So you have your piece of chocolate, Ghirardelli. It fits in there perfectly. A great little item for craft fairs and things because you're chocolate just fits perfectly in there. Okay, So I will see you in the next video, and what we're going to do next is we're going to create. We're gonna be stamping the embellishments to put onto our onto our pockets to decorate the's. Thank you for watching. We'll see you in the next tutorial.
7. Paper Crafting Chocolate Holders 07: Hello and welcome to this video where we will stamp the sentiments for our chocolate holders. I'm using the lasting lily stamp set by stamping up. And when I opened it up and take out and acrylic stamp photo polymer, I mean, photo, polymer stamp. It's come and I'm gonna step. I'm gonna mounted onto it Acrylic block. Like so the reason I'm choosing this color here, which is like a pool party, I believe it's goes with the painted. I mean, it's the other side of the paper, the Painted Seasons paper, and then this call me clever is a coordinating color. So that's why I chose that. So definitely choose sentiments and colors and paper that that match your project, okay? Just opened up the call me clever. Think by stamping up and I'm going to just do a tap tap tap when I stand, and then I'm gonna press down. I'm going to use both hands, okay? And I'm just gonna stamp some of these sentiments. I'm stepping Vernoff apart. I probably should have put that one too close to the edge in your suit. I mean, because this this pretty table, I mean, classic label punch it needs room on both sides. I think this one's gonna be a better punch for me. Let's do another one right here in the middle. And I'm gonna put these this way and you'll see why. Because again, the way that the punch is shaped Okay, so that one got messed up, but most of our stamps. Okay, We need four good ones. So that's took Let's do one work over here we need, at least for what we I can change up. I have some extra ones, so it doesn't matter. I've already pre stamped some of these guys. I'm gonna close my lib just to protect my table. I don't want I think to move while punching and embellishing. Okay, so we're gonna go here, and I just What I did is I opened up my punch. That's that's how I did. I just wanted Don't you miss any steps? Even if you don't have the same punch, the stamping of punches to have a little lever on them. So you have to open him like that. Okay, so then you're going to go in and you're going to punch the sentiment out. Okay? I was gonna place that here. So you just want to be above it when you're punching, so you just want to look above it. So you make sure See what? I was staying. That one was too close to the edge. But that's a good lesson anyway, so no problem it off. I just am Okay, That's enough, though, because I have some already pre cut, but you get the idea. So what I have done ahead of time is like, I always have a bag of these because what I do is I do a lot of projects. And when I when I punch out things wishing you will I know when I you know when I stamp and I punch out things, I always make extra little shapes and I make extra little embellishments and things so I have more than enough for what we need. I'll do a couple wishing you well in a couple. I do. Are you? No one has a little extra ink on it. By the way, these are all coordinating colors. Here's wishing you well. That looks perfect. Okay, we're going to use those. We have enough sentiments, Okay, so let's just go ahead and continue on to that part of our project. We're going to take our rolling adhesive, okay? And we're going to just put adhesive on the back of the sentiment and place it on. So let's look at our four pockets first and just make sure, So we're gonna match up. So this one are much good with Well, these are all match Well mean, that all the coordinating colors match, But we don't want to put this color. We wouldn't want to put I adore you on this one because there's no contrast. So we definitely need We need a lemon lime thistles called lemon lime Twist is clear. We definitely need that color on that one just because of contrast. And that will be fine over there. And then our fourth pocket. Let's say I know you might look good on that one for lemon lime to assist. You see, I think I'm gonna go with that. Okay, so I'm gonna go with that. And if you want more contrast, what you do is you take these extra shapes. So I cut out extra shapes and you just put him behind there and you can have extra contrast C. And also, if you're if you're, for example, if your paper did it really fold right or you know you have something hide. Now, this one, there's nothing to hide their but sometimes decreases were not like here. Perfect. And then you had you hide it with extra little lines. Okay, so we have everything laid out. And in the next video, we're gonna get here the sentiments on onto the chocolate holders, and then we're gonna put our chocolate inside him. So I'm just gonna clear off the table a little bit so we can get that last step done and admire our handiwork. Thank you for watching.
8. Paper Crafting Chocolate Holders 08: Hello and welcome back. I adhered a few of our sentiments onto our chocolate holders, and I saved one just so you could see how that is done. And I'm just using the rolling adhesive. Okay, too, to it. Here, the sentiments we selected. And again, this is lemon lime twist and full party, these air just coordinating colors of sentiments. And the Yankees saw a stamp them with the Call me Clover, Inc. Okay, so now you have your sentiments are out here to your little chocolate pockets. Okay? I'm just gonna focus that now what we're gonna do is just add the Ghirardelli chocolates, and then I want to show you the other ones I made, which are very similar. But everyone has its own little personality because you can turn the paper different ways. Put the sentiment from different spots, etcetera, etcetera. Okay, so we're we'll put the mid one, like with the MIT one in in here with the Christmas pattern. And here, let's take Let's take the blue one. Let's put it right here. States like Fall Winter, Spring summer. Good. Very cute. So great job. And I want to show you now some other variations of these. So this is the same. So I took that same paper, but instead of having this pattern on the outside, I just reversed it. OK, so that's one variation. Here's another variation where I put the sentiment in the middle. Here's another one where I put the sentiment on the side and this type of dark chocolate caramel looks really good as well. So you just keep changing it up and you could have thes at a craft fair and everybody would get to search through them and see how they're different and then pick the ones they what? Okay. And you could just use all the paper in your stash for this and the other reason I have this one tucked in this way instead of the other ways because the rapper was a little messed up, so I just tucked it in that way. No big deal. And here's when I haven't finished with yet. Okay, so I will. But I will be putting a sentiment on that one as well. So I really appreciate you taking this course, and I hope that you will take a look at my profile, see which other courses I offer and I hope to see you again. I am one of my future classes here on skill share. Bye. For now. This is the paper chip.
 Papered Chef, Kimberly Smith