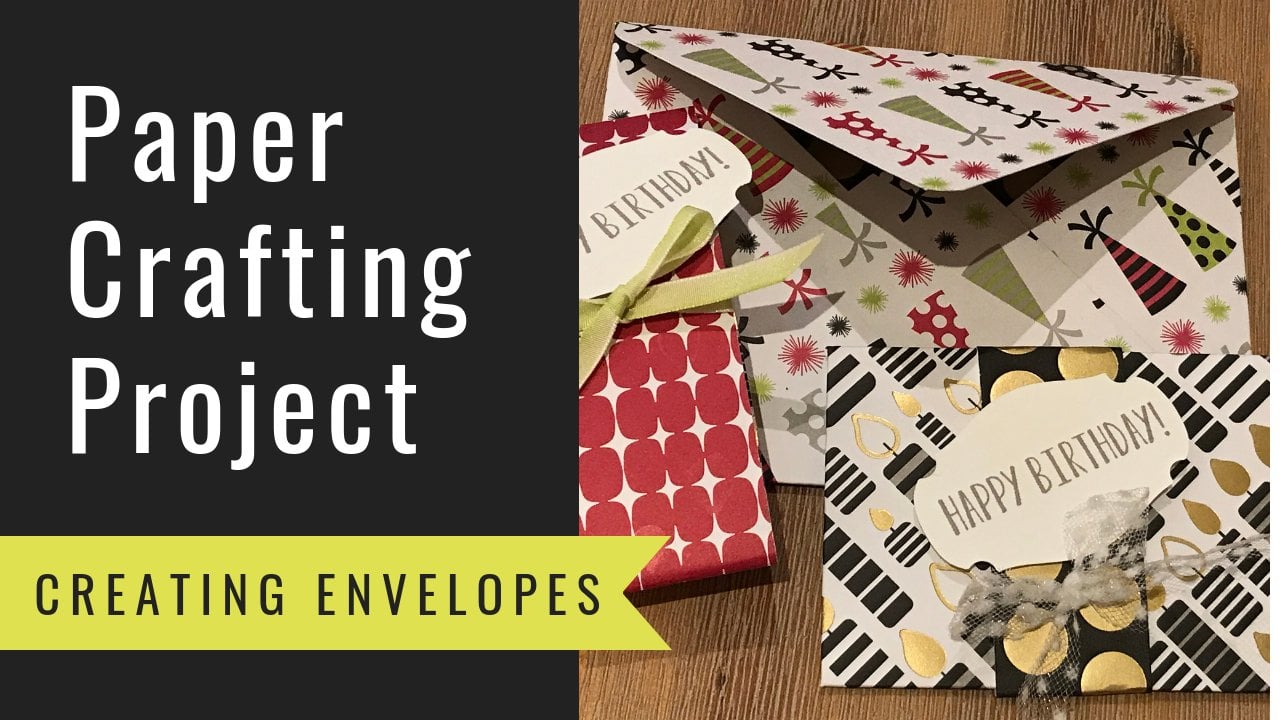
Transcripts
1. Instructor Introduction & Course Overview: Hello, my name is Kimberly Smith and I'm your instructor for
this card making workshop. I'm a stamping up demonstrator,
professional crafter. And I'm best known for my
YouTube channel, the paper CEF, where I teach many card
making tips and tricks, brothers scan and cut tutorials, and how to do many
3D paper crafts. I'm excited to go along this card making
journey with you. We're gonna be learning how
to create gatefold cards. I'm creating them
along with you. As I create many
for a swap that I'm doing and some extras
along the way. Whether you're
beginning card maker, you've created thousands
of cards before. This course will benefit you because I teach
you techniques for mass-producing your
cards and techniques for creating cards more
effectively and efficiently. One of the things that you're
going to be learning is how to close your
gatefold cards. And there's four or five
techniques just for doing that. I'm gonna be teaching
you how to cut and score the card basis. How to layer up your
designer series paper. How to stamp and
embellish your cards. How to step it up
by adding bling, embossing layers in boss layers, and how to decorate
your envelopes. There's so many things you
can do in this course. And so many things
that you can apply to with using whatever crafting
materials you already have. So I'm excited to share these techniques
and tips with you. In the next video, I'm gonna be sharing the materials
we'll be using. But don't worry if you don't
have the exact materials. I'm using the flowers
and more designers series paper and do something fancy bundle
by stepping up. But you can follow along with whichever materials you have. That's okay. I'll walk you through the
step-by-step process. If you're a beginner,
don't worry. I'm holding your hand
through the whole thing. Well, I hope you join my course and I will see you in
the first tutorial. Thank you.
2. Card Making Supplies - Gate Fold Ingredients: In this video, I'd like to go over the
supplies that you'll need for this gatefold
card making project. Let's start with the
designer series paper. Because all of the ink and card stock should
coordinate with your paper. You always, when you're
making cards of this sort, where the paper is gonna be
the main focus of the card. Then it's good to look at the coordinating
colors in this paper. This paper is fantastic. It, It's a pack
that comes into 48, 48 sheets per pack. And it's called
flowers and more. And the flowers and
more coordinated colors are Blackberry bliss, crushed, carry, parakeet party, Polish, pink, starry sky,
and sweet survey. Okay, So as I show you this, you're going to see
why I'm picking the different colors of card, stock and ink that I'm picking. The Vera familiar
with those colors that are stepping up colors. E.g. is the starry sky. Really, really fun? And I could see that they even a couple of extra colors
we've done here as well. Now I'm not sure which colors I'm putting on which panels yet, but small patterns are
these like e.g. a. Small patterns like
these flowers are gonna be better for the panels, I believe, than the
larger patterns. But we're going to experiment
and we're gonna do all different things
with the panel. So we'll bring the kids another one that would be
really nice, small pattern. But who knows this one might
cut up nicely too as well. Alright, so there you go.
That's the paper almost done. Let's see, double-sided.
And then I didn't have a sheet of 12 by 12
of this piece to show you, but I just wanted to show
you that's one more pattern. There's 12 sheets double-sided, so we have 24 patterns. Now, let's talk
about the ink then. So because of these colors, I've mentioned in the paper, I took out some of the
ink colors that we can use and we don't need
to use them all, but these are just colors.
I had the coordinates. We have sweet survey,
Polish, pink, starry sky. Definitely wouldn't
be used that for the main sentiment because
it's dark and good contrast. Now for these two, when you see light colors like parakeet
party and crushed carry, the light colors are good
for inking around the edges. With a blending brush. I have different size blending brushes and there's
gonna be more, more materials as
we go throughout the course that I can't
fit in this one video. But we do, we do use blending brushes to brush
around the sentiments. And there's, there's
other things that we use. So then we have you
always need scissors, your card making in case
you're going to trim. It's always good
to have a tremor. But you also may need
the scissors for ribbons and things that you're going to use for
embellishments later. So here's a paper trimmer. The paper trimmer
cuts in scores. So you'd want to use scissors
to ever cut your card. You always want to cut them
evenly using a paper trimmer. This is a blade that will
cut and then this is a, this is a scoring tool. Let me just take
those off to give you a better idea what
those look like. That's the blade, it
see it on the side. And then this is
the scoring tool. So the blade is sharp
and the scoring tool is round and you can touch
it so that scores, however, even though the tremor
itself will cut in score, I like to use what's called
as simply score scoring tool. This has ridges in it and it'll help us go
to the card stock. You'll get a better look
at what this does later, just trying to show
you an overview. And then I like to
use little scratch. Those are bone folders to
help flatten the cards. When I scored the cards, It's good to have what's
called rolling adhesive of some kind. This one's empty. Let's say this is called
seal plus adhesive. So it's good to have
a rolling adhesive. Or you could use what's
called tear and take. That helps keep the layers nice and tidy when
you're adhering. And then you wanna,
you wanna get some coordinating card stock
when you make cards. So I have starry sky. Love this color. Look at how it highlights. Look at the difference
when you, when you don't want to
say the difference, but look at the, look at the
similarity, the difference. Look at that. You have beautiful starry
sky coordinating with that. And then you have crushed carry. You can see how the
crush carry coordinates, even this little accents. Now i'm I'm pretty sure for the card base is
I'm just going to be using starry sky and Blackberry bliss
because they're dark. These pieces are good
for accents though. We have Blackberry bliss. That's the pieces and
in BlackBerry bliss, but you get the idea and
then you're going to need. So I could have taken out some other colors of card
stock as well, the coordinate, but those are the three
I decided to use and then black, basic white. This is going to be
for the inside layers and to do the stamping
for the sentiments. Need that. And then of course, you
always need a stamp set and dies or a punch or something that's going to go
along with that. So for this particular project, we're using this
something fancy bundle. And I'll give you a
better look at what the dyes look like soon. And I was thinking, I have this tweaks and sprigs in
Boston folder and die. We can use for what's called
stepping up your card. And sometimes I
do stepping up in my courses where you get to see some extra things you can do to make the cards
pop even more. So we have stamps that we have dies and we're going to have a dy stamp stamp
cut and in boss No, it's not called
stamp cutting bus. It's called cutting,
stamping up, cutting, cutting, putting
n in buck machine. Okay, so it's a cut and Emboss
machine and this machine, you're going to get a
better look at when I do the dye cutting. But it's a machine that
does it has it has plates that you put there and you're going to put
the metal dyes through there, which I'll
be showing you. And you have different
plates, what's called a **** cutting sandwich. And I'll show you how
to use this dichotic. That's about all I could fit
on my table at the moment. There are more supplies that I will teach
you as we go along. All right, thank you. We'll see you in
the next tutorial.
3. Cutting & Scoring Gate Fold Card Bases: In this tutorial, you will
learn how to score and cut your card basis for two different styles
of easel fold cards. I personally prefer
a horizontal style, and I'll be making more
of those in this course, but you're going to learn
the vertical style as well. You're going to need a
way to score your cards. I'm using what's called
the simply scored tool. I love this scoreboard. You could use a tremor that
has a scoring tool on it. You're going to cut
after your score. So you need a way to
trim or cut your paper. You're going to need the
card stock that's going to coordinate with your
designer series paper. Let's just go ahead and
take out a few sheets. Because what I wanna do,
we'll do two of these. I'm going to show you
two different ways. I wanted to repeat one
of the ways for you. So that way you really,
really solidifies. Maybe I'll repeat
both ways because it's out of four sheets. Now we're going to also need a spatula or some kind of way to burnish
your score lines. So I do that after I cut, I use, I use this. I call it, this is
from pampered chef. It's a, it's a scraping stone and it's a really nice way
to flatten out my edges. But you can also use what's
called a bone folder. Let's get to work. Now we're going to start with
this piece here. We'll do, we'll do two with the starry sky and then we'll do them different
ways and then, then I'll do it again
for reinforcement. So let's look at this in
a way that's logical. We have an 8.5 sheet
of card stack. It's eight-and-a-half by 11. Now if you take this piece and you were to cut it in half, you'd have four and a quarter. Then you have to cut it in half again and you'd
have to underneath. Okay. So that's the concept
behind the gatefold. You'd be folding it
to and an eighth on each side and fold it
over to the middle. Okay, let me, let me
show you this one. This is the one I prefer to use more often and
we'll start with it. So for this one you have 11 " across and five-and-a-half
to the middle. You're not scoring
in the middle. You're scoring half of
the five-and-a-half. Half of the five-and-a-half
is two and three-quarters. So you could just
do it to two and three-quarters on each side. If that's the only number
you want to remember, you could flip it around and do two and three-quarters
on this side. But another way to do it is just if you know that both
measurements on both sides, it's two and three-quarters
on one side. Go ahead and do that. And over on this side, it's eight and a quarter. So eight and a quarter will then if you add the two
and three-quarters to that, we have eight nucleus. We have three-quarters there
because tonight and intent. So we have the same
distance on each side. So let me go and show
that to you in the light. So this is what, this is how you make your
gatefold cartoon. When we cut it in half, we're going to have to gatefold cards. This will all be
in your workbook. Let's take this piece and
show you what I mean. So we have, again, it's eight-and-a-half for cross. So we have half of that
would be four and a quarter. But we're not going to
scroll down the middle. We need half a foreigner credit. So that's two and an eighth. And then on this
side it would be 612.6 and three-eighths, each of these little things
that are one-eighth. So what that has
done is it gives us the same amount on each side. And once we cut that in half, we have what's called
a vertical gatefold. So let's go ahead and
do another one of each. And we'll show you about
cutting. So we're gonna say, we're gonna put this one out,
a piece of crushed carry. We have 11 " across. So the two score
lines are for the 11 " across our two
and three-quarters, an eight and a quarter. Each one of these is an eighth. Nakota. Make sure I did that
last time as well. Okay. They're both the
same, so that's good. So these are horizontal
gatefold cards. For our vertical gatefold
cars would put this there. We have two and an eighth. That's the first little legend. This is BlackBerry
bliss, 6.38, 1238. Loops. I got a little bit off. Don't worry when that
happens, just try again. Okay, 6.3. Now we're going to look at those, compare them. And sometimes I do that. Well, I'm going to go back
and do my whole pile. I usually do a whole pile and
then I do the next stage. That's how you make cards. I'm only give me making a couple of these as an example to give you one more card style through this, in this course. But really for my
swaps and what I'm actually doing my big
project for is I'm going to be making this style because that's
just what I prefer because there's
more real estate on a horizontal gatefold card. I didn't get your trimmer. And we're going to cut
these in half now. We're gonna take our
piece of trim around. I'm going to take our
piece of card stock and now we've flipped it around, so we have our horizontally scored right? Now we're
going to turn it. And we have it. It's in the vertical format. We're gonna go over here and we're going to cut it in half. It was eight-and-a-half
across and now it's four and a quarter
is half the paper. I'm going to go ahead and we're gonna go ahead and
cut that in half. We're gonna go ahead
and put that piece of paper in four and a quarter. Cut that in here. Now this one is 11 " across, so we need to take
the arm out of my tremor because my arm
only goes up to 6 ". We'd probably need we didn't really need the arm
out of my tumor. It was only
five-and-a-half but I like sometimes I just, I
just just thinking of that. Alright, we're gonna
go five-and-a-half. Actually because it
was less than 6 ". Don't mean to
confuse you. So let me shut my arm and my tremor. Five-and-a-half. You only gave you
six inch tumor. You're okay. Now we're
gonna go over here and go five-and-a-half because
he's 11 " across. Now let's do what's called
burnishing the edges. Put this trimer down. I like to work on
my simply sport and I like to work
with I'm watching TV. So this is something I
would typically do on a table standing over the table. I would do this,
this kind of thing later when I'm
doing my assembly. So we're gonna,
we're gonna say this is when you square something, you have a valley,
you're scoring down. But when you fold it,
you have a mountain. So you're gonna be
folding it like this, folding it like that,
and then flip it over. So that is the
gatefold card fold. So we're going to then just
make them meet in the middle. And you're going to just kinda, I just use this little edges. Just as a little edge it to choose to simply
scroll to educate, that's the way you're
going to do it now, it will stay shut. Other ways. I can show you different ways to keep
this gatefold shut. But now you have all
of this real estate. So I like this is what I call the I call it the
horizontal gatefold card. And I like it better because they're bigger
panels to decorate. And you'll be seeing
different examples of that. Let me go ahead and do this. I'll just do one more of these. So again, I squared downward,
so I flip it around. And then I have the valley
the valleys scoring it down. And then I have the mountain. We have gatefold card to
horizontal gatefold crisis. Now let's do the vertical lines. Just grab, I'll just
grab one of each. Just show you. So we have again,
this is just a habit. I scored down. So I filled up. You can go ahead and fold
them both like this. But then you're going to now, depending on your design
and you're gonna, then you're just
going to furnish up. You might prefer the
vertical beat from card, and that's why I've given
you lots of options. Maybe you have something, a stamp or a sentiment that would look better on
this kind of card. So that's why you will be decorating a couple
of days as well. And you'll get all the score and the measurements for these. It's just that I would be
making more of this style. But it doesn't mean I won't be making some of
these to show you. Now. You can either way. Okay, as I'm doing
this, let me just finish this last one
that I'll tell you. That data that
make it down fold. So now either way, if this is what I'm calling, I call it the vertical gatefold. This way. Now, either way you
could make it like this, or you could design your whole
car with panels like this. And this is great because
you might have something to say that has long since
horizontal sentiment. And then which case you would
take what I'm still calling your vertical gatefold and
you would turn it this way, make a horizontal card design. So this is just another option, or you could do it like this
and same goes for this. You might want to open it from the top and put your panels here and
then you can decorate. This is what's really
nice about this one. What I like about these
gatefold cards is you can decorate this
panel, this panel. You can put your message inside, integrate this inside
panel as well. Here and here, which
I really think is fun to have a big real
estate area to decorate. I'm going to continue
making my card basis. And I will see you in the next tutorial where I
will show you how to cut out the next layers
for these cards, which is going to be done
with designer series paper. And I'll show you a
few different ways to do that. Thank you. Go ahead and squirt and
cut your card basis. Thank you.
4. Creating Designer Series Paper Layers: In this tutorial, you're
going to learn how to cut your designer
series paper layers. I've created all the cards I need for these
gatefold card project. As I've mentioned previously, most of my cards are going to be done in this
horizontal style. I have your, I have
my starry sky, my crushed carry, my
Blackberry blessed. But at the same time,
I also wanted to show you a couple of other
ways to do cards. So I will be showing you the other measurements as well and they'll be
in your workbook. You don't need to
take notes right now. You just need to kinda
pay attention to the concepts because you
have, it's up to you. These are your cards and you will make some design decisions. You're going to make them
before you do all the work, and then you're gonna be
able to mass produce. So what I've done here is
just a couple of options. I've just started
cutting the papers and then I'm gonna go
back and cut the rest. Now you have a choice. You have when you have
this horizontal card, you can put extra layers on it like so with the
eighth of an inch, That's just an
eighth of an inch. And then you can
take a smaller panel and put that inside
the eighth of an inch. So you could do. We
have the card that's one size and then you have
the eighth of an inch. Yeah. So it's only one
eighth from the edge. And then you have this one which is only one-quarter
from the edge. Now you could just
do this as well. And that would be fine. And
for the swap I'm doing, that would be fine just
to do my cards like this. When I say swaps,
I'm gonna be trading these cards for other
cards with my team. But I like how
this has a border. But then you might be
thinking to yourself, that does look much
better with that border. And it really does. However, that's a
lot of wasted paper. So that's where I get into
the design decisions. So if I were to layer
these up like so, I would take the dyes
that you already need to know what
you're doing ahead of time with your dies. So how are you going to
be layering these diets? These are the something fancy
dies it already happened. Layers in them. So the
sentiment could go on this in the sentiment would be stamped
in basic white card stock. And then the outer layer
could go on this die, e.g. for a card. So let's take these guys. And you would take it and you would die cut the pieces
after you've cut them out. You can die cut
the pieces so that you have lots of nice layers. That's a nice pieces to
use for your layers. Then it doesn't matter
if you're going to hide that part before you
seal these two together. So now you're not wasting
this back piece of paper. So I think I'm gonna
go for that method. But I'm just letting
you know that if I were typically just making a card, I could go for this
method of just making. Actually, let me show you the
one making layers that are quarter-inch smaller
than the edge and just putting
them on like that. Of course we're not
going to hear them yet because I want to
show you different ways to set your gate vote cards are ways to keep your
gatefold cards closed. So that's your option. Now they show you this
with the taller one, the vertical style
grabbing a piece of I'll grab a different color
since we've already used starry sky will grab a grep, this one that just
Blackberry plus. And you can see I have the
layers done as an example. Like so, where you
have the eighth of an inch and you just, you just look for contrast. Like actually this one
is really nice already. So you might say, well,
I don't really want to hide that paper that
would look really nice, just like that and it would, but whatever you do to one side, you want to do another if you do that border and you
wouldn't want to put too busy pieces of
paper together, right? That would be a waste
of the flowers. You would be hiding the flowers. So it's more something like
something along those lines, maybe something like that. And whatever you do to that
side, you do the other side. As far as your panel sizes. Alright, we'll be cutting
these in a moment. I just want to show
you one more thing in case you want to step it up. I always like to give you
extra tips and tricks. So what I've done here, grab a piece of this will
look best on the crest, carry the crash, scary colors. So what I've done here
is I've taken a piece of Blackberry
blister card stock. So if you don't want to use
designer series paper layers and you want to use
card stock layers. This is a cane we've
3D in Boston folder. And I just ran
this piece through the embossing voter
in my Boston machine. And then you could make panels like this and
put them on your cards. And that would be nice as well. These are just
different options. Alright, so let's
get to cutting. So we're going to save paper or not saved paper to save time.
We're not saving paper. You know what I mean? Hopefully, we're going to put, I'm going to put
my term right here. And we're going to
put a few pieces of paper in it one time. Now, keep in mind your panels. So you're going to look at
the, look at this again. And you're going to say, well,
this paper doesn't matter. This is a great pattern I
thought to start out with because it really
doesn't matter which way we cut this paper. So let's go ahead
and cut. This would be more of a good for
the inside paddle. Hey, so let's take, I'm
going to take all three, these three pieces of
designers use paper at once. The flowers and more. I like it. This one. I definitely want
to go vertically. So I would like that to go
the patterns to go this way. And I'm gonna go
ahead and cut this the pieces for my panels, they're going to
be a quarter-inch smaller than a card itself. The other reason I
just have to simply scored here is just to
kind of review that. We're going to see. If you look here, the
card is five-and-a-half. Right? And this panel though, this inside panel, is
two and three-quarters. So what I'm gonna do right now is the two-and-a-half pieces, the pieces that are
two-and-a-half inches wide. So I take all three pieces
and I use this little legend, my tremor to keep
them all lined up. And then I go back over
here to two-and-a-half. And I'm just going to cut this. So now I have the pieces that we're gonna go over here and we're
going to turn the paper. And we need to know
what you need to make this a quarter inch
smaller than this side. So this side is four
and a quarter the card. So we're going to
make these 4 " tall. And like I said, these will
make great panels on their own without anything else. And the nice thing is
this paper was 12 " long. So you can go ahead and
do them all at once. And this is what I would do and I wouldn't do it standing up, but I'm just doing that
for teaching purposes. I'm actually going to sit
down and cut these all later while watching
Netflix or TV. So these alone, I mean,
you're already good to go. Great. You have
super cute cards. Just put the panels on there. And you're, you're
already good to go. You can open it up. I mean, I like to sometimes
put panels and inside. I'll be doing both just
to show you examples, but for my purposes. So let's just go
ahead and say that these are gonna be
our outside panels. And they're going
to be surrounded by a little piece of
paper that will be an eighth of an inch wider. So now let's take I mean, it's starting an
eighth of an inch wider and just Nathan
niche on the edge of this. So again, we have
foreigner quarter and fourth quarter is two is like
a quarter is two-eighths. We now we need one
eighth, right? So we need, we need to be
four and an eighth wide. And then since this is
two and three-quarters, we need to be two and
five-eighths, sorry, two and five-eighths
wide and 4.1 eighth. Again, you should be
referring to your notebook. I'm going to save
those pieces of the flower ones for
the inside paddles. And I'm just going
to take a look at my stash here and say which ones will be
good outside panels. This one, because it has
such a big floral pattern, doesn't make a really
good card front. So I would think that
would be a really good outer layer at an outer border. This would be good for the
borders because of all that. Hello, isn't it? And let's see what this one, this one would be good for
the borders of the panel. So let's use these three. And we're going to cut. So I'm gonna do this. I'm gonna get them all lined up. Again. We're gonna go from
there, gonna be two. And instead of two-and-a-half
like the other one, or this is gonna be
two and five-eighths. 2.5. Let's go like that. We're going to trim them. And then instead of 4 " like these were,
they're gonna be 408. Let's make sure that's
foreign and eighth, because this is
four and a quarter. So this is four and a quarter. So this is going to be 408. These are just in a
smaller an eighth of an inch smaller than
the outside of the card. We can't really get
three out of this one. We can only get to because
the paper was 12 " long, but that's okay
because these pieces, I'm gonna be saving
for my die cutting. And I'll be doing
some dye cutting before I show you that section. Because only be
dichotomies entities. Alright, so let's do it. Let's take this
piece and we'll go, we'll do, we'll
look at that. Okay. That would be this
is called tone on tone when you put crushed
carry on Chris Carey, I don't think that's
enough contrast. So I might put a piece
like this on there. And then let's see,
maybe a piece. There's a little bit, not a
lot of contrast and that one, so let's say maybe I would take this piece and
do something like that, that would be a good background. And then maybe, yeah,
more and more like that. So you just experiment
and you figure out where you're going to
layer these layers up, some contrast and then put
them on the backgrounds. This one would be really
good on this background. But maybe with this
little piece of Karen, I think that's gonna be a
really good combination. Something like that
for half the card. And then you might say, okay, that's a little too much
Blackberry blessed. So on the other
side I might put, well that's a little too
many flowers are too many of the same kind of flowers,
something like that. But I would put a layer here. Here's just kinda how I work. I go like something like that. And that would look
good together, but perhaps that one
that had the blue, so maybe this one that had the blue background
instead of the green, because that's a lot of green. There you go. That's
called balmy. The color was called balmy blue. So you just play around with your layers and
that's how you do it. But I'm not going
to be adhering them because I'm still going to be die cutting out
the middle pieces. Okay, Now let's, Let's go
ahead and just why we're here. Go ahead and cut some
of those other layers. These ones here that for
the vertical cards I liked, I've already started cutting this one and I really
liked this for the vertical card
because this seems to me like it just
goes really well with a vertical card stock because the way that the flowers
are in this pattern. Same with this piece yet. Because I'm not making as
many vertical cards and I need to save these
pieces of paper. I'm gonna go ahead and just cut a couple of these for you. This is gonna be
for the front of my cards or for
the inside panels. We're going to line them up. And we're gonna go one,
and this is gonna be 1.7 eighths and then
five and a quarter. The reason that
they're this size is because this is a
corridor or these are the quarter inch away from the edge of the card
and you're going to see that. So we're
going to grab it. And I'm gonna go ahead
and do another set. So I have the maid. Then we'll save our little
scraps for die cutting. Put those in a separate path. So here we go. Now let's take
these pieces and say, well, we have that would look really good just like
that on your Blackberry, blessed with your vertical panel and maybe too many
flowers, right? So flip it over. Like on the other side
that might look nice. So that's what I mean by experimenting
with your patterns. So now we're gonna
go ahead and those were a quarter inch
away from the edges. And now we're gonna go
ahead and do a little panel around are little
border around those. Did both of these patterns
make the borders? I think this one would
make a really good board. But I really like this. I really like this
one. I'm saving that for some other funds. So let's take these two pieces. These two are gonna be
really good for outlining. See there's an a and a B side of every piece of
designer series paper. I'm gonna go 2 ", this is 2 ". And the a side would be
considered like the fluoro, the pattern side, and
then the B side would be the backside without
as much going on. And that is how I'm saying right now I'm
using the B-side of that. Designers use paper 5.3 8123. So I wanted to take
the time to really go through this with
you so that you understand how I go about my design process and what's going through
my head right now. So I would say,
okay, let's check out some of these
patterns. I would say. All right, we can have
this pattern here. This pattern like so, right, with a nice
border around it. Whereas this side could
be something like that. And you're still bringing
out those colors. You're still, you're bringing out the BlackBerry bliss colors. You have all coordinated colors. They just goes well together. Now, in the meantime, I might, I might not be able to
use this die because this might be seen as too wide. So now I'm going
to decide, okay, if I'm gonna do this, if I'm going to die cut
out these back pieces. That piece may be too
wide because it'd be hard to die cut those pieces
and then hide the borders. So what I would do in this one, I need to use basic way
because it's my sentiment. So in this case, before I die, cut these back pieces that
might take a look at my, something fancy dies again. Okay, here's, here's a nice layering that you
could use this for the sentiment and then this
one for the background. There you go. That would be nice because it's still give me the border I need. This is my hexagon and they could still give you
a nice layer as well. And I don't think
I'll be able to cut both at the same paper. Yeah. Maybe. I probably want it because it's getting a little too
close to the edge or something like that
would be good to cut out. And also, if I were
gonna be using this, this tags that are close, but I could use these
two together chip. So this is just a design
process of layering it up. Now sometimes I don't
know what the end is in mind when I'm starting
out this process here, I'm not sure exactly which
sentiment I'm going to use, but I know all the elements
I need for my cards. And I know that these are
gonna go well together. So I know that I can die
cut out these pieces and I won't be disappointed because I'll have all of
these pieces I can use for layers when the time comes. So that did take a
little bit longer then cutting out the card faces. But now I want you
to go and really get moving with your get to assembly line passes
or shouldn't take it, but go ahead and do your
assembly line process, you're going to mass
produce your cards. And even if you don't think you need a few cards right now, go ahead and make them go
ahead and make extras. Be cutting my
pieces that I need. And you're going to
have room in your in your notebook to take
notes and maybe write down how many you already
have so you don't make too many extra layers
that you don't need. You'll have all
your pieces ready. Then your next step is
you're going to die cut the insides of those pieces. I'll be showing you
that in a later video. Then you're going to be, in the next video, I'm gonna
show you how to assemble, how I glue these
together or how, how many adhere these together, and how I'd hear
them to the card. And at the same time
we're gonna be doing how to we're going to start to do how to
close the cartilage is just a few different methods
of closing the card. And one of those we
need to do before we put these panels
onto the card. I will see you in
the next tutorial. Just get going with your cart. Go ahead and make
those designers trees, paper layers that you need. Thank you.
5. Assembling Gate Fold Card Layers: In this tutorial, you
will learn how to assemble your designer
series paper layers. Before we do, I want
to show you how to cut out these pieces so that you're making the most out of your layers
have designer series paper. Then I'm going to show
you some tips and tricks for getting
your cards to close. And we have another video about that in this course as well. So let's go ahead
and do the decade. For the dichotic sandwich, we have the stamping
your boss machine. It's a dichotomy machine. And I opened it up. It closes like this and I opened
it on both sides. I'm going to put
down the base plate. That's the same, which it's called a die cutting sandwich, the base plate and
then this didn't die adapters plate number two. So we have the platform, which is number y,
or the base plate. We have the thin di adapter, which is point number two. Then you're going to put
plate number three down, which is the scratched one. There's two number threes. We're going to put another
plate number three on the top. And I use this one for the top because
it's not as scratch, but I do take care
of juice in them. We can die cut up to three
layers of paper at a time. Three layers or
designer shoes paper. And we can also cut
some basic white. Why were there? It'll help us. So we're not cranking through the machine without a purpose. So let's put these
down and I'm going to take out the dyes and show you. So let's make sure we
have the right ones. This one is for the week. I'll be doing thank
you cards with this piece here. So
we need a piece. We're going to cut out a
piece of basic wife for that. That's for the sentiment. And
we'll be doing that later. But I'm just letting you know that that's going
to be in white. And then it's gonna
be layered with a nice piece of
designer series papers you want to send to this. If you're not sure. What you do is you take a piece
of low-tech tape. If you're not sure if
it's going to move, you can put the
low-tech tape there, put it on top, and it just keeps the dye in place
where you're going. Now let's, for this one. I already have a piece of
low-tech tape attached, putting that around
the middle area. And that's going to be for the layer where we have
this for our white part. And that's going to
have a sentiment. Then we're going to have,
that is the outer layer. So here's, here's
what I'm doing is I'm just going to go and
put the lid the lid, the top plate number three and we're going
to crank it through. One of these has two layers, one is three, but that's okay. I just saved a few
pieces for you. I had already died
that list of those. And I'll show you
what that looks like and how I store my data as well. So we call this die cut. We call this a manual
die cutting machine. There also something called
electronic dichotomy see. But when you have metal dies without a manual die
cutting machine. So here are our layers. And you can see
how we cut out all three of those at once. And then this piece,
these pieces like that. So now these are the pieces
where we're going to attach the other pieces of
design research paper to. Well, let's see if I have
any more of those handy. If we have to cut
some. Okay, let's see. We're going to look
at what I have here. Should have these already cut. So we're going to sort
of mix and match. What you're going
for is contrast. If you're going to use
this as your back piece, you want this piece to contrast with that piece
and also complemented. But all these are going to compliment each other because of the way that this
one will look nice. Wave a little bit of blue. The white with the patterns. Something like this. You,
what you're doing is you're, at this point you're
mixing and matching the colors so that you have
a nice background layer. So those three would
be complimentary. And just to give you an
idea of how I touch this, then, let me show you, let me show you how I stored
these as well. It'd be doing two
things at once. I want to show you
this little box that's from the Dollar Tree. And I take my dyes and I
just store them in there. We'll be using these later
to layer up our pieces. But you could see how I also have a lot of
other pieces for other projects in
this little box. And then Kevin boxes
with compartments. So I already have a
bunch of these cutout. And I'll be showing
you how to cut out these in these later. Because right now we're
on the mission to work on the designer series papers. Now for these layers,
move at first, we mix and match and
we get them all ready. And then I'm gonna go
ahead and put this out. This is a plate
where I'm gonna be using or I used to emboss. But I'm just putting
it there for contrast for you so
you can see better. And we don't need
to assemble all of these just to
give you an idea, I want to show you
how I would do it. So you can take liquid adhesive. It's very important when
you only have an eighth of an inch wiggle room that
use liquid adhesive. And I also use what's
called rolling adhesive for other
parts of the project. And that's a little bit more permanent where you
can't wiggle it around. But this time we needed to we don't have
much wiggle room. We only have an
eighth of an inch. So I like having this
liquid glue so I can then get it to be
exactly where I want it. And it looks good. I'm going to turn that
around and go like that. Now we take this
piece and we're going to put that onto a card. So now what I wanna
do is show you, I'm just going to take a few cards out and
show you that I have a few half-done and want to
see what this would go on. That might go really nice on this card here because
of compliments. The other side of that. So
we will do it that way. Now let's go ahead
and this time then, after I used the
liquid glue to put those two panels together,
then I go ahead and I. My rolling and he said, I touch or you can
use liquid glue, doesn't matter. Liquid
glute, we're rolling. And he said For this next layer, it depends on what
you have a lot of. And then he stayed still,
just go around the outside, maybe a little bit
on the inside, but mostly around the outside. And we just make sure
that's the right side up. Well, this side
doesn't really matter, but sometimes you have to worry about the pattern
going the right way. And that's how I assemble the designer story
is paper layers. Now, let's talk about
whether you have your, this way, this kind of twine
to enclose your current. Now these are too late to
put twine on the inside of. But I'm gonna, I'm not gonna be using twine and
inside of my cards, I'm only gonna be doing it
just to show you how I do it. And I just want to give
you an idea in case that's one of the ways that you want to experiment with when
closing your current. Now, you either need,
you either need linen thread or twine
when you're doing this. So let's go ahead
and get a piece. Let's first scuff, get the car that we want to put
the paddles on. And already have
some panels created. Some that can be created
so that one might be good. I also might think that that might be a little
better on the blue. Let's see. Not feeling that one. Go ahead and take some of
their choice. Show you these. When we're gonna
be referring to, show you a few of
these panels I've put together just to see how
I had flowered side. I tried to do a side
that wasn't as busy. Sometimes I use two flowers, flowers and leaves combination. Okay, So let's see. We have a couple of
panels done to save time. So let's see what I think that would be
nice on that side. And then, and then I could do, I'd sometimes due
to flower flowers on the other side as well. But I'm thinking more
like something like this. Actually. And I even like ****, that is the same color of designer series paper behind
it actually liked that. But I think since I am
using the starry sky, I might go for the blue there. I'm gonna go ahead and
switch it out and you can, it's up to you how
you design things. How do you switch
out this minute? These are all just design
decisions that you're going to make on the fly. And that's why I say go ahead and cut up
your whole pack of paper. I've already cut up the
entire 12 sheets of paper. And I only have a
little bit of scraps left for die cutting. That's how much that's
how much cutting I did just for this one project. And it's really gives me
a lot of design choices. Helps me, helps take
the guesswork out, helps me get a lot more done
faster because I have a lot of options when I have a lot
of pieces already cut out. So you can see how I use
the liquid adhesive. And be careful with this
and check the front again because you
may have moved it a little bit because it is liquid that dries quickly,
but just make sure. So now we can go ahead and
we're not attaching this yet. I'm just I'm just gonna
go ahead and attach the blue part or the
liquid adhesive. So now what I want
to show you is if, if in case you would like to
use Twine or linen thread, you're going to need
to put the adhesive, write like this on the card. Then you're going to get
about two pieces of twine. I have night of navy, which is not exactly the color that coordinates
with this paper. But this has just happened
to be what I have. So use what you
have and also try to get its coordinates
much as possible. White, which would
match anything. But I really thought
this would be nice. And even that's poppy prayed. It's a very close color to
what's called Sweet survey. I have done here a piece of cardboard on my
table that's 12 " and I'm just gonna go
ahead and make this 24 ". So if you're doing
a horizontal card, you want this to be about
24 " and don't worry about writing it down because it
will be in your workbook. How much twined you
need for each card. And then you're going to go
ahead and put the Twine. So keep it folded like that
and go around the back and then you can
open it up. Right. So that that's still the
midway mark and you're going to just go like
that and flip it around. I probably should have put that other card
right on top of it. And you're going
to use that little piece to hold it in place, that little bit of
rolling adhesive. This is just one
of the many ways to close your gatefold cards. I prefer a whole different way which we'll be
talking about later. But I just want to
show you this way before we assemble the panels, because it's important to notice before you assemble the panels, I'm gonna move your
point up there. And then you're going
to just go ahead and put that panel on. You only have an eighth
of an inch leeway. And it's good to go. Now what I like to do for
this part is I like to tie it because I feel like it's
the only way to get it tight. I'm going to tie it
and even though I need to put the inside
panel on there later, just sort of tie it
a little bit just so it's it's a little
bit street like that. And then I've already
put the adhesive on it. So you already have
twined stuck on me. I'm stuck on you. And then we're going to
put this piece like so. There are tweezers,
which is they act as a, as an extra hand. I really like them. They're
called reverse tweezers. And sometimes I
use them when I'm crafting because it'll
hold things in place. Now what's really nice about
the Twine is it doesn't give you a lot of lumps on your card. It's not very lumpy. And then you just
tie a little bow. And somebody can open the card. And it's beautiful and
you can see the inside. So that is, That's just one way of shutting
your gatefold card. Before you put the panels on, you're going to put
your Twine on there. Now linen thread works
a little better. If I have a little, I have a little piece of
that just to show you. This is linen thread. I didn't have a lot of it, so I'm not using it
for this project, but linen thread is a little
bit thinner and less lumpy. And you can also use some
flat ribbons which are sort of shear and they
won't be as lumpy, but then they're going to be
harder to put a bow here. That's why I like this method because it puts a
bone right there. Alright, so continuing
on, what you wanna do, just a couple of
tips and tricks for you is when you're assembling. Here. Here's what it looks
like with the vertical card. I did put a little too
many flowers on this one. Sometimes I did,
sometimes it didn't. What you wanna do is get
as many done as you can, get as many panels
done as you can. And then when you have
a lot of extra petals, I cure my extra ones. I just set them aside
and I tried to, I tried to match them up later. Now that's a bit too much with the same kind of panel on each
one. That's the same kind. So this is why I have a lot
of leftover panels like this. So I need to go back
through my scraps and see if I can give it
some more variety. These are all the
scraps I have leftover. Mostly mostly the sizes I don't need except for
these two I could use. And I might be able to use
these for some panels. But other than that, these
are scripts that are pretty, almost all of these are
too short for me to use. It's not wide enough. But I'm going to go through
my scraps and tried to make some panels that will make more sense and not be
as busy on both sides. So when you come, when I
come back in the next video, I'm gonna show you all of the finished panels
that I've made. So I hope that makes
sense now to you as how, how I do the assembly. And you can see now
why I decided to use that extra eighth of an
inch on all these cards, it would have been
fine to do that. That's the right size. It would have been fine
to do these panels with just this only without
the extra eighth of an inch. But I just think that decides such an element of
professionalism. I really like it would
work, it works that way, that done cards this way too, especially when I'm a
Russian around the holidays, when I'm in a rush,
I really liked that extra layer around the outside will continue to step it up and learn how
to step up your cards. As we continue this
card making workshop. Thank you for your
attention and we'll see you in the next tutorial.
6. Creating Layers for the Inside of the Cards: In this tutorial, you
will learn how to cut the layers for the
inside of your code. I'm going to show you what
that looks like and show you the direction I've decided
to take with these cards. Just so you can have an idea
of what we're doing next. This is a full
outside of the card, and I love how I can fit two of my thank you
messages on one card. So it doesn't matter
if I put Thank you On this side or that side. And me, may the good you
do come back to you. I just loved how these
two things went together. And now I'm gonna
show you a sample of the inside of a card where I decided to use grateful for the everyday magic of you. That way you have the grateful, the thank you, and may the good you do come
back to you all. One, something fancy stamp set, which is important because that makes the font coordinate. And then it also coordinates
with the dyes which fit, which decides what will
fit in those dyes, which will also come into play later when I show you how
I'm going to actually make a couple other
cards too, just for fun. We're going to
make birthday card and we'll make a couple
other styles of cards. So here's a sample of the, now I haven't done the
outside of this one yet because we're gonna be
doing the dye cutting next. But here's the sample,
the inside of the card. So what I've decided
to do is create panels because I
just thought I had, I just open up another
pack of paper. I took out 12 more sheets and I just started cutting
it up and thought this would really be nice to highlight the designer series paper on the inside and outside. But on the inside we're
not going to be doing that extra one
eighth inch layer. Just going to be doing
that on the outside. Now you can see
how I took a piece of paper from the outside. It doesn't matter if
it's from the outside. It could be any
part of the pack. And I coordinated that with the basic white panel
that we're going to cut. So that's the
inside of the card. And also as promised, I want to show you all of the different ones
I've created so far. I'm done all of
these except for one because I'm going to show
you how to step it up later. So I did save one for later, which we'll do
some embossing on. But here are the outsides. And I even took out some
more colors of card stock which coordinated so
that that would be fun. As you know, we've been
using the starry sky, we've been using the
BlackBerry bliss, and we've been using
the crushed carry. But then as I had some leftover
scraps, I thought, well, I need to take out a
piece of fresh freezer, which is sort of
that lavender color. And it took out a
piece of posh pink, will probably come
across a couple of cards made from those. Maybe I made them vertically,
or maybe they're not. Maybe we're not finished
decorating those will use dozen later section,
but I think I did. Yeah, here we go. Blackberry, bless. These
are the vertical cards. I'm going, I could
be doing designer series paper for the
insides of these because these are not gonna be part of the swap
project I'm working on. These are going to be
part of another project. Just for different, I'm gonna be putting different
sentiments on these. So we could do one of these. I do have a neighbor whose
brother passed away, so I could create a
sympathy card out of these. Vertical cards are
nice for that. I could create birthday
cards out of these. And if I did, I might I might do some other
panels in the inside, but just depends on the
mood I'm trying to create. If I were doing a sympathy card, I might do something
like this where I used both fluoro panels, the
same on both sides. So I'm not trying
to be too fancy and I definitely
wouldn't want to put more designer series
paper on the inside. Here's a piece of
Polish pink because I wouldn't want to be too distracting when you
open up the card. I wanted to focus
on the message. You're writing, a
sympathy and support. So that is what the inside and outside of the
cards will look like. Accepted. I'm not I'm also not gonna be
using this tying technique. I just didn't want to
open this one up yet. I'm gonna be using a different technique
for shutting the cards. And I'll be showing
you a few techniques. I've already cut
some of the panels. Let's get work and
you're gonna, you're gonna use basic way. And then you're going to
use the dynasty is paper. So basic like card
stock is not the thick basically, that's
damping deposits. The regular one where you
get 40 sheets in a pack. I'm using
eight-and-a-half by 11. And I wouldn't cut more than two of these at the same time. Two pieces of card stock
because these are a little bit thicker than design.
A serious paper. Let's see how many I
pulled out of the pile. I pulled out for. So we'll take two and we'll
put two off to the side street
and these two out. And I always like to
use my little ledge on the trimmer to make sure
they're straightened out. So now I'm gonna go
and I'm gonna make this panel for the inside four. And of course we use written in your notebook or
in your workbook. It's going to have the
five and a quarter first, but I actually cut
it the foreleg first and I just
turned this around. And I'm just going
to go ahead and cut. Make sure that together. Now you have these
extra half-inch strips which you can use
for many things. So save these strips because
they're good for sentiments. So we have four my
five-minute credit, but in here, I have
a quarter inch. And in your notebook,
it's going to always say five and a quarter by four because we
do the length times width. Now, this little technique
of flipping it around, I just like to use as many edges as possible
that came like cut that way. So I take so I'm doing the five and a quarter and then
I'm cutting this edge, right? So what I do is I tend to see how when you cut
it's a little bit ragged. Compare two, can't really tell, but when compared to the way
it's cut at the factory. So what I do is I tend to turn that regularly side around. That way I have at least one Really nice side that came from. The actual package
from the factory and then I just cut that side. It just makes it just a
little bit more professional. It's just a habit. I have a flip into paper around. So you're going to be
cutting a bunch of these. You need one for each
year inside your card. Now let's talk about
the little strip of dissented stage paper. So you're going to take the ones with the smallest patterns. So this one I wouldn't
use for that. But these will make
good belly bands. Tried to take ones
with nice patterns that you can see when you
cut a half inch strip. So here's a good one
and this is a good one. These two are really good
for the front of the cards. So just pound them
down so that they're, they're lined up and you can cut up to three of these at a time. Three pieces of
design issues paper. Let's just, let's just
go ahead and do that. If I could find one
more pattern that's nice, I can do that with you. This pattern would
probably be nice for that. Here. This one, this one
is good because you can still see the stripes. Alright, so we have, we want
to make these half an inch. So there's the half
an inch on that. We're gonna be using the
right side of the tremor. I'm just lining this up. I'm holding that little legs down and I'm having
a half-inch strips. Keep doing that. Cut as many steps as you need. But we're not going
to cut them to the length five and
a quarter just yet. Because I like to always know that my stamps
came out correctly. I'm going to save this
because I might use it for a belly band because good width. But let's just go ahead and do a couple of half-inch strips. I do everything at once
as soon as you may have noticed throughout
this entire time. Now you can use
these, you can use this side, you can
even use decide. But I tend to use, you can see that
it gets a little ragged when you're
using a tremor. These sides are a little
bit ragged and so you always want to use the
top side that you cut. I think they're going to look
really nice on the inside. So these cards, but I don't want every card to be the
exact same on the inside. Even though it's
giving them away, it's still nice to have variety. So that's good. We have our half-inch strips. We've cut them now you're gonna take your pieces of paper. I didn't want to go
too far because I need some of these
for inside panels. You're going to go ahead and
take line them up again. Now, for inside panels, anything goes really because
the pattern can be figured. This would even work
for an inside panel. But it's not the right way. So let's just cut these ones. So we're going to go back to the measurements we used before. And we were not with
the one eighth inch. But remember these these cards, if you recall or
it's an A2 card. When you recall, we had this this was the
length of this card or I should say the width or height of the
cardiac would just say height, which for an accordion. So these panels needs
to be 4 ", right? So they're going to
be a quarter inch smaller than the
height of the card. So let's go ahead and
make them forward. Just going to do the
four-part first. Then we'll start talking
about the width. Well, this is the height, so 4 " and it looks like I even get an extra strip out
of these ones. An extra strip for the inside of the car, which
is really nice. Perfect. It looks
like the paper's not quite lining up perfectly. Okay there. That's good. I have some extra half inch
strips for later, but now we have the
four inch height so that we could turn these around and we can go ahead and cut them
two-and-a-half inches. And I'll show you how they look on the inside of the card. And just keep going.
Just make them all as many as you can. And then you're going to save
the rest for die cutting. Because we still need
some extra hexagon. We can use some extra things
for a belly bands later, so we'll be doing some dye
cutting in the next video, in the next section because
that's what we're doing next. So this will be scrapped that we save whichever whole
bag of scraps. And these are the panels that we're putting
in center cards. So let's go ahead
and grab a card. And what I would do is just look at this one and look
at my pile I rehab. And I would just try to find because there's
so many designs and you have you have
12 pages and each page, each page or each sheet
had an a and B side. So we have 24 patterns of
design research paper. So why do you use, we already have this pattern
in this practice, so don't use any of those. We use two different ones. What might be nice
as using a piece of this and the inside
and piece of this. But we also want to
complement the colors. So with this there's
no starry sky, so I might not do that. I might, I might use that which will complement
these colors. But then I might take this piece which be nice for the
inside of the starry sky. And I'm just gonna
kinda play around for a moment and see, see
what would look nice. But compliments each other. These two would be nice
because you have your, your butt a little bit of blue and then you
have your shade. It's Bruce complimented
on that side. I don't know. I'm not really feeling again, maybe this one because
there's a lot of contrast. So now you have
flowers on that side. So i'm, I put the
flowers on that side and then the sprigs
on that side. I think that would
be nice. And I put these two on the inside. And then you're gonna
take your panel. But we're not going to
attach the panel yet. But we would attach the
panel on the inside. Now what I wouldn't
want to do it yet because I always stamp first. So the process is
going to be first, we're gonna get our die
cut four pieces we need. Then we're gonna be doing
all their stamping at once. Then we're, after
we're done stamping, we're going to be
adhering or strips. That's the process to the
cards then and only then we're gonna be putting them into then we adhere them
into the card. But you can go ahead and
what I want you to do now in the next part of
this mass production. And I hope you're
making a lot of cards at once and you can feel how relieved that you are
to have so many cars. You don't need to worry about
needing a card for things. You make these cards up. You can use them
for any occasion. Friendship, birthday, graduation, I mean,
sympathy, anything. So go ahead and make
up a bunch of cards. Put, go ahead and attach
or inside panels. Just save your output,
saved this panel to last till you know what
centimeters to be putting in it. Then after we do,
we're gonna put that little strip and
we'll have it ready to go. And of course we need our
sentence for the outside. So I will see you in
the next tutorial where I will already have
on my panels attached. And we will be doing some dye cutting with the basic
white card stock. So you're going to keep
that card stock out. You're going to need it. See
you real soon. Thank you.
7. Die Cutting Tips & Tricks: In this tutorial, you will do to die cutting that you
need for your cards. And I'm going to be
teaching you a few tips and tricks for die
cutting along the way. We are using this
something fancy dies set. This is a coordinating dies set that goes with the
something fancy stamp set. They both have the same name. We're going to open
this up and I just want to point out a couple
of things about these days. If you wanted to make
tags, have either kind, which you need to do
with these dyes as you would put this part inside here. Make sure that you die. Put
those together. Facing down. Of course always the
average side is facing down so that you can get the
hole in the right place. Now I did that a
couple of times. Not for the cards that I'm using for the main project here, but I did it a few times
for a different project. And I may use a couple
of other cards. So here's ones without if I just put centimeters
on my when you put a hole. And then here's
some white ones I did with the hall
and I liked it. The whole wedge shaped
like a raindrop. And what I did is save
those little raindrops, saved the centers
because there is another coordinating set that
I think this is going to go with called
playing in the rain. And so I just save those
to color those later. All right, Back to
the ones we're using dies I'm using for this project. So as you can as you recall, we did we'd already
used the insides of our panels to cut out the pieces we needed and
designer series paper. So my first tip for you is get yourself
these little boxes. I got this at the Dollar Tree. I use one for whatever
project I'm working on. And it really helps
me stay organized. These if we need to two, we have some extra scraps like these scraps I might
as well use up. I'm going to take the
larger one of those and that one and make some more out of designers Jewish paper. I also need some more of these and descenders, Jay's paper, because these worked perfectly behind the hexagon,
this little shape here. And I have a few already cut out in design
research paper. So they're gonna go great
behind the hexagon. Now I need some Mexicans in basic weight which
I already have any. I think these were all
just done with designs. And I also want some hexagon in designer shoes paper
because these are going to go really nice around the
belly band to just give a little accent or embellishment for the
front of the card. Furthermore, I like
to cut these out. The shape in either
can see I put the happy birthday on
here, or in basic white. This one is crushed carry. And that way I can use
those for sentiments. But only a couple of
Sentiments fin on there. Congratulations and
happy birthday. And I already have
a graduation card, so I don't really need
congratulations for anything, but I do need other sentiments and I can always use other sets. So let's go ahead and
cut the basic white. And if we have rambled, cut some designer series
paper as well. And we are going
for this look, we, we need some of these
and some of these you always die kept first. So you may be wondering, well
why don't we stamp first and then tried to sent
to the dram the stamps. Well, for several reasons, you can cut out a few sheets at once when you do
your die cutting. So that's one reason to okay, So besides cutting out a
few sheets of what somebody talk about that the
other reason I don't do it is because I'm not
sure which color I'm going to stamp
these until I know which projects I'll
be using them for. And it's good to
have a lot of these shapes already cut out, so these are already
ready to go. I've already done a
sympathy one from a different stamps that
just say you just have, you'll have more than you need. And it's always good to
have more than you need. Several reasons. I mean, I
just like this is my method. Krishna is no right
or wrong method. I'm using the step and
cutting and bus machine. Let me tell you that when it shut both sides,
you've got that day. Both sides are closed up for I don't want is really say portability because
it's pretty heavy machine, but it does help you
store it in a cabinet. We opened it up. We put on base plate one. Then we put that base plate two, which is your thin di adapter. And then you put that on
a plate number three, which is your bottom
cutting plate. And it's usually
did scratch to him. And then I put a plate
number three on top of that. Now sometimes I put it in this direction or
this direction, or this direction
or that direction. So I mixed it up. Also what makes up
the bottom way, which way I put it, it helps keep the plates from warping. So let's grab some
scraps of paper. We're going to use some basic
wait for two down at once. Not more than two for basic way, but you can put more,
you can put three down for designers to use paper. We're going to go ahead
and put the dyes on there. Now the other thing to
do is use loot low tech, or let's say loose
tech, low tech tape. Low-tech tape keeps these from moving on top of
each other, et cetera. Okay. The dies tend to roll
up on top of each other. Sometimes you can just
cause problems and we'll go ahead and put three pieces of
designer shoes paper down. And we'll go ahead and cut out some extra shapes like that. Just so we have them,
It's always good to have extra shapes for your projects. And then we're gonna
take our top plate, which is another
plate number three. I'll put that on top. And that's what we're going
to use to crank it through. If at anytime you start seeing things and I'm just cranking it through
with the handle here. If you start seeing that
things are starting to slip. The dyes are moving, slipping. Definitely stop and
get them back out because you don't want them
to fall on top of each other. You can actually bend
your dies if they, if they go on top of each other, you're a little cracking
sound and that's okay. Just means you've got
some good leverage. So we can take these and pull
those parties little bit. And now we have
some extra shapes. Put those in your little bucket. I call it my bucket
of crafty goodness. And I'm just going to
put those two down. And I'm going to run those
through with this die. Pull off the low-tech tape. So we have extra
pieces and it's nice to kinda emboss is
a little bit to this one shape buses the
edge, there's a front of it. See how it's puffed
up along the top. Put those away. Put this shape here
so you can cut some design issues paper
out of that shape. Safe. There's hexagon. Save these, and you can reuse this tape. I'll show
you in a minute. So just kinda visa. I only put there were only two
sheets but you just make sure they're
not stuck together. If you put that one there. Now what it would do typically for my dad cutting
tip and trick here, I will turn this around. And sometimes I haven't
faced this one down. But just, just to give you
a little bit more leverage, that leverage, but just
less, less warping. Warping would give
you more leverage. But when you don't want it, you don't want to
work your plates. So let's see if anything
has fits on here. This one's not going
to fit on there. But to save this for
other guy cutting shapes, I'll go ahead and put
another piece of, couple more pieces
of basic. Wait. And we'll go ahead
and cut different shapes out that we need. So while I was making things for this particular workshop,
this carbon making workshop, I actually cut out a lot
of extra dye pieces I needed from other sets for future kits that
I'm working on. So always, I would
say in my youtube, never waste a good crank. When you're cranking
through your skin and cut. We're not scanning, sorry. When you're cranking through this die cutting machine.
That's a different kind. Don't want to
confuse you. This is called the stamping cut
and Emboss machine. When you're cranking through this damping cutting machine. Never waste a good Crank. Always tried to put
as many dyes in there as you can so that your, your energy of your arms cranking here and it
is good exercise. Then you have a lot of extra
things that you cut out. I didn't need the
tape because they didn't seem to be moving
on top of each other. You can just see how I'm
gonna keep on going. I have scraps here, good. These are good and I'm
going to turn that one, maybe turn it around
a little bit like, like so we'll flip
this one down. Put it down. We're gonna
go turn it that way. And let's go ahead and
get one more out of it. Right? This time I
might use tape because there's small piece of
paper and I don't want to lose I don't want to lose the paper by if it
slips, you lose the paper. Pulling these apart, putting
them in my little bucket. And I'm gonna do this until
I have more than enough. I was making about 10% extra. Because you're gonna,
you're gonna be messing up some of these. They're not all going to fit on your project when you stamp, they're not all going
to maybe stamping. Next step goes cricket. So they're not all going
to want to say fit, they're not all going
to stamp correctly. And even if you stamp
the other side, you make a few mistakes. So cut extra shapes so
you don't have to do the dye cutting later when
we're in our stamping mode, will be in our
stamping mode shape. And I can reuse this tape. Now let me show you
now I'm going to grab another die because
I see this as, let me just show you, you
can get a better view. I see this as little
wasted space. I'm going to grab a
different dye from a different totally
different set and see if that
might fit in there. Okay. Does it so I don't
have any smaller ones with me up on this table. Like I have this
one from another. But if I did, I put a
small one right there. So instead I'll just
save that scrap. My hexagon is not going
to fit right now. But I could go ahead and put another piece of paper in there. Like so if I wanted to, but that scraps
not going to work. So I'm just going to crank
it through as it is. I normally would fill this
up a little bit more. But for teaching purposes we're just gonna go
with what's here. I'm looking for that top plate. Here it is at the top
plate sitting right here. Says put that on top. And just so you can see that
handled cranking through, turn it to the left,
sometimes to the right. You can see the dye just moved a little
bit, but that's okay. We're just taped out. A low-tech tape keeps you
from ripping your paper. Now finally, after using up
the scrap as much as I can, I love using up my script. It's a fun thing. I kinda
fun challenge for me. I have enough pieces. And then I can throw these
scraps away, which I just did. But this one I'm not
going to throw away because I feel
like I could still get something else out of
this little piece here. What is coming up next? I'm about to tell you, I am going to
continue to die cut. In fact, I'm not just going
to cut enough for now, I'm gonna kinda enough for
an extra project I'm doing, I'm actually doing two swaps and I'm only making a
course on one of those. So I'm going to go in and cut out a lot of extra
shapes that I need. Then when I'm all
done die cutting, I'm going to have my I'm
gonna have my kids ready. My pieces I need for my kids. I'm going to have my tags, radium, you'd have
everything ready. And then I'm going to see you in the next tutorial where I will show you how to
do your stamping. You're gonna be stamping
in the starry sky. You're going to be inking
around the edges for dimension. And we're gonna be also
stamping the inside of the card and attaching
these little pieces of design research paper so that you have your
final card assembly done except for how to make
your gate folds close, which we'll do in
a future video. That's all for now. See
you in the next tutorial.
8. Blending the Edges of the Dies: Now that we've die
cut all our shapes, It's time to do some stamping. So in this tutorial,
I'm going to teach you stepping techniques. I'll even show you how to
mount one of these stamps. Most are already mounted. And these are called
cling stamps, meaning the rubber
stamps and they need to be put on
a stamping black. So let's do that first. We'll do grateful for
the everyday magic of you will do the inside
of these currents. So I'm just going to
put it like that. I'm going to take a
long stamping block. This happens to be there. They have letters on them. This is happens to be stamping block H and we'll just
go ahead and mount that. So it's a little crooked. I just I liked about it. Kind of straight even
though you can see what you're stamping
when you stamp it. So that's good now that by mounting it onto
this damping block, it helps me secure it. So next I want to take one of these pieces of basic
white that we cut. And I'm going to
stamp in starry sky. And I already have a piece
of cardboard because this is just a folding table that
my neighbor let me borrow. And it's not very
the glider straight. I also have, this is just
a mat to stamp onto. So I always like to stamp one, onetime onto the mat before
a stamp onto my paper. So I'm going to take my piece of paper and I would do
all of these at once, of course, in one
session and open up the starry sky because
it's a coordinating color. You saw how I open
that. I hope. So. I just went and use this
little ridge, pop it open. Some of these aren't as loose, but I use my stamp pads a lot. So this one is pretty loose. But it right there. Next
we're going to take your stamp and you're going to, Let's move these hexagon
xdx out of the way for now. Tap, tap, tap and
stamp onto the mat. Okay, great. So it gives you a couple
of things and it gets you make sure your
inked up good, but it also makes sure that
you're not upside down sometimes with a different type of stamp called a
photopolymer stamp. It's hard to know if you're
right, set up or upside down. Notice how I kept it on every few seconds to
let the ink soak in. And now we have a
good stamped image. So what I would do now, I said don't attach these little pieces here until you have a
good stamped image. Let me go ahead and close
this for a moment because I want to get everything. Although I just
got it on my hand, as you can see, wiping
on the silicon. These are, these
are silicon mats to your table become more flat. Now what I want to do is
take one of these pieces of the half-inch strips. Just go ahead and put that
along the bottom of the card. Go ahead and put a
line at Blue Cross and glue washers right off
of the Silicon Macs as well. So we're going to take a piece. Let me find a piece. It's pretty straight.
This one's pretty good. On one side. I'm just gonna go
ahead and lift it up and see it's already straight
by me using my finger. Rub it there this way. I didn't have to cut
them until later. I like this method for
working with small strips. I'm just going to
turn it around. And I'm going to use
the smaller paper snips to cut it straight
along the edge. I have one more piece that
can be used for another card, even though it was
12 inch strips. So of course I have a
little extra pieces that I won't use leftover. Then you just eyeball it and
make sure it's straight. You still have plenty of room to write your thank you message. And that's gonna go on
the inside of the card. And you put it on the
inside of the card. I'm going to use
rolling adhesive. That's these sealed plus
adhesive we've been using. I wouldn't pop it up with
dimensionals because it's just a flat piece of paper
so I would use to attach it. Okay, let's move on to Bagram, back to this concept here. I want to show you how
to ink and had a stamp. So what I would do personally is I would ink these
before as stamped them. Most likely, the reason is because you don't want
to smear your stamp. So let's take some of these and we can income a
couple of different ways. We're going to use what's
called a blending brush. And we're going to use coordinating colors
and we don't want it. When I say a couple
different ways, you have a few choices here. So let's say we're going to use parakeet party or
an crushed carry. You could do one side parakeet party
once I'd crush carry, and then you pretty much are guaranteed that one of those colors will be
in one of your card. I say almost guaranteed. Or that it'll coordinate
with anything. Or you might want to do
some with parakeet party on both ends and crushed
carry on both ends. So here's what I did. I used crushed carry here on these ones and parakeet
party on these ones. That worked out too because
I had both of those colors. So you can see this is a
parakeet party colors. Here's the color
I'm referring to. It's in these little twigs and then you can see the
crushed carriers in that part. But you never know what kind of card you're going to
put it on right now. I think you might be better
off just mix and matching. So we have a few
choices we have, we can even do some of
them in Polish pink. And then you'll know that if you do some empower key
parties, summon crush, carry, some impasse pink, then you'll know you'll have something that will
coordinate with any current. Now sweet surveys
a little too dark, even though it's
coordinating color. Shade is britches too
dark to ink up with, even when you rub off
some nail polish, pink can become light and
so can Tahitian tide. When you try it
can become light. But I would say your
best bet or these three. So you don't want it,
you don't want to ink up the edges with the starry sky, that's the color
of your sentiment. So let's start with Chris
Carey because we're gonna be using the most and then
we'll do parakeet party. Okay, I have I have a brush already started to
use for Chris Carey. So what I wanna do is take
this one is really dry, so I'm going to
start with it first. Then perky parties, more. Juice, your stamp set. So what I'd like
to do is put some ink on a stamping block. And then I'd like
to tap, tap, tap. I mean, I'd like to rub on tier, sorry. And then tap, tap, tap. What that did is
just put a blob of ink onto my little silicon mat. So then I can kinda do a
circular motion and just go in there and get around the edges with the bunny brush. Now see, this leaves me, it makes me be able to put my finger there,
which is nice. Now if I had just
stamp that, oops, Of course, I made a mistake
right in front of you, but that's okay. We're
going to keep rolling. Well, if I would give we won't we won't
put my finger right down the middle of
that unless you have another piece of
paper to do it with. So let's see here, Let's get a little piece
of crushed carrying. It'll help hold it down. Alright, so because I have
crushed carry on my fingers. So using little
circular motions helped you put some ink
around the edges. And we'll do that
on the other side. Now of course you have
fingers are clean. You can hold the
middle yourself, but if you were to
hold it while there's a stamped image there,
it may rub off. It may smear the stamped image. So that's pretty good. I've inked around both edges. And now we have one that's done with crushed
carry on both sides. Now let me show you the method again where I put a
little bit of ink on here and see when I tap off how much ink comes
off on the mat. So that's important
that you don't want the ink to get onto your the edge of your shape. Circular motions,
still pretty dark, but they're gonna get lighter as they do these,
do more of these. Alright, so that's good,
that's more natural. And then we'll do
one for the hexagon. So here's the
hexagon, a hexagon. You have to make sure
it goes this way. For your thank you
message. Show me to put it that way and just sort
of hold it there. You can ink a lot of these
with the blending brushes before you need to
refill the ink. And when I say refilled
and you can just tap into your little blob
there or you can tap back onto the
stamping block. Alright, so that's good. Now we're ready to
stamp the messages, which we will in a minute. But now let's go ahead and
do some parakeet party. For that, I want to use a
different silicone mat just so I don't mix the inks together and at different stamping block. I'm going to leave the
Chris Perry opened because right after
this video I'm going to be getting to work in doing all the inking
in the stamping. It. Let's go ahead and open up the parakeet party will
get a stamping black, put some ink on it, put the stamp with the
blending press into it. That's a mini blending brush. Let's see if I can
hold this with something, but that there. That's a mini
blending brush so it has to smaller bristles. And entities happens
to be the one that I used already with that color, you can wash them off
when you're done. But I tend to just use them for a while before
I wash them off. Alright, that looks good. And now let me show
you what that would look like with a
couple of colors. So we'll put that one over here. She can keep looking at that. We have a little bit
we'll do a little bit of parakeet party tap. Just I'm just gonna
put something there because my hands are still inky. They'll get in gear as I go. Okay. Now, I think one
thing that looks nice is when right over there, when you use more than one color for sort of an ombre effect. And to open up the pink
sort of a light color. Put a little bit on, stepping back, a
little bit to shear. So it's going to
take a bigger blob and it's going to take a bit to get it off
the blob or ticket d, block the ink off, I should
say Tap, see how it's darker. So maybe tap twice
and get that Inca, get that blob of ink off. Now, tap onto your silicon mat. And I'm just going to go down to this end because I don't want to mix it with the parakeet party. The parakeet parties up there. I'll get its own little spot and see how we can do that
on the other end. And that would look
really nice as well. And it would also give us
more of a chance that this is going to coordinate
with what we're doing. If you put a couple
of colors on it. So that's a nice way to do it. Maybe a little bit further in. And let's go ahead
and ink up a hexagon. That way. I'm going
to turn the hexagon sideways and there's still enough ink on there
for me to use. Now the only downside is if
you do mess up your stamp, you'll have to sponge
color the other side because you're gonna use the
other side of these shapes. Unless of course they're emboss, but these shapes you
can use either side. I'm just inking up the
sides a little bit. So that's how that'll work. And now we're ready
to do some stamping. I'm going to put that on there. This one on here. These are gonna be
vertical, close. I'm gonna probably
closest Pausch pink. So I'm not going to
use that as much. I was just showing
you that these blending brushes out of the way. And let's see, ready to go.
9. Stamping the Sentiments: So now we're going to
open up the starry sky and we're going to go
get the stamps we need. Looks like I've mixed up a
couple of sympathy stamps. That's from another set. Okay, Here it's May the good. You do come back to you. We're going to use that stamp. I'm gonna put it flat side up. And we're also going to be
using the thank you stamp. Let's get a big stepping back. This is simply block D
and mounted on there. And we're going to tap, tap,
tap and stamp onto the mat. It looks good. Then I'm just going
to turn these a bit and we're going to
stamp the sentiment. I would do all the
sponge coloring and then I would do
all the sentiments. Okay, it looks good. Put that off to the side to dry. See, I'm just holding it for
a few seconds each time. Oops, that one's a little
cricket. That's what I did. Extra. Wonder why it's crooked. Let's see. Let me just see why it's
cook it for a second. Because when I'm straight,
it seems to be cooking, so I might have to go yeah, I may have to compensate
by turning that way. So when you figured
out that, that's another tip and trick for
you, so let's try it. I'm gonna have to compensate by turning it a little bit this way because it's not really straight or it
could be the angle. I'm looking at it. Okay, That's good.
That's better. So that's how it works. And now we're gonna go
ahead and do the thank you's grab a stamping block. This would be a
stamping block B. And we're going to put this
thank you straight up. I'm still gonna keep
using starry sky for the darker sentiments because it just looks better,
easier to read. And I loved the script font. Okay, that looks good.
Let's do that again. I need to hold it a
little longer for a sharper image. Great. So that's how you
get a thank you. Now, last let me show you. I did I didn't. If you have a vertical card, the gatefold remember we do
the vertical gatefold card. You're gonna do
the strip the same way and stamp it up
in this direction. Just, just to reminder to know your orientation
before you stamp all these papers and go Oh, no, I didn't mean
it to be this way. My card is vertical or for
most of my swaps today, in this course
that you're taking are gonna be
horizontal gatefold. So opening this way, so that's the way I'm
stamping might sent him up, but just be aware of how
you stamp your sentiment. Now, let's show you how
to mount a claim stamp, because we're all
about tips and tricks in this card making workshop. So let's look at something. I have a birthday, I
have a birthday one. I've already done
some happy birthdays. I think I may have
told you about those. So here's already
stamped and crush carry. I've used that little banner. I think it would
be good to say for a belated birthday
card, this one. Let me show you in the front. I'm going to use
the one that says, I didn't forget your birthday. I'm just stretching
out the celebration. So that's really cute. So I'm going to take
off the sticker. There's just sticker
sheet on there. Let's lay this down. Now. I'm going to take pieces
and throw them away. They're just they were
just covering the sticker. You don't have to put
your stamps on a sticker. They'll stick straight
on his stamping black just as they are. But you want to put the
sticker on so you can tell what the font looks like when you're,
when it's upside down. Then you're going to
pull this part off. And then you're going
to match up the shape, see how the shape is. And then you're going
to take this shape and put it right
over the sticker. It's pretty close although
I'm a little bit of an angle but you tried to get
right over the top of it, happened on their peeled off. And now you have the sticker
mounted to the clink step. Then of course, put it
on a stamping block. I'm not going to stamp
with this one now. I just wanted to show you
how to map the stamp. What I'm going to do is show you how to layer
up the sentiments. Hopefully you won't
have too much income. So what we're gonna
do say, like, I really liked how
this one came out. And this one is
still pretty good. Even if it's a little
crooked, this one, this one's quicker, but
I would just probably turn it a little
bit on the card. And then we have
this. Thank you. So what we're gonna do
is take some layer, Let's take some shapes
for layering. I like how? Well first you're going
to decide on the cart. So let me show it. Let's take this card
for an example. If this is the card, I think I'll go
for the one that's There's a lot of crushed carry going on already on this card. So I might go for this one because it's a little
bit different because there's a lot of Chris Carey, although this would,
this would coordinate two because there's a
lot of Chris Carey, but I think there's just too much Chris carry on that card. So I'm going to put
that sentiment there. And then I'm going to put
the thank you On this side, I think only because
I want to cover up more of this side
and less of this side. So you just have to decide which side you want
to cover more of. It doesn't matter which
you put on either side. It's up to you each time
it can be different. So now we're going to
take these little shapes and see what would match. This would be acute shape
because it coordinates with that little accent over
there, that would be cute. You just want to bring out the colors from the other side. This would also be cute because
its coordinates with the Card itself, the crush carry. So let's try them both and see something like
that might be good. Something like that depends
on how it's going to show up. Nope, I think I like
the darker one. For you saw that
the darker shape now going to layer up
a shape in-between. So we're then we're going to
take these T-shaped here. So for each card, your
little decisions. This is why you're using a whole pack of
paper and you have lots of shapes cut
out because it gives you more decisions, more things to make
decisions with. So now you have this
little piece might be acute exit to put behind. Now that I'm happy
with that side. Now for this side,
we already have, we're not going to use
the same ink drown. This one has the pedal
pink, I'm sorry, the Polish pink color, but you still need something
behind it for layering. That was delirium for
that side, sorry. So these layers, we are going to just go ahead and put
the thank you over there. Dupe or deck Thank You. Would work too. I'm going to
actually I'm gonna do it on that side because this
one I should have. I just keep going when I
make a mistake, as you see, for that shape, I actually
have an outer shape like that. But it's the same
concept applies to the hexagon goes over
the top of those. And for these, I want to find something that's
going to look good. Does it either way,
I'm going to cover up almost the same side. I'm going to see which way
to put them in a moment. I'm just looking, looking to see what might look good
on this background. I'm thinking this
might look good again because it's
the same as that one, but I think that's a little too much too much of
the shaded spruce. Alright, maybe this one. Yeah, that one's looking good. Bargain is looking good.
Let's see what else. Try one more. The dark one. It's a little time and flip diverse a
little bit. Yeah. Okay. I actually
liked the darker one better for that one because
of the contrast on the back. Okay, now you could
either try to switch them around and see
which you'd like. But I do actually, I just wanted because I am layering
up this back piece. It's going to work out. It's going to work
out well because those pieces are both covering
about the same amount. So we put a little bit
of rolling adhesive on this part and put it down. Then I'm going to take
a little bit of an eye. You should not take that
long to make decisions. Actually, I was just
doing it the first time. I think I'm going to have
a lot of these layers and then just plunk
them on cards. But I do when I'm watching TV. And it is kinda fun to experiment with which
one goes where what I do is the next one I'm
putting roller adhesive on the designers share his
paper ones like so. But then I'm popping up.
Make sure that stays. Could he used a little bit
more adhesive on that one? I'm going to pop up the
sentiments with dimensionals. Yeah, something like that. Now what I'm going
to do is pick out full dimensionals and make sure you know which
one I'm using. So this one. But two on the back. Pop that up and sent to that. If you want to put it ribbon
behind it, it's good. But all of these things are
actually embellishments, so these are all good to go. Then that one already has, I think I have one with
polished pink and not this one. So here it is. So whenever there it
floated to that side. So now we're going to put, I just like to put
two-dimensional thing, each one to keep its, keeps
it a little bit less wonky. And that's how I do it. If there's more than
one right way to do it. But this is how I do
it and I'm gonna be showing you how to
shut your cards, different ways to
shut these cards. But we have almost
finished card. We have beautiful designer series paper layered
in the inside. We have too little banner grown around and I will show
you how to close that up. It discards very heavy. It's already may require a little bit extra
postage because we have lots of layers on it. It's really
professional-looking. And I think you're
gonna like that. Okay, a couple of more things is you could just go ahead
and watch season the sink. That's one way to
wash off your stamp. It is water-based ink
that we have been using. You could get baby wipes and wash them off or wipe them off. You could use what?
Stamping scrub. That's one of the stamping up
things that you could use. A stamp and scrub where you spray some solution
on the little sponges and Slashdot around or a shammy. A shammy. So those are four ways to clean your stamps when
you're all done. But I'm not going to clean my end because I'm going
to keep using them. After I'm done all my stamping, I'm just gonna go ahead
and layer these up. Then what I'll do
is I'll have them all layered up like
this one I might say, okay, let's, this is cute. And what would I put that on? I might say I'm going
to put it on there for now. Are on there. Then what I would do is I
would have all of these done. These pieces would be
popped up on dimensionals. Then all I have to do
is put the adhesive on and put them on
the different cards. So I would actually
spend some time layering up the pieces after
I'm done stepping them. Hope that was useful to you. Go ahead and stay up
all of your sentiments. And we'll see you in the next
tutorial where bring back some designer series paper because we're gonna
be showing you some ways to close
your gatefold cards.
10. Using Belly Bands to Close your Gatefold Cards: There are countless ways to
close your gatefold cards. I've already shared this
method with you where we tied the twine and we put that twine underneath the DSP in the front to hide it. There's also a way you can put the twine
around the outside, which will do, we're going
to work on the belly band. I want to show you the two
sizes for the belly band and a couple of other tips
and tricks along the way. I chose the belly
band method because I really like how you
can make it belly band, that they can even
see the inside of the designers to use paper. I like how it encloses
something that the belly band is reusable. They just put it right
back on if they want to. And another thing I like about the belly band is that you can put the
sentiment right on it, or you can slide it
out of the way if you want your sentiment
street scene. So let's just get right into it. What you're going to need
for this are just one strip, 1 " strips of design
research paper. I have a bunch of
them laying out here. And then for the vertical folds, the vertical fold
cards that we did, you would need a nine
inch strip of dissenters, those paper, nine inch by 1 ". This will all be in your
workbook. Don't worry about it. And what do you want to then
do is take I have a couple of cards I didn't
finish with yet. Because I think
the best way to do this belly band if you've already put
the sentiments on it. Like I told you, we do
assembly line process in my classes where
we have a lot of my workshops where I
talk about making a lot of pieces and then
assembling your cards. So yes, we have done that. And this is what I have done. I've watched many
episodes of Yellowstone, which I just started
watching in Season five. It's pretty cool. I saw this like fun show
I've been watching. So what I did is I just put all the cards
together like that. And then I said, Oh, I
should have told you. I should have told myself that it be a little better to make the belly band when
this is flatter? Because what it does is it
makes your belly band tighter. You see what I did. Hopefully you saw that. I just do it so naturally I sometimes need to explain
it as they do it. I'm going to get a
little bit of rolling adhesive and I'm going
to tear my belly band. So what I do is I put
a little bit of he's up there because I want to make sure it's not going to
stick onto the paper. Then I'd take this side and I put a little bit of
adhesive on this side, but you know what,
Sometimes I have to trim a tiny bit off. So let me show you. I'm not sure if I'm going
to trim a tiny bit off. Yeah. It's about 12 ", but sometimes, depending on where I folded,
I cut a little smidgen off. Then I just put a little bit
of rolling adhesive there. Now I think this
makes it tighter, but if you do what I
did and you assemble all your cards while
you're bingeing on TV. Just when I get a lot
of the parts done, then that's okay too, because you can always
put this band on later. You can also make
all your bands. And then you can put
them on. You can decide which card
they go on later. You could just take
one card and say, this is the cartoon media
use to make my bands. And then you just bend the car a little bit to get the band on. Like so put it on, slide it down, put it where
you want it, and let go. Then what I do is I use. So here's my bucket of crafting. Goodness I call it, I'm going
to use a little hexagon that we die cut out of
something fancy dice. And we're gonna just show
you my process for this. We'll see which one will
look good on this band. So we want contrast and we want something that's not already
used in those two patterns. That would be cute
with the flower. I already liked that. This one doesn't contrast as much
because it's a light color. But I like that, but then
that's too much like that one, so I just going to use that one. So then you find the it goes horizontal search
machine on that side. I make it go horizontal. You can make it go
vertical, your hexagon, but I keep calling and hexagon, it's not exactly equal sides, but I guess it would
still be 6-sided. Let's put it there and put a little bit of adhesive on it. And then you're
going to do that. Now you're going to reach
under there with your finger. This is just a tip
and trick for you. Make sure that district under there that you have no
extra adhesive because if you do it over the paper underneath and that is how
you slide your belly band on. Let's start from the very
beginning for this section of the course where
I'm going to take my tremor and just show you
how we get these belly bands. We're going to take a piece
of designers use paper. You can actually
do three at once. Here's a good one. These
both, these are both good. That's good and
do three at once. Grabbing some paper
for my table. Any patterns will do
because if you don't use one side, you
can use the other. If you want them to be planar. There's a B-side of
other aid beside of all, you're designing shoes,
paper, getting there. You want inch strips. And they don't
have to be exactly like when you're doing the card, their exact wonder if I
forgot to push that whenever. I don't see it. Which is okay, we're
just gonna do it again. This one, this one
might not have been on the right when I cut. Okay, So we have a few strips. Now let's take one of these and make it a nine inch strip. So I'm gonna go ahead and make this one a nine inch strip. Because that's going to be for your vertical card, you
need nine inch strips. So now let's look at a
card and we would say, okay, so this was the car. Now we'd look at it
and I would say, well, this one is. I wouldn't use this pattern because it's already on there. I probably wouldn't use this
blue because it really, even though this
starry sky is one of the coordinating colors in
this card, it would clash. I think that would clash. So for this one, this
one I think would be good because there's a little bit of that
background there. It says little pink stripes. I think this will be a
good band for this car. So that's how I do it. I just match them up
as you'd call him. Talking about how I put designer shares paper on the
inside of all the cards. I did all that but
I was watching TV. So I'm gonna get
near and go loosely. I don't use, I'm not using
any score scoring tool. This is better to wrap a belly band and I'm
just going to do that to where it overlaps and you want it to
overlap somewhere in the middle so that your
little hexagon can hide any of the
little foldover area. And it doesn't mean hexagon. Just going to put that one on top than it would be a hexagon. It can be any kind of
embellishment to hold it shut. Okay, now let me just make
sure I want to make it tight because it'll loosen up
when you lift hip, lift up. And then we're gonna
take our little, this would be a good hexagon, I think for this one, you could pop it up
with dimensionals, but I'm going to just use my rolling adhesive then
on top sort of center. But I can't really
sent to this one because it's sticking
out a little bit. See what I'm doing. I
just don't want any of this little part to stick out. The hexagon is
covering up the same. That's why I was
showing you that could cut a smidgen of this off. These are just
little details that you're going to not have
to worry about now. But as you become
your professional card maker that you are, these are little things
that make a difference. There you go. So
that's how to do it. And then at that point you could take these and I just wanna show you
how we'd go about picking the sentiments. I've already done all the
inking up and I've already done all the
stamping and inking, so I might just do
something like that. Okay, That one
looks pretty good, but it's the same
as that background, so that one might look better
but they're no blue no. Or starry sky? Yes, for that color because it brings
out a color in there. And then maybe that one but
the crush carry on that side. So this is how I would figure
out where to put things, kinda put these back. Then I would take one of these. And we could say, there's a little bit of
green that would work. I think that one
would work for shade, It's Bruce and then
I would take these little maybe a little bit of blue there
because we're not using your blue anywhere else. Let's see, are the starry sky. There's a little, it would
compliment the inside. So I think I could do that
little piece for contrast. And then the thank you. Okay, so that's how I
would go about layering up a card and deciding where
are the elements go. I will be showing you these
cards in greater detail, but now let's go ahead and
look at the vertical lines. Okay, well, I did
Happy birthday on the outside because
this particular way that I put the
sentiment was too big for this to put a cross here, but you could put these
little banners at an angle. So show you some of
the belly bands here. And I used an oval from
a different dissect because I just thought that look good on the vertical cards. Okay, and I also have
the way we can touch it. So let's grab, we'll just
use this vertical card. Doesn't have any that
don't have a band on him. It says a different
kind of band. I'll let you take a look at
that when this is pretty fun. For this card, what
I did is I took a vertical card and I had, I had an idea. I said, well this
one doesn't really, the way I had cut this paper was going into vertical pattern. And then I realized that this, this card can be
presented in this way. So it's a vertical fold card, but you're just presenting
it horizontally. And you put the sentiment
on the outside. So that's just another idea. We have infinite ideas
here because there's infinite possibilities
for how you can make this, these belly bands. So let's go ahead
and put this on their status was the
Carta was putting it on. I'm just going to center
it folded around. And I'm just making the band now I'm not actually
going to be using it on this one because that's the same
coverage, that one. A little bit of adhesive there. And then you can
also go to the site and put a little bit of adhesive there and close it up. Then you can add your
hexagon now or later. But I usually tend
to wait until later for my hexagon because I want to know where
this is going to go and put it on a card
that'll contrast with. So now let's talk about
a few other things.
11. Using Twine on your Gatefold Cards: Can we have some other, Let's go back to this cartoon. So we could take, say, for this card or any card, we can take twine, bakers twine, and I
like to do to it once. Okay. And you can just go in there. I mean, I'd like
to do two at once when it's Twine, not ribbon. And I like to have enough
extra time, a little bow. And so you don't
need to worry about this belly band that
you're running low on. Designers share his paper, or you just want to do
something different. The only thing about using twine and especially using
two layers of twine is that get it straight so
it doesn't separate off. It is going to separate off. So sometimes you have to
pull it at a certain angle, pull it at an angle
a little bit. I get it real tight. Sometimes you have
to double knot it. But then you can, you
can split these up. But the only thing
about this is it does make your mail bulky. Okay, so that's,
that works as a way of making your card shut. So little bulky though is if you're gonna be
handing it to someone, this is acute method, okay? And you can do this
then you can go like this, your Twine. And it makes it fun because
now it's real tight. It tightens up your whole card
and it looks really cute. I think that's just
a beautiful way of presenting your car to someone. And then you can see how it
crosses over in the back. That's really nice. Alright, now for the Velcro, I gotta be fun to do with
the Velcro because this is something that's very
professional looking to. The only thing about the
Velcro is somebody who doesn't always know necessarily where they're supposed
to pull over, how they're supposed
to open this. So say you were the recipient of this card and you said,
Oh, that's really nice. And someone gave you this
card and then you'd be like trying to open it. And you might not know that all you have to
do is that at the Velcro. But if you're giving
it to a card maker, they can definitely
figure that out. They won't rip it. A card makers definitely going
to go try to lift this up. Lift that up. Now, oftentimes if you've seen
interactive cards before, there's little tabs that
say pull or Lyft or slide. And sometimes there's
directions on the cards, but I don't like to put
directions on my cards. I want it to be intuitive. And the only thing
about this, as I probably should
have put the Velcro over here on the sidebar so
someone can get an airfield. A couple of kinds of Velcro. Let's say we wanted to
Volker this one shadow. Actually, let's do it.
Let's do a horizontal one because I've already
done a vertical one. And wheat now, sorry, we need to do, we
could do this one. We need to do one
that doesn't already have sentiments on it because this is going to be using
this for your sentiments. So let's say I wanted to
do one a little darker. Here we go. This one here, we're going to use
this one here because it's darker and then
this will contrast. So here's my little,
this is gonna be my tab. So what you're going to do now there's a couple
of kinds of ochre. This one I just
wanted to say because I got it at the Dollar Tree. And please you're saying
I don't have any velcro. They do have it at
the Dollar Tree. And then you'll get
these little tabs, but these are kinda thick. And then they make this
other kind of velcro. And it's just called Velcro. And you can see
it's really thin. It's like paper thin. So I like to use
this and I'd like to put the flat side down
and the fuzzy site. So I'm gonna use, I'm gonna get my two pieces of okra together. And I'm going to put
them straight onto my little little tab. And I'm just gonna go like this. And I'm gonna push,
I'm gonna put it there in the center. So
there's my little tap. And that's gonna be,
it's gonna be Velcro. Now, this side, what
you wanna do is put, put some adhesive on the side. Of course you should
work on a mat, don't work on top of other
cards because you could get your adhesive
caught up in there. Okay, So in it's
very basic form, That's how you Volker your card. But to make someone think
that that's decide to open, I, I put the sentiment
on this side. And these vertical sentiments work well in cards like this, this blue one, starry sky should say it's gonna be
good because look at that nice contrast. So you can see how I
think and how I lay out my designs and how I
work with my designs. Getting to see this in action. So here we go, we'll
put that there. Then you can leave it like that. Of course, that's cute. And then someone probably
would know more about opening this up when you
leave it like this because this is sort
of sticking up. So may the good you
do come back to you. It open up the card. And then inside you
have these well, this one's a
birthday one inside, but I just wanted to figure
out some vertical designs. And inside you put
your sentiment. I didn't put sentiments
and all my card yet. But I think to go
one step further, it would be nice to then put this same timeframe when
it's a little better. When I have a few here, here we go. There's your one
that's a little better. And put that right
on top of that. I think that just looks better
to hide the Velcro into. It doesn't look as accurate. So if I'm sending this
to another crafter, this is a very good method. It's pretty flat because I
used the flatter Velcro. It's pretty intuitive to
somebody who crafted. They're gonna go,
they're going to try to open it and they're not
really going to know how. And then it gives
them a little fun and have a little fun with it. Then they figured that
out pretty quickly. It's pretty flat. It goes into
the envelope very easily. It's not lumpy like the other. Like this Twine we were using. This one is a little less lumpy. Alright, so those
are some ideas. And then the last idea would
be to create a slider. And you could put a slider, you'd have to have a little bit of a gap here in the middle. And he committed a slider that goes up and
down the middle. You just make a little device. So a little bit more of a gap in the middle and it slides. When you pull it off. You open. However, don't even think you need if you give
someone discard. And they're not all quite
done on the inside. But if you can somewhat a card, let's say you don't put a
belly band on this card. You don't, you just
hand someone discard. This is very nice the way to
plus the way you made it. It's very heavy because
you use designers share his paper panels here
and on the inside. So to me, you really even, you don't even need to
actually have a belly band. This is such a nice card. And if you do put
a belly band on it just to train it or
to keep it shut. It will it will stay pretty flat even if you don't
send it with a belly band. So that's how you do it. Now you could also put a
little bit of a little bling, little pearl or something, right in these two layers
and that will hold, hold it shut as well. Infinite, infinite
possibilities. I'm gonna be showing you how
to step up your card next. But let me just
review what we did. So you have the idea of the different ways to do Valley bands and
some measurements. Alright, so let me just
put these in, in a pile. I'm going to show you
that my belly bands, but I'm not going to show you
the insight to my cart yet. So you have several ways to
shut your gatefold cards. The several ways to shut your
gatefold cards are using twine that you hide underneath your design
research paper. Using twine to wrap around
the outside of your card. Either way you're going
to see the Twine in the back using one or
two layers of twine. At the same time. You use Twine, you could
have also used the ribbon. The reason I don't like
using regular ribbon. And even, even though
this one is pretty thin, this is called organ the
rumen is because ribbon. It's okay when you
just laid out. But when you do about it
Good becomes very bulky. But ribbon can be
used as a belly band. Okay, so we talked about Twine, talked about Twine,
singular double. We talked about belly bands. And the belly band
doesn't have to be just added designers
to use paper, you can make a belly
band out of ribbon. So let me show you
the belly bands. Okay. I left. I took some out of the way. I've split them out of the way. The different ways to
do the belly bands will go through the
insides of the cards. Soon after I finished making, kind of finished the
insides of some of my cards have made
32 card server. And I'm just in the
process of finishing out. So we have twine belly bands. Belly bands can be
made with designer series paper or ribbon. Tying them up can be done with designing shoes paper or
sorry, twine or ribbon. And then lastly we have Velcro. So I would say, I would
say the three ways really are to tie it, to use a belly band
or choose Velcro. And then there's infinite, there's infinite ways to use Velcro and sliders and other, other ways too fast and your
cart. So that's a review. And then this is what
the Dr. looks like. I didn't even showing
you on my belly bands. So now what I want you to
do is go ahead and take the knowledge you
have to go ahead and finish up all your cards. Finished putting all your
sentiments on your cards. And then I want to see you
back here where we will show you how to step it up by
making another kind of layer.
12. Adding an Embossed Layer, Bling, Decorating Envelopes: In this tutorial,
you're going to learn three ways to step
up your cards. The first way is embossing. We're going to show
you how to use an embossing folder to get
this effect on your card. The second way is to
just add some bling. We'll be using some
different gyms just to leave a little pearls, just to show you how you can step up the carpet using blank. You can also use blink to hold your cards shut. He's
little piece of it. The third way is by
decorating your envelope. And the way you do that
is you're gonna decorate the flapper your envelope with a piece of design
research paper. There are many ways to
step up your cards, but let's just work
with those three in this tutorial as a way for you some spark your
creativity so far. Alright, so let's go ahead
and cut this paper. 4 ". This is black, very
blessed card stock. It's not just
designers grade paper. It's best to if you're
going to do with bossing to use card stock. So next we're going to cut it
by two-and-a-half percent. So this is that same
measurement that you would use for the for the card panels, the inside car panels. That's these panels here, the insight that the
designer shoes paper. So we're gonna go ahead
and cut a couple of those. These were my scripts
that I didn't quite like. I didn't, I didn't score
in the right place or my scoring tools
slipped, et cetera. So those are the extra scripts I have of this Blackberry bliss. Now we're going
to take our stamp and cutting and boss
machine, which is like this. I raise the camera
bits, you could see it comes like that. So we open up both sides of the machine and then
we're going to use what's called a die cutting
sandwich or die sandwich whenever using a dichotomy seen
there's a sandwich. If you look at the platform, the base plate, it will
explain what to do. So we're using plate number one, which is your base plate. And it says when you're
using a 3D embossing folder, all you need is
plate number four. In previous tutorials, you
used plates number 2.3. This time we only need
plate number four. Next, we're going to use
an embossing folder. And the one I've
chosen to use for this example is called Kane. We've 3D in Boston folder. And it's a 3D bus in Photoshop. It's pretty thick. So
all we need to place, so we're going to take
the impressive folder and put it with the logo stamp and
UPS logo site up. And we're going to put our
pieces of card stuck in there. And I'd like to do two
at a time and I'd like to keep them straight because this pattern is one
of those patterns that is a straight pattern. It's concentric. Concentric. What's the word?
Lines has lines on it. We're going to put
this plate on top, plate number four and we're
going to crank it through. And I have one piece
that I haven't embossed. So you may get to see amazing transformation of
before and after. Let's open this up. And it's just amazing
what it does. So that when you, when you put this on here, when you look at the
one before and after, you can really see that
this paper is transformed. You can use either side. Both sides will work. I personally like
the site better, but if I was going
to use this side, I would use something
called wink of stellar, which is a glitter, clear glitter pen toothbrush. So let's take our adhesive and they're going to come back. Now let's take this
piece and we're going to use these pieces. I've already cut
some fresh Frazier. Now these were in
eighth inch bigger. Recall we did it with the
designer series paper two. These are the same
measurements we're using for the design. Show his paper
panels except that when you're doing bossing, used to diaries of card stock, nice solid edge will make this
pop and put that on there. And then we'll put it on a card and show you what
that looks like. I have an extra card I've
cut out with Polish pink. Okay, there we go. Extra Cardinal has put that
on the layer of pause pink. Amazing. So just, just always using contrasting colors, you're okay. Alright, so that
is how to do it. And of course then you'd go on and do the rest of your card. The way that we've been doing, where you're going to
put your sentiments on there, et cetera. So now let's move on to the next way to
step up your card. Make a little bit of room. We want to add some bleeding. So let's get a card. I'm going to make sure I'm not using the one I'm using for my swaps because my swaps are not actually
getting any blank. But this one here, it can, it can stand some blink
because these are the extra cards that I'm
using for something else. And I have a pack here of iridescent Ryan
Stone, basic joules. There's one that's open. And then I have wanted
to show you what it looks like when it
comes into full pack. It's open because
I cut them up for doing some shares when I share
embellishments and things. So I'm gonna go ahead
and put a few on there. So one, I'd like to do with
things in odd numbers. Say one. I'm not going to put
one on this band itself because I don't want
to raise it that much. I'm going to put
another I don't want to use the big one again,
there's three sizes, so one I'm going to
put one down here. So I have a couple on that
side and then I'll put the smaller one over here. Oops, I don't know
if it has the, there we go. So we have 123. So I like to work
in odd numbers. Now if I were gonna keep going to work, you could do five. I think it would be
nice to put another big one over here. And then one small one. Likes maybe here. So then we have five. So that would look nice
too. So you could do seven. I just like to use odd numbers, so that's a nice
way to step it up. And then the third way, go ahead and get that
trigger out again. And you would cut a piece.
I've already done it. And you'd cut a piece
of paper that's five and three-quarters
by two and a quarter. I'll just go ahead and
show you the measurements, but we'll I'll have them
in the workbook tissue. So two and a quarter by five and three-quarters
I'm sorry. Make sure that's
in the kind of 5.3 quarters, two and a quarter. Now that means that we have
the exact size we need. And then we're gonna
go ahead and take the medium. That that
was an envelope. That's not an envelope. We want the clear
medium envelopes. I don't mean clear
medium envelopes, just basic white
medium envelopes. Clear me to men's lives.
So what we're going to store the cards in later. So go ahead and you're going
to lay that on their net, decide how you want this to be. So they decided, I think
would be better if this paper will look better if that
was, that was the top side. So that looks good. So it
states excise, we need it. We're just going to put
some rolling adhesive work or glue, but I
think this better. This is thin paper when
you have envelopes, I think it's better to
use rolling adhesive. Go ahead and put this on there. And of course you
can use you can use your tremor or something with allege to help you line that up. Go ahead and push
that on like so. So we have the pattern
the way we want it to go, push it on, push it
down. That's good. And then we're gonna
take our tremor. Tremor or paper or papers, snips and trim around the edge. And the top is
fine. You can trim. I give you a little
bit of extra their job across the top or just go round. And this is a really nice way
to decorate your envelope. That's of course,
if you're mailing the card in this
envelope directly, That's a really
nice way to do it, and it does fit in there
directly these A2 cards. However, I tend to put my cards into other bigger envelope, so I'm not going to
be decorating these for my swaps in particular, but I definitely wanted
to show you how to step that up. Okay. Some other things you can do. That's fine. One
that's birthday. I'm going to show you
these little pearls. These are some flat pearls. You could just decorate
the band itself. Few size, different sizes at some playing or
the card itself. Okay, that would step it up. And then I wanted
to show you lastly, say you have a card
that starts popping open and you can take a little. These are just some
little gems I had and I thought these were being
nice because they're vertical. And you could just take this if you didn't
have a belly band that is put one little
rind stone in there. And it would hold your card shut and keep it from popping up and say you didn't have this band. It could just put a
couple of little gems and that would be a nice
way to keep your card shut. So there's waste to step up
your cards by embossing. And there's ways to
step up your cards by decorating the envelopes
and in using blink. So those are the three ways. And of course there's more. And I'd like to see
what you create in this card making workshop and see how you
step up your card. So what you do to take
them to the next level? Well, that's all for now. Next, I'm gonna be showing
you how I package up my cart. Thank you.
13. Packaging Cards for Sharing & Selling: While I was producing this
card making workshop, I created 32 of this style of card and 16 of another
style of card. So what I want to show you now is how I go about packaging up my cards that I'm
going to be giving away. Then I want to show
you how I package up my cards that I'll be mailing to customers and how we package up cards if I were
to sell the cards. Just so you have an idea
of how to do all three. But first, let's look at some of the ways you can step
up your cards because I did finish adding some blame
to these embossed cards. If you recall, we learned how to step up our cards with sampling. And I added to the
different cards, either five, maybe seven,
sometimes just three. But I advise students to these cards that were
already in Boston, made little belly bands and
then created the envelopes. And here's one more
added, some warbling. I thought that'd be
fun to show you. Alright, so now let's get to it. When I am going to
use these first swap, I take the bag. And these are called
clear medium envelope. So they look in the
book a little bags. Just double-check everything. Make sure nothing's upside down. Okay, we're good to go. Put the belly band on. You can put the belly
band on now you can put it on the side. I mean, you could just lay it. What I'm saying is you
could just play it inside there like that if you didn't want to put
the belly band on. But I'm going to go ahead
and put it right on the card so everybody
knows what it's for. And then I'm gonna put
the card in a bag. And this is for a team swap. I'm doing where
we're all sharing different designs and that's how you can get inspired
by others creations. So then after I do that, I put down, I put it in
the materials I used. I put down the stamp set, something fancy stamp set. And then I write down the dies and the product numbers and ink. I use starry sky ink, so that's something
I used in all of them stories got ink. Now I didn't break down.
Parakeet party crushed carry here because I didn't ink them all up
with the same colors. See here this one, I used
the Polish pink down here. I didn't always use
the same colors. So instead, I put flowers are
more designer series paper. And then I put all the coordinating
colors with the paper. That means that if you see
any other colors of ink, you can see that I used
one of those colors. And then I worked
at I created it. And then we put it, I
put that inside the bag. Then I steal the bank. That's what I would do. Now for customer, I would
do the same thing. And then you can see how
I let, you could see when we do the same
thing for customer, except I would write, I have one that says thank
you for your order. And I put that in
the Baptist is thank you for your order and
how to order more. And I would still do cottage cheese or something like that. Not always predicts
youth, but something. Thank you for your order. Then I want to show you I will stay at the same time
I was doing those. I was doing a different slope. So that was a swap. This one was based on the
what's called our mini catalog. It's stepping up and
then this one was based on a celebration brochure. So I did, I did this swap and these are these
say carriage. I showed me, just show
you that it was stamping support or sending support,
sorry, sending support. And then I wrote
which kind of dies, the citric Tango dies. And then I use native any
of the ink for this and pedal pink ink because I did
use pedal pink on all these. Then I put them AND designs, design research paper and
all the coordinating colors. And that way that covers because I've put down all
the coordinating colors. Sometimes they use balmy blue, sometimes they use fresh, Frasier, sometimes pedal pink granular, green, mango melody. So I used five petal pink, five or six colors
of card stock. But so by putting all the
colors of the paper I color, I covered the different
cards doc I could have used. That's and then I didn't
break down the ribbon because I had
already made these. But then later I decided to add the balmy blue, blue ribbon. This is a card
that will showcase designer series paper.
That's what that card does. Now, let's get back to the
skip back to packaging. If I were male This
true customers, then I would take
something like this. May or may not give
me an envelope. I probably wouldn't give them
this kind of fancy input. But I would, I would do is give them a card and I
put it in a bag. Just do that again
to protect it. Now, if there was if there
was playing like this, I put a piece of card stock. I don't have a piece
of planes card stock, but you get the idea. I put a big piece of card stock. Maybe I do. Here's one. Here's one, something like this. But it might, it might not
be stepping up cards deck. I would use a piece of
a cheaper card stock moving from a craft store.
But they have it at the top. If I had some blaming the
card and then I put that over to protect it,
put it in an envelope. Now if you don't do
that, if you don't put the piece of card stock, then these will poke through and rupture envelope and then I put the whole thing in an
envelope and address it. Maybe some pretty stickers, There's some washi tape. I give a big envelope like this. If it's more than an ounce, you have to pay a little bit extra for $0.20 extra for
the extra outs. All right, Now I
want to talk about quickly about
selling your cards. In our stamping up catalog, there's a policy
and it depends on which company are using
which kind of products. But it says angel policy. If you love crafting, you can create and sell
your projects, but you must use the copyrighted the symbol, symbol down here. This is just one stamp set. Many steps sets have this
copyright symbol in it. So if I were to
sell these cards, I would have to take I'm just going to get a
light color card. I would put it back here in
a copyright stamping out. And I wouldn't want it to be so prominent that it would
be annoying to people. So I would probably
take family blue ink. That would be tone on tone stamping and I would
take the stamp and stamp it right there
in this color of ink. So it's not so obnoxious
sometimes if you put a big stamp on the back
created by this big logo, I think that's
kind of a noxious. That's why I don't put my name
on the actual card itself. Maybe they want to use
it for something else or it's a donation of some kind, but do I do want to
follow the policy. So I'd put the copyright if I was selling this
at a craft fair, as such, the copyright symbol that would be adhering
to the policy. Okay, So you can do this, put it in the envelope,
and just melt as this. That would be fine too. It does fit in assembler, but it's a little
tight because of all the extra layers
and you'd want to do. That's really nice, is put
that extra postage on this. That's another way to mount. So I hope that was
useful to you. And you get inspired by the kinds of projects
I'm working on. I just want you to know that the reason I was able
to create so many cards and during this workshop is
because of my wasn't quick, It wasn't that I did it fast, but I did do it efficiently. And that's more important
than doing things fast is you're not going
back and doing one. You're not making
one card at a time. So if reason I was
able to do that is by doing everything in steps. So in the next video,
I'm going to show you all of our finished cards from this particular design using the flowers and more
dissenters, there's paper. I'll be right back.
14. Finished Gate Fold Card Projects: You've done your
final embellishing and it's time to
share your cards. I'm going to share these
cards with you and then send them out into the world
where others can enjoy them. That's what crafting
is all about. I want to open most of
these for you just to go through all the
different possibilities. I hope your creative
juices are flowing. And you get a lot out of this because no two cards
are ever alike. And just to save time, I'm
not going to go ahead and put that belly band back
on until later, but I do want to keep the
belly bands with the cards. Now for this particular swap, the team limits it to 20
people and I think about 14 signed up for
this one and then for the mini catalog
swap and then 13 for the other swap that
I gave you a sneak peek of. In the last video, I have
loads of extra cards to use, which is great because I, I always need cards and I already needed a sympathy
card from this branch. And there's a couple
of cards that I didn't put the inside and yet, just because I wasn't quite sure what I'll be
using them for. A couple of the vertical cards. I put Happy birthday
on the band, but I can always
change it to something else if I don't put it
something in the inside. So when you do a swap, the
cards can be a little bit different as long
as you're using the same materials
to create them. No, no two cards
are gonna be like I used the same ingredients
to make those cards. If you recall the
ingredients video, we added some things later that I didn't
have at the time. I wasn't thinking of using the
fridge freezer card stock. You'll see I have used
it a couple of cars, but I wasn't planning on it. And then here's that card
that's a little different. That happens that way. So those are those notes moved. So much for keeping the
belly bands together. You'll know if you follow me on my other platforms that I'm
always a hot mess crafter. Alright. This one. I didn't put anything
in inside yet, but I probably will put that
same gratitude statements. So there we go. And then these not sure if I did something
on the inside. Yes, I did. So let's see, when I
put an insert to these, these should think of the yeah, I didn't forget your birthday. I'm just stretching
out the celebration. So this is a good
belated birthday card. I would do that for
the birthdays and then if I needed something else. But this one has to be
birthdays, so that one's okay. But this one I can still put that
gratitude statement. And so I have a thank you card. So basically I mostly
made thank you. And I meet birthday cards. That's what I'm
mostly made in this. Now here, here are a couple of others that I did,
slightly different. So if you go to try to
open this card, right? I mean, you can,
but I'm saying you don't know exactly
how it happened yet, but it is a ductile card. And I did go back
and make a couple of other styles of the Velcro card. I used the thin Velcro and I just put the banners
around like this. And then sometimes they
use this other shape because I thought that
gave me a little bit more leveraged for my velcro. The Volker does
lay nice and flat. This one, I might not put
anything in the inside yet, so this one will be
another thank you card. And I'm grateful for the everyday magic of you said just have to remember I
have some extras made, but I have to remember to create the verdict
vertical lines. So I did while I was
creating this project, I did create extras of these. But then they're not
in this orientation. Okay. So you learned
how to learn how to do those kinds of clothes closures. We talked about the belly bands and we talked about the Velcro. And then here we talked about the different ways
to use the Twine. So I won't untie these four. You're just giving you an
overview of the outsides of these double twine
and pulling it down. So what I did for
this as a birthday, but then I did make the
good you do come back to you because I
thought that also goes really well with
the birthday style, with the vertical. We have our decorated envelopes and then we have
the ones that we, the cards that we
added the blink to. Which again, I really like that. You just got to put that extra piece in there
when you're mailing them, may pop through the card. No matter if you made one card
in this workshop are many. I'm sure that you are able to gather some tips about how to
do things more efficiently. And that's what, that's
what crafting is all about, is just making as many things as possible so you can
share them with the world. I hope you enjoyed
this and ready for the conclusion
right after I show you just a couple of things. So this is the pack of paper I started with and I'm down to about a
quarter of this pack. It was 48 sheets
and I thought, Oh, I'm only going to use 12 sheets and then I went to 24 sheets. And then I'm on my
third set of 12. 12, 12, and then my
third set of 12, I have plenty of scraps and
plenty of pieces of Dover. But this was a 48 pack
of flowers and more. And then this was I don't know. I don't remember if I showed you in the catalog
where this was, but this was something
fancy bundle. And that was part
of this catalogue. And that's with discipline. So that's what we
used in this course. Of course we used
many other products, such as C0 plus. And then later on I added
the Terran tape because I liked the way to put the
little strips on the cards. I like the way this was easy to tear to put
these little strips on. I did embossing,
embossing folder. And there's just so
many other fun things that we did and using
the die cutting machine and our other products. Alright, so that's all for now. I hope you enjoyed making these and I hope
you'll give this a try with whichever materials you happen to have in
your craft stash. Thank you.
15. Course Conclusion: I want to thank you
for participating in this card making workshop. I hope you learned many tips, tricks and techniques for
creating gatefold cards. I had a lot of fun and I created many more cards
than I expected to. And they came out even
better than I expected. And I learned a lot
by teaching this. And I hope you
learned a lot too. Now I have more cards to share, and that's what
crafting is all about. So speaking of sharing, please follow me on
my YouTube channel at paper check on Instagram,
Facebook and Pinterest. I want to continue
these card making journeys and paper crafting
adventures with you. And I appreciate you
taking my course today. That's all for now. My name is Kimberly Smith
and I'm the paper itself.
 Papered Chef, Kimberly Smith