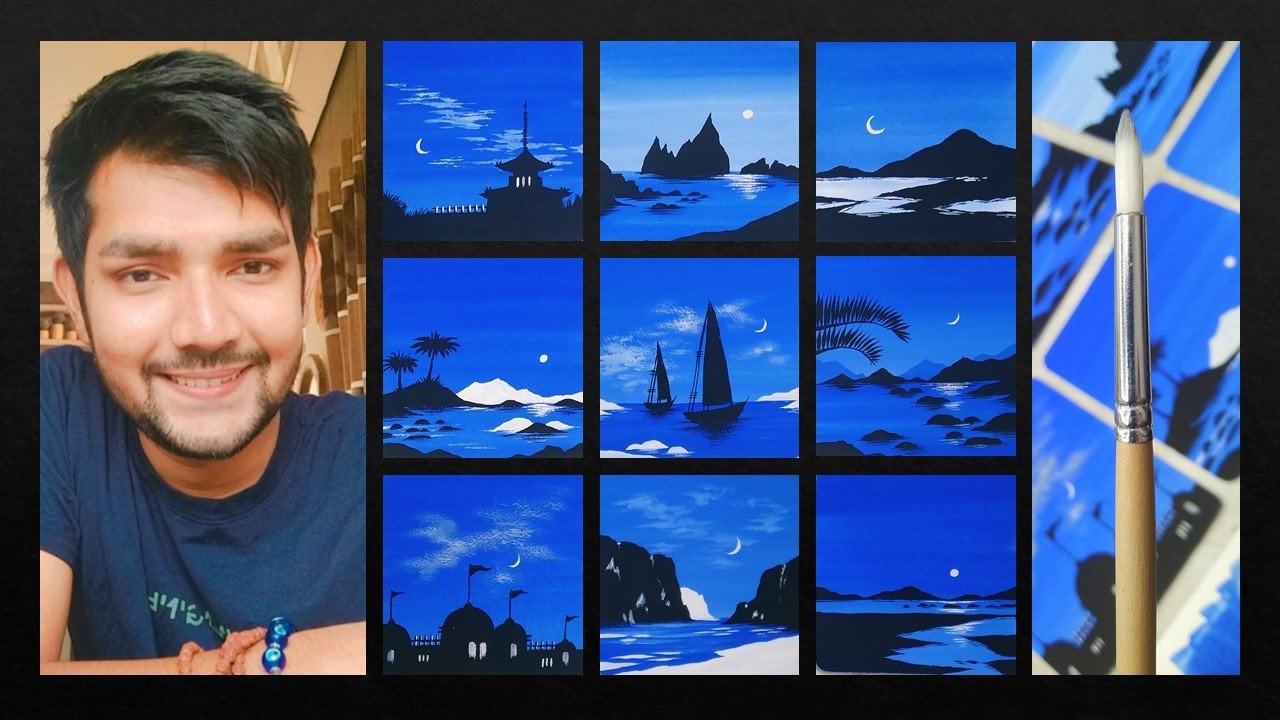
Transcripts
1. Welcome to the Class: Welcome to the world
of wash painting. In this class, we
are going to explore gouache as a medium and art. And you're going to paint
a beautiful painting in which we are going to paint
palm leaves as a subject. Minimal art is getting very viral and
trending these days. And it creates a beautiful
sense of elegance. Palm leaves are a very
popular subject in art. I'm using gouache painting. You can create stunning
and realistic depiction. Hey everybody, myself. I'm a self-taught, independent artist and an interior designer. My profession. You can find
all my artwork on Instagram. I go by the name
shutdowns antigens. In this class we
are going to have a beautiful Class
Overview and which I'll be telling you the details about the painting that
we are going to create. We're going to talk about all the art supplies that you will need in this
particular class. No need to worry at
all. I'll be giving you all the details about
the art supplies as when we'll be talking about the watercolor paper
that we're going to use. I'll be giving you a
nice practice session in which we are going to learn about the brushstrokes
that we are going to use in this
particular painting. So this will act as a
nice practice session. We're going to start by cutting an A5 size paper into
a perfect square. I'll be teaching you
how you can cite tape, your watercolor paper carefully. We're going to start by creating a beautiful gradient background using black and
olive green color. Once we've finished painting
the entire background, we are going to start by
painting black palm leaves. Don't need to worry at all. The practice session
will help you to have a nice grip on your hand making these beautiful
brush strokes. Once we're done painting
the black palm leaves, there'll be adding some
nice golden bomb leaves, which will give a nice contrast with the background and
the black palm leaves. At the end of the class,
we'll be removing the masking tape in a
very careful manner, and this is the
most satisfactory. But in the entire painting, we are going to
cut the side edges carefully using a
pair of scissors. And the final painting
we'll be done. I'm very sure that you
are going to enjoy painting this
beautiful painting, as it is, a very
minimal and easy, simple, elegant
painting to create. That's a very short
and simple class. So without any delay
and grab your supplies, and let's get started
with the painting.
2. Art Supplies: Hey everybody. So before we start, it is very important for all of you to know the correct art
supplies that you will need to create this
particular painting? Ready with all my art supplies
being placed on my desk. So let us start with the
brushes that you will need. So it is very amazing that for the entire painting you
will need only two brushes. The first one is around
rush of size ten. The second brush as a
flat brush of size 1 ". So these are the two
brushes that you will need for this
particular painting. Now let us talk about
the next art supply, which is a golden dust. Basically, this particular
cloud is in our dust form, which we are going to
create in a liquid form. You will find a golden
color in a liquid form very easily in any nearby
local art store as well. No need to worry at
all in case you do not have a golden color
and a dustpan, you can use a golden color
in a liquid form as well. The next time we have
a simple black color, which is a wash color
basically that we are going to use to paint
the black palm leaves. And we're also going to use that in the background as well. Then we have a simple
masking tape of size 1 ". So we're going to
use a masking tape to tape the watercolor paper. Then we have a simple
ceramic color palette. So this is color palette, which is having three
sections to have your colors in a proper
systematic manner. No need to worry in case you do not have the same color palette. You can go for any other
good alternative as well. Then next up we have our
simple glass in which we can hold some clear water to clean the brushes that we
are going to use. We will need a simple pair of scissors to cut the side edges. Once we are done with
the entire painting, then we will need a simpler
tissue paper on which you can dab your brush to
remove excess amount of water. The next up we have our
simple pencil which everybody must be having
and assembled ruler. The ruler is basically a simple plastic
ruler in which we have dimensions in centimeters. So we are going to use this
particular ruler to cut the A5 size watercolor paper
into a perfect square. Then next up we have the single wash color
that we are going to use, which is olive green. That is not necessary
to use the same color. You can make your own
color combination as well. Now let us talk about the
most important art supply, which is the watercolor paper, which is going to act as the base on which we
are going to paint. These are hot pressed
paper and it is 300 GSM. Gsm is something that you
have to keep in mind as it is the thickness of the
watercolor paper so that we can apply
heavy washes on it. So these are all
the art supplies that we will need for
this particular class. No need to worry at
all in case you are missing out on any
particular art supply, you will find it very easily in any nearby local art store.
3. Lets Practice: Hey everybody, you
are most welcome to the lead practice session for
this particular painting. Before starting the
entire painting, it is very important
for all of you to know the correct techniques and methods that are needed to paint this
particular painting. You can already observe
the beautiful palm leaves, which are absolutely
hand painted. These are basically
in two colors. One is black and
other one is golden. So you can observe the
strokes of the brush that have been made in
this particular painting. While we use the A5
size watercolor paper, we are going to get this remaining scrape off paper which shouldn't be thrown. We should definitely save it and you can also use
it for practice. So here I have my simple pencil. Now to practice these
particular strokes, what you have to do is just make two dots in a co-linear format. Try to make it in a pair of three or as much as
you want to practice. I'm just taking three
to show you and give you a basic idea
about the brushstrokes. Now, I'll be using my
round brush of size ten. And you can see I have some
clear water in the glass. We're going to use
solid black color so that you can observe
these strokes carefully. You can absorb my color palette. I'm just losing the cholera
using some water in it. Now we are going to
make the false true. You can observe I have taken some solid black
color in my brush. Just make sure you have
the right consistency. Also make sure that there isn't access amount of
water in the brush. Now we will be starting from
the first point and we'll be taking the stroke
to the next point. Now while making the stroke, you have to be very careful. Once you start from
the first point, you have to apply the least
pressure on the brush. Now once you move
towards the next point, slowly, you have
to dab your brush. And as you connect
the last point, you have to pull the brush above and you have to
apply the least pressure. Again. You can see how beautiful
the entire stroke looks. Again, I'll be showing you. You have to start
from the first point. Apply the least pressure, dab your brush a little bit on the center portion and again, apply the least pressure
on the end portion. So this is how these
beautiful strokes for the palm leaves are made. No need to worry at all
in case you are not able to get the correct
strokes initially, it is absolutely fine. You can practice it
as many as time C12. And by practicing these
particular strokes, you'll be able to make the entire palm leaf correctly
and in a perfect manner. Now let me show you
how we're going to create the bomb
leave as well. That'll be just making
the main stem paused. I have taken a simple
stroke and our code manner. And then we'll be adding
these little strokes on the left portion
and right portion. You can see how
beautifully you can use the tip of your round brush. You just have to maintain the consistency and capacity of color and the color palette. Just make sure that you do not have access amount of water. This is how the solid
black color will look. So now I'll be starting painting the little pond stokes from the left portion coming
towards the main stem. So let us start painting them and you can observe already. I'm just trying to repeat
the same method that I showed you to
practice the strokes. So initially we
are going to have little stalks on
the top portion, and that is how real
palm tree looks as well. Now, as you move towards
the bottom part, you have to slowly
increase the size of the strokes that
you're making. You can also play with
these particular strokes. You can try to make
some level curves. You can also intersect
two leaves together. That is absolutely up to you since leaves are in
a very natural form. So you can definitely
experiment that is not at all compulsory to paint it the
same way I'm painting. Now we're going to
repeat the same process. We are going to apply these little strokes on the
right-hand side as well. Just try to start it from one point and come
towards the main stem. You can observe how beautifully
the strokes are looking. You just have to
maintain the pressure on your hand and just try to
make the strokes carefully. You can see how easy it is to create the entire palm leaf. Also, if you want to see, you can just try to create
the leaves in an angle. I'm just trying to show you. These are the straight strokes. And once you move
in a curve manner, you can just observe the
movement of my brush. I'm just trying to make
it in a curved format. This is how you can use n number of strokes and try
to practice it on a daily basis or in an art journal that you
maintain while practicing. You can use these rough
scrap of paper to practice. Now by practicing, it
will definitely decrease the chances of mistakes while we move towards the
final painting. And it will definitely give you more confidence while painting. I hope that you've got
an idea of how to make the strokes using
your round brush. Now let us move
towards the next part.
4. Lets Cut the Paper: Hey everybody. So before
starting the entire painting, let us prepare the
watercolor paper. As you can see here, I have my watercolor
paper of size A5. These watercolor
papers are of 300 GSM. So GSM is something that
you have to keep in mind. It is about the thickness of the watercolor paper so that it can take heavy washes on it. I've taken one simple
sheet of watercolor paper. And here I have my simple ruler with dimensions and
centimeter in it. Just place your ruler vertically
on the watercolor paper. Now will be just taking the exact size of the molar size of the
rectangular paper, which is exactly 14.7 cm. But you can also take
it 15 centimeter. If you do not want
to be that accurate. That'll be just
taking one point, just plays zero centimeter on the edge of the
watercolor paper. And take one point, add 14.7 cm on the paper. Take another point as well, so that you can draw a perfect line and the points are co-linear
to each other. Now simply play the scale
on both the points. Now, I'll be drawing a
simple vertical line. So here I have got
the perfect square, will be removing the
remaining portion. Now, I'll be taking my pair of scissors and simply follow
the line that I have drawn. Just be very much careful
while using a scissor. Simply follow the line that
have been drawn on the paper. So now you can observe
that we are ready with the Baltic squared that
we're going to use to paint. Now the remaining
scrape off paper, you don't have to throw it. You can definitely use
it for practicing. That is something that you
should do and not waste paper. Now let us move
towards the next part.
5. Lets Tape the Paper: Hey everybody. Now let us take the watercolor paper that
we have just prepared. Here. I have my 1
" masking tape or masking tape is basically a tape which is
made out of paper. And we can use two-sided
tape, the watercolor paper, so that once they remove it, if we can get some
nice white border for the entire painting. You just have to take a piece of your masking t and align it
with the watercolor paper. I'm just placing
the first portion on the tried to give
some portion of the masking tape on the
watercolor paper and some portion of the masking tape on the board on which you
have placed in the paper. Just made sure that
the masking tape is parallel with the paper edge so that you can get a
nice white border. Try to apply some pressure
using your finger or thumb on the masking
tape so that it can get stuck with the
watercolor paper and the surface on
which you have placed your paper carefully
and in a proper manner, replacing the last masking tape. And you can observe
that we are done applying the side deep to the
entire watercolor painting. Now once we are done painting and we remove
the masking tape, we get a nice beautiful
white border. And that is the most
satisfying part of this particular step as well. Now let us move
towards the next part.
6. Painting the Background: Hey everybody. Now
let us start with the first step for
the entire painting, which is painting
the background. So you can see I'm ready with my entire watercolor
paper. When does IT? I hope that you have followed
all the steps carefully. I have my color palette
ready on the right portion. I have my tissue paper as well, a clear glass of water. Then we have this particular
tissue paper on which we can dab the brush to remove
access amount of water. You're going to observe that
everything is placed near to the watercolor paper so that we can access them in a quick way. I'll be using my
one-inch flat brush to apply the background completely. Now, let us prepare the
color palette so that we can quickly and
easily access. To apply the background code
on the watercolor paper. The first color is a grayish
color, which is black. Basically, you just have to maintain our
beautiful consistency of water and color together. I'll be taking some
solid black color using my round
brush of size ten. And I'll be adding
some water in it. And you just have to maintain
a good consistency so that there isn't any axis amount of water or color side-by-side. You just have to
make sure that it is thick enough so that we can get a nice coat of water and color together on the
watercolor paper. Now simply clean your round
brush and I will be taking another color. In
the background. I'm going to take
black and olive green together in
a gradient effect. I'll be taking some olive green color and
the color palette. Make sure that you do
not take too much color. You just have to save
color, no need to waste it. Does try to dig the color
in an approximate manner. Now it is not necessary that
you use olive green only. You can create your own
color combination as well. So now I'll be
adding some water to loosen the cholera
so that it can get a nice consistency while we use the flat brush top light
on the watercolor paper. I'll be using my 1 "
flat brush to apply a thin coat of water on the watercolor paper
that we have side paved. Now the reason behind
applying a thin coat of water initially is so that the colors that we're going
to apply in the background can blend in together
in a beautiful way. Now this technique is basically known as a wet on wet technique. Makes sure that you have applied the thin coat of water carefully and correctly on all the portion
of the watercolor paper. Now, I'll be taking some solid black color in my flat brush and we are going to apply it on the top portion initially. You can already see that it
is spreading in a good way. Because we have applied a
thin coat of water initially. Now I'll be adding some water on the
olive green color that I have in my color palette to get a nice consistency of it. No need to hurry at all. Just do it in a very
careful and convey. You can see I've made
a nice consistency of olive green and
we are going to apply it just below the solid black color that
we have applied initially, tried to cover the
entire portion of the watercolor paper
using olive green because it is going to be in the maximum amount
on the entire sheet. Now will be slowly applying. It will be moving the
brush on the top portion. Try to blend it with
solid black color. Apply as many as
strokes as possible. Try to blend it
in a correct way. Just make sure
that you will make a horizontal movement of your brush to not make
a vertical movement. Now slowly, as you can observe, that we have got a nice blend of black and olive green together. You can simply repeat the
same process and just make as many as talks as possible until you find that the
blend is absolutely correct. I hope that you got
the correct idea of painting the
entire background. Now before painting
the palm leaves, we have to let the
background dry completely. Now, let us move
towards the next part.
7. Black Palm Leaves: Hey everybody, now let us
paint the black palm leaves, which is the first layer of
this particular painting. So here I have my round
brush of size ten, and you can already
observe we have some solid black color
in the color palette. So this is basically
the same black color that we used to paint
the background. So no need to waste color. You can use the same
black color as well. And in case it is finished, then you can take some more black color in the
color palette. Always try to save resources. So we'll just add some water
and losing the cholera. If you are not that much
confident enough to paint it directly to
the final painting, you can use the
grape of paper which is left from the A5 size sheet. You can make the main
stroke initially. And then you can use the dip of the round brush and make these little strokes which
is creating the palm leaves. Also, if you want to learn
this particular stroke making, you can definitely go to the
practice part where I have explained how you can create these little strokes in detail. No need to worry at all. It is absolutely fine if
you practice it on a rough scrape off
paper initially and then come towards
the final painting. That will definitely decrease the chances of making mistakes. Also, this particular step is very satisfying While doing so, you can do it in a very patient. And Conway is, I've taken some solid black color and my round brush, as
you can observe, we are going to make
the main stroke, which is willing to be the
center of the entire army. Down from the top portion
come towards the bottom part, tied to make it a
little bit thicker. No need to hurry at all. Do it in a very slow and
steady way to make sure that your entire stroke is effect
and not blood on the edges. Also, it might happen
that you think that your stroke is not looking
exact similar to mine. It is absolutely fine. There might be minor
changes or difference. It is definitely a
painting so it can happen. So no need to worry about that. Just try to paint it in a
very slow and steady way. That's it. Now will be a dodging
the little strokes to the main stem that our entire palm leaf
can get completed. That'll be starting from the right portion where we
have the masking tape as well. Try to make these little
stroke in a very careful way. You can try to
intersect them also, but I'm trying to maintain
some distance in between them. So you just have to
repeat the same process. And I'll be painting
the strokes one-by-one. Also, trust me,
while doing this, it is giving me a nice
sense of satisfaction. So let me tell you a story also side-by-side while
we are painting. So just continue making
these little strokes. So what happens is while
creating your final painting, it is not at all necessary
that on one go you get a good result or a
good output directly. At times what happens is that you get multiple
attempts to create a single painting
and there might be not collect or
a great output, which doesn't give you
that much satisfaction. You have to just go again
and again and create that one painting that gives you the exact satisfaction
that you want. So it is about giving all
the trials and giving all your efforts to create that particular
perfect painting. Also, one more thing that
I have observed is that once you make mistakes in
any particular painting, you do not have to quit and give up on the
entire painting. It is absolutely fine
to make mistakes. And from that, you
have to learn again and come towards your
final painting again. You can observe
that we have almost completed the entire
portion of the palm leaf. On the right-hand side, it might look a little bit
shiny tool because it is wet, but once it gets dry, you will get a nice
finished look. Let me also tell you something
about gouache colors. So these are
basically mixture of acrylics and
watercolors together. And once they drive, it gives you a very nice,
amazing matte finish, which you can already
observe in the background, which we have created using
black and olive green color. Now being an artist,
it is also all about being very
much experimental. So you can also experiment
with the background. So here I have particularly used olive green
and black together. You can try out with different colors and make
your own combination as well. Now, I'll be completing this
particular palm leaves. And I'm adding the same tools that we have added on
the right-hand portion. I'll be adding those themes, tropes on the left-hand side. This time, we are starting from one point and coming
towards the main stem. Just try to dab your brush
on the center portion so that it becomes a little bit thicker on the center part. You can already observe the
detail of the entire leaf. It has very pointed on the edges and it has a little bit
thicker on the setup portion. You can also observe a natural palm leaf and you can observe the
details accordingly. There might be a little
bit of variation in the sizes and the
length of these lives. It is absolutely sine
since these are leaves, so they can have a
nice natural form. You can also experiment with these little
strokes as well. You can intersect then you can make some curvatures in-between. But I'm trying to make it a little bit simpler
to understand. So that's why I'm just trying to maintain some gap
in-between the leaves. We're done painting the
entire palm leaves, which is the biggest, I guess, for this
particular painting. Now one more black
palm leaf we have on the left-hand side corner, which is on the bottom portion. So again, the process
is absolutely same. We just have to
make a main stroke. I'm taking some
solid black color and my round brush
again of size ten. Isn't it amazing by
using a single brush, we can create certain beautiful elements
for the painting. I'm just trying to add some
water to the black colors and it dried up so you can
lose them the cholera. Once again, try to add
some more black color in case you're black color is finished and the color palette. So now we'll be making
another main stroke. Now this time we
are trying to make the stroke in-between
the painting. So start applying from
the center portion. Dig some good amount
of color in your brush in case you find it
a little bit empty. So I'll be starting
from the center portion trying to make a thin
stroke initially. And once I move towards
the bottom portion, I'll try to dab the brush on the watercolor paper so that it becomes a
little bit thicker. You can already observe
the main store. Now we'll be adding the little
leaves, attaching to it. Again, the process
is absolutely same, will be starting from
the left-hand portion, adding these little
leaves on the side edge. Now once I move towards
the bottom portion, I'll be increasing the size
of these little leaves. The process and method
is absolutely same. You have to start by applying
a little pressure on the edges and dab your brush on the center portion so that they become a
little bit thicker. I'm just trying to
increase the size as I move towards
the bottom portion. Now this time, I have pleased the location or the position of this particular palm leaf on the left hand corner
on the bottom side, you can experiment
and try to keep it on some other side as well. Or you can change
the composition of both the palm leaves which
are in solid black color. Now, right now you
might be seeing the leaves a little bit shiny, but once they dries, you'll get a nice matte finish. I'm coming towards the
masking tape area. I'll be adding a
leaf there as well. No need to worry at all. Once you remove
the masking tape, the remaining portion of
the color will be removed. Now similarly, we'll be adding these little leaves on the
next side of the palm leaves. I'll be starting
from the top portion making these little strokes. Again. No need to worry at all in
case you make any mistake. Also, it is absolutely
fine since the means are having a very natural
and organic shape. So this is going to be the first layer for this
particular painting. Now we have black
color palm leaves, and we'll be overlapping it with golden palm leaves so
that they can create a nice contrast effect
for the entire painting. You can observe that there is a difference between the
first black man leave, the second palm leaves that
we are painting right now. So accordingly, you can create your own natural composition
for this as well. We are almost done painting
the second palm leaf as well. Just be Wayman, slow and
steady while doing this, I'm repeating this again
because if you will hurry, then definitely there
might be some mistakes which won't look good for
this particular painting. Now let us move
towards the next part.
8. Gold Palm Leaves: Hey everybody. Now let us
add the gold palm leaves, which is one of
my favorite steps for this particular painting. So let me tell you
about the color that I'm using right now. So this is basically
a Golden dust that is available in
any local art store. I'll be taking some golden
dust and my color palette. No need to worry
at all in case you do not have a Golden dust. Golden color is easily available in any nearby
local art store. Now the reason behind why I'm using golden luster
dust, that is, that it gives a very nice, shiny look to the entire
painting that we're creating. If you are going to use
a golden color also, it is absolutely fine. I'll be adding some
amount of blue in it. The reason behind
that is so that it gets stuck to the
watercolor paper. And we'll be adding
some water in the color palette so that we
can lose them the cholera. Now you can already
observe I'm trying to mix the entire color together. So just be very much careful, slow, and steady
while doing this. We're doing this to
prepare the entire color. So I'm just trying to mix
it well and trying to make a nice consistency using some water color
and blue together. We are almost done preparing a nice consistency
of golden color. We can definitely check it
on a rough scrape off paper. I'm going to use the
same scrape off people on which we have practiced
using the black color. Just try to make this
particular stroke. You can add a little palm
leaves as well too it, to check whether the consistency of the golden color
is correct or not. By using it on draft,
scrape off paper, you'll get the exact
idea whether you have to add some amount
of water or color. The color is almost perfect. So we can start painting. Just make sure that the color
is completely mixed well, and it is looking
really nice right now. So this is also one of the most satisfying part
preparing the color. So you can already
observe the already with black palm leaves. Now we're going to
add golden palm leaf. So I'm starting from
the middle portion. I'm going to make
this particular bond live in a curved way. I'm starting from the fourth
step, which is very thin. Now once I move
towards the main stem, I'll be just applying some
more pressure on my brush. And you can see how beautiful
the entire stroke looks. No need to worry at
all in case you are not that much
confident enough to paint this particular stroke on the final painting directly. Just simply take our
rough scrap of paper or an art journal on which you
practice on a regular basis. So what you can do is
that you can practice this particular
palm leaf on that first and then you can come
towards your final painting. So the method n steps
are absolutely the same. You just have to repeat them. I'm just trying to add
the tenants on the edges and I'll be dabbing the brush on the center portion so that it
looks a little bit thicker. Now this time what you
will observe is that the leave is looking
a little bit more in contrast with the
background and black leaf. That's why I have
chosen the royal color. It is looking very
much vibrant and creating a nice contrast
with the background. Also, I really don't
know how it is visible to you on screen, but live, it is going
to give a very nice, and in fact, it is creating
a sense of elegans. Now I'll be just
making the size of the leaves a little bit bigger as I come towards
the bottom portion. No need to hurry at all. Tried to paint it in a
very slow and steady way. You just have to
repeat the same steps. We are almost done painting the entire leaf on
the right portion. Now, I'll be adding the little strokes on the
right-hand side as well. The process is absolutely same. So here we have a little
bit of congested. Ada.com is making the leaves
intersect in-between. So no need to worry, just
be very much careful. Use the tip of your
round brush so that you can make the little
strokes together. You can also
intersect the leaves. It can give you a very
nice and natural look. Leaves agenda having a
natural and organic farm only so no need to
worry about that. Also, I know that I'm saying the same steps again and again, but trust me, this
is just to make it a little bit easier
for you to understand. You can already see that is a nice combination of
the black palm leaf, which is in the background and the one that we are
painting right now. There isn't any confusion
while painting, so you just have to make
the strokes accordingly. I'm done painting the
first gold leaves. I hope that you've got an exact idea of how you have
to paint this particularly. Now, in case you find that the color is getting
a little bit dry, you can definitely
add some water in it. Now we are going to paint
another golden leaf. I'm starting from
the top left corner and I have made the main stem. There's a little
bit of color that is placed on the background. You can just dab the tissue
paper on it to remove it. I've made the main stroke. Now this time we are going to
create these little leaves from the top portion and coming
towards the bottom area. It's always starting by painting the strokes and omega
format this time. And then we'll be making
them in a smaller size. You can already observe the
stroke that I'm making. It is absolutely fine if you practice this particular
stroke on it up, scrape off paper initially. And then you can come
towards your final painting. Once you come towards the end, just try to make a pointed
tip for the entire palm leaf. You can see how beautifully
the combination is looking. You can also
intersect or tried to make the leaves a little bit
more closer to each other, it can give you a
different effect. You can also change
the composition, the size of the leaves. So basically you can experiment
with the entire painting, tried to create your own
combination as well. You can see I have come
towards the bottom portion and I have made the strokes
very smaller in size. Now let us add the strokes
on the left portion. So since we are moving
towards the masking tape, you have to apply the color outside the masking
tape as well. So that once we remove
the masking tape, it shouldn't look incomplete. Now I'll be moving
towards the bottom part, repeating the same steps. And we're done painting the
second golden leaf as well. So now I'll be adding a small gold leaf
on the top portion, which is going to
be very smaller. Goal live in size. So again does step
is absolutely same. I'll be making the main stroke. You can absorb that. I have made a main stroke
and a very smallest size compared to the leaves that
we have painted initially. And we'll be adding these little strokes on
the right side initially. Now I'll be adding the little strokes
on the left portion. So we are done painting the
small bowl leave as well. I'll be adding some
indirect leaves that are coming
inside the painting. So it doesn't absolutely fine. You can just create these
random strokes on the corners. So we are done painting
the leaves as well. Now, let us move
towards the next part.
9. Finishing the Painting: Hey everybody, I hope that you enjoyed creating this
entire painting. Now, let us give
the final finishing to the final painting. I'll be removing
the masking tape. No need to hurry at all. Tried to remove the masking
tape and an angle so that you do not end up tearing
your precious painting. You can already observe
that we have got a nice beautiful white border for this particular painting. I'm not going to keep this
particular white border. We are going to cut it
with a pair of scissors. But in case you want to keep a wide model according to
your particular requirements, you can definitely keep it. I'll be removing the site date, which is on the left
and right portion. This is particularly a
very satisfactory part in this entire portion
where we remove the masking tape and we get this beautiful crisp edge
on the entire painting. Now let me remove the
last step as well. So you can see how beautiful the white frame looks
around the entire painting. Let me take you a little bit closer so that you can
observe the details. You can also observe the
corners or the entire painting. Now according to
your requirement, in case you want to keep the white border for
the entire painting, you are absolutely good to go. For me personally,
I'm willing to cut it with a pair of scissors. So here I have my pair of scissors and we
are going to remove the white edge from
the entire painting. Will be very much careful
while doing this. Do not remove the
colored portion, just the white edge. While removing the white edge, be very much careful
and just make sure that you do it in a
very slow and steady way. Also tried to make
yours is parallel to the paper edge so that you
get a nice straight line. Once you are done cutting
the entire white area, what you can do is you can use the entire painting to
create beautiful printouts. You can use the entire
painting to give somebody, you can create some
beautiful illustrations. You can use it for
invitations as well. Also, while you create
your own painting, do a lot of experiment
with the entire painting. You can change the
composition of the leaves. You can experiment with
the background color. You can also use a bigger size of paper to create a
huge painting as well. I'm done removing the
white portion from the entire painting and you can see how beautiful it looks. It is absolutely fine if you want to keep the
white border as well. That is all up to you. That's your alcohol,
what you want to keep for your
particular painting. I hope that you've got
to learn something new and creative from this
particular class. I also hope that you enjoyed creating this particular
painting with me. Keep practicing and
happy painting.
10. Class Conclusion: Hey everybody, you are most welcome to the class conclusion. Being an artist, I love to explore new art bombs
and art mediums. And that is something I always suggest my students as well. Being an artist, it
is very important for all of you to create
an art journal or maintain it on a regular basis so that you can always keep a record of your hard work
and your progress as well. Practicing as
something that will always keep you one step ahead. I'm very happy and excited to share this class
with all of you, and I hope that you got to learn something new from
this particular class. Feel free to ask any adults who have been added
to the class. I'll be really excited to see
all of your class projects. Let me know your
reviews for the class. Keep practicing and
happy painting.
 Rutvik Patel, Artist and Instructor