Transcripts
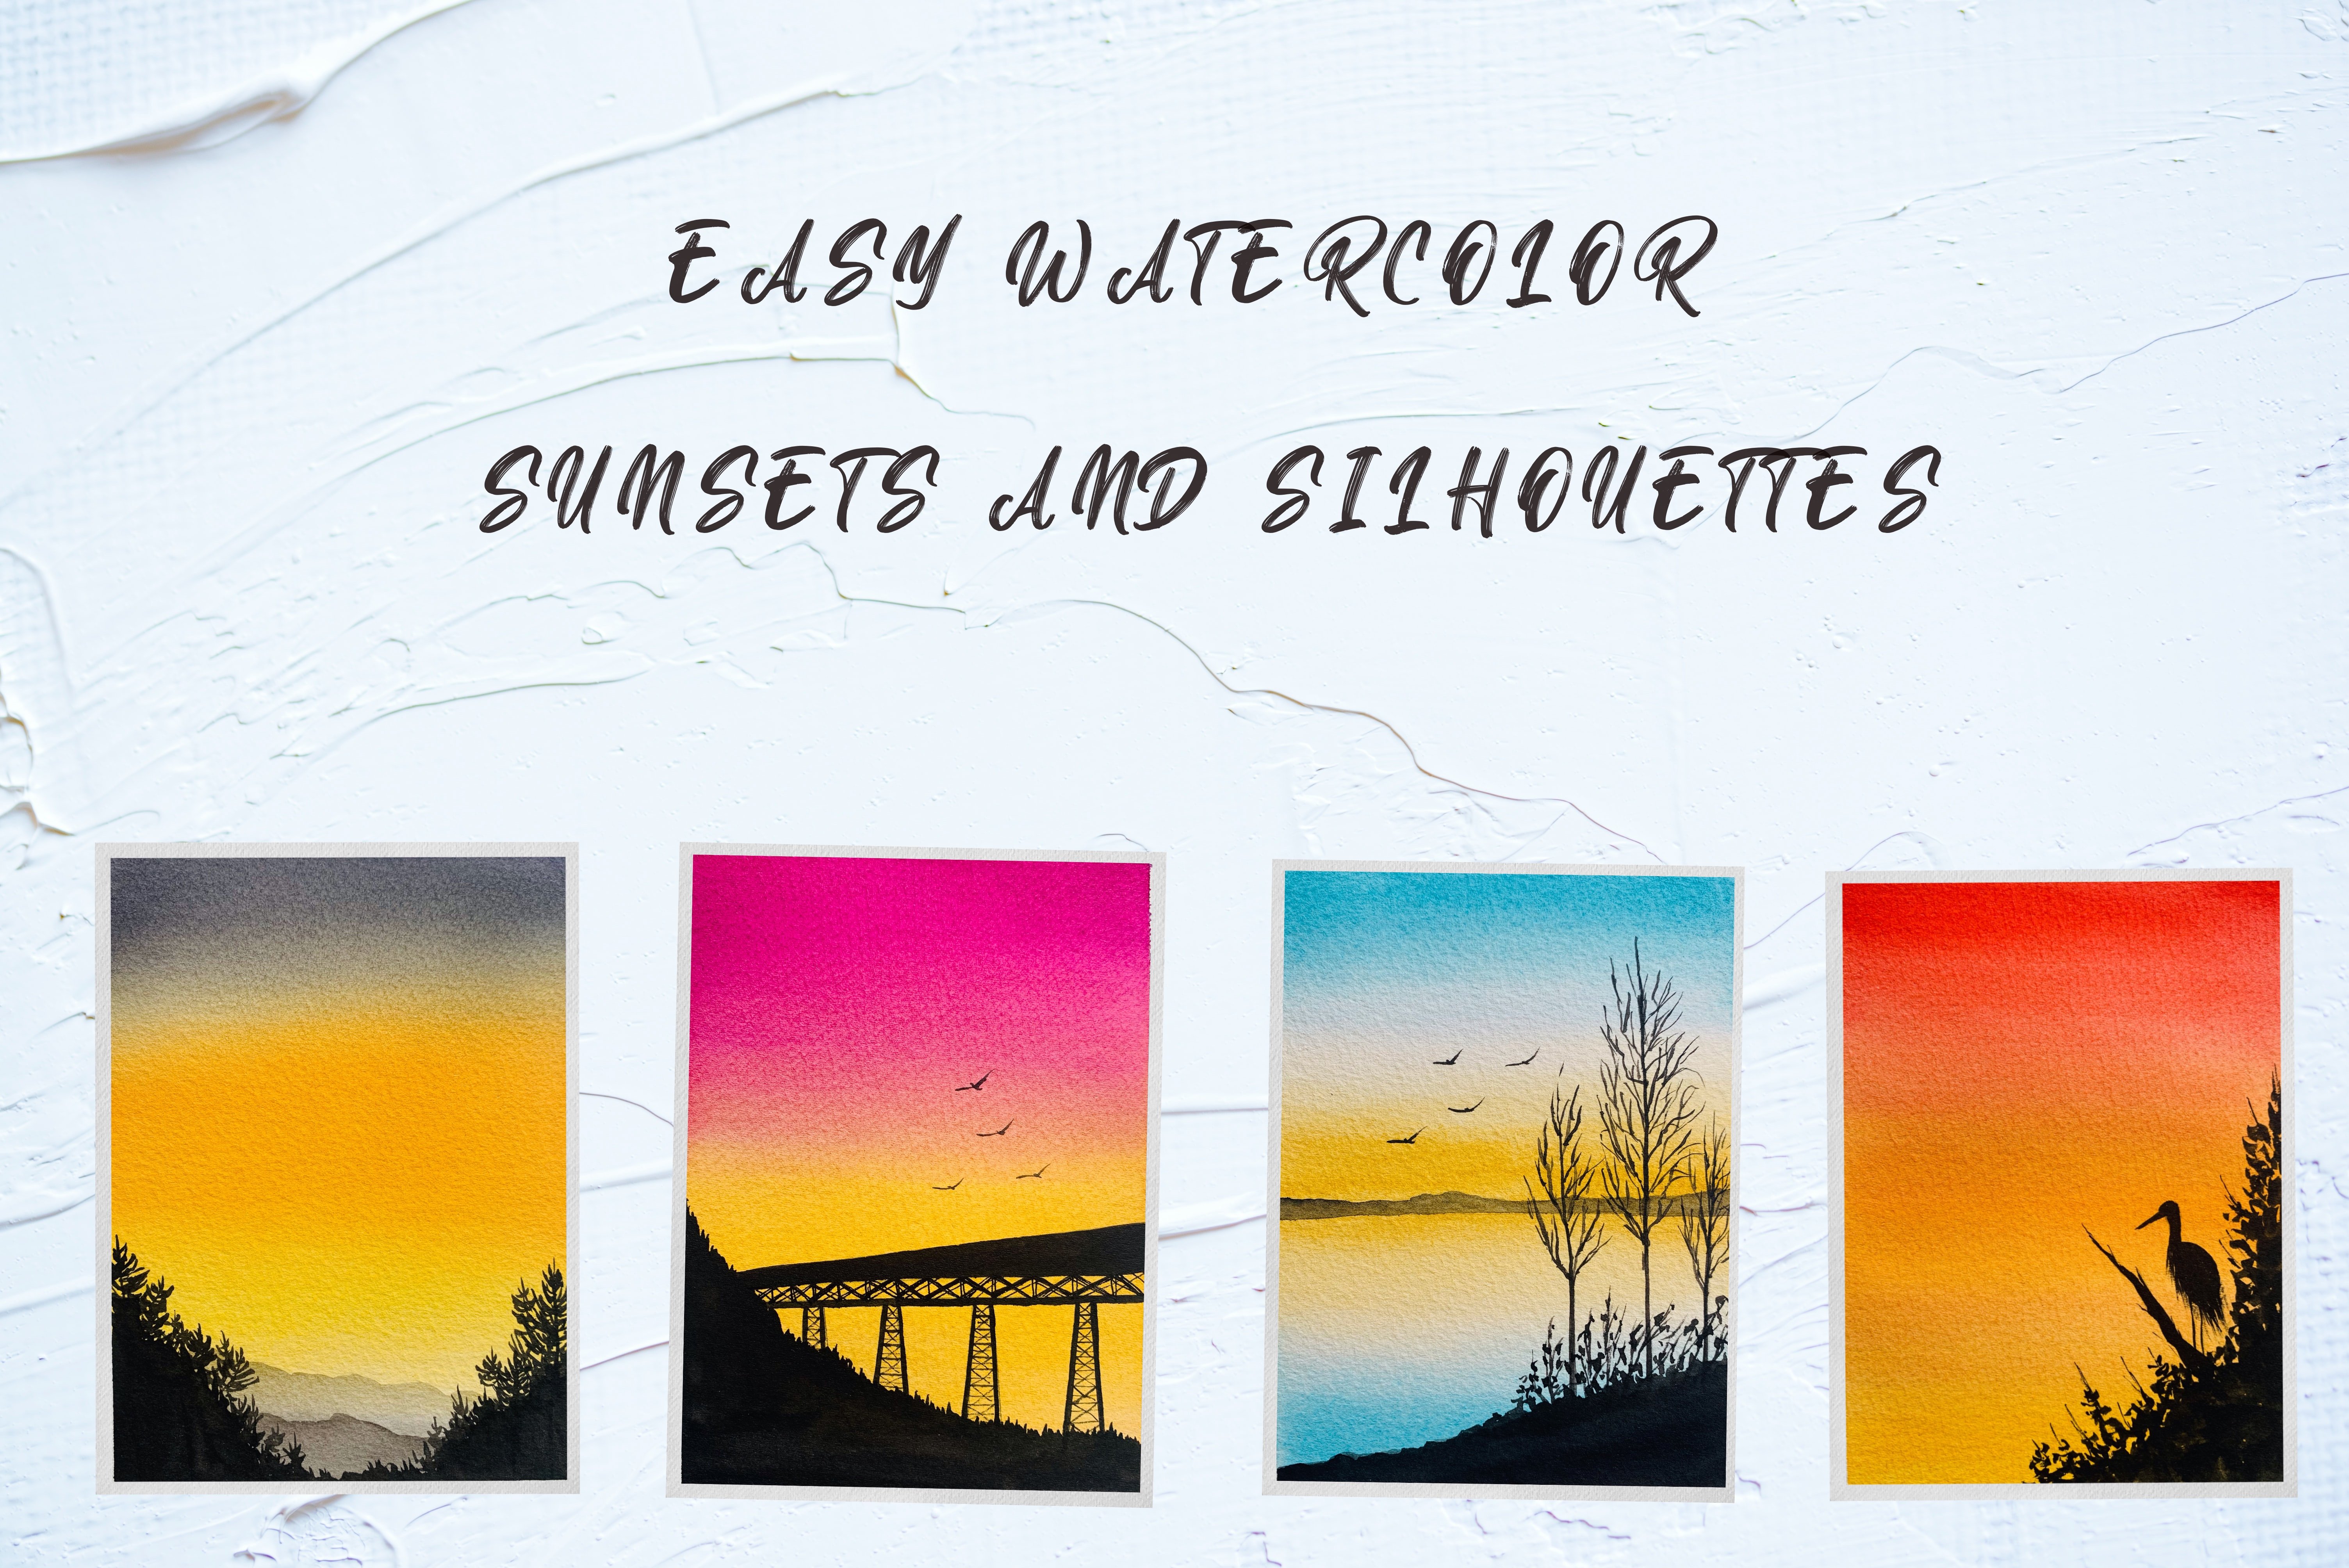
1. Introduction: Nature is all around us and there's so much to explore its magnificent diversity. A job as a work of art, and it speaks to us through different colors and patterns. Let's enjoy some of its beauty and richness. By painting on paper in the form of silhouettes. Hello everyone. I am a watercolor and digital atlas from India. In this big enough friendly class, women learned to pain so many different trees silhouetted against colorful painted skies. I will be teaching some important tips and tricks to master the brush strokes that you need to know before you begin with the silhouette painting. We will be learning some important techniques like what should be the consistency of the paint, how to apply the brush strokes for the tree silhouettes and much more. You'll get to see every detail, every stroke up close. All you need to do best follow along with me the lessons step-by-step and base so that they're actually do weapon. With a bit of practice, you will be painting beautiful tree surveys with ease and great satisfaction. This class is going to be a full week watercolor exercise. I will be uploading five projects and then be followed by a bonus class at the end of each week. Bonus classes designed in such a way that you will learn to paint on new cell made from the techniques that we learned in that particular week. In total, we will be painting twentyfold different silhouettes by the end of this class. Also, each project can be done under 15 minutes. How cool is that right? Now, if you're ready to join this fun, enjoyable class, Let's go and paint some beautiful striking nature silhouettes.
2. Materials: Now let's discuss about the art supplies that we will be using for this class. First, let's talk about the BBA. I'm using Fabriano artistic old traditional byte, 100 births in court in old breast. 300 GSM paper, which is of the size nine inch by 12 inch. But for our projects, I have got down to single people in group four equal parts. Each of this size, six inch by 4.5 inch like this. So you can use a table from a new brand. You can go for any size that you prefer. But I recommend that the paper should be at least 300 GSM or 140 LPS. And it should be a 100 percent cotton. And also go for a watercolor sketch book as we will dipping being 24 different projects. Now coming to the brushes, I will be using these brushes from Princeton. Candidate CDs, which includes three by four inch wash brush or a flat brush size, standard round brush, size three round brush and a size three by 0 brown brush for detailing. You can use brushes from any blank, but a flat brush for washes and blending to round brushes that there's one small size and a bigger sized round brush and a detailing brush is necessary. Apart from these brushes, we would also need another brush. Go for a round brush. Old and new stone rash which does not have a pointed tip or a mop brush should work. Now this soul, our news brush, is the one that is going to be used exclusively for the cell bursts. And that is the one which is going to do amazing reason for the silhouettes. So go grab an old unused a round brush which doesn't have a clip from your blush counter. You will need some paper Douglas or upload drag to clean and white the brushes. Next you would need an eating disorder, kneadable eraser, a pencil for sketching and masking tape, and a masking tape to tape down the paper towel so that it doesn't go up and you get drips. Clean edges are clean dialect or pilots for mixing the colors. Next, you would need daughter so forth. One for cleaning the donut brushes and other one for painting. And at least some colors I will be using watercolor and sin fumes from brands like watercolor. Paintings from line beyond aims and graphed angles, and some other colors from white, nice and Sennelier will be discussing about the colors used in each project. And also, I have mentioned them in the project description section. You all free to use colors from any plan. And if you do not have the colors that I will be using in the projects, I have mentioned the alternate colors or to substitutes that can be used. That's it. And now let's go to the next section.
3. Practice Exercise - Part 1: So this exercise is to practice some brush strokes and also talk about the paint consistency that we are looking for a while painting the main subject, which is the silhouette. First, let's talk about the consistency of two black thing that we should go for. We will be seeing three different consistency or clean sand, how we can achieve it. Do you see in the center of this palate is the freshly squeezed out overdue onto this palette. And I have already mixed some of it using water and decide, as you can see, I'll use the red blush that is dip my brush in clean water and I will load some bed themed and laid on the paper. And you can see that the color saturation is very low. Also the lights onto the paper very easily and smoothly and you do not see any whitespace. Now this is the first Can consistency that I want to talk to you about. Next, I'm cleaning my brush. And this brush has a little bit of water and net as you can see. And using this brush, I'm loading the dry paint that is precisely squeezed. And I'm going to leave the spammed on the paper. Now. Now you can see that the lights onto the papal, well, but you can also see some dry texture at the end. Because the paint is dry. This you see some white space at the end and it has, okay. Now coming on to the next one where I will clean my brush and use a paper towel to wipe out the water from it. That is extremely a dry brush. And I will now load the dry paint that is the freshly squeezed and laid on the paper. And you apply this paint on the paper, it will not glide smoothly. You will see x chosen whitespace or low. Well, how does the three techniques that we tried, how we are going to follow the middle one, that is this one. Let me write down the names of the techniques that before load to achieve these three consistency. The first one was wet paint and a wet brush that is being mixed in water and brush differently. What does x technique that before load was wet brush and dry paint. That is, I clean my brush and it had regained some water and I loaded it with the freshly squeezed. So the pain force drag. So this is bed brush and dry paint technique. And the last consistency was dry brush and dry paint. That is, I clean my brush using and by belt the excess water that was present and loaded it widow freshly squeezed dry paint. So that's stored dry brush, dry paint consistency. Consistency that V1 is still wet brush and dry paying for all the silhouettes. So we will be using this. Now, each of this technique or the consistency of the paint, will yield different results. And see, and try all this consistency in the next part where we learn different brush strokes. And you can see how each of these consistency will give us different results. Even for low HDL that flash drive, or the consistency for the projects. Now let's move on to the next technique that we will be doing in some of the projects for the background sky. So it is one of the famous wet on wet technique. We will be using this technique for adding clouds for the sky in few of the projects. I begin by applying a quote of any Gallo. In this case, I will be using a low from the palate and for Linda color to a small area on this paper. Now, this is the first vector that is the wet paper. I will now load damn mind from violet and apply this wet paint on the wet yellow layer, which is basically the wet-on-wet technique that is wet paint on wet paper goes to a low layer was wet and the paint that we loaded late drawn was also expressed beautifully, creating some soft edge clouds that we want for this guy. And check my previous class to see how to blend two colors for the background sky.
4. Practice Exercise - Part 2: Now it's time to launch fuel basic brush strokes that you need to know before we begin. But the class projects. First technique is quite easy and it's called dabbing. Now, we will try dabbing using a round brush with the point that, and also try them with a different paint consistency that we saw earlier. First, I'm loading wet paint using wet brush and keeping my brush. I've done almost 90 degree angle and dabbing it on the paper. This technique, all you get some points because you're keeping the brush at 90 degree. So you'll get to use only the tip of the brush. Now when the second method, I will use the web version bed. But I was on my brush at an angle, say about 45 to 60 degree and you'll see the difference in the stroke, right? So you'll see that the stroke is completely different than New. Just change the angle of the brush. I will use the same dabbing technique, but I will use the bed brush and dry paint. So first I would do it at a 90 degree angle. And bed. Next, I will slanted of bed and drive the same technique. And you see the difference in the stroke. Next. Next I'm going to try it with the last Kansas density that is dry brush and dry. So I will buy the excess water from the brush and note the dry paint and first, use the 90 degree angle and dab it on the paper. Next, I will load dry paint and keep my brush at an angle and dab it on the paper. So you can see that we have six different types of strokes just by changing the consistency of Dupain, changing the angle of the brush. Let me write down the name so that contain understanding BED DO. First one was wet paint and wet brush and the dried dabbing using a round brush at a 90 degree angle. And are the one was at 40, 50, 60 degree angle. Second one was wet brush and dry paint, and the third one was dry brush and dry paint. You can mix and match status. You can get various results from just knowing these techniques or by just changing the consistency though angle of the brush. It's timed alone. The next stroke of it as the downward leaf stroke. Again, I will be using all the three kinds of stances to show you how you can achieve different results. So first, I will use wet paint and wet brush and start by touching the tip of the brush on the paper. Press down and release. Press F4 it down and release. Repeat this step that is used there. Tip, press, pull it down and release. Next. I will try this with a wet brush and dry paint that I've applied the same leaf stroke that does keep the breast it down and release. And you see that the ends will be a little dry. Will sit there and pull it down and release. First one had smooth ends, but you can see this has some dry ends. And the next technique would be dry brush and dry paint. And it is going to be completely expected to complete leaf is going to have whitespaces and not just the ends. Let me just mark what we use for each of the strokes. One was bag paint, wet brush, this brush dry paint. And last one was dry brush, dry paint. Now, I want you to practice this draw a couple of times, you know, to understand how it works. But we will be using photo projects would be the wet brush, dry paint consistency. A bit downward Leaves stroke. Now, let me show you few Adobe brush talks that we need to know before we begin. Now, the next brush stroke is the better shape. Using the round brush again, all you need to do is place the tip of the brush on the paper, press and release. So it's a very simple and easy stroke. All you have to do is press and release. Press release is a deep breaths and realists tried this brush stroke using different size brushes with the differently in Kansas TNC as we did earlier. I have you're still wet brush and dry paint consistency. And that is what we will be using in our projects. But I recommend you to try it with the different bean consistency to learn the stroke. Next day stroke that I want you to try and guide. This is the pin lunch drops using different sized brushes. I've been forced use the size 10 round brush with a pointed tip and tried to be really thin lines with it. I'm using the tip of the brush, drawing or painting tiny lines. Avenues my size three round brush and to beat this thin line strokes. These strokes are like a warm-up exercise before you begin with the actual painting. Now I will use my detailing brush, which is of size three by 0 and try the same strokes. Next stroke would be the grass stroke that is using my size three round brush and using the tip of the brush to add some code lines like this. Again, you can try it with different pain Kansas density due to different reasons. I'm just going to name it as good as stroke. Now, also I forgot showing you the dabbing technique using the old unused brush or a mop brush. So let's do that. So basically the brush that we're using for this technique should not have appointed it. So a mop brush or a brush that all bash that does not have a point. It works best with this. I'm naming this technique as dabbing without pointed tip. Now I'm using my old brush and dipping it in water and loading some bad beam. And I will try to jab by holding my brush at a 90 degree angle and you get this result. Next, I will use the vector brush and dry paint consistency and that bit again at the 90 degree angle. And you get this because we used wet paint and wet brush in the first dabbing technique, or the intensity of the color is very less, as you can see compared to the second one by being live brush using a paper double. And so basically it's a dry brush and I will load the dry paint and a bit on the paper. And you see this texture. We will go that the second one, which is still wet, brush on dry paint for our projects. So it's basically the pain or tiny amount of water so that you can make doping is leave from the pilot and laid on the paper. So that is the consistency that we're looking for and the wet dry paint technique. Now, if you do not have a rash or a mop brush, you can try it with a flat brush as well. But I'm sure all of you must be having a round brush that you no longer use because it does not have a pointed tip. I want you to practice all this drops to improve your muscle memory in painting the silhouettes. With a little practice you can master destroys very easily. And also after doing a few silhouettes of few projects who will know what works best for you and you can apply that on all the paintings. Now, it's time to learn and being some beautiful, the same vets.
5. Week 1: Are you ready to learn some amazing and easy silhouettes in this week one? If your answer is yes, had the word to the next review.
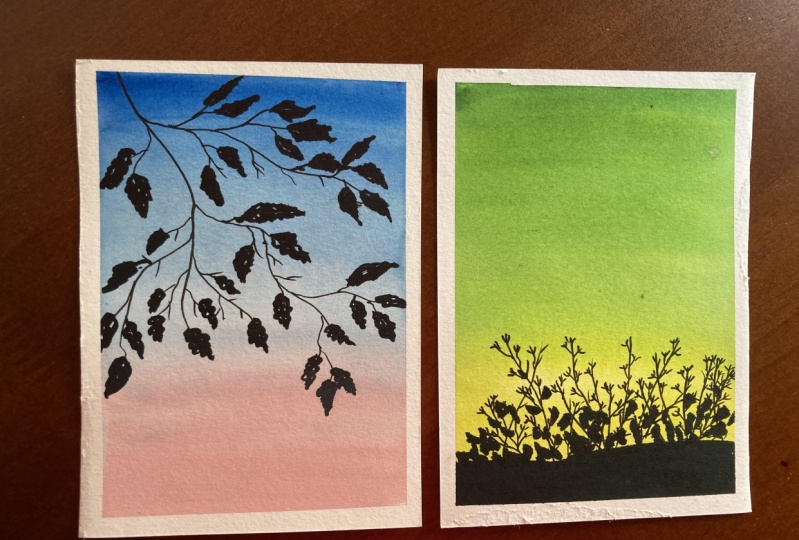
6. Project 1: Hello everyone. Welcome to this one. So let's begin by taping the paper using the Maschine PIP2, a stiff surface. We will be painting side tree silhouette width, some branches and leaves. Once the paper is set, I'm going to be doing a rough sketch of the tree cell. But for this painting, we are going to draw a tree MMR gene from this side. So I'm drawing some blank. From this side. I'm adding, I'm just sketching the main branches here and adding some smaller branches to that main branch. Just me doing a bag of the DRI and not complete tree. All I'm doing is I'm drawing a tree silhouette which is going upwards. So I'm just doing the branches here. And we will add the details later on while we are painting it. Once you're ready with the rough sketch of the tree silhouette, we will also be adding distant mountain in the background. So I'm just sketching it as well. So I'm going to swatch the gallows that we will be using for this project. As I mentioned, this is going to be a bright and vibrant sky. So I'm going for a low rank. Then comes binds gray. And lastly black for the silhouette. By a low and red watercolor. By screen is from Sandy Leo. So you can use any watercolor that is available with you. Now, let's start with the painting. And for that, I'm going to begin by applying a layer of clean water on the paper using my flat brush or the wash brush. I'm loading the size ten brush with a low and painting the bottom section of this guy, but this color, I'm going to stop at some bad in the mid part of this guy. Now, I load my brush with dread and apply the color starting from the top section, then the mid portion of the sky. Now these two colors blend with each other really well. And you don't have to worry about how they make. Now, I'm loading my brush with bands, clay, and paint, only the top 1 fourth section of the paper. But this galaxy, what it does is it makes the shade dread a little darker and intense. It I think you can already see. Now, don't worry about the midsection, but this red and a low don't look blended. We will fix that using the flat brush or wash brush. All you need to do, start from the board and Goldman the horizontal strokes like this and blend the two colors. Uganda, for my previous class to see how to blend two colors beautiful do get a seamless relegated Rosh. I'm cleaning my brush to remove any excess paint that is on the paper and blending these two colors beautifully in the midsection. And you can already see effect blend. I'll be made for this layer to dry before we begin with the silhouette. So the background layer is all dried up. So I'm going to load my size 10 round brush with black and willingness mountane first. Once you fill in the gallery using the tip of the same brush, I'm adding tiny peaks, as you can see. So once you're done adding this peaks, I'm just going and filling in the black again and making a deliberate.com. Once this is done, let's do the main part, which is the tree silhouette. So I'm using my size two round brush and loading it with black paint and painting. The main branches that we drew earlier, just filling in the color sketch that we did earlier. Since the main subject here is the silhouette, that is the one which is going to take a lot of time. The background sky can be done in a minute or so, but the silhouette needs a lot of dealings. So it is going to take much longer. So don't hurry up this process, take it slow. Also one thing that you have to know S while doing the sketch or well-being thing if you're going freehand painting, is that dollar. Tree branches always make it irregular. And that makes it more interesting. Once you have filled in the tree silhouette, It's time to add the details now. So I'm using my detailing brush with the size 3 by zeros and adding some more smaller branches or what you call twigs store all those branches that we did. Again, I'm not adding just some lines here and there. They are irregularly shaped lines. I can see. What I'm doing now is adding some leaves to that quakes that we did just now. Slide. A bad thing leaves and the spring or Alam doing is just using the tip of the brush and it dawned on paper. It will add beliefs. Do those two weeks. You can go ahead and add it. So on the Drake's audio again, just randomly select true two weeks, then add this. By adding leaves. I'm adding few more tiny branches here. And I'm going to stop here. I'm building off this masking tape. And we have a spring tree silhouette with bright and beautiful sky.
7. Project 2: Today we will be painting project 2 of week one. We are going to be predicting sky with a pine tree silhouette. So I'm taping down the baby using a masking tape. Once the bay by straight d. Let's look at the colors that we need for this project. As I mentioned, it's going to be up sleeping sky. So I'm using a wireless and black for the silhouette. So let me just write down the names of this gala. I'm using watercolor in here. On Friday. If you do not have water color inks, you can go for water color tubes or pans, whatever is available with you. We are doing and how can we forget the famous pine trees, right? So I'm doing a rough sketch of binary by drawing a straight line first, which is going to be the trunk and adding some downward branches to this trunk. Going to have another small pine tree. And I'm adding some branches for that as well. Is that that is a legal gap between the branches. So it's going to be filled with the leaves. Let's paint the sky first. So apply a code of water evenly on the paper using a flat or a wash brush. So once that is done, I'm using my size 10 round brush and being in this type ink. Now, you don't have the winery do spread it evenly on the paper that it's okay for this DACA at some places and light at some places we are going to add some soft clouds to this being sky. Now while the paper is still wracked with this pink beans and low going to load my brush with violet and adding some soft clouds here. Just adding it randomly because it is wet on wet method, you don't really know how it is going to split, but I'm just adding some horizontal strokes like this to give the soft clouds block. Just make sure that the clouds are darker at the top section and Lidar and the bottom part of this guy. I'm going with the sacred layer to intensify the gullet of this clouds. Once you are done with this, we wait for this layer to dry before we begin with the pine tree silhouette. Once the paper is dry, I am using my size three round brush and loading it with black paint and painting this trunk and branches first. So we're going to add the foliage to this pine tree months. We have this trunk and the branches ready. I'm adding branches. Do this more logline three as well. This done, it's time to add the four leads to this pine tree. So the old brush technique works best for this. So this is the same technique that we learned in our practice section. Don't use my old brush and I will pick some black paint that is almost dry paint just enough are a bit DOT 4 dose or that the brush can pick up the paint from the palette and use the same our dry brush stroke technique and add the foliage to all the branches that we have done here. Is that the paint is not too wet. It should be a big dry. To create this foliage. I'm just dabbing the brush and adding leaves. I'm filling in the gap between the branches by adding more foliage to the trunk. Now would it be the same step forward, those small literary hero that is, load your brush with almost dry paint and dab the tip of the brush and add before. Now, the bottom section of this bigotry is looking MBA. So I'm going to fill in more foliage here. Now it's time to add the detail. So I'm using my detailing brush and adding weeks at the end of each branch. I'm adding like really thin lines in all possible directions that will make it look like some drinks. In this same step of adding tweaks to this smaller pine tree as well. And I'm done. Let's add some tiny little flying birds on this guy. So using the same brush, I will add the birds, just draw a line and add a tiny dot in the middle. I'm adding around four to five flying birds and we are good. Then let's build off this masking tape and see how painting looks when those clean edges. So the pre dipping sky with the pine tree silhouette looks amazing.
8. Project 3: Hello, Today, trajectory of me, one thing only feed lead, new background, sky. So let's start today's project by draping down the masking tape. Now, the colors needed for the project, as I mentioned earlier, it's a blue skies, all we will use blue. And then we are going to use Payne's gray for the soft clouds and black for this silhouette. Writing down the names of the scholars or that you can refer, do it. I have also mentioned them in the project description section. Now let's begin with the sketch for the silhouette. So I'm drawing small branches closed and I'm going to add some leaves to these branches. The news or are not of the same shape. Just drawing them randomly. Uganda, refer to this sketch added in the resource section and do the same. I'm adding one more branch. And we'd be in the same step of adding leaves to these branches. So always, while doing the sketch, make sure that you keep it or not. Because once you apply paint or when this gets you cannot. Once your sketch is straight d, let's go to the painting bad. I will apply a code of Bordeaux on the paper and read it evenly using a flat brush or the wash brush. I've been nom use my size 10 john brush add. The blue being from the ballot and apply this color on my paper. Now you don't have to spread this paint evenly on the paper. You can leave it as it does. As we are going to add some clouds to this red paper. I'm vibing big strapping that we settled on the edges. Now I load my brush and add some clouds to this guy. Again, wet on wet technique. So just add some horizontal stroke and let it do its magic. Going to increase the saturation of the clouds by going, Oh, when I'm adding my second layer of paint. Now rebate for this layer to dry. This is how this guy looks. Once it dried, you can see the soft gray clouds on this guy. So now I'm using my size three down brush and loading black paint and just filling the sketch that we did. There is nothing extra. I'm just filling in the leaves and the branches that we sketched. Since it started, but deduced process of filling in the color sketch that we did. So I'm going to speed up the video here. You can always adjust the speed of the video by going to the settings and slowing it down. Please note that that I'm not filling the leaves completely, I'm just outlining it and leaving some gaps in between the leaves arrows not of the same shape. They are also two estate and Don. So when you're doing the dream, that always makes sure that all of them are not uniform. Gave each offered a different shape. So I'm done painting the sketch now it's time to add the details. So I will use my detailing size three by 0 brush and add the remaining deep is that Does left, that is adding those small buds, do that. All the branches. What I'm doing as I'm adding tiny line and joining us. So good. Do indicate that it is a bug. Could be the same step and add these diamond buds to all bunches. Now, I will add some more smaller twigs. I'm adding some more volume to the silhouette. Bye. Painting this. On adding this two weeks. I will stop it here. And being done masking tape. And B have an adult leasing sky. The side tree silhouette.
9. Project 4: Hello. Let's see what is going to be. Today. We are going to paint some don't need bush silhouette with stunning background sky. So first step down the PayPal using masking tape. Now I will do a rough sketch of the cell bed. First draw some upward facing branches like this. Now add some Schultz, do these branches and feel more deep is laid down by painting. So your acid off schedule of the silhouette that we will be doing today. I'm adding few more branches. So if you notice this band just out in the form of a zigzag line. So a rough sketch of the silhouette is ready. Now let's take a look at the colors that we would need for this project. I'll be using orange and flawed the sky and Blackboard. So let me write down the names of the colors use for this project. Escaped to the painting. Now, as always, I begin by applying a quote of clean water onto the paper and spread it evenly using a flat brush or wash brush. One, start this done. I will use my size 10 round brush and big orange from the ballot and being the dice guy using the scallop. Once you're done filling the paper but orange color, load the brush with brown paint and apply this pain to dot-dot portion of this guy, about 1 fourth of the paper. I will now use my flat brush to create us more blended sky and wait for this layer to dry. Did more excess paint or water that is present on the paper and why they exist Spain fusing RP but double and continue to blend this guy that the backbone Scott is dry. I will use my size three down brush and black from the pilot and the branches. First. All the branches but black. Now I will use my big gaming Gosh to add the b is that I mentioned earlier. I think small Jones shoots like this. I really also be adding some berries at the impulse. Each shoot. Just add a tiny little dot at the hips to show that they are berries. And all add small dawns. Do the shorts like this. Now repeat the same step for all the branches that do have Dawn, That is add the berries and cons. I'm speeding up the process here since it is repetitive. And that is for each branch. Now once you're done, but this step is time to add some more. Be using my size 10 round brush and add some foliage. And the bottom part to make it look like a bush. So note the branch with some black paint and use the tip of the brush and dab it on the paper like this. Had the foliage to this end guy bought them section and fiddle it complete. Is just a simple technique that good practice to add foliage. Now I'm going back and adding some more finishing date is by painting some more shoots using my detailing brush. Like me stop it. And below the masking tape. Now, we have a donee. Baghdad on Skype.
10. Project 5: It's time for the last project of this week one. And let's see what we are going to paint today. We will be doing a complete tree celebrate today with some easy brush strokes. So I will start by dipping down to pay by using a masking tape. Now, let me come to the sketching part. First, I will draw a line for the tree trunk, trunk of bed. Next, add two branches on either side of this drunk. Now add the ground for this tree. So I'm adding an amoeba shaped structure here to act like a ground. And I will do the same for the side branches as well. I will add some more branches here. And the sketch is ready. Now let's look at the colors that we use for this project. I'll be using blue, violet, and black for the cell. Red. Blue and violet are watercolor paintings. You can use the Galois in any form. Beep and groups, band playing, sport that where you have. Let me write the names of the colors used. Now, let me start painting by applying a god of water using a flat brush or wash brush. I will use my size 10 round brush. Big boiling from the garlic and being the top section of this guy using this color. I'm going to keep the shade light and not make it too dark. I'm going to clean my brush and load it with blue now. And being the bottom section of this guy using this blight and blend the two colors. In the mid section. I'll use my flat brush to make the blending process easier and smoother. As I mentioned, I'm going to keep the sheets a little lighter. And so I'm not going with the second layer of paint. And I wait for this layer to dry. Now that this guide layer is dry, I'm using my size 10 john brush to paint the grounds he are using black color. I'm going to fill in the gala first for the sketch that we had done earlier and add the details or more foliage later. In data outline first. And now I'm going to fill, I love note a beat the same step that spill in the law for the side grounds as well. We're going to speed up the video here. So now that I'm done filling in the Gulf. It's time to add some brush with paint and you set the book, the brush on the paper. Just add the foliage around the grounds. This same step that is using the brush, add some foliage to the site. One, this is done. I've been Main.main tree, trunk and the branches. So more like a gun. Now, let me build this mass can be, have an STI, beautifully silhouette.
11. Bonus Project: Hello, and it's time to being the bonus project. As I mentioned, the blueness class will be something from what we learned so far and this week. So we are going to be painting out binary in this bonus project, but in a different style. So let's begin by taping down the, by using a masking. Now the paper is set, so I will begin with the binary cell red sketch. So as we did it in our project, we are going to draw the trunk first for this pine tree silhouette. Once you are done with the Zhang, add few branches on board decides of this trunk. Now notice that the branches are going in all possible directions, some upward, some downward, some strain. By just changing the direction of this blanches. It's going to be a completely different binary cell bet, different from the one that we did in project boo. Now, it is going to be binary read only the branches and fuel leaves. So all the details needs to be in these branches. Now let me show you the colors that I will be using for this bonus project. I'll be using cadmium yellow for the background sky, and black for the silhouette. Let me write down the names of these shades. If you do not have this coral color. I have mentioned the substitute or the alternate color that you can use in the project description. I'll, let's get to the painting. So I will start by applying a group of clean water owned by using my wash brush. Make sure that you spread it evenly and you know, you do not have water on the paper. I've been using my size 10 brush and get a loan from the palate and being the top section of this guy using this color. Next, I'm going to clean my brush and big Gordon from the palate and being the board and portion of this guide using this quote and shaped. Now, I'm not going to create those more blended sky here by using my flat brush. Instead, I will go for a playful sky by adding some clouds using the same paint. So I will add some clouds while the baby is still in bed. On the top portion of this guy. We made for this layer to dry before we begin with the pine tree silhouette. Now that this guy, Leo, is dried, I've been in use my size two brush and loaded with black paint. And I believe that does done. I will use the same brush and paint the branches that I have sketched. I assume that now you already know that this binary silhouette looks completely different from the one that we did in project do, just by changing the way we sketch the blanches. Now that's warping thing that you need to understand by doing this already. That is changing the direction of the branches, changing the shape. Could, you could end up with a completely new tree so that now switching to my detailing brush that is size three by 0 brush and adding the tiny branches using this brush. As I mentioned, on your best boundary, will not have a lot of foliage. So you need to add all lot of details in the form. Wolf is tiny branches. Now I'm using the same body detailing brush, I add some foliage to fuel this branches by going with the dabbing technique. I'm just using the tip of the brush and just dabbing it. I'm not adding four leads to all the branches. I'm just randomly selecting tube dances and adding tiny bit of foliage to it. Adding finishing touches and the form of tiny branches. I'm going to stop here. And the mass came. And then may have all completely different pine trees, right with God, this bag known sky.
12. Week 2: This week we will be learning new set of trees. So let's get started.
13. Project 1: Hello and welcome to this new week when we will be painting and learning new setup. So let's, let's begin today's project by taping down using masking tape. Now, let me swap the colors that I'll be using for this project. Trust up a spines. Then we will be using Bing. And finally black for the silhouette. So binds great is from Sandia and this pink is pretty peony from graphed angles. I have mentioned the alternate colors that you can use instead of this if you do not have the exact shade. Again, find that in the project description section. We'll start by applying a code of clean board and wetting my paper evenly using a flat brush or a wash brush. Now, I've been using my size 10 john brush and start applying the pain from bottom part of the paper. For this guy, I'm going to fill about three fourths of the paper, but this being shade. Now I'm thinking, binds crave from the palette and painting the dark section of this guy with this color and blending these two colors. Have. Use my flat brush. For the seamless blend. All you have to do is use a flat brush and go with the horizontal strokes like this, starting from the bottom or from the top section of the paper, depending on the colors that you have used and blend them beautifully. My bodega, more opaque brush using a paper towel and continue the process. I am going with the second goal of Carlos to increase the saturation. I'm going back to my flat brush and blend. Again. Once you are happy with the blend bait for this guy, too dry so that we can bring the cell back. Now that my background sky is dried, I'm going to draw a rough sketch of this silhouette. So what I'm doing is just adding some branches starting from the bottom left corner like this. You can do this beforehand. That does before we do though, before we paint the bag gone sky. But just that it is very simple, so I'm doing it now. All you need to do is add some branches here. If you can skip this step and add the paint the branches freehand directly. Now I will use my size two round brush and load my brush with black paint and drilling the colors for this branches. Uganda, refer to the sketch. I have uploaded the final painting in the resource section. So if you want to sketch a rough sketch before painting, you can refer that and do the sketch and keep it ready. And then you can start painting the background Skype. To make the process easier. If you find this difficult. Once you are done painting all the branches, Stine to add a bind leaves these branches. I really use the detailing brush and load it with black paint and add some needle shaped leaves like this. This is one of those strokes that we practiced in the practice section. Just adding some, drawing, some leadership leaf and add them, do all the tips that you have drawn here. I'm speeding up the video here because it's wet it a bit. The duke, all I'm doing is adding those are buying shaped or the needle shaped leaves on all the tips that you see on the thing. Again, adjust the speed of this medial in the settings. This is a time-consuming process that is adding these leaves is a little bit time-consuming, but the end result is really what the time. So take your time and add the beak shapes. Now I'm using the same detailing brush. I'm going to add few more branches here and there. Between those leaves. I'll switch to my size 10. Brush and add little pico branches in the gap, which looks a little empty. So I'm going to fill it in by adding some more thicker branches. Now let me be logged the masking tape, I add more and more detail that I'll add a little more using white gel pen. Or you could use white watercolor wash and added dynein wound. So we have drinks in bed with me. This shape leaves and beautiful night sky.
14. Project 2: Hello, and it's time for the second project of this week. And we will be painting a beautiful tree silhouette with a glorious backbone sky. So let me begin by dipping down my paper using a masking tape. Now let's look at the colors that we would need for this project. So I stem out. I'll be using blue, I'll be using red. Binds gray. And finally black for the silhouette. I'm using blue and red watercolor paintings and pines gray is from Sennelier. So I'm just writing down the names so that you can draft if you do not have pines gray, I have mentioned the alternate color that you can use. The project description section. Let's paint this colorful sky with some soft clouds. So I'm going to start by wetting my paper using a flat brush and spread the clean water evenly on the paper. My size 10 john blush and big blue from the palette and paint a dog bite of this guy with this gorgeous blue. I will keep the shade ready light in the mid part of this guy. Me my brush and I will not load the blazing red and apply the paint to the bottom section of this guy and reduce the value of the color. As I know midsection. I will now go and apply the second layer of paint to intensify the color. And to be the same step as I come towards the midsection and slowly blend it in. Still bad, I will load pines gray and adds add some random stroke and let the paint do the magic on the wet paper. Adding them only in the top section, that is create clouds in the blue sky. Don't worry about the shape of the clouds that you're going to paint. I'm just going to increase the density of the clouds. As you know that once the paper dries, the colors will look or shade, light out compared to when it is back. Now we wait for this layer to dry. Once it is dry or use your old unused brush that doesn't have a fine tip for creating the foliage. We are loading this brush with black paint and painting the ground of the tree. I'm using the almost dry paint to create the foliage here. This is the same technique that we tried in the practice exercise. I'm adding the foliage to this For section that is top sides and bad. Don't worry about the shape of the foliage here. We're just going to create a ground for the tree by dividing it into four sections that a stock back, the sidebars and the Mapbox base. Make sure that when you load the paint, it should be almost dry and not very wet. Otherwise, we cannot plead the foliage effect. Using a brush and just dab the brush on the paper. And you have the 4d10 h. Now, I will add to this tree using my size three down blush. I'm just drawing slanted vertical line and adding some branches. Now I'm using Adobe detailing brush. I will add few more branches. Everything is in the database. The more you add the bad dog is going to add them as much as you want and make it look better. I'm switching back to my brush and adding to this tree. Now I'm using the signs, three down brush. I'll add a meadow here. Just very small portion and the bottom of the paper at this black paint. Now, I will use my old brush and load the dry paint and just dab some paint to create the texture for this meadow. It is the same stroke that we did to create the foliage for this tree. So we are doing the same thing in the bottom, but to add this meadow, yeah. I will now add one more small tree here to the side of this big tree using my detailing brush. First, I'm ending the branches and the dream dunk. And later I will add the foliage in the same a method that we did for this bigger tree. I'm just showing you that it can be done either obey first draw or paint the trunks and later at the foliage, whatever is easier for you. Once the foliage is done, I'm adding some more details to this small latrine using my detailing brush, my add-ins in our branches. Now that would the tree sat done. I'm going to build off the masking tape. And we have a beautiful tree silhouette with a delightful guys ready?
15. Project 3: So it's time for the project. So let me begin by keeping down the B by using masking tape. Your paper is set. I'm going to draw a rough sketch of tree branch. So it's a Blanche popping out from the top right corner. And I'm going to draw the main branches coming downwards. So once we have a main branches set, I'm going to add some smaller branches attached to this main branch. Or you can call it wakes. So draw a few more, smaller branches or twigs coming out from this main branch. Now while drawing the main branches or the weeks, make sure that it isn't a simple slanted line. Always make sure that the edge of the line is irregular. That is what makes us celebrate look more natural. I'm going to keep this simple and not adding the Lord doctor answers. We will see how we can improve wisely drawn by repainted. Now, let's look at the Carlos needed for this project. I am going for bright colors. That is a low orange and black for the silhouette. I'm using watercolor paints. You can use watercolor in any form. I'm just driving down the names of the colors used for this project. Now let's begin painting by first applying a quote of clean water evenly on paper using a flat brush or a wash brush. So this process helps to blend the colors without any difficulties. So I make sure Michelle blending two colors. I'm loading my size 10 round brush with a blind to the dark portion of the BIBO first, linger about three-fourths of the paper. Now, I load my brush with orange and fill important one for section with this color. Now, as many of you know that these two colors go with each other really well and you do not have to worry about anything. Since the watercolor in sadly, really vibrant, I don't really have to go with this thinking wash of the color, but if you think the colors are done, you can go for the second layer of colors while the paper is still wet. Now, I'm using my flat brush to create a seamless blend even though it's not really required. But it's an easy process and you get a seamless blend. So, and using my flat brush and blending these two calls colors really well. You can see how beautifully the color transition from orange to yellow. Now, wait for this layer to dry before we begin with the silhouette. Now for the silhouette, I'm using my size three down brush and loading it with black paint and starting with the main branches that we drew earlier. This process is a bit time-consuming, but do it slowly and add the main branches for. Also notice that as I come downwards, the thickness of the brand is going to reduce that as it is going to get a little thicker at the top. And as we come downwards, it has to be didn't know. Was the main branch is done. I'm adding the smaller bank to says When using the same brush, you can use a detailing brush to get thinner strokes. And speeding up the video. As I'm doing this, painting, the branches that we drew earlier. In case you wanted slow, you can just add just a setting on the screen and refuse the speed of the suite you. Now it's time to add some more details to this. Red. I'm using the same size three Rom brush and adding some leaf buds to the tweaks that we did. Just using the tip of the brush and adding tiny buds to all the twigs. We are trying to look up odd to flood tree, but oh, a new leaf buds. So I have increased the speed of the medium. So all you have to do is to be the same step. We'll all the gouache. Once the says Doc, I've been switch to my size 0 brush to add like ring leader need thin lines. Or two weeks in-between those tiny leaves. Don't get rid some more interesting, look at them better what you feel like and give it some more life. So when it comes to bog, everything is in the detailing, so add them as much as you like and give more life to the silhouette. I think I'm done. So let's just be loved this masking tape and read me the work, which is like the most satisfying. But when you finish a painting. And then we have a live version, sky with this I three brands, silhouette. So same building yet so beautifully.
16. Project 4: Let's learn. Let me first state down the b-bbar using the masking tape. Now let's look at the colors that we will be using for this project. First one is orange, next is Blue Lake and black for the silhouette. So Blue Lake is from bike nights. I have mentioned the alternate gala that can be used instead of blue lake in the project section. In case you do not have this sheet. Let's begin painting. This is going to be a very simple silhouette and you don't really have to sketch it beforehand. If you are not really comfortable doing it freehand, go ahead and do a rough sketch. I have included this final painting in the resource section. So you can refer to that and do though, sketch before we begin painting. So I'm applying a goal of even more or using a flat brush. Next, I will load my size 10 round brush with blue lake and applied the paint to the dark portion of this guy and work its way down to the meat section and see the color in density data using as you come down and let us keep it that way. Now I will load my brush with orange and paint the bottom part of the sky, orange. I'm not going to mix these two colors in the midsection, so I'm going to keep it really light in the mid part of this guy. Also, I recommend you do dry and slide staccato beforehand in this module paper to see how the colors blend with each other. If they mix with each other, you don't have to keep the shape light in the mid portion of this guy. You can blend them together. Just going but the second layer of wash and trying to make this blue a little darker. Now, I'm going to use my flat brush and small portion of this guy and take out the excess water from the brush. Once this is ready, we made for this layer to dry before we begin the silhouette. I love this color combination so much. It is so bright. And 20, now that the background sky is dry, Let's go to the cell bed bug. So I'm loading my size 10 round brush with black and painting slanted vertical lines like this. That is, I'm just painting the tree trunks. So increase the thickness of the drunk at the bottom. As I mentioned earlier, it's a very simple tree silhouette with some tree trunks. So I'm adding some more detail runs on the other side of the paper as well. As again, notice I'm making the border section of this drunk a little thicker and the upper portion will remain a little thing compared to the bottom section. Now that the main tree trunk. Let's add some smaller batches on both the sides or age of the tree trunk. So I'm using my size three down brush and adding irregular blanches, going in all possible directions. As mentioned earlier, make sure that these branches are not just straight lines, make it water, and add them in all possible places. Both adding some trunks though the trees that is present on the other side as well. Now that I'm done adding branches, I will use my brush and add few more days. I'm just adding few mod p Now branches do all the branches that we painted just now. Somebody leaves small leaves and add them, add them to these branches. So like I mentioned before, when it comes to recreate, everything is in the details that you add to the cell red. You can add as much as you like or you can keep it really simple. I think I've gone now. And let's build off the masking tape. So we have a radiant sky with some tree trunk silhouettes ready.
17. Project 5: Hello. Today we're going to be doing the last project of this week. As always, after start, by dipping down to beat while using a masking. Now let me do a rough sketch of the tree so that we will be painting today. I'll start by sketching the tree trunks first and adding some branches to the trunks. I will add more Zhuangzi and branch branches for that as well. I'm lady with the rough sketch adding the is with being the leader part while we are painting, that is basically adding the leaves to the tree. Now let's have a look at the colors that I'll be using for the sky here. I'm going to be using ink and bind screen for this guy. And lag for the silhouette. Think and a logo, watercolor. And binds is from Sennelier. Let me just write down the names of each color used. Let's start painting and admin for loop. The first basic step that is applying a quote of clean water using a flat brush or the wash brush. This process of applying any more wetting your people eat when Lee makes the blending of colors for the background sky much easier. Now, I will use my size 10 round brush to color this guy. I will pick a low flows from the pilot and the bottom part of this guy using this Gullah. Next, the dog, but all of this guy is going to be beings. So clean the brush and load it with ink and apply paint to the top section and blend it in with a low as you come towards the ocean. Now for this mode transition from a lot of pink abil use Miguasha angle with horizontal strokes like this. And lender do really well. I'm happy with the blend. So while the paper is still wet, I'm using my size 10 john blush and big pines gray and add some dark clouds to this beautiful sky. I will add the clouds only to the top section that does the pink bar. Does this guy. Let the baton back technique work its magic and we will wait for this layer to dry. Was this guy is dry. I will not use my size three round brush and being the sketch of the tree trunks and the branches that we did using black paint. This is the potion bad, you have to take it snow and not cloudy. You can see as well that not enough good, drunk or the bad just as trade always make it irregular, so that makes it look more natural. Once I'm done painting the blanches and a tree drums, I will switch to my size 10 round brush and add the downward leaf stroke that we discussed and practiced in the exercise section. Now the consistency of the pain for the stroke should not be too watery nor too dry, should be somewhere in between, as we discussed in the practice exercise section. So now I will add a bunch of downward leaves to all the branches that have done. And filling this tree. I'm going to speed up the video here as I'm doing the same downward leaf stroke for all the branches. Of course, you can adjust the speed of the video intersecting and make it slow. Hope you have drag is the stroke outcome for practicing the strokes beforehand makes it much easier when you execute it on the final painting. Now, I'm adding, feel more finite Dr. I use my size three Don brush and add some final adjustments to this day. Let me stop it. And they loved the masking tape. So we've finished beautiful Jason bit with Skype.
18. Bonus Project: So you know that each bonus class, we will be creating and painting something from what we learned this week. So this boldness glass is no different. We are gone up being outside tree silhouette, which is completely different from the projects, but that we did earlier. Start by taping down the paper using a masking tape so that your paper doesn't go up and down your fingers to make sure that being done not bleed. Now, let's look at the colors for this project. So let's watch the colors. I'll be using watercolors from White Nights. So I'm using cadmium yellow. Next one is blue. I love this color. Now if you do not have the exact shade, do not ready, save the project description. Do know which other alternate colors that you could use. And I'm using black for the silhouette. So let me write down the names of the colors, hues so that you can drive forward to it. Let's do the rough sketch first. So I'm drawing a mounting here. We'll have two layers of mounting here in the bottom section. And we will have those side three silvers coming down from the top right corner. I will just sketch these branches and leaves really be added later when we being the silhouette. Let me start by applying a layer of clean water on my ball using a wash brush. Even label vector, I'm going to use my size 10 round brush. Load blue lake from the palette and paint the top section of the sky using this color. Next, I will clean my brush and load my brush with cadmium yellow and apply this color to the bottom section of the sky. You can see that I have kept the intensity of the colors, watercolors very low in the midsection as I do not want a green shade for my sky. And let me fix this by applying my second layer of colors. You can see that my lowest mixed with blue when the valid. So I'm going to load my brush with the flesh and go with the second layer. I'm going to stop here and wait for this layer to dry. Before we being the silhouettes. Once the sky layer dries off, I will use my size 10 round brush again and load it with OBD light shade of lag by mixing it with a lot of water. And being the distant mountain that I have sketched. Before, I go ahead and bring the second layer. I didn't have to wait for this layer to dry. Now once the layer dries off, I will load my brush with the shade, a little lapdog God than the previously off by mixing it with more Bain does die and go and paint a second layer. Once that is done, it's time to being the silhouette. So I will use my size two round brush. And being the branch just post that have sketched. Once the batch size, maybe it's time to add the leaves. And for this bonus project, we will add the same leaps. That is the downward Leaves stroke back using the smallest size brush, which in my case is the size change on brush. And you can see that the size of the brush can make a lot of depth friends end up brush stroke and the appearance of the cell. I will go and add this downward leaves drugs for all the tips of the branches that I have sketched, I might add few more in between as well. So I'm going to speed up the video. Since it does reduce step, you can always go to the settings and adjust the speed off this video. All I'm doing is adding few bland just in-between. Painting the downward stroke and make it look like a bunch of leaves at the deep of each branch. And also define our dodge. I will add few more inland just in-between. And now it's time to peel off the masking and the bonus projects silhouette S ready.
19. Week 3: It's time to learn a new set of UDL work to the next video to get started.
20. Project 1: Hello everyone and welcome to the first project of this week. Let me first dip down a big debate by using a masking tape. So today we are going to be painting our tree silhouette on the edge of a cliff. Now that the paper is ready, let me do a rough sketch all the mountains and Eclipse. So I'm adding or sketching the first layer of mountain comes on Web medal of the paper and drawing it. So once that is done, I will add another layer of mountain below the first one. I will now add the clip starting from this bottom section here and going all the way. The main part of the PayPal. And we will draw the tree silhouette on this glyph. Is the tree silhouette width is coming out from this corner here. So I will add few branches here. And some ongoing or upwards. I'm just sketching the branches. We will add the foliage to this tree, Lido by Bain. Thank you again for the sketch which is included in the resource section and do a rough sketch. Now let's look at the gallows that we will need for this project. I'll be using ultramarine and a low for this guy. Brown for the mountains and black for the silhouette. I'm using colors, brown bike nights. He start by applying a code, clean water on the paper using a flat brush or a wash brush. Make sure that there are no water paddles on the paper. Now, I've been lowered my size 10 round brush with ultramarine and the bird, dog Bush. None of this guy with this blue. As you come towards the midsection, keep the intensity of the color. Because we are going to be using a lower, as you know, new and a local end up with the green sheet. And we do not learn that in the sky. Now, I will pick a low from the palette and start applying the color from the mountain sketch that we have done and bring it up keeping the saturation done when you reach the mid portion. You can take my previous class to understand how the news to plan muddy colors for the sky and lend them without creating a new color. Now, I'm going with my second layer of color wash while the paper is still wet. Now the background sky layer is 3D and I wait for this layer to dry. Once the background sky lee, I strike the ground from the Padlet and keep them density of this brown a little low by mixing it with more water. And being the first range of mounting. I'll wait for this layer to dry before you go. Next layer. Now increase the saturation of the brown and we'll get the next layer of mountains. Now, why I made for this second layer of mold into dry, I will use my size two round brush to paint the trees will read that we sketched. As always, I will start with the main branches and aim them using the black color. One exam day David domain set of branches. I'm going to add foliage to it, so I will use my old unused brush to add foliage. Now the consistency of domain here is I'm using the wet brush and dry paint consistency and I will add foliage to all these branches here. So if you notice I'm adding foliage in a very small area of each branch that we painted. So you can see that I'm not adding too much of foliage all around the branch. Now fill in the foliage at random places on the branches. Initial offer line. Now I will use my detailing brush and add some tweaks or coming out of this foliage. Make sure that this drinks. I'd really, really bend, just like how we practiced in the practice exercise. I'm adding this twigs coming out of this foliage in all possible directions. Now I'm using the same brush. I will be adding some really thin branches as well to this main branches. Like I always mention. Is this going to look, I guess time-consuming. It's really worth the effort. Now the main idea behind this tree for leads to give an idea that how you can make a tree look better by adding less foliage and more B is now does you will be adding more of our tiny branches and gouache, This dog bed. And move on to the next part. So I load my size 10 round brush with black paint and this cliff here. Both the brush, I'm adding some foliage to this cliff. I'm going back to this tree and using my old brush and making the full list that we have already done. A lipid bends by going over it. So I stop here and I'm happy with how this tree silhouette is looking now. So let's just be off the masking. And then we have a tree silhouette on the edge of a clip. Let the Bureau differ evening Scott, in the background.
21. Project 2: Hello, welcome to Project. Today we are going to paint lands, right? Again, it's going to be a free hand painting, so no sketch English required now. So I'm going to take my paper first using a masking tape. Let's look at the colors that we'll be using for today's project. First Scala, scad mine or ink. Next one is lemon, yellow or a low. And finally black for the silhouettes. I'm using. The Scotland's from White Nights. He'll do not have the exact look at the project description section for the alternate colors that can be used. Let me start by applying a layer of clean Bordeaux on beat by using a flat brush or a wash brush. Make sure that the water is evenly spread on the paper. I'm now loading can mine using my size 10 round brush and paint the dark portion of this guy with this pink color and stop at somewhere in the map. I will clean the brush and loaded with a low. Now being the bottom portion of this guy with this local law. And slowly blend, blender do colors. As I come to dominate bad. I will now use the flat brush or the wash brush for the seamless variegated wash off the stoke gallows for the beautiful sky. Now once the background sky is dry, it's time to add the plant silhouette. So I will first use my size three round brush loaded with black paint and add some sugar like this or whatever it is. God. This dark. I'm not drawing things straight lines, but kind of lay we go b. So shoots. Once that is done, I will use my size 10 round brush and add some leaves to these shoots. Better shape leaves to all the arms that we have painted Q0. So repeat the same step and add the leaves and make it look for law. It is the same stroke that we practiced in the practice exercise. So use the tip of the brush and draw some leaf-like back then using it. I am speeding up the video here since it's sort of a particular back-end of adding leaves to go. So if you want, you can adjust the setting and the abuse the speed of the video. Leaves stroke a couple of times before you begin the project to know how exactly it was. Once this is done, I am adding more leaves to the top section, which is looking MBO. So I'm going to fill it with leaves. I'm just dabbing my brush and filling it with the black paint. Now it's time to add some more red. So I'm using my detailing brush and adding some really been shown to be present. Now the boardroom section of this painting looks empty, so unknown to add some more gained range. So I will load my size 10 round brush with a very light shade of black and add flaws mountain range. Once that dries, I will go with the second layer by loading my brush with o shade liquor darker than the previous layer and add the second mountain range. We are done with an adult beautifully. Think so what let's build off the masking data. Landscape width of the plant cell.
22. Project 3: Today it's time doping the Cloud project. For today we will be painting bamboo tree silhouette. So let's begin by taping down to pay by using a masking tape. Now let's look at the colors that we need. I will be using while loop for this guy and black for the silhouette. Now, if you don't have the coral sheet, I have mentioned the ultimate cheat or the substitute that you could use in the project description section. So do check it out. Now let's come to the sketching part. I've been draw a very simple sketch of this stem. Just don't know where I want my Sylvester be. All other details like adding the leaves and branches can be done by painting it. So I'm just drawing the shoots or the bamboo shoot skeleton. And that's it. Now let's get to the painting. But let me first being the background sky. So I will begin by applying the goal of clean border evenly on the paper using a flag or the wash brush. I really was my size 10 round brush and load it with violet at the top section of this guide using this Gallup. Now, I will clean my brush and load liquid golden shade and being the bottom part of this guy using this, we are creating a very simple variegated wash for the background sky. Now, I will use my flat brush, Yoda wash brush to blend the two colors and create a seamless mode sky. Was this guy is dry. I will paint the bamboo tree silhouette. I will use my size 10 round brush and the black paint from the eyelid. And I'm painting the notes for us. So I'm taking this line into smaller notes like this, living a dynamic gap in between. As you see. Now, each node should look like a bone. So make sure that you leave that tiny gap between each node. Now being good and meanings, stems that do have sketched in the same manner. Now I've been joined the ends, the gap that we have done, representative of the glass. Then I will add the leaves to H naught. So I may be using the downward stroke shop to add a leaf to each of the bamboo shoot door, three leaves on either side of each node. By doing the downward stroke that we practiced. I'm adding some young bamboo shoots in between by just painting a simple line.
23. Project 4: Hey, it's time for default broad. And this damn thing, a bomb to Silverberg, The bright Amun in Skype. I am taping down my pay by using a masking tape so that it doesn't move while light beam. And also for clean, crisp edges. Now let me switch the colors that will be used for this broad shape. So it's pink, orange, which are watercolor paintings. Next, this binds career from San Liao for louds and black for the silver. If you don't have friends, you again have a look at the project description sections or the alternate or the substitute color that can be used. And now it's getting damn. So I built first sketch the trunk of the palm tree. Trunk got this boundary is going to be kind of rough because of the leaf scars and not very smooth. I am now sketching the leaf base like shape of a triangle. And now I will add the leaflets. So what I'm doing here is drawing some triangle shaped leaf and add-ins exact edges to it. Not least know that it's a very rough sketch of the bomb dream. More details will be added later while being dead. So this is rough sketch that I'm doing. I will use my wash brush and add a layer of clean water and spread it evenly on the paper. Next, I will take my size, standard round brush and big orange from the ballot. And being the bottom part of this guy with orange color. My brush law declared bandgap DO part of this guy with this being my wash brush. Now to create this mode transition from being too orange. I'm happy with the blend here, so I'm going to stop it here. Now my base is still bad, so I will add the clouds students guy by using my size 10 round brush and low declared binds gray and add some clouds only on the top part of the sky. I'm going to keep the law really light and not going with the second layer of colors and make it dry. Once this is done, I've made for this layer to dry completely before I begin with those silhouette painting. Whilst the paper is dry, I am using the size 3 down brush. And for Linda, for this first I'm using the brush and adding some old leaf scars to the drunk. Yeah, It's time to the leaflets. I will show us paint the outline of the leaf led by adding leaf tapes like this using the tip of the brush. You'll see that the shape of each leaflet, as in the form of a triangle. I'm adding some spines at the end of each leaf let making good nucleophile family fled. I'm a little bit the same step for all the leaflets that I have sketched. And I'm using a dry brush consistency. So you will see that the ends of each leaflet is dry. Now that Damn Daddy, with the outline of each leaflet, I had been use my size 10 round brush and trillion black paint to each one of them. I'm also adding some spines at the end of each overhead using the tip of the brush. Now while you are adding this bias, though, each one of them make sure to Leo gap between the leaf. Let's add some spines here to fill the gap. And we are almost done with it. Masking. And project 4, that is, the boundary, is now ready.
24. Project 5: Hello. Today we will be doing the fifth broad day. From week three. We will be painting a bushy shrubs silhouette with Claudius background sky. Let me start by using a masking tape and taping down to paper. Now, I will do enough sketch of the shrub that we will be painting today. The ground sketch first. And then I will add some upward pointing branches like this. Just some random lines. Since it is a bushy plant, it can have that just in all possible directions. So add them as much as you like, get. The days will be added while painting it. So this is the rough sketch. Let me show you the colors that we will be using for this project. I will be using cobalt blue, orange, and black for this silhouette. Cobalt blue and orange. Watercolor paintings used for the background sky. And I will be using black for the silhouette. Now, let's get to the painting, but I will apply a quote of clean water on my paper using a flat brush or a wash brush. Load your size 10 round brush with cobalt blue and paint adopt section of this guy. Low value. At the mid portion makes load orange. And being the bottom section of this guy, we're using this color and slowly, we'll do our estimate section reducing the intensity of the color. The blue. Looks really done. So I'm going with my second layer of blue paint while the paper is still bad. And I'm going to intensify the color, repeating the same step. Now, I'm switching to my flat brush to create a smooth transition between these two colors. Out the extra pain that is on this side using a paper and continue with the blending process. Now, I made for this layer to dry before I begin with the silhouette painting. Now the vein, the silhouette, I will be using my size three down brush. And I will paint the branches first. So we'll load it with black paint and start painting this branches. Once the branches RDB use the old brush to add foliage to this branches, they are almost driving from violet and dab the brush on the paper and agile need only on the blanch like an a vertical line formation. Now the foliage, then you add the foliage. It should look like lavender bush. So use the old brush and ink, some dry paint on the paper to make it look like Windows stalk. Now this step, also adding the days to do so red is always time-consuming process. But if you are a little bit lower like me, I think you don't find this step, but I'm going to use my brush just to make it like really bushy. So I'm adding few more branches and I will add foliage to it. Once this is done. Now, I'm switching back to my old brush, DO adding the foliage to the newly added branches. Now, I will use my size 10 john brush, but with black paint. Now switching back to old brush and adding some foliage, just a bold new ground section to make it a little more dense. Now, as if I made that joke, I switch back to my detailing brush and the last step, both adding some really thin branches in-between. I'm going to stop the masking tape. And may have been dead. But warm sunset sky.
25. Bonus Project: In this bonus class, we will be painting a palm tree silhouette. It is a completely different silhouette than what we did in the previous project. And we will have a cool NBC tropical Skype and simple boundary silhouette. Let me first do some masking tape and they've gone my pay Bob. Now let me do a rough sketch of the palm tree. I'm just drawing the skeleton that does. I will be doing the trunk and the midrib. Unlike the previous palm tree that we did in the drawing, this tree trunk is a small dog. Now I will add some drips of what the ground or the canopy and I will paint the leaf lesley DO. I will draw this ellipse, some hanging down and some swing upwards basically in all possible directions. So the basic sketch of the boundary is now ready. Now let's have a look at the colors that I will be using for this project. So I will use pink, blue, white, and black for the silhouette. Now being blue and violet are watercolor paintings. So we will use these $3 for this guy and black for the silhouette. Let's come to the painting part. So as always, I will start by wetting the people evenly, by applying Bordeaux on might be by using a flat brush or a wash brush and spread it evenly. Now, I will use my size 10 round brush and a glue from the valid and being the top section of the sky blue. Next I'm going to pick ink from the palate. And then in the bottom section of this guy using this color. As you come towards the mid portion of this guy blender, do colors relieve a while the paper is still wet? I will use violet color to add soft melting clouds to this beautiful blue and pink sky. So you all know this is wet on wet technique. That is your adding wet paint to the wet paper. That is, I'm adding some white strokes on the wet paper and don't worry about the shape. It's going to be fine. Now I'm going to make this cloud. So literally that go by going over and adding another layer of Y-linked. We'll have to take gate is that the bot is still wet while adding these clouds, it goes, we need soft clouds. And if the paper is dry, you will get hard edged clouds, which we do not want. Now that goes sky is dry. It's time to paint this palm tree. I will use my size 10 round brush and I will paint the trunk first by loading my brush with black paint. Now, it's time to add the details to this drip. That is, I will add the leaf lead so I will switch to my size three round brush and being the ribs force. Now for the leaflets, the paint consistency that I'm going to use is not too watery nor is it too dry. You need to add a small amount of water to the paint, to the net out a bit and add the leaflets with the strokes that you see on screen. Now domain this leaflet, you have to start from the spine or the lip and drag. Rush down forming the leaf lead. Now the key here is to have the consistency of the bank to get this stroke to be feathery 0. If the consistency of the paint is too watery, it is difficult to achieve this feathery texture that we want for the palm tree. Now for the rib that is pointing downwards, I will add the leaflets only on one side. So I add inwardly fled score the ribs that are pointing downwards. And for some drips I've been at loops on both sides. So keep doing this. I'm getting the leaflets for all this binds that you have sketched. Now this is again, a time-consuming process, but I recommended take it slow and take all your time and fill him the leaflets. The more the better it is going to look. Downward facing ribs. So I'm going to add the leaflets only on the inside. They paid the same step. And all of this makes sure that you add the leaf. Let's start from the spine and drag those. Now one thing that you will realize while painting this is if no inconsistency is still watery, you will not get those dry oh, fed to the stroke. So you can always use a paper towel and wipe out the excess paint from the brush. Strokes. Hello. Now it's done. So let me be the masking tape. And here we have another tropical tree silhouette with a nice pleasing bagged on Skype.
26. Week 4: I can't believe that B are already in week four. We will be painting the last set of silhouettes.
27. Project 1: Hello, It's time to paint the first project of the last week. Week 4. I will start by dipping down to do a step so that the paper doesn't move. Also, it doesn't go. Let me do a quick sketch of today's read. I'll be doing a branch for lawfully use holes eaten by bombs. So abil first draw the main branch and add smaller branches on the sides. Now, I will add some leaves to these branches. I'm sketching and all different shapes. As you can see, it does all the leaves are not the same shape. Uganda for the final project that I have uploaded in the resource section and this rough sketch. So all the branches with a friend shaped leaves like this. I'm not adding the holes now, as I mentioned that we are going to be doing branch to localise with holes. Again, add that detail. Men weeping these leaves the sketch just now. But I need to lighten it up a bit because I do not want this graphite monks while I do the background sky. Now let's look at the colors that we need for this project. I will be using cuboid, Dogecoin, and black for this silhouette. So we video score and cobalt, turquoise for the background sky. But the colors are from White Nights. I have mentioned the substitute or alternate colors that you can use in case you do not have these sheets. Now let's get to the painting. I will start by applying a layer of clean water on the paper and spread it evenly using a wash brush. I will use my size 10 round brush and the cobalt turquoise. And being the top section of this guy met the shade. Clean the brush, and being the bottom section of this guy with quarter. So I load my size 10 round brush with Gordon and start applying this beam from the bottom part of the paper and bringing towards the meat section. I will go ahead and apply the second layer or the second wash of cuando guys for the dough portion of this guy and make it a little more intense. Now I will use my wash brush and blend the two colors for this mode. Variegated wash and bade for this layer to dry. Once this layer has dried them to being dark. So I will use my size two round brush and the leaves by leaving some tiny gaps in between to show the holes. All you have to do is don't fail. The leave is completely black bean. You some tiny gaps in between so that it looks like the leaves eaten by worms. Again, does not have to look uniform. You can make it smaller, however you like it. Now would have been the same step. Draw some leaves completely and you get some new SMED holes. Joy. I'm going to speed up the video here, since it is a two-step all Trilling Bane for this leaves. But you can always go to the settings and adjust the speed of the video. Also notice that each leaf shape is different from the NFL, making it look so beautiful and rich. Now that I'm done with all the leaves here, Stein doping the branches, I will now use my brush to add more details like really thin branches and between the branches with leaves as well. We show up that by now, you know that adding these tiny indeed makes a lot of difference to your silhouette. I'm done but the details, so let me ADP masking. We'll celebrate off a branch would lawfully smith against beautifully based on Skype.
28. Project 2: Hello. And this project do we are going to paint all submitted beauty or a big tree against bright red sky. I always find the bed trees beautiful than a tree for no feelings. Or do you think the same? Let's keep that aside and get to the painting. So I'm going to take down might be by using a masking tape. Once that is done, let's get to the sketching, but I am going to sketch only the bark of the tree. Upward, growing branches up, David, how it's looking. So let me just erase it and lead to the sketch. Now, you might be wondering why all this tree silhouettes that I do are on the right. I don't know, maybe I find this more comfortable than sketching it on the left. Again, always obeying the celebrates on the left side of the paper as well. It may not be in the same place that I'm doing. All the tree branches will be pointing upwards. By just changing the direction of the branches. You'll get DO completely new cell red being uploaded in the resource section for sketching. I'm going to give it the sketch of this bag. Bag. Now, let's have a look at the colors that we will be using for this project. I'll be using red and binds gray for the background sky, and black for the trees. So vec now binds great is from Sevilla and red is watercolor ink. I have mentioned a substitute that you can use for all binds create the project description section. As always, I begin by applying a quote for clean water on the paper using my flat brush or the wash brush. Once the paper is evenly wet, my size 10 round brush with red and start laying the color from top. As I come down, I'm reducing the intensity of the color and I'm going to keep it light in the bottom section of this guy. I'm going to make small more data and keep it light in this mode. Now, I will add some dark clouds. Hussein back on wet technique. So I've loaded my brush and add some horizontal strokes to create soft clouds in the sky. While I'm doing this, my brush has picked up some pigment, so I've been using the same and applied them in the bottom part of the sky. I'm going to densify the clouds by cooling the second layer of colors on top of the previous layer. Was this layout dry. I'm going to use my size three down blush for Windows branches of the tree. That means using black paint. I'm going to speed up the process here as all I'm doing is filling in the black paint. And just slow down the video in the settings and watch it at the speed that you're comfortable with. I'll use my detailing brush and add some more really tiny, thin branches and make good look more beautiful. I think. Adding the job and off the masking tape now. And that's done with your bed. I dread Skype.
29. Project 3: Hello. Are you ready to being the project? So let's start. Let me begin by dipping down my paper. I'm using a masking tape. So the next step is to apply a code of clean water on your peak while using a flat brush or a wash brush. Now, I've been big my size 10 round brush and load a blue pen and ink adopt section of this guy. And slowly coming down and reducing the saturation of the color. We're going to keep it light in the mid portion. I am not going to mix the two colors for this guys, so reduce the intensity as you come towards the midsection. Now load the brush with ink and do the same step that goes slowly, reduce the intensity of the color in the midsection. Assume no blue and would end up being papillae. So I don't want the bubble on my skies, so I'm just going to keep it light at the mid section of this guy. Now I'm switching to my flat brush and by being the excess water in case that is using a paper tablet. And I will start with the horizontal strokes like this to even out the colors. I'm just not blending the two colors. I'm just spreading it out and making it smooth. Now, clean your brush and remove the accessible. So the advantage of using a flat brushes that you do not see this as dorsal played colors. But it should look like that these two colors are going to merge with each other, but they are not, you know what I mean? So we're not like mixing the two colors, but it should look like they are going to merge with each other in the mid portion. So that is what we are trying to do here. I said no, they did not schedule. This'll make for this painting. We are going to do a freehand thing. But if you're not comfortable, but the free hand painting, you can always go and sketch beforehand. That is before we start painting, seeing the project uploaded in the resource section. So what I'm doing is I'm loading my size 10 round brush with black and painting the ground. I'm using the tip of my brush. I'm adding some foliage. No, I'm using my size three, don't brush and adding a tree trunk. So slanted, almost irregular line, which is going to be the main branch. And I will add some more smaller branches to this. What we did this we did first we drew a drum and then we are adding some branches on both sides of the drunk. Now I'm adding one more small tree on the left here and doing the same step, that is Zhang first and then add some branches on Buddhist site of the trunk. Now I'm coming back to my big tree and adding some more smaller branches. Now, you should know that when it comes to this kind of painting. So let's add the 1 dot is going to take a lot of time and the background sky can be done in a minute or so. But adding the day students at a time depending on the size and the subject that we are painting. Once you're ready with the basic structure of the tree, Let's add some foliage to it. Now, I'm switching back to my size 10 round brush and loaded with black paint. Or the paint should be a liquid if the God that is, add a tiny bit of water and don't add too much water to it. Using the tip of the brush, just dab the paint on the paper to illustrate the texture of leaves. Of this is the same technique that we learned in the practice section. Or the consistency of the pain that we are using your little watery and not 0 dry. So it is very easy to create the texture by just moving the plane. So it moves very smoothly on the paper. I'm just going in and filling all the branches and filling the gaps in-between and adding more diffuse to the tree. Now, I will create dynein. Dynein leaves on all the edges like this and make it look more natural. It's the same stroke, but I'm going to create smaller leaps. The wild statically did earlier and filled in wars. Well, the good news now, what we are doing is we are adding smaller leaves around those bigger leaves. And it would it be the same step for all the branches and fill in both the trees. Now, you can follow the same step just by changing the shape of the tree. That does you change the shape of the trunk. And you have a completely different looking tree. I'm going to speed up this medial, since it's such a particular step of adding this more leaves to all the branches that way. But if you want, you can slow down this bug intersecting section. Now I'm switching back to my size three down brash and adding some more branches in between. They mentioned everything is in the details, so add them as much as you want, or if you like, would say, the more the better. Until you're done with adding the dataset. Let's be loved. This masking tape. We have an adult amazing to celebrate with the beautifully colored sky.
30. Project 4: Hello, and let's paint a windswept tree. So MSc in this project four and middle tape down my paper using a masking tape, misfires two colors that we'll be using for this project. We will be using some warm colors for this guy. So it's a low orange, brown and black. A low end orange. Watercolor paintings belong is from Sennelier and black. We will be using for the silhouette. Now let me sketch this silhouette. So I will start with the base first and then add the trunks and branches of this wind swept three. I'm adding all the planters rain in this particular direction, that is to the right. I will add the foliage or the leaves later. That is while being done yet. So the rough sketches now maybe it's time to paint the sky. Now. Let's start by applying a goat of clean water on the paper using a wash brash and spread the Bordeaux even beyond the paper. I will not use my size 10 round brush and load a low from the ballot and when top section of this paper, but using local law. Now I clean my brush and pick orange from the palate and being the bottom section of the paper. I am blending these two colors using the same brush. And I've been not use wash brush to blend, blend these two colors here. Next, I will use the same brush and load brown and add some drama to describe while this layer is still wet. Now, these three colors go with each other. So I am adding some brown clouds. Do this alone, orange colored sky. Now, wait for this layer to dry before we bring the silhouette. Once the paper dries, it's time to read. So I am using my size two round brush and the black color from the palette and the trunk and the branches first. Make sure that the branches are not very thick. And applied the thin strokes for each of the branch that you have sketched. Was the branches RGB, it's time to add before. And I will use my same sized round brush to add foliage. I am going with the Bechdel shaped leaf stroke and adding the foliage to each branch. Is symbol Leaves stroke. All you have to do is press and release. Press and release. And we have the big U-shaped peak day. So fill the end dab branch with this leaf stroke. Also make sure that the leaves are suing under direction of wings since we are doing a windswept tree here. I'm sure they end guide trunk also, but this leaf stroke and adding few more bad just in-between that as well. I am painting one more branch and adding foliage to that as well. Now I add in some gouache coming out of this branch just using the same brush. I've been now mu is my size 10 round brush and add this base that we have sketched using the black color. Now, I didn't use my big bailing Josh and add the grass strokes. This base, sweeping ended direction, all domain. Now adding all or grass to make sure that they are not uniform. That does make some grass and some short DO. The grass strokes are now done and it's immersed. Windswept tree silhouette against a bomb, sky.
31. Project 5: It's time for the last project off this last week. We will be doing shrubs and this project. So first date down to pay by using a masking tape. Let's look at the Carlos for this project, I realize that we are doing nature celebrates and never use green in any of the projects. So I decided to use some green for this final project. I am using lemon yellow, green, and black for the silhouette. Lemon, yellow and green that I'm using here are from White Nights. If you do not have the exact shade, I have mentioned that alternate colors that can be used. Now let me do a rough sketch of the shrubs in red for this project. I'm just drawing some stems and adding branches to eat them. Going in every direction. I will add more details to the stem SLI DO YOU weeping though? Silhouette. So this is the basic graph sketch of the silhouette. Once the sketches ready, Let's get to the painting part. As always, I start by applying a goto clean border on the paper using the flat brush or the wash brush. One step paper is even live with. I will use my size 10 round brush and big lemon yellow from the pilot had been paying the board and part of the papal, using this Gallo. I'm going to paint a vote, half of the papal Bedlam and a low. It's time to clean my brush and load it with the green paint and being p-doped half portion of the papal. Using this green color. These two colors blend with each other really well. So you can bring this green yellow portion and blend these two colors. Now for this mode transition between the colors I will use my flat brush and blend into relief when you're in the midsection. Use a paper towel and wipe the brush to remove the excess pain that can set it on the big bulk. Since I did not clean my brush properly, you can see some green strokes in the Borg dam section ended toolkit. I am going to apply another layer of lemon yellow or will it, and I wait for this layer to dry. Once the layer is dried, I will use my detailing brush and being this in bed, I will force the stems and I'm going to add the detail like in the shape of a dry drawing. Make sure that the stems are really thin so it is better to use a detailing brush to add the details. Now, I will repeat the same step that is the stem and using the black paint and add o of each stem like this. I am speeding. Since it is. But you can go to this thing down if you want. Once you are done with this, it's time to add the next set of the bills. So I will use my size three John brush and add some news in-between the stems we use at the bottom of each stem and smaller ones at the top. I am adding, adding them randomly for each of the stem. You don't have to fill completely with the news at them, at random positions for each of the stem that we have been good. The status done. I'm using my size. All the black paint. I'm using the same. I will add some foliage. Using the brush. Does use the same brush and add few more steps in between. The final step. In between. It's time to build the masking. Week 4. Now JB.
32. Bonus Project: Hello. And finally, it's the last bonus project. And this project, I want to show you how we can add other elements to the silhouettes and make kept even back DO. So. As always, I begin by taping down a B, by using a masking. Let me scratch the colors that I'm using for this project. It's a low boiling for those guys and black floor, so amusing and low end Violet watercolor ink. And this one is draw. We will be doing again, but with some extra elements like I mentioned. So let me use a pencil and start with the rough sketch. I'm drawing the trunk first and we'll add some twisted branches to this main trunk. Adding one will branch on the other side of this drug is, well, now it's time for that extra element which I was talking about that just invest. So I just did a rough outline of the nest sitting between the branches. In the middle. I will add few more branches here. And we add the d with the rough sketch of the syllabus. I will be adding a bird sitting on a nest, but you can sketch that now or you can do that later as well. I will start by applying a code of clean water on my paper towel using a wash brush and spread it evenly all over the paper. Next, I will note and low using my size 10 round brush and Gullah, the bottom part of this guide, using this color in my brush. And now I've been a while it from the ballot add section of those guys using this Gallo, keeping the color saturation and low in the midsection. Now I'm going with the second layer and intensifying the gallows both at the top section and bought DOM section while the paper is still wet. I love you so flat brush and even out the brush strokes. When the paper is wet and wait for this layer to dry. Was the paper is dry. Avenues my size 10 round brush and paint the main trunk and drag just using black color. I'm first outlining the sketch using black paint and I really slowly, I'm speeding up the medial show. The Bhagavad. I am filling in the trunks and the branches. You can go to the settings and change the speed of the video in case you want it slow. Why is that this done? I will use my size three down brush to add the details. I'm adding sticks and twigs by drawing some lines like this using my size brush. Add them in any direction onto the next completely but state-centered weights like this. Make sure people knew some gaps in between. Don't make it completely black. My big brush to add branches and gouache sense thanks to this nest. Now using the same detailing brush, I will add a board heal. But if you're not comfortable painting it directly like how I'm doing it, you can always sketch beforehand. And being good laid go. I start with the head and the beak first and continue with the neck and fill in the complete body but black. And that's it. We are done. It's a simple bot. I'm adding. Like it's getting in that space. I don't know why I used a pen, but you can do this using a beat. Dalian gracious, Well, I will now add some finite weak base, like adding some more branches to this bed tree using my size two round brush. Now let me build the masking tape and still find no willingness project.
33. Thank you!: Thank you so much for watching my class and I hope you enjoyed this AC class of paintings, silhouettes. If you have any questions related to this class, drop them at the discussion section, and I will be happy to help. If you have dried this project's due upload them in the project gallery. I am waiting to see all the beautiful and wonderful projects that you will be creating. Please do. Leave a review for this class. We're back. I can get back doll for my next class. Until next time. Keep painting and thicket.
 Sheetal Shetty, artjauntwithsheetal