Transcripts
1. Introduction: When you think of a beach, you will probably
imagine palm trees, the sound of ocean waves, turquoise waters,
white or golden sand. Now, imagine that
the sand is black. Yes, a beautiful shade of black. Black sand beach is something that cannot be found
in many places on photogenic
masterpieces of nature, which are the result of lava and other volcanic
materials being broken down over centuries
by the ocean. The pitch black sand strikes a perfect contrast against the white form of waves
and the blue water. Black sand beaches of inspiring. So I have chosen projects
that are not only beautiful, but very simple to paint. Hello, and welcome to
my Skillshare class. I will show you how to create amazing blacks and need
scapes using watercolors. In just a few easy steps. We don't have a
lot of sketching, but I know there's often a
big field for beginners. You can paint along
with me where I explain each and every step. We will primarily focus
on dry brush technique. And I have also included a practice exercise for you to master the dry brush technique. This class is for
beginners who want to paint some easy and
beautiful paintings. Lead minimum supplies.
If you're already, and if you find this interesting,
Let's start painting.
2. Materials Required: Let's look at the materials that we need to start the projects. So first, let me talk
about the paper. So this is the watercolor
paper which is rough textured. And I'm using the paper
of size 7.5 by 5.5 inch. These are a 100% cotton
acid free 300 GSM paper. You can go for any
watercolor paper, which is a 100% cotton and
300 GSM or above papers. Now, I am using this rough
textured paper because it will help us to
achieve that texture. Because of the texture, it makes it easier to apply
the dry brush strokes. It does not necessarily a necessity to go for a
rough textured paper. You can go for this mode, extrude or medium
green paper as well. Now, let's talk
about the brushes that I will be using
for the projects. I will be using this flat
brush or to wash brush, which is of size
three by four inch. Next, I would be using this
size standard round brush. I would also be using this
size three round brush. And finally, this
detailing brush, which is of size three by 0. You can go with any
brushes of size ten and anywhere between
34 and a flat brush. And if you have a
detailing brush, you can use that as well. So this are the brushes from the Princeton
Heritage Series. So these are the
only four brushes that I will be using
for all the projects. Would also need a clean palette. You can either go for the
plastic or ceramic palette. You would also need a
couple of paper towels. Or you can go for a cloth rag. You need an eraser
and a pencil sketch. I'm going to use a
masking tape to secure my paper onto a stiff surface and also to get clean borders. Along with this, I also need to just water to clean
your brushes. One to mix and dilute the colors and the other
chart to clean your brushes. So that's it. These are the basic things that you
will need to get started.
3. Let's look at the colors: Let's quickly look
at the colors that we will be using
for the projects. So I am using the watercolors
from the wheat brand. So the false color that we
made for the project is black. Then we would need cobalt blue. Next baby would
need indigo, green. And finally sap green. You can use the shapes, any brand for the project. So out of these five
colors, these two colors, that is the ivory
black and cobalt blue is from this watercolor
set from the week. So this set comes with
12 premium Carlos. And I will be using
this cobalt blue. And I read from this set
and the rest three colors. The individual tools that you can check from the same brand. Lot from these phi
Carlos watercolor tubes. We will also need white quash. So I am using this bone length
wiped from Dallas on me. So these are the colors, set of colors that we would
need for all the projects. Now, if you do not
have the exact shade, I'm Bill mentioned the
alternate colors that you can use for the projects in the
project resources section. Now let's quickly swatch
Carlos and I will also mentioned the pigments that is used in each
of these color. The color that I'm swatching
your fellow green. And it is made up of
ligaments BY E14 and p27. The system Let's go
for the next one. The next color that I'm
scratching your is sap green. This contains pigment
p by 129 and p27. Next color that I'm
swatching your all blue. And this contains
pigment BB drinking a swatching indigo here, and it contains pigment PB. We became six and we
are one-to-one T2. And finally, we
have ivory black. And it contains
pigment BB, BB canine. So here are the colors. All swatch that we will be
using for the projects. Let me just quickly write down the names for you to read for. The first color is yellow green. The next color that
we need a sap green. Next would be cobalt
blue, indigo. And finally, ivory black. I have mentioned that
alternate Carlos, in case you cannot find these colors that you can
use for the projects. To. Apart from these colors, we would need white gouache. If you do not have white girl, she can go with the white
watercolor as well.
4. Practice exercise - Dry Brush Technique: Let's look at how to achieve
this dry brush strokes. So I am going to take
my size three round brush and I'm going to
load some dry paint. That is the freshly
squeezed paint. Load my brush with
that and I am applying the dry brush strokes here
using the tip of my brush. I'm using the tip of my brush and the Bristol and dragging it, dragging the paint or
scrapping the paint onto the paper to create
the dry brush stroke. Now, you should note
the consistency of the watercolor
paint on your brush. While using this dry
brush technique, it is better to use the tube paints rather
than the bands, because you need to use water to activate the
paints and a band, which doesn't make for a
more FAQ, dry brush strokes. Now I'm going to use the tip of the brush and draw
an outline like this. And now clean, wipe
off the excess paint from the brush and make
the dress completely dry. And then scrub the pain
from the outline like this at an angle to achieve
their dry brush stroke. The angle of the brush
and how hard you press. It creates a different
dry brush effect than the one which, in which you use the
tip of your brush. The pressure that you
apply will also have an impact on your final
dry brush result.
5. Dry Brush Strokes: Although it is not necessary
to use extra paper, but it will definitely
add extra advantage and extra texture to this
dry brush application. So it is much easier to create a dry brush tool
corner draft paper. You're using a small,
dark textured paper. Speed is very important on
a smoother texture paper. Feel using a very smooth
paper than you need to move the brush very fast to
create this type of stroke, that is the dry brush strokes. For this technique,
I'm going to load some dry paint and I
will use the tip of my brush to create some very thin brush
strokes like this. So this is basically what
I call web-like pattern. So all I'm doing is draw some very thin strokes
using the tip of the brush and then join
the gaps in between here, like this to create
a web like Patton. Continue filling the
gap between the lines. Once does this ready use the app and drop the
crystals onto the paper. So the rough texture here
really helps to create the dry brush
strokes much easily. So if there is excess paint, wipe it off using a
paper towel and use the tip and job bit on the
paper to create the extra. Know, your should
always remember that the dry brush works
best on dry paper. Now, let's see if, what if your brush and
the paint is too wet. So now when you apply the
paint onto the paper, now because this is
a textured paper, you can still see
some dry stroke. But if you're using
a smooth paper, while you will see is just a blob of black
paint on the paper. If you're using a
smoother paper, your brushstrokes
need to be quicker. Speed of the stroke impacts
the effect of dry brush. With a little practice and
experiment with your tools, that is the brushes to paint, the speed, the texture of the
paper you will become more comfortable with using this dry brush technique
in watercolor. Grab some paper
and try your hand at creating some texture
for your paintings, will be using white
gouache instead of watercolor for more opaque
look in all our projects. So you can experiment with white gouache on
colored paper as well. Now, if you are ready and comfortable with this
dry brush technique, Let's start the project.
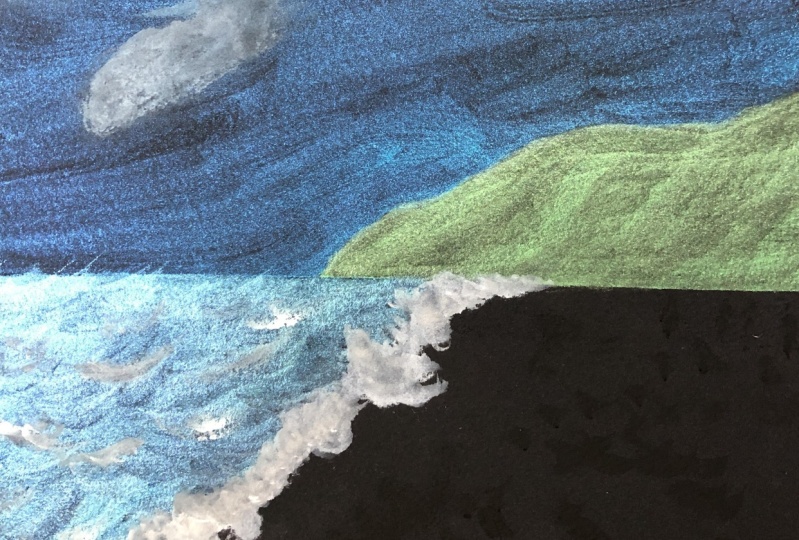
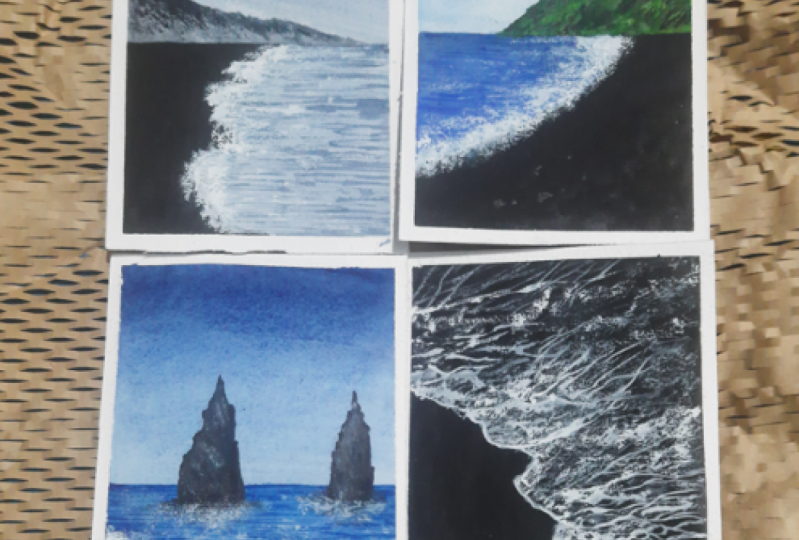
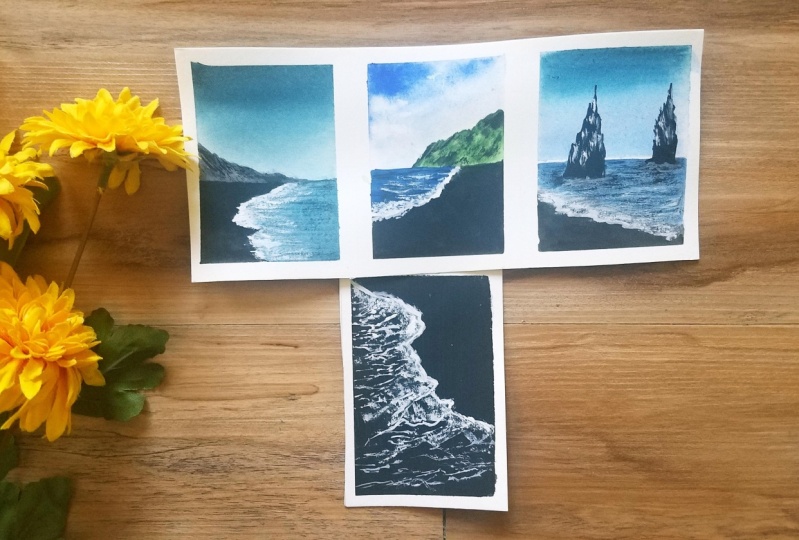
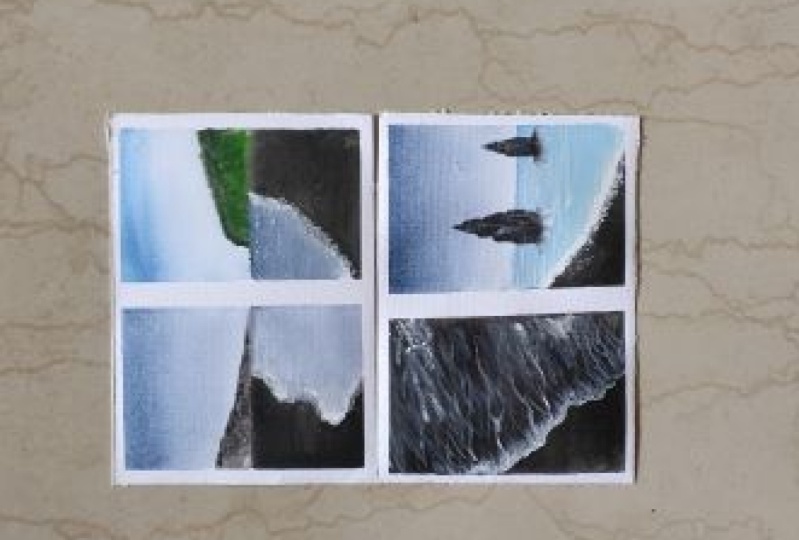
6. Project 1 - Muriwai Black Sand Beach: It's time for the first project, which is the Muriwai
black sand beach.
7. Painting the Sky: Let's start this project. I am using a masking tape and I'm going to
secure this paper. This masking tape also gives you a crisp, clean edges. You can skip this step. If you are not fond of
clean edge painting. You run your fingers
through the stapes so that no gap and the pain
cannot sit under the tape. I'm also using a tape for the horizon line where
the sea meets the sky. You can also skip this step and draw a straight line
using pencil ended up. Just to look the colors that
we need for this project. I am first taking
out some indigo onto the palette Before I begin with the painting. And going, and
going to sketch or add a very light sketch
of a mountain like this. And we will add the waves
or the beach later on. Now, this is the basic sketch. Now, I will use my flat
brush using clean water. I am going to wet my
watercolor paper evenly. This step helps to spread the
paint evenly on the paper. And you do not have to struggle a lot when you apply the colors. I'm using my size ten
brush to paint this sky. So I'm going to load my
size ten brush with indigo. And this is the color that
we will use for this sky. So I'm going to paint this
guy with this indigo color. I am going for a graded
wash of color the sky. So it basically is a wash wet. Color value decreases
from darker, to a lighter value. That is I'm going to
a lighter value in the of this color
is near the horizon. And keeping the value of
this indigo color very dark. At the top section
on sky. I'm going over and
applying a second layer of color and darkening
the top section. And keeping the value
of this color very low. As I come towards the bottom, you can go for as many
wars as you want. And now we are ready
with a graded wash. This sky. Let's now move
on to the next section.
8. Painting the Sea: I am going to peel off
this horizon masking tape, tape at an angle so that it
does not damage the paper. And now using a ruler, I am going to draw a horizon line right below
the mountain lake line. Now using the pencil, I am going to draw a very
light sketch, of waves. So this is basically wavy line. You can refer the final project and we'll draw the sketch. Let me, just erase this
part and redo it. Just changing the shape
of the wave here. That's it the, sketch
of this way, ready. Now, Let's move on
to the painting. I will go back to
my size ten brush and I'm going to wet this area. So we will be using
the same indigo color for the sea part as well. So I am applying a very
light shade of indigo here, keeping it very transparent. This is wet on dry
technique where we are applying wet paint on dry paper. Also notice that I have left a white gap between the
sketch and the sea part. So that will be the section
where we will add the waves. So keeping it to white. I'm removing the excess paint that is settled on the sides. You can use a paper towel and
wipe off the excess paint. So the sea part is now ready. We have to wait for this
layer to dry so that we can add details to the sea
that is adding the leaves. Now it's time to paint the
sand and the mountains. So I am going to use
I really black paint. And I'm going to squeeze out some paint from the
tube onto the palette.
9. Painting the sand and adding foamy waves: Again, I'm using
my size ten brush and going to loop
the black paint. And I'm going to fill the sand section using
this black paint. Again, I'm going to do a white gap or gap between the sketch and sand area where we will be
adding the waves. I am using very
concentrated paint to paint this sand section and not
very diluted color. So this is again wet
on dry technique where we are using the wet
paint on the dry paper. This technique, the colors, do not look dull ones the
paper or the paint dries. Now, don't worry about
the shape of the gap that you have left between
the sea and the sand. Because we will be adding
the foamy waves there. Make sure that you
fill any gaps. Me all the tape with
this black paint and no whites left in-between. And we are done with the sand, but there's no much
details that we need to add to the sand
area. So this is it. Now it's time to add the wave. So I am going to take some
white gouache onto the palette. And I will use my size three round brush
to add the waves. I am using a dry brush. So we are going to use
the dry brush technique to add the waves so
that it looks for me. Now, if you think
that the brushes wet or the paint is too wet and dry, use a paper towel to wipe
off the excess paint. Make sure the brushes dry
and add the waves like this. Dry brush techniques
or dry on dry, which is basically dry
paint on dry paper, is a great technique to add, for me distinct waves. And secret to applying this dry brush stroke is to mainly use the tip of the brush. Use the tip of the brush and scrub the paint onto the paper. So face to create wave
light texture on the paper. Make sure that you load your brush with just
enough paint and not a lot of paint while doing this
dry brush technique. I am going to keep still, leaves thicker as I come
towards the bottom section. And the distant waves
are going to be thinner, that is the ones near
to the mountain. So make sure that when you
try this dry brush technique, the paper is dry, that is true previously
on, is dried completely. Otherwise, the white
things to get done, and you may have to repeat
this step of reapplying white gouache so that
it looks brighter.
10. Adding details to sea area and painting mountain: Now I'm using the similar
dry brush technique. I will use the tip of my brush and add thin strokes like this. Make sure that the lines are really thin and not too thick. I think this thin strokes
will create an effect of distinct waves and
scattered wave forms. Load the brush with
some more paint. Continue adding this
really thin strokes or obese until you're happy with
how this sea section looks. Now it's time to add some
details to the sea. So I will clean my brush
and use my same size three round brush and
load some indigo paint. Again, I will go with the
dry brush technique to add some really thin dry
brush strokes like this. Always make sure that
you use the tip of your brush to get
those thin strokes. This dark, indigo in lines against the light
background layer, make the scene look
more realistic. The more you add
this thin strokes the backdoor you're
painting is going to look. So take it slow and
add this thin strokes. Adding this thin dry strokes will add more dimension
to this painting. Now, if you think that
the show looks too wide, you can add some indigo
in-between the waves to give it some more dimension so that it does not
look flat white. Once you're done adding
these details to the c, Let's move on and paint
the mountains now. So I'm going to take some black paint and mix
it with some white gouache. Basically, I will go with the gray color
for the mounting. And once the gray
paint is ready, I am using my size 3 round
brush and filling this area, but the gray paint. So you can take equal portion of black paint and white gouache
to create this gray mix. If you want it darker, you can go forward or
greater portion of black and if you want it
lighter shade, gofer. portion of white gouache. So I have I am going for a
darker shade of gray here. All I'm doing is filling this white portion that
is grey mix. I'm taking it slow and
filling the tiny gap between the mountain
and the sand here. This gave you a completely
with black paint. Once you are done
painting the mountain, we will wait for this to dry so that we can add
the details to it.
11. Adding details to the mountain: Let's add some more details now. While we wait for
that layer to dry, I am going to add some more
definition to the shore. So I'm going to load my brush, size three round brush
with some gouache paint and filling in the gaps and giving
it some more definition. So I'm using the
tip of my brush and adjusting or adding more
details to the shore line. Meanwhile, our mountain
layer has now dried up. So I am going to clean my
brush and load some dry paint. That is, I'm loading my
brush with ivory black. And I will again use the dry brush technique to add details on this mountain. So basically, I'm
adding some shadows using the dry brush
technique to this mountain. Use the tip of your
brush and load some dry paint and make sure
your brush is also dry. The dry on dry technique and add the shadows can give it some dimension and
depth to this mountain. That's it. It's very
simple dry brush technique that we mainly use for
this cityscape painting. That's it. We are done
with this project. It's now time to eat
the masking tape. I'm going this ballot away. The masking tape and
to reveal the final artwork. Make sure that you
pull the tape that can angles so that you do
not damage the paper. I hope you enjoyed painting this very simple
and easy seascape.
12. Project 2 - Vik Beach: Second project that we are
painting is the Vin beach.
13. Painting the Sky and Clouds: lets start the project by taping
down to paper using masking tape to tape and secure all
the four sides of the paper. If you're not comfortable
the masking tape, you can always
skip this step and go for the borderless
painting. Make sure to run your
fingers through the tape. So with that, that is no gap. The masking tape for the
horizon line as well. Now, use a pencil. And I'm adding a mountain
here draw a curvy line for the top section
of the mountain. And this is the
sketch for mountain. Now, let's move on
to the next section. Now I'm going to take my palette and let's look at the colors that
we need for the projects. So I'm going to take some
cobalt blue onto the palette. This is the color that
we will use for the sky. I will use my flat brush
and evenly wet the paper. That is the sky part. Once your paper is evenly wet, load or size ten, brush with this
cobalt blue color and applied for this
sky section like this. You can notice that I'm
leaving some gaps and not filling it completely
for the clouds. So the gaps that I'm
leaving off for the clouds. So I'm going to
clean my brush with clean water and wipe it
using a paper towel. And now I'm going to take off the color using this
dry brush like this. And wipe with using
a paper towel, excess paint back the brush loads from the people
using a paper towel. You can shape the clouds as you want by wiping the excess paint. You can also use a paper
towel and dab it on the paper to create those white spots for
the clouds as well. The sky and the clouds
section is now done. Now, let's move on
to the next part.
14. Adding colors to the mountain and sketching the shore: Let's paint the mountain now. So let us look at the colors
that you need for this. So I'm going to
squeeze out some sap green onto the palette. It will also need
some yellow green. So I'm going to
squeeze some paint out of this tube
onto the palette. Now I'm going to use my size
10 round brush and I'm going to wet this mountain
area using clean water. I reload my size ten brush
with a little green. And I'm going to fill in this column to this
small thin section. If you do not have the exact
shade of this yellow green, you can get for the project
description section where I have mentioned
the alternate color. I'm going to take
some sap green. And I am going to do sections
of this mountain area. So basically I am darkening few areas of this mountain using this sap green color Where we are using
wet on wet technique. Now I'm going to load my brush
with indigo and I'm going to highlight few areas of the small thing using the
same bet on wet technique. Using the tip of my brush
to add this highlights. All you have to do
is darken few areas. This mountain section
using indigo and sap green to add more
depth to this mounting. I'm using the tip of my brush and I'm going over the
outline of the small game. That's it. We are done with
this mounting section now, we will add more
details directly. Let's move on to
the next section. I'm going to peel off
this masking tape that I had used for the horizon. I will now sketch
those show that just basically distinguish the
sea and the sand section. Not happy with this one, I'm going to erase it
and redo it once again. Have a sketch of
COBie or BB line. You can refer the final
project uploaded and the resource section to do or draw the sketch
or the outline. Once you're ready
with this sketch, wavy line for to
see all the ocean. Let's move on to painting
this and this and section.
15. Painting the sand, sea and adding texture: So I'm going to take some
ivory black on to the palette. I've been load my size ten, brush with the black paint. And I'm going to paint this sand section with
using this black color. I'm not going with a very
dark shade of black. I'm mixing a little amount
of water to the paint. Notice that I'm leaving some gap between the sketch
and this area here. Bad. We will be
adding the waves. It gets slow and cover this entire section
using black paint. Again, using the wet-on-dry
technique where we apply the black
paint on this try people make sure that you fill this layer completely but black paint
and there are no white gap. So once you're done
filling this abs and add some details
to this layer. Now, I will use my size
three by 0 round brush. And I am going to
add some black spots or adding some texture to the sand on this wet
paint or the big paper. So we are basically doing
the wet on wet technique here to add some texture
to this and section. All I'm doing is
leaving or adding some dark paint on
wet sand section. You will not be able to
see this texture that I'm applying on this section
because it is wet. Once the paper dries, you will be able to see the
dark spots on this sand area. Now it's time to
paint the sea. So I'm going to take some
cobalt blue and mix it with little amount of
indigo to create a darker shade of
blue for the sea. So I'm going to load my size ten brush with this mix of cobalt
blue and indigo. And I'm going to fill in the
color to the sea sectionhere. Using the wet on dry technique, I am applying
horizontal strokes. It gave notice that I'm leaving some white gap between
the sketch and the sea, again, for the waves. Don't worry about
this uneven outline. Your Cabo that is
going to be covered. Can Now we're done
painting to C-section. We have to wait
for this layer to dry before we add two waves.
16. Adding details to the mountain: Now it's time to add some
details to the mounting. So I'm going to load my size 0 round brush
with black paint. I'm going to take
some dry paint. That is, I'm going to take my dry brush with
some dry paint and I will apply dry brush technique to add details to this mountain. To adding this dry brush strokes add depth to do mountain. We are basically adding some shadows and few
areas of this mountain. More definition using
the dry brush technique. Add this texture to some
few areas of the mountain. It's better to use a smaller size brush
to add these details. Make sure that your
brush is not bad and you load dry
paint and add this. The games would
think that the brush or the paint is to make sure to use a paper towel
to wipe off It's this water from your brush and add this dry brush strokes. That's it. We are done adding
details to this mountain. That the sand layer is all dry. You can see the texture that we add it to the second
section bundle. A bot was wet, sand section was wet. Where we added the texture using the wet on wet technique. I'm going to use my
size 0 round brush. I'm going to fill the gap, wide gap that you see
between the mountain and the signed area
using black paint. Now it's time to add some
details to the sea section. Make sure that the sea layer
has completely dried. I am going to load my size three by 0 round brush
with some indigo paint. And I will add some water ripples using
the dry brush technique. Again. Use a paper towel if you think your
brush is too wet or the painters to what wet. And add the details
that is the way to the seat section using
the dry brush technique. Just this horizontal strokes in your painting when
make it look like. When you add this dark paint, horizontal strokes on
top of this ocean color. It makes it more interesting and it makes it look like
reuse in the distance. Well, I'm doing this, adding some lying or dry brush strokes, leaving some gaps in-between to add those waves in the sea. Use the tip of the brush
and this thin strokes. Once you are done adding
this Dry brush details, It's time to paint the waves. Let's do that now.
17. Adding white waves: I'm going to take some white
gouache on the Padlet. I will use my size three round brush to
add the waves here. So I'm going to load my dry size two round brush with some white gouache paint. And using the same
dry brush technique, I am going to add the beams to the section between
the sea and the sand. Always for our dry
brush techniques and white cosh to add
the crashing waves. So the form white gouache is thicker or more
opaque than watercolors, and you can use it to
paint with watercolors. As you can see, I am keeping the waves thicker. This section. And as it goes further away, it is going to look like now. So I'm increasing the weight
off the waves here in this section that is left side. And as I move towards
the mountain area, I'm going to keep it T Now. I'm covering the pencil marks though are the sketch
with Dwight gosh. Now for the final
set of details, I'm going to add
some white gouache in-between the
sea section as well. And that's it. We are done with this project. Let me keep this ballot aside. It's now done to pay off this masking tape to
reveal the final artwork. Because it slowly again. And that is this beautiful
black sand beach to seascape.
18. Project 3 - Reynisdrangar Rocks at Black Sand Beach: Finally, it's time for the
third project where we are painting this beautiful black
sand beach from Iceland.
19. Painting the Sky: Haven't started this
project by using the masking tape and taping down my paper will flat
surface or in my case, I'm going to secure all the
four sides of the paper. I'm using this masking tape
to keep often inch Bordeaux. Now, if you do not want
clean edge painting, you can also skip this step. Once your paper is secured, run your fingers
through the tape so that there are no gaps. Also use masking tape or
across the horizon line. So I'm going to start out with a straight line of masking
tape across the horizon line. And this needs to trade on
your finger over the tape. Let's now look at the colors that we need for this project. So I am going with
this cobalt blue, so I'm going to squeeze out some cobalt blue
onto the palette. So this will be the color that
we will use for this guy. I will now use my flat brush and load it with clean water. I'm going to split
out clean water evenly on the paper like this. Wet the paper ball. Make sure there are no
puddles of water on the paper and it is evenly wet. Make sure that data or no
puddles of water on paper. Once that is done, I am going to use my size
standard round brush. And I will load my
brush with cobalt blue. And I'm going for a
nice flat wash of, now for this guy, that is, I will go with
this cobalt blue flat wash, this entire sky section. And later I am going to intensify the colors which
you will see in the later. So I creating a nice wash
of this color for this guy. I am applying horizontal. Now. I'm going to seek some
cobalt blue intensify the colors here at
the bottom section because it looks too data. We have a nice full
shelf, cobalt blue. Now I will take
some indigo that is load my brush with
indigo and I'm going to intensify or darken the value in the top section that does the top section
of the Canvas here. I'm intensifying the color by loading my brush
with some indigo. And now you'll see
a nice graded wash from indigo to cobalt blue. I'm going to load
my brush with some cobalt blue and intensify the color of cobalt blue
beyond the horizon. And I'm going to blend it with
the indigo in the middle. There we have a nice graded wash of indigo to cobalt blue. And we will wait
for this layer to dry before you peel
off the masking tape. I'm going to use
tissue to wipe off the excess paint that has
settled on the sides.
20. Painting the sea and the sand : Now it's time to
sketch this show. So I'm using a
pencil and drawing a red light sketch
for the shoreline. That's it. I'm not defining it or adding in a lot of
details for the show. So that will be covered
by the white gosh. I'm also adding
some little frogs here in the middle of the sea. And therefore the painting for the sketch on how to sketch
this mounting or the role. You can go ahead and sketch this before painting the sky layer. By referring to
the final project. I am adding a
triangle shaped rock here with some curvy
lines are the edges. Similarly, I am going to add one more roadshow,
triangle shaped rope. So that's it. We add the
details when we paint them. Let's start with the painting. I will use my size
standard round brush and load the brush
with cobalt blue. And I'm going to fill in this
sea section with this color. I am slowly applying horizontal. Folks here. We are filling in the color
Cabo with the cobalt blue. It's just a plain light
wash of cobalt blue. We can add more dimensions
by adding details. Once this layer dries up, I am going with a very light shade of cobalt
blue as you can move this. Once you're done filling
this layer of cobalt blue, I'm going to load my
size lawn brush with some indigo and intensify the color near the horizon line. Because the distant ocean
waves look often looks darker. So that is why I am using indigo and I will go with the darker
color near the horizon. Wait for this to dry. Meanwhile, we can paint, start painting though
San, black sand. So I'm going to use my size ten brush loaded with
some ivory black paint. And I am pulling and killing this white section or the
white people but black color. We are following the wet on dry technique and applying
wet paint on dry paper. Once you are unfolding the sun area completely
flat, clean, clean your brush and blend
the sun and the C-section but TO water or more
like a gray color. So I just cleaned up my brush and I'm just blending
it with the sea section. If it is too wet, you can wipe off, ward off using a paper towel
from the brush and blend it. Now, if you, if you're not comfortable with this technique, you can leave this leave the
white gap for the shoreline, like it was used or clean brush. And let the two colors
blend with each other. That is the ocean and the sea. Now we have to wait for
these two layers to dry before we add
in more details.
21. Adding the white waves : Once paper is completely dry. I'm going to use my size three round brush loaded
with white gouache paint and using the dry
brush technique, I am first going to
outline the wave. So I'm going to do the outline first by using this
dry brush technique. You can use the tip of your
brush for this outline. That outline is now JB. So now you can load your brush with white gouache paint and use the dry brush technique
to cover this short line. But we blended, see though sand, the color that you
see underneath where the sea and design blended. So that will add more
dimension to while you add form or the waves
and the short line. The gray color underneath this white goulash will make
it look more realistic. Now I am cooling, read my second layer of paint. And I am going to
brighten this ADR here by reapplying white wash. Again, please notice that
I'm going to keep though size of this
foam or the waves. Oh, because you're in the
bottom section and it will be thinner as it goes further away. So this bottom section
is going to be thicker. Now I am growing rather dry brush
techniques and adding some white strokes
and the sea as well. That is adding some details. And the C-section with this white gouache
strokes, strokes. I am going to fill few
portion of this AVR, but this white strokes. I will make some
final adjustments by adding some more wash paint
over this short line. So you can add until you're
happy with the result. Making some final adjustments to the shoreline and defining
the outline of the waves. Now, let's move to
the next section.
22. Painting distant waves and rocks: Now it's time to add some
darker details to the C. So I am going to use my size three round brush again and loaded with
some indigo paint. And I will add some dry brush strokes of this indigo color
or the horizon. Starting from the horizon. And slowly I will move
towards the shore. It's better to use dark pink
than the diluted color here. I'm using the tip of my dice three round brush to
add dry brush stroke, thin strokes like this. You need to be patient here
and apply this thin strokes. Filling this completes ADL, but this dry brush
strokes of indigo color. I like the contrast of dark
and light blue waves and the C. So that's it. We are done with adding
details to this area. Now, let's move on
to the next section. Now it's time to
paint these strokes. So I'm going to use my
size two round brush and load it with this
ivory black paint. I'm going to fill in the area. I've been floor. Start with
the outline of this drug and then the color to this. It's sporty. The stroke area completely
with the black paint. Keep the consistency
of the paint thicker and do more
dilute it a lot. Add more details to it. That is, add some
white highlights. Once this layer dries. Make sure that you do not leave any gaps in-between
and completely. Now repeat the same step and the other's wrong
with the black paint. Again, I am going to start with the outline first and later, slowly filling the body
with the black paint. And it's better to use
the tape, the outline. Now once you are done to use the dry brush
technique or wipe out any excess water or paint brush and just applied dry brush. Stroke below the
row caveat here. So adding this dry brush strokes right below the rocks gives it, makes it look like
it's reflection. I am going to load my size three round brush
with some more indigo. And I will go ahead and
add few more tunnel or indigo strokes like this between the waves that
we already created. I am going to fill in this
white gap that you see between the C and the horizon
with this indigo color. Now I'm going to clean
my brush and load it with some white goulash. And I'm going to add
some white waves that looks like crashing
this rocks here. So I'm just going
ahead and adding some dry brush strokes using white goulash,
neon disrobe area.
23. Adding details the rocks: Once the ROC area
is completely dry, now it's time to add some
details to this row. So I'm going to load my size two round brush with
some white gouache. And again, I will
go ahead and add some texture to this rope
using the dry brush technique. Adding this wide strokes well, give it some more dimension. I load my brush with some white gouache paint and add some white
texture to this row. I messed up this bottom
section with white gouache. I'm going to load some black
paint and gobbling it up. Now, if the applied texture, white textures too much, you can go over it
with the black paint. I'm adding this
texture to the rock at an angle and not
adding like what? Because extra, Instead I'm
going but some slanted extra. And I think I will
stop the details. And I'm pretty happy with
how this painting notes. It's now time to
take off though, be loved as masking tape. Again, peel the tape at an angle so that you
don't damage the B. Well, we have an adult beautiful
black sand beach.
24. Bonus Project: Let's see how to paint this beautiful bonus project
using black and white paint.
25. Painting the black sand: It's time for the
bonus projects. So I'm going to use masking
tape and secure my paper. In this bonus project, we will be painting very simple black and
white beach scape. Once this is done, let's start the painting. So I am going to wet my paper using this wash
brush or the flat brush. I'm going to load my brush
with some clean water and evenly spread the
water on the paper. So make this steps helps the paint to spread
evenly on the paper. So you can skip this step and apply ivory black director
on the paper as well. Once your paper is evenly wet, I'm going to load
my size ten brush with some ivory black ink. And I'm going to fill the
entire paper with this color. As I mentioned, you
can directly go ahead and paint ivory
black on the paper. Instead of letting the paper
and then applying the color. Go for a nice flat wash
of the black paint. Any black paint that you have. Now spread the color
evenly on the paper. Once the paper dries, the color tends to get lighter. So I am going with my
second layer of colors. You can go for the second wash
only if your color looks. Now, spread the color evenly and create a nice flat
wash of ivory black. Once this is done, you need to wait for
this layer to dry completely and then start adding the waves
using white quash. Now, I will use my
size three round brush and I am going to load it
with some white gouache. And I'm going to start with the outline of the
waves like this. Now, you can get for the
final project uploaded in the resource section to know where exactly the
outline is placed. Or you can go with your
own outline for the waves. The technique remains the same. I will use the dry brush
Technique and add the waves. Now, load the brush with some white dry gouache paint and start adding this
dry brush strokes. If you're using white watercolors
instead of white quash, might have to repeat the
steps multiple times to achieve the desired result.
26. Adding the brush brush strokes: I will continue adding
this first layer of dry brush strokes along this outline that
we just painted. You can see I'm using
my tip off the brush and adding this dry brush
strokes along this line. I'm sure by now you must have mastered this dry brush strokes. Now, I'm going to
fill few more areas, leaving some gaps
in-between accurate, as you can see, showing the layer underneath, which is black in color. As the waves breaks
and hits the show, wide form is created. And for that AV out, the full mass lot of bubbles and voids through which the
sand will be visible. Now using the tricks
learned in this class, you can try to paint it reference images from sites
that offer free majors, like Pixabay and Unsplash. The brush stroke should mimic
the motion of the wave. Here. Again, the form should
look to the shore line. And as you move further away, it can go to now, I am adding more
distinct or making the shoreline very thicker
and bright with whitewash. Now I'm using the
tip of my brush. I will add web-like
patterns here, which will make it look
like a breaking wave, and it will add more
depth to the painting. So all I'm doing is adding
some web-like patterns here. So I added the dry brush
strokes near the shoreline, and I am adding this web-like
patterns. The next step. Take it slow and fill up this
section with this button. Now using the tip of the brush, add some wiggly lines
or curvy lines, and fill in the gaps between the lines which will
create a web-like button. Now, if you like
using masking fluid, you can create this
wavelike packed and, and cover the paper
with the masking fluid. Instead of creating this
pattern with white gouache. Now I'm moving to the top section and
beating the same process.
27. Adding the final details: I am going to add some
more pattern here. All I'm doing is I will add some very thin
strokes like this. You're in the top section
to show the breaking wave. Now, repeat the same pattern you're in the top
section as well, but make sure that
it is not Leave Act and the black layer
underneath is clearly visible. You do not have to stress or aka of the pattern y'all at this just random
wiggly lines. I'm loading my brush with some more goulash and I'm
going to widen this area. You're going with my second
layer of white gouache. Look brighter. I am defining the outline
with more gouache paint. You're adding some more final touches here and there until you're
happy with how do we looked at this time for me to stop, I think though, waves and
stay happy with the results. So I'm going to stop it here. It's time to peel off
this masking tape. Andrew, be the final artwork. Here is a quick and
easy bonus project using just two colors.
28. Thanks: Thank you so much for
joining me in this class. I hope you enjoyed painting this beautiful black
sand beach scapes. If you liked this class, please leave a review
about the class so that the class can
reach more students. Have a wonderful day
and happy painting.
 Sheetal Shetty, artjauntwithsheetal