Transcripts
1. Introduction: Everything about
when S mesmerizing. It's the season that
inspires many actors. If you are also inspired
by the cold season, then you will allow what I have to offer you in this class. Hello, and welcome to
my Skillshare class. In this class we
will be painting. Landscapes, lead
two main projects and one practice project, where we will be learning basic and important
watercolor techniques that you need to know before you begin when the action projects. I'm so excited to share this painting process where
we've been too loudly, snowy winter landscape
captures the seasons essence. I will teach you
step-by-step exactly how to paint these two
winter landscapes. There are two main concepts that we will be concentrating on. Diapers paint using limited
palette and paint it using a wet on wet approach
to create delicate soft, misty background and the snow. I am so excited to share this
painting process with you. Let's learn few important but basic watercolor
techniques and look at the watercolor
supplies that you will need to start the projects. Let's quickly do that
in the next section.
2. Materials Required: Let's quickly talk about the colors that we'll be
using for this project. So these are the colors that we will be
using the projects. And it's a very
minimal color palette. And I will go through each of the colors that
we will be using. We'll be using colors from the Indian brand
called to lead. Free to use colors
from any brand. First color that you will
need is cobalt blue. Men number is BB 28. X color that you
will need as indigo. And its pigment number
SPB Fifi became 61 22. In case you do not
have indigo color, you can mix one-third
of red to blue. Next color that I will
be using is ivory black, which contains pigment PB K6, and P became nine. You can use any black that is available in your
watercolor set. Next color that I will be
using for the project is blue, violet, which contains
the pigment p me 1929. In case you do not
have the exact shade, you can use any violet or
purple that comes in your set. You can mix two
parts of blue, red, one part of Fred to
create a shade off book, but next color is permanent red, which contains pigment PR to 54. In case you do not
have the exact shade, you could go for any drug
that is available with you. We would also need burnt sienna, which contains pigment BB R7. That says the very basic color that comes in your watercolor set box from these colors, we'll also be using
white gouache. I'm using this meant
White from Xiaomi. In case you do not
have white gosh, you can go for the white watercolor that
comes in your watercolor set. Talking about the brushes, I will be using these brushes
from the Princeton CDS. This set includes a wash brush or a flat brush of
size three by four, round brush size stem. Then the round
brush of size three and lawn brush off size three by zero can go for any
flat brush that you have. But on brush of size
preferably eight to ten. Add the details. Use a
round brush off size zero. Or you can also
use a liner brush. Next coming to the most
important material, which is the watercolor paper. So I'm using this
watercolor paper from Honk, which is cold pressed or
rough textured paper. And it is 300 GSM paper. Who can go ahead and use any
watercolor paper that is 100% cotton and
300 GSM or a bot. If you have a rough textured
paper well and good. If not, you can use any hundred percent
cotton watercolor paper. Each paper is off the
size 20 by 14 cm. Apart from these, you would also need a pencil and an eraser for sketching a painting
palette to mix, mix the colors. It will lead to jars
of clean water, one to clean your brushes and other one for the washers
or to mix the paint. And you will need
a paper towel or cloth rag to wipe the excess paint or excess
water from the brushes. So if you're already
with this supplies, Let's move on to the next
section and start the projects.
3. Practise Project -Sketching and painting the background: Before we start with
our actual project, let's do a quick exercise to understand few
watercolor techniques. I'm going to take
a watercolor paper and stick it to a stiff surface, your skin masking tape. While I'm doing this, let me quickly tell you feel watercolor techniques
that you need to know. That will be wet on wet, wet on dry and dry
brush techniques. So I will explain each of this technique and this weekend simple
watercolor exercise. The techniques learn in
this exercise we'll be also used in our main projects. I will explain each of these
techniques while painting. So let me begin this exercise by doing a very simple sketch. So I'm going to draw
a slanted horizon. I'm going to add a cottage here. So I'm going to start by
drawing an inverted V, the ends, the horizon
line that we sketched. And then I'm going to add the roof and joined the end
to the horizon as well. So this is it. So keeping the sketch ready
light and very simple. So you don't really
have to struggle a lot with the sketching here. All you, all we
have to do is add an inverted or upside down V, the roof and join the ends. Adding a tiny little. We know. And I'm going to stop it
kept coming to the colors. I will be using emerald, green, indigo, and burnt sienna
for this project. You can go ahead and use any green that you have in
your watercolor set, indigo and burnt sienna
for the cottage. So let's start by applying a
layer of clean water using flat brush technique that we are going to do
here as wet on wet. That is applying a layer of
clean water on the paper. And I'm going to wet my paper
evenly using a flat brush. Makes sure that it is
evenly wet and there are no water puddles
on your paper. In case you do not
have a flat brush, you can go for any
because I round brush to apply apply a layer of
clean water on the paper. Now while the paper is wet, I'm going to use my
size ten round brush and load it with some emerald green and apply the
paint on the wet paper. This is basically the
wet on wet technique. That is when you apply wet
paint on the wet paper. You can see that the color takes its own shape while
the paper is wet, creating a nice
beautiful background. So you can, you can create
the misty look using this wet on wet technique that we are going
for the background. That is, we are going for this misty background
for this painting. Wet-on-wet technique as the
one that you need to use to achieve a tube that
in your painting. You can see how beautifully the vein just spreads
on the wet paper. Now, I'm going to add some, a bit of indigo
in-between the screen. So I'm going to
load my brush with barely diluted indigo
color and I'm going to add some white. I'm going to drop the
color on this wet paint. So again, this is wet on wet. Make sure that when you
your paper, in fact, while you do this, because I'm using a
textured paper here, you can see the textures or texture on the paper
while you apply this color. You can already
see the result has created a nice misty background. So we will wait for
this layer to dry, to add more details
in the foreground. Now it's time to paint the
pine trees in the foreground. So I'm going to use my
size three round brush, and I'm going to load
it with some emerald green and add the pine
trees in the foreground. Make sure that your background
paint is completely dry. Before you add this
trees in the foreground. You can go ahead and add the pine trees of any shape
or size that you like. There are different techniques
to paint the pine trees. So you can go ahead and add
pine trees in your own style. Or you can just, and the way I'm doing it, just filling the color right
above the horizon line. And I will start
adding the pine trees. I will just add the
tree trunk first. And I'm just moving my brush like to left
or left to right and random direction to add the branches
to this pine tree. This is my technique, my messy technique
to paint pine tree. And it turns out
to be pretty good. I think one more tiny one right next to the
house or the god HER. In filling in the details. Adding a tall pine tree. Again, draw the, I'm drawing, I'm painting the tree
trunk first and adding this plantains by going in random direction
from left to right. But make sure that it is
in triangular shapes. Start from the top. When you reach the board. It has to look like triangular. Triangular shape, pine tree. I'm just outlining
like about the loop of this cottage and I will fill
in and add the pine tree. Don't keep those size
of the tree uniform. Make it different shapes and
different sized pine tree. Now filling the rest, you can see that I'm using the same emerald green color that I used for the background. Because we followed the wet on wet technique
for the background, the color appears much lighter compared to the color
and the foreground. And the technique that we
are following your wet on dry because we are applying the wet paint on the dry paper. This is the wet
on dry technique. Adding the last pine tree here.
4. Painting the cabin and snowy pine trees: I'm thinking of add some more
trees in the background. I'm going to use diluted, diluted color of emerald green. I will add some background trees in between this
foreground trees. Make sure that the
shade that you use a slider compared to
your foreground tree, so that it looks like it
is tree that's far away. Just add them in
between the gaps that you see in between
this foreground trees. Now, we have to add some snow to this trees
in the foreground. So we have to wait
for this paint to dry completely before
we add white gosh onto it. I'll be waiting for it to dry. We can get started
with snow areas. So I'm going to
use my flat brush and wet this area
using clean water. We are going to add soft shadow to the snow area using the wet-on-wet technique. That is, I'm going to wet my
paper using a flat brush. And while the paper
is still wet, I'm going to load my size ten, brush with some indigo, very light shade of indigo
and add the shadow to this back area so
that it looks really soft and not very like it looks like the
soft shadows in the snow. And you don't want it
to look very bright. It has to be like really soft. We're following the
wet-on-wet technique here. Like that is added some random slanting strokes to this new area to
add the soft shadows. Now we can paint
the cottage, yours. So I'm going to use my size
three round brush loaded with some burnt sienna and
fill in the color. For this cottage. I'm leaving area
for this window and a door as it is and
filling the rest of the cottage using this color. Once this is done, I am. I will intensify
the color or adding some depth by just loading
my brush with some indigo and intensify or add
some shadows around the edges of this cottage
using indigo color. While it is still wet again, we are adding the shadow to this cottage using the
wet-on-wet technique. Just darken the value, intensify the color
around the edges. Now it's done to add snow. Using wide caution, I will
load my size zero, round, brush with it and add this node to this tree
is in the background. Make sure that the background
layer is completely dry before you add this wide gosh. I am adding those new randomly on this pine trees that
we painted earlier. You can experiment with the background
color for painting. That is, instead of using
emerald, green or anything, you could also use black or indigo or binds creek
for the background. And the pine trees
instead of emerald green. Use a smallest size brush to
add this snow on the trees. And make sure that you
do not cover the tree entirely with this white gosh. Them randomly on different
parts of this pine tree so that it looks like the
snow settled on the trees. So notice that I'm
not mixing white gosh with water and directly loading the paint and applying this dry paint
on the dry paper, which is again the
dry on dry technique. In case you do not
have white gosh, you can always go ahead and
use white watercolor paint. And adding some snow to
this roof of this cabin. I'm loading my size three
by zero round brush with a tiny amount indigo color and add some depth
to this roof so that it doesn't look
like a blank white. And now adding some snow
on top of the roof. I'm just adding the snow
on the sides of the roof. I'm going to add some snow on the ground where the house
digest this new area. For the last set of detail, I'm going to add some more
details to the snow area. Make sure that this this part of snow area is completely dry. And I'm using my
size three by zero round brush and loading
it with some indigo. And adding this dry brush
techniques will feel areas. Here. If you have
loaded too much. You can use a paper
towel to wipe the excess paint
from the resistance and just add this
dry brush strokes. I'm just loving the
crystals on the paper. Now let's add some detail to this door and the
window of this cabin. So I will use my size three
by zero round brush again. And I'm going to add
some shadow here on the side using indigo color, very light shade of indigo. Now I will load my side. She by zero round brush
with burnt sienna. And I'm drawing a vertical and a horizontal line for the window so that it looks
like the girls of the window. We'll make sure that paint is dry before you add
details to the door. Load my size three
by zero round brush with some burnt sienna. And I'm going to draw
the lines on the sides. And the same dog. I do like this. Not going to select completely with all been seeing
now she fell down. I'm going to keep it
like transparent door. Grunts on the sides
and the center. Then this is said, we are
done with lactose project. I hope you'll learn the basic and important
water color techniques in this project. Now it's time. We
often masking tape. This is Mary first,
warmer, warm. It's more like a
warm-up project. Will learn about few of
the watercolor techniques.
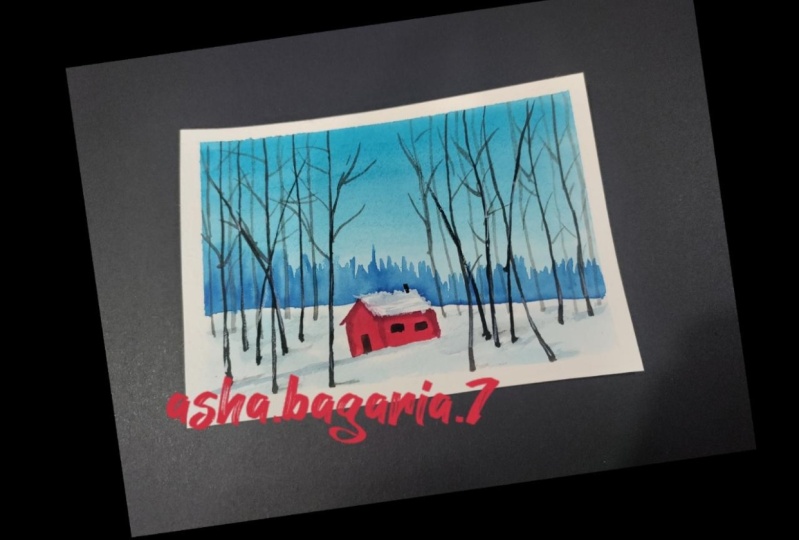
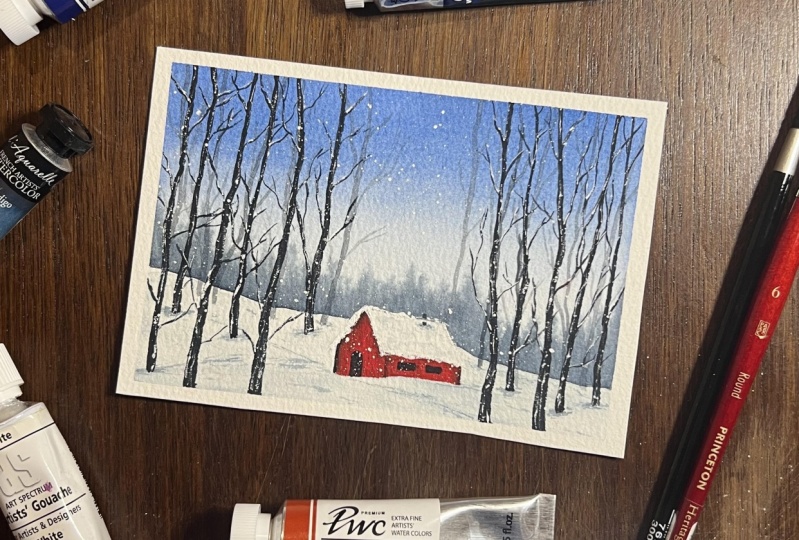
5. Project 1 - Red cabin snowy landscape: It's time for the first project. So I'm going to use this
paper and I will use a masking tape and
stick this paper to a step selfies
using masking tape. It's not a compulsion to
use the masking tape. You can you can start
painting without it. But I like to secure my
paper doorstep surface. So when I'm painting, the paper doesn't move. And also I like the clean
borders to my paintings, so I'm using the masking tape. Once you have secured your
paper doorstep surface, it's time to start sketching. I'm going to use the
pencil line and we'll start with this
sketch by drawing a descending coffee line from the left and get it all
the way towards the right. Going to add one more ascending line from the left to right. Now it's time to
sketch the cottage. So I will start by
drawing an upside down V. And then we will add the roof by drawing
slanted rectangle, or you can call it
up badly low gram. Now, I will draw straight lines like this
to complete their house. Finished by drawing the
diagram here for the roof. And then draw a line
and complete the house. This set, this is a very simple sketch of the cottage that we
are going to paint. We will add the details like the door and
windows later on. We'll make sure to keep
sketch very lightly. You don't want, don't
make it too dark. Because watercolor is
a transparent medium and pencil mask can
be seen through it. So make sure to keep
the sketch very light. I'm going to draw the sketch of the trees that we
will be painting. So I'm adding only the
foreground trees here. We will be adding
background trees as well, but we will paint that directly. And this is, this is it. So these are the foreground and the background trees that
we will be painting. We can add much details
to it later on. So this is set, this is the basic sketch
of our first painting. Once you're ready
with this sketch, let us quickly swatch the colors that we will be using
for this project. The first color that I'm
swatching here is cobalt blue. Next color that I'm using. Indigo. This is burnt sienna. Next would be this color that I'm swatching here
as bombed I dread. And finally, this
is ivory black. So this is that these are the five colors that we
will be using. From this. We will need white
goulash to add snow. Now, let us start with
the painting process. I will be using my flat
brush or the wash brush. And I'm going to load it
with some clean water. And I will wet my paper evenly. That does the sky section. I'm going to wet
this guy section evenly using clean water
and this flat brush. Make sure that I know
what a paddles on the paper and the
paper is evenly wet. I will now switch to my
size standard round brush, and I'm going to load
my brush with cobalt blue and mix it with a
tiny amount of indigo. And fill this guy section. But cobalt blue, I am going to go for a graded
wash of this color. That is, I will keep the
color dark at the top and I'm going to
drag my brush with pigment that is left to the bottom section of the paper so that we have a
nice graded color. Going to intensify the
color a little bit. By going with my second
layer of colors. You can see that and going
but horizontal strokes. We have nice graded wash or the school board
blue mixed with indigo. Once this is done, it's time to paint
the background trees. So I'm going to use my size ten brush loaded with
some indigo paint. And while my paper is still wet, I'm going to add the
background trees. So we are following
the wet-on-wet technique to add this background
trees in the distance. As you can see, I am adding this background
trees just about the descending line that
we sketched earlier. You can create a nice
effect. You can. As you can see, the
wet-on-wet technique is a wonderful technique
to add the background. Florida's trees. Now I'm using the tip of
my brush and I'm going to add the three peaks
using the tip like this. As you can see, I've got some shorter and some
longer trip beaks. And if there's not
of the same size, going and adding
some more trees. We are done with the
background trees. Now, we wait for this layer to dry before we proceed
with the next step. Once the background
layer is dry, we are going to add or
paying the snow area. So I'm going to use my
size than John brush. And I'm going to
wet the area below the horizon line or
the background layer. I load my brush with a
light shade of indigo and add some shadow to the snow area using the
wet on wet technique. As you can see, I am
adding them randomly in few areas to depict though. Shadow and the snow. Use the tip of the brush and
add the shadows like this. You can do this. Adding those shadows step using the dry brush
technique as well. You need not follow the
exact wet-on-wet technique. If you have a rough
textured paper.
6. Painting the background and foreground trees: Once this is dry, I am going to use my size three round brush and I'm going to load my brush
with some black paint. And once the paper
is completely dry, it's time to add the
foreground trees. I'm going to use the
size two round brush. And I will start adding the foreground trees that
we have sketched earlier. We are adding really
long and thin tree, so I'm going to keep it. So it's better to use a smaller sized round brush
or any brush that has a wind. To add this thing. Tree branches on
the tree trunks. As I was telling earlier, if you have a rough
textured paper. So you can add the background shadow in this new area using the
dry brush technique. In stove wet on wet technique. The texture of the
paper really helps in achieving the dry brush
strokes very easily. I'll repeat the same
step and use my size three round brush loaded
with some black paint. And I'm going to add though tree trunks on the other
side that have sketched adding the foreground trees. Now, we will add some lighter shade background
trees as well later on, once we are done with this. As you can see, the treats may not be straight. It's okay to have
slanted tree trunks. Now I'm going to add few
more background trees using a little lighter shade
than the ones that we use for no foreground trees. By adding tiny amount of
water to the black paint. And in-between the gaps, I'm going to add few lighter
shade background trees. You have to do is
mix the black paint with some amount of water. And you being the same step of adding the treatments that
we did for the foreground. You can add asked me me foreground and background
trees as you like. Just make sure that you use a different shade of lag when you're adding
this background trees. That is the lighter
shade of light when you're adding this
background trees. Once this is done, it's time to add some branches to this foreground
and background trees. So I will use my size
three by zero round brush. And I will start by
adding branches to this background trees plus by using a lighter
shade of black. Adding them randomly. I'd like really thin branches
to this background trees. Now it's time to add some branches to the
folk down trees. It'll be the same step. Really thin branches to
this foreground trees using smallest size
brush or a liner brush. If you do not have a
smallest size rush, we can go for a liner brush
to add these details. Make sure to keep these
branches really thin because our tree trunk
is also not valid thick. We have added really
think drink drugs. So the branches need to be
thinner than the tree trunk. So it's better to use ready. It's better to use a size
zero or a liner brush to add this really thin
details to the HDRI. I'm going to repeat
the same step and add the branches to the trees
on this side as well. And don't keep those
eyes of this branches, even just add them randomly. All possible directions. All that said, we
are almost done with adding details to this branches and the foreground
and the background.
7. Painting the red cabin: It's now time to pain. Though. Plot H. I will use my size three
by zero round brush, loaded with some red and mix it with tiny
amount of indigo. Going to add some more permanent red and make
it a little darker. And I will start filling this
area here with the mics. Don't all have to be more like a dark brown sheet when
you mix it with illegal. So I'm going to
load my brush with bone marrow and fill the
idea with this color. I'm going to keep the edges dark and go mid section
is going to be red. The front portion and decide
portion of this goal. He using this spreadsheet. I'm going to use some indigo. And I'm going to
darken the borders are the sites of discord,
choosing the color. Just on the corners. I'm going to add some indigo
and dark and no video or add some shadows to this
H, blending it together. And I think I've been
stopped at hill. Now it's time to some details to the
roof of this cottage. I am going to use
my size three by zero round brush and load it with very light shade of indigo that is mix the color with a
lot of more bell and create a very light shade of indigo and add some shadows to this
roof covered with snow. So we're adding a little
bit of shadow to this, which should look like
it is covered with snow, but we are adding
some shadows to it so that it doesn't look
like a blamed by truth. And status done. I will also add some extra fill this area
in the ground section. So I'm using the same brush and wiping the excess paint
from the brush and adding some shadows to this
brown area using indigo of year following the
dry brush technique here. I'm adding the shadows below each tree using the
dry brush technique. You have to make sure that
your brush is not too bad. Use a paper towel to wipe off the excess paint from the brush. Like this and add these shadows. And below each tree. I drink some more
extra in-between. And that's it. We
are done with adding this dry brush x show
to the painting. Now it's time to add some snow texture in
this foreground trees. So I'm loading my size three
by zero round brush with some white quash and adding some white texture in each of this tree
in the foreground. Now, if you do not
have white gloss, you can use white watercolor and add this white texture to the trunk of each tree so that it looks like it
is covered with snow. It also add some dimension
to the painting, adding this white strokes. I'm going to add some snow to the roof of this age as well. Keeping it a little wonky. Keeping the roof a little
bumpy and not straight so that it looks like the
roof is covered with snow. Now coming back to the trees on the left side and adding some texture to
this tree trunks. Again, make sure that again, you can see that it is the dry brush technique
that we are following here. To add this white texture. I'm going to stop with
the details here. It's time to add the last set of details to the Scottish Swan. Am using my size three by
zero round brush and adding the doors and windows to this
cottage using black paint. Just adding a
rectangle shape here. And I will add two
tiny windows again. And going with the
rectangle shaped windows. Now, use burnt sienna and add some horizontal
lines to this code. Just adding small details to this code so that
it looks better. Here, I'm adding
the vertical lines. I will load my brush with black paint and
add me too, me here, it has got h. And I'm going to add
some shadow here. And we are done with
the first painting. I am very happy with the result. Now it's time to peel
off the masking tape. So let me just move my palate aside and the masking
tape to reveal the final artwork itself. First projects snowy landscape, but tiny LED code page.
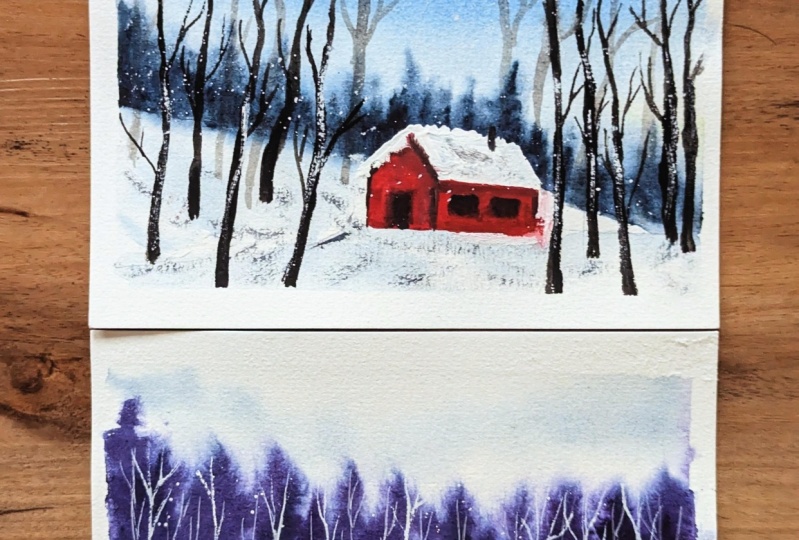
8. Project 2- Winter cabin in forest: It's time for the
second project. And again, I'm going to
take my watercolor paper and stick it to a steep cell
fates using masking tape. We are going to paint all winter forest and
a lonely winter cabin. Once your paper is secured
to the step cell face, Let's move on to the
next section and do very basic sketch. So I'm going to draw a
slanting horizon line. I've been drilled
out and go case right in the center
of the paper. So again, I'm going to start by drawing an upside down
V. Then I will add the roof by drawing a
parallelogram and then join the gardeners by
drawing straight lines. And that is simple
garden cottage. It is pretty much similar to the one that we
sketched earlier. It's the simple sketch
of the second project. It does just a very
rough and basic sketch. We will add more
details to it later on. I am erasing some extras
that does that I have drawn and this and making
keep the sketch very lightly. You don't want to
keep it fairly dark. So that's it. Let's move
on to the next section. Now. Let's look at the colors that we will
need for this project. So the first color that
I'm swatching your indigo, we would need burnt sienna. Next ode be blue-violet. So in case you do not
have this exact shade, you can go for any purple or violet that you have in
your watercolor set. And finally, we will need black. So that's it. These are the only four colors that we will be using for this project. It is just a full color palette. And let's begin with the
painting process now. I'm going to start by
using my flat brush, dipping it and clean border. And I'm going to go with clean
water wash for this guy. I'm going to wet
the paper evenly using a flat brush
and clean water. Spread the water
evenly on the paper. Once this is done, I am going to switch
to my size ten brush and load my brush
with some indigo. And I'm going to randomly add
or add some brush strokes. I'm leaving some
white gaps in between and keeping this
color very light. As you can see, it's not too dark or very light shade of indigo and random
strokes for this guy. Next, I'm going to load my
brush with some blue violet. And I'm going to start from the horizon line that I've
sketched and add this. Hello, I'm going to make some
indigo and between blue, violet and add the strokes here. This is going to be
the forest sections. Makes blue violet with
a tiny amount of indigo and add load to the paper
while it is still wet. So this is again the
wet on wet technique that we are using here. Don't have to worry about
the shape of this forest. I'm adding some indigo
in-between and intensifying or just deepen the color
of blue violet here. Unlike the previous project, I'm not adding the three peaks, just keeping it the
shape that it takes. Adding some indigo
in-between violet is still wet and intensify the
color. This is it. We are done with the
background forest. Now we need to wait
for this layer to dry. I'm going to stop it here. And we need to wait for
this layer to dry before we move on to the next section. Oh, this looks uneven, so on, just straightening it out
using the tip of my brush. Once this dries, while we
wait for this layer to dry, I'm going to just lighten the sketch here using an eraser. And I'm going to read this
section using clean water. We're going to add some
shadows to this snow area. What I'll do is I will load a tiny amount of indigo
and my brush and wipe the excess paint using
a paper towel and add this shadows to
this new section. You can see it's just
random strokes here and there to show the shadow. And the set, we will
wait for this to dry. So I'm going to stop it here and wait for this layer to dry. Now it's time to add the fence. So I'm going to switch to my size three by
zero round brush and load it with some
black and indigo mix. And I'm going to draw vertical lines like
this. For the fence. It's better to use the
smallest size brush to add this really thin lines. And I'm going to draw a line
connecting these fences, this vertical lines, making
them a little bigger. I'm going to repeat
the same step. On the other side, I will start by adding tiny
vertical lines like this. You can see I'm
increasing the size of this vertical lines as I come
closer to us, the sites. And I will join
this vertical lines using very thin horizontal line. It doesn't have to be straight
offense, so it's fine. Now I will add shadow right
below this vertical lines. I'm just matching
the paint using the brush with a tiny
amount of water.
9. Painting the wooden cabin and snowy forest: Now, if you load too much paint, you can use a paper
towel and wipe the paint or water
from the paper, from the brush and just match the ends of this vertical line. It looks too dark, so I'm going to take
off the excess paint by just going to
smash them together. It's too much. So wipe off. Always use a paper
towel to wipe off the excess paint from the
brush and start the process. I think this looks good. Now it's time to stop and
move on to the next section. So I'm going to switch
and use my size three by zero round brush again and load my brush
with burnt sienna. This is going to
be round caught. H would incorporate the brush wet burnt sienna,
and pain though. Section here. The roof is again going to be white so
you can leave it as it is. And remaining section of the house should be
filled using this color. I load a tiny amount of indigo and darken the edges
of this cottage that link the rest of the
portion that this color don't do it with tiny
amount of indigo. And I will intensify the colors or make it a little
darker on the edges. This looks better. You can see the shadows
of the roof on the house. So I'm going to stop it here. I'm going to erase this section. But you can see
though, fancy math. I'm going to load my
brush with a very light, very light value
of black paint and add some dry brush strokes to the roof so that it doesn't look like a
flat to white surface? Yeah. Just a tiny amount and I think I should
stop it here. It's time to add details
to this background trees. So I'm going to use
my size three by zero round brush loaded to load it with some
white quash paint. And I'm going to add
the tree trunks in the background forest area
that we painted earlier. So all the trees are
going to be YPO. That is, we are adding this white tree trunk
and the branches to this blue violet section
that we painted earlier. So that it looks like
trees covered with snow. So add this really, really thin white branches
and tree trunks in this area. The first set of three
terms that I am painting, you're really thin
and very light. I will be adding the
next set of buttons which are going to be
bigger and brighter. That is, it will be more going to use thick
white gouache and make it look more brighter against
this dark background. So you can go ahead and add
as many regions as you like. The background. Go ahead and add few more like
tree trunks in between. Some short and some longer. I will go ahead and intensive try the trees little brighter by going over it and
applying another layer of white gouache on top
of it and making it a little thicker so
that it stands out. So that it looks like
the tree that is, it's Nieto to you compared
to the ones behind. Out of this few trees, you can go ahead and you can
paint over and make it a little brighter so that it looks like the tree
which is new to you. I'm making sure fuels the trees a little
lighter and keeping to light so that it looks like the ones
in the background. I didn't feel more background. White trees, drunks.
Few more here. Section and add details
to this Odin coated. So I'm going to use my
size by size three by zero round brush and I'm going to load it with
some black paint. And I'm going to
add the door and window to this cottage
using black color. I feel we need to add
some snow to this roof. So I'm going to
use white goulash and add some snow
on the roof here. Covering the roof with
some white gouache. And that's it. We are done with our second project and it's time to peel off
the masking tape. Let me move this aside and
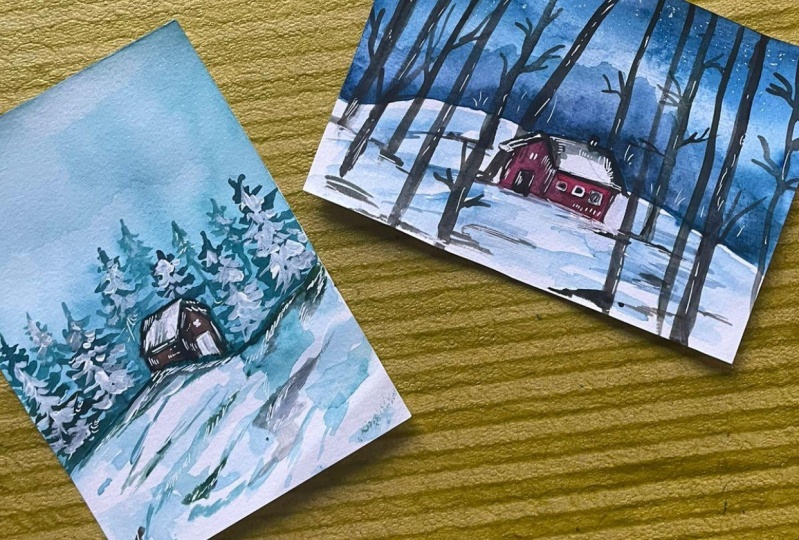
feed off the masking tape. So here is our second
simple and easy. The landscape, which
is meant a forest and normally wouldn't cottage.
10. Conclusion: Thank you so much for joining
me in this class today. I hope you enjoyed
painting this week, the cabin landscapes with me. If you enjoyed it, please do leave a
review about the class. If you have any questions, queries about this class, feel free to drop your questions
and discussion section. I will be happy to help you. If you have tried this projects, please upload the projects
in the project gallery. I am eagerly waiting to see all the beautiful projects
that you will be painting. It good and happy painting.
 Sheetal Shetty, artjauntwithsheetal