Transcripts
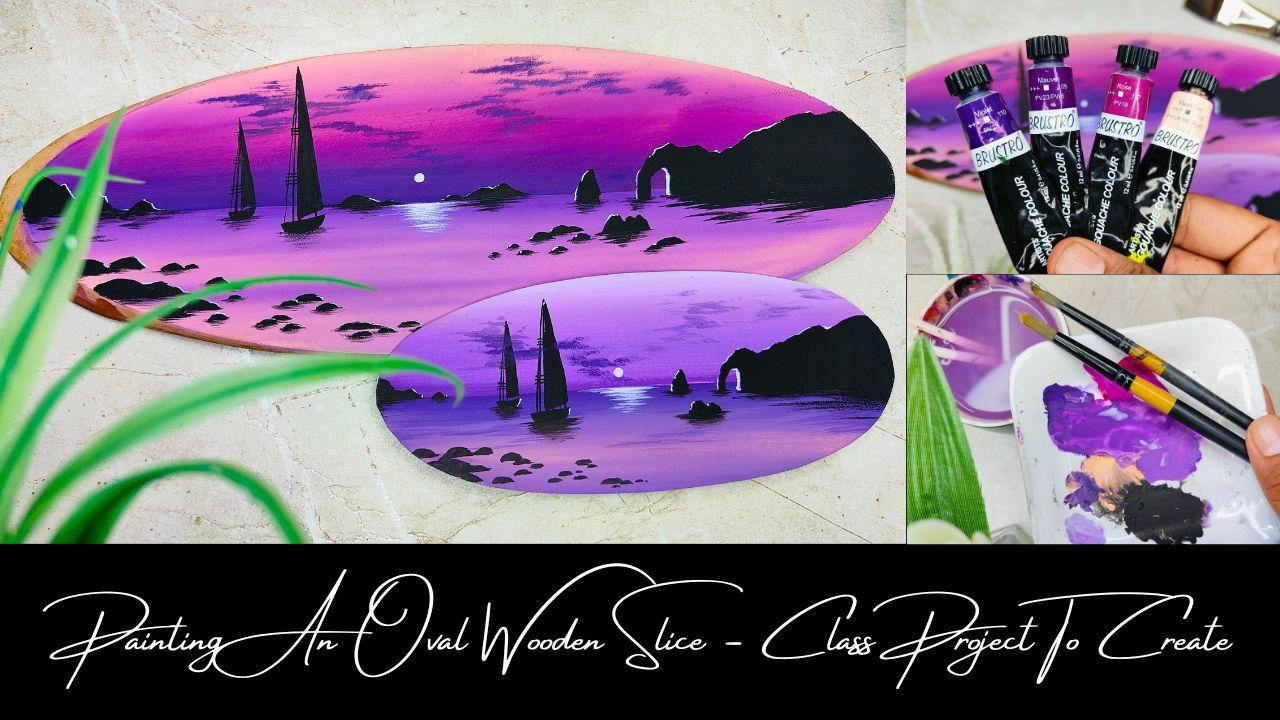
1. Welcome to the Class: Have you ever tried painting on all objects like an
Oval Wooden Slice? When it comes to
different Art Forms. I'm somebody who loves
to experiment the most. Wash has such a medium
which will give us a nice, elegant matte finish on the object that we are
going to paint on. Using minimal elements and some basic techniques to paint. Hey everybody, I'm rutvik Patel. I'm a self-taught
independent artist and an interior
designer by profession. And this class we're
going to create a beautiful oval wooden slice by painting a wash
Seascape on it. We are going to
start by studying all the odd supplies and details that you will need for
this particular class. We are going to talk
about the Brushes and the gouache colors
that you will need. We're also going to
talk about how you can select an object to paint on it. Before we start with
the final painting, we are going to have a
beautiful practice session in which we are
going to learn about each and every element in detail and how to paint it
in an effortless manner. We are going to start by
creating a beautiful background, which is a combination of the sky area and the water body. Using some basic techniques
and brush strokes, we are going to create a
nice gradient effect in the sky area and some
depth into the water body. We are going to paint
some beautiful clouds. In contrast with the Background. There are going to
be minimal elements like mountains and Rock Bodies. A beautiful pair of
Boats that are going to enhance the entire area. No need to worry at all. We
are going to learn about each and every element and
how to paint them in detail. That is going to be
a beautiful sun, which is going to
create a nice contrast with the Background
and Its Reflection, which is going to enhance
all the elements together. All the elements are going to
be in a form of a sellout. And together it forms a beautiful seascape that we are going to paint on an
oval wooden slice. So without any delay, grab your Art Supplies, join me and lets get started.
2. Art Supplies: Hey everybody. So
before we start, it is very important
for all of you to know the correct Art
Supplies that you will need for this entire class. As you can observe on my desk, I have pleased all
the Art Supplies and a systematic manner so that
I can give you the details. The false starts apply as a simple spray bottle which is having some
clear water in it. You can use it to loosen the color up
and you color palette. The second Art Supply as
a simple Tissue paper, which we can use to dab
the brush to remove excess amount of water
and color in the Brushes. Now comes the most
important Art Supply, which is the Brushes that
we are going to use. The food that we also have a
simple pencil that you will need to draw a horizon line before starting the
entire project. So in total, you will need for basic brushes by the
entire class project. The first one is a simple
flat brush of size 1 ". The next time we have
to down Brushes, the first one is of size six, and the other one
is of size four. So these two Brushes are basically needed to
paint the details. Then the last brush
that you will need is a simple flat
brush of knife 11. So these are all
the four brushes that you will need for
this particular class. Now let us talk about
the gouache colors that we will need for
this particular class. So the gouache colors that I'm having are basically
tube colors. And apart from that, we are also going to
need two more colors, which are going to
be black and white. So let us talk about
these four colors first. The first color is
flesh tint color, which is very nearby to white, but not exactly white. Then the second
gouache color is mold. Then we have violet, and then we have the
last one which is rose. So these are the four gouache
colors that you will need. And apart from this, we also need black
and white color. So my black and white tube
colors, we're finished. I'll be using It's dub colors. So you can observe that
I'm having two tabs, which are black and white. And these are also
watch colors only. No need to worry incase you have black and white tube
colors available. You can use that as well. Just to remind you one small
teaser, gouache colors. Then we will need a simple
cup of water in which we can hold some clear water
to clean up the brushes. The next up we have the object on which we
are willing to paint. This is basically an
oval wooden slice, which you can find very easily in any nearby local arts store. Or else you can also use any wooden coaster or any other object on
which you want to paint. I find this a little
bit aesthetic. So this is basically
an oval shape in which we are going to paint. Then the last Art Supplies
is the color palette. So this is basically a
simple color palette in which we can take out the
color and mix it well. No need to worry at
all. You can use any other good
alternative as well. So these are all the odd
supplies that you will need. Now, let us move
towards the next part.
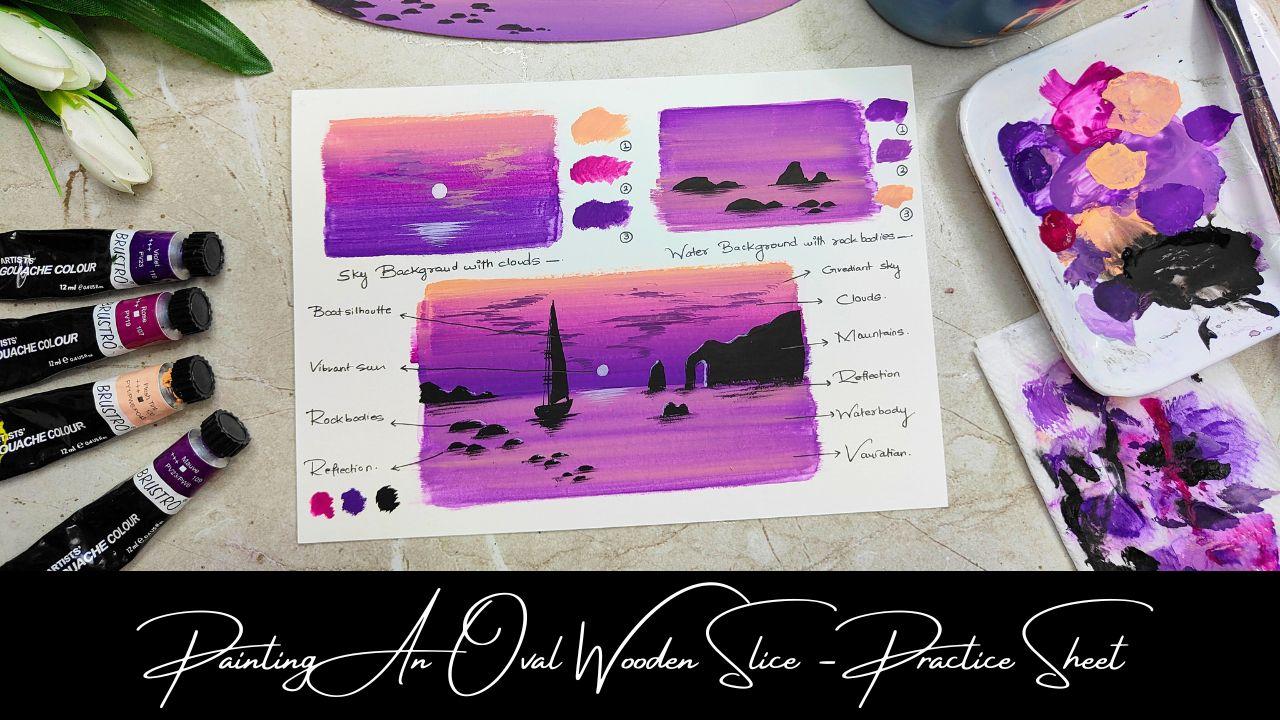
3. Lets Practice the Elements: Hey everybody. So before we start with the entire
class project, let us practice all the
elements that we are going to use to paint this
entire seascape. For practicing, you can use
a simple watercolor paper of 300 GSM or else you can use your journal as well in which you practice
on a regular basis. So you can see I have placed my gouache tubes on one side. We have a reference image. On the upper portion, we have a simple glass of water. Color palette is ready. And here is the entire project that we are going to create. You can observe that we have all the elements like
the Rock Bodies, a pair of Boats, sun and Its Reflection on the watercolor
paper that you can observe right now
in front of me. We are going to practice
all the elements in detail so that you can get the exact idea of how to paint them in a very easy
and simple manner. So let us start
with the sky area, which is having a
nice gradient effect. I'll be taking my
flat brush size 11 and simply just
apply a thin coat of water on the
watercolor paper and try to apply it in
certain portion only instance we are
practicing right now. The reason behind applying
a thin coat of water is so that we can move our
brush and a very smooth way. So now in my color palette
you can observe I have taken some violet color and simply take some good amount of
color in your flat brush and apply it in this horizontal
direction as you can absorb. No need to hurry at
all. Try to paint it in a very slow
and steady manner. So this is the first
color that we have applied just above
the horizon line. Now similarly, I'll be
taking some rose in the color palette and we'll
just clean the brush. Just simply clean the brush in the container that is having water and dab it on the Tissue paper so that the violet color
will be removed. Now take some rose
and you flat brush again and apply just
about the violet color. The movement of the brush
shouldn't be similar. It's a simple
horizontal movement. Now similarly, we'll take some flesh tint and the
color palette tried to clean your flat brush again into the water and dab it
onto the Tissue paper. Take some good amount
of flesh tint in your brush and apply it
just about the rules. You can already
see the difference between the three colors
that we have applied. Violet, rose and flesh tint now will be blending
them together. So you have to clean your brush carefully into the water and dab it nicely onto the Tissue paper so that
it is completely dry. And then you have
to apply it from the bottom potion moving
towards the above side. This is how we get a
nice gradient effect. These were the three
colors that we used to paint the
entire sky area. Now to paint the Clouds in
contrast with the Background, you just have to simply use your round brush of size four, takes some amount
of violet color in it and add some amount of water. You can also mix and match
certain colors to get a nice contrast between the
Background and the Clouds. Now we can simply use the tip of your round brush to create
these random strokes. Must be knowing that
clouds generally have a very natural
and random shapes. So there isn't any specific
way of painting them. You can create your own
natural shapes as well. You can play with the
shapes and sizes as well. Just simply tried to create these little
horizontal strokes in a random manner which are
connecting to each other. This is how we practice
to paint the Clouds. Also, it is very important
that you practice it on a rough scrap of paper initially or in your practice journal, and then you go towards
your final class project. This will definitely
minimize the chances of making mistakes and you'll be more confident while painting. Now as you can observe, we have painted the
entire sky area, which is a nice gradient
effect with the Clouds. Now comes the second element, which is painting the
entire water body, which is the main part
of the entire seascape. I also want to tell
you that I love to create these practice sheets, adding these nice labels
using a black pen. You can do this to create a nice record of your
artwork as well. So now we have simply
applied a thin coat of water using our flat
brush of size 11. Now I'll be taking some mauve in my color palette and also makes sure that you do not take a lot of color in
your color palette. Try to use some amount of
color only which is needed. We have simply applied
a thin coat of mauve on the entire paper where we have applied a thin
coat of water also. So this is basically
known as a wet on wet technique incase, you find that the saturation of the color is a
little bit lighter. So you can take
some more amount of color in the brush and apply it. Again. The reason behind
applying a thin coat of water initially is that your brush can move a
little bit more smoother. Now I'll be taking some flesh
tint and directly we have applied it onto the watercolor
paper in a random manner. No need to take it in
the color palette. So we want to have
a nice wave effect. So we just have to simply
clean your flat brush, dry it onto the Tissue paper and apply these horizontal strokes. Blending mode the
colors together, flesh tint and mauve. So this is how we paint
the entire water body and it is a very crucial
part of the entire seascape. Now in the sky area we have a beautiful vibrant sun
and Its Reflection. So just have to take your
size for detailing brush, which is basically
a round brush, take some solid white
color in it and simply tried to paint
a small circle. Now, just below
that, you have to apply these little
horizontal strokes, which are decreasing in size as we move towards
the bottom portion. So this is basically acting as Reflection onto the water body. Now similarly, we
are going to take some solid black color
into the color palette, try to add some amount of
water to loosen the cholera. And using the same round
brush of size four. We are going to paint
some Rock Bodies into the water body area. What we are going to do is
that you can simply create a nice outline of the entire mountain
AutoDock body basically. Then you can simply add
solid black color inside. Mountains generally have
a very natural shapes, so there isn't any specific
way of painting it. You can create your
own natural shapes and a natural organic
composition as well. Now to create Its Reflection
onto the water body, you just have to take
same black color in your brush tied to have minimum amount of
water and apply these little horizontal
strokes just below them. Now, let us add all the elements together and create the
entire seem completely. I'll be taking my simple
pencil and I have just created a simple
horizontal line, which is separating the sky
area and the water body. You can already observe. I have created a nice prototype of the entire class project, which is placed just
above the practice sheet. So it is just a cutout of a watercolor paper
and an oval format. So we are going to
start by painting the entire sky area by applying a thin coat of water using a flat brush off size 11. The methods and steps
are absolutely same. We are starting with violet
on the bottom portion. And you can observe that it is looking really
amazing and vibrant. Now, just above the
violet color will be adding the rose color, which is a little bit
different than violet. And above the rose color we
are going to add flesh tint. No need to hurry at
all. Try to paint it in a very slow
and steady manner. Observe all the steps carefully. Now simply, we are going to blend all the three
colors together. And you can observe the
entire gradient effect. Make sure that while you are blending all the three colors you're flat brush should not have access amount
of water in it. That will not give you
a nice matte finish. Now similarly will be painting the entire water
body area as well. So the steps are
absolutely same. You just have to apply a thin
coat of water initially. Then I have taken some mauve and the entire flat brush and just apply it in this
horizontal format. In case you find
that the saturation of color is a
little bit lighter, you can take some more amount of color in your flat
brush as well. To create some nice depth
on the entire water body, what we are going
to do just apply the flesh tint color randomly
using the tube directly. And you just have to use your
flat brush again and blend the colors together so you can observe how beautiful
the entire depth looks. We are done with
the sky area and the water body now using
our detailing brush, which is basically a
round brush size four, you're going to
paint the elements which are basically the sellout. These are generally
black and it does not have any color combination
or color variation. So we are painting them
black so that it can create a nice contrast with
the entire background. And the scenario would look
very much minimalistic. I have painted a huge mountain initially on the
right-hand portion, having some gap in-between. And it will create some nice aesthetics to
the entire painting. You can also create
your own composition for the entire Rock Bodies
or mountains, as well. As you can observe
that I'm having these little Rock Bodies on
the bottom portion as well, which is having a nice
variation in sizes. You can create a combination of bigger and smaller
rocks together. Now to create some
nice reflection effect for the mountains
and Rock Bodies. What we can do is just
simply take your round brush and have some amount of black color and very
less amount of water. David, onto the Tissue paper in case you find that there is excess amount of water and create these little
horizontal strokes, which creates a nice reflection effect onto the water bonding. No need to hurry at all. Try to paint it in a very
slow and steady manner. Observe these steps carefully. Now as we practiced initially
to paint the clouds, you just have to simply
take some amount of violet color in
your round brush and just apply these
little horizontal strokes which are connecting
to each other. And a very random
and natural way, since clouds are not
having a fixed form, you can create your own
composition as well. We're almost done
with the elements. Now let us paint a
beautiful pair of Boats, as you can observe on the
prototype, just placed above. Just have to create a
nice vertical line. Having the entire board
body on the bottom portion. Then we are going to paint
a nice triangular shape, which is basically the cloth of the entire boat. No
need to hire at all. Try to use the tip of
your detailing brush to paint an outline initially. And then you can paint in
solid black color insight. To paint some ropes connecting to the cloth of the entire boat. Just use the tip of your
detailing brush and add these little thin lines
connecting to the motor body. Now using the same
detailing brush, I'll be taking some solid white color in the
color palette. Just paint a small circle, which is a sun basically. And using the tip of
the detailing brush, just enhance the
elements by adding these little thin strokes to the mountains and
the Rock Bodies. Now I'll be applying these
little horizontal strokes, which are basically
the Reflection onto the water body of the sun. So this is the final
class project and this is the practice sheet
that we have created. This practice sheet
will help you a lot to practice all the
elements in detail. And it will definitely decrease the chances of making mistakes. And you'll be more confident to paint the final class project. I hope that you hope that you've got an exact idea of
how you have to practice. Now let us move
towards the next part.
4. Painting the Background: Hey everybody. So let us
start with the first step, which is painting
the background of the oval wooden slice
that we have right now. This is basically a wooden
piece which is having an oval-shaped and you can observe the flat surface
that it is having. So on that particular
flat surface, we are going to paint
the beautiful seascape. Now it is not at all
compulsory that you use this kind of object only. You can have various
different shapes of wooden cutouts as well. And it is absolutely fine if you have variation in
shapes and sizes. So here we have a
small prototype of the painting that we
are going to create. So I have just made
oval shape cut out out of watercolor
paper of 300 GSM. And I painted the same Seascape that we are going to
paint on our object. This will help us to get a nice reference of the entire scenario that
we are going to paint. So you can observe
that I'm ready with my object being placed
and we are ready with all the Art
Supplies and the surrounding so you can place all your Art Supplies
accordingly. Now we are going to start by creating a simple horizon line, which will give us a
difference between the sky area and
the water-boarding. To just have to draw a
simple horizontal line separating both the paths. Incase you do not want to
draw it with free hand. You can definitely
use a scale as well. So we are going to start
with the first color. You're going to presume
that I have taken some amount of violet
and my color palette, which is the first color
that we are going to use. Initially before starting
the entire background color for this guy area will be taking our one-inch flat brush and you have to take
some clear water in it. Now simply applied on
the entire surface of the object so that we can make it a little
bit smoother. And this is basically also known as a baton wet technique, so that your brush can move in a very smooth manner
and the colors can blend in a very nice way. No need to hurry at all. Try to apply the water in a
very slow and steady manner. You can also maintain this horizontal
movement to apply the water in the entire area, which is this guy portion. I'll be taking my flat
brush off size 11. So the first color that we
are going to apply just above the horizon line
is going to be violet. So try to add some
amount of water in your color palette so that
the color can loosen up. And you can observe that I
have simply just applied it in a simple horizontal
stroke manner to just have to apply it
in this particular way. No need to hurry atan, try
to maintain a steady hand. This is going to be
the first color, which is just above
the horizon line. Now incase, you find
that the saturation of the color is a
little bit lighter. You can take some more amount
of color in your brush and you can apply it again
on the same portion. Now we are going to
take the second column, which is going to be rose. So we are going to use
the same plant brush, but make sure that
you clean it well in some water and dab the brush onto the
Tissue paper so that you remove excess amount
of color and water. Now take some amount
of water and mix it well with the rose color that we have in
the color palette. And you have to apply just
about the violet color. No need to hurry at all, painted in a very slow and
steady manner. And you have to just follow this horizontal movement on
the outline of the object. We have curved surface to have to paint it in a very
slow manner near that. And try to use the edge of your brush to paint
in difficult areas. You can already observed
that we have got a nice combination of
violet and rows together. We'll be starting with the third column,
which is flesh tint. So again, you have to clean
your flat brush in water, dab it onto the Tissue
paper to remove excess amount of water and mix the flesh tint color
in the color palette nicely tied to add some
amount of water incase, you find that the color
is a little bit stiff. Now we are going to apply
it on the top portion. You can observe the difference
between three colors. Now we are going to
blend them together. So once we have applied
the flesh tint color, you just have to clean
your brush again. Now this time they
are going to have a very minimum quantity
of water in the brush, make it very much dry by dabbing it onto
the Tissue paper. And now we are going to blend all the three colors together. You can observe the
movement of my brush. It is having very
minimum amount of water. And by applying a dry brush, we can get a very nice blend
of all the three colors. Now in case you're not
that much confident enough to paint it
directly to your object. What you can do is
you can practice it on tape of paper initially, and then you can come
towards your final painting. So as you can
observe, we have got a very nice gradient effect and we will let it
dry for awhile. Now let us paint the water
body will be taking R1 inch flat brush again and
will be simply applying a thin coat of water
on the bottom portion, which is just below
the horizon line. No need to hurry at all. Try to apply the water in a
very slow and steady manner. Make sure that you do
not leave any area. We have applied at ten cutoff
water so that we can move our color brush and a
very smooth and nice way. You can use the tip
of your flat brush to apply water in
difficult areas. As you're going to
observe, we have applied a nice thin coat of water onto the
entire water body area, which is just below
the horizon line. Now, I'll be taking some mauve color and
my color palette. No need to worry at
all in case you do not have mauve color tube, you can definitely
use a purple as well. That also works perfectly fine. Will be taking our flat
brush off size 11. Try to take some good
amount of color in your brush and applied just below the horizon
line initially, because there you have to paint
it a little bit carefully so that you do not enter your
brush into the sky area. Use the tip of your brush
to paint it just below the horizon line
and make sure that you do not enter the sky area. Now once we have applied the color below
the horizon line, we have to apply it on the
entire surface as well. So try to add some
amount of water incase you find that your color
is a little bit stiff. Before that, what we are
going to do is we are going to take the flesh tint to, and I have just applied
it in a very random way, creating these little
horizontal strokes. And using the same branch, we are going to blend
the colors together. So for the water body, we are not going to
create a gradient effect. Instead, we want to create
a nice VV background. What I've done is that
I have simply applied some flesh tint just below the mauve color that we applied. And you can see that we can get some amount of color
from the color that we applied just below the horizon line as well
because it is still wet. Now to create some
nice variation in the entire water body area, what I'm going to do is I'm going to take some mauve color. And you can just simply, just applied on this random way. You can see how beautifully it blends with the flesh
tint background. And it creates a nice
VV Background together. No need to worry
about the perfection. Just maintain the capacity of water that you carry
in your entire brush. It should be a
little bit dry and do not have access
amount of water. So we are done with
the background now let us move towards
the next part.
5. Painting the Clouds: Hey everybody. So once we're done painting the
entire background, now let us paint the Clouds in this beautiful gradient
sky that we have painted. You can observe in this reference painting
that we have created these little horizontal strokes combining and forming
these beautiful Clouds. So you just have to take
your round brush size four and try to add some amount
of water in violet color. Dab your brush onto the Tissue paper to make
it a little bit dry. And you can observe
that I'm having rough sketch book here in
which I'm showing you how you have to create these
little horizontal strokes which are different in sizes. And only to hurry,
I don't try to use the tip of your brush
so that you can create these little strokes
in case you're not that much confident
enough to paint it directly to
your final object. What you can do is you
can practice it on a lab, scrape off paper initially, and then you can come
towards your final painting. I have taken some nice violet
color and my round brush. And you have to dab your brush onto the Tissue
paper to make it a little bit dry because
we do not want to have access amount
of water in it. So the reason behind
that is because we want a rough texture of clouds
in the entire background. It should also create
a nice contrast between the gradient background. So that's why we have
taken violet color. You can observe that
I'm trying to create these little horizontal strokes which are vanishing slowly. So as you move on the
edges of the Clouds, you can just apply
less pressure. No need to hurry at all. Try to paint it in a very
slow and steady manner. So as you all know that
clouds generally have a very natural and
random shapes. Do not have a perfect geometry. It is not at all necessary
or compulsory for you to paint it in the exact
same way I'm painting. You can create your
own composition and decide the position
of the Clouds as well. So as you can observe
that we have created some nice clouds on
the left-hand portion. Now let us paint some clouds on the right-hand side as well. So these steps are
absolutely same. You just have to take
some violet color in your round brush and
try to dab it on to the Tissue paper so that
you remove excess amount of water and get this
nice gloves texture. You can also observe that I'm slowly moving towards
the bottom portion, decreasing the size of the horizontal strokes
that I'm making right now. So this is how you have
to paint the Clouds and contrast with this
gradient background. Now let us move
towards the next part.
6. Mountains and Rock Bodies: Hey everybody, I hope that you enjoyed painting the Clouds. Now, let us paint some
mountains and Rock Bodies. You can observe in the
prototype painting we have a huge mountain and some nice small Rock Bodies having variation in sizes. So it is not at all a
difficult element to paint. You just have to take some solid black color and
the color palette. And I do add some amount of
water to loosen the cholera. I'm using my size four
round brush basically, it's a detailing brush only. You can also use a size
six round brush as well. Just make sure that
it's a round brush. So we'll be using the tip of the round brush to paint
the outline initially. Let me tell you that
mountains and Rock Bodies are also very natural
and organic shapes, which we find in nature. So no need to worry at
all incase you want to create your own organic
and natural shapes. That is also absolutely fine. But the basic step is to create the outline first using the
tip of your round brush. And then we are going to fill in solid black color inside. So you can observe
that I have created the outline leaving
some space in between. So it's a hollow cavity in the entire mountain to make the painting a little
bit more attracted. Now once we're done with
the entire outline, we are going to fill
in solid black color to make sure that you do
not have access amount of water in your brush that will definitely decrease the
saturation of the color. So try to have less amount of water and more color
and your brush. And you can observe
the direction in which I'm moving my brush. You just have to apply the entire solid black
color inside, right? To make these strokes in a
particular direction only. So you're going to
observe that we have almost painted the
entire mountain. Right now. You do
not have to worry about the bottom surface, which is irregular right now. We are going to cover it
up with reflection effect. So as you can observe,
that we have created a nice cavity in the
entire mountain. You can finish it up by using the tip of
your round brush. Also incase, you're not that much confident enough to paint the mountains and Rock Bodies directly to
your final object. What you can do is
you can practice it on a rough strip of paper, initially creating
different shapes and sizes. And then you can come
towards your final painting. This will help you to develop some more
confidence to paint. The chances of making
mistakes will be very less. So as you can observe via
Painting few more Rock Bodies just around the bigger mountain that we have painted right now. These steps are absolutely same. You just have to create
the outline initially, creating a very natural
and organic shape. And then you have to fill in
solid black color inside. Now similarly, we
are going to paint some more Rock Bodies on the
left-hand portion as well. This time we are going to have a nice mountain on the
left-hand portion, which is a little bit
smaller than the one which we will have painted
on the right-hand portion. You can also observe
the variation in the shapes and sizes that
I'm painting right now. And similarly, we
are going to create some nice Rock Bodies
which are going to have a little bit
more variation in sizes onto the entire
water body area. So you just have to simply make these little oval
shapes, I can say. And you can just
play with the sizes. No need to hurry at all. Try to paint it in a very
slow and steady manner. You can use the tip of
your round brush to paint it in different sizes. And you can also
create the outline initially and then you can
fill in solid black color in case you're not that
much confident enough to paint directly to
your final object. And you think that
you might end up spoiling the entire beautiful background that
you have created. What you can do is that you can practice it on an
app scrap of paper, creating a nice composition
of rocks together. Then you can come towards
your final painting. You can see that I'm having a nice composition of
3.2 rocks together. They might be one
single Rock separately. And you can also see the
variation in the sizes as well. Now the reason behind selecting black color to paint these
elements is that we can create a nice contrast between the Background Color and the elements that we
are going to paint. Now you can observe in
all the elements we have Its Reflection
onto the water body. And there is a very easy and simple technique to paint it. You are going to use your same
round brush off size four, or you can also use a
round brush of size six. You have to take some amount
of black color in it and dab your brush onto the Tissue paper to remove
excess amount of water. Now to create a beautiful
reflection effect, which has to be very subtle. You just have to make these little horizontal strokes just below your mountains
and Rock Bodies. Now, initially your
horizontal strokes are going to be a
little bit bigger. And as we move towards
the bottom portion, you just have to simply decrease the size of the strokes
that you are making. No need to hurry at all. This is a step which will need a lot of patients
while painting. The most important thing that
you have to keep in mind is about the capacity of water that you're
holding in your brush. No need to have access amount of water that will definitely
spoiled the painting. Just try to have
more color and dab your brush onto the Tissue paper to make it completely dry so that you can make
some rough strokes which are vanishing as you move towards
the bottom portion for the entire amount. And we have to create some
bigger horizontal strokes so that the reflection looks
a little bit more bold. Now incase, you find
that you color is getting punished
from your brush. You can take some more color
and dab your brush again to the Tissue paper so that you can remove excess amount of water. Now in case you find adding this reflection effect directly to your final object a
little bit difficult. What you can do is you can
practice it on a rock, scrape off paper like
we did for the Clouds. And then you can come
towards your final painting. Second, observe
that I'm creating some bigger strokes
for the mountain, which is a little bit bigger
because Its Reflection will be a little bit more
bold onto the water body. Now repeating the same steps
we are going to create the reflection effect for the other mountains and
Rock Bodies as well. Now, there isn't
any specific way of creating the
horizontal stokes, but you can definitely
try to maintain a nice composition on
the bottom portion. For the mountains that we painted on the
left-hand portion. Also, you can create this
beautiful reflection effect. I hope that you've got
an exact idea of how you have to paint the Rock
Bodies and the mountains. Now let us move
towards the next part.
7. Pair of Boats: Hey everybody. Now let us paint a beautiful pair of Boats, which is one of my
favorite elements in this entire seascape. So you can observe and
my prototype painting, we have a nice pair of Boats. These modes are going to be
also in solid black color. So we are going to use our
round brush off size four. And you just have to simply take some solid black color in it. Try to have maximum amount
of color and less water. So we are starting with
our simple vertical line. We are going to have two votes. Basically, one is going to
be a little bit bigger and the other one is going
to be a little bit smaller according
to the perspective. As we have drawn
a vertical line, we are going to create
a triangular shape on the about portion, which is basically the cloth, which moves with the wind. And on the bottom
portion we are going to paint the body of
the entire board. Just have to simply
make a horizontal line, which is a little bit slant. And then you have to fill in
solid black color inside, creating a nice shape
of the entire board, which is basically
a trapezium only. Now incase, you find
painting the entire board directly to your final object.
A little bit difficult. What you can do is you can
simply paint it on a rock, scrape off paper
initially to practice it, and then you can come
towards your final painting. Now I'm just simply trying
to paint the cloth area, which is on the about
portion of the entire board. Just have to create
this triangular shape. You can observe the
movement of my brush, which is a simple
vertical movement. And at the bottom portion, we are going to complete
the entire triangle having a small rho, which is connected
with the boat body. You can simply use the tip of your brush to paint
thinner strokes. Similarly, we are going to add two more ropes which are
going to connect from the top portion of the entire cloth body
to the entire boat, which is going to be
two vertical lines, which are a little bit
slant, end position. You can use the
tip of your brush simply and try to paint it in a very slow
and steady manner. You can create these little
horizontal lines to attach it with the closed body to add some minor details
to the entire boat. You can observe how
beautiful and aesthetic the entire boat looks with the entire background
that we have painted. Now similarly, we are going
to have one more vote, which is going to be a
little bit smaller in size. So I basically wanted to create some perspective
between both the Boats. That's why it is having
variation in sizes. These steps and the
method to paint the second board is
also absolutely same. There isn't a difference
between both the Boats, but you have to make sure that the second boat is a little
bit smaller in size. And you have to use the tip of your detailing brush
very carefully to paint the details. You can observe. We are done painting
both the Boats and it looks really
amazing and aesthetic. Now similarly, we
are going to create its reflection effect onto
the entire water body. The method is absolutely same. You just have to simply apply these little horizontal strokes
near to the entire board. The horizontal
strokes are going to be a little bit bigger in size. And as you move towards
the bottom portion, you just have to simply decrease the size of these tools
that you're making. Try to have minimum amount
of water in your brush, dab your brush onto
the Tissue paper to remove access
amount of water. Now the entire water body
looks a little bit empty, so we can add some
more Rock Bodies to the right-hand portion, just near to the hills
that we have painted, or I can say the
mountain Bodies. So you are just going to add
these little oval shapes. Or I can say you have to paint these Rock Bodies
which are a little bit smaller than the
Rock Bodies that we have painted on the
left-hand portion. You can also decide
the position of the Rock Bodies according to
your convenience as well. You can try to create
your own composition. You can play with the
shape and sizes as well. So as you're going to observe, I just painted some Rock Bodies on the right-hand portion, and I'm going to add
some mountain Bodies on the horizon line as well. To make the painting look a
little bit more aesthetic, you can start by painting
a little outline first and then you can fill
in solid black color inside. Make sure that you do not have access amount of
water in your brush. Try to have more color
and less water that will not decrease the saturation
of the solid black color. You can already observe the
beautiful contrast between the elements that we have painted and the
Background color. Now we are going to add the
reflection effect that we added on the bigger
mountains and Rock Bodies. The steps are absolutely same. You just have to make these
little horizontal strokes, which are a little bit
bigger to the Rock Bodies. And as they move towards
the bottom portion, you just have to simply decrease the size of the strokes
that you are making. Try to have minimum amount
of water in your brush and dab it on to
the Tissue paper so that it's completely dry. And you can just make these
little horizontal strokes to enhance the beauty of
the entire overall body. And it looks a little bit more realistic and in-depth
onto the water body. This is how we have added
a nice pair of Boats onto the entire painting and added
few Rock Bodies as well. Now, let us move
towards the next part.
8. Sun and Its Reflection: Hey everybody, So we are done
painting all the elements. Now comes the most
important part, which is sun and Its Reflection, which is going to enhance
the entire painting that we have painted on
this particular object. So simply take some plain white wash color and
you color palette. We are going to add some amount of water to loosen the cholera. Now to paint the entire sum, you just have to use your
round brush off size four. And we are going to paint
a small circular shape. No need to hurry at all. Try to paint the sun in a very careful manner and
painted with a lot of patients. So you just have
to simply create a circular shape having
solid white color in it. You can also create
the outline first and then you can fill in
solid white color inside. No need to make a huge fan. You can just create a
small circular shape. Now to enhance all the
elements that we have painted, we're just going to add
these little white strokes using the tip of the retailing
brush basically to enhance these elements and to enhance the white that we created in this
bigger mountain, I have just added the white stroke on the
right-hand portion. Makes sure that
you use the tip of your round brush to create these thin strokes to
enhance the Elements. No need to make thicker strokes
that will not look nice. Now similarly to the Rock
Bodies which are having variation and sizes which
are bigger and smaller. You can add these
little white strokes on the topmost portion, which is basically the
sun's reflection only. You can observe by adding
these little thin strokes, you enhance the
entire black elements that we have painted. Now we are going to paint the reflection effect of the
sun onto their water body. So the methods and steps
are absolutely same. You just have to create
the horizontal strokes. But this time we have
added a little bit of mauve color and white. And we are going to create these little horizontal strokes which are bigger to
the horizon line. And as we move towards
the bottom portion, you just have to simply decrease the size of the
strokes that you are making. It seems as if it's vanishing
onto the water body. No need to hurry at all. Try to paint it in a very
slow and steady manner. Now we are going to
clean the round brush and we will be taking
solid white color again. Now on the horizontal
stokes that the applied recently
we are going to take the solid white color
to make it look a little bit more in contrast
with the Background. So again, we'll be starting
just below the horizon line, creating horizontal strokes which are a little bit bigger. And as we move towards
the bottom portion, I'll be simply decreasing the size of the strokes
that I'm making. Incase you find
your brush moving a little bit too rough on
to the entire surface. You can just add a little bit of water and dab your brush
to the Tissue paper. No need to hurry at all. Try to paint it in a very
slow and steady manner. Try to make these strokes
as perfect as possible. Also incase, you're not that
much confident enough to paint the reflection effect directly to your final painting. You can practice it on a rough scrape off
paper initially, and then you can come
towards your final painting. So as you can observe,
we are done with the entire seascape on
the oval wooden slice. Let me also show
you the prototype. So it is not at all
necessary and compulsory to paint it in the exact
same way I have painted. You can create your own
composition as well, and you can experiment
with the entire scenery. Let me take you a little
bit closer so that you can observe all the
details carefully. Using wash as a medium
and painting it on an object was a very new
experience for me as well. I'm very sure that
you're going to enjoy the entire process. I hope that you got to
learn something new. Now let us move
towards the next part
9. Class Conclusion: Using gouache as a medium, I'm painting it on an
object was altogether a very new experience
for me. Being an artist. I love to experiment and
explore different Art Forms. And one thing that I always tell my students is to maintain an odd journal to practice on a regular basis and keep
a record of your artwork. Creating this class was a very new experience for me and I made N number of mistakes. And that is how you
learn and grow. I'm very happy to share
this class with all of you. Incase you have any questions or doubts related to the class. Please free to ask them into
the discussion section. I wouldn't be really
excited to see all of your projects into
the project gallery. I'd would be really great if you leave a review for
the entire class. As it encourages me a lot, I hope that you enjoyed the class and got to
learn something new. Keep practicing happy painting. And thank you so
much for joining
 Rutvik Patel, Artist and Instructor