Transcripts
1. Introduction: After having a busy day, I always used to visit
the beach nearby my house to see the
vibrant beats sunset. Let's always helps me
to come down and relax. Whenever I used to
visit the beach area, I always used to
observe the variation in the sky while
the sun is setting. And how beautiful it vanishes,
reading different colors. Hey everybody. I
said Protect button. I'm a self-taught independent
artist based in India. I'm also a professional
interior designer. In this class, we
are going to paint four different vibrant beach
set using wash colors. I'll be giving you
all the details about the art supplies that
we're going to use. No need to worry at
all in case you are missing on any
particular art supply, you'll find it very easily and any nearby local art store. I'll be giving you
all the details about the brushes that we're going
to use in this entire class. So we're going to
start by cutting an A6 size paper into
a simple square. And I'll be teaching
you how to tape down your entire watercolor
paper carefully. I'll be giving you
all the details about the color palette
that we are going to use. We're going to start by creating a gradient background using
various colors together. I'll be teaching you all
the brush techniques and the movement of the brushes that we're going to make my painting. Starting from the mountains, adding a nice reflection
effect into the water body, painting little buds and painting a tiny little
sun which is setting. So we are going to paint
every element in detail. And at the end, I'll be teaching you how to remove the side tip carefully. The class is absolutely
suited for beginners and also an intermediate and advanced
level artists can try it. I'm very excited to share
this class with all of you. And by the end of
the class you will be definitely learning
something new. So without any delay, grab your art supplies, join me and let's get started.
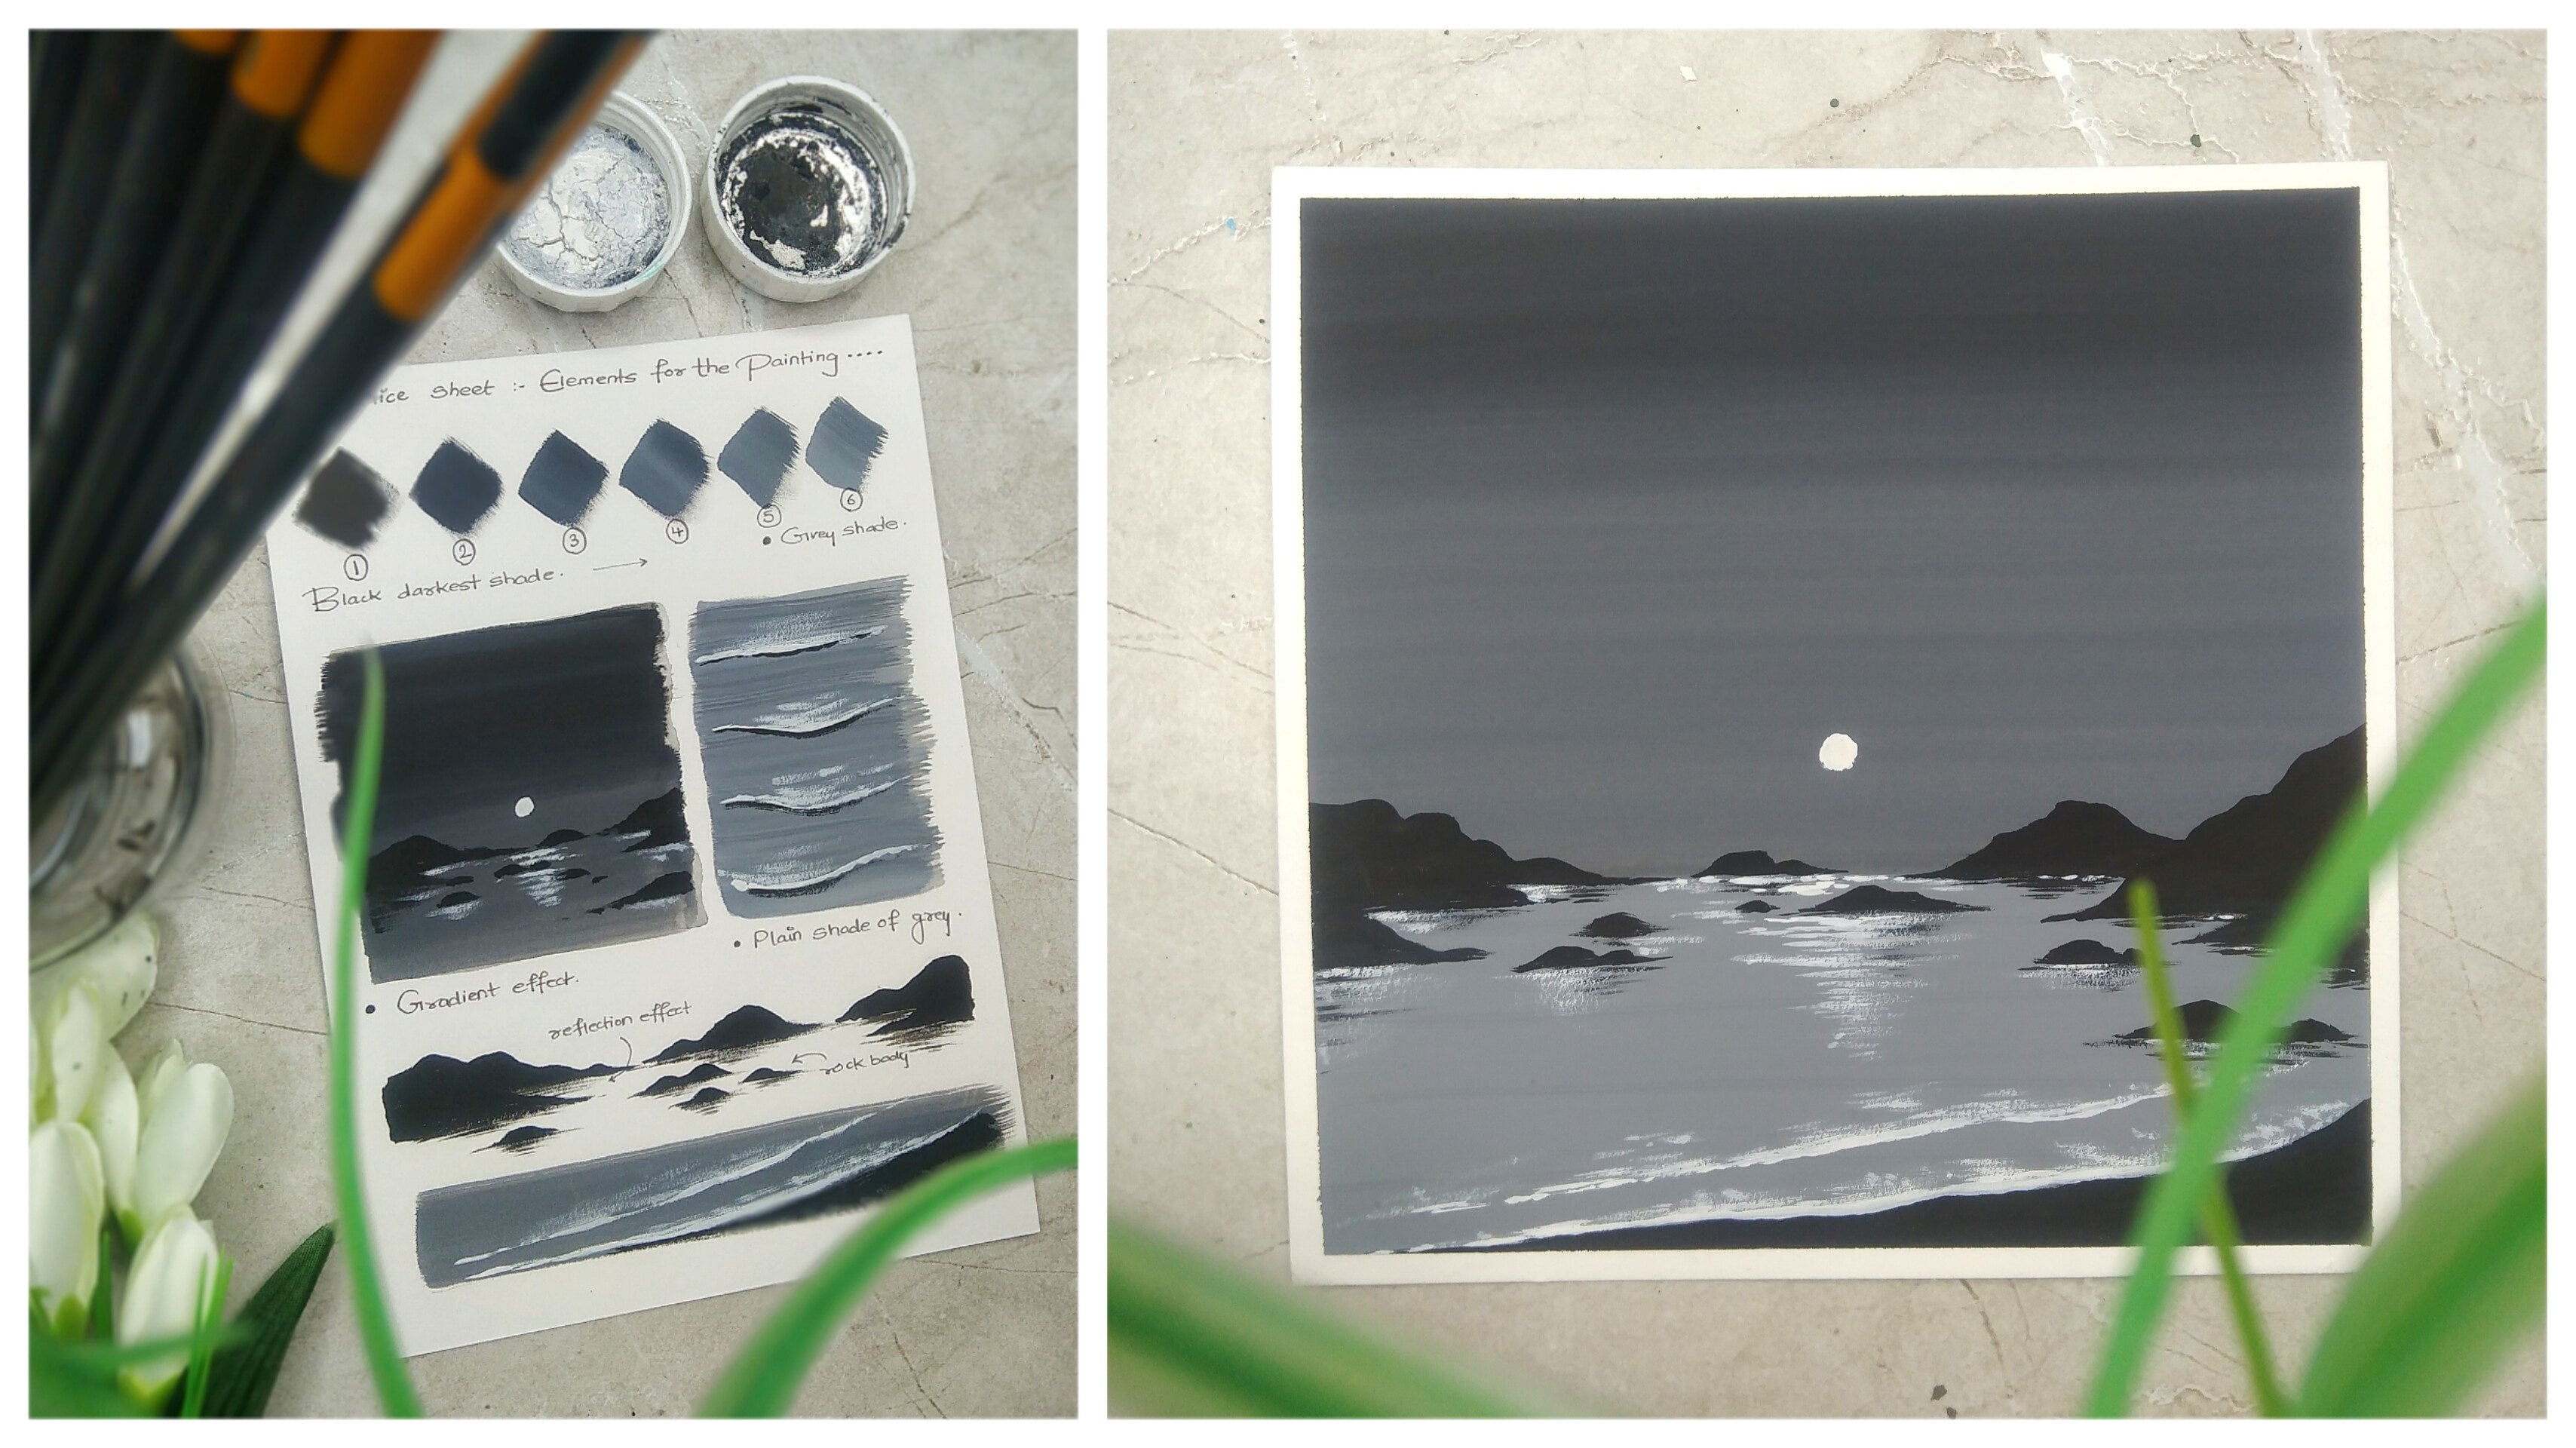
2. Art Supplies: So before we start,
let us talk about all the art supplies that you will need in this
particular class. No need to worry at
all in case you are missing on any
particular and supply, you will find that very easily in any nearby local art store. So here I have all
my art supplies. Pleased. Let me start
with the first one, which is a simple cup having some water to clean up
your brushes basically. Now the next one is
simple still Edge, which is basically
a scale in which I have measurements in
centimeters and inches. This is basically
required to cut the A6 paper into a
particular square. Then the next one is a simple tissue napkin on
which you can dab your rushes to wipe off
extra amount of water. Now comes the most
important part, which are the gouache colors
that we're going to use. So basically, I'm using
the wash clothes from R22, but it is not at all compulsory
to use the same brand. You can go for any other
good alternative as well. So after the wash colors, you will need a simple color
palette to mix your colors. So here I have my
simple ceramic palette having three sections. But you can use any other
good color palette as well. The next one is a simple
pair of scissors, which you will need to cut the A6 size paper into
a particular square. Now let me give you
all the details about the watercolor paper
that we're going to use. So these are basically A6 size sheets of watercolor paper. In case you do not find A6 size, you can go for A5 as well. These paper or from an open, and these are 300 GSM
watercolor papers. So these are basically
in rectangular form, but we are willing to cut
it into a proper squared. So here I have a
simple masking tape of one inch and we're going to use this two-sided tape,
the watercolor paper. Some basic art supplies like
eraser and a sharpener, that I think everybody
must be having. A simple pencil to
draw a rough sketch, which is not that much required
in this particular class, but to draw the horizon line. Now let me give you
all the details about the brushes that you will need
for this particular class. There are going to be four brushes that
we're going to use. The first one is a simple
flat brush of one inch, which we are going
to use to apply a thin coat of water
onto watercolor paper. The second one is, again
of land rush of size six. Another one is a round
brush of size one, which is basically
a detailing brush. And then we have around
brush of size six. So these are all
the brushes that we will need for this
particular class. And that's it. These are all the art supplies
that you will need for this particular class. Now let us move
towards the next step.
3. Color Palette: So before we start, it is very important for all of you to understand the color
palette that we're going to use in this
particular class. So you can see all
the four paintings being placed on
the upper portion. And as you can see, we have vibrant
color combinations in each of the painting. As you observed this
particular painting, you can see a nice gradient of pink coming towards
a nice creamish color. Now to make you understand
the word vibrant correctly, I have my color palette here and you can make
your own as well. Just simply take
a small piece of paper and put up all
the colors that we're going to use on that and write the name just below the
color that you have applied. Now for the painting that
is placed on the left, we have olive green sap, green flesh tint, and black altogether having a
good combination. And similarly, I have made these ballots for all
the four paintings. Now can see we have rows, hot pink, flesh tint and black. For the second one we
have violet pollution, blue, teal, and black. Then for the third painting, I have black, crimson, red, ocher, yellow
flesh tint and boil it. And the last one I
have already told you, what is going to happen is
that the colors that you can see are going to have a nice combination
in the background. And black as particularly
to be used to paint the elements so
that we can enhance them. Now these are the wash tubes in case you want to have a look. So the first one is rows and
the second one is hot pink. No need to worry at
all in case you do not have the gouache colors
from the same brand, you can go for any other
alternative as well. Before starting the
entire painting, it is very important
for you to know the exact color palette
that we're going to use. And for that, I recommend you to take a knife, scrape off paper. It could be a waste
paper as well. So you can just apply the colors that we're
going to use, right? The mean, particularly
just below that. And then we can start painting. Now this will make sure that
you come up with a nice, good and precise output. Now without any delay, Let's move towards
the next step.
4. Lets Cut the Paper: Now let us cut the
watercolor paper into a perfect square so that
we can start the painting. Let me give you a basic brief about the watercolor
paper that we are using. So these are watercolor
papers from an open and these are 300 GSM. The size of this particular
paper is basically A6. In case you do not
find an A6 size paper, you can go for a Phase
II people as well. So on the bottom we have the shorter edge of the rectangle
and we're going to take the same measurement on the vertical side to make
it a proper squared. So let me measure it first. But the reading
of 0 on one edge, and just simply take
the measurement, which is 10.5 centimeters. So this is basically the shorter side of
the rectangular paper. Now, I'll be just taking 10.5 centimeters on the longer
side and put one mark there. Take your D latch, put it very carefully
on one edge and 10.5 centimeters and mark a
simple dot or aligning at 0. Make sure that your scale is
parallel to the paper edge so that you can get a
correct and proper squared. Now on the bottom portion also, I'm taking one marking. So you can see we have
got two points so that you can draw a
perfect straight line. Now simply take your steel edge, place it on both the
dots and draw a line. You can see we have
got our square. Now going to be just removing
the remaining portion. You can use a simple Qatar
to remove the extra bad, but I will suggest you
to use a pair of sizzle. It would be more safe. I'm just willing
to take the paper in my hand and follow the line. Be very much careful
while doing this. Try to follow the
line correctly. Use your seesaw carefully and make sure you do
not hold yourself. Now as you can see, I
have other meanings, creep of paper and
this strip of paper you can use to make
your color palette, which will be really very nice. We are utilizing waste. Now you can see I have got my perfect square paper on
which we are going to paint. Now let's move towards
the next step, which is taping the
watercolor paper.
5. Lets Tape the Paper: Hey everybody. Now let us take the watercolor paper
that we have to pad. So as you can see, I have
placed my watercolor paper on the exact location
I want it to be. You can just observe your
mode where you want to place your watercolor paper and simply place it carefully. So here I have my masking
tape of one inch and we're going to place it on
all the four edges carefully. Now why we are placing it? Because after we
remove this IPE day, we want to have a
nice perfect edge, as you can see in this
particular painting. So that's why it is
very important to place the masking tape
correctly and carefully. Let me start with the top edge. I have a piece of
my masking tape. What you have to do is simply absorb the watercolor paper. Try to make your masking
tape parallel to the paper edge so that
you can get a nice, proper edge while removing it. Once you place
your masking tape, just simply tap
your finger on it. Let me please another tape on the right side and simply tap your finger or thumb on the masking tape so that it gets attached to the bone carefully. Now the last one on
the bottom part, you can see how beautifully
the masking tape is placed. No need to hurry at all, do it carefully and now your watercolor paper is
ready to get painted. Now let us move
towards the next step.
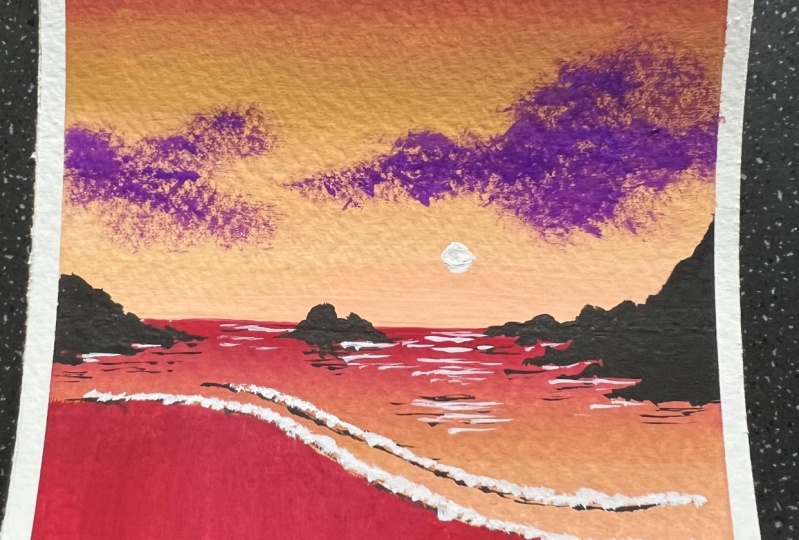
6. Crimson Red Sunset: Hey everybody. So you're most welcome towards the
first painting, which is the crimson red sunset. So as you can see,
my watercolor paper is ready Windows IoT. I have additional napkin, my color palette, and a cup of water to
clean the brushes. Let us start by drawing
a simple horizontal line which will separate the
skyline and the ground line. I'm using my pencil and just drawing a simple
horizontal line. Now before starting, let us
talk about the color palette. The first color would be black, crimson than ocher yellow, flesh tint and boil it. These are the colors
that we're going to use in this particular painting. And here are the tubes
of gouache colors. Black, flesh, tint, ocher, yellow, crimson, violet,
and titanium white. The white color is not
shown in the color balance because it will not be
visible on the white paper. So that's why it is not
shown in the color palette. So here I have my one inch
flat brush and we are going to apply a thin coat of water
on the above portion, which is just above
the horizontal line. Now you must be thinking
that why we are applying a ten god
of water initially, this is basically
known as a wet on wet technique in which
when you apply the color, it will let your
brush moves smoothly on the paper and help the
colors to blend together. So here I have my flat
brush of size six, and I have taken some solid
crimson red in it and I applied a nice thick coat on the top portion,
as you can see. Since you can see we have already applied a
thin coat of water. Your color will spread smoothly. Add a little bit of water in your brush in case
you do not find it that smooth so that the color will apply
in a better way. So initially we are
applying crimson red on the top portion
using our flat brush. Makes sure that the edge
of the watercolor paper is correctly painted and there
isn't any white area left. We are done applying
crimson red. Now simply clean the brush in the water color cup and dab your brush on
the tissue napkin. Now will be taking some darker
values of ocher yellow, as you can see in
my color palette, using the same plaid
brush of size six. And we will apply a nice thick coat just
below the crimson red. Again, if you find it
very rough to paint, add a little bit of water in it. Now once we have applied a nice thick coat of ocher
yellow just below crimson. Slowly move your flat brush towards the crimson
red so that you can get a nice blend of ocher yellow and
crimson together. And move your brush
and this horizontal direction as I'm moving
as much as you can. Unless you find a nice, beautiful blend of multi colors. You can already
observe how beautiful the combination of both
the colors is looking. Now I'm dabbing my brush.
I have cleaned it. Now we have just taken some flesh tint and the color
palette you can observe. I'm digging the darker values of flesh tint and my flat brush. And now we will apply it and just above the horizontal line. Apply a nice thick
coat of flesh tint, add a little bit of
water in case you find it very tick or rough to apply. Simply move your flat brush and this horizontal direction and try to blend it
with ocher yellow. No need to hurry a doll encase you find me painting
a little bit faster. You can definitely slow it down. There's an option below. I'm adding a little
bit of water so that the colors mood
ends up a little bit. You can simply move
from bottom to the top portion towards ocher yellow so that you
can get a nice blend. Now you can observe
that we have got a nice gradient effect
in the sky area. Now let us paint the
water body again. I have taken my
one-inch flat brush and I applied a thin
coat of water below. As you can observe. Now I'll be taking
my flat brush of size six and we have to
repeat the same process. We are going to
start with crimson. We are taking darker values
of crimson in the flat brush, as you can observe
my color palette. And I am simply applying the darker portion just
below the horizon line. This time. Be very much careful
and only to hurry at all. Now once we are done
applying the crimson red on the bottom portion
of the horizon line, you're going to again,
clean the brush. But before that,
what you can do is just simply use the tip of your flat brush to make the color perfect near
the horizontal line. Now, I am just simply
cleaning up my flat brush. And now we are taking
ocher yellow again. So now just below the crimson red area
in case you find that the color is finished and your color palette take
again and the color palette. But make sure that you
do not waste the color. Now, I'll be applying a
tech code of acai alone, just below the crimson red. So as you can see,
I'm just moving my flat brush and this
horizontal direction. And slowly you can
just move your brush upwards by blending it
with decrements and red. Now, I'll be cleaning
the flat brush again and you have to
repeat the same process, dab it on the tissue napkin, take flesh tint and
your flat brush. The color is finished. So I'm taking a little bit of color and the color palette. And there'll be simply painting
it on the bottom portion. You can again observe the
movement of my plaid brush. I'm moving slowly towards the above ocean and blending
it with ocher yellow. You can see how beautiful
the gradient is looking. So we have come from crimson red towards the flesh tint color. Now let us paint the mountains. Here I have my detailing brush, which is basically a
round brush of size one. And we are going to paint
some beautiful mountains near the horizontal line. You can start from
the left edge. Now, if I have to be honest, there isn't any particular
way of painting mountains. You can have any random and
natural shapes to paint them. Just make these
nice pointy shapes. And I'm digging the
mountain a little bit lower to the
horizontal line. Once you are done painting
it with solid black color, you can add these little edges
near the water body area. Now simply we are going to
repeat the same process. I'm going to add these little mountain effect
on the other area as well. Now you must be thinking that
why are we using black to paint these rock bodies
on the water area? The reason behind
that is that we have already created an
amazing background. But crimson, red, ocher, yellow, and flesh tint. Now to make your Mountains
or the wrong body is more visible and have a good contrast with the background
we are using black. You can simply observe that the mountain that I'm
painting right now is having the same method
and technique of painting like the one that we have painted
on the left area. Again, I would like to tell you is that not only to worry, the mountains can
be in any natural and randomly as you
wanted to paint them. No need to be that much
specific or don't worry if you are not able to paint it
the same way I'm painting. You can see how I'm using
the tip of my round brush to paint these minute reflection
effect on the water body. You can use this
technique to add little reflection
effects and just below the mountain that we
are painting right now. Now one thing that I always tell my students while they are learning something new or
trying to explore a new medium, is that whenever you
want to paint something, always try to practice it on adapt scrap of
paper initially. And then you can come
towards the final painting. By doing this, you
can really minimize the mistakes and your output would be really
precise and beautiful. I'm adding these little
horizontal lines to go some nice reflection
effect of the Iraq body. Let us add some more on
the right area as well. You can see that we are
almost done painting the mountains and these little rock bodies
on the water body. Now, let us add some nice horizontal lines
on the front area as well. Because we want to have
to wave lines also. You can simply observe the movement of my
detailing brush. I'm just making
these little strokes and this horizontal way. I'm having a little bit of black color and my
detailing brush. So now I'll be painting
the wave line. Just simply observe the
movement of my detailing brush. I haven't done the first one. As you can see, we
have moved from left portion to the right area. Once you are done painting
that you can just darken it. So this would act as a reference
line for the first wave. Now let us add one
more line just above that to make
the second wave. No need to hurry at all. Painted slowly and just observe the movement
of my detailing brush. You can see to have this particular thin
line of black color. I'm using the tip of
my detailing brush. That is where you have
to be very much careful. And since it's a way, you can make it a little bit rough texture by spreading it. Now I'm adding these little horizontal strokes just about w, so that you can give it
a nice and water effect. Now to show the
difference between the sand area and
the water body, what I'm doing is I'm taking my flat brush of size six and I'm taking some
crimson red in it. And we're just going to paint the yellow portion with
that particular color, which is just below the wave. Time. Adding the
darker values to create a separation between the water body and
this and area. We are done. You can apply another code in case you find it a little bit
lighter in tone. So now let us add another amazing element
to the painting. I'm digging my round brush and I have this amazing
violet color in my brush, but we have to take
very less water in it. Let me explain you
the technique, NDP, big dark color on your brush and dab your brush onto
the tissue napkin so that extra amount of water
is removed from your brush. And you have to just make these
beautiful rough textures, these Kai area to create
a nice cloudy effect. You can observe the
movement of my brush. As you all know, that
clouds do not have a specific form or
a specific shape. It can be very random
and natural in the sky. So there isn't any
particular way I'm doing. You can just absorbed
beyond just moving the round brush and
this random fashion. And once you find that your color is finished
in your brush, you can just take some more
color from the color palette. Just make sure that
you do not have access amount of
water in your brush, that will definitely
spoil the painting. Now, let us add some
more cloudy effect on these anti-abortion. Again, repeating
the same process. Having some color
in my round brush and minimum amount of
water in the brush. No need to worry at all. Take your time and incase
you're not that much confident enough to paint the clouds directly to the final painting. Once you can do is decode rough scrap of paper or
your practice book for your painting and try to paint these clouds
in that first. And then you can come to
you on your final painting. So you can see how beautiful
this cloudy effect looks. Let us add some more clouds
on the left, atria as well. So again, the process is same. I have taken some violet and
my brush with less amount of water and I'm just adding the
Cloud on the left portion. So you can see how
beautifully the shade is forming and it looks really
amazing when it dries up. I'm just tapping a dry brush and making it a little
bit more smoother. Now what we're going to
do is that I'm going to take my detailing
brush of size one. We're going to take some
titanium white and add this beautiful
reflection effect of water just above the
waves that we have drawn. No need to worry
at all in case you find me painting a
little bit faster, you can just decrease the speed
and observe it carefully. Now, let me add some
more reflection effect on the second way
which is below. No need to worry,
you just have to tap your brush and this
random format. And you can see how beautiful the effect of wave
is looking. Now. Now let us paint the sun. I'll be taking some
darker values of titanium white and
my detailing brush. And you just have to simply
draw a little circle. And just below that,
we'll be adding these little horizontal
lines to add the reflection effect into the
water body, which is fine. Again, this is very
simple and easy. You just have to tap you on detailing brush and
this horizontal way. We can add the
reflection effect near the mountain area as
well a little bit. And we're done. So now let us remove this. It be very much careful while removing the site team
tried to remove it in an angle so that you
do not end up tearing your watercolor paper and
your painting as well. You can see how
beautiful the edges are looking and the painting
is absolutely ready. I hope that you enjoyed painting this
particular painting. Now, let us move towards
the next painting.
7. Elegant Blue Sunset: Hey everybody, you're most welcome to the second painting, which is an elegant blues onset. As you can see, I'm ready with my watercolor paper
with the tip. We are going to start by drawing a simple horizontal line. Just use a simple
pencil and draw this horizontal line to separate the skyline
and the ground area, which is going to
be the water body. So it is the color palette, violet, Prussian
blue, and black. Here are the gouache tubes. Prussian blue, violet,
black, and titanium white. Titanium white is not
shown in the color palette because the white color won't
be visible on white paper. Let us start by applying
a thin coat of water. I'm using my
one-inch flat brush. Take some water in it and
simply apply it just above the horizontal line. No
need to worry at all. Do it very peacefully
and in a slow manner. Now I'll be taking
my size six brush, take some water in it. And we're going to
start with violet. Initially. I'm
digging darker values of violet and my flat brush. Now the reason behind applying
a thin coat of water on the watercolor paper is so that your brush moves very smoothly. I will be starting
from the top portion. Just simply apply
this horizontal line. And one more stroke. Just make sure that
you do not leave any whitespace between
the masking tape and your watercolor paper. Now, in case you find that there is excess amount of
water in your brush, you can just dab it
on the tissue napkin. Again, applying some
nice darker strokes of violet on the above area. Now will be just
cleaning our flat brush. Dab it on the tissue paper. And now I'll be
taking Prussian blue. We are taking darker
values of pollution blue. No need to hurry, get tall
and just make sure that you have sufficient amount
of color in your brush. Again, I have applied a
nice horizontal stroke, just below the violet color. Now slowly you have to move about and try to
blend it with violet. You can see how many times
I'm moving my brush, dab it on tissue napkin
and just make it dry. Your brush will just remove
the excess amount of water once you dab it
on the tissue paper. And you can see how beautiful violet and Prussian blue
and blending together. And now we're going to move
towards the next color. I have simply cleaned my
flat brush and we are taking some teal and my flat brush. As you can see, I have taken
some nice darker values. This particular color is
basically known as steel. In case you are not having
this particular color, you can go for a
light blue shade or you can add some
white intrusion blue. I'm just simply again
repeating the same process. I have applied a nice horizontal stroke
in the bottom part, just above the horizontal line. And you have to move
towards the upper side, Towards the Prussian blue color. And try to blend it. Dab your flat brush
on the tissue paper so that Ax is amount of
water will be removed. And you can blend
the colors together. You can think how many times
I have moved my hand in this particular
horizontal direction to blend both the
colors together. And you can see how
beautiful the gradient is looking from violet to deal. Now let us paint the water body. The process is absolutely same. I have taken my one
inch flat brush. I've simply applied a
thin coat of water. Now, again, we'll be taking
our flat brush of size six. We're starting with violet, having some darker tone of
violet and my flat brush. In case your color
gets finished, take it from the tube. But always make sure that
you do not waste color, use it in a sufficient
amount which is needed. I have taken darker values
of violet and again, I'm just repeating
the same process, but this time we are applying
below the horizontal line. Since it's the water body, you can use the tip of
your flat brush to put color into the detailing area where you find it
difficult to paint. I'm just using the edge of my flat brush to fill in the color just below
the horizontal line. And again, you can just give
this horizontal stroke. Now have simply cleaned my flat brush and we'll
be taking Prussian blue, will be taking darker
values or pollution low. The process is absolutely same, applying a horizontal
line just below the violet color and simply move towards the upper portion
by blending both of them. Apply as many as
horizontal strokes. Once you get satisfied
that the blend is looking really nice,
then you can stop. Now we'll be taking again, deal on the bottom area. Clean your flat brush again, dab it on the tissue paper. Now will be taking
darker values of t. And I'm starting with
the bottom portion, my applying a horizontal line. And I'll be moving slowly
towards the upper portion. You can see I'm just moving my brush and this
particular direction. You can observe it very carefully
to blend all the colors together and you can see how beautiful the
gradient is looking. Now let us move
towards the mountains. I'm using my size
one detailing brush. And you can see in
my color palette, I have some black. You're going to take
darker values of black. Let us start with
the left portion. Just simply make this
random mountains on the horizon line, which is separating the
skyline and the water body. So if I have to give you a basic detail about
painting these mountains, or we can say rock bodies. What you can do is that no need to be that much
particular sense. Mountains and rock bodies
are very random in shape. And these are natural
shapes basically. You can draw it in
your own way also. But if you want to paint
it similar to mine, then you can just observe
how I'm painting. Also, what you can do is you
can give an outline first to give a particular
shape to your mountains, and then you can fill it
with solid black color. You can see I have
a nicely painted the mountains on
the horizon line. Now let us give it a
little bit 3D effect by adding these horizontal strokes and just below the mountains. You can use the tip of your
detailing brush to get these thin strokes
which are horizontal. And you can see how I'm
moving the detailing brush. Now let us add some
more around bodies. On the front portion. We are starting on
the bottom area. So again, I would tell
you the same thing that sends around bodies are very natural and random shape. You can draw it in
your own way as well. If you are painting
with me or you want to paint the wrong bodies in the same way I'm painting. You can observe them fast
and then you can paint. I'm just adding these
little drop bodies. In case you finally painting
a little bit faster, you can just slow down the
time-frame. There's an option. We're done painting
the rock bodies in the bottom area as well. Now let us add these
nice reflection effect and some shadow abortion. What do you have to do? Just use the detailing brush and add these little horizontal lines just below your route bodies. You can do it in a very
random and natural way. No need to hurry at all. Take your time and
painted slowly. Now as you can see, that the vibrant background and the black color is coming in a very nice contrast
with each other. You can see that the finite
shape of the mountain body. Now I'll be taking
some titanium white and my detailing
brush of size one. We need some darker values
of titanium white and just make this beautiful sun. So you just have to paint
it in a circle form. A small circle is enough
as you can observe. And I'll be adding its reflection
effect just below that. Using the same titanium bite, you have to apply these
horizontal strokes just below this one. Let us add some more
horizontal lines just below the mountain area. You just have to simply add these horizontal strokes
in a random way. We can also add them on the rock bodies in
the front portion. And we are done with
the entire painting. Now let us remove this idea. You can start one by one, just make sure that you
remove the side deep in an angle so that you do not end up tearing your
watercolor paper. So as you can see how beautiful that edge looks once
you remove the site. No need to hurry at all,
do it slowly and make sure that you do not have your
pressure's painting. And let me remove the last one. As you can see how beautiful all the four sides are looking. Let me take you a
little bit closer. And I hope that you enjoyed
painting this beautiful, elegant blues and set. Now, let us move towards
the next painting.
8. Olive Green Sunset: Hey everybody, now let us paint a beautiful olive green sunset. So as you can see, I'm ready
with my watercolor paper, color palette, tissue paper, and a cup of water. So as usual, we are
going to start by drawing a simple
horizontal line, which is the horizon
line basically, which will update your
sky and the water body. So here are the gouache
tubes that you will need. Olive green, sap, green flesh, tint, black, and titanium white. Let me show you in the
color palette as well. So I have not shown the titanium white in the color
palette because white color won't be
visible on white paper. So I'm using my one
inch flat brush and will be simply applying a thin coat of water
on the sky area fast. So you have to apply
a thin coat of water just above the horizontal line. You can already see
the pencil line. You just have to
apply a thin coat of water above that initially. Now I'm taking my
flat brush of size six and we will be starting
with olive green first, take some nice darker
values of olive green. And we'll be applying a nice horizontal stroke
on the top portion. Make sure that you do
not leave any spaces in between the watercolor paper
and your masking tape. And simply apply a nice
horizontal stroke. As you can see, you can observe the brush moment that I'm making now will be
cleaning the flat brush. Once you've cleaned
up flat brush, just dab it on the
tissue napkin. And now let us take some
darker values of some green. And the same plant branch. And the process is
absolutely same. We'll be applying a
nice horizontal line below the olive green. You can see the movement of my flat brush and simply will be moving towards the
olive green area by blending mode the
colors together. If you think there
is excess amount of water in your flat brush, just dab it on the tissue paper so that the axis amount
of water will be removed. And simply move your brush and this horizontal direction
between the two colors, sap green and olive green. Let them blend correctly. You can keep on blending
mode the colors unless you are satisfied
with the gradient effect. I'm just making horizontal
moves as you can see. Now, I'll be cleaning my flat
brush again and we'll be taking some darker values
of flesh tint this time. And I'll be applying
the flesh tint just about my horizontal line. And the same
horizontal direction you can observe the
movement of my brush. Now let us blend the flesh
tint, width, sap green. Again, we'll be making
these horizontal strokes to make a perfect
gradient effect. You can see how beautiful
that gradient effect is coming from olive
green to flesh tint. Now let us paint the water body. I have taken my one
inch flat brush again, and that'll be simply applying a thin coat of water
on the below area. This time we are
applying a thin coat of water below the horizon line. Now once you are done with
a thin coat of water, you have to simply
repeat the same process. What I've done is I've
taken my flat brush and we have darker
values of olive green. This time we are painting
just below the horizon line. You can use the tip of your flat brush to paint
into the difficult areas. Now, I'll be cleaning my flat
brush and just dab it on the tissue napkin to clear the excess amount of water and we will be taking sap green. No need to hurry at all and just paint it in slow and steady way. You can just make these horizontal strokes and try to blend the olive green
and sap green together. In case you find me painting
a little bit faster, you can just slow
down the time-frame. There's an option. Now again, I'll be cleaning
my flat brush and we'll just apply some nice thin coat of sap green in the bottom part. And then just take flesh tint and add it
on the bottom area. Try to blend it with the sap
green applied just above the flesh tint color can take some darker
values of flesh tint to make it a little
bit more brighter. Now you can see how beautiful the gradient effect is
looking in both areas, the skyline and devoted body. Now I'll be taking my
detailing brush of size one, and we'll be taking some
darker values of black. And let us paint the mountains. So as you all know, that mountains and wrong
bodies are generally having a natural shape, basically, which is very random. So you can take the mountain
shape as you like as well. If you want to paint it
exactly same as I'm painting, then you can definitely follow. What I would suggest is draw
a nice outline first to get the perfect shape
of your mountain and then you can fill it
with solid black color. I have painted to mountains. And just to add a
little 3D effect to it, I'm just adding some
drug bodies below that. You can always add some
water in your brush to make your brush move a little bit smoother
on the watercolor paper, but make sure that you have
darker values of black. Now let me paint a mountain
on the left area as well. So as you can see, I've drawn
the outline first and then simply added the solid
black color inside. No need to hurry at all. You can also paint the
mountains and your own way. Let me add some rock bodies
on the blue portion. Now let us paint the wave
lines that are going to come on this
particular beach, sunset. So what I have done
is I have taken my detailing brush and I'm having some solid
black color in it. You can just observe the line
that I'm making right now. So this is the first wave and
let me just darken it up. You can observe the movement
of my detailing brush. Add some water if you
find it rough to paint. Now let us add one more
wave just above that. Again for the wave also, you can have your own natural
and random from painting. But if you are painting
the same way I'm painting, then you can observe
and painted. Let us darken this up as well. So these are the two wave
lines that are going to come towards the land area. Now to show the water body a
little bit more beautiful, what we can do is we can add these little horizontal strokes, just about the wave lines. You can use the tip of your
detailing brush to get these beautiful ten
horizontal strokes. You can also add these
horizontal strokes just below the mountain body to give a nice reflection effect
on the water body. Now, let us add these
horizontal strokes a little bit into the center
area as well. You can observe the movement
of my detailing brush. Now, I'll be taking my
flat brush of side effects again and we will be taking some darker values of sap green. And using this
particular technique, what we're going to do
is that we are going to make the land area where
the waves are coming to just take the darker values of sap green and apply it in just below the force to
be very much careful, no need to hurry at all. Add some water if you find the color a little
bit rough to paint. So you're going to observe
that I'm using the tip of my flat brush to paint
the area below the wave. And we are almost done
painting the land area. Now what we're
going to do is that once you are done by
painting the land area, just dig the detailing
brush of size, one again and take some
darker values of titanium white and draw a
simple small circle just above the horizontal line. So this is basically the
sun which is setting. Be very much careful
while painting the sun. Now using the same
titanium white, I'm going to add a nice reflection effect
on the water body. You have to just simply take
your detailing brush and use the tip to add these little horizontal
lines below the Sun. This is basically
the reflection on the water body which is
coming due to the sun. You can also add these little horizontal lines near the mountain reflection. This would enhance your
painting even more. So you can see how beautiful the gradient background
of olive green, green and flesh tent
as looking together. And why we have
used black to paint the mountain is so that the element gets
highlighted more. So there's this nice combination of black and the
gradient background. Now let us add the
reflection effect on the waves as well. No need to worry, this
is also very easy. Using your detailing brush. Just take some darker
values of titanium white. And randomly just move your detailing brush
and I'm moving. You have to add
these nice effect to give us flashy
effect of water. Let me add this effect on
these second wave as well. And we are done. So you can see how beautiful both the waves are
looking as well. You can also apply another
coat on that domain, divide even more vibrant. You can randomly move
your detailing brush. Now let us remove
the tape carefully. No need to hurry up tall. Remove your site tape and an angle so that
you do not end up tearing your watercolor paper and your brush is painting
shouldn't be spoiled. As you can see, how beautiful the edges are looking after
removing the site team. Now let me remove the last one. So this is looking
really amazing. Let me take you a
little bit closer. I hope that you enjoyed painting this particular painting and
got to learn something new. Now, let us move towards
the next painting.
9. Rose Pink Sunset: Hey everybody, now let us paint a beautiful rose being sunset. So as you can see, I'm again ready with my
watercolor paper, color palette, tissue paper, and a cup of water. We're going to start by drawing
a simple horizontal line, which is the horizontal line separating the skyline.
And you want a body. The gouache tubes is Rose, hot pink, flesh, tint
black, and titanium white. Here is the color palette. Titanium white is not in
the color palette because white color won't be
visible on white paper. I'll be taking my one inch
flat brush and will be simply applying a thin coat of water just above the
horizontal line. So we're starting
with the sky first. No need to hurry at all. Just simply apply a thin
coat of water carefully. Make sure that there
isn't any space left. Now, I'll be using my
flat brush of size six. So here I have my flat
brush of size six, and we're going to start by applying darker values of rows. Initially. The reason behind
applying a thin coat of water initially was to get your brush even more smoother while applying
onto the watercolor paper. Now I have applied a nice thick and dark coat
of rules on the top portion. Now once we are done, just dab your brush on the
tissue paper, clean it. And we'll take hot pink now. So just take some darker
values on hot pink and apply a horizontal line
just below the rules. Now once we have applied a
nice dark coat of hot pink will be blending it with the rules applied
on the above area. Make these horizontal
strokes as much as you can. Just give it a nice blend. So you can see how beautiful
the gradient is looking. Now again, I have simply
cleaned my flat brush, dab it on the tissue paper, take some darker
values of flesh tint and apply a thick coat and
darker code basically, just above the horizontal line. Now slowly move towards
the above portion. Blending it with hot pink. Make as many as
horizontal strokes as you can to get a nice
perfect gradient effect. You can see how beautiful
the gradient effect is looking from rows to flesh tint. Now, let us paint
the water body, apply a thin coat of
water on the bottom area. So again, I'll be using my
one inch flat brush and apply a simple ten coat
of water so that I can move my brush
and a smoother way. Once we have applied
a nice thin coat of water on the water body area, which is just below
the horizon line, will be repeating
the same process. In case you think that you have applied access amount of water, then you can just dab your brush on the tissue paper
and remove it. Now, I'll be taking my flat
brush of size six again, and we'll be taking the
darker values of rows. Now simply apply a
nice horizontal line just below the horizon line. Move it in this
particular direction. If you think that there is excess amount of
water in your brush, dab your brush onto
the tissue paper. Make sure that you make the horizontal line in a
careful and perfect way. Use the tip of your flat brush to paint into the
difficult area. No need to hurry a doll painted
slowly and in a calm way. Now, I'll be just cleaning my flat brush and let
us take some hot pink. I have taken darker
values of hot pink and I'll just
apply it below the rows and blend it with
a nice horizontal stroke. Make as many as
horizontal strokes as you can so that you can get
a nice gradient effect. Now after cleaning the
flat brush, again, I have taken darker values
of flesh tint and we'll apply it on the bottom part and slowly move towards
the above area. You can observe the
movement of my flat brush. Also in case you are
not that much confident enough to paint the
gradient effect initially, you can practice
it on a scrap of paper and then you can come
towards the final painting. Now, I have my detailing
brush of size one, which is basically around rash. And we're going to
paint the mountains on the horizon line. No need to worry at all. This
is going to be very easy. So again, I'm just repeating
the same process that mountains and rock
bodies are generally very random and rough shape. You can make your
own shapes also. But in case you want to paint
the same way I'm painting, then you can just follow up. The best way to paint
mountains is that you can give an outline to give
the finite shape, and then you can fill it
with solid black color. You can see how beautiful
the mountains are looking on the right area. Let us add some more rock bodies just below the mountain area. So you can use the tip of
your detailing brush to paint in the difficult areas where you want the
color to be minimum. You can make it ten. Now let us paint some mountains
on the left area as well. I have taken some darker values are black and my detailing brush and some water
into your color. If you find it
difficult to paint on a little bit rough on
your watercolor paper. I have drawn the outline first. As you can see, this is the best way to
paint the mountains. Once you are done with
the finite shape, then you can fill
in the solid color inside this particular mountain, we have taken a little bit lower than the horizontal line, which makes it look a little
bit nearer to our vision. So as you can see, the reason behind using
a black color to paint this mountain element
is that you can see how beautiful the vibrant
background is looking. And we want to make a nice
contrast between the ROC area, which is the mountains and some rocks that we
are going to paint. So that's why we have
used solid black color. And the contrast
looks really amazing. Your shapes get even
more nice definition. So we are done with
the huge mountains. Let us add some brown
bodies on different area. So I'm just painting these random rough rocks
on the bottom potion. No need to hurry at all. Just painted the
way I'm painting. Or you can just paint
it in a random way. So these are little rock bodies
which are into the water. And I'm just using the tip of
my detailing brush to paint them because these
are smaller in size. One more thing
that I always tell my students is that in
case you're not that much confident enough
or you are very new to the medium of
wash. What you can do is that you can simply practice the painting on a rough scrap of paper initially by painting the vibrant background,
all the elements. And then you can come
towards the final painting. Now, let us add some
nice reflection effect onto the water body. So just use the
detailing brush and add these little
horizontal lines just below the mountains. Use the tip of your
detailing brush to make these amazing
little strokes. You can add depth
on the edges also. Now let us add some nice
reflection effect and below these little
rocks as well. In case you find me painting
a little bit faster, you can definitely slow
down the time-frame. There's an option. Now, I'll be taking
darker values of titanium white and
my detailing brush. And there'll be painting
the sun, which is setting. This time I'm painting
the sun a little bit shifted towards the
left area, which is fine. And after painting the
sun in a soluble form, you can just use the same
titanium white and add the reflection effect on the water body by applying these little
horizontal strokes. We can also apply these little horizontal
strokes just below the mountain where we have given the reflection effect to
enhance the painting even more. Let me add these
little white strokes just below the
wrong body as well. We are almost done
with the painting. Now, let me add
some little buds. So I'm using my same
detailing brush of size one. I have taken some
solid black and you can make this V-shape, or I can say, small thin strokes to paint these little buds. This is not at all difficult. What you can do is just
make a nice V-shape. In case you find painting
the birds difficult, just practice them on our left, scrape off paper first, and then paint it on your final painting so
that you do not spoil it. Now, let me remove
the side tapes. Just remove your site
type in an angle so that you do not end up tearing
your beautiful painting. And you can see how beautiful the edges are looking
after removing the tape. Let me take you a
little bit closer. You can observe the details and I hope that you got to learn something new and creative from this particular
painting as well. I'll be really excited
and very happy to see all of your projects
into the project gallery.
10. Class Conclusion: Hey everybody, you are most welcome to the class conclusion. Being an artist,
I always love to explore and learn
new art mediums. And that is what I always suggest for my students as well. I'm very happy to share
this class with all of you. And I hope that you
got to learn something new and creative from
this particular class. Wash is a medium that you
must try and explore. Also, one more
thing that I always tell my students is to maintain a practice journal on
which you can practice on a regular basis and keep
a record of your artwork. I'm really excited to
see all of your projects into the project gallery in
case you have any doubts, feel free to ask it in
the discussion section. Let me know your
reviews for the class. Keep practicing and
happy painting.
 Rutvik Patel, Artist and Instructor