Transcripts
1. Introduction: Hi, I'm Tory Hageman. One of my most
favorite things to paint are big dramatic skies. And I'm always experimenting with different types
of techniques, different brushes,
different styles. I just finished this
impressionistic, loose painting using one brush. I think this may be the
largest painting I've ever done just using
a single brush. I'd love to show you how I did. You know, with acrylic paint, sometimes it can be difficult
to get a smooth transition from dark to light
in your sky color. But with this painting, that wasn't an issue at all. I'll show you how
I got around that. I'll show you how I
put these clouds in in the proper angle so that they read correctly with
the right perspective. I actually put in a traditional landscape in the bottom of this,
the first go round. I didn't like it,
painted over it, and then put in a more
contemporary landscape and just have great color harmony between
the land and the clouds. And I'd love to just
walk you through this painting and how I did
it. It was a lot of fun It would be great for
a beginner painter or someone who's a little
more down the road. I did this in acrylic, but I believe you could also
apply to oil paint as well. It was a lot of fun and I hope you'll come
join me in this.
2. Pt.1 Getting the Right Perspective: Almost every sky that's full of clouds will appear to
have a vanishing point. That point in the distance that appears to be the
origin of the clouds. Take this first example. Now see the vanishing point. Even though the sky
may initially just look like it's full of
half hazard clouds, they actually are coming from a certain angle
and perspective. Here's the photo reference
for our painting today and here are the lines
we're going to be using, showing the correct angles. Now, let's see if we can get those same angles
onto our Canvas. I'm starting with
the prime Canvas using Naples yellow and white. I'm taking a T square. You can also use a yardstick, and I'm just putting in a very low horizon because I want the sky to be the
predominant feature. I'm looking at my
reference photo, I'm looking at
those angled lines that we have identified. I'm just going to mimic those same lines and pencil
them onto my canvas. Don't get locked up about this. If the angles off a little bit, no one will know but you
because clouds are so organic. Every sky is a little different. This is just to give you a general feel for
the right lines, the right angles so that as you start to lay your clouds
in on these angles, it'll help keep the clouds
in the right perspective. I've found this
to be so helpful. It's a great tool that
I use frequently when I'm doing a sky full
of large clouds.
3. Pt. 2 Color Palette: I used a super simple color
palette for this painting. The primary shadow color for the clouds is a combination
of burnt umber, which is a dark brown
and ultramarine blue, which is a dark blue and
a tiny bit of white, and that made a dark gray. I was trying to get that color
where it wasn't too brown, it wasn't too blue, but it was
right there in the middle. Using a palette knife, I pulled some of that first out, added some white to it, coming up with the middle value. I came up with several
values of gray and eventually, I
used even more white, but it gave me a
nice range to go from the cloud shadow
to the highlights.
4. Pt. 3 Putting in the Clouds: Brushes are a little bit
like fountain pens to me. Sometimes you'll
stumble across one, and it has just that
right amount of ink flow, I just handles just right. That's how I feel
about this brush. This is made by Princeton, and it's called a Summit brush. It's the series 6,100, and it's a number
ten bright brush. And to my hand, it has just
the right amount of spring. I love doing this entire
painting using the single brush. If you remembered, we put in pencil lines so
that we would keep our clouds on the right angle going in the right
general direction. So I'm referring back
to my photograph and I'm just taking my
darkest shadow colors. I'm putting them in the
center of the cloud, and I'm slowly building out. I've sped this up
to twice the speed because it took me
a while to do it, and I didn't want you
to get bored with it. But the quicker that you
work, if you'll notice, I'm then going back over
some of those edges, just blending those
colors together. You can also add a slow dry
medium That's a great way. I don't really know
why I didn't do it on this particular painting, that would have been
a great application. All the major paint manufacturers
have a slow dry medium. I don't know that it
really matters which one. Again, I'm just
checking my reference and I'm just dropping
some big clouds in. I'm starting with my
biggest clouds first. The ones that are largest, most predominant, the
fluffiest, if you will. Then I'll move down to the smaller flatter clouds
that are near the horizon. It was interesting later on. So you noticed that we've got
this yellow underlayment. And later on, after
I'd put in the sky, I decided to add an extra cloud and putting
that cloud on top of the blue looked completely different than these clouds
put on top of the yellow. You don't realize how much of that color is affecting
what's on top of it. But I love the effect
of this yellow. So if you've never I usually like to paint
on white canvas, but it's hard to
see a white cloud on top of a white canvas. So I wanted to have a
colored background, but I really love
this Naples yellow. It's just kind of a medium
beautiful, gold color. And it worked really
well with these clouds. I'm just lightening that again, adding a little more
titanium white, getting some of
those outside edges. I really encourage you to make
these clouds very organic, have some places where they really come in and
really go back out. You don't want
something that looks like a big cotton ball. It needs to look very
irregular and organic. That's something I have to
make my brain do because we tend to want to do
things symmetrically, even You'll notice that
I'm going back over areas. I'm wiping my brush
off right there, and I've wet my brush and I'm just going back
over and softening, even though I painted
that a while back, with a damp brush, I'm able to I'm wiping that
paint off again. I'm able to soften those edges and get
that blended nicely. It's just slowly starting to
look like a realistic cloud. I want to slow this
back down for you. I want you to also notice
that I am turning my brush. I'm not putting down
the same stroke. Sometimes I'm using the
flat face of the brush. I'm often turning
it on its edge. I'm loading it with a
fair amount of paint. I'm putting some places I'm
putting a lot of pressure, other places where I'm blending, I'm putting very
little pressure. I'm just doing everything I
can to vary those strokes. Sometimes I'm pulling up, sometimes I'm pulling down. Again, trying to
keep it painterly and loose and not
so predictable. I got back from it
just to see how it's looking and it can look
pretty wonky at this stage. It doesn't look like much. But I was mainly looking at my angled lines and the
proportion of the clouds. Do they look like they're
reading correctly and they are? Now I'm ready to move down to a lower angle and say the clouds are going to get
the farther down you go, and typically they
will get flatter. That's not always true.
Every once in a while, you'll see a sky full
of cumulus clouds and these big bilby clouds
start at the horizon. But in this photograph, they do get, which is typical. They do get a little smaller
and a little flatter, the closer they get
to the horizon line. Typically, you're going to get lighter as you get to
the edge of the cloud, but that's not always true. Sometimes you'll have
a real light spot in the center of a cloud. So I'm just looking at
my reference photo. At some point in this painting, I sort of quit looking
at my reference, and I just started looking
at the painting it and how did it I think sometimes adding a wider outside edge can make the cloud
look like it's backlit and can add a little
drama to your painting. Sometimes I'll push the way
a cloud really looks from the photograph just to
make it a little more dramatic and a little more
interesting in my painting. Notice I'm continuing
to turn that brush, sometimes on the edge,
sometimes flat out. And it's just getting softer
and prettier as you go. I find, and I say this
a lot in my videos, but I have found with
clouds, with flowers, with flat surfaces, putting a lot of layers
in makes something so much more interesting and so
much more painterly looking. I just try not to have things
that are only touched once. I like to go back over
them multiple times. And with these clouds, the more that I go over, soften and add another
layer in soften, it just gets richer
and deeper and more interesting to my And the
If you're a new painter, the idea of using
multiple layers may just seem complicated and overwhelming
to you, and I get that. I used to put down one layer
of color and that was it. But the longer that I paint, the more I enjoy
putting layers down, the more I realize
if I mess it up, I'll just put another
layer on top of it. I've gotten to where I've lost my fear about messing
up a painting. I used to be so afraid
to paint over anything, and I've really
gotten over that. And if it doesn't look good,
I'll just paint it again. It's one of the things that's so forgiving about acrylics, and if you're painting in oils, you could actually scrape it
off and just start again. I encourage you to if you can get past that fear of
painting over something, it's going to free you up to experiment with your paintings, and that's where you're
really going to get good because you're going to
try different techniques. You're going to try.
You're just going to push the limits a little bit
and get outside your norm. We all tend to have habits
in the way that we paint, and our paintings can
look very repetitive if we're not willing to push those boundary
lines a little bit. So I encourage you to not feel so invested
in every painting, but to see it as a
learning experience.
5. Pt. 4 Putting in the Sky: To put in this beautiful sky, I'm making a mixture of
ultramarine and white, and I've made three
different values, a dark, medium, and a light. And I'm going back using the exact same brush that
we use for the clouds, and I'm going to
just start laying in the darkest value at
the top of the canvas. One of the things
that I really love about this brush is it's
going to enable you with that chiseled
edge to go in and cut in a more interesting
outline to your clouds. Particularly if your
clouds have started to get a little bit of a two round
or a cotton ball look. This is a great opportunity. It's so easy to do
just to go in and make some marks get the edges of your clouds so it really
juts in at some places, cuts up, cuts it down, just to give an interesting organic looking shape
to your clouds. Here you see me
dropping down into that middle value of
the blue and white, and I'm just laying it in
like I was the darker. You notice I've got
that hard transition. I'm taking my brush
and very lightly doing an kind of in and out. Over that transition
line and softening that. It's easy to do. You can push up with the light into the dark or you
can get a little more dark on your brush and
push down into the light and just criss cross lightly
and soften that line. Sometimes I'll go back in and
darken the top a little bit more if I feel like it needs
it. Just work that line. I love, again, the fact that
it gives a painterly look. I'm not trying to get
a smooth transition that's void of any brush marks. I love the way this looks. As much as I love
painting clouds. This was the most favorite
part of the painting for me. I just felt like
all of a sudden, wow, right before my eyes, the painting started
coming to life. See how I've made some really steep cuts into those clouds. Don't be afraid
to experiment and get some really dramatic
edges with your clouds. That's going to kind of
take it to the next level. If you leave them to
rod and too fluffy, they're just not going to look as interesting or realistic. I wanted to mention
that I'm using Liquitex heavy body
paints with this, and I didn't have any trouble at all covering up my pencil lines. If you're using something
like Liquitex basics, which may be a paint, you may have to go over
those lines a second time, but the heavy body paints
took care of that. First go round. Here I'm adding in some extra clouds down at the bottom
of the canvas. Notice that I'm
still being mindful of those angled lines. And typically, clouds will get flatter and less voluminous as they go down closer
to the horizon. That's not always true, but that's how we're doing
it in this painting. So that one I'm working
on right there, that's the last
medium sized clouds. Everything else is going to get fairly flat as we
go to the horizon. Again, I'm using this
opportunity to make some interesting cuts into these clouds and just get a
really distinct shape going. Just feeling in that
middle, so I'm going back to my dark blue at the top. Again, I'm not worried about trying to get
that super smooth. I've even got a little bit of
the yellow showing through. I'm just I'm turning that brush. I'm not painting it like a wall, getting real smooth marks. I'm intentionally letting
some brush marks show. Here, I'm just smoothing that
area. Not overthinking it. You know, painting clouds and skies are just
like anything else. When you just look at
the finished product, it can look kind of complicated, but when you see the steps behind it and you
take it step by step, it's really pretty easy
and pretty doable. And just like anything else, when you practice and
you do it over and over, you're going to work
through problems, you're going to see
things that look good, things that didn't look good, and you're just going
to get better and better if you don't
quit and give up. My skies look so different than when I
first started painting, I should show you some
of my early ones. They were very, very
childish, but the only way, and I've watched a
lot of videos and I've read a lot of books, and there's just nothing that can replace
getting in there, putting paint on your own brush, and trying things yourself to get better and better at it. And I'm just confident that if you will practice with this, you are going to end up with
some really stunning skies. Here I've dropped down to our lightest value ultramarine
with a lot of white in it. And a lot of times, as I get really close
to the horizon line, I will add even more
white to it where it just it looks almost more
like clouds than sky.
6. Pt. 5 Decisions to be Made: I started laying in
some simple mountains in the back using old terrain. I think I might have
put a little drop of burnt sienna in
there to darken it. I'm not going to
spend a lot of time on the landscape
because number one, I know you looked at this video because of
the sky and the clouds, and number two, I ended up
redoing this landscape. I'm going to just quickly
show you what I put in the foreground that
I later painted out, and then I'll spend a
little more time and show you how I put the
final foreground in. One of the things that I like to do several times
during the course of a painting is just get back and see if I'm pleased with it. Is it working? Is there anything that's jumping out to me? And every time I look
at this painting, the one thing that
jumps out to me a lot is this big V of Blue Sky. And even though that's how it was in the
original photograph, it's not reading well
as a painting to me. And I think that's
a good lesson. You can copy something fairly
closely to your photograph. But when you get back, does it stand well on its
own as a painting, and I feel like this
looks kind of odd. So I'm I love these
clouds and these. I'm not crazy about these. And even though the
angles are correct, the way they were
in the photograph, I feel like that's too upright. It needs to be a
little more angled. I might even try to
add the bottom of a real big cloud
right there just so you get the feeling
something's overhead. And if it doesn't look good,
I can always paint over it. I love that about acrylic.
It's so forgiving. I paint over things a
lot in my paintings. The other thing I
want to do is maybe tweak this bottom ground a lot. I have in my pinterest folder. I have maybe 100 little
landscape paintings that are very simple
with a low horizon line. And sometimes for me, where it's most difficult is getting in some simple
little foreground. I don't know why that's harder
for me than the big sky. But it helps me to go
back and I'll look at 50 or 100 little paintings and just get some
creative juices going. Maybe I could put in a road, maybe I need to
put in some fields or just something to make it
a little more interesting. Still keep it pretty simple. Sell using my one big brush, not putting in a lot of detail, but just to have something
a little more interesting. The other thing I
want to do is I love how I've got some wispy
clouds up in here. I think that always
makes a cloud seem more realistic where I use a thin bit of paint and my wet my brush is fairly wet, and I just put some
thin layers of clouds, particularly down
near the horizon. So you're going to
see me do that. So I'm going to kind of do
my final big tweak on this, and then I'll let
you take a look.
7. Pt. 6 Landscape: So we're at that point again, where I've gotten back from it. What do I like?
What don't I like? I like most of it. I don't like how this
cloud cuts off at the top because this one would be closest to you and should
look like it's overhead. I'm going to go
ahead and take it all the way up and
maybe darken it, so it really does look
like it's going overhead. I think given how low these are, this looks too big. So I'm going to go back
with my same flat brush, and I'm just going to put in a little sky color
and I'm going to break those up a little bit and just make them
a little smaller. I'm not going to take
them out. I'm just going to use my brush to
reduce them down. And I don't like this
dark at the bottom. I feel like it's so strong. It really pulls your eye. I love the mountain range. I love that purply blue. I like the fact that it's soft. I like that this whole
painting is fairly soft, and I want to keep
the foreground, I think, to be fairly soft also just so it doesn't
take over the painting. I'm going to probably use
some white paint or gesso, and I'm going to just paint over this because I don't
want to have to take three coats of
something to cover this dark foreground and
put in something lighter. I really want to encourage you. I used to never
paint over things. That just was too scary, and so I would just
end up with a pile of terrible paintings that there might be a part of it I like, but one part that I didn't. I've gotten where
I just fearlessly paint over things all the time. Almost every painting I do. There's some area that I don't like or I think
it could be better. I just paint over
it and I move on and I end up with
something so much better, particularly if you're
using acrylics, it's just such an
easy thing to do, so I encourage you to also be fearless about painting over something if it's not
working in your painting. Let me change this cloud, reduce these down, and then I'll let you see what I decide
to do with the foregroun. One of the ways to keep great color harmony
in your paintings is to use a very limited palette and use the same
colors over and over. If you remember how we
use the ultramarine blue and the burnt umber with
white to do the cloud covers, I'm using those same colors in the ground with a touch
of the Naples yellow, which, if you'll remember
was the undercoating. But I'm using more in the
brown and tan shades, just making it look
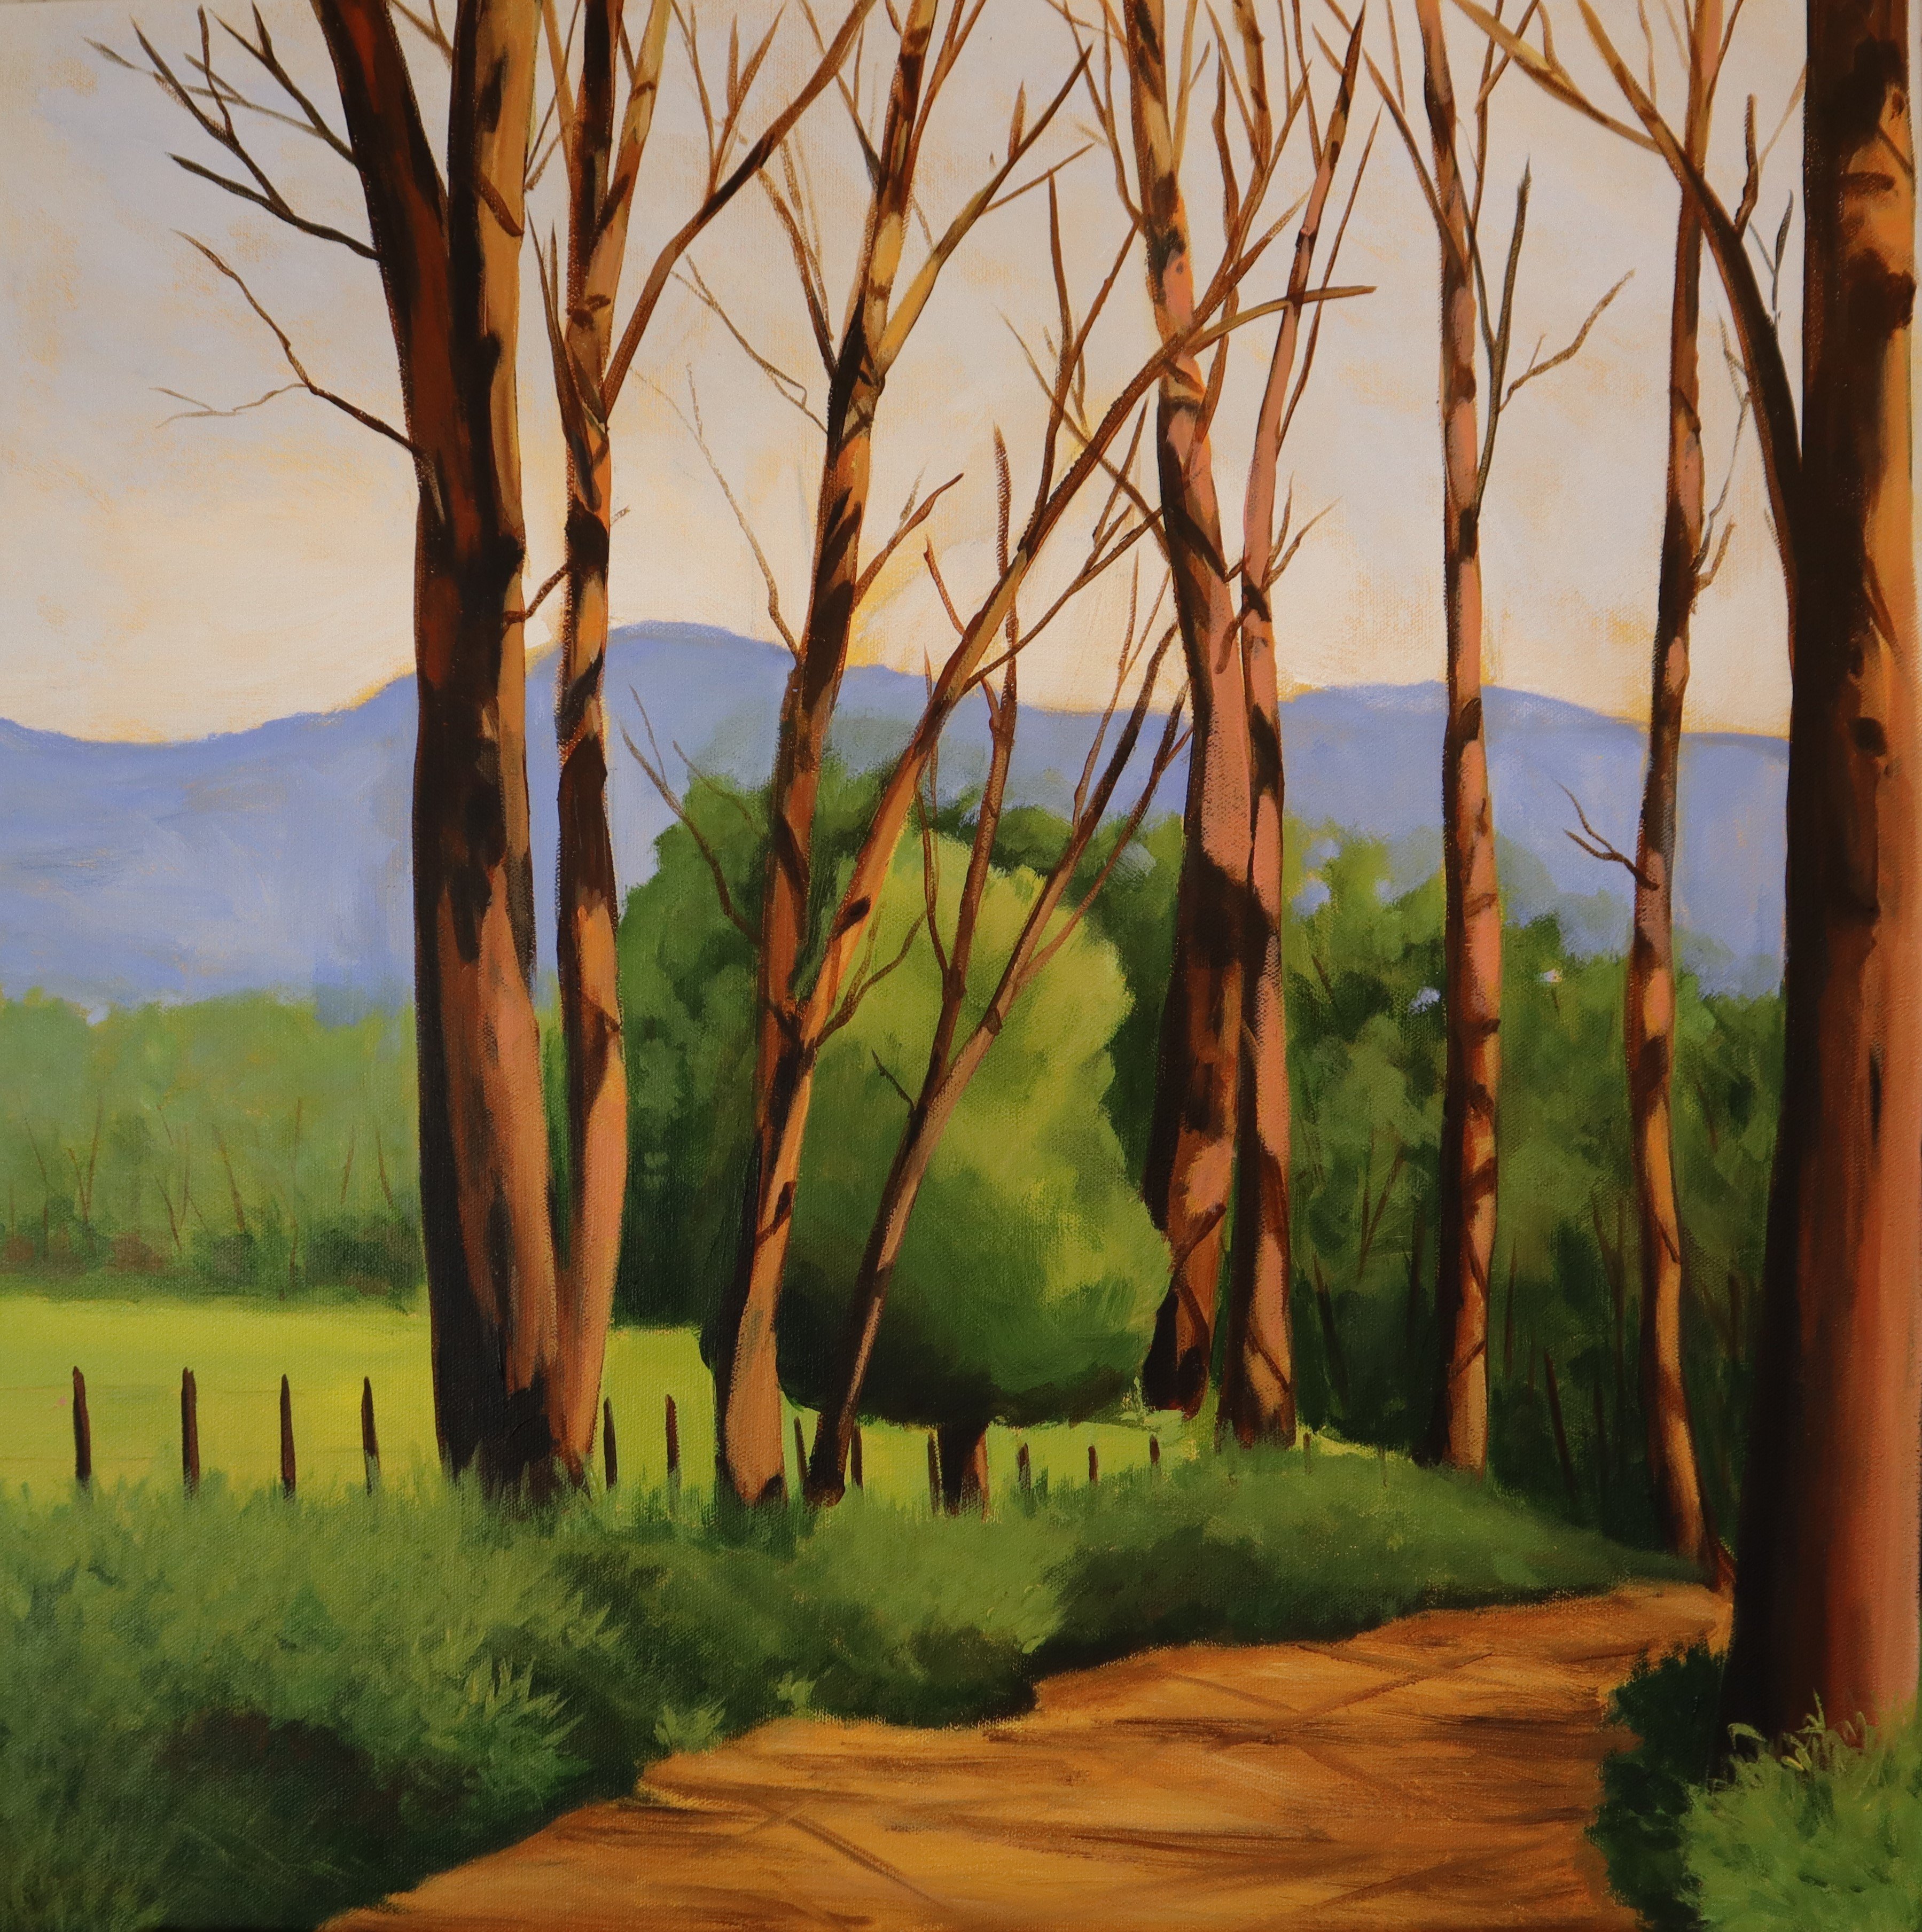
more like earth, just getting a warm tune. I started out thinking I
would have it going at an angle But the further along
I got with that landscape, I thought, I'm going
to put a little hill in the background. And then I'm going to put in a slightly more
contemporary feel in the front by putting in
little blocks of color. The colors that I use
included the blue. I put more cream, more blue, more brown, some were vertical blocks, some were horizontal blocks. I just dropped the men
pretty loosey goosey. I didn't overthink it. I had that darker
heel in the back and I just gave it this
really clean, nice, contemporary look a
little different from my normal landscapes,
but I really like this, and I think it kept the
pole painting looking just really clean and nice and
little more contemporary here. I'm putting in a super dark
line right at the base of the mountains just
gives you the feel that there's just one more
hill way back in the back. There's a close up of it. Yeah, I like this
technique a lot.
8. Pt. 7 Summary: So as a recap of what we've
learned from this painting, when you look at the sky, when you're taking
photos of the sky, be mindful of the
direction of the clouds. I have found it so helpful when I can pencil in some guidelines that helps me keep from
getting off track and helps my clouds to stay
in the right perspective. Try to use a big flat brush when you're putting
in your clouds. Go ahead and pre mix your
values and just gently blend, use lots of layers. Remember to get your
shapes very organic and irregular so that they
don't look like cotton balls. Don't forget the little wispis that add so much character. When you put in your blue sky, pre mix the values
there as well. Make sure you have a
good dark at the top, a nice middle value and something very light
at the bottom, gently x your brush across
those transition lines. Ha nice, painterly
big brush strokes. Don't try to smooth
everything out, and try a contemporary
little landscape using blocks of color. That was a lot of
fun for me a little different from anything
that I'd ever done, and I think it ended up
giving it a really clean, nice that hope you've enjoyed
following along with me. I look forward to
seeing your paintings. I've put a project below and hope you'll give that
a try. Thanks a lot.
 Victoria Hagaman, Joyful Art