Transcripts
1. About the Class: Round brushes are often used
by artists including myself, because it's a versatile brush that can paint a
variety of strokes. But what if I told
you that there is another brush that will help you effortlessly paint
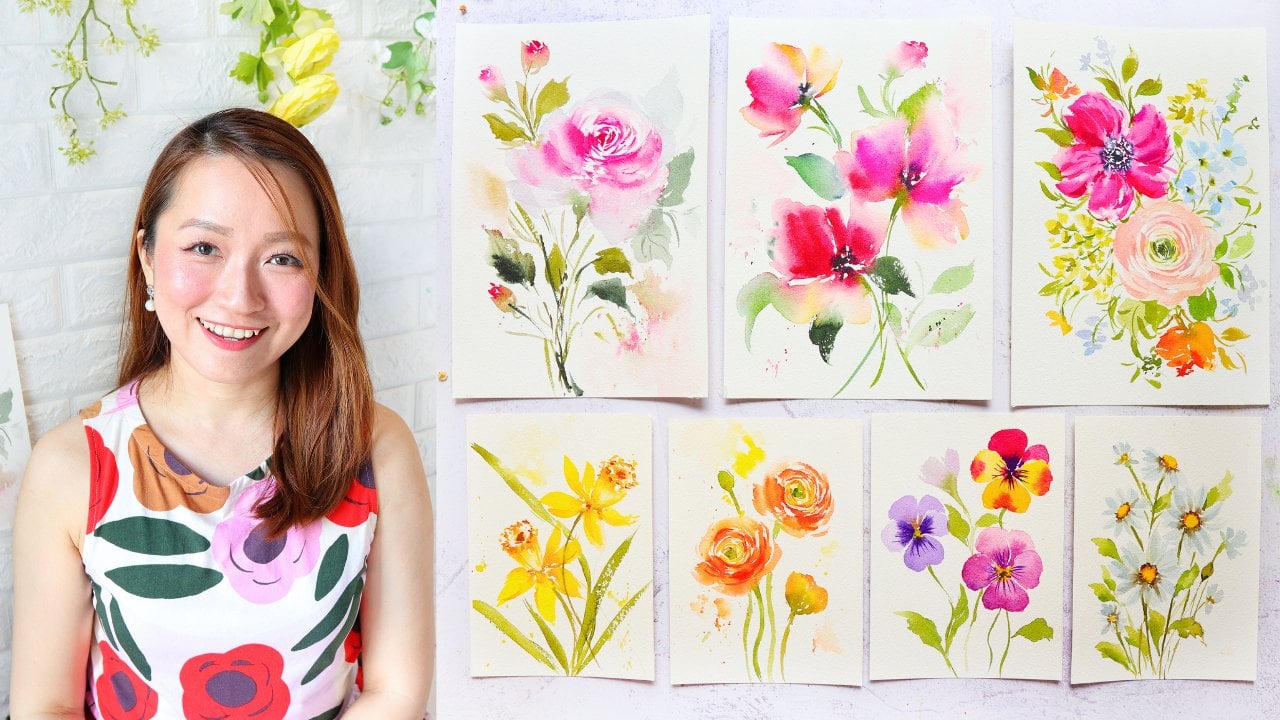
flower petals. Hi. My name is hole, and I'm a watercolor artist, online art educator and a
Skillshare top teacher. I'm also a brush nerd, which means that you're in
good hands in this class as I have explored so many brushes
over the past few years. My art revolves around painting watercolor florals in a
loose and expressive style. A filbert brush looks
like a flat brush, but with an oval tip. And when you lay it flat on the paper and pull the stroke, the distinct brush shape
easily creates a flower petal. If you have never
tried this brush or had a hard time using
this brush before, then don't worry, I will guide you on how to use it with ease. In this class, we will talk
about the differences between a round brush and
a fillberd brush to understand how
each brush works. We will dive into brush stroke exercises and learn about petal
and leave strokes. We'll discover how
to pull, twist, and flick your brush to
create organic strokes. All of these exercises
are designed to help you build the muscle
memory in your head. On top of these learning points, I will be sharing my
floral composition recipe so that you can start creating
your own floral bouquets. After learning all the skills, we will apply them to
three different projects so you can see the
techniques in action. This class is suitable
for beginners, and for seasoned artists
who want to try a new bruh. I have found that exploring and learning a new tool
ignites my creativity. It gives me that
fresh perspective on approaching my artwork. And I hope that this class
will do the same for you. Coming from a brush nerd, I'm really excited for you to
try this new brush with me, so let's get started.
2. Class Overview: Welcome to this class overview. I'm really excited
for you to try this class because we're
going to use a new brush. I have deep passion for
learning new things. I'm pretty sure you will
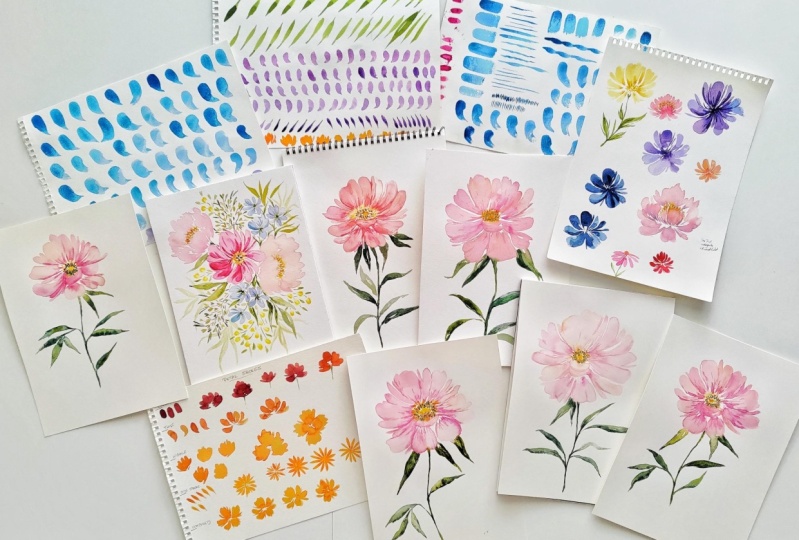
enjoy this class as I have prepared so many brush
stroke drills for you. Let's start with the first
project where we will paint eucalyptus using
a live reference. It will help us observe
the subject and move it around so we can paint it
from different perspectives. The eucalyptus leaves
also can be easily painted with the round edge
of the fiilbert brush. For the second project, we're going to paint
a single step. I chose this flower because the petals are large and curved, which can be easily painted using the natural
curve of the brush. You'll also learn to paint expressive petals
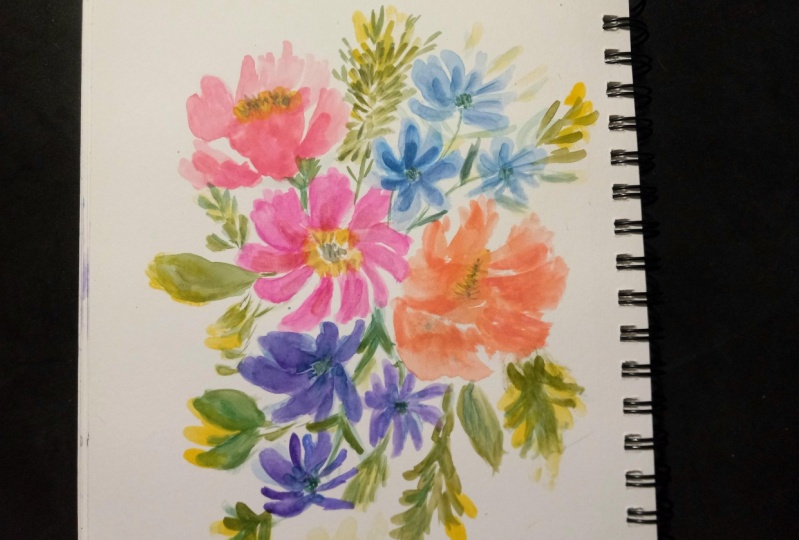
and add layers. For the last project, you're going to paint
a large bouquet, but don't worry because
I will be including a separate lesson on
floral composition guide, and we'll be using this guide as we paint this last project. So we'll start with
the main flowers or the focal flowers. Next, we'll paint the
secondary flowers, followed by fillers and leaves. I am sharing with you one of my favorite recipes for
painting a floral arrangement. All right. Without
further ado let's check out the next video where I will be sharing
the art materials that you need in this class.
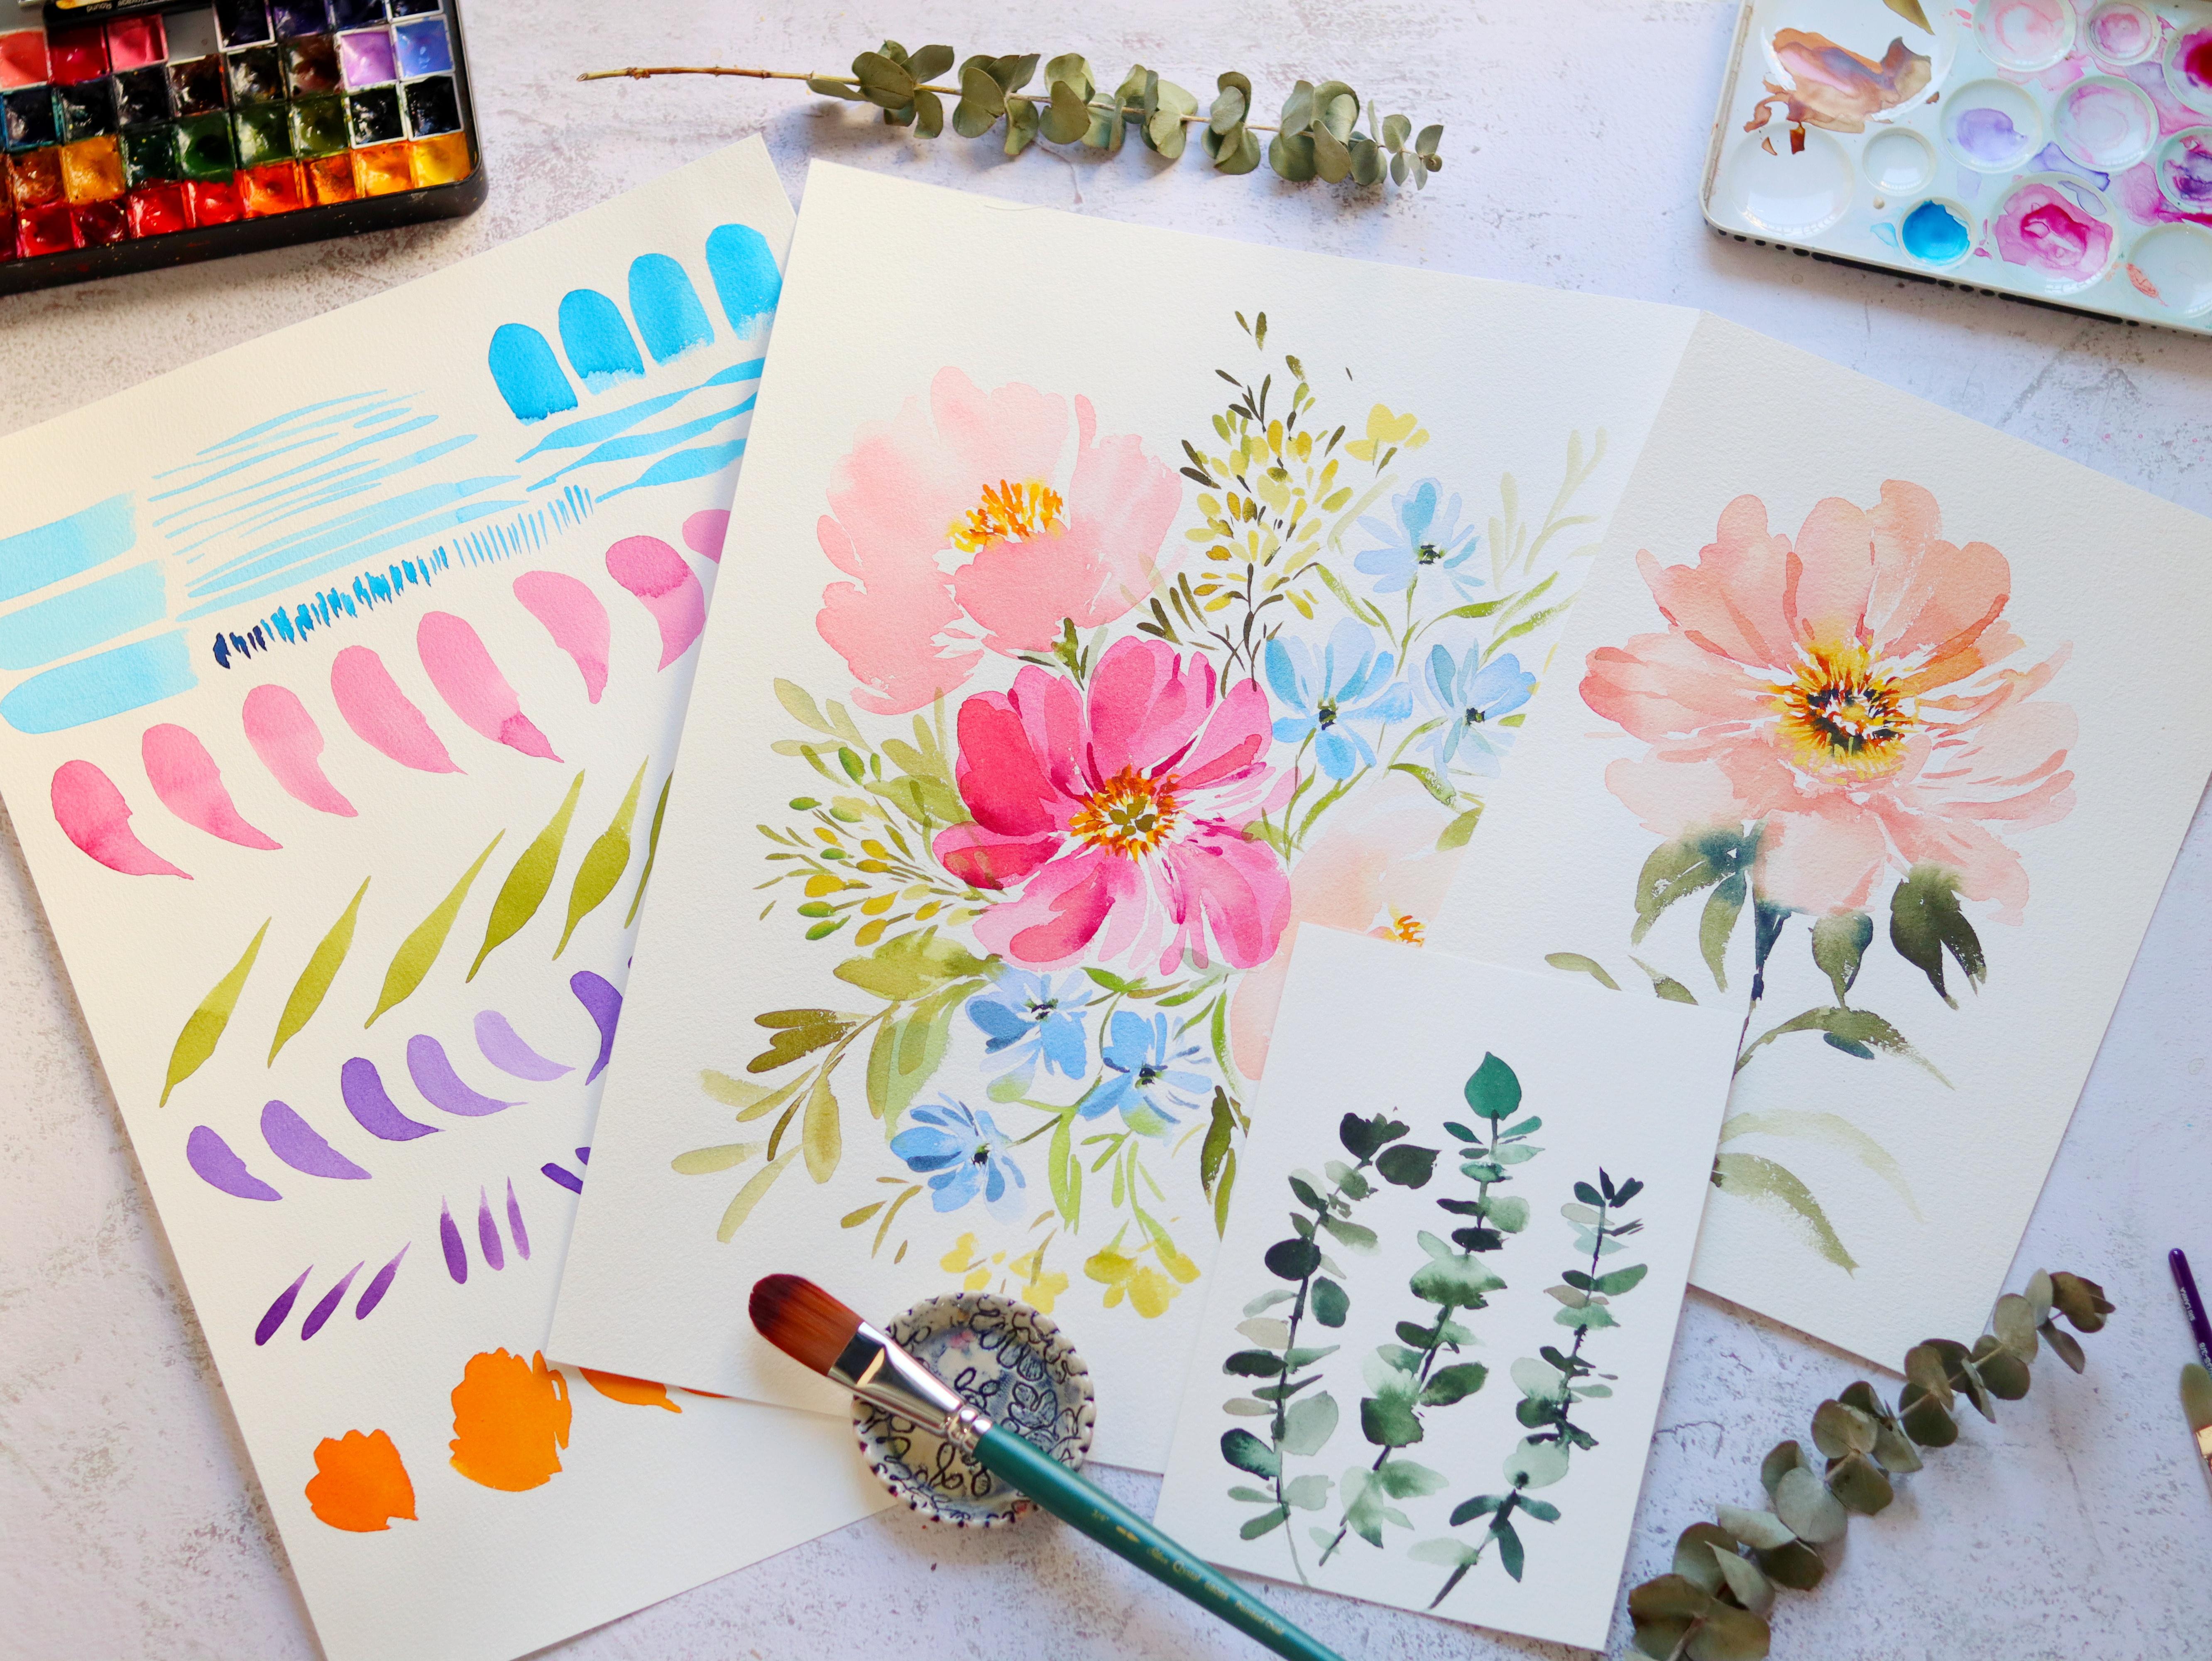
3. Materials: All right, so let's talk about the materials
that you need. The first one is paper. I'm using this brand called Bauhng artist grade
watercolor paper, which you have probably
seen in my other classes. So this is cold pressed paper, and it's also 100% cotton paper, and the thickness is 300 GSM. So this is the
texture of the paper. So it's really nice
for loose florals, and this amazing texture gives
more depth to the flowers, as you can see here in
the sample painting. So, aside from the
artist grade paper, I'm also going to be using
the Bau jug Academy, which is the student
grade paper. So this is a great alternative
if you are on a budget. And I'll just quickly
show you the texture. It's a little bit smoother
than the artist grade paper, but it still works fine
with loose florals. Now, the downside of
this paper is that it easily creates harsh lines. For the petals, and you'll
see that more in this sample. So this huge paper is
also Ba home Academy, and you'll see more
puddles and just more unevenness on the
paper as the paint settles. But for me, it's okay as long as it's affordable and you
can practice on it, and the result is going to
be amazing once you just try to master the amount of water that you put
in your brush. But definitely feel free
to use any paper that you have on hand and just enjoy
the process of painting. Let's move on to the
most important material, and that is the brush. So we are focusing
on a filbert brush. This size is three
quarters inch. And in this brand, they actually
call it a pointed oval, but it's the same
as a filbert brush. So you can see that the
top has a rounded shape. And when you flip
it to the side, you can see that it has
this tapered shape, and it goes to a pointy tip, and this is going
to help us create those nice sharp strokes
or thin strokes. Next, we're also going
to use different sizes. So I have here one half
inch filbert brush. It's from the same
brand silver brush. It's just from a
different series, so the bristles are just
a little bit different. All of them have
synthetic bristles, but even if it's synthetic, the paint brush is still soft. So we are able to create some
nice organic brush strokes. We are going to use
the smaller sizes to paint some tiny leaves
and also stems. You can definitely use
other brands as well. Here are just some of the
brushes that I am used to. What we're looking for in
the fill red brush is that it's quite soft to create some
movement in your strokes. At the same time, it needs
to have that pointy tip towards the end of
the brush so that we can create some
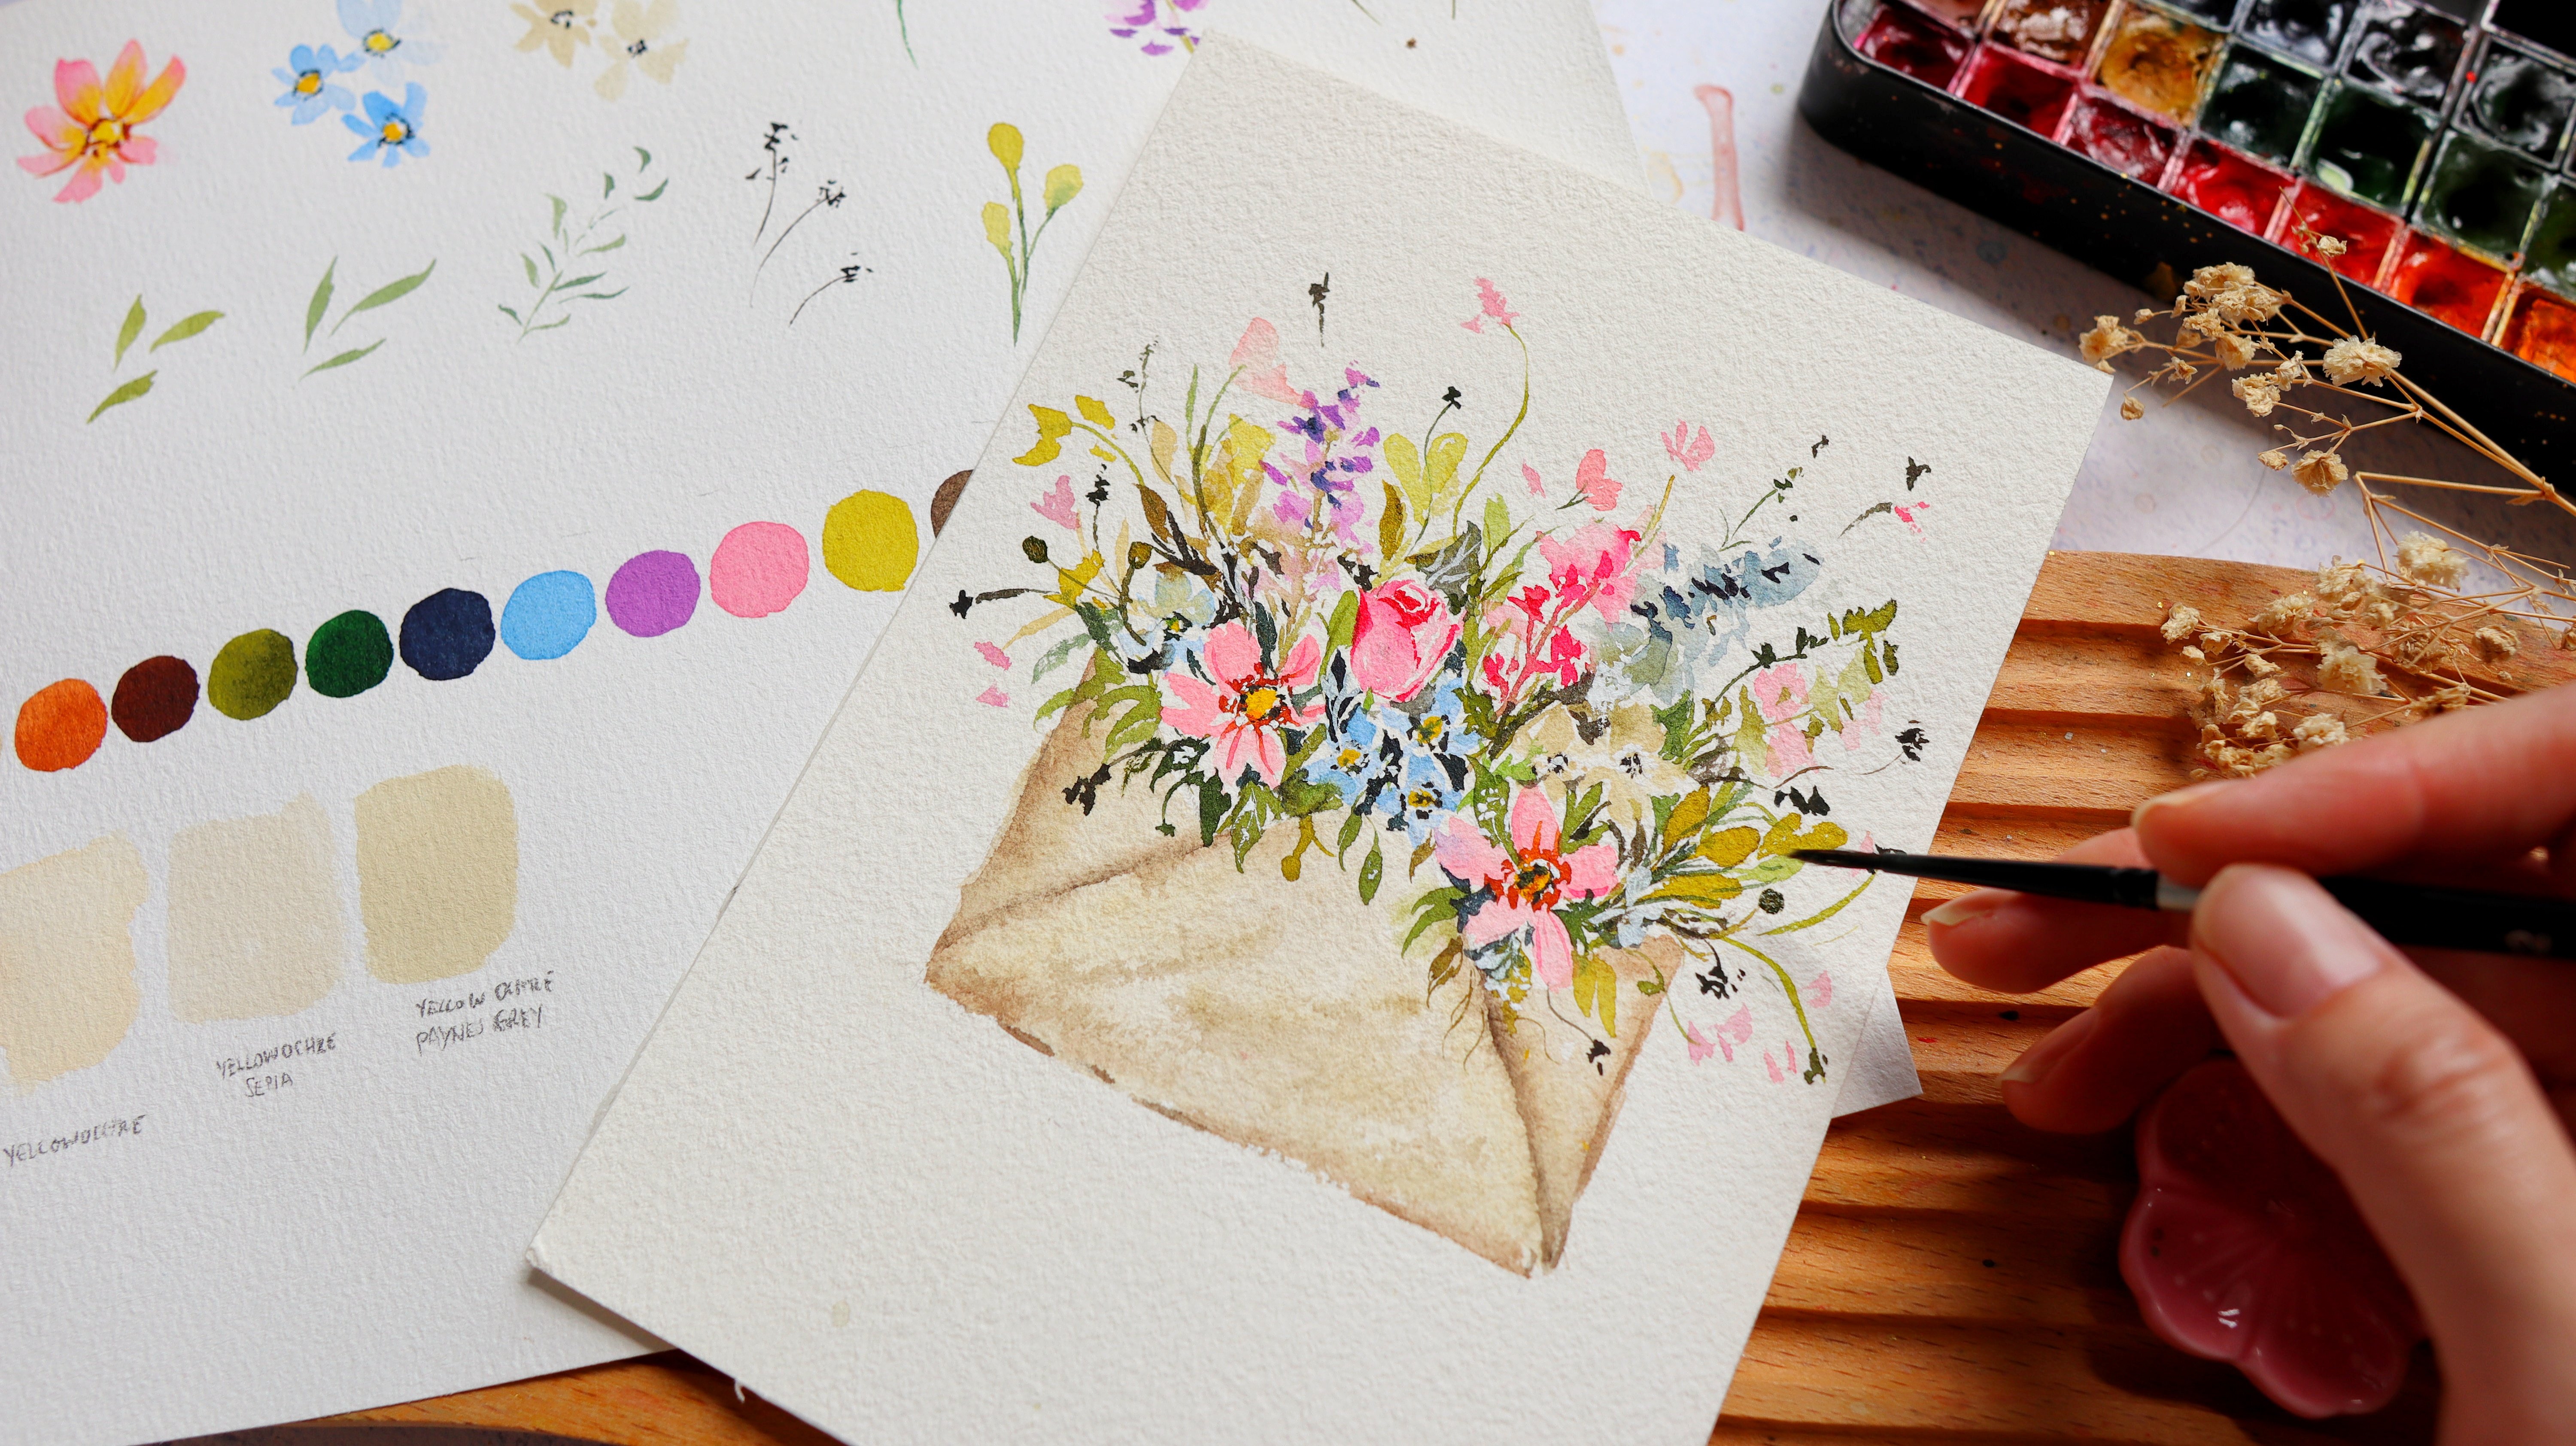
nice thin strokes. For the paints, I'm using sheen hand PC and I just pour them into
half pants like this. Let me show you the tube paints. I have container and this is
where I put all my tubes. This is the Sen hand P B. It's a Korean
artist grade paint, and I just pour them into small half pants because
it's more convenient to use. So I let them all dry on the half pants before I
start painting with them. It's actually a revised
palette that I did, so you can see
that there are now more pastel colors
in my palette. So we also need a
mixing palette, and you can see right here, this is a beautiful
mixing palette. It's just the lid
of my metal tin. It's actually from
the brand core. It's a watercolor brand, but I took out the paints inside and replaced
it with an hand PWC. I just love this tin
can because it has all these little
wells that I can use for mixing different
color combinations. You can use a ceramic palette or even just a regular plate. Next, we also need tissue
paper for blotting out the excess moisture in our
brush and also a water cup. This is just a new water cup that I bought in my
recent Japan trip. I love adding cute things
in my workspace because it just keeps me happy and
more motivated to paint. All right, so that's
it for our materials. So now let's move on to the
next video where we will define the difference between round brushes and
Tilbert brushes.
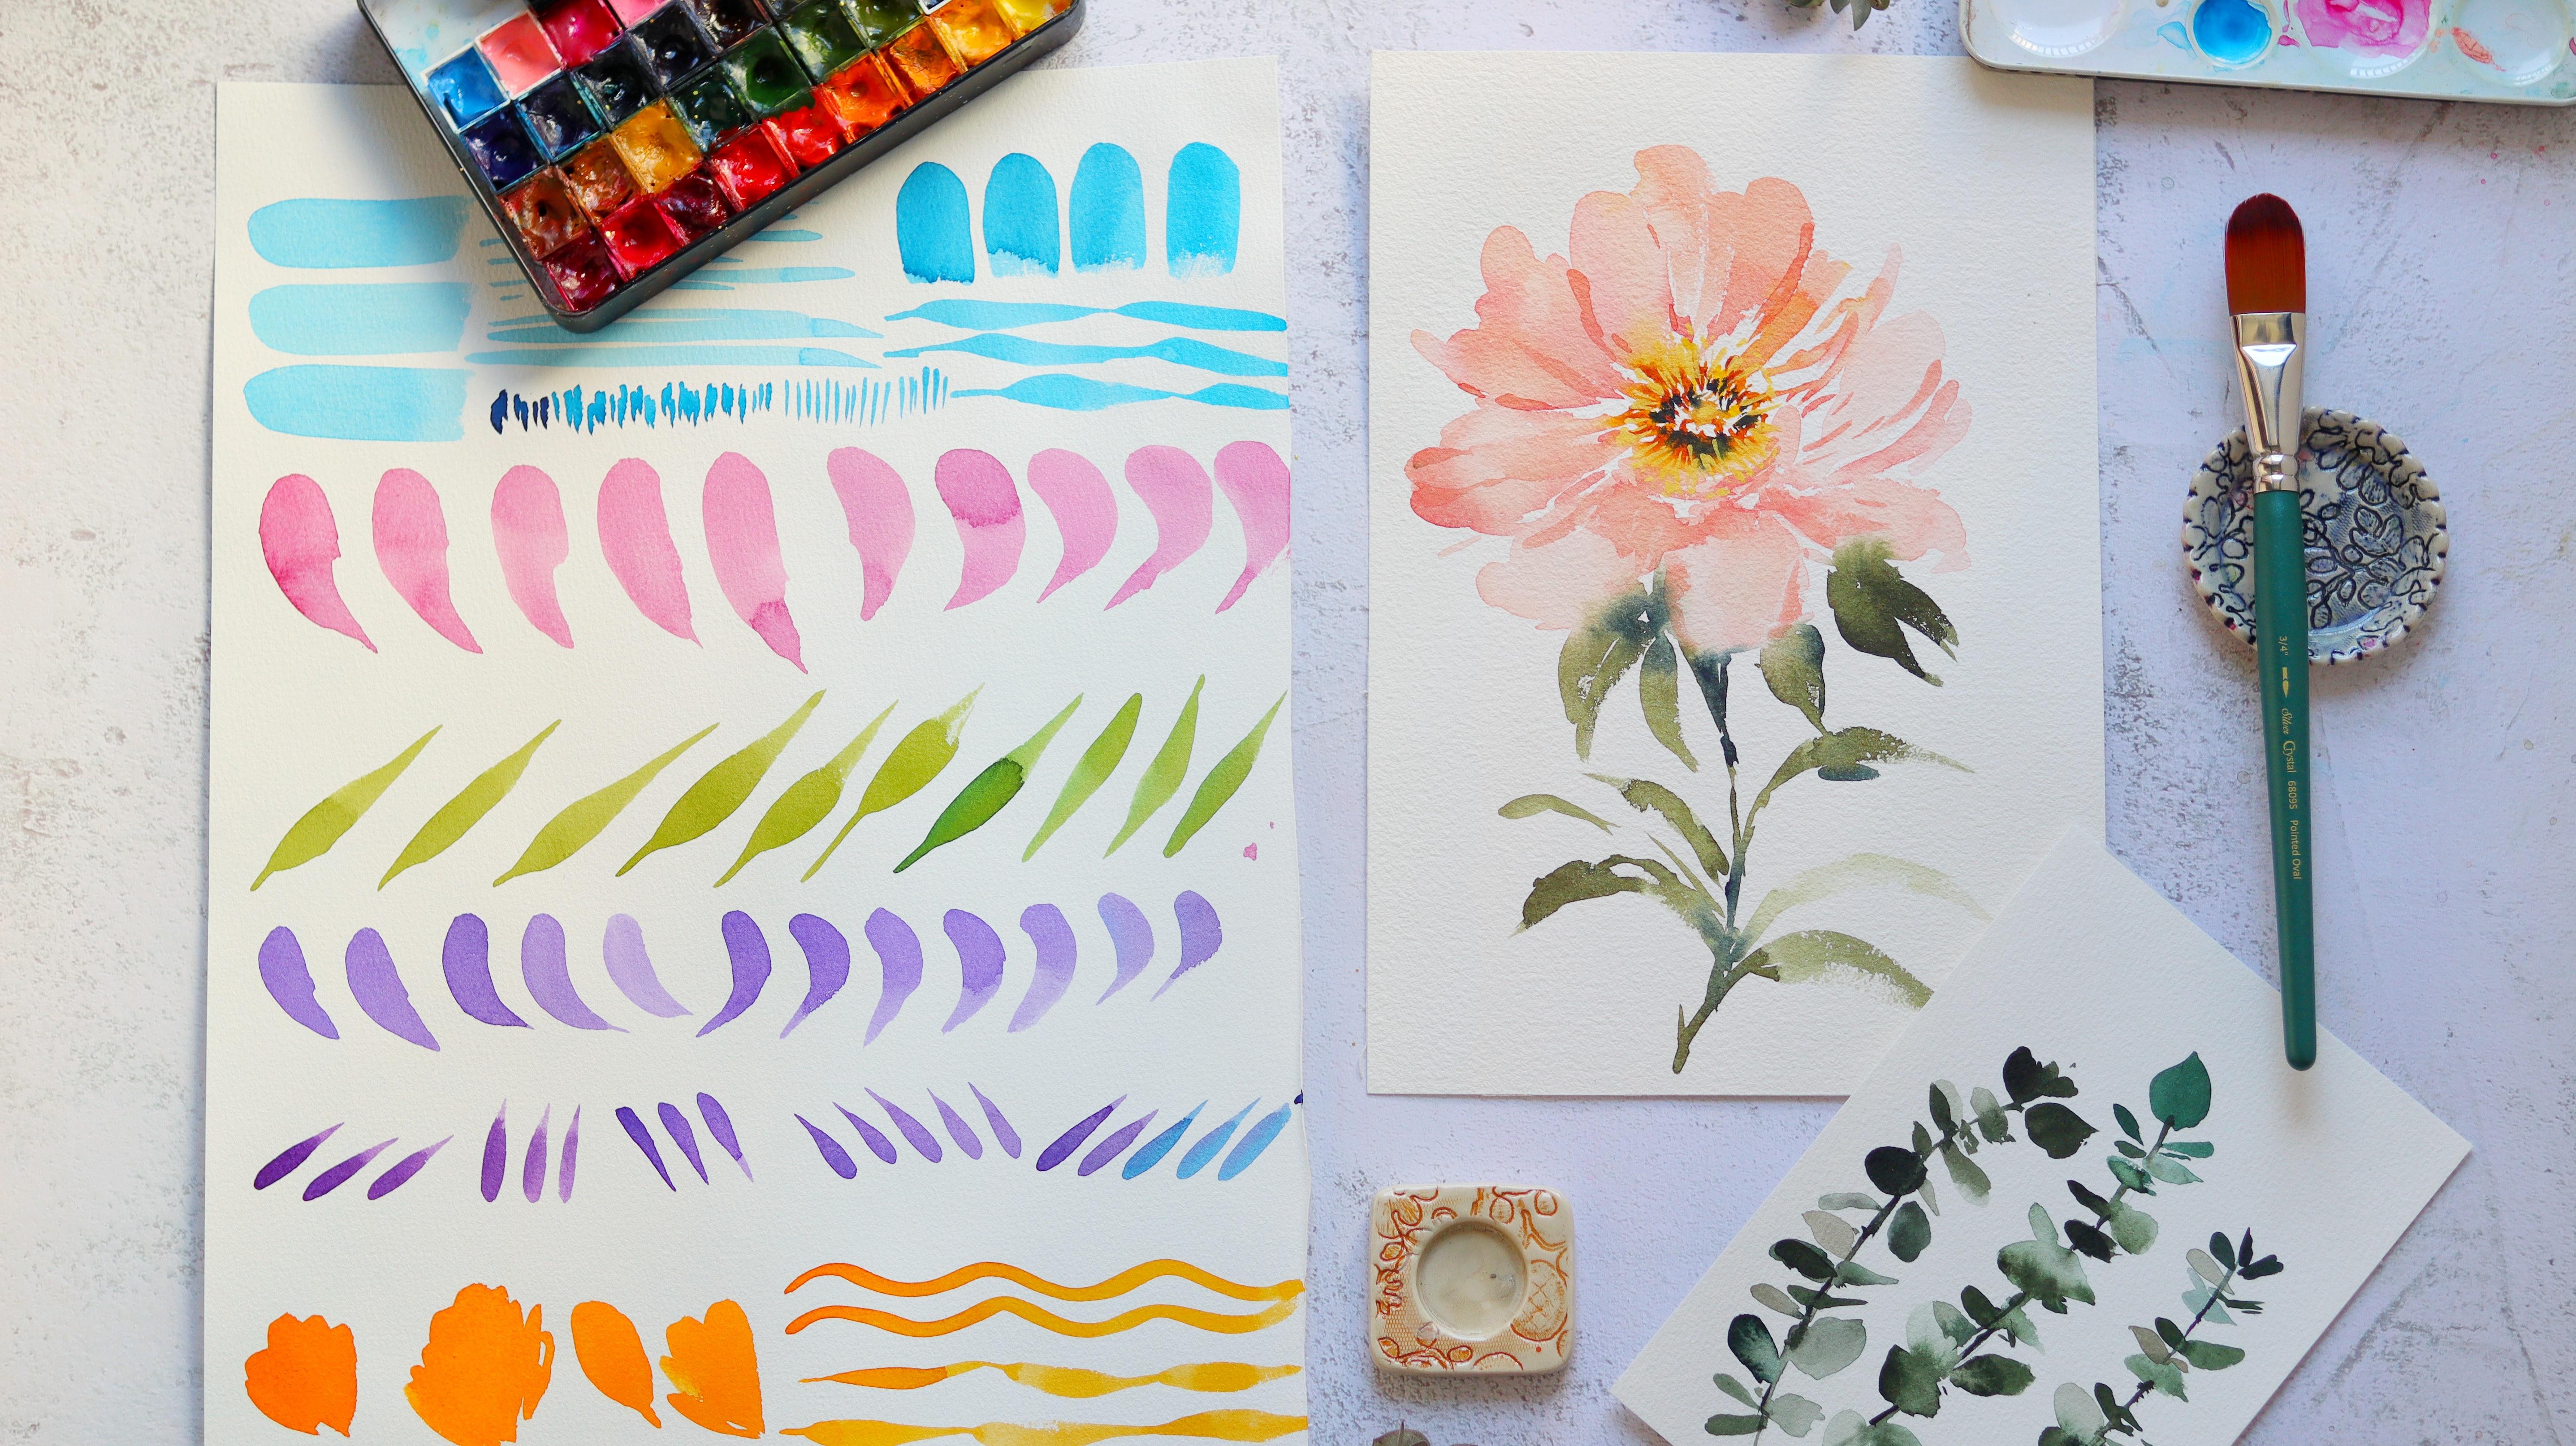
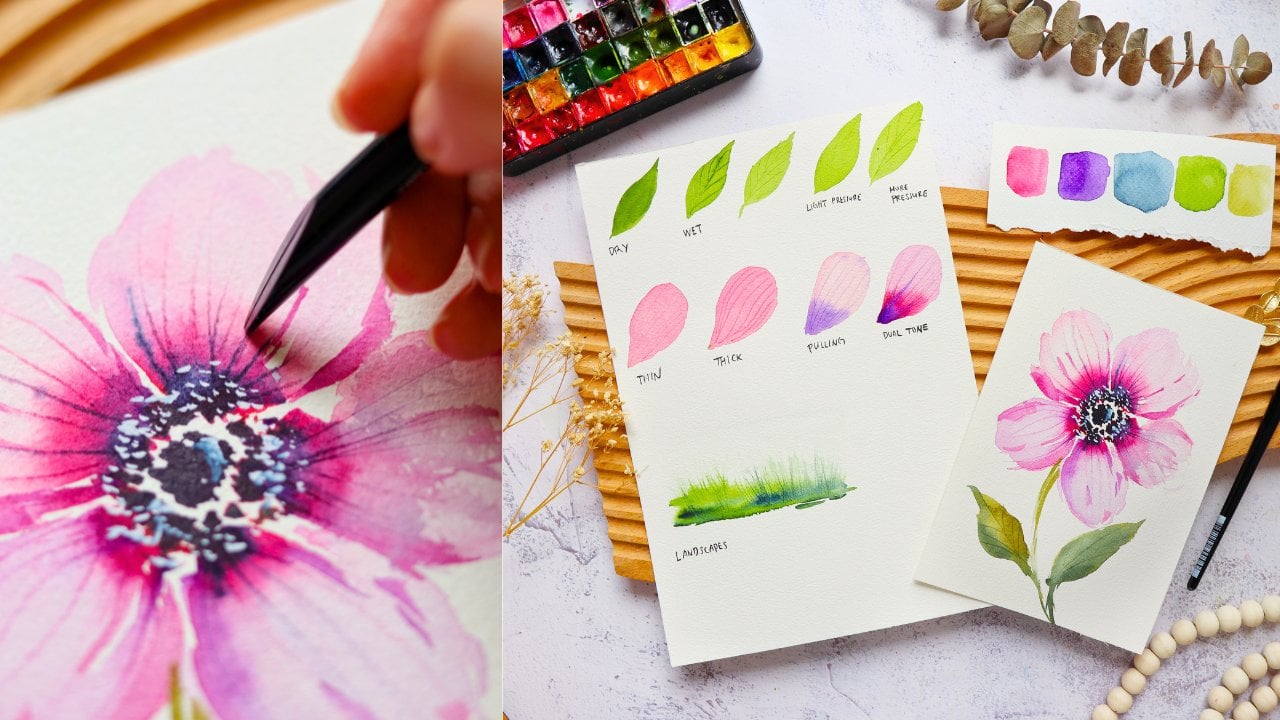
4. Round vs Filbert: So you are probably
familiar with a round brush because that's
what we use all the time. But now let's try
to differentiate these two brushes in terms of the strokes
that they can make. For the round brush, you can
see that nice pointy tip. On the other hand,
the fill brut brush has this rounded tip. So now let's try to
paint some strokes. You can use any color
in your palette. I'm going to use permanent rose, and I'm just going to
lay my brush flat on the paper and you'll see the
strokes that we can create. It has that leaf or
petal like shape. You can see that the
top part is pointy and it's just following
the shape of the brush. Let's now move on to
the filbert brush. Let's just grab some more paint and we're going to
do the same thing. I'm just going to lay my brush flat and just lightly
drag it down. You can clearly see that
the top part is rounded. That's one of the
major differences between these two brushes. You can see that you
can easily paint a rounded petal using
a filbert brush. Let's now observe
how the brushes work on the paper as we're
painting five petal flowers. I'm going to start
with the round brush. You'll notice that
with the round brush, we have to keep moving up and down to create these
broad strokes. It looks like we are building
the petals from scratch. That's why we have
to move up and down to create
these broad petals. But what's nice is that we can create some jagged edges using a round brush which
makes the flower look a little bit more organic. With a filbert brush, we can also move our
brush up and down, but you'll notice that
it's easier to paint the shape of the petal because the brush
is already rounded. So all you have to do
is to twist and turn your brush to create
different strokes. Something that I noticed with the filbert brush is that
the strokes seem more confident or it feels a little bit bolder compared
to a round brush. It's probably due to
the shape of the brush, and I think that beginners
can take advantage of that. I'm just trying to
wiggle my brush. You can still create
some jagged edge. You just have to be more creative when it comes
to using this brush. So it's more effortless
to paint using a filbert brush because you already have
that rounded tip. And I think that both are good brushes to try
if you're a beginner, but if you have been
painting for a while, I think using a filbert brush is a nice addition to
your art materials. Sometimes it's nice to try
a new brush that you can explore when it
comes to painting some more organic or
expressive strokes. You can definitely use different brushes in
a floral painting. So the aim of this
class is for you to incorporate Filbert
brushes in your style. All right, I hope that this
lesson was helpful to you. Now, let's move on
to the next video.
5. Getting to Know a Filbert Brush: So in this video, we
are just going to learn how to create
gestural strokes. So we are just going to explore different strokes by twisting
and turning this brush. You can see that
nice rounded edge, and that's going to give
us a different stroke. And then if you move
it to the side, you can see it tapers
down to a nice fine tip. So the size is
three quarter inch. It's a big brush that's nice
for painting fluffy petals. But later on, we're
also going to try out one half inch and also
three eighth inch. So we're going to try out
different sizes that you can also observe how
I use the brushes. So this is a big bruh, which means that it
also is going to absorb more water than the
smaller brushes. So this is something
that you might need to practice because if
there's too much water, then it might be hard for you
to paint certain strokes. I'm going to get
a cerulean blue. Use any color that you
have in your palette, and you can also use
student grade paper. This is just Pau Hong academy, so it's a student
grade paper because we're just going to play
around with different strokes. Now for the first few strokes, I just want to drag my brush. Just get a feel of that brush. It's like a nice flat stroke. You can play around and press your brush
even more so that the bristles will spread and
give you a broader stroke. Okay, now we are going to
use this tip over this edge. So you can see that I'm going
to hold my brush up high, and I'm just going
to drag my brush, create some thin straight lines. It's something that you
can also try to practice. I love doing these strokes
because you can also create an abstract art from
these gestural strokes. If I press my brush
a little bit more, you can see that the strokes are getting thicker. All right. Now, let's just grab
some more paint. I'm going to use
still cerulean blue. It's just a thicker mixture. So now I want to
add some texture. I'm just going to tap my brush, create these short strokes, and you can definitely blot out your brush if there's
too much water in it. So this stroke, we can
use it for the center of a flower or just to simply add some
texture to the petals. Instead of tapping, you can also do what they call slicing, just dragging my brush
in short strokes. This one will give
you a cleaner stroke. All right. Now, let's
use this brush and paint stroke from
the top going down. Whenever I'm using a new brush, I like to paint strokes facing
in different directions. That's going to
help me understand how to work with this brush. I'm going to use the side
of the brush and just press and then try to lift
and then press again. So I have that wobbly
style of a stroke. Now, let's just grab
a pink paint you can use other colors or
the same blue color. I'm just going to
press my brush and just slowly twist
towards the end. That's going to help create
a petal like stroke. Let's just try to
practice some more. It doesn't have to be perfect. We are really just playing
around with this brush and just trying to discover the
strokes that we can make. If it doesn't look good,
it's completely fine, we really are just having fun. Just going to paint some more strokes and play
around with different angles. I'm going to paint a curve
stroke from the right side. Just try to observe
how the brush moves and changes direction
as I go down the stroke. For me, that's what's interesting about a
filbert brush because you can twist and turn
your brush and create these beautiful
organic strokes. All right. Let's try a leaf like stroke because I'm
going to grab Sap green, and you can use any
green in your palette. I'm going to start with
the side of the brush and then just press and then lift. You can see we have
the two ends pointy. Let me show you that
in a different angle. Again, start from the bottom, and then you can see that
bristles will fan out, and then slowly lift. That's one of the
ways to paint leaves. So you can extend
the first stroke to create sort of a stem and then slowly press your brush to create
the body of the leaf. We can also start from
the top going down. This is just a nice play of strokes that you can
apply to your paintings. So this is going
to help you create some beautiful organic leaves. All right. Now let's
try this one half inch. A one half inch
brush will give you a little bit more control because the bristles
are smaller. I'm going to also paint that curve stroke
that we did earlier, but this time we're
using a smaller brush. I find it a little
bit easier to do this stroke using the
one half inch brush. But they, we are going to learn more about petal
strokes in a separate lesson. So I do get a little nerd
when it comes to introducing a new brush because I like exploring the brush and
what it can create. All right, so I'm just going
to repeat the process a couple of times and just play around with
twisting the brush. So you can also try to do this. Okay. We can also try creating a tear drop shape petal and it's going
to look like this. Just press your
brush and then lift quickly towards the end to
create that nice pointy tip. You can see that I'm
dragging it quite fast towards the
end of the stroke. You can try to do this stroke
facing in different angles. Let me show you
another one up close. It's actually quite fun and
very therapeutic to do this. It reminds me of the
petals of an aster flower. All right. We are just
really using the side of the brush to create
these small strokes. I think it's looking
really good. Now let's try a
different stroke. I'm going to use a
different color. For this one, we're just
going to try and wiggle our brush to create
a petal shape. You can have that
nice jagged edge. So we can make some
strokes, short strokes, and I'm just using the flat side of the brush to
create this petal. We can also do just
a simple loop, just one petal like this and you can have that
nice clean petal. Another way to have fun with a new brush is to paint
some wiggly strokes. I'm just going to do some
curve strokes like this. You can even do this
in different colors. It's going to look
like an abstract art. This stroke will
help you control the pressure in your brush. We're playing around with a light pressure and then slowly press your brush
and then lift again, then you're going to do the
process all over again. All right, so that's it.
I hope that this warm up exercise help you become more comfortable
with this new brush. Now let's move on
to the next video.
6. Petal Strokes: All right, in this
lesson, we are going to learn different
petal strokes, seeing a field bert brush. So we are going to explore
different petal strokes that I have formulated after using
this brush for a while. So these are my coined terms. I call them chunky strokes. So there is a twist, wiggle, and also a side stroke. Then we're also going
to do combination. For this lesson,
we're just going to use student grade paper. We don't need to spend on
expensive 100% cotton paper. We're just going to practice and going to use my one half
inch fill bred brush. We're going to do the first one, which is what I call
the chunky stroke. I'm going to grab permanent
rose for the chunky stroke. I'm just going to
lay my brush flat on the paper and let it
create that rounded shape. I would say that this
is an effortless way to paint a flower. Let's try to paint some strokes, just lay it down flat, and then drag it down. That's our first stroke. We can try to paint a
simple flower here. You can see I'm
just trying to move my bruh to the left and to the right and making it a
little bit curved as well. But I'm mostly just
laying my brush flat. Okay. Now let's try it again. I call this a chunky stroke
because you can see that the flower doesn't really
have a lot of movement. For this type of flower, I usually use it for fillers, if I want some small
chunky flowers. Let's just grab a
little bit of green, just to better visualize
that this is a flower. Of course, you can also leave some spaces in
between your strokes. This type of stroke feels
a little bit bolder. So when you see it, it's
a big chunk of petal, I guess it depends on the
style that you're going for. Okay. Let me just do one more flower so you can observe it a little bit better. You can see right here. I'm
also trying to build the petal by doing two
strokes in one petal. You can also do
that. Some strokes can also be overlapping. I'm almost done, and I'm just
going to put a simple stem again just to better visualize
that this is a flower. For the next stroke, we are going to do a
bit of twisting and a little bit of flick towards
the end of our stroke. You can lay it flat, move
it in a curve manner, and then flick towards the end. For this one, you can also
try to twist your brush, you can see the bristles are moving and then lift
towards the end, so that you have
that pointy tip. Now we can practice it facing
the other side as well. Let's just try to paint a simple flower again
using this technique. I'm just going to lay my
brush down and you can see that there is a little
bit more movement using this stroke because
we're trying to flick our brush and trying to twist the brush to create a
nice pointy tip. All right. So you can see right here, I also left some white spaces
in between my strokes. Hey, Let's try it again. I can see I'm just
trying to twist my brush and just trying to lift towards the end of the stroke to get
that nice sharp end. So with the chunky stroke, it's almost like
we're just stamping the brush on the paper. But with this twisting motion, we are trying to flick our brush to create some more
movement in our stroke. Next, let's do a
wiggling stroke. So I'm just going to lay
my brush flat and kind of move it up and down to
create that jagged edge. It doesn't really look
that good right now, but once you apply this on a
flower, it will make sense. So a flower that I would use this for would be an is flower. You can see that
nice rougfle edges. This is also a
stroke that you can do to create bigger petals. Let's try it for a flower. You can see I'm moving it
up and down to create one petal and I have those nice curves towards
the edges of the petals. I'm moving from the outside, going to the center
of the flower. This is also a
technique that I would sometimes use for
painting peonies. So you know that peonies have nice beautiful petals
that are usually big, so we can use this
technique for that. For this exercise, just
focus on your brush strokes. There are a lot of
puddles in this exercise, and that's completely fine. We're using a
student grade paper. So definitely those puddles will appear more compared to
using a 100% cotton paper. You can see that it's almost like you're dancing
with your brush, you can see the bristles
moving up and down. Next, we're going to use
the side of the brush. This is what they
call the side stroke. For this one, it's going to
give us a sharper petal, just like what
you're seeing here. I'm just laying it flat and just pushing it on the paper and
lifting it towards the end. You can see that I
have that rounded tip. Just press and then flick depending on the
angle that you want. This is an easy way to
create a simple flower. Usually, this is what I use
for daisy like flowers. Those open flowers with
a lot of small petals. You can also use this
for smaller fillers. Later on, we'll learn
more about that. Right now, I'm going
to do a combination stroke of everything
that we learned. I'm going to do
this chunky stroke. Then we're going to
use this side of the brush to create
some thinner petals. You can try to wiggle. All of these strokes that I mentioned here
are just guides. Of course, you can definitely try to paint using
your own style. Think of it as just
a warm up exercise and just so that you have
something to start with. You can see I'm starting
from the outer part of the petal going into the
middle part of the flower. With Filbert process,
you usually start from the outside going in to
the center. Okay, right? I'm just using the
side of the brush, doing a side stroke. So it's really nice when you try to twist and
turn your brush, you can definitely create
a more expressive flower. All right, so that's it
for our petal strokes. Don't worry because
in the next video, we are going to apply
this to painting some flowers and usually
for fill bird brushes, I prefer using it
for open flowers or pony like flowers that
have huge petals. So now let's move on
to the next video.
7. Floral Warm Up Exercise: Now that we have learned
the petal strokes, let's do some simple
warm up exercises and paint some flowers. So we're just going
to play around with different strokes. This is a no pressure
exercise. So just have fun. I'm going to be using the
one half inch filbert brush. I also suggest using
a bigger sheet of paper so that you have
more space to work with, and it just feels more free
to move around the paper. So first, I'm going to use
permanent yellow light. This is one of the ways that I paint a flower using
fill bread brush. So we're going to start
with the center and you want a more saturated center. This is a thick mixture, and I'm going to
use just a tip of the brush and lightly
just tap it like this. So you'll end up with a
lot of short strokes. This is going to be the
center of the flower. And then we're going
to rinse our brush, and let's grab yellow
ocher and some cpa. I'm going to mix
these two colors. I want a more muted
color and you want it to be light or a little bit
more transparent than usual. So we're going to
add more water. All right. So just play your
brush flat onto the paper. I'm going to press
it just like so. Torsam going to lift and it's going to touch the
center a little bit. So you can see
that yellow center is going to flow
into the petals. I'm just going to try
and twist my brush, create that pointy tip, and you can use a side stroke. Okay, let's grab
some more paint. I'm going to do the
one on the right side, just trying to move my hand from the outer part of the
flower going into the center. You can do a mixture
of combinations here. You can try to just
twist and turn your brush to create
some beautiful strokes. I'm going to leave
the bottom part open because we're
going to put a stem. I will be using Sap green with a little
bit of burnt umber. All right. So let's
drag it down. And I'm going to add some
nice strokes for the leaves. You can see I'm doing some
really quick strokes. This flower is looking
a little pale. I'm going to put
some burnt sienna in the center so that you
have more contrast. I'm adding this while
the base petals are all still wet. All right. So there you have
it, your very first simple flower using
a fill bird brush. Okay. Let's move on to the
second flower exercise. I'm going to be using
a bigger brush. This is a three
quarters inch brush, and let's grab some violet. This is called mineral violet. But you can definitely use other violet colors or even
any color in your palette. I'm just going to mix
that up on my palette, and we are going to
start at the top. This is going to be a more
expressive style of painting. So I'm going to lay my
brush flat and then lift, then use the side of the brush. And sometimes I'm just really
painting some lines or even some small dots.
That looks good. I'm going to grab a little
bit of that ultramarine blue. Now you can see I have a two
toned color for the petals. Now I'm just going
to rinse my brush and just add a lighter
color at the bottom. You can see I'm trying to twist my brush to create
that nice pointy tip. So we want the petals to
have different lengths. So some are shorter,
some are longer. And also, you can see that the petals on the
right side are shorter. The petals at the
bottom are longer. That would give the impression that this flower is at an angle. It's just a very simple trick that you can also
try to apply to your paintings to just add some movement or add a different perspective
of the flower. Of course, we can grab a
darker center for this flower. I'm using just the same color, it's mineral violet, but
it's just more pigmented. I'm just tapping my brush in the center while
the petals are all siilut Let's do another one that's more like front facing. The center is going to be in
the middle of this flower. I'm going to use indigo, and I'm still using this
three quarter inch brush. Again, we start at the top, and we're just going
to lay a brush flat and just drag it. You can see we have
one stroke there. I'm going to use the side of the brush to create
a thin stroke. Every time I finish a stroke, there's a little
bit of that flick so that you have a
nice pointy tip. Now, I'm just going
to rinse my brush, tap the excess water, and you can see I'm
trying to twist my brush from the outer part of the
petal going into the center. Don't forget to leave some space in between your strokes
and also in the center. It's also best to
change the value so you can see that some strokes are
darker, some are lighter. So I really love
the combination of those broad petals and the side stroke petals
which are thin. Alright, that was pretty
fast. Don't worry. We're going to also
add a second layer to some of the flowers just
for some more depth. Now, let's move on to
a different flower. I'm going to do a peony
like flower here, and we're using
the color shell p, which is a beautiful
pastel pink color. I'm going to start
with the front petal. So we are just going
to lay our brush flat. You can see that around the tip. That's really perfect
for painting peonies. Now let's move on
to the left side, and I'm still not really
connecting these two petals yet. And on the top, I
want this to be lighter so I put more
water in my brush. So I'm just lightly tapping
my brush onto the paper. And now I'm going to add
some petals on the right. And also towards
the bottom part. You can see that
I'm really pressing my brush onto the paper
to create a broad stroke. Okay? So you can use the side brush here and
just lift towards the end. All right. The shape is
looking really good. And we're trying to really
build this petal one by one. I'm just going to just press my pressure
create a round the tip. Next, I s grab a little bit
of this violet on my palette, and we can try to just
add it to some of the petals just
for some variety. I think it looks nicer
with a two to color. Now, for this stamen,
I'm just going to use yellow ochre or any yellow
color in your palette. We're just going to
tap it right here in the center and just
lightly stamp your brush. Just to create some
small gestural strokes. You can also grab a darker
brown color for more contrast. All right. It's
looking really good. Now, let's just play around
with some smaller flowers. I'm going to use a side stroke. So just use the side of the
brush and create some flicks. And now we can try to paint
just a simple flower. This could look
like a cone flower. So you can see all the petals are towards the bottom
part of the flower. We're going to put a small
circle in the top part, and maybe a little bit of that dark brown color just
to give it some contrast. Again, we're just
really playing around. It doesn't have to look like a certain flower
we have in mind. We just want to practice with
different petal strokes. Next, let's grab this
yellow orange color and you can definitely
use other colors. So you can try to paint some
smaller flowers as well. So you can see that I'm really
trying to twist and turn my brush to create
some movement. And your brush always ends up in the middle
of the flower. I think that's one of the characteristics of
using a filbert brush. So now I'm using a red color
and you can see that it's so nice to just play around with different shapes and
lengths of petals. It's going to feel more natural as you paint more
and more every day. I think at first, it's
going to be awkward to paint using a
fill bread brush, but that's all going to be
better when you practice. We're going to do
a second layer. I'm just using the side of the brush to create
some thin strokes. I'm using just mineral
violet as well, but you can see that it's darker than the first
layer that we did. This is also going to help
us build some contrast. I like adding these thin
strokes in between the petals or just to break up
some chunky petals. Okay, it's looking really good. It really depends on what
you painted as well. You don't really need to
follow what I'm painting here. I also want you to
practice on your own. Now let's grab some
darker indigo. I'm just going to also use
that side stroke and use the flatter side
of this fill bred brush to create
some small details. That's it for our floral
play warm up exercise. It's all about movement
and twisting your hand or your wrist to create some
beautiful organic strokes. Now let's move on to
painting some fillers and foliage that we can use for
our floral composition.
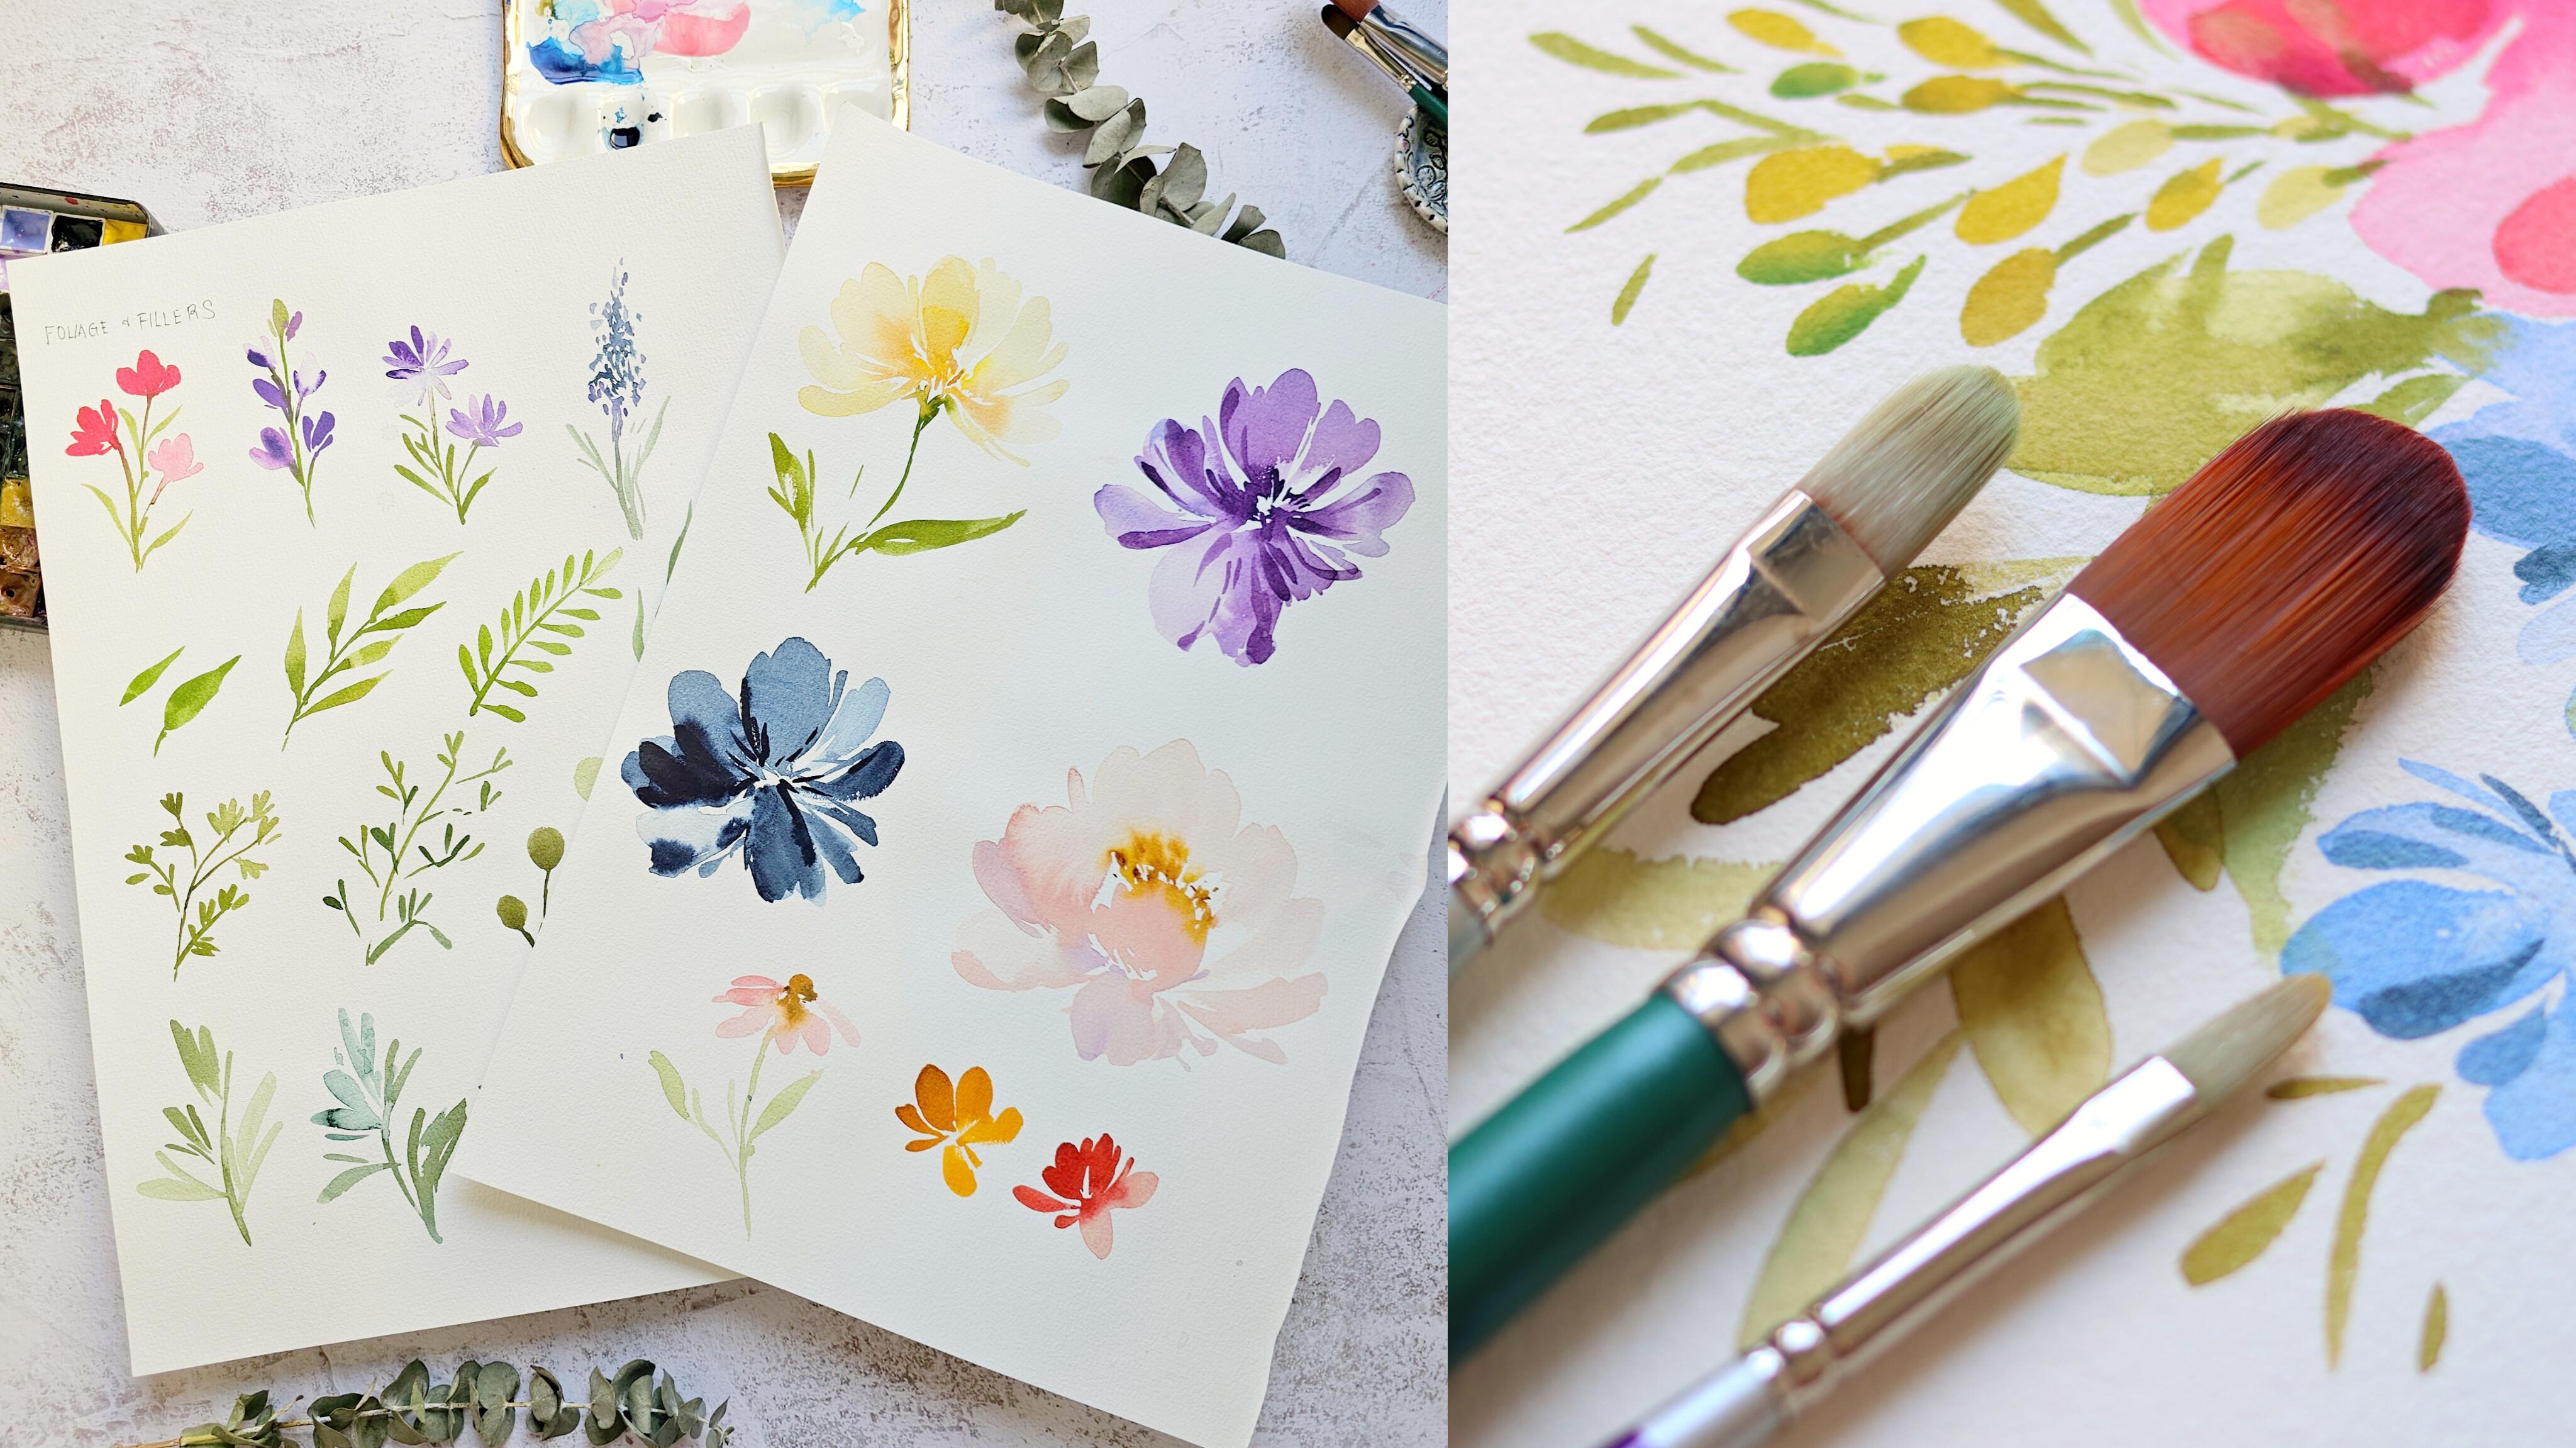
8. Foliage and Fillers: Foliage and fillers
are very important in a floral composition because it fills in those small white caps. You can use it to add
some more volume to the bouquet or even
extend a bouquet. You can also use this to add some contrast and make
the flowers pop up. In this lesson, we're going
to learn how to create foliage and fillers using
a small fill bred brush. This is a three
eighth inch brush and I'm going to just paint some simple flowers
that you can also try My default color is
always going to be pink. This is permanent rose, and don't worry you
can use other colors. We're just going to lay
our brush flat like this and just do some
combination strokes. I'm going to do a
side stroke and then maybe add a flat stroke, then that's going
to be a small bud. We just want a simple stroke that will make it look
like a small bud. It doesn't have to
look realistic. I think that's also
what I love about painting with Filbert
brushes because you can easily create gestural
strokes. All right. So now we have three buds here. I'm going to use a green color. This is just sap green and
just paint some stems. There you have it, you
have a very simple and easy to paint filler. You can even add
some small leaves just to add some volume. Now I'm going to this
is a lilac color, and we are just going to
paint another filler. You want to paint clusters of petals that are side
by side. You can see. I'm just going to
use a little bit of this violet and do a
side stroke there, do some combination strokes. We can layer brush
flat and then flick it and add some thinner
strokes beside it. Then you can also
rinse your brush to create a lighter value. When you're creating
these small fillers, it's also important
to change the value. You want some colors to be
darker, some are lighter. I'm just adding a little bit
of green towards the tip. All right, so you can go back
in with the darker color. And now I am going
to paint the stem. You can have fun and do this in different color combinations. Next, we can do some
tear drop petals using a side stroke. So we also practice
this earlier. Okay, so it's going
to look like an as flower or you can do
a daisy like flower. So you can even add another
color in your stroke, that's going to make
it more interesting. All right. So this looks good. You can also add a center color. You can add some
yellow. All right. So you can also do a flower
that is on its side. Once you have all the
flowers in the top half, just paint a petal
that is horizontal. I'm just going to add a stem
and maybe some small leaves. All right. This is
another style of filler that I love doing
with a round brush, but you can also do it
with a filbert brush. I'm using indigo, you
can use any color. So you just want
to tap your brush onto the paper to
create some texture. This is a really easy
way to add a filler. I usually use this type of filler to add some
contrast in a bouquet. So you can see this
color is quite dark. So if the bouquet looks
a little bit pale, I'm going to add this filler
using a darker color. So we can just add some
gestural leaves here. Okay. So now let's move
on to the next one. All right, let's go to leaves. So this is just a mixture of
sap green with burnt number. And next, I'm going
to mix another green. This is sap green with indigo. So it's going to be very useful to mix these
greens beforehand. We'll start with the Mg two
style of painting a leaf. You start with a light pressure, and then you slowly
press your brush against the paper and brussels
will fan out, and then you lift
towards the end. You can also do this
in two strokes. You start with the top half, and then you do the second half. You can see it's going to
be a bigger size of leaf. All right. So let's just try to practice going to
paint a thin stem, and then we're going to attach some leaves using
the same technique. So just start with the
light pressure and then just press and lift
towards the end, give it a little flick so that you have a nice pointy tip. So it's almost similar
to using a round brush. We can do a different variation, just paint a thin
stem and then try to paint some tear drop
leaves using side stroke, going to start from
the top and then go to the middle
part of the stem. You can try to vary
the colors as well. Some can be a darker green, some are lighter green. You can also try to vary
the length of the leaves. Because I'm right handed, this angle feels a little
bit awkward to me, but it just comes with practice. You can definitely do it. Even if you're using
a filbert brush, you can still paint
some elongated leaves, drag your brush and
do a flick towards the end of your stroke to
create a nice pointed tip. You can also try to wiggle your brush to add some
movement to the leaves. You can see on the
right, there's no movement and on the left, I try to wiggle my
brush a little bit. All right, let's do
another variation. So right now, I'm going to
do some cluster strokes. Again see I'm doing about three, four strokes in a leaf and
they all have rounded tips. This is another style of leaves that you can do
using a fill bread brush. Let's try another leaf type. These are all mostly
from my imagination. Right now, I'm going
to do leaves that are kind of further
apart from each other. The one on the left, we
did some cust leaves. This one, they are going
to be single leaves, so you can see that there
are spaces in between them. This is also a great way to add as a filler to your florals. So you can do this technique to lengthen a floral bouquet, so you can extend an
area using this filler. So this is another
way to paint a leaf, using a spill bird brush. So this is a more
rounded shape leaf. So press your brush
and just twist. And you can see that
the bristles are trying to fan out as you
twist your brush, and you can create this almost like a circle
or oval shaped leaf. It depends on how
you hold your brush. This practice that
one more time, and then you can just
try to fix the shape. I'm going to add the stem. So it almost looks
like a small balloon. This is another great filler
for your floral bouquet. And do a simple eucalyptus. I'm going to use the
side of the brush to create some side strokes, and you can see that they
look like flattened ovals. That's how I will describe it. You can also use the
broader part of the brush. Just try to the shapes
and also the colors. You can see some,
some are light green. For this next one,
we're going to create some gestural leaves. This is something that I do all the time with filbd brushes. I'm going to start from the
top and just move my brush, going to the center stem. You can see that we're
trying to also vary the length of the petals
or the leaves rather. It's a really fun way to play around with leaves
can change the color. So I'm just using mostly
the side of the brush. So these are side strokes, and they look more expressive because I'm
doing it quite fast. You can see sometimes I'm also starting from the
center stem going out. It's just a fun way
to paint leaves. You can also try to do this
and do some cluster leaves. Now with this technique, you are most likely going to have some rounded tip leaves, just like what you see here. But you can also start from
the center stem going out. I'm going to paint a thin stem
and then from the center, you go out and flick your brush and you get
that nice pointy tip. It's going to look a
little bit different. This style is giving me
some tropical vibes. All right, so that's it for
our foliage and fillers. I hope that you learned a lot
with these gestural strokes and that you can apply it to your floral
composition. All right. So for the next video, we are going to do
our first project. It's going to be a
simple painting of eucalyptus and going to
provide a live reference. So we're going to copy the leaves and try to
translate it on paper. So let's check out
the next video. A.
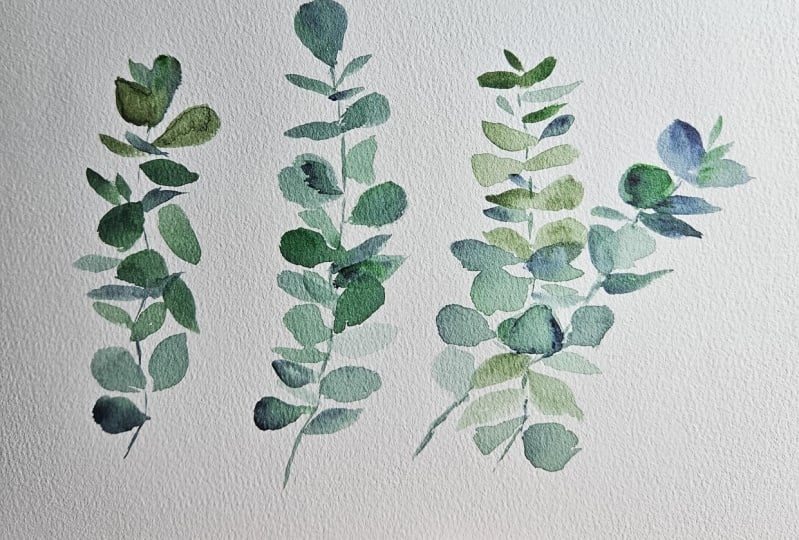
9. Project 1: Eucalyptus: Before we start
here is a list of colors that you need
for this project. For the first project, we are going to start with
something simple. We're going to paint
this eucalyptus, and you can see that the
leaves have a rounded shape. I think that is just very
perfect for our filbert brush, which also has a rounded edge. Now, what I'm going to
do is I'm going to mix the greens first
that we'll be using. First, I'm going to mix
hookers green with epa. This is going to give us a
more earthy green color. So you can mix
different proportions. You can mix more hookers
green or more sepia. Next, I have this
special color in my palette called
shadow green and it's just a nice muted
dark green color. That's how I would describe it. It's almost similar to perylene green if
you have that color. Next, I'm going to mix
hookers green and indigo, and then you're going to mix hookers green and paints gray. It's going to be
useful once you have all the greens in
your palette so that you can just
grab any of them and start painting. All right. I'm just trying to lay down
the eucalyptus on the paper, and I think we can
do three stalks. I'm going to start
with the first one and you can see that
it's a little bit curve. So I'm just going to use
a pencil and lightly draw a line that will
serve as a guide. I'm going to start at the top. I'm using hookers green and spa. I'm just going to follow
the shape of the leaves. I'm going to use the side of the brush and lightly
press on the paper, and we're just going
to change the angles. These leaves are a
little bit dark. Now I'm going to rinse my brush, tap the excess water and paint some light colored leaves
using side stroke. Okay, let's grab a
different green. I'm going to be
using shadow green and going to paint
a rounded shape. I'm just going to lay my
brush flat and then lift. Then we can try
to fix the shape. So when you look
at the eucalyptus, some of the leaves are
kind of on its side. So they look like a line
from our perspective. And to paint that,
we're just using the side stroke or the side of the brush to
create a thin line. And then you'll notice some leaves are facing
upward, just like this. This is a really
great way for us to practice using
a filbert brush. Next, we're going
to paint the stem. You can use the
smaller filbert brush, or you can simply use
a smaller round brush. This is a size four round brush. And of course, you can go ahead
and just dab some texture on the stems just to
make it more organic, can drop in some darker
color on the leaves. Okay. All right, let's move on to the
center eucalyptus. You can see that it's
taller than the first one. That's because we want to vary the heights of the eucalyptus to make it look
more interesting. And I just use my pencil to draw a line
that will serve as a guide. So to start, I'm
just going to mix Hogar green again with indigo. We're going to use
this color for this. I'm going to start
at the top again and I'm going to paint this
leaf in two strokes. I'm going to start from the
top and move our brush to the left and another one to
the right to form this leaf. The next two leaves look like just line from
my perspective, I'm going to use
the side stroke, just like this one on the left, one on the right, and then another one right
here in the middle. I'm just really
following what I see. At the same time, if it
feels a little bit off, I will adjust the
size of the leaves. I think that's the
beauty of having a live reference object. In this case, we have
eucalyptus stalk and you can try
to just twist and turn the leaves so that you can get a
different perspective, and you can be more creative
about painting this. Well, the leaves are still wet, you can drop in
some darker color for a more dramatic effect. Yes, I'm trying to vary
the pressure in my stroke. You can try to press and then lift to create these
rounded leaves. You can also try to wiggle your brush to create a
more irregular shape. The last two leaves at the
bottom are a bit dark. I'm just going to
rinse my brush and paint leaves that have
a lighter green color. So it's really important
to change the values in a single stalk so that it
will look more interesting. I'm pretty happy
with how this looks. We're going to just
paint a stem and I'm going to use the tip
of this fiilbri brush. But again, you can use a different brush
to do this as well. Okay. Look at your
painting from afar and try to observe if you still need to add
some more leaves. This one looks a
little bit watery. Let me grab some tissue paper, blot out my brush and just try to absorb the excess
water on the paper. We have the last stalk. This time, it's
going to be a bit shorter than the first
two stalks that we did. You can see that
I really tried to vary the height of
all the stalks. Let me just grab some
more shadow green. Again, you can use other
greens in your palette. Let's start at the top. Again, you can see that we
have some really small leaves. I'm just going to lightly press my brush and try to mimic that. You're also facing upwards. So I'm trying to
adjust the angle of my brush to try and
paint the same leaves. So now let's just rinse our brush to create a
lighter green color. So I'm just painting some thin
lines using a side stroke. Let's switch to a
different angle so you can see it better. You'll notice that it's just the tip of this
filer brush that's moving and it may feel a
little bit repetitive, but I think it's quite relaxing
to paint these leaves. This is all about mark making. You can see I'm trying
to twist my brush and stamp my brush or
create some flicks. Okay, now let's paint
a line for the stem. While the leaves are still wet, I'm just grammy some
darker green color and just dropping it in randomly
in some of the leaves. And I'm doing this to add some more contrast in
certain areas of the leaves. Right now, I'm just adding
some finishing touches. But if you're already happy with what you painted,
you can stop there. I'm just grabbing some
really light colored green. I added a little bit of brown
just for some variation, and we are just going to paint some small leaves to just
fill in those white caps. All right. Let me switch
to a fibre brush. It just feels easier to paint the eucalyptus leaves
using a filbert brush. You can see I'm just
trying to paint some light colored leaves. All right, so I think we're done with this eucalyptus painting. It looks really beautiful. It has that minimalist feel, and I hope that you
enjoyed painting it. Now let's move on
to the next project as we paint a
single temporarily.
10. Project 2: Single Stem Peony: Before we start here is a
list of colors that you need. So for our second project, we're going to paint a
simple single stem pony. I liked using this
book as a reference. This is from the
flower color guide, and there are so many
pony photos in this book. So if I grab a filbert brush, you can see that it's
just perfect for painting the petals and you have
that nice rounded tip. It is going to make
it easier for us to paint the beautiful
fluffy petals. All right, aside from this book, we can also look into Pinterest. There are so many beautiful
reference photos of single stem ponies and you can grab different photos that
catches your attention. What I'm looking for is a photo with an open pony like this, so you can clearly
see the petals and it's not too
curled or covered up. I'm going to start
with the center. We need to use
permanent yellow light or any yellow in your color, and we're just going to
paint short strokes. I'm just using the tip
of this fillbert brush, so it feels like we're slicing the strokes on the paper to
create these short strokes. Now, let's grab a nice
pastal pink color. This is called shell pink. It has a white in it, that's white looks a bit creamy. I'm going to grab permanent rose and mix it with a
little bit of yellow ochre. In order to achieve
that soft petal, we want to use soft
colors as well. And what I do is I add more
water in my paint mixture. Okay. I think I'm going to grab some more shell
pink as a backup. So it's nice to just mix the colors on your palette
before you start painting. From the top, lightly press your brush and lift
towards the end. I'm just going to lightly
touch that yellow center, and then you can try to use
the side of your brush, create a curve stroke. I think we can add
a little bit of burnena in our mixture. So I love changing the
colors in the flower. It's going to look a
little bit more brown. Just lightly press your brush and then lift towards the end. Our anchor point is
always the center. I'm always going
back to the center. Just press your brush, make a curve stroke and then
lift towards the center. Let's do a horizontal stroke. Ming just the side of
my brush to create this cup in the reference photo, you'll notice that there are petals that are a
little bit curve, and that's what we're
trying to mimic here. Let's do another petal
on the right side. I'm just going to press and
then twist my brush and then lift towards the end
to create a pointy tip. You'll notice that all the
petals have that rounded edge, and that's because of the
shape of the filbert brush. If we were to do this
using our round brush, the petals will look a
little bit different. Let's just twist and then
pull our brush towards the center and we're almost done with the base layer
of this pony. Is going to drop in
some pink color, and we can try to
adjust the size of the petals and the length as
well while it's still wet. I'm going to mix permanent rose with a little bit
of that burnt sienna, drop it in between the petals. This is going to give us a
lovely effect once it dries. Now let's move on to painting, the stem, and the leaves. I'm going to be mixing Sap
green with burnt umber. But later on, I felt
like it needed to be Tarker I added some indigo. Another option would be to use shadow green or
maybe pine green. Because we have a soft flower, we want to highlight that
by adding Tarqu leaves. You can see I'm just adding some leaves near the bottom
part of this flower. Next, we're going
to add the stem. Instead of painting
one straight stem, I'm going to do
some dotted line, and I'm not going to
fill it in right away. That's going to
give me flexibility when it comes to
adding some leaves. Let's just create
some gestural marks. Let's add some leaf over here while the
petal is still wet. You can see that the colors
are blending with each other. That's going to make
a beautiful effect. I'm using a half inch brush and you can see that I'm just trying to flick towards the end. I even have a little bit
of that dry brush effect. You can try to dab your brush in a tissue paper if you
want that effect. While the leaves are still wet, let's grab some
indigo and just drop in a darker color in
some of the leaves. It's looking really great. Now let's move on to adding a second layer
to this flower. So I'm going to grab
permanent yellow deep or just a darker yellow. And as I'm adding this I feel like we need to
add more contrast. So I decided to go
with burn sienna. I'm just going to add
that in the center, using a tapping motion. I. Let's just add some
gestural mark in the center. I'm just going to grab a
little bit of print sienna and just dab my brush
or stamp my brush on the paper. Okay. Let's just grab some indigo, and you'll notice that
it's really dark in color. So I want this mixture to
be a little bit dry to create some more intense
stroke or sharp strokes. You'll notice in this
picture that you have some shadows in the petals and we're going to
try and mimic that. I'm going to use my
one half inch brush, and we're going to
use the same mixture. It's just slightly
darker than the base. This is permanent rose
with yellow ochre, a little bit of
that burnt sienna. Now, make sure that the flour is already dry as
you're doing this. I'm using just the tip of my brush and creating
some elongated strokes. The brush feels a
little bit wet, so I'm just going to dab it in a tissue paper so that I have more control
over my strokes. So you don't want the color
of the second layer to be too dark or else it
will look very heavy. The purpose of adding a second
layer is just to enhance the overall look of the flower
and just to make it pop. Okay. I also add these lines to separate
some of the petals. Usually start from the tip of the petal going
to the center. Now, it might be a little bit difficult if it's your
first time to do this, but it's going to be
way easier once you try to practice adding second
layer to your florals. It's going to be feel
more natural as you add these gestural
strokes or mark making. I think we can add
a pop of color in the center and I'm going to use white gash and mix
it with yellow. This is a technique
that I actually use for a different class. If you have seen
my poppies class, I mixed gash with yellow, and we're going to create
this nice opaque color. I'm going to create
short strokes, but you can definitely
skip this part if you don't want to add it
or if you don't have Gosh. Let me show it to you up close so you can
see the details. Something that I have
noticed when it comes to painting on is that it's more effortless to paint
the petals if I use a filbert brush compared
to using a round brush. So I hope that you can try out this project using a different reference photos
that you can practice. Okay. Now let's move
on to the next video.
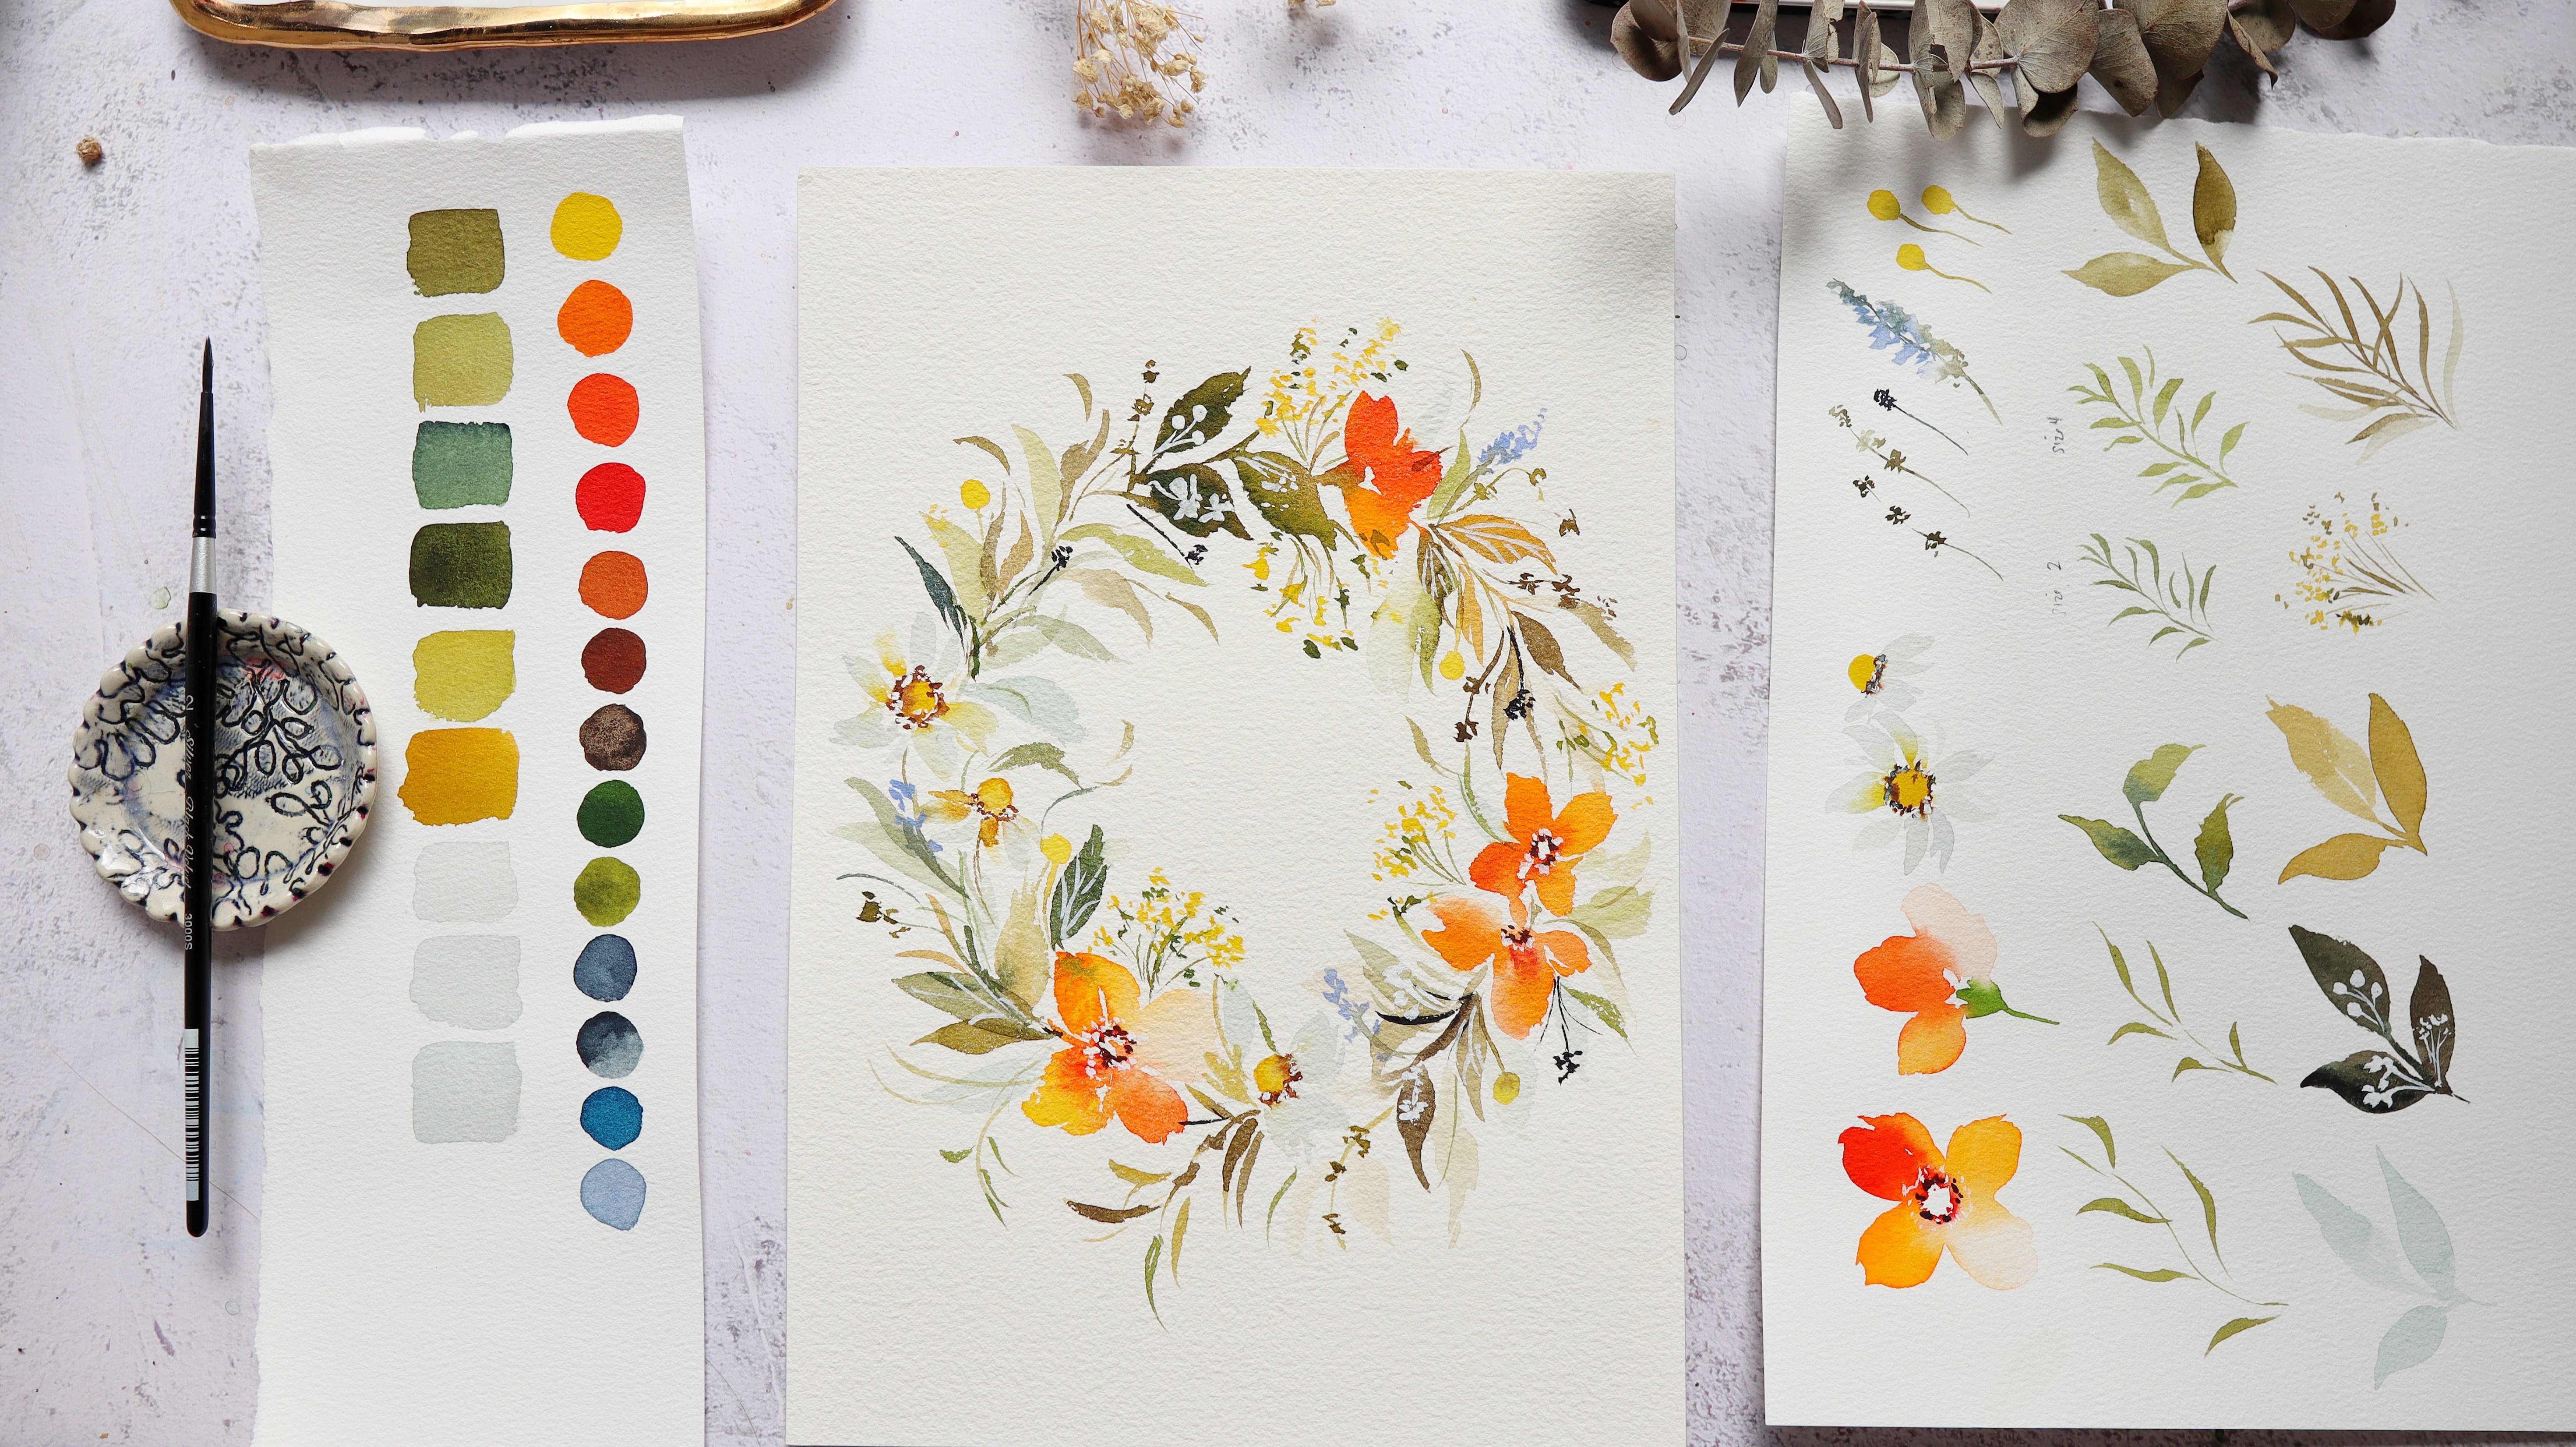
11. Floral Composition Guide: Learning about
floral composition is important as it ensures that your paintings are visually appealing
and well balanced. Here are some tips to
help you transform that blank paper into
a beautiful artwork. So let's start with
the first step, and that is to start
with the focal flowers. So the focal flowers are the largest blooms in
the floral arrangement, and this is the
star of the show, and it will get the most
attention in a bouquet. So it can be one or more depending on the
size of your paper. I would suggest to
vary the perspective, like some top facing, some more side facing. You can start in the
center of the paper. I think that would be the safest if you are just
starting out with painting so that you
have the flexibility to move up or down or go
diagonally across the paper. Some examples of focal
flowers are sunflowers, ponies and roses
and also dallias. After you have laid
down the focal flowers. Next, we're going to go in and paint some secondary flowers. So the secondary flowers are smaller than
the focal flowers, and in a floral composition, these secondary flowers
complement the focal flowers. So we're adding this because
we want to vary the size of the blooms to make it look more interesting
in an arrangement. So in this example, I put some smaller bluish
flowers near the main flowers. Some examples are cosmos, sweet peas, and
anemone. All right. So when you have
all the flowers, now we're going to
add the fillers and some textural flowers. So the fillers add
volume and fill in the small spaces in between the focal and secondary flowers. It can also be used to adjust the height and shape
of the bouquet. So textural elements such as berries can provide contrast or add another color
to the bouquet. So adding these fillers
and textural elements, it creates a less flat painting. So I personally like
adding these bits and pieces of fillers
because it adds a movement to the bouquet and adds some air or it lets
your bouquet breathe. Okay, let's move on to the
last part of this guide. Let's add leaves.
Adding leaves is important because it complements the color of the flowers. Leaves can also create depth and dimension by placing it in
the foreground or background. I personally use leaves to
make certain flowers up. And the same way as fillers, we can also use leaves to
add movement to the bouquet. Like any other scale, mastering floral
composition takes practice. Keep experimenting and
exploring different approaches. All right, I think you're
ready for the next project. Let's move on to the next video.
12. Project 3: Focal Flower: Before we start, here is the list of colors
that you need. For this project, we're going to follow the floral
composition guide. That was discussed in
the previous lesson. It will be split into four
parts. This is the first part. We're going to start
with the main flowers first of the bouquet. I'm going to use this
book as a reference. This is a very beautiful photo. It has that spring like vibe. I want to grab the
colors that I see here. There are soft pinks, and then there are bluish
violet secondary flowers. Then you have beautiful
fillers as well. So when you're looking
at a reference photo, you don't really need to follow all the
details that you see. So you just grab things
that are speaking to you or even just grab the colors of that reference photo and translate that into
your painting. Now, let me grab
some permanent rows, and we're going to paint
a beautiful open pony. This is front facing. I'm going to start
at the top and then slowly work my way down, and then I'm going to lift and then use the side of the brush. Then just try to flick towards
the end of the stroke. We want to vary the shape
and the size of the strokes. Let's do some on the sides. You can see that I'm painting
some thin strokes as well. You can rinse your brush. I'm going to do
the bottom petals. Just trying to twist
and turn my brush. I'm also leaving
some white spaces in between my strokes
to separate the petals. You can see I'm just moving
it in a circular manner, making sure that the
center is open or that it doesn't have details for
now. So it's just white. For some contrast, I'm just
adding some darker or more pigmented permanent rose in between the petals and
also near the center. So you can blot out your
brush if it's too wet. For the paper, I'm using
100% cotton paper. This is Artist's grade paper. So it's quite forgiving
when it comes to painting flowers with more water compared to a
student grade paper, which might rest to some
patchy areas or hard edges. Let's do the second flower. It's going to be a
lighter pink color. This is called brilliant pink. You can add some more water if you want it to be
lighter in color. I'm going to paint a peony
that is on its side. Let's do the front petal. I'm just dragging my brush
and just trying to flick towards the end so that I can get the desired
shape of the petal. Now let's just change the angle
so you can see it better. Now on the right side, I'm just using the rounded tip
and then dragging it down, going to this front petal. You can see that the color
I'm using is really light. Now let's move to the left, and I'm painting
the petals here a little bit higher than the
very first one that we did. So now I added more
water in my brush. So I want this to
be really light. So when you're looking at
the flower at an angle, the front part is going
to be darker and the one at the back or the petals behind it, it's
going to be lighter. Let's continue to add some
more strokes to fix the shape of the overall flower while
the petals are all still wet. So the bottom part
of the pone is supposed to look like
a cup or a letter U. So right now, it
feels like we need more contrast and
separation from the petals. So I'm adding a few
more strokes that are darker or more pigmented. All right, so it's
looking really good. I'm going to grab
a little bit of permanent yellow light or use
any yellow in your palette, and I'm going to mix that
to the pink in my palette, and I'm just going
to add more water. I want this to have
that peachy color, and that's going to give it a good variation in
this floral bouquet. All right. Let's start
with the bottom petals. I'm going to start right here and then pull
my brush downward. And you can see that
beautiful rounded petal. It's just so easy to
paint pony petals using this brush because
you automatically have this curve petal. I'm just going to
do the top part. It's going to be very loose, so we don't have to be very strict about it,
looking so realistic. Now, let's just paint
a few more petals to close this flower. You can see that I
tried to also rotate my paper so that it's
easier to paint. Since the position of the flower is a
little bit different. As I'm painting the petals, I'm also trying to grab different colors on my
palette. You can see. Some have a tinge of that pink, some are more peachy, and that's going to
give it a great look. Let's put the stamen. I'm going to use
permanent yellow light, but you can use any
yellow in your palette. I'm just going to dab my brush, using the tip of the brush so that you have nice,
short strokes. Now, if the petals
are still wet and this yellow is going to
bleed into those petal, and it's going to look great. But if you don't want it
to bleed into the petals, wait for the petals to dry. So this center flower
here is already dry. We can see the yellow
stamen is not really moving into that
pink petal anymore. Okay, so that's it
for the main flowers. Now let's move on
to the next video as we add the secondary flowers, and you can see I'm already
mixing the colors here. But let's check out
the next video.
13. Project 3: Secondary Flower: Okay, let's move on to
the secondary flower. So right here, I'm
using verdicre blue, but you can use other muted
blues in your palette. Or you can simply
add a little bit of white so that you
get a pastel color. So I'm going to paint
some smaller petals here. They will look like
five petal flowers. I think they also look a
bit similar to cosmos. I'll try to just move
the angle of your brush so that you can create petals facing in
different directions. I'm going to add a little bit of lavender for some variety. I'm going to add clusters
of the secondary flowers. This is going to complement
the main flowers. You can see I'm just really pressing and then trying to lift towards the end of the stroke
to get a more pointy tip. Okay. And then sometimes
you can paint using just the side stroke so that you have a pthals that
are on the side. Now, let's just add a
green color in the center. Going to dab it in the center while the flowers are still wet. I'm just trying to follow what I see in the
reference photo. Now let's add some stem. I'm using this three
eighth inch brush, but you can also use a round brush for a
more precise line. It's looking really good. I think the color is also complementing the pink
flowers very well. Dig to across this. We're going to add the
same secondary flowers. Just try to flick your
brush and try to pull and it's just a fun way to create expressive
smaller flowers. I really love
experimenting with this. You can even add another
color if you wish. And I also like adding some
really thin strokes and also small dots and just making the flower
look like it's dancing. Let's do one more that's
facing on the side. I'm going to start right here
and try to pull the brush. You can create that
nice tear drop shape and then going to paint
this horizontal stroke. Now, I'm using sap green, and let's just tap that color in the center of these flowers. You can also change the color. It doesn't have to be
this bluish purple color. You can definitely add
some yellows or oranges. To lessen the pressure of
painting a floral bouquet. Sometimes what they do is I just paint something more repetitive. The secondary flowers are just diagonally
across each other. I painted them in
roughly the same way, but they still look good. So you don't always need to change things too
much in my opinion. Eventually, through practice, you will learn to instinctively add or place these flowers
in a more natural way. Okay, now let's move on
to the next video as we add some foliage and
fillers to our bouquet.
14. Project 3: Fillers and Leaves: Now that we have
our main flowers and our secondary flowers, it's time to add the
leaves and fillers. I can see in the reference
photo that there is a small bunch of leaves
that are really, really cute, and I'm
going to add that. I'm using greenish
yellow with some white gosh just to mimic the colors that I see
in the reference photo. Using my three
eighth inch brush, I'm going to paint these tear drop shapes
using the side of my brush. I'm just trying to
press my brush and just adding these small tear drops
in different directions. I'm also trying to
change the value. You can see some are
lighter, somewh darker. I want this to look quite full, so I'm just going
to add some more. This is looking good, but we need a little bit of contrast. So I'm mixing sap green with sepia to get a nice
dark green color. I'm just going to
add some steps. And then we can also
add a few leaves. I also like adding leaves that are not attached to the bouquet. So it's going to
make it look loser. Let's now switch to
a half inch brush. I'm just going to
grab this is just, and we're going to add
stems and also leaves. All right let start here at
the bottom, and you can see, I'm trying to move my hand and just trying to see where
I should put the leaves. I'm going to rinse my brush to create a lighter colored leaf. This is really fun to do. I just added a little bit
of yellow in my brush. You can also add
different colors to complement these flowers. Just holding my brush lightly, and just trying to move
around and add some leaves, and I want the leaves to
have that pointy tip. I'm trying to flick my brush towards the end of the stroke. Then you can grab a
darker green color and add it towards the
base of the leaves. That's going to give
it a little bit of drama and just more contrast. Right here, I'm just adding some leaves near
the main flowers. That's going to help make the
flowers pop up even more. This part right here on the
left looks a little bare. I'm going to just add
the same fillers. These are the tear drop leaves. Again, feel free to
duplicate some of the leaves or fillers
or even flowers. It doesn't have to be too
different all the time. Sometimes using
simple fillers and flowers can make a
painting look great. Just make sure that
you have spaces in between your strokes, and you can see I'm trying
to also change the angle of my brush so that I get different
thickness of the leaves. Now let's attach them
all to a stem Now, these tear drop shapes are actually quite difficult to
achieve with a round brush. So you can definitely
use this technique for your floral bouqse using
a smaller filbert brush. One of the goals of this class
is for you to learn how to incorporate a filbert
brush in your own style. Let's paint some
expressive leaves. I'm going to start with a
stem and then I'm going to create quick strokes going
into the center stem. This way, I'm going to create some rounded leaves
instead of pointy leaves. Use a side stroke and flick
towards the center stem. Okay, so I think I
need a pop of color. So I'm going to use yellow, and I'm going to mix
it with a little bit of guash, but that's optional. So I just want pops of
small yellow fillers. So I'm just going
to stamp my brush to create these
petal like strokes, and I'm just going to scatter it all throughout the bouquet. All right. So now let's move on to adding some finishing
touches and some layering.
15. Project 3: Finishing Touches: For part four, we are going to add some finishing
touches or some layering. So for this mean flower, I'm going to use just some
more pigmented permanent rose. I'm going to paint on top of the first layer, but
at the same time, I'm making sure that I'm leaving spaces in between my strokes, so you can still see
the first layer. Now let me grab
some crimson lake, and this is going to add some
contrast to this flower. So I'm adding it in
between the strokes and also near the
center of the flower. It's going to give
us a nice contrast. Next, we can grab
a smaller brush and get some
permanent yellow tap. I'm going to add
some stamen right here and it's going to
make the center pop up. I'm just following what I
see in the reference photo. In the center, there's around four small oval
shapes using green color. Now, let's grab some burnciana. I'm going to add some more
definition to the stamen. I'm just dabbing my brush to create these short thin strokes. I'm also going to add some
more permanent yellow deep in the center of the
other two flowers that are facing on its side. So that is will
look more balance. I'm not going to add more
details or a second layer to the petals of the two
pale pink flowers. If I add some more
details on their petals, it's just going to
overpower each other. And what I want is
for you to just focus on the center flower. It feels like there's
some contrast here. So you have a more detailed
center flower, the pink one, and then you have some
lighter and softer pink that's complementing
the center flower. Now, we can also add some contrast to these
small blue flowers. So I just makes the same
mixture of verdicre blue, just make it more concentrated. So I'm just lightly
tapping my brush, creating these gestural strokes. Now, you don't
need to overlap on all the first base petals. I'll just add enough contrast. So I think I use a little
bit of indigo here to get that darker color and just paint lightly
because you don't want to make the petals look
like they're overcrowded. Now, we can grab
indigo and add it to the center of these flowers. Now, I'm onto the
finishing touches, so I'm painting some
leaves to either extend some areas or just
add some more detail. You can take a photo of your painting now
and look at it on your phone so that it will give you a
different perspective. If you've been
painting for too long, then you'll get used to
the floral placements. Okay, I think we're. Congratulations for finishing
your final project. I hope that you enjoyed painting these
flowers step by step. Now let's move on
to the next video as I share my final thoughts.
16. Final Thoughts: As we wrap up, I want to thank
you for taking this class. To sum up the class, we have learned the differences between a round brush
and a fill bird brush. We explored mark making
using a fill bird brush. Next, we also learned how to paint petal and leaf strokes, along with some floral
warm up exercises. There were also important
tips discussed on floral composition that you can apply to your own paintings. For the class project, you can follow the projects that you painted in this class. Or you may create your
own plural composition in your own style using
a fillbert brush. Just feel free to use your
own creative interpretation. I look forward to
seeing your projects in the project gallery
section of the class. Simply take a photo
and upload it there. Under the projects
and resources tab, hit Create Project
to share your work. I'm excited to offer feedback
and words of encouragement. You can also tag me on
Instagram using my handle at Jolly Poa and use this hash
tag so I can see your work. Leaving a class review
would mean a lot to me, and it will also
help others discover how this class help you in
your watercolor journey. You may also check out other
watercolor floral classes on skill share for
more inspiration. So that's a wrap, I will see
you in my next class by.
 Joly Poa, Watercolor Artist