Transcripts
1. Impressionist Water Introduction: Have admired impressionist
painting and in particular, how the impressionist created such beautiful effects
with light on water. We think of Claude Monet painting the sea or
the seine River, beautiful light effects, reflections, colors,
sparkling light. He loved painting water, and we love it, too. Impressionist painters are
always looking for ways to make the water in their
landscapes look even better. Now, this short lesson is going
to focus exactly on that. I'm going to share
with you a couple of my most important
tips, five tips, actually, that will
help transform your paintings and your
impression of water. Now, we're going to go into this with a short demonstration. I'm going to focus on the water. You're going to get a
little bit of a bonus tip on how to paint boats
in the water, as well. There's a reference for
you a beautiful reference. Download it, have a go
with the painting as well, and focus on the light
effects on water, as I show you in the lesson. I'm sure that this is
going to help you with your next impressionist painting of water as well.
I'm Malcolm Dewey. I'm a full time
professional artist, and I paint in an
impressionist and loose style. So if that appeals to you, try out this short lesson. It will be a lot of help to you.
2. Hows Impressionist Masters Painted: Right, thanks for
joining the lesson, and I think it's a good idea
to have a quick look at some of the
impressionist artists and how they painted water. I'm going to share some of my favorite impressionist
artists with you right now and give you a brief overview of what they were doing
in their painting, paintings that we can learn from and take forward
into the future. Let's have a look at a few
of these paintings now. Start with Monet's famous
painting Impression Sunrise, where the name impressionist
really took hold. We have a look at this painting
and you can see some of the key ideas we're going
to discuss in the lesson. Looking for reflections,
you can see the sun reflecting in the water, reflections of the outlines of the boats and all the things
going on in the harbor, just picking up that gently in the water because there's
a lot of atmospherics, soft light, et cetera, creating very soft images. Also want to look at simplification of light
and dark patterns. You can see the brush
strokes just making very simple patterns yet to
suggest gently moving water, dark strokes over light. The boats, et cetera, have been simplified a lot, practically silhouettes
because of the atmosphere. You can also see a soft
transition from light in the foreground into the darker
water into the background. So lighter getting darker. That away, and that
creates a sense of depth right from foreground
into the background. There's a rhythm in the water, rhythm of the brush strokes, creating that sense of
the rhythm of the water. Each of these strokes suggesting sort of
slow moving water. The strokes getting softer you are in the middle
and over very soft. So soft edges to those strokes, and that sort of blurs the
movement into the distance. You can see the boats in the background here
sort of softly merging with the water edges getting softer due to the
atmosphere in the scene. Let's have a look
at this one with the houses of
parliament in London. And once again, it's about atmosphere and light picking up the reflections
in the water over here and also the
reflections of the sky. It's reflecting darker in the water because
reflections will be darker and the details obviously will be
disappearing in the water, but lights will reflect
darker and darks will reflect a little lighter because the reflections
are opposite. Color and a harmony is
created by repeating colors from the sky into the water and from the
objects also into the water. That creates a very
harmonious scene. Look at the rhythm of the water. Quite gentle, a lot of dabs
of the brush back and forth, mostly horizontal and placing
those next to each other, cool, blue against warm orange, and that complimentary
color contrast, also creating an
energy in the scene, a few dark strokes of amongst the lights just to break
up some of those areas, suggestion of the
boat of or barge or something moving along
very softly suggested. This one where there's
a view from what looks like the cliffs at
at trata over the sea. And there's obviously
a lot more wind, so the sea is a bit rougher. And we can see that with the brush strokes,
right, more descriptive. But each brush stroke is
just an abstract shape. And what's prominent here
is the transition from light all the way
to dark over here, and that creates a sense
of space and depth, the brush strokes back much softer compared to the
brushstrokes in the foreground. They are bigger and
bigger contrasts or more contrasting
between darks and lights. So you would probably
start off with dark color, we dark blues and start
placing the lights over that lighter greens and the sort of turquoise
colors over here, reflecting the
colors in the sky. These are picked up
here. Here, there's less sky reflections because of the angle of the viewpoint and also the water back
there is much darker. But you can just see these. There's an occasional
very dark stroke, almost a black color. That could be just
a combination of ultramarine and zar and
crimson to create that dark. You can see the horizon
is fairly gentle, but it's not perfectly straight. So it was just done very
roughly with brush strokes. Finally, this one with a
real dramatic type of scene, you can see the sea in the foreground linking
up with the sky, very similar, strong lights, dabs of thick paint, very visible, aren't they? These light strokes, bigger strokes in the
foreground, softer, less contrasting
shapes further back, and that helps to create once again that sense of
depth into the scene. The boats merely
shapes of rectangles with sort of a dark shape
underneath kept very simple. It's a simplification of
shapes extremely important. Think of creating patterns. For instance, here, it's
a lot of these triangles, the s itself, just a pattern of mostly
horizontal strokes. Some of them bit more sculpted
like these over here, commas that are fallen over and there's a
general sense of movement as well as the
wind is blowing the water. There's a soft curve sense
of movement this way? Well, certainly movement in
the direction of the wind, which is pretty much, I would say, right to left, if we look at the yachts, and you can see that
pushing this way, a harmony of colors, similar colors in the sky
reflected in the water, creating an overall
very harmonious scene. Having a look at these, we can see the
simplification of shapes, the strong brush strokes, and the rhythm created
with the brush strokes, a sense of movement
and dynamic element. Either the sea is rough or the sea is very
calm and gentle, and that comes across
through the brushwork.
3. Demonstration Painting: Right now that we've had
look at some inspiration, let's get into some
action and create our water and
impressionist masterpiece. Well, I'm going to show
you my five main tips, and you're going to
see how they unfold. And it's really not
that difficult. This is suitable for a
beginner, so don't worry. But if you've been
painting for a long time and you find that your
water is not looking right, maybe it's one of these reasons. And one of these tips is going
to sort that out for you. So let's have a look
at the reference, and then also the
little painting sketch I'm going to do for you in oils. Remember, you can do all of
these things I'm showing you with acrylics and
gouache, even pastols. I will work as
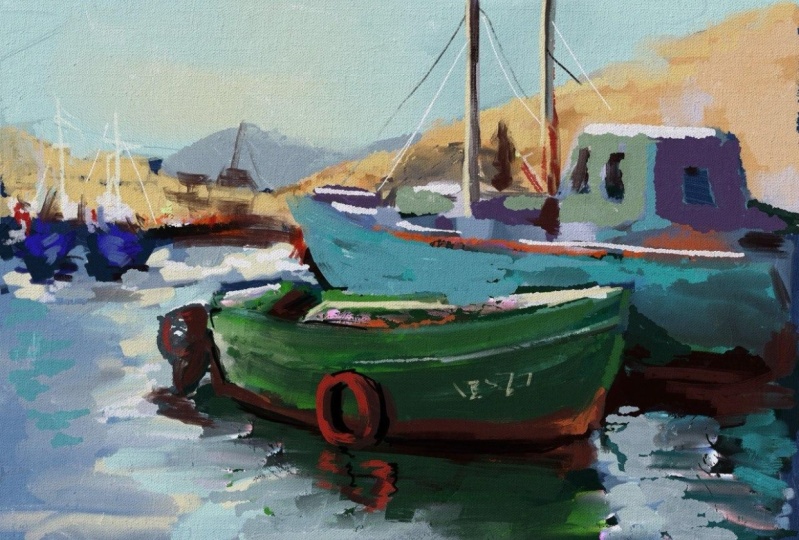
well. Let's begin. This is the reference, and I'm going to be
focusing on the water, the lights, and the
shadows in the water. So I'm going to be
doing a sketch in oils on some oil painting paper. Roughly sketching in
the first rowing boat, and then I'll add
the other couple of boats as we go just
for completeness. But a very loose painting
this in more ways than one, just a quick sketch,
like I said. And using my cerulean blue, ultramarine blue, deep yellow, lemon yellow, red light, isu crimson, got a bit of orange there from
a previous painting, so I've just brought that
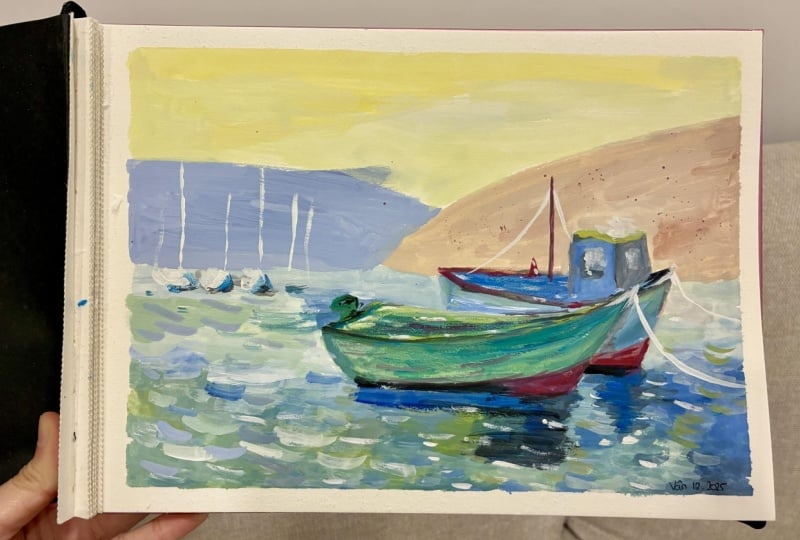
along and some yellow ochre, of course, titanium white. Alright, so let's just get a
bit of paint into the scene. And I'm particularly interested in the green in the
first two boats, because this green
is very attractive. It's got to become part
of the water, as well. We got to try to
bring that green into the reflections and
also in the lights. But in the lights, it'll be
more of a turquoise color. I was going to try to
warm the scene up a little with a bit more
warm light in the sky. And as you can see
in the reference, the sky is a bit washed out. There's perhaps partly cloudy if we want to get into
some weather forecasting, so I don't want that to
make the scene too cool. So I'm not really spending too much time on the
drawing of this boat. As you can see, it's
quite rough and ready, but I think it's
got a charm to it, or at least I wanted
to have some charm. There's a lovely touch
of red and a bit of red light on the sort
of prow of the boat, which I'm going to
add in as well. But let's get a few
highlights just to add a little bit of definition to the
edges of the boat. And that also just helps it to stand out from other objects. There's a bit of a cutaway at
the back of the boat there, so I'll try to incorporate
that but like I said, this is mostly
about water, right? And so I'm not going to spend too much
time with the boats, although they are important for the sense of colors that we're going to
bring into the water. The whole painting
must harmonize. So it's going to do that with the type of brushwork we're going
to be using the colors, and repetition of color. The reflection in the reference, reflection of the
boat is very dark. Yes, it will still be
dark in the painting, but light enough so that the shadow and the reflected
shadows are colorful. Remember the photo
darkens shadows. That's the camera itself. We don't want
shadows to be black. They must still be colorful but darker in value and
cooler for the most part. Yeah, we've created
some of the turquoise with cerulean lemon
yellow and white. The greens, basically
serlean and lemon yellow, but with the emphasis
on the blue. So the reflected
greens are quite dark. You might want to
use something like a halo green if you're
confident with thalo green, but it's not really necessary. Okay, the dynamic
element of the water there's a sense of
the water sort of curving from left to right, and then heading into where
the dark reflections are. So with the brush,
I'm painting sort of sharp and sharp
horizontal strokes, but also curving strokes. A variety of stroke,
some longer, some shorter will add an impressionist touch
to the water as well. The water is colorful. I haven't brought a lot
of white paint into it. The white paint will come
subsequently for highlights. So there's a variety now
of warm color as well, and the darker, bigger strokes in the foreground will give way to lighter, smaller strokes in that area, that sort of middle area. And that will enhance
the sense of space and distance as the foreground moves into the scene
and to the back. See that stroke,
that curved stroke. That's what we want. Some longer, some shorter. There's a few little
sparks here as well. Not too many, but it adds to
the broken color element. The touch too much white there and I will have to
return with some color so So it's strong strokes
clearly defined, mostly of a light color because that's
picking up the sky. I'm going to have to bring
some yellow into that sky and warm it up so I can
have those warm strokes harmonizing Here we get these dark light overlap. All right, so put down
stroke, overlap it slightly. There, we've got
yachts and things. I won't worry about
that too much. More of a scumbled look back. Okay? Not too defined,
not too dark. Yeah, more defined, bigger
strokes, they're softer. Okay, so back there, you could scumble as I said. So let's just have
a look at that. You've got your color down first and then bring
your lights over. In that way, you're going to get a painting that is
vibrant and colorful. And it's just a variety, mostly horizontal strokes, dabs, longer strokes, et cetera. Keep your brush
clean using tissue, just wipe that brush off so you make sure your colors
remain clean throughout. Alright, I've started a few
of the next boats in the row, put in a rowing boat. Now I'm going to do that little
fishing boat at the back. I'm not too important in
the scheme of this lesson, but it may be of interest to you just to see how this
loose sketch comes together. And I'm just improvising
with a few colors there, bringing a little more
color into that boat. It's a sort of a turquoise
blue side to it, but I don't want it too
washed out, either. This is also, I guess, a lesson in simplification. There's so many
things going on with these boats details
in the boats, lines coming off them, tires hanging off the
sides of the boat. I'm leaving all of that out for the most part because
they're not important, and I don't think they're going
to add much to the scene. If we stick with the idea of painting light and atmosphere, then details become
less important. It's more important to me
to just define one shape from the other using some
highlights here or there, here on the right, dark, sort of mysterious shadows, hard to see what's actually
going on in there. So we're going to not add too much attention
to that area. A little bit of soft edges on the edge of the reflections. The edge between the
boat and the water, it's quite dark, of course, and that shadow is caught up in the water and sort of connects the
boat to the water, but the edge doesn't
have to be too dark. You can soften it just a little. The hill in the
background and buildings, there's so much going on there. I'm going to really
pretty much ignore the buildings and just
get the hill situated and I'm just going
to try to figure out how the foreground hill merges
with the background hill. Quite soft and
atmospheric back there. I'm going to make
the sky quite warm, yellow and white
for the most part. I got to be light, though. It must be Basically, it is the lightest light. And those yellows in the sky, the warm sky are picked up with yellow in the water
in the foreground. Let's suggest some yachts back
here, very, very loosely. Once I put the masts
of the yachts in, it sort of reads better, and then we've also got
some nice vertical lines going through those hills. Um a little bit of lemon yellow and white. And let's just pull this foreground boat
forward a little. I'll just add a figure. There's all bits and pieces
in the boats, as well. I'm just trying to pick
up a little bit of red suggesting perhaps a seat in the rowboat or fishing
boat, something like that. Let's just get some
masks in here. We're using a rig of brush. Oops, there's a bit of
just clean that up. Just get the masks in You can do these a
little tidier than I am very easy to rectify. And there's this mast of here, which is quite a nice element. A little bit of rigging
and a line or three, I think is useful. While I've got the rigger brush, I'm going to make a
few little sparkles. Tidy up a few marks
here or there, but let's just get the
water finished off. Bit of green being picked
up off the second rowboat. So the repetition of these
colors, as I've said before, helps to harmonize a painting, makes it look complete. We've still kept it very
loose in this quick sketch, and the painting can stand
on its own as it is. It's quite simple, but
I think effective. Okay, so there you've got
some ideas of painting water, and now you can try that out. One or two highlights. You're there again.
And there we have it a loose impression of water and boats and something
for you to practice.
4. Next Steps: I hope that has helped
you and given you a few ideas to try it in your next impressionist
painting. Have fun painting water. It's a beautiful subject. Don't worry. If it doesn't look exactly right
the first time, you're going to keep
painting and keep trying. But if you try these tips out, they will become
much easier to do. You're going to
take it forward and develop your own
style a lot quicker. If you want to find
out more about these painting
techniques and styles, have a look at some of my
other courses as well, whether it's beginners
or oil painting. I cover all of those
topics as well, and you can visit
me on my website. Remember, I have something
special for you as well. If you want to work
with me, one to one, I have a one to
one class as well, and you can find that
right here on skill show. Just book a lesson with me, and we can go into
something a bit more in depth with your
painting specifically. Alright. Don't forget,
download the reference, do the painting for yourself. There's also a PDF with these tips down there
for you as well too. Put it alongside
your painting and just help you as
you work through. Alright, until next time, enjoy your water painting, and we'll see you soon.
 Malcolm Dewey, Artist and Author