Transcripts
1. What you can Expect: Have you started
painting in Guash but are struggling to
take your skills further? In this course I'm
going to help you take your knowledge of guache and build on that learning
new skills to create a beautiful
springtime orchard scene. You're going to learn about
transparency and opacity. Getting the perfect consistency, layering the paint and
getting clean color notes. How to master a beautiful
subject like this. If you wanted to paint a
beautiful springtime scene, much like the impressionist
would have painted, then try this course. I'm Malcolm Dewey, a
professional artist, and I paint landscapes in
an impressionist style. I'm going to show
you how you can do just that with guash paint. So enroll in the course
and let's get painting.
2. Welcome and Introduction: Thank you for joining
me on this course. You're going to learn a
whole lot of new skills and a process for creating a beautiful springtime
orchard scene. Much like the
impressionists painted. You may have seen paintings
by Mone Pizarro van Go all creating these
lovely impressionist and loose paintings of orchards. Now it's not the
simplest subject, but I'm going to help you see it and simplify it in a way
that's going to make it much easier for you to create
this type of painting. Learning how to apply paint in layers to get clean color notes, using transparency and
opacity of the guache medium. And getting the
correct consistency, seeing how the brush strokes
are applied and how to work through this subject
in a logical process. A process that you'll be able
to apply to any subject. Let's get started with the
painting demonstration. I'm going to work
through it step by step, And then you can download the reference and try the
painting for yourself. I'm looking forward to
seeing your work as well. So let's begin with
the first lesson.
3. Materials: Okay, before we start painting, let's have a look at
the materials Now, You may be familiar with
your gas materials already, but I've got a few
extra colors and types of paint involved
in this as well. Maybe there's a few
tips for you to discover in this video.
Let's have a look. All right, let's have
a look at the range of colors and materials
that I like to use. It works for me and that's
the important thing. You'll find your system, what colors work for you, what brands, et cetera. Now first of all, let's
have a look at brands. And mostly I'll be using Windsor and Newton
designers Guash. There's also Carn dash which
I don't use very often, but sometimes if Windsor and Newton
doesn't have the stock, I need things like titanium
white for instance. I may use Carn dash for that. The important thing
though with guash is get the best that you can afford in whatever brand is
available in your region. But bad quality guash will
give you terrible results. There's really no in between. Okay. The colors I'm
going to be using, I'll show you that range
in the list of materials, but mostly warms and cools
of the primaries yellows, I would have lemon yellow as a cool primary yellow
as a warm with blues. Ultramarine is my warm
blue and I like sky blue, turquoise blue or cerulean blue. They fairly interchangeable. Burn sienna is important
for a convenience color, but with guash you don't
want to try to mix. Burniena have burn Siena
for your earth tone. Yellow ochre, also
important for reds. I've got flame red and
Alizarin, Crimson. Elysrine being the cool
red. Add in orange. You can really, you
can mix your orange. But pre mixed orange
is such a good color, you may as well add
that if you can. Now, as I said, obviously titanium white,
extremely important. You'll use a lot of
that with quash that gives it its opaque nature, Basically transforming water
color into an opaque medium. Now speaking of water color, I may also add water
colors to my colors. If I don't have a Guache color, you may say, how
is that possible? But Guache is just a bit
more concentrated form of water color after all. The big difference is Guache has a bit more density
and pigment perhaps. But it's the white paint. The white paint really transforms Guache into
something different. And I find that I
can use water color in tubes like this and
get similar results. I may just need a
little more white or a little more water
color, but it all work. All right, so let's
put the paints aside, containers, this is also a popular thing
with gach painters. What can keep the
paint dry for longest? This is a watercolor palette
that I also use for guache. On occasion, it doesn't have quite the ceiling ability
as something like this, which I has the rubber seal ring around it which helps to keep your gas moist for
a couple more days. The problem with guache, of course, is keeping it wet. And I live in a very dry region, so tends to dry
extremely quickly. 34 days perhaps. And then it's dry and I may
have to reconstitute it. And it's never quite the
same simple principle. You put guash paint out, try to use it all up. There's no point letting it stay in these containers
for weeks on end. It will just dry up. Now this palette, I said, is basically a water
color palette. And you may notice
that I use it fairly similar to perhaps what a
water color rust would use. I've got warm color
mixing areas, I've got cool mixing areas, and I've got ones
that I leave open. And I just mix things
around like that. And very much like I
would use water color. So let's move that out the way. So I said this is
very similar palette, but it's got a lid
with a rubber ring to just seal and keep it
moist for a bit longer. I will also mix color
on a palette like this. You can squeeze out your color
onto a palette like this, and it will work fine. I like to mix color like this and give me some more
working room as well. This is a paper
tear off palette. I can use it for acrylics or oils or as I'm
using here for gas. So of course, I must mention
keep plenty of clean water. Normally, I would
have several jars of water because it gets dirty quite quickly
and you don't want to contaminate your
paint. All right. Now what do I paint with? Basically synthetic flats. Short flats and rounds. The brushes are
quite inexpensive. I'm not using Sable, as I said, all synthetics and that
works very well for me. A large, a medium, and similar for rounds as well. You can add in a rigger
brush for finer details. Usually paint in a spiral
bound travel pad like this. This is Fabriano
watercolor and I use cold press paper and I find
that's the best option. I've got a bit of
tooth to it as well. Very nice paper and
as you can see, a little bit of texture
which handles the guash very nicely as a matter of managing your colors
and consistency. Have lots of tissue paper
to dry off your brush, and that just makes
sure that you don't get too much water into your paint and you lose your consistency. Have one of these color wheels, always useful to help you
with your color mixes. It also has the value scales
which are increasingly important as you develop
your painting practice. Pencil, two B or a six pencil to help you with your
composition. And that's it. With these materials and the basic painting
materials and surfaces, you can start your
Guache painting.
4. Paint Consistency Tips: Okay, now I want to just
have a look at what is the ideal consistency for
a painting like this. A lot of gas painters have
their favored ways of getting the right texture,
the right vibrancy. One of the important
areas, of course, is just how much water
do you add your paint? Do you have it runny? Do you have it as
thick as possible? The thing with gas though, is it's not really
very forgiving. Too thin, it's a
mess and too thick. It's like trying to
paint with Patty. It really is very
difficult to work with. You got to try and get
an ideal consistency. Okay, let's play around
with the paint a bit and see what
we can find out. Now let's have a look
at paint consistency. Quash has various abilities to add layers to your painting. Consistency can vary through
the painting process. What I would do is
add water and get the paint to a creamy
consistency. Mustn't be stiff. It mustn't be sticky, but it must be creamy, almost like a aporable,
creamy consistency. Once I turn this over, it would pour out, but it's not watery either. Okay. It's just got that
thickness of cream. Okay? If I put it down, it's got that good
coverage and then it will get that sort of scumbled
effect if it's too watery. It's more like so very thin. But that could still work
in your first layers. When I say to watery, it could just be for
subsequent layers. When I start off the painting, it's fairly thin but it's
not dripping off my brush, it's just picking up nicely. So those would be early layers. And I would let them dry, don't let it puddle
on the paper as well. It's smoothed out and that
dries fairly quickly. And then subsequent layers, when that's dried, it will
be the creamier consistency. And that would make layers on top of the thin initial layers. All right, so similar to oils and acrylics where
you would block in with your thinner
layers like this and then come in with your
thicker layer of creamy color. And go over that, you can see this has already
pretty much dried. So let's take some
of this orange. And I could go over that, no white paint involved. But once you go over that
dry paint, that's it. Leave it alone. If you
go back and forth, you're going to
reactivate the blue. And that's going to happen. Be careful when
you put on layers. It's a one shot approach and then you've got
to leave it alone. As I said, I like to mix
on the tear off palette. I could add my white
paint like that. I would rather mix in
the white over here than do it on the palette there where things get
messy quite quickly. We got the white in, I can put that layer on. I may wipe the brush if it's
got a bit of contamination. Make that lighter next layer
and start adding highlights. Best to let things dry
though, before you do that. Otherwise, subsequent
layers sink in very quickly, one stroke. Good idea to change brushes
from warms to cools. Let's get some lovely lemon
yellow, get some white. Get your highlights strong, opaque color with all that white that's
not quite dry yet. I'll give that are a bit longer to just dry and
then we'll go over it. This has pretty much dried, so I can put those
layers on color. White in gas is very
cold, titanium white. When I put white in
that color, generally, I'll go back to the color, put a little bit more back in. I don't have a
dramatic color change, or I should say a dramatic
color temperature shift. Too much white gets really
cold. That's quite cold. Compared to that,
that's got a bit more yellow in it Turn
some of that yellow, I can warm that up. Basically to recap, we
work from thin to thick. We try to add layers, wet over dry to watch out for getting too much
color contamination. Let's get a bit of
blue into the yellow. Okay, so that's dried enough, takes that color without too much trouble picking up a bit because that
was still wet. Know what you're painting on
for instance, that's wet. I'm going to leave
that alone and I'll paint somewhere else
on the painting. Go where the paint will work nicely and not get contaminated. Once that's dry, I can go
back to that painting. Even on a small
surface like this, I can work different
areas quite confidently. Can you mix color on the paper? Yes, you could do that. If you wanted to turn that
into violet, you can do that. If that's what you
want then you can work wet into it on
the paper, right? Clean color notes is
something very important. With gas or at least
with my way of painting, I like to have the
colors strong. Even if I'm painting a gray, I want that gray to be
either warm or cool. Not a dead color, a clean color, light blue. It's just that, nothing
else, white and blue. And get nice and clean color
If you are picking up, let's say some of this violet, now that blue is no
longer a light blue, it's now heading into a violet. Just be careful of
what's on your brush. Make sure you've
cleaned your brush. Well, what, How do I
start off a painting? You'll see that in the
demonstration of course. But as I explained, I'll start blocking in fairly thin, getting that composition. Perhaps you've
already drawn it out. That's up to you. That's the
way you're going to work. A little drawing is
never a bad thing. And then starting
off fairly thin, a little bit of
water on the brush, I'll just put the
corner into the water. Get that thin enough so
it's still manageable, it's not running around. And then for the lights, make sure the brush
is cleaned off nicely and paint that in. Once it's all dry, I can go back in and paint
the thicker layers. Right. Let's also have a look at the water color I
was talking about. That's that's a little bit of lemon yellow water
color and some white. The water color just on its own, you can see thin and
transparent like that. Still a bit of blue
coming through there. Then get your gach
color coming through. Now as I said, it's not going to be as strongly
pigmented as the guache, but you can use it in a pinch. Especially softer colors,
atmospheric colors.
5. Notes on High Key Paintings: Okay, before we start
with the painting, I want to show you a few
issues with the reference. Have a look at a few
inspirational paintings as well. But also draw your
attention to some of the problems that you may encounter with a
reference like this. Things like high key
color and little tips like that that are
going to help you approach a scene like
this a little better. I think it'll be useful. So let's have a quick look
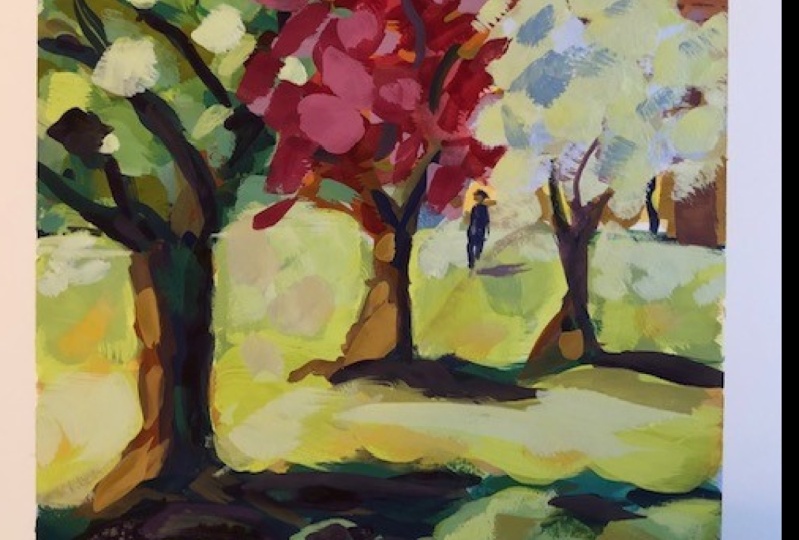
at those issues. Now, here's the reference. And it's a very attractive
scene, isn't it? But there are a few issues that I just want to
bring to your attention. First of all, is the part of the painting right up
from middle point, let's say from about upwards. Now, there's very
little value contrast, this is all pretty
much the same value, all of this area quite light. Perhaps the darkest value
here is the red tree there, but it's not significant. We're working with a scene that has a lot of high key color. You need to make these colors
stand out from each other with color temperature variation and also good,
clean color notes. Here we've got these, let's say reddish to
pinks next to it. We've got the blossoms which are like so and some a
little darker over here. We got the house and the
trees building around there. Also, quite a lot of
lights up behind it there. We've got that thing
going on over here. We've got the light
greens as well. Of course the grass and the
sunlight is quite green. All of these values
are very similar. Big strength of the scene is
coming in the foreground, the dark green and then
the lights as contrast over there. Now the
other complication is this tree on the left. There's all sorts
of branches hanging over the very few leaves, just a lot of twigs, et cetera. I'm going to try and get
some of the strength of the tree trunks
to anchor things. Then all of this area, all the foliage, branches, twigs, et cetera, we're going
to have to try to simplify. We've got a few lights and there are some darks
as well in there and some cool darks here or there. Somehow distinguish
all of that using the tree trunks and a few
strategically placed branches while making the
whole right hand mid to right hand side
really stand out. With a lot of vibrant strong
lights and nice and clean, no muddied up colors,
nothing like that. Of course, the
lights on the grass, they're going to really
have to pop as well. Getting a little
lighter and cooler year compared to what we'd have in the
foreground really strong. The whole effect should be a lot of clean zinging
color, really standing out. Let's have a look at
a bit of inspiration. What's the opposite
of high key color? Of course it's low key. And a lot of the
paintings you see that I'm, I'm basically teaching how to use dark and light, dark shapes to give
strength to a scene. And we've got some of that
in the foreground shadow, little bit of that on
the tree on the left, and more shadows leading
in actually very little of the darks this time. Now we've got to use the high key colors to make this painting light and
bright. It stands out. Let's have a look at a bit
of inspiration and see how other impressionists we're doing this type of subject. Here's one by Mona and you can see the tree trunks
giving structure. But for the rest, very much similar values with a
lot of light color. These blossoms pinks, whites, there's lavender colors as well. And then the shadow and
light and the grass, very similar to what we're dealing with right
here is one by Vang using the tree trunks
outlined in a very dark color, almost a black,
to give strength. While all the lights are
of a similar value, right? A lot of light, high key lights held together with a
few strong dark shapes. And here's a beautiful painting
by Pizarro Camel Pizarro, also a lot of high key color, very similar light values with a few dark shapes
of the tree shadow. Of course, using figures to hold the painting
together and have sort of a center of interest
on the right hand side, lots of broken color,
dabs of color. Look at the lights of the
sort of white blossoms. And we're going to
have to use some of those ideas in our
painting as well.
6. Gouache Painting Part 1: Okay, now we start the fun part and we're going to get
into the painting. Step one is do the blocking in. I've already shown you the painting consistency issues and how I like to start the
painting with quite thin paint. Another important part of
this starting phase or the blocking in stage is
to use transparent paint. I don't like to bring in
the white paint right away. In fact, this is how I paint with oils or acrylics as well. Keep the white paint in reserve. The second layer,
getting the big shapes. Get them in nice and loose
work quite vigorously. Quickly, big strokes with the brush and just get
some energy going. Cover the white paper and
get something happening. And then we will have
the whole page covered. And at the end of stage one, we'll have made a great start. Let's have a look. Okay, my coal price
paper is ready to go. I'm starting off
with a round brush and some ultramarine blue. I'm just going to
loosen that up with a little bit of water
and start roughing in the big shapes or ready the composition more or less where I'm going to
place the focal tree. Also a shadow pattern, the foreground shadow
pattern is very important. It's going to anchor the scene and it's also going
to link up with the shadows further on into the painting and
help take the eye in. Because there's so
many light areas, light value areas
in this reference, I need these darks to attract the eye and lead the
eye into the painting. Now there are a couple of trees, the larger one, the foreground, the second one, and then of course a few trees on the right. I'm going to start
with the suggestion of the big tree and build it
up in layers from the back. Coming forward,
I'm starting with this light green
but lemon yellow. Touch a blue, just
a bit of water loosen it up and
that's all we need. The shadow in the
foreground also, keeping that transparent simple, all these shadow patterns, I'm just laying them out more or less
where I want them to go and then moving into
transparent darks. The darks are at this
stage quite loose, but the darks are so important. Don't leave them out.
Those background shapes, I've taken a bit of yellow
ochre with the blue. Bring in touch of red for where the roof is of the building
and the building itself. Although there's a lot of light on the roof and the building. Once again, I don't start off with the
white paint as yet. Just get color down. This is very similar to a water color
approach, hasn't it? Get the colors down thin
and loose to begin with? And isn't that a beautiful
touch of Alizarin Crimson? Now, just a little bit of to
separate that building in the background a
desaturated yellow. Just a bit warmer in the back. Now with the sky,
I'm going to put in the white paint to basically
get that sky in place. Since the sky is pretty much a small
area of the painting, I'm going to have that fairly
well established right from the start to build up a lot more layers for the foreground colors and
the foliage and trees. There's a little bit
of warmth in the sky, closer to the roof
line of the building. I've put in a touch
of that yellow and white to convey that. Now back into the colors, pure colors, lemon yellow, below that, turquoise,
blue, some ultramarine. And we're getting
a nice variation to the shadow in the foreground. The shadows are not flat,
they're not lifeless. Although they are dark, they have a lot
going on in there. It's little color, temperature
shifts for the most part. Not too much of a value contrast because it is a dark and
it will remain that way. Tree trunks and branches
burn sienna at this stage, just transparent burn sienna, a little bit of green. To get the shadow
in touch of yellow, the sunlight is
obviously left to right, and we've got to carry that idea on throughout the painting. Wherever their
lights are hitting, they're coming from
left to right, the branches, there's some
overhanging in the foreground. I'm going to just suggest those all very loosely
placed at this stage. The tree on the right, done quite softly,
it's got to recede. It can't be as strong or as hard edged as the
foreground tree. This one over here has
the strongest edge there. It is pretty much blocked in and ready to go into
the middle stage.
7. Gouache Painting Part 2: Onto stage two of the painting. We've got the blocking in
and the page is covered. And now we've got to carry on develop the middle
section of the painting. Now as this first layer
dries pretty quickly, I can get right into it and start adding those
second layers, the more opaque paint, Bringing in some
white paint as well, and also strong color, getting the strong
reds in as well. Building up the layers of the big tree with
smaller shapes. Now this middle section is not the pretty stage of a painting, but you must persist and
it will all come together. Now getting into
that second layer, I spoke about the burn Siena adding an immediate touch of
warmth to the tree trunks. And we can also start
adding in a bit of white paint, touch of red. And I'm creating this coral pink or coral red
color for the roof. A lot of that's going
to be covered up, but get the background colors established before we move into the middle and foreground areas. In especially the foreground where there's going
to be quite a lot of extra layers added to
build the painting up. Now it's a bit of
a yellow ochre, white and some yellow,
medium yellow, making a very strong, opaque, bright light color for the house to show
through the background. That's of course,
the good part about opaque color, strong coverage. And you can cover up what
you don't want to show, cover up mistakes
and fix things up. All those advantages of
opaque over water color. For instance, that shadow under
the roof, very important. And I'm going to use some
of those cool blues, blue violets and bring them
into the tree as well. That's the thing with
painting tree trunks. You don't want them to
be just one solid color, solid, dark, something
like a burnt umber. I never use burnt umber. I always try to
create a colorful, a shadow side to
tree trunks and of course some vibrant
lights on the sun side. Sun coming from left
to right, quite thin. For these background shapes, these trees are like they haven't got all
their leaves yet. I have to suggest trees
that are still a bit spin. But without having to paint
all those little twigs, I'd do a flat light color. Similar value to the
sky but the sky itself, the blue sky, I'm making
that quite light. But you'll notice how gas
dries slightly darker. This light blue is going to be quite a bit
darker as it dries. And I'll probably
have to come back in and might have to just
warm up some of that. These leaves and trees
closer to the sky, they will be picking up
some of those sky blues. And so you can
soften that edge up just a little blue green here, just a touch warmer, a bit of that ochre
coming into the lights. Now there are some suggested
tree trunks back there. There's also a few
little branches that can be suggested in
a very soft value. By the soft value, I
just mean the value of the branches are similar
to the background color. Bringing in blues into the bone. Senos creates the cool
side of the tree. Now the orange, I'm going to bring some warmth into
the sun side of the tree. As I develop that layer, I can bring in some
white and create a bit more of an
opaque light color. Now I've got to
build up the tree. The foreground tree has
many things going on. Looks like hundreds of branches. Of course, I can't
paint all of that. I can only build up layers of light and dark and
warm and cool color, working with different
kinds of greens, darker, cooler, bluish greens, and then more yellow color
greens for suggesting light. There are a few
little highlights on the trees of white blossoms. We can try to suggest
a few of those, but most of that will come later on just feeling things out by dropping in some of white colors and just see
how that will work out. Now back to creating
the darks or re, establishing some of those darks because it is the shadows that
make the lights stand out. To spend a good amount of time getting those shadow
areas established. Also the second tree. If you struggle to
see these shapes, remember close
your eyes halfway. Just get that squint going and you'll notice mass
shapes come together. Details disappear and you can
see the bigger mass shapes.
8. Gouache Painting Part 3: Onto the final stage
of the painting. The part that we can really look forward to bringing
in the bright lights. As those middle sections
have dried down, they're gone a little bit dull because that's
how gas works. Now I get in the
really strong lights and bring this painting to life. It's a fun stage.
Let's get into it. Now we start getting
that color that brings in the theme of
this springtime scene. The light colors,
the bright colors. This foreground
tree is of course, quite complex because there is no real definite
specific shape to it. It's made up of all
these tiny details. Of course, I cannot
capture everything. I'll go for the color
notes that make an impact. The grass itself, the lights. We need to get some layers
and textures there as well. Get in the sky holes
in the foreground. Get some clean color
notes as well. Some good strong color
notes, a little more white, especially for the grass shapes
in middle to background. Bit more yellow in
the foreground. It's got to be warmer
and brighter in the foreground but
cooler in the distance. Cutting in here or there technique also
called carving in. That's where you use the
background shapes to help define the positive shape. Very important
technique I use a lot, even in the foreground year, using it to just clean up
the edges of the shadow. Getting some really
strong lights in. Now want to getting
this beautiful tree. This tree with all the
off white blossoms and it's going to now create a beautiful contrasting
shape of lights, contrast within it of shades
of white but not pure white. Straight out the tube white. Mix something into it. On the palette little
bit of yellow and so on. The lights of the red
tree in the center. Of course, those
are pink colors. Alizarin white, a
touch of yellow. Just putting a line on that roof to define
that building a little better. The pink shapes. And then I'll move into the reds to depict the center and the shadow
parts of that tree. The white tree and the red tree are starting to
support the scene. Look at that beautiful,
strong color, coming in a cool red, cool red contrasting with
the warm colors around it. This, to me, really creates the springtime scene a
warmer strokes of color, just to give a
little more texture and life to those
background trees, but still keeping them
pushed back because there is very little value
contrast back there. A high key colors, a few strong lights, Yet this balances out with
the tree on the right, really pushing the lights now to give that bright
light effect. Of course, this is a constant
technique with gach. As you find colors have
down a little too much, you need to push that
color a little more, create a little more light, a little more texture. Improve the vibrancy here, the dark shapes of
the tree branches, creating more support
for the light shapes. All the contrast
between dark and light. Just a bit of definition
to the tree branches. Using some blue to
create cool color. A few more lines to suggest overhanging branches,
the highlights. This is also a stage of
the painting that you do almost instinctively here. There's way too
many little shapes. I'm consolidating with
a few bigger shapes to give the red
tree some weight. The tree on the left
of the big tree, I also feel has too little shapes that I need
to just consolidate a bit. Let's get a little more texture in the foreground, just a bit. Too much of the white paper
showing through as well. A little more dark
near the base of the tree for that
deep shadow there. Using brush strokes
to break up color. Now some highlights on
the edge of the tree. Just accent I should say, just highlights the accents. Referring to darker shapes, sometimes there are
just too many here. Pulling this back a little, this constant back
and forth is a theme of most impressionist paintings. You try something
and it's a bit too, you got to pull back by creating some bigger shapes to get rid
of too many small shapes. These strong lights, I
really do like them. You have to be careful,
you don't do too many. You just got to get it right. Get the painting to
just sing clean color. Color notes are
critical with gas. If you find you're mixing
in color from below or you've picked up
something on the palette and it's not giving
you that bright, strong color you're looking for. It's because the color
notes not clean with quash. Mixing colors is very
important to get it right, to get it as sharp
as it should be. A bit of scumbling in
the fore ground here, just letting a few textures
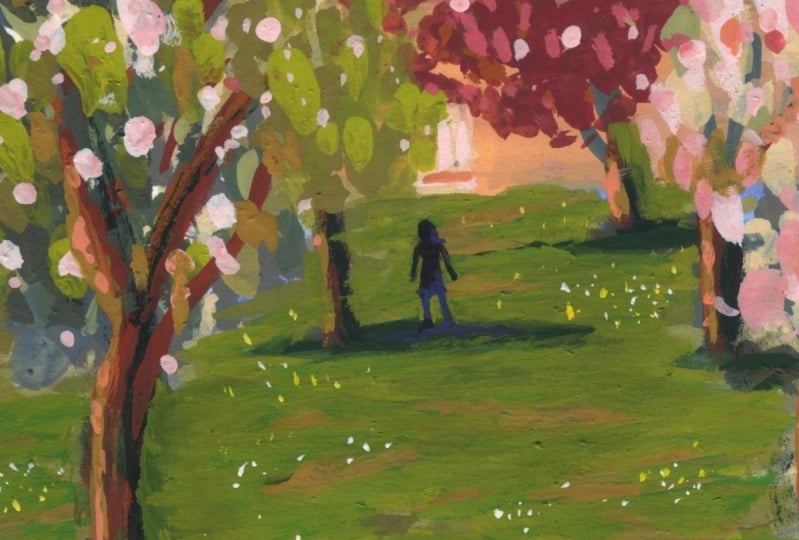
show in the brush stroke. All right, There is one thing
I do want to add though. Even though I've
signed the painting, I feel a figure is necessary, A figure just to
create a little bit of scale interest
on a focal point, a little fun element as well, keeping it very simple. Just a dark shape with a light
on the face and the arm, a shadow to tie
the figure down to the landscape and
then will be done. Overall, I think the impression of a springtime orchard
has been obtained. Always fun to work with Guash and now you can try
the painting for yourself.
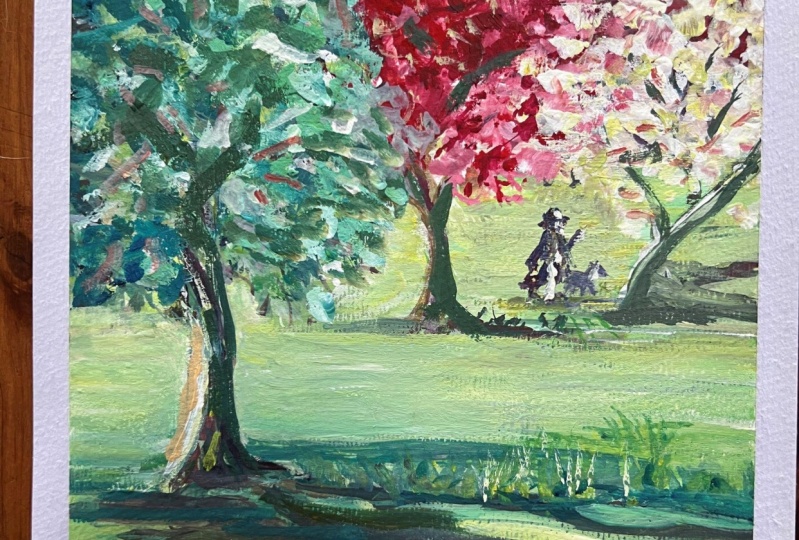
9. Painting Assessment: Okay, the painting is
complete and here it is. I must say, I really enjoyed the painting and I
was a little bit concerned about it to begin with because it's not a
painting with those big, strong light, dark contrasts. There's a lot of light colors. And that means a painting
in a fairly high key, as I explained earlier on, it's not going to be that easy to work with a
high key painting. But I think looking at it, I'm pleased there are some strong darks
in the foreground. The foreground shadow really does anchor the whole painting. Those lights stand out so well. The creamy light colors, the reds, pinks, and of course
the greens set it all off. That is the painting, a beautiful spring scene in an Impressionist style
and it's a wooden. I hope you are going to try this painting out
for yourself now. Don't forget, you can download the reference and
do the painting and send it in. I look forward to having a look and giving my comments on it. Now please remember
if you've enjoyed this course and you've learned something
valuable from it, and don't forget,
add your review. It really does help
the course to get discovered and help
other artists as well. Now why not also add
your painting to your Instagram
account and just tag me in there at Malcolm
Dewey Fine Art. I look forward to commenting
on your work as well. If you want to find out more
about my painting courses, just visit Malcolm
Dewey Fine Art.com Well, that is it. I look forward to meeting you in
the next lesson. Coming soon. Until next time. Happy painting and
chairs for now.
 Malcolm Dewey, Artist and Author