Transcripts
1. Join the Journaling Course: If you're looking
for a way to connect with your inner creativity, express yourself in a
unique way to create beautiful illustrations and paintings and
promote mindfulness. Then this course is
perfect for you. You'll learn how to create beautiful and personalized
journal pages that reflect your
thoughts and emotions. Throughout the course,
you'll be introduced to simple painting techniques
that even beginners can do, including gouache,
watercolor, acrylics, and pen and ink
drawing to create stunning backdrops
for your text. The reference photos are
provided to for you to try out. By the end of the course, you'll have gained a
deeper understanding of the therapeutic benefits of creative journaling
and how it can help you connect with
your inner spirit. Enroll today, and
let's begin journaling
3. What Is Mindfulness?: Now what is mindfulness
in this course are referred to the concept
of mindfulness. This is an important
idea and one of the reasons why I do journaling, it might sound very vague and you're not
quite sure what it means. You probably are enjoying some sort of mindful
creativity already. But let's have a look
at this for a moment so we can appreciate
the importance of journaling and also
how we should go about it to get the
best out of it. Let's have a look at the idea of mindfulness in a
bit more detail. What is mindfulness? Journaling? Mindfulness
is the practice of being present in the moment and aware
of your thoughts, emotions, and surroundings
without judgment. Pay attention to your
thoughts and feelings. Observe them without reacting or becoming overwhelmed by them. Mindfulness helps you become engaged in the present moment rather than being distracted
about all your worries. Journaling is a powerful
way to develop mindfulness. Writing down your thoughts and feelings in a
non-judgmental way, you become more
self-aware and you develop an understanding
of yourself. It can help you identify
patterns in your thinking and behaviour so that you can make positive change in your life. It is also a way of
reducing stress and improving your focus
and concentration. And this results in more calm and relaxation
mindfulness term link is a powerful way to develop a positive relationship with ourselves and the
world around us. Practice mindfulness
regularly and you will approach
your challenges and difficulties with more calm
and not so much stress. Mindfulness journaling
will help you appreciate the small things in life and cultivate a sense of gratitude. So it is a powerful practice
that can help us live more fulfilling and
meaningful lives
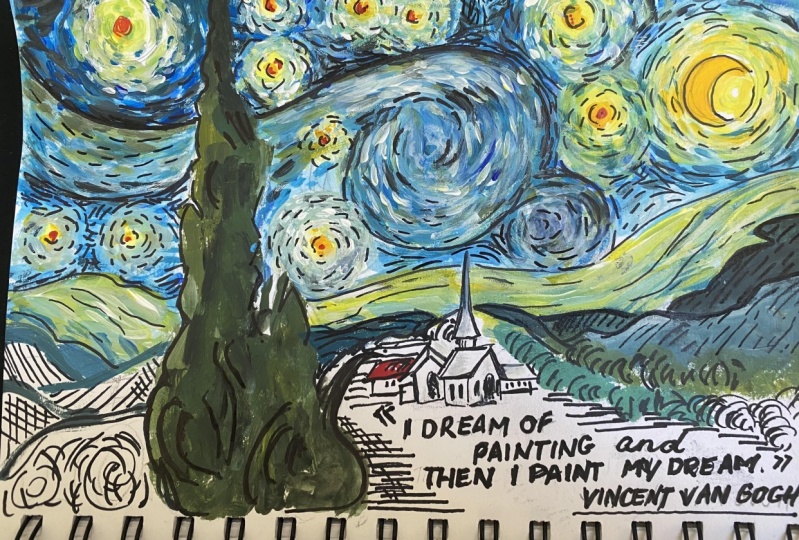
4. How to Add Writing : Now as I mentioned, one of the important aspects of keeping a journal for me is
having some text as well. I like to write something
in the journal. It might simply be
about the subject, but ideally, it's something a
bit more meaningful to you. It's your private
journal as well. Now, I'm using a general
theme for my journal and that is quotes by
Marcus or really as things that are meaningful, that will remind me
of important ideas. But you can also write about
your personal experiences, about what's happening that day, about what's bothering you, about what you thinking
about at 3AM in the morning. Maybe the kids are keeping
you awake at night. They all sorts of
things that are solved. Or at least you can find some comfort by putting
them down in writing, creating something that you can focus on instead of
just having it all running through your mind and making the matter even worse. Now there's a famous
book written by Julia Cameron called
The Artist's Way. I recommend you get
hold of that book and read it if you
haven't done so already. In that book, she advocates what she calls the morning pages. Basically, you get up
in the morning and the first thing you do is
open your journal and you just write a kind of free form writing or just a brain dump as
it's sometimes called. You just write. You get your thoughts out, whatever they may be, you can jump from one
topic to another. It doesn't matter. Just get out all of that accumulated
thoughts and concerns, everything that is keeping you confused and not knowing
which way to turn, just get it out in writing. She advocates also doing this, the old-fashioned way of pen or pencil instead of
typing it all out. I think I agree with that
because I do find that even digital art is not as engaging as the
old-fashioned way, using something like
a pen or pencil, brush, pastels,
whatever it may be. A manual physical activity
is more engaging and that's important to break away from the digital now and then when
you are creating your art, the same thing
applies to writing. Typing rollout may
be fine for writing a book or correspondence through emails,
that sort of thing. But this is a special moment. Basically. This is
your time to get out ideas and thoughts and also
to commit this to paper. That is very important. And by combining this with your illustrations and
your painting and sketch, and you're tapping in to your creative
problem-solving brain, your visual stimulation
that is going to help you boil things down and
settle these issues. Calm you down as well, and create something
beautiful out of what perhaps started
as a chaotic mindset. Here's also a few tips
I'm gonna give you to improve your writing even if you're very
hesitant or bottled. Make a start. Follow
these tips and I'm sure it'll be
easier for you.
5. Journal Theme : Now what about having a
theme for your journal? It could be just about anything. In my case, I'm creating a journal based on
the Stoic tradition. Quotes from some of
the stoic authors like Marcus Aurelius, this, Seneca, and many others. But you can have
any theme you like. It could be your travel journal. It could be your gardening
journal where you record the front plants
and things like that. Could be about food, it could be about
religious topic, that could be many, many things. Your own personal development, having a theme is something that can connect
you to the journal a lot better and make it more of a personal thing and make
you more committed to it. So come up with a
theme if you want. It can be very general, can encompass a few
different topics or very niche and focused, but something that's going to motivate you and inspire you. So that's all it is. Ready to give you a direction and get you thinking about
more deeply about something. There it is, you can always
change the theme or perhaps start another one and see
where it all leads you. You might be surprised
by the results
6. Materials for Water Media: In this lesson, we're going
to look at watercolor media. Watercolor media is quite
a broad topic as well. That not only
includes watercolor, but there are different
kinds of watercolors. So I'm gonna be looking at
a few that I like to use. There's also things like
gouache and acrylics. You will get
water-soluble pencils, as you saw in the
video on pen and ink. So you can bring
that in as well. It will some bridges that gap. Water kind of media is also very convenient for traveling. You can store it easily as well. You can have your watercolor pen set in your pocket
or in your bag. It's great for journaling, so I use that quite a lot. Let's have a look at
a few options you can try out for yourself. Watercolor media
forms, a large part of my painting practice
for journal keeping. So once again, your multimedia
pad or your cold press, watercolor paper is just
fine for this process. So what I like to use, well, I think the easiest thing
to do when you doing your watercolor painting is to use a set of painting pans. For example, this is a Winsor and Newton
set of half pans. This is actually quite
an old set that was my wife's grandfathers set
of Winsor and Newton paints. And I'm going to be using
these in the course to illustrate the various journal
demonstrations and I'm going to be doing. And you can see
very good quality. Now today you will
find Winsor and Newton have a series
called Cotman. And it's pretty much
the same sort of thing. 12 half pounds, with my essential colors and
a few extras as well. So great. It's got three trays are pretty much use
the left-hand tray for the lighter colors. The middle tray for, as you guessed it,
middle value colors. And the last one for the
darks, shadow colors. And that's more or less
the practice or follow. Make sure you always
have tissue paper. Sometimes we want to clean
one of the pens but leave the others or dirty like that. It's amazing how often I will scratch in the corner
like that to get just the sort of gray that I need and I can always
add to it perhaps. And then I've got
just the right color. I need a set of half pans. As I said, this is
Winsor and Newton, but you get all sorts of brands these days is another one
also good value for money. This is Mongo and extremely strong
pigment it covers. These are really quite
amazing and very good value. But we spoiled for choice. And with this brand like
some others as well, you can simply buy the
replacement half pans like us and follow up the tray and you're good to go
easy to transport. Even got a little
ring at the back for you to put your
thumb in and you can hold it while working
on playing a perhaps. So quick, simple, easy way
to get some color going. Now another set that I
use a lot and I find very useful is to graph
it and paint pan set. Alright, so as it says here, a unique blend of graphite paint with color for
dramatic tonal work. Now that means values. You painting with values, and you've got a
range of colors, but they all have that sort
of graphite look to them. I've actually got
a whole review of these in my YouTube channels. You can just look
for that as well. That you can see there's
some color as well, but all sort of a muted range. And it can create some
beautiful paintings. And you'll see these in action throughout
the course as well. But I use these a lot. I don't really want
to be fussing over. Strong colors are more muted range and it gives a
very pleasing result. Not all sorts of
other brands as well. Daniel Smith, you
can't go wrong. Some top quality
artist, watercolors. Let's also my Marie Veronica, a very good student quality
paints watercolor in tubes. And you can actually fill up some of your pants
with these as well. I've actually put in Some tube color into
this lemon yellow that was starting to get a bit empty instead of
replacing the pen, you can also just fill it up
with your tube, watercolor. So versatile to paint with. Watercolor that you're
spoiled for choice. Once again, there's
all sorts of brushes, natural hair brushes you can get top of the
range like this is a Winsor and Newton Kolinsky
sable brush number two, a fantastic brush I use for
watercolor and gouache. Quite expensive. Otherwise I would
have a lot of them. Or on the other side you've got synthetic hair
brush like this. This is a short flat, also very nice for
watercolor painting. Not very useful to get larger washes of color
down pretty quickly. And your smaller brushes, obviously less paint for
more precision painting, you may want to get some
of these reservoir pens. You unscrew it for the
handle with water and you can just squeeze the pen and the brush gets wet
and there you go. Alright. Put the cap on. So great for traveling. You've all has got
water in the handle and you're ready to start
painting at a moment's notice. You can buy these
individually or in sets of different sizes. By enlarge though, this is
all I use for watercolor. And in this course
I will be mostly using the 12th pan
set for watercolor, and of course, the
gravitons as well. Alright, let's have a look at other water media
that I'll be using. Most important of which is
my set of gouache paints, which I keep in the
etat container. It's got a plastic seal
or rubber seal that keeps the gouache paint
moist for as long as reasonable doesn't
last forever. Of course it will dry out. But you can see how I deal with dry gouache paint in my gosh painting for
beginners course. But basically put my gosh in here and I tried to
keep the paints moist. And if I know, I'm gonna
be using gouache soon, at least the day before I start
to wet all the gouache in the trays and the next day
it's usually ready to go. Now the quash I use
is Winsor and Newton, designers gouache, or useful strong pigment
last quite a long time. And I get great results with it. There are of course,
many other brands. So you may have to get what's
available in your area, but I think Winsor Newton, OK, quite well known
throughout the world. Other watercolor
media that we'll use in this course is acrylic paint. And for that I'll use the Amsterdam student acrylics
made by royal tollens. Good-quality actually
vary vibrant. And I use it straight
up the tube. Don't mix any water into it. It's ready to go straight out
the tube and it is at its best when it isn't watered down. So you don't need to water
down your acrylics brushes. For acrylics, synthetic
hair brushes are best at. I think the top
painting brush anyway, for my acrylic
painting is daily. Ronnie's gorilla
range of brushes, very good acrylic
painting brush. I use those and they've
lasted me very well, lost me years and it's still in good condition.
And that's it. A range of materials like this. You can paint any subject and it will keep you going
for many months, if not years, of enjoyment. I've got no trouble
endorsing any of these materials are
going to get paid for it. These are things that
are bought myself and tests lot over
the years Emma, find they have served
me extremely well. Now with your
watercolor materials, always have tissue
paper on hand or a good cloth or lint free cloth to dry your brushes
off in-between or mop up any excess paint
or anything like that. You need these to remove excess water very
quickly from your brush. Okay, I think that
about covers it. And now we can
start seeing how to get the best out of
these materials.
7. Materials for Writing: Now let's start having a
look at the materials. There are so many types of materials you can
use for journaling. So I'm going to divide this
up into a couple of videos. Starting off with
pen and pencil, advanced and basic
writing materials is enough to get you
started with journaling. Or when you need is a
pencil and some paper. But we're gonna go
further in as well and look at some of the
more interesting things you can add to the whole idea
of drawing and writing, and also different journals or paper that you can try out. So let's have a look
at what you can use to start drawing and writing
in your first journal. Well, let's start
off with looking at an drawing media things. So I'm going to use for the
drawing stage of journaling. And this is perhaps
the most important. What do you need to get yourself
started with journaling? Well, the simplest
thing of course, is just having a pencil, a couple of pencils, like a six B and a to B pencil. What more do you need? You can do so much with it, and then of course you
need something to draw on. Now there are so many
kinds of journals, books, pads, all sorts of things
are like Fabriano paper. It's one of my
favorite papers and wholeness tend to get
Fabriano products. I'm not sure why that is. But you can start
something as simple as a sheet of paper and
simply draw on that. But ideally, to get the
most out of journaling, you want something like a book, a pad of paper that
you can draw on. So let's just have a
look at a few examples. Is a Fabriano
watercolor pad or book. And it is 300 g, 140 pound paper, cold press, or always go for cold press because it's quite
forgiving with many types of media from watercolor to pass
toll to pencil to pen, that handles at all. Find hot press paper is very
smooth and it's not so great for watercolor mediums or ad hoc price is perfect
for simply drawing. It's a very smooth surface
compared to cold press. Cold press has a texture to it, which holds a lot of pigment and you can paint
on it very easily. Great for watercolor,
also pen and pencil and gouache as well. So this is one example
of Brianna's products. Watercolor book, A5 size, very nice, spiral bond. Easy to fit into your bag and take with you
another example. This is a sort of
multimedia pad, 200 gram paper, A4 size,
relatively smooth. It's more of a drawing paper, not really a watercolor paper, but it will still handle
watercolor medium. This is your basic
multimedia pad. Very cost-effective as well. Now this is the
watercolor paper, 300 gram, once again, hundred and 40 pounds. And this is cold press, so there's a bit of
texture to it as well. Very nice paper, indeed, great for just about
anything as I've said. So this is also good value. But what am I going to be using
to draw on in the course? I'm going to be using this in Phoenicia book or
subpar Fabriano, 200 gram paper, 90
pounds, A5 size. Think it's a very
attractive book as well. And the pages have
some tooth on it. It is a cold press, but very good quality
paper, nice and thick. Really a special book Clark
this with a marker as well. And you can create something attractive for your
journaling records. Get one of these, I think they're very good, but any type of
book will be great. So as I said, you can start off with just a couple of pencils. And what I like to do is sharpen the pencil as
well with a blade. I don't use a sharpener. And you just sharpen
your pencil. The old-fashioned way,
get a really nice long Pencil lead on it, which is great for
doing various things. As an example, you can
hold the pencil loosely. I don't put fingers down. I'm not actually
resting my hand on the paper when I'm drawing as if I'm writing, I'm
not doing that. I'm holding the pencil like so with a lung and
lead on the pencil, you can hold it at an
angle, shade with it. It can hold it up,
get a thin line, vary the pressure, soft, light, soft light, etc. And you get that looseness, which you get with a paintbrush. And that's what I
want with pencil. I want to get this variety. I'm not doing that. I'm not writing and
drawing and creating or other media that we will
be using to write with. You can use a simple
pen like this. This is a gel pen and
perfectly fine for drawing. The, some artists, what they
do with a ballpoint pen, for instance, is quite amazing. But if you just have
one of these pins, always use black ink. You can do amazing drawings
with that as well. Other examples of drawing media contact crayon gets
at sort of rough effect, Very nice as well. But as a general drawing item, I don't use contact crayon, It's more for filling in if R12. An important drawing tool for
me is the Pigma Micron pen. I can get them in
sets like this, or you can just
buy individually. My favorite size is the 05. It's a bit thicker
and it gets you a nice line like
that. Very nice. You get a thicker one as well. A point or 0805 is ideal. Another nice addition to
the my range is the brush. You can get brushed
up good, nice thick, thin and basically that brush shape, that
very attractive. And of course the good thing is they are all
waterproof so you can go over that with your water
media without any problem. Pigma Micron pen for writing. I'm using a fountain pen nib. Alright, these are made
by speed ball and you get different sized nibs and this is the handle and you just
pop it in. Like so. This is a Parker pen
product, Parker ink. But if you want waterproof Indian ink is
the good one to get, right. But just for writing, if we're not going to
use any water media, dip into your ink and you can
write like this, alright? And what I find is that this
makes me more conscious of my writing and I take a bit
more time to write neater. I think that's just a fun way
to fully in your journal, but you don't have to
use and LED like that. You can of course
write with anything, a regular pen, even
your pencil as well. We will do the other
writing instruments that are used from time to time in all my artwork,
felt up markers. These are Copic markers in different shades
of gray and black. I have a pointed
tip on one side. But my favorite is
of course the wedge tip because I can get
that broad stroke, which is very much like a brush, thinner strokes as well, and all sorts of textures. And then, and then different
shades like that of gray give me the
essential values. I need. Black, light, gray, medium
grays, subversive four values. And I can do almost
any subject like that. So there's black. This is a natural
gray number three, cool gray number five, and a cool gray number one. Alright, so generally go
for the cool gray or black, a number five, and maybe a number one for an
extreme light gray. Even if you have three of those, you can draw so much
with that are spanning the divide between dry
drawing media and watercolor. Watercolor soluble
pencils like these. This is Qur'an dash
and Staedtler, all sorts of manufacturers
and works like a regular pencil
that when you add some water media to
it, dissolves away. And that's a very attractive
compromise as well, especially if you're traveling
or you can't take a lot of paints with a few
pencils like this, and a brush and some water
and there you have it. Now if you want to really
try something different, it can make a quill, the sock made out of
segal feathers, right? I see go further, which was strongly
at a diagonal, make a little split at the end. And basically you've got an old-fashioned writing
cool tip that a new ink. And you can write quite nicely with
that if you want something fun and a
little bit different, make your own writing
quo for your journal. This is all a lot of equipment, so it's quite handy to
have a role like this, to put all your writing tools in there and easy transport. So pick what you want. Start somewhere. Start with a couple of pencils and a multimedia pad
and you're good to go. And you add as you go along. I never acquired all of
these things all at once. This is over a span
of years of testing different things and settling on what I need from
our own practice.
8. Pencil Techniques : In this lesson, I
want to talk about the techniques I like to use. And I'm going to
start with pencil and then move into pen and ink. Now, of course, using a pencil
and some paper must be one of the simplest ways to
get your ideas down. You can do pictures,
you can write. It's actually a
perfect combination. And artists have
been using a pencil and some paper to a journal for probably as long
as it's been painful. It's as basic as that. And it's a wonderful way to
just get some ideas down. Now meeting of the
demonstrations, I'll be starting with
pencil and then moving into some watercolor or
maybe gouache or acrylic. It's seldom that I'm going
to just do a pencil drawing. However, I like to start with a pencil and sometimes
I'll develop it further. And because of that, I can sometimes just use a little bit of color
instead of a lot. And going too far. If you've got nothing else, then just get yourself a to B or six B pencil and some paper. Now the techniques I use
to draw are very simple. The way you hold a pencil
is very important. It's the same with
holding your pen. When you're drawing,
you're not writing. You got to try and keep your
hand above the paper and don't rest your hand on the
papers if you were writing. So the result is a fairly loose drawing
and that is what we want. It's kind of a spontaneous
way of drawing, one that I tried to keep the
pencil moving constantly. It doesn't matter
about perfection. It's not a computer
illustration. Alright, it is an
organic experience. Each time I draw
the same subject, it's gonna be a
little bit different. Now with the pencil, besides drawing the very rough outline, I will do some shading. And for that I think
the best technique for me anyway is to use
the tried and tested method of hatching when
you draw lines and then cross hatching
when you go over those lands in the
other direction. And you can build up texture
and light and dark that way. It's very simple technique
but very effective. The other way is
to create texture. And I'll show you that in the forthcoming demonstration of these techniques that we're
going to use the pen, that's mostly a Pigma Micron pen and it's waterproof, of course. So very easy to go straight
into any water medium. And the same thing applies. They hold the pen with
your hand above the paper. Don't let your hands
rest on the paper. Keep that pen moving. And with the pen, I like to use almost dots and dashes approach some
squiggles as well. Just keep the pen up, down, moving along, varying the
pressure on the pen, right? Let's have a look at this
in action and then perhaps also how I'll take it a little further with adding some color. First of all,
sharpening your pencil. I like to use a sharp
blade to sharpen a pencil like this so I get a long lead and that makes
drawing a lot easier. Six P and to be pencils
cover most eventualities. Now holding the pencil, don't hold it like you're writing with your
fingers on the paper. Hold the pencil higher up. Kind of like you're
holding a paint brush. And then keep the pencil moving. Lift off the paper, but keep your eyes
on the subject. So you, your hands moving
is hand-eye coordination, but also coordinating
with you Brian, as you're looking at the
subject and thinking about placement and
automatically putting those onto your paper. So you get this loose, organic type of drawing. And you can develop
that as you go with shading and
changing your values. And as I usually do, I end up adding some color. Vary the pencil pressure,
as you can see, it gives a different effects. And of course, hatching
is the way I like to add value changes
lights to dogs. This is basic hatching, these diagonal lines
and then going across to cross hatch. You can do that again and
make the value even darker. You can vary the width between the diagonals to create
light to dark as well. Very useful technique. You can add texture, could be stippling or
little circles like this. Just make marks So your basic hatching, crosshatching and
adding that shadow side to the trees and the
shadow across the road. Very simple. I am fairly impatient and draw because probably want to get to the color as
fast as possible. Adding some texture
on the road here. Say if your picture is
going to be all in pencil, all in ink, pen, take more time with
it and really enjoy getting those textures
down that little details, the stippling, the
crosshatching and so on. Variation of width
of your edges. Pencil pressure. You see how various gated
Lost and Found look. Now, moving in the direction
of the shape as well. Getting these curves helps to indicate the volume of the tree. So you use all these
little techniques the same as you
would using a brush. Here's a contact crayon just so you can see that in action, this is a Brown County crayon. And you see it gives
us a dry line effect, kind of broken. And you can smudge side
with your finger as well. Water-soluble pencil
crayons, very handy. Kind of a dry
watercolor approach. Get your color down as I'm doing here with
blue in the shadows. And then get some water on your brush and
just dissolve that. Very handy and very
clean and convenient way to get a bit of
watercolor effect, yellow, blue, and
you'll get that green effects so you can
do some mixing as well. The Pigma Micron pen, my favorite size 05. Nice waterproof pen. But here's a regular
Joe writing pen. And notice also quite
waterproof too. Is a Pigma brush tip. Very nice pen. If you want to get a lot of
variation of thicknesses, you get all of that. Convenience of a brush tip. Very bold, strong
graphic potential with the brush pen, also
waterproof ink. The county cran does dissolve
a bit as you see this, that could be useful using
the number 05 Pigma pen. I'm going to start
drawing out with the ink. Notice the stippling of
the lines, little dots, dashes, longer lines,
shorter lines. All part of getting some variety and texture and
variation to your shapes. Bit of cross
hatching as well for the shadow side of
those distant trees. The wall I'm keeping
also very loose, suggesting some of
those stones if you want to create some texture. So you decide how detailed
you want to make it. I'm going to bring a little bit of color into this as well, just to show you a pen
and wash approach. Urine bringing textures
to the utility pole, crosshatching and
stippling up and down. And you see the nice, interesting texture
just happening. Now with the
water-soluble pencil, creating that shadow. Quick and easy. Now bring in some
watercolor pans to create that wash. Now when
you do a pen and wash, the wash is normally a very
thin layer of watercolor. You don't want to build
up too many layers are the ones that turns into
something a little more formal, a little more like a
typical watercolor. I do tend to want
to add more layers and develop the painting,
but that's fine. If that's what you
want, then go for it. But in a general sense
or a general guideline, pen and wash, very simple one
layer wash of watercolor. Over all or part of the drawing. You don't have to do
the entire thing. I always like to
leave some space in a journal drawing
or illustration. Space around the edges to
perhaps write some notes. Adding color and just making this little sketch
come to life. And that's it. This is pencil, pen, watercolor, everything
you can try and make an interesting
journal illustration
9. Watercolor Techniques: Now with a lot of
journal paintings, I want to add color. I love color, and
it's hard to resist. Now, a great medium with journals is of
course, watercolor. I use the regular
watercolor pens. That's a Winsor and Newton
set 12th half pans. And I will say use the
dough and graph it and water-soluble
colors as well. Give me a different
sort of experience. The graviton pans more in
the line of a value study, whereas the regular watercolors, more of the vibrant color
you'd expect with watercolors. Once you've got your pencil
drawing or your ink drawing, nothing better to go
in there with a bit of watercolor and just
add something to it. And I let the process develop. Sometimes I will just
do a little bit of watercolor adding a thin layer. But if it looks good, so often I'm going to progress
with another layer or two, or I should say another wash of watercolor Results
always also interesting. It's such a lot of fun
watching watercolor develop. Now, once again, the technique that I'm using for
journaling with these watercolors is not a perfect process
that you would use perhaps in creating a
large watercolor painting. But they certainly are more similarities
than differences. Starting off with a transparent, warm wash and then
adding the values, the darks afterwards is a
standard watercolor approach. Now I'm going to show you how I use this with my journaling. Sometimes I may
even start or very soon in the process get
some docs going as well. But I don't try to put
everything on at once either. So you gotta be mindful of the medium itself and respected. So in this demonstration, I'm going to show you the
very basic process for starting your watercolor
and then coming back into it to add
some further washes and get to a rather
pleasant completion, something you can be
really happy with. Let's have a look using the same reference as we tried
with the pencil and ink. I'm going to use that
now with watercolor. Composing the painting
as described, using the pencil just to
loose, constant moving. Drawing of the composition. Rough idea of weird
shapes are going to go. And just marking out where I'm going to put some script at the bottom and into
the first light, wash to some of the warm yellow to begin and a
little bit of that green. But I like to start with the warm colors because
I can cool them down and also darken them
as the watercolor develops. Some yellow ocher on the road. A little bit of green
mixed in there. Also very light. I'm not too concerned about
reserving any lights. Now, let it dry. Very important. Once triad, I can go in with the second wash and start applying more values as well. Deeper color, richer
color, build up. A layer or two. I just want to clean
that out and exit. Don't want that orange in
that middle mixing tray. But more or less premixed
a few tray colors. I like to have.
The light warms on the left and obviously
the cool docs on the extreme right. And just dropping in
some color, That's all. Middle value. A few darks as well. So second wash, like I said, just getting the darker colors, mostly middle values, but doesn't matter if you bring
in some darks as well. And I might just
finish this painting off with a touch of
gouache paints as well. Because we can do that. We keeping a journal and we
can mix media. No problem End justifies the means. That's a little too strong
with that burnt sienna. So I'm gonna just walk
through a tunnel at all, break that dark edge. Light. At the focal point. We're going to take that
green right across, actually looking
very nice indeed. As in summary or
springtime greens. This is the thing
with journaling. Am more interested in getting the values correct and
playing around with color. Experiment a little
with the color. If it doesn't work out, it's not the end of the world. Journaling is just playing with your color,
experimenting, trying things. And if you make a complete hash of your watercolor, no problem. We're going to fix things
up with some gouache. So for instance, in the focal area at the
end of this road, I want to tidy that up a little with some
opaque gouache paints. So that's what we're gonna do. In the meantime, get a
little more gradation of these greens and yellows
in the middle distance. At latter second
layer on the tree. Remember painting trees, bushes, shrubs, that sort of thing. They're all really can be
described in three values, lot, middle value, and
the dark shadow side. I like to pop in a few
touches of alizarin as well. Kind of a warm shadow color. But it suggests a few branches
and things like that, but with a touch of mystery
because it's more shadow like a little bit of
that cobalt blue, very soft bit of water in there. Just a suggestion of some wispy clouds and
sky. Little more. Slightly drier
brush application, suggesting some details. It's just the bit of
reflection in there, but that is still a shadow. Quite strong shadows
in the reference. But you don't have to
follow that dark shadow. Absolutely. Like that. I do
keep in mind that photographs tend to make
shadows a bit too dark. Now, I brought in the gouache. I'm going to add a few highlights
on the top of the wall. Traditional watercolor
artists would object, but that's not what we're doing. Journaling, using multimedia and really enjoying this process. Some bright lights and the
focal area to clean that up. So for the most part, the watercolor is going
to remain in place. We are just tuning
up the painting and, but getting some
deep yellow with white breaking in a few scar
holes in the tree. I think. The painting, I'll just clean up the shadow
area by putting in some burnt sienna to bring out the road a little more on
that certainly does help. You can do a lot
of the painting, paint over it in
gouache if you want, but I just want to get the focal area really that's the main thing in
a couple of highlights. A little bit of variety
I think is great and I love the perspective
of the scene. It's given us a little
more drama and energy. Some lights on top
of that hedge. Now, let's add a figure using burnt sienna and ultramarine
blue for a dark. Can I just suggest a figure
in there to finish this off? And look how we've progressed
from our pencil drawing. And the color wash. Little more information
with watercolor before switching
to gouache to get those final tweaks
and details in place. And I think it's looking
quite sprightly. Little bit of burnt sienna
gouache coming in there but not bringing
white into the docs. Okay. If sign that off, I'm now going to
inscribe it with a quote from Marcus
Aurelius to finish things off and take a moment to acknowledge some thought
into this painting process. And something a little life-affirming as
well to keep in mind. And of course, an artist
has a happy life. A working artist can only happy. And they will have it
10. Gouache Techniques: Now one of the most
important mediums are used for journaling
is gouache paint. And gouache has a unique sort of consistency as
kind of watercolor, but it has a more of an opaque nature to
just bigger particles. And also bringing in
white paint turns the watercolor effect
into a more of an opaque kind of like acrylics. But then again, not so
much because it can be reconstituted with water and it dries to a more of a
matte finish as well. I like to start with watercolor
and then go over it with the opaque gouache
paint where I want that stronger or
more punchy color. But of course you can
start straight off with gouache paint as well. It is so versatile. Anyway, let's have a look
at the gouache paint and a few techniques and
thoughts about how to use the paint in
your journaling. Well, let's take a closer
look at gouache paints. These are tubes of Winsor
and Newton gouache paint. And I generally work from
a palette like this. This is a stay wet palette. That lid has got a rubber seal around it there and you put the lid on and clamp it closed. And it helps to keep the
gouache moist for a few days. Doesn't lost indefinitely. But it certainly gives you a bit more time because
gouache dries very quickly. Okay, Now, quash is very
similar to water color. So let me put a little
bit of lemon yellow. This is a Winsor and
Newton designers gouache, one are alike quite a lot. And I'm just using some cold
press watercolor paper, which is very nice
for using gouache. And we'll put some quash down without any
white paint in it. And you can see it looks very similar perhaps to watercolor. This is Phoenicia, watercolor, primary yellow, so it's
going to be a bit darker. Let's put a little bit
of that on the pellet, mix some water into it. So it's more like watercolor. And next to the gouache. Now, you may be able to notice that it certainly looks
more transparent, which it is, of course, because it's watercolor and
the particles are much finer. The gouache is already
pretty much dry. Watercolor so obvious
is still quite wet, but warm, dry soon enough. But yeah, I'll take some of that yellow watercolor and
I'll mix with quash into it. And they mix just fine. So they get along
very nicely together. And watercolor and gouache
can be a good combination. Particularly if you want to start with vibrant,
transparent color. You can start the scene
off with watercolor. Or maybe you want to just turn your paper and work
over that with quash. There's many options. In my journaling. It's handy to start off with watercolor and then
adjust with gouache when I need a little
more strength in the opaque color
because one of the great things with gouache is using your white paint
as titanium white. Mix it into that gouache. And you can see that
strong opaqueness already starting so not as
vibrant as pure gouache. Cooler, the titanium white, it's very cold or cool it down. Put some more in. You can see a cooler
color already met, already marks back the
vibrancy of a lot. So there is that trade-off. Once you get white paint
into your gouache, it's changes quite considerably. White and I can, thus was the watercolor.
I can go over that. Actually quite similar in value. The effects that it has on
painting, acrylics and oils. Pretty much the same
thing with quash. Here's some scar,
blue and quash. You can see very
strong vibrant colors straight up the tube, gets some white paint into that. And just like adding
white paint into any of the other typical opaque
colors like acrylics and oils. A big, big change to that color. Okay, if I take the sky blue also without
anything mixed into it, Go over that yellow
that's already dry there. You can see no
transparency to it. In particular, if you wore
to the dance or more, you could perhaps get a
bit more transparency. You can see the green
coming through. But with watercolor, you
would almost be glazing that. It would be nice and green, perhaps more similar to that. But the covering strength of gouache is quite considerable. So if you're doing your gouache
painting over watercolor, you could perhaps
simply create a tone. Let's say this is
your paintings panel. And you could do your landscape. Here's some Ultramarine
mixed in with the yellow. And you can create your docs. Let's get some of that
watercolor yellow. You see it makes
quite readily yellow. Some burnt sienna. To get these light effects. With some white and some yellow, you can get mass opaque. Brush strokes like that. But you'll notice your
gouache will dry darker and as many even sink into
that wet paint around it. So you would go back and create more layers of gouache paints. Benefits when you layer it, like most opaque type of colors. The other thing is
your consistency. How much water do you add in? So let's go back
to this scar blue. And you can see that a fairly dry technique
there for scumbling, but quite difficult
to work with. So little water in the paint, so I'll put it on
my palette like that and up the
brush in the water, but I don't want water
dripping off the brush. That's mustn't be pouring
off just with the brush. And I may use some
tissue just to take up any excess water if it's
too much, mix that in. And basically you
wanted mass and fluid, but not dropping off the brush. It's not a wash
like in watercolor. It's simply of a nice
and fluid paint. So you get that. And of course the pipe is absorbing the paint
very quickly, but it gets a nice cover,
coverage like that. You're not scrambling
you now painting. If you go over the
wet gouache paints, That's fine for certain effects, but you'll find
that the wet paint is now going to absorb the
wet paint you put on it. So if you want a
vibrant top color, It's not quite like oil paints. We, you can simply pick
up a lot of oil paint on the brush and
paint wet overweight. With gouache. You might have to move on to another part of the painting. Let that dry a bit
before you come back to get that strong, thick paint they wanted on top. Even that, it is going to sink a little and get absorbed into
that semi wet blue paint. So ideally, you wait
till it's nice and dry. And that's probably
sufficiently dry there. And now I can should
be able to do fairly strong of color on there
and paint some more color. Should of course, keep
my white paint on the palette and mix it
in my other colors. So just remember that
what's happening here is the wet yellow is reconstituting
some of the blue below. So if you go over, you gotta be very careful. You're going to lose your paint, your top color that way. So put on your
color and leave it, go over it again when it's dry. To avoid intermixing like that. That's really the most
important points with gouache. Even though the
gouache paint is dry, it doesn't mean that can't
be reconstituted with water. So keep that in mind. You can use acrylic gouache, which dryers permanent
lead like acrylic. But I believe if
you're using gouache, this is the way to go. And you can paint
good, strong layers. But don't overdo it. You don't want to get a
thick blob of paint and put something like that
on with quash paint because that is very
likely going to crack. We're not dryers. So there's too little
water and it's too thick. You'd have to just a bit of water to get
it a bit thinner. And you can start
getting a nice layer. But it's not going to crack
like that one went nuts. Dry. Gouache paint has
dried in your palette. You can rework it
with some water, just soak a little
bit of water on it. Take a bit of time, break it down with your
palette knife and mix it up. And you can reconstitute
that dry paint. However, it's not going to be as good as fresh paints
straight out the tube. So bear that in mind. It might be better
idea to scrape art. I cover, yeah, I
would probably scrape the side and bring in new paint. Fresh paint is much
better with gouache. So that's the simple fact of it, is great for painting direct and getting great color effects. Sometimes you want to
use the white paper to come through and
add more vibrancy. Very often though, you may
want to tone your paper, let that dry before you
go over it with gosh, because you can still
get some great effects with the underpainting coming through and even a bit thinner, you'll get that color
coming through. Alternatively, you can make very strong darks as well
with gouache paints, burnt sienna and ultramarine, just like you can with
oil paints and acrylics. So extremely versatile
and fun to work with
11. Painting Lost and Found: Sea shells: Now let's have a look at
painting some C shows. I've got three seashells that
I'm going to try painting, and I think they'll make a nice addition to
the journal as well. So let's get into it. I've got three shells
that are found on the beach that we're going
to try and do some painting. I'm going to do them
three in a row. Basically. Just going
to outline was one because I'm doing
them more or less the same sizes they
are in reality. So that's just a quick
little shortcut together. A more or less correct shape. I'm going to be starting the drawing in pencil
and just getting the main shape and a few select lines and
marks on the show. And then try some
of the diamond, graphite and watercolor pans. Use that as the medium. I think the graphics
and colors have that washed-out look that is ideal for this
type of subject. These shells all obviously
showing the effects of sun bleaching
and wind curing. You could say, they got
that old. Look to them. I think that when Turk graphics and
colors will be perfect. Also just putting in
that shadow line. The next one, same process. Just a quick little size. And then fill it in with
the main lines and marks. And I think it'll be fun
little exercise to try and get the simplicity of these
shapes down on the paper. And this one needs a bit
of correcting there. So I don't mind showing
the correction lines. Some of them show through
with the, the watercolor, but I think that's unexpected
thing with watercolor. It's not a real problem. If it's really is an issue. You can obviously just rub out the lions or soften them up. And that wouldn't
be even noticeable. But I find it has
somewhat of a charm. Plus I think there's
a benefit to reminding yourself that you do make mistakes
when you're drawing. Okay, I've put the color
chart from the box up as well because it's
very hard to actually see those colors in the pans, that cell phone video. They all look quite
dark actually. So it's interesting to
note the color chart. Now mostly using
the warmish colors, the browns, the yellows, yellow, greens, and some of the
cooler colors will be blue. Now this color I'm using
is called a autumn brown. That's on the extreme top left. Next to that. The orangey
looking colors called rosette. And then the yellow sort of off yellow next to
that is called meadow. And although the names
don't tell you too much, at least you get to see
what those colors on. Now, once again, I'm using
the little sable brush. I find the watercolor mop. Although a great brush to use is just a little too big for this, and this number to
Cybil is ideal. So looking for the
direction lines, for the shape, I'm trying
to suggest the form and get a three-dimensionality
as well. So that means I tried to drag the brush in the
direction of the, the lines, suggesting the form. So convex lines, concave
lines, that sort of thing. Try and move your brush in
that direction as well. Also the edges of the shell on the shadow side will have
to be cooler and darker The top of the show will
be the lightest area are all leave a little bit of
the white paper showing through to try and
emphasize that light and then the illusion of three-dimensionality
will be assisted. I'm not suggesting it's
gonna be perfect that way. But I think it
should come through. Let our minds IS the top
beer also kept quite thin, so I will add a little more
water to the paint to thin it out and make sure the transparency
is not lost too much. Find these gravitons
are quite transparent. There's no doubt about that, but they do hold. But of pigment almost
like little grains, especially when I'm
using this color, yeah, I think this
is the ocean blue. For the shadow. You can see those grains just accumulating in the water bead. So you've got to try and
push that around the bud. Straight onto the next one. Quite a complicated shape this, but keep the top, that little off white spot, keep that white on the paper and then fill in the radiating
lines from that. Keeping in mind, the
left side of the soul is in shadow and that's
going to have to be cooler. And then once again,
the illusion of three-dimensionality should
at least be noticeable. So there's the radiating lines
and then there's kind of concentric circles almost
like topography map. Say, try and look out for these little shapes
and try and make the best of just rub that one of that age was just going
to be much too hard. So in the shadow areas, a bit of a softer edge perhaps, or also on the lights
at the top of the soul. Fairly soft edged. And that tries to give
a little sense of atmospheric perspective
at a very small scale. Soften that up a
little more water. So an interesting exercise. I have not painted this
particular shell before. So really, you're not sure what to expect as I just
soften these edges up. A little bit of water
on the brush just to make sure it doesn't get too, too hard and too demanding
of the eye as attention. Spread those beads out a little. And then the final one, this is perhaps the toughest one of all I can see I have
the drawing, a little art. Looks like the
shells are slightly compressed from left to right. But never mind. We'll
work with what I have. I think it will
still come together. So all I'm looking for is
believability as well. It must be obvious that it is a shell that
I'm painting and have some connection with the actual appearance
of the shell. I'm not doing a natural
history illustration for a book conch shells
of course, but stole. Hopefully it's recognizable. The back of the show has
quite a strong shadows. So that's Aston be much cooler. Cooler down the sides as well
as I explained previously, to help the
three-dimensional aspect. Light on top. Very quickly drawn this and it's all about trying to
get the grabbed the moment. You could do this on location. And that would be a lot of fun. I think, just sitting on the
beach during these sketches. Or maybe even in your car after you've been
down to the beach. Using the lions. Want to soften this
one up above it, using the lines to suggest
the shape as well, the flowing lines of the shell. And these circular shapes, I think that pretty
much finishes it off. So I'm sure you'll
agree the soft, muted colors of the graph it and pans are perfect
for this subject. We'll sort of earthy
look to it as well. And that's more or less set. Let's get a little shadow. And that'll be a
fun little subject. And I'm sure you'll do plenty of these great little exercise as well in color
temperature, I think. Let's get something
done to inspire us. And I hope you have
fun with this subject
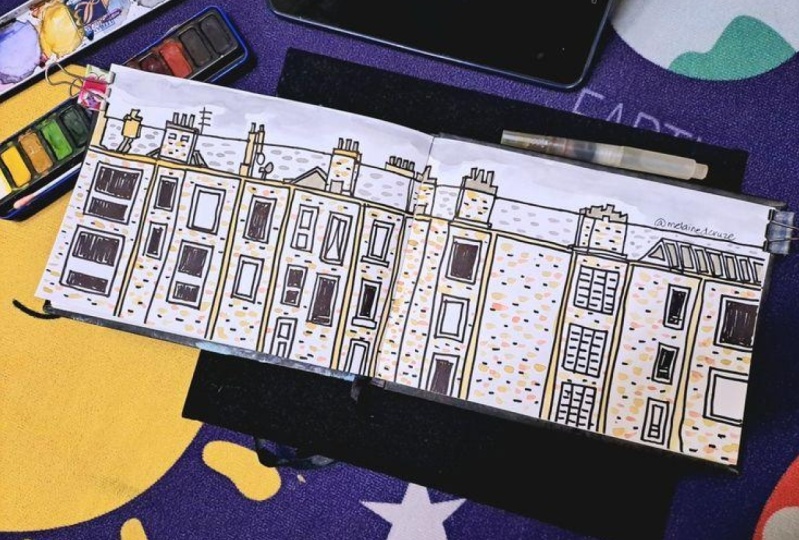
12. Urban Sketching Introduction: Now there are all sorts of things you can do
with your journal. Perhaps you want to
try urban sketching. If you live in a city, you may want to go out and it might be right
there on your doorstep. You've got traffic, buildings. We use a subway or you
travel on the bus. All these opportunities,
you have, perhaps some downtime as you're commuting and you can
do some sketching. This is about urban
sketching specifically. It is actually quite a big
movement and you can find lots of urban sketching groups. Let's look at a few tips to help you start to urban sketching. Start with the basics. We've discussed materials. And you just need a sketch book, a pencil, pen, and few
other bits and pieces. Choose the right sketch book. If you're going to
use watercolor, then must be a
watercolor sketch book. Now you can experiment with different materials
and ink pen or gel pen or pencil or
watercolor pencils as well. But keep practicing,
keep sketching. Set aside a little
bit of time to do some basic sketching. We're quickly, it's all
about capturing the moment. Not really worrying
about perfection. What, even if you're
doing buildings, just think about the
perspective and big shapes. The main shapes and lines of the subject simplify
as far as possible. And yes, always take your reference photo so you
can look at that later on. Basic common sense
precautions and don't get in people's
way or privacy. And you should have fun with your urban
sketching this way.
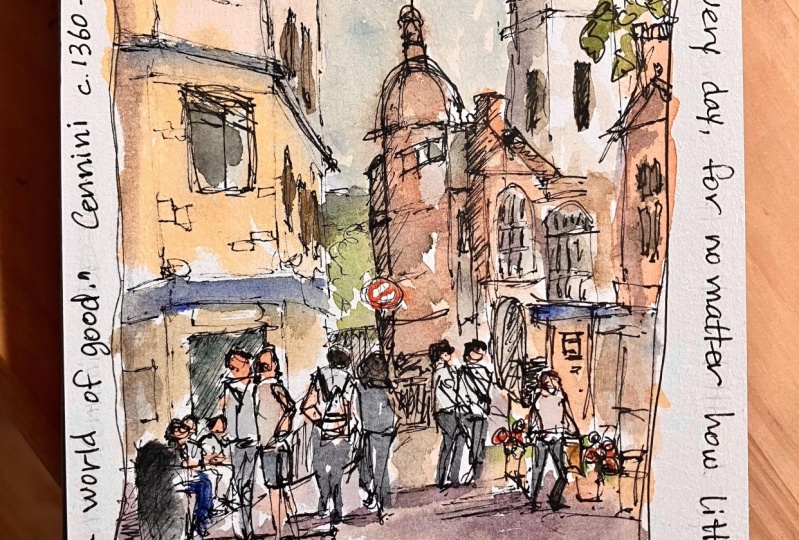
13. Urban Sketching Demonstration: I'm going to just
do one sketch to give you an idea of
how I would approach an urban sketching
situation where time is limited and you just wanted
to try and capture a moment. This is the reference and beautiful sunny
Street in London. So I'm going to start off
with the Pigma pen, the 05, and start sketching out a very
rough sketch up the scene. Notice I'm holding the pen
just with my fingers above the paper and letting the nib
of the pen carry it along. Getting this sort of
broken sketchy line. With buildings like this. And in most urban
sketching situations where the streets and
buildings were trying to keep the perspective in mind. So that's why I started
with the horizon line. And then trying to relate all the diagonals of
the buildings to that. This is a single-point
perspective down the street as well. And of course the buildings have another perspective
line as they go up. But for this drawing, it's the buildings relating as diagonals to
the horizon line. So just these stumbles
on dots, broken lines. And this to get that sort of loose and sketchy look to it. But of course, if you in doing this outdoors at the scene and any sort of scene like this, you're going to
have to work pretty quickly and there's
a lot going on. And you just want to
capture the essentials. Overhanging tree with
the branches and leaves, making a very nice
framing elements to the scene and giving that dark value change into
the lights up ahead. So I'll be filling this up
with a wash of watercolor, trying to keep that
very loose as well. Stop placing the figure now. Well, I should say
that the figures, the two main figures. And then I'll put a few of the surrounding
figures around them. Remember to work fairly
quickly as you do this. Keeping your eye on
the subject as much as possible and trying
to keep the pen moving. Especially when you're doing the buildings and
surrounding objects. Taking a little more time with these figures just
to get placement. And the gesture of the figures really
the fact that moving so one leg shorter than the other makes sure the heads of the figures are not too big. And that should just be enough detail then of
course, the shading, be aware of the shadows, especially in urban sketching, shadows are a big
factor, very important. Always. Shadows caused by
buildings, trees cause people. It's a critical part of getting
that warm and cool color. Or at the very least, value contrast if you're
just using pen and pencil. Few more figures as well, that's a quite prominent, There's some dark background. The doorway is behind
one of those figures, so it does stand out a bit more. Few of these seated figures on the side just acting
as a framing or composition element to take
the eye into the painting. The focal area being the street leading up and between
the buildings. So it does take a
certain mindset to keep things loose like this. I know a lot of artists are absolutely determined to get
the details in the scene. And when I look at it like this, I do sometimes feel that way. Maybe I should try and get a
little more of the detail. But once the color is in, I think things pull
together mainly When you get the warm and
cool colors in the shadows, that sort of thing
that really makes such a huge difference
straightaway. So I'm not going
to be able to fit all the buildings in with this format of the
picture is more or less kind of leaning
more to S squared, but I've got quite a
strong portrait shape with the page as it is. So I will fit in these
towers and one of the, one or two of the buildings. You gotta keep a steady eye on the subject and pick up
all of these shapes. There's that street sign. There's all sorts of
marketing signage as well, but you don't have
to get everything. The trick is suggesting
these details. Few, a few lines, shape beer or are there. And that's what's important. Shapes and lines. And then the shadows. What part of the
building is in shadow? What part is light? Is it warm? Is it cool? Pretty much a concern
for every painting, every sketch you do. A couple of figures ahead. For the most part. Figures like us, adults, all the heads are pretty
much on the same level. And it's just the legs that
are at a different level, depending if they're further
away or closer to you. Here's one figure. Yeah, that is quite
a bit short-term, but that's just because
the person is quite short. So if you're drawing
children in the scene, obviously the children's heads will be lower than the adults. But it's just one
of those things. Keep adult say it's more
or less at the same level. But the legs can differ. Quite complicated, tower others. So what is a relatively
complicated scene becomes even more so with all of
these architectural features. And the trick is trying
to simplify them as well into rectangles, half circles,
squares, triangles. Look for those shapes. Try to put them down
in the right place. Don't think about getting out a ruler and drawing
every straight line. That will take away from what we're trying
to achieve here, which is a quick loose sketch. In the tradition of
urban sketching. On the hoof hazard
were there in person, That's the ideal situation. It could be sitting in your car parked on the side of the road and just sketching or
maybe on a park bench. If you can. You can even do all the color work
when you get back home. Just get the pen work
in at this time. I think we getting to
some progress here. And I think there's something
that can be done with us. A few of these
lines could be just a little more diagonal, pointing down towards the
vanishing point in the horizon. But never mind, I think for the most part we're
pretty much on track. Windows. You have to
have a lot of patients to do windows in
buildings like this. And it's one of my weak points is being
patient in this regard. I'd just like to get the shadows in and start adding some color. Another figure over here, just to balance that
against some shadow. Well, I have a foreground
shadow as well. Let's basic hatching
of shadows with the pen will show through
with the watercolor as well. So it does help.
With the watercolor. I'll be adding the color
temperature aspect to the shadows. So that's all fine too. 101 little details. I've got a suggestion, a few shapes and hope
that is sufficient. If you can actually
recognize the scene. Then I think that's pretty much all I can really hope for. Starting off with the, the lights in their typical
watercolor fashion. But I'm trying to keep this. The genre of a pen and wash. So very simple colors, a lot of overlaps as well. Choosing to use some
terracotta and for the light sides of smudging
that down with a finger. So the thing with
the wash is to get a general impression
of the color. Let's say the building is
an orange brick color. You just wash the entire side of that building with that color. And then when that
first washes dried, you can add the second layer, which could be a shadow
over that initial color, using the Winsor and Newton
sable brush. Number two. But at wholes, a
surprising amount of water are really ideal
for the painting. Using ultramarine
and some cobalt for the darks and shadows. Applying that shadow wash over the warmer red wash
for the light, Bolding some yellow ocher, little bit of yellow
in the latter parts. So really I'm asking myself, what is the value, light or dark and what's the color temperature
is warm or cool. That's saturated. I'm doing this more
or less as if you could be in a location with you. Watercolor pans, maybe
some reservoir brushes, and just getting done
quick bit of color. Leaving the white of the
paper for the extreme lights. This little dashes of red year, they're adding
energy to the scene. I'll bring a bit more green into the painting to offset the reds. Repeat some of these reds in the figures as well
for a bit of harmony. Strong light, dark contrast
on the main figures. I'll touch of burnt sienna, which of course is a
reddish color as well. So those little red nodes also add to the
energy of the scene. A couple of strategic dark
shapes under the roof line, for instance or so. That's an important dark value. But of shadow. The trick is, even though the, these are the shadow sides
of the buildings, we don't want to
make them so dark. The store, a lot of large flexing backup
into these buildings. Really having fun
with these colors, I must say though, often bring the scene to live. The shadow of your second little wash so they add some more
texture and interests. Bring these leaves on
trees forward a little. Actually using a bit of
phthalo green as well. And that adds some,
actually some movement as well with some of
these longer strokes, looks like perhaps leaves blowing through the air as well. It just adds a
little bit of extra and harmonize that with a few
of those notes down below. That's pretty much it. Work on a few of the shadows. But this would be a typical
urban sketch type of scene. And one that I'd be certainly
happy with if I was doing in location. To be great. I'm going to add a
little quote here from Marcus Aurelius just to
add my personal thoughts. There it is. So try and approach like this if you
indication or back in the studio to get something energetic and maybe
whimsical as well.
14. Conclusion : Oh, there we go. A whole
lot of inspiration for you to take up journaling,
illustrated journals, write your story, make
notes, observations, anything that you can commit to writing that's
meaningful to you. All of that can be included in your
journal and of course, illustrated with your art. It's not the same. Without bet illustration. That painting, that drawing, that little sketch, that moment. Memory you've put down. All of it is special
and ultimately, you are building up your
knowledge of painting. Everything you put
into your journal is going to increase
your skills, your powers of observation, and your interpretation
of the scene. And of course, your ability
to simplify the complex into more simple and
stronger compositions you're after all, are now looking at shapes, are also bringing your emotional input
to your journaling. And that's going
to translate into your painting, of course, MAN. Firstly, improving your entire creative
output as an artist. I don't want to
overstate journaling, but it's hard not to, because it is a fundamental
part of my creative process. I think you can see just
how much fun it is as well. So I hope you, so I hope
you are inspired to include journaling in your painting
process into your life. Make it part of who you are. As time goes by, you're pulled up a library
of journals as well. And what a beautiful
collection that is not just for you to enjoy, but perhaps your family
and friends as well, something to look back on. I guarantee you it
is not there to replace photographs of
course, but at Whoa, hold perhaps an even more
special place in your heart because you've
committed a memory and you've processed at the
end you've created something. So if you haven't started yet, now is the time to create your first journal painting
or drawing or illustration, or simply start doodling with a pencil and see where that
takes you. Think about it. Work something out,
come up with a theme, perhaps, just get started. That's all I want and don't forget to share
your work as well. Let Everybody see
how you progress and help others as well with
your inspired creations. Have fun journaling, keep
it up and I wish you all the best with your
creativity in the future.
 Malcolm Dewey, Artist and Author