Transcripts
1. Introduction: Sketching cup-shaped flowers can be a bit tricky, especially when they insist on facing you at all different angles, right? You know the culprits, crocus, tulips, magnolia blossoms, poppies, all of those beautiful colorful flowers that are out there early in the spring. And we're itching to get outside and sketch something a little bit different, something with a little bit of color. Foreshortening stumps all of us at times. In this class we're going to learn some specific shapes and how they hold the key to helping us capture those difficult cup-shaped flowers, no matter what angle there. We're going to start with, well, a cup. I hope you'll join me on this journey to see how learning to sketch a coffee cup can help us capture those elusive cup-shaped flowers, no matter, no matter what angle they decide to present themselves in.
2. Start with a Cup: All right, so as I said in the introduction, we're actually going to start with sketching a coffee cup. So I'm going to have all the reference photos for everything that we're going to do in the reference area, both in color and black and white depending on what you wanna do with it, there will be photos of this cup also, but I urge you, if you have a coffee cup that you can use, It's much better to do the project from something live in front of you rather than from a photo so that you can flip this at different angles and see how it changes. All right, so let's move on over to the work table and get started sketching our cup. All right, We're going to start out here taking a good look at our cup before we begin. All right, if I set it down like this directly under the camera, you can see that the top end of the cup is, it's clearly a circle. If we flip it over, same thing with the bottom, it's a circle, right? If we put it straight onto the camera, it just looks like a flat. It's almost a rectangle. It's a little curved at the bottom, but a rectangle. All right, Now what happens when we begin to the cup, towards the camera? You begin to see up here, what happens is when our brain knows that this is a circle because we know what a cup looks like. But if we really take a close look at it, this is not a circle. It's actually a squished circle called an ellipse. And that is the key shape that we need to learn to be able to capture these cup-shaped flowers. I think you see down here at the bottom of the cup. That's also not circular from your point of view. The more we turn the cup, though, the fuller the ellipse gets, but it's still not a circle. Whether we tip it this way, this way, or this way doesn't matter which way we turn it. It's always going to be an ellipse unless it's directly facing you like that. Okay, so that's what we're going to work on. Let's pull this sketch pad over here, get rid of the cup for a minute. We need to look at an ellipse. So we've got a circle. We'll do the best we can free handing a circle. There's our circle. That's what it looks like when it's full facing us. But an ellipse is a squished version of this. So we're going to make a shape like this. And this is a shape that you need to practice. And I urge you before you start working on the projects to do a couple of pages of warm-up exercises using the ellipse. And if you'll notice right here in the corners, It's not pointing like a football because this is a squished circle. So make sure that when you're drawing your ellipses, they have rounded edges. All right, so this is a thinner lips you can, you may run across a wider ellipse. You may run across a medium one. They can be at any angle depending on how you're encountering these flowers out in nature. So play around with a page of ellipses before you get started on your cup. So we're just going to do a real quick cup down here. And like I said, the reference photos are in the reference section for you to, to draw from. Does not remember the cup in the sketch pad here and the camera so that you can still see. All right, so what I'm looking at, what the cup right now is this. It's facing me at an angle where I see a pretty fairly wide ellipse. All right, and I'm just sort of getting the shape. And now I'm gonna go down from the center angle of this. Now I'm going to draw the bottom of the cup, which is another ellipse. I mean, our eyes only see this part, but in reality it's a full ellipse. We just can't see the whole thing, right? We're going to draw it in just to get us started. And then I'm going to connect these two with this rounded cup shape. And here's the thing that you need to think about when you're drawing cups and cup-shaped flowers. These two ellipses will always relate to one another. They'll never be off kilter. So when you think about drawing the petals of your flowers, remember that the center of your cup shaped flowers going to always in three-dimensions line up with the top opening of your flower. Alright? Alright, so let me grab an eraser here real quick. And we'll just kind of lighten the stats. The part of the cup that you don't see when the cup is tilted like this away from you. All right. So what we're also going to look at is some lighting. If I've got currently, I'm sitting at my desk and I've got sunlight here to my right. It's hitting the cup like this. So the lightest areas are going to be here inside the cup and here on this side of the cut. So when you're shading and this will apply to the cup-shaped flowers as well, which is why we're doing this little part here. Whatever is, part is facing the sun is going to be the highlight in is likely to be opposite on the inside as to the outside. So if you remember, when you get to the flowers, as you're doing the shading, look at the lighting. And note that wherever the light hits is going to be opposite on the inside as on the outside. All right, that's a real rough sketch, but that gives you an idea how we can practice sketching coffee cups to get the idea in, to be able to sketch the cup-shaped flowers in real life and get a more realistic drawing. All right, let's move on to sketching some actual flowers then.
3. Project 1 Sketch a Crocus: Okay, let's get started with this little crocus. It's kind of a tight one is more like the tall cup that we had. And you can see that the face of it is tilted toward us. And I've got it in this plastic sleeves so I can show you the shape of the ellipse. What we're gonna do is kind of define what the top ellipse looks like. So you can see we've kind of touched the tips of all of the different parts of the petals. And then down here at the bottom, this is the part of the bottom ellipse that we can see, and this lighter dotted line is the rest of it. So there's still lined up and the petals are all aiming down towards the bottom as they have to write. Okay. So with that said, let's get a pencil out and starts sketching. And here's our photo that we're going to work from. Just going to be using pencil today. And we're going to use this small piece of paper that I have in front me, this little sketch book. And we're going to draw multiple cup-shaped flowers. One more light on the subject there, that's better. Okay, so we've got our reference photo here, and we've got the shape of our ellipse. So we're going to start with that ellipse and just going to draw lightly on the paper here. I'm drawing a little darker than you probably need to just to make sure that you can see it. And our bottom ellipse is somewhere in here. I'm only going to draw will dotted line, most of it. And then the flower begins at the edges here, and it comes up. That same thing on this side. Okay, So that is the general outline of our flower. Now we're going to go back and we're going to look at where are we going to start with this? With individual petals. So I'm looking at this one right here. And it starts all the way over here on this side. And it comes up. And then we're going to stop it here, even though it looks kind of short to our eyes. That's the way it is. Remember I said, as the tips towards you, the petals in the front become shorter than our eye thinks they are. All right. And now I'm gonna go ahead and get this one on the edge because this is defining that side shape. And it comes all the way up and it's a little more rounded them I have this. I believe. So. I'm going to extend that just a little bit. But again, it comes down and it meets that bottom ellipse. And this one is slightly tricky because it, we're seeing the side of the petals, so we're going to make that little corner right there. And then we're going to come down and actually it's quite a bit more around it. And it comes down and almost touches this other one. And announce. Get a little eraser action going here so we can see a little bit better. All right, There's that one. And now we've got one in between here. It kinda bridges this gap. And again, it looks way too short when you put it in here. But if you look at the relationship here and that angle, we've got it, right. Okay. That's a little more. Okay. Now we've got this one that kind of you're just seeing part of it again, right? But it comes down like this. It's one of the taller petals that we can see. And it comes down and around and touches the first petal that we drew. And then what we see is it comes off of this one here in cups all the way around. When it comes to a point. And then what does it do? It turns down toward that ellipse. You can't really see it because we've got this pistol and the y. But you can imagine it so that you can, I mean, if you need to draw it all the way out, by all means, do so. With that really light line there, you can see everything is aiming at this little ellipse at the bottom so they're lining up properly. All right. And then we've got two more that we have to get in here. This guy sits behind, so I'm going to save him for last. We're going to get this one in here that comes up off of this one and kinda curves around. And it meets this one. And you can't see it because it's in the back of the flower. But this one also curves around these overlap in its aiming towards that ellipse. And then the one in the back is a little bit taller, comes up to a point and around. And it too has a little bit of a fold here that we need to capture. All right, and then let's get in here and we'll draw this little pistol in. It comes up and it's got a little ellipse of its own going on here. And comes down and spreads out. Alright, and there you have, that's our first cup shaped flower. Doesn't look like much at this point, does it? But we're going to we're going to fix that. All right, and let's add in our stem coming down. Okay, so now we're going to look lights and darks, which is why I've printed this out in black and white so we can see better. And I'm going to start with the darker parts first. This back pedal is really fairly dark. So we're going to put a lot of lines in this one. And they seem to come down almost into V-shape like that. If you choose to do this in color and the references I've given you, in the reference section, I've given you the photos. Um, there are black and white versions in color if you choose to do this in color instead, just make sure that you get the darks in the dark spots. If you're using watercolor. That's going to mean you may have to do some wet on dry work and layer color to get enough color go one in the darker spots. Alright, and we see, I'm just kinda fill in all of the darker spots that my eye sees. Some of it is more line work and some of it is shading. But that's what's going to make this flower come to life. We've got our petals the right shape. There's usually a little shadow in the area where the petals crossover one another. He's petals kind of bleed right down into the stem. And we've got a little dark spot over here. Kind of a medium tone. And this pedal kinda gets lost in this one and that's fine. And this one comes like this, not quite as dark as that back one. Make sure that there is a differentiation between your front petals and your back petals. And one of the great ways to do that is by really emphasizing the lines that are closer to you in the front. And that makes the things in the back kind of disappear. All right, so there we have our crocus, that's our first cup shaped flower for today.
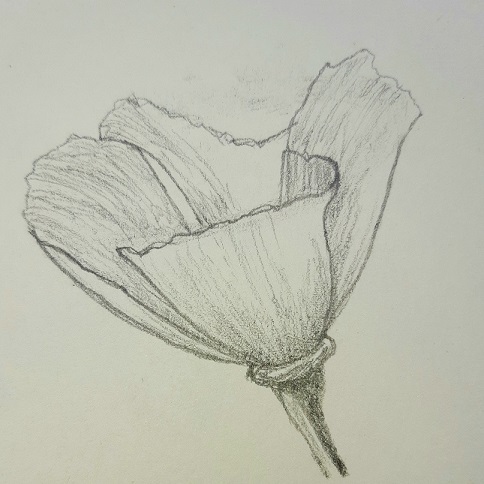
4. Project 2 Sketch a Poppy: So now we're looking at a poppy. And you can see this is much wider at the top than the tight crocus that we just did. But we're going to do it exactly the same way. We've got this wonky petal that really sticks up in the air here. We're just going to kind of make it match the rest of the ellipse that we're going to draw here. So we're going to start over here. And this is a tighter ellipse, then it looks like I said this, this petals kind of an outlier, but if we do, do it this way, make it really wide. Kind of more narrow issue lips. That makes sense. And actually this looks like the outlier, but it's actually this petal. It's begun to weep down. The older poppies get the more of the petals opened up and kind of spring downwards. So that's the ellipse we're going to look at. And then we have, here's our bottom. This is a little clearer this time because there's actually a little pedestal down here. And so it's going to on the inside we can't see comes around like that and you can see clearly all of the petals come down and aim towards that center ellipse. Okay? So let's move this aside and you're not going to be able to see the reference the whole time I'm working on this necessarily because this is a bigger picture. Alright, but we're going to remember that we've got this longer, thinner, more flattened out ellipse. And we're going to start with that. And this is how you do. You just kind of keep going around and around. Not a lot of pressure. Just get that basic shape in. All right, and we're going to pull this back up. And this is really small and this flowers really opened up. So we're going to put our bottom ellipse here about center. And then we're going to do the same thing we did with the other and we're going to finish the cup. It's going to meet with this bottom ellipse here. And we can just kinda dot that in so we can see it as we go. All right. This is a fairly unusually shaped flower, which makes it really fun to sketch, in my opinion. So we're going to look at this one here first. And this goes, this pedal covers most of the front part that we can see. But you can see that it's really kind of a short look and pedal. So we're going to start that about here. And it curves all the way down into this bottom ellipse. And then we're going to make it a little fluffy here because that's what we're seeing. And if you look really closely right here, we can see that that pill curves around on itself. So we're going to do that two curves around up like this and comes down. And then we have to come to the outside of that curve and draw the rest of this flower, this petal, and as it comes down and connects with that bottom ellipse. All right, there's our first petal. And now I think I'm going to go over to this one. And you can see there's little point there. This IS curve and in around itself in the front. And it's shorter than this one. So we're going to start that one about here. And now we're going to curve it down into that bottom ellipse. And then it kinda comes up at an angle. Then it becomes this other petal comes around and then dives straight back down because it's got to hit that ellipse. Right? And yeah, I went over a little bit my my ellipse, but you don't have to be ridiculously married to that particular ellipse that you first true if you see that the proportions are off, you can adjust as you go. All right, and then we have to draw the outside of this petal, which is the part that we can see. And it comes down like that. All right, that's two petals down. Now right here. This third pedal actually touches this one up here. But then it comes down at an angle, and then it follows the same path as the other one did. Again all the way down to that ellipse. And then it too is pretty ruffled. But then as you notice, this is the pedal that's kind of, it's, it's changing course and beginning to flop down. And it comes right here, almost down to where this front petal comes in on itself. It's way down here. All right. Now we're going to tackle this bad boy over here. You can see kinda comes up. Right here is where this petal folds. So we're going to start him right here. And he angles down like this. And then it comes down and it also hits straight towards that bottom ellipse. All right, That's the basic shape of our flower. Let's put in this little, we've got a little peduncle down here underneath. And it follows the shape of that ellipse. And let's go ahead and put our stem in. All right, so there is our poppy. And let's go in and get rid of some of these extra lines. Now we're going to look at the darks and the lights. And we can see here's a highlight, here's one here, there's a little bit here. The inside part of this petal is pretty dark, so I'm going to start with that one. And also look at the direction of the lines in the photograph. If you follow the direction of the lines. When you're doing shading like this, it's going to create a much better feeling of realism. It kind of points our eye down towards where this particular petal is coming from. And it's fairly dark in between here. And again, I'm going to darken the lines of the petals that are more in front so that we can see them better. We need to, we need to get rid of that too. That's the part we can't see. All right, and then right here I'm gonna define that one just a little bit. Because that looks like part of a pedal that didn't get colored in. All right. I'm going to draw some lines here. But we don't wanna go too far over because remember over here is where there's a highlight. And we're just going to come up from the bottom of this front petal. Because it's a curved thing. It's not a flat pedal. Remember it's a cup. So there's always going to be, unless the light is coming up from underneath, there's always going to be some dark. Right at the bottom. And right underneath there's where the darkest spot is going to be. In. It lightens, it goes up and there's a highlight right in this area. And make the lines a little bit sketchier as you go up, making it look a little bit lighter. And then this little folder on pieces considerably darker because it's behind. And then this one, this petal also. It's got a highlight over here on this edge. But otherwise it's a medium tone. So we're gonna do some hidden skip lines here, following the contour again. And then this little piece underneath here is pretty dark. We're gonna kinda follow the contour of that as well. And then the stem itself is the darker part. It's shadowed by the flower a little bit. So we're going to make this part fairly dark. And then some light strokes over here. All right, so there's our poppy.
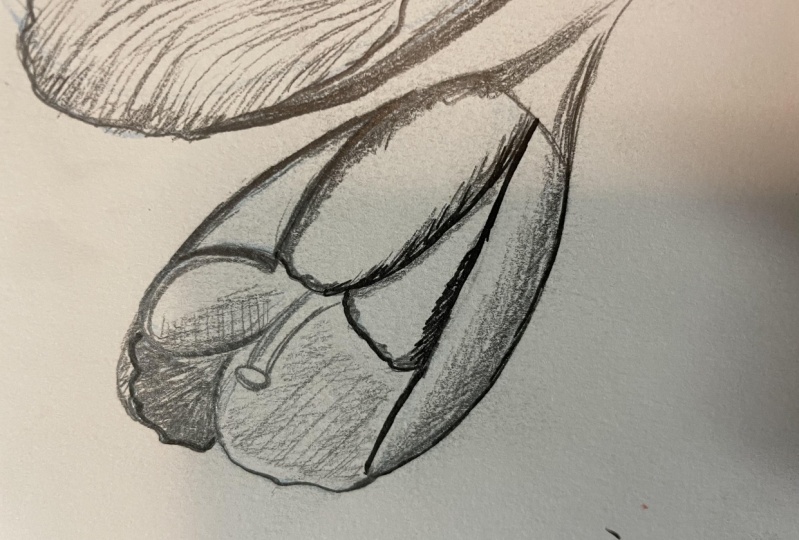
5. Project 3 Sketch a Lenten Rose - Hellebore: All right, so here's the last one we're going to do. This one is that its common name here where I live is Lenton Rose. Its scientific name is Helen bore and blame super early in the spring. And the flowers kind of hang down to this is not the photograph is not upside down. This is the way they grow, but it's the same thing if we flip the cup upside down, the same rules apply. So this one is pretty open to. So this is going to be a big ellipse, almost a circle, but not quite. You can see that's pretty open. And this time we can see the inside ellipse. But as always, all of these pedals go home. Even the ones here, you can kind of see the outline of this one come in, comes around like that, and that one comes around like that. The pedals, no matter where they originate, are always going to go home to that center ellipse. Okay? All right, let's set that aside and remember that this time we're starting with almost a circle, but not quite just a little squished compared to the others. So we're going to start this guy about right here. Again, almost a circle but not quite. And then the inner ellipse, the bottom is pretty close to a site of the petals here. And it should be basically the same shape, almost a circle but not quite. Okay. That's our starting point. This one looks a little trickier, but you just have to follow the rules that we've been following from the beginning. We're going to start with this main petal. And you can see it's actually sitting behind these two pedals. Hard to see that in this photo, but it sits like that. But because this is the center one, I'm going to start with this one. And so it starts almost at the bottom here. And it curves around. This. This is a big wide petaled flower and all of the petals overlap. So sometimes when you get a pedal this shape, rather than starting at the edge of the petal. It's just as easy to start at this bottom ellipse to make sure that the flower petal is heading towards this ellipse. Alright, then I'm going to move over to this one. And it also starts at the center and comes up and out. And then because we're looking sideways at this, it looks like it doesn't come around to meet that. Indeed it does right there. It's just this funky angle. And this is how you can get these petals to meet up when it doesn't make sense to your brain. And let's get rid of this line behind so we can see it we're looking at this is a thing that takes time. Training your eye to draw what you see, rather than drawing what your brain knows it looks like. And that is the hard part. It takes time, it takes practice, but it can be done, I promise. In this petal now goes all the way back here to the backside of the flower and around and again, your brain is going to say, nope, nope, nope, that doesn't make any sense. But it will all come together and end here. Alright, so we don't need that part of this front pedal anymore. I'm erasing as I go. So you can see what we're looking at and we can actually go in here and trace this a little bit. So you can see indeed, that's the shape that we're looking at, right? Okay, got that part done. Now we're gonna go back here and look, these are pretty wide pedals. This one is all of this. That's a big petal. It comes around the backside. And so this one starts about right here. And it comes around like this and stops about there. And then it curves around the back part of the ellipse like this. And then we've got this little guy back here, comes up and around over top of this petal that we already drew and around like that. So it starts underneath this one, comes around into this pedal space, and then around and back under that one. Okay, So now let's erase all this extra stuff that we stamens and pistol thing going on in here. And I'm just going to draw those really quickly. Some little squiggles to represent the stamens around the edges. And then we've got all these little snaky pistols coming up. Just a representation. Need to get it all. Okay, so now we need to look out where are the highlights? Where are the shadows? These back petals, the light is, since these flowers hang down, the light is most probably coming from up. And this is actually the top of the flower up here. It faces down. So these back petals are the highlights spots. And we're going to, I've made them a little brighter or I'm sorry, a little darker lines like we've been doing all along so that you can tell what's in front, what's in the back. But notice underneath them because they're cup down. It's fairly dark back here. So I'm not even gonna make this line work necessarily, I'm just going to make it a little bit darker. Can however, see this petal coming up here. Anything that is underneath those cupped parts is automatically going to be darker. And we've got a little bit dark here. Some here. And again, any place a pedal crosses over another petal is automatically going to be at least a midtone. Because there are shadows there. Otherwise you wouldn't be able to see. But there was a petal separation there. And then this petal is a little bit darker. But I just put a little bit of dark around the top edge of this, even though it's a highlight. Tricks your eye into understanding that this is a rounded three-dimensional form. Can't really see the stem on this one because of the leaves that are in there. So there we've got cup-shaped flowers, one that's nice and tight with the crocus here. The poppy that's a little looser but a little more open. And then the hell a boar that is a very wide open, almost more of a saucer than a cup.
6. Final Thoughts: So the next time you encounter a cup shaped flower while you're out on your adventures, I hope you'll have the confidence to go ahead and dive right in and sketch that flower. In the meantime, please do try the projects and don't be afraid to post them in the project section. No matter what level you're at, we can all learn from each other. And that's kinda the point of the projects section. Also, make sure to pop on over to my website, www dot wandering leaves studio.com and my YouTube channel. Also wandering leaves studio for more nature journaling tips, tricks and sketching tutorials. Thanks for watching.
 Lisa Duncan, Nature Journaler/artist