Transcripts
1. Class Intro: Hello, I'm Daniella melon and author and artist in today's class, creating sketches to improve your abstract art. I'll show some easy and no pressure methods of using sketches to improve your artwork. Sketches are simple, quick and loose drawings done to give you practice, as well as the study of a subject. In today's class, we'll create 90 seconds sketches based on reference images of owls. This class is for all levels of artists. It's a form of practice, as well as a method of creating relax drawings that are sketched and then cultivated until we have a result that we either like or that inspires us to study the subject further. We'll use basic supplies, just pens in index cards. But you can use a sketchbook or any paper that you have. Will set our timer and create our pieces. The focus isn't on the details, as much as it's on discovering one or two details that capture the image. As we continue with our images will notice progress in our drawings. So we actually have created a visual study of an owl. When you're finished with this class, you'll have a series of sketches where you can see immediate improvement in your work. And you may actually find some sketches that you love. So gather your pens and paper, and let's get started.
2. About Sketching: In today's class, we're going to create sketches as opposed to drawings. There are many times the word sketches or drawings can be used interchangeably. After all, they both use similar techniques and tools. But for today's class, I'm going to focus on the humble sketch. Now to me, sketches have a slightly different purpose and a drawing. A drawing is more formal with more details and a main focus to me as sketches, a process with a purpose. And that process, what is so valuable. Sketches have all the benefits of drawings and none of the drawbacks. Sketches are loose. They can be done quickly with few details. I think of sketches as quick texts that you send on your phone. Whereas drawings tend to be emails. Sketches are for training the mind, coordinating the hand and I, and for repetition. And that just means practice. Sketches do not have to be complete images, nor do they have to have details. But they certainly can. And because of the nature of sketching, focusing on loose strokes, free-flowing lines, and the short time spent on them. Sketches are no pressure artwork. There are few errors in sketches because by nature, the process is about making mistakes. So we'll create some marks, refine them, refine them again. And then use this sketch as our study to delve further into our subject or an aspect of our subject. In today's class, we're going to use photographs of owls as our subject. I've included a template, the six images of very intriguing our faces and bodies. There are lovely shapes with piercing eyes, lots of character in these raptors will follow some exercises in the next chapter to practice our sketching. And while sketching can offer endless possibilities, I will suggest a few guidelines to follow. Well, use simple tools, a timer and the reference photo. And we'll go over the challenge and continually refine our sketches. After we have our sketches, you may find a winner amongst them. This is a sketch that you love that speaks to you. Therefore, you have a finished drawing or you may not find a winner, but you may find that the sketches have potential. And then you want to continue the process that we've started. Or you may feel comfortable with your quick sketch and want to move out of sketching with pen and paper. And use this process of loose strokes and continuous lines with your favorite medium. I'll show you how to continue the process with watercolors on new papers. And I'll show some variations with other media as well. In the next chapter, we'll take a look at the supplies that we use to start our sketching process.
3. Class Supplies: So here are the supplies that we'll use for our class creating sketches to improve your abstract art. There's the our reference sheet with six images of different animals, all full of character. And then I'm just using some three by five cards. These are very inexpensive cards. You can use ones that are lined, these are unlined. You just want to have simple piece of paper. You can use copy paper. You can use a journal, whatever you'd like to use. I'm just showing you how to use simple products that you already have on hand and just quick ways to make a sketch. The reason I like the index cards is because I can keep a stack of them together. They're very easy. And I can see my progression as well using just any pen that I want to use. Obviously you want to choose one that doesn't smear. But I do like using gel pens, ballpoint pens, whatever pen you like to use. I haven't timer and it's going to use my phone. And then further, I'm going to show an, another topic where we take our sketches, still create them using the methods shown in class. But I'm just going to use watercolor paper because I'm using watercolor paper, I'm going to use a waterproof marker. And then just simple colors because my focus is the sketch. The next chapter, we'll go over starting our sketches.
4. Sketching Basics: So before we begin, I just want to take all the mystery out of the sketch versus a drawing. So when we do our sketch, if we're trying to make a circle per se, obviously you can just make a circle. You could also make it a little more loose. And by that it just means larger motions with your hand and not really worrying about getting a perfect circle in the first go. So I just go over it and I refine it as I go to make that circle. So if my first attempt at that circle was a little wonky, I can just continue to improve it. And eventually because I have enough ink and enough images going round and round, my eye sees a perfect circle. No, clearly, I've got a number of attempts here, but that's okay because that is our sketch. So aside from continually going over that piece to make our shape the way we wanted, There are a couple of other things to keep in mind. You could fill in a piece. So if I have my circle and I want to fill that in, I could just continually make lines in the same direction. And the tighter and closer the lines are, the darker it looks. I can also, using the filling in this method here where I have my circle and I've made some lines. I can do some crosshatching where I just continue by going perpendicular to the first lines I put down. And then if I wanted even darker, I'll just continue adding different angles of these lines. And eventually I'll get a very black image. Now there are some other ways to do that. If I wanted to create a circle, I can obviously outline it and fill it in. But first sketch, it might not be necessary. I can just kind of eyeball filling it in here. And while it's not a perfect circle, I'll just continue to refine that. And so eventually making a circular shape without making the contour line. If I wanted to just do a contour drawing, I could do that. And that's where I would just outline that circle. Now, a circle is a simple shape. Perhaps we were outlining onto a contour line on maybe a mug. And so I would just kind of go around the shape of the mug roughly. Again, it's not perfect, but it's starting to be recognizable as a mug. And then I can just further refine it as I want. As I go. I can start to add lines to create little shadows. Pull up lines to imply direction, height of the mug. Maybe going over here with some darkness to imply coffee or something in the mug. Another thing you can do is for texture. You can make dots. You can fill in dots and similarly to the lines, the closer they are together, the darker they look. You can also just scribble. And I really like scribbling when I do my sketches. So again, if I was going back to that mug analogy, I would just kinda repeat that shape for maybe the top of the bug, figuring it out as I go. And then I would kinda just loosely scribble the filler shape and then the handle. And I can do this repeatedly until I get a shape that I like. The point of sketching is to continually refine it and refine it and refine it. And so by the time I'm done with all my sketches, I have kind of an idea of which method I want to pursue for my actual drawing. Now if my goal was just to practice, maybe I'm waiting for a doctor's appointment and I'm sitting in the waiting room or if I'm in my car waiting for the kids to come out of school or something. I could just do it on anything in my journal and my planner, even on your phone, you have a little apps. You can use your finger and you just want to go with just practice making shapes, trying to make something recognizable about them. In the next chapter, we'll start our owl sketch.
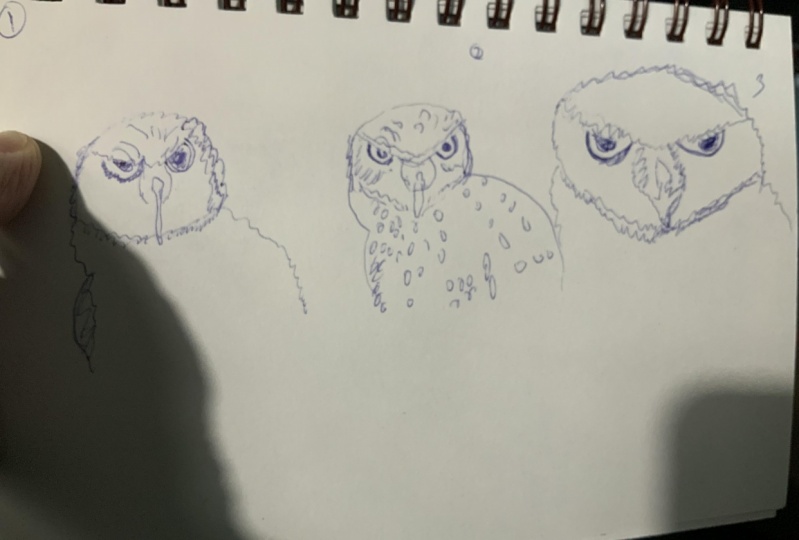
5. Creating the Sketch: So now we have our owls downloaded and there are six owls here. I'm gonna take the second l here, and that's the one I'm gonna make my sketch from. So the couple of things to keep in mind, I'm doing this first sketch. I'm going to limit myself to 90 seconds and just one ballpoint pen here. So what I'd like to do is I kept my timer at the ready to go. I take just a moment before I start to just examine my reference photo, and that's this owl here. I only have the head and the body. I'll start my timer and I'll make my loose sketch. What I like to do is I like to put a number one here. So I know that this is my first sketch in this series, and then I'll start this process. So the first thing that I do when I create my sketch, at least my first sketch is I create the contour just to give me boundaries for the shape of the final product that I want to create. And here I am really focusing on the face because I find that shape intriguing, particular to this subject matter. Then I'm working on creating the, just a fine line for the body. I just kinda go over it with little just rough lines. Then I'm drawn to those eyebrows. They're kind of unusual and crazy. And so I kind of put them in where I think they belong. I continue just wherever I am on my sketch, just adding details as I go because I know time is of the essence. Then I make the shape of the eyes, the pupil. And I continue refining that, making it darker as I go, being sure to leave a little spot for a highlight. And then I'm feeling low pressure for the time. So I want to start adding some more details. I start making little marks for the feathers because this textured feather on the body and the head really stand out to me. And do that. I just make rough little kinda rectangle shapes of just scribbles, straight lines up and down in little chunks to match the what I'm seeing on the paper, the reference photo. I continue this and then I'm kinda keeping one eye on the timer. And so they'll happen, you'll get used to the timer going off. So now my timer is up. I haven't completed my image, but I do have a good starting point for myself here. By looking at this image, I see some things that I didn't notice right off the bat of this owl. He's really textured and I don't know why, but that didn't stand out to me the first time I really examined the owl. What stood out to me were the eyebrows and the eyes. And it's very interesting face shape. So here I have my first image, 90 seconds, not complete, but not a bad starting point for me. Now I can take this apple and set it aside. I can set it underneath my Owl paper here so that I have now two owls to reference. Because I only have 90 seconds though. It's not, doesn't give me a lot of time to go back and forth between the owls, at least not yet. I don't think I'm really proficient in creating this owl. So what I'm gonna do is take my paper and start another one. And I'll do this a few more times. We'll come back in the next chapter and see my progression.
6. Progression of the Sketches: So I'll quickly go through and show you my process for creating numbers two through five. Once again, I start by making the contour, and I just go on and I continue to make the shape of the face. And because this is my second time doing the same subject matter, it's a little easier for me. It just shaves off a little bit more time. I can spend a little more time on the face and making the different angles and shadowing that I didn't do before. So now when the third drawing going there and I create really large shapes and then I quickly want to fill them in. Again. The time is kinda weighing on me, but I'm getting used to it as I go. I add more shadowing, more feather shape and texture. For my fourth drawing, I come in here and I do a really kind of a detailed close-up in 90 seconds of the eyes. Since those are the parts that I was drawn to the most I felt like I can spend a little more time here in a wood very the feature would vary depending on the subject matter. And here I'm really going to make the effort of creating the shadow, the different color, feathers and the plumage. You're doing the same thing where I'm making the contour and the feathers of the head. But I'm doing it in a different manner. I started with dots and now I'm kind of just filling it in as I go. And because of the time crunch that I'm under, I just work the area that it brings me to. I know I'm going to stop whenever I have to, but I have the option of continuing further later on, all my sketches here place together. Now you can see a progression as they went across. And what you notice is not so much that my technique improved dramatically. I mean, it did improve on this particular subject. But what you see is that I gravitated towards the eyes and that whole EI mass area. And by just doing quick little sketches that I didn't seem to ever have enough time to finish. I was able to complete some images of this owl here that I think I'm going to really work with for my next step in the process, you can continue doing sketches of one owl or multiple sketches of the same owl just as I've shown you in class today. But I'm also gonna show you how you can take your sketch practice and turn it into something a little more. And I'm going to use watercolor to do that. And we'll start that in the next chapter.
7. Springboard to Watercolor: So I'm going to transfer this process to watercolor. I have my sketches I was intrigued by, and these are the ones just basically the i's here and the head. I have my watercolor marker, and I have some watercolor paper cut to five by seven. I'm not using my timer, although I could if I wanted to, but I am still working on just creating a quick sketch. I wasn't really wanting to be contained with just 90 seconds as I never felt like I had enough time to finish my piece. Now there was some beauty in that as well. Like I really like this image here, but I'm going to just take that pressure off of the timer now to work on my, just my step to sketch. So I'll just create my sketch right here. Again, I'm, I'm jumping right to ink. I'm not even bothering with pencil because I do want it to look loose and sketched like. So I create the contour, but this time I'm using jagged lines. I'm kind of going back and forth to make them. I go over the shape of the eyebrows, Abby eyes. Again, I'm just kinda making wobbly strokes. Very loose, Gary flowing lines, almost a continuous line. I do pick up my pen a bit, but I do use continuous lines. And I just kinda make things work by repetitively going over the same stroke repeatedly to get the shape that I'm looking for. If I don't like the end result, I'm okay because I spent 90 seconds learning something about making this sketch. I wanted to delve a little more into the eyes. So I continued adding shadowing and shading here. I did get the distance between the nose and the eyes incorrect in this sketch. And that was something very valuable for me to learn that I'll improve upon in my future sketches. I'll continue over here to make shading and shadow and texture along the lines of the fur. But I don't have to spend too much time doing that because I know that I'll get additional shading When I add some water color. So I've completed my first sketch, I'll complete a couple more, and then we'll come back and do some watercolor painting. Again, very brief because we're just trying to enhance the existing sketches.
8. Watercolor Painting Option: So here are my three images. Sketch with a waterproof marker onto watercolor paper. This is one we did together and then I did to others. And I found that I really missed having that timer. So I did use the timer for the two of these. And when the timer expired, I continued going. So I only went for another 20 or 30 seconds for each of these, but I liked that pressure of the timer. It helped me to really fine tune what I wanted to work on. And yet it allowed me to create the sketches in a very quick manner. So then they have just some very simple watercolors. I have sepia, yellow ochre, and burnt sienna here. And now I'm just going to create just some color onto my images. I'll start with the one that we did first, and it's a very loose painting. So here I have a number for brush. I'm just gonna paint little water on the body and the head here. Just haphazardly to create some areas of wetness because this owl in particular has dark brown and white splotches. So I'll pick up some of the sepia on my brush and I'm just going over some of these marks that we made. And again, very loose. I know that the body has a little more intensity and color of this dark brown than the head. So I'll be a lot looser with it on the body. And then on the head, I'll just put some areas as well. Again, I'm just trying to create slight coloring just to make my sketch a little more involved. That'll sharpen my point and just pull some color here underneath that I, that I is the most dramatic thing I've seen on this bird. And those kind of funny eyebrows remind me of my father's. I'll rinse my brush and I'm going to take just a little yellow ochre here. And I just want to add some areas of the yellow ochre. The owl itself doesn't have this warm color, but I do like that. And then I'll take a little more of that yellow ochre, a little more intense, little less water on my brush. I just wanna go over that. I just like this and maybe a little bit here on that knows. And that's all I'm gonna do for this sketch. A comeback to the next one here, very similar design. And again, I'll just dab the water on the body and the head and various areas. And I think I'll do the same thing. I'll come back in with my set via very haphazardly fill in that body with a little sepia. And then we'll just add a little bit to the head. Again, I'm pushing it away from the center of the head. And then whatever's left on my brush, I'll go over the little face area here. Just a little bit on the brow. Come back in with some intense yellow ochre. For that. I that knows. I'm going to leave that one just like that. And then lastly, I'll take my close-up of the eyes and I'm going to start with that yellow ochre, red around that eye area. And then they'll go with my sepia. And I'm just going to push color away, dip my brush and water, and just pull more color, getting it very light. And because of the direction that I'm pushing it, I kind of resemble feathers growing away from the face. Put a little more water on my brush so I get a very muted color. And I'm gonna go in here on this brow. And just some of the other feathers around the face, pulling it away even further. And then I'll come in with just a light yellow ochre for that knows. So we'll let these dry and we'll come back and take a peek at some more of our sketches. And then I'll show you some variations for all the images here. How I created some variations and might inspire you to do some as well. And I'll show you some finished sketches with some different media.
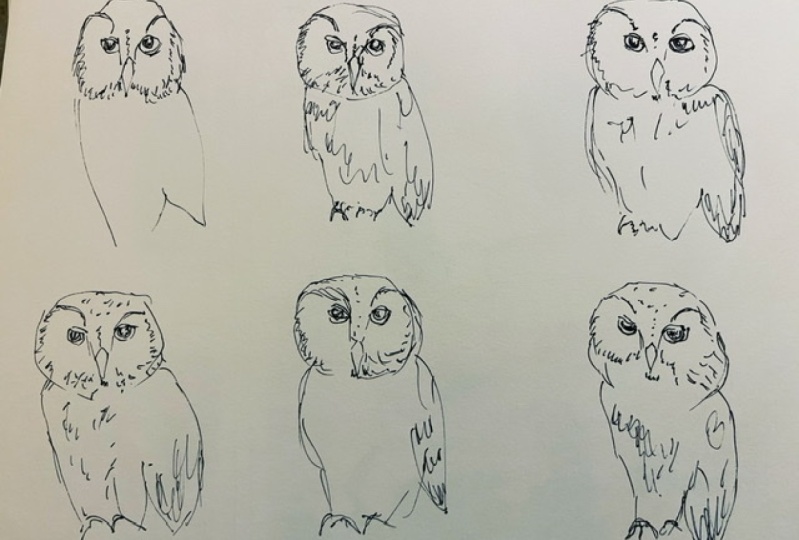
9. Variations & Class Wrap Up: So here the sketches that we meet in class, we use the reference photo from the template. And just taking 90 seconds to create these sketches, I did them on three by five cards. As I progressed, I found things that we're interested in, perhaps the eyes and the head area. So I spent a little more time on that, meaning I devoted 19 second period, one segment creating that and then just playing around with it. And once I got to a point where I was somewhat comfortable, not a 100%, but somewhat comfortable. I took that knowledge that I had gained for making my sketches and I transferred it to my medium, which was watercolor. So I took a watercolor approved marker, one that wouldn't run when I wet it. And I created my sketch. Now knowing that I was going to add watercolor, I didn't have to really worry about all the details that I had here because I knew I could make my shading with my watercolor. And so I created the first one. Now the first one is a little sloppier than the others. Still a nice sketch. But then you can see my progression in that as well. So that's another method of taking your sketches and using them to make more involved sketches. Are they paintings? Well, there's somewhat paintings. There's a lot more area for me to evolve in, in my drawings, but there's also paintings and sketches here that I'm actually quite proud of him quite happy with. I wanted to show you some other variations using the template and the images from class. So using the template from class, these are my initial 90-second sketches of each of the images you see here. Now some have more potential than others. Some are amusing, some are adorable. But they're my first sketches, my initial sketches effort just glancing at this for maybe 20 seconds and taking it in, taking my basic pen onto my three by five card and just creating that sketch, it gives me a launching pad, a starting point, a springboard. And so I'm really happy with that. None of these are going to win any awards, but I won't. I do like them. I will talk them into my journal just because they're cute. I'll show you another variation using the barn owl. So now using that barn owl, which happens to be my favorite Al, I created my 90-second sketches and as I went along, I changed things and refined. Just as we discussed in class, the shape of the head changed. I kind of refined that to that heart shape. I worked on a little shadowing and I got the nice shape that I wanted. I transferred my image and I use that technique on watercolor paper. And so here I have a very rough sketch that I added watercolor too. And here's one that I like a lot better. Still have a long way to go. But I'm very pleased with this progression. Wanted to show you another variation using that barn owl and a different media. So here I just took those sketches that I showed earlier in class and I created them on just a journal that I have regular paper. I didn't have to worry about any particular paper. I just took a like a black gel pen, created my barn owl. Each of these are 90 seconds sketches. This one, however, is about 490 seconds sketches to create that image. After the 92nd timer ran out, wherever I was on this piece, I stopped, reset my timer, put it for another 90 seconds to see if I could complete it in, say, three minutes. And I couldn't took me about six minutes. And then afterwards, after I had my sketches, I went back and just use some marker just to add some very rough shading. I love the way that looks. The shading also coordinates with this journal, which happens to have an orange theme. But I really liked that effect. Now I have one more to show you using different medium as well. So using my template and this angle here, who's very interesting looking with his ears that look like an antenna and is very brilliant eyes and sharp nose and beautiful coloring. So I made my initial 90 seconds sketch, kinda looks like a teddy bear, but nevertheless, I made an effort for 90 seconds, and I decided I'd go back in and I use a fun pen. And so this time I use a purple gel pen. And I did my next 92nd piece. And it certainly improved from my first one. And then I evolved further. So then on my third one, it kinda has more personality. So I have my third sketch here. Then on the fourth one, I took another 90 seconds and you can see the evolution. And then the fifth one where it was refined even further. By the fifth one, I had a little more confidence in my sketching. So I came and I created the watercolor sketch and just added some water color background. I'm pleased with that. So I thought I'd use one more medium. And so I took a gel print that I did on just copy paper. And this was just craft paints on my gel print. And they have some classes that I'll reference in the description. If you want to look, take a look at that. And then I just used my marker and I made my sketch again. After I had my sketch complete, I went over it with colored pencils just to add some shading and some pop of color. So there are many ways you can take your sketch and really make it stand out. And you can also see your progress. And that is why I think sketching makes such great practice. You get the immediate results of your progress. And if you do a little every day, you're sketching will improve tremendously. Thank you for joining me today. I really look forward to seeing some of your progressions in the project section. Feel free to take a picture of all of them and just show us how you, your sketches evolved. If you're interested in using a different medium and making it really stand out, please do that as well. I'd love to see those results. Thank you for joining me today. Please be sure to follow me here on skill share to get notified of future classes. And please consider leaving your review.
 Daniela Mellen, Artist & Author