Transcripts
1. Class Intro: I'm a big believer that drawing or sketching is a way to ease into any creative activity. I find that drawing enhances my observation skills, which leads me to improving my skills as an artist. Not only do I view things from a different perspective, but I also practice recreating what I see. And drawing benefits all level of artists from beginner to experienced. Because we all see things differently. Hello, I'm Daniela Mellen and author and artist. In today's class, skeleton leaf in dry. We'll take a look at a common object, a leaf. And instead of viewing it simply from its shape or color, we'll focus on its skeleton. Yes, you heard that correctly. Leaves have skeletons. These are the basic veining structures that bring nutrients Throughout the leaf, contributing to its color, texture, and beauty will start our sketch by observing an actual skeleton leaf that's included with the class supply list. I'll show the process in short steps of sketching the shape of a leaf, then adding the intricate and lacY veins one step at a time. Lastly, I'll add a subtle shadow to the leaf, which adds another texture and level of interest. So gather your materials and let's get started.
2. Class Supplies: So here are the class supplies that I'm going to use for our skeleton leaf drawing. There is a download that you can print out that has just a guide for silhouettes of different types of leaves in case you don't want to do a standard leaf here that we're doing in class today. But you can make any leaf using this technique. And here are just some guidelines for you. I also have a reference photo that I'll include of the skeleton leaf. And I like to just view it either with light underneath it or on white paper so that you can see all the little nuances attached to that leaf. I have a pencil and eraser to make my sketch. And then I like to use waterproof markers on the paper. I like to use these because once they dry, they're waterproof. That can be erased over without smudging. And I can use a watercolor marker on top of them just for a little bit of shadow. So I have different sizes if you want, and you only have one side, that's fine. I'll show you a technique to make your lines thicker. But I have sizes or 0138 one. They have a water color marker in like a soft gray. And then for my paper, you can use any paper to make this drawing. You've card, stock, colored paper, copy paper even. And I like to use just an office clipboard with a bunch of copy paper underneath it. So that when I'm creating my sketch, I have a nice soft, comfortable area to work on. If you want to work in a journal, that's fine. If you prefer to work on a magazine or just on the table as is. That's perfectly fine. The next chapter we'll go over the anatomy of the skeleton leaf.
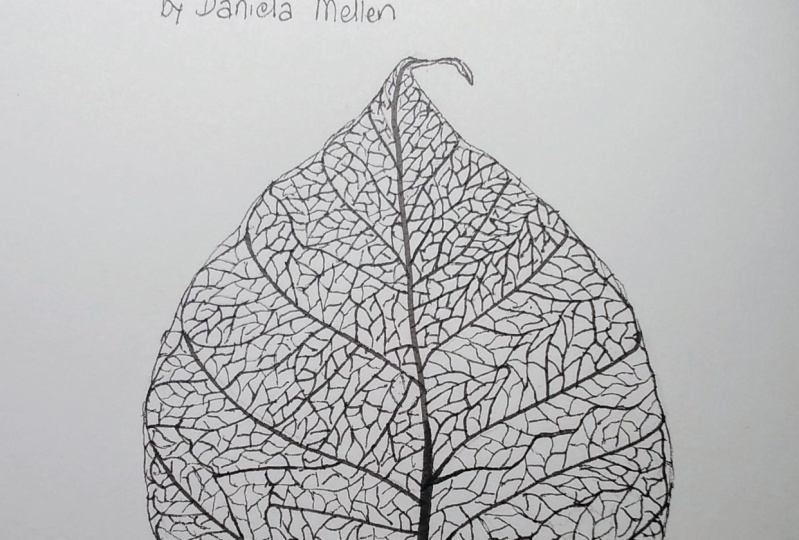
3. Anatomy of a Skeleton Leaf: So here I have a close-up of that skeleton leaf. Now as you can see, the skeleton leaf is exactly as it sounds, the skeleton of the leaf. You can see all the veining and other little lines in between the veining. But here's a fresh leaf that I just picked from my garden. It's the same premise, even though two different species of leaf, this is Guardini, but it's the same thing that you can see the veining throughout it. It's just covered with chlorophyll and pulp. If I turn the leaf over, you get a little more view of the veining, but not as much as it. That's skeleton leaf. And that's what makes that skeleton leaf so intriguing. I just have it on a light pad here just to really show it off all the little nuances and I'll include a close-up of this for you to reference if you'd like for your drawing. The next chapter, we'll start our sketch in pencil.
4. Sketching the Silhouette: So we're gonna start my sketch. I select a leaf that I want to use. Can select a leaf from here. Or you can use the shape from the actual leaf that as a reference photo. And I like to start with my pencil sketch. And I'll just create this as large as I want. And what I do is I take the shape of the leaf and in this case, it's kind of an upside down teardrop shape. And I'll just gently, very lightly sketch that teardrop shape. I'm not going for perfection. Just looking at the proportions. And as I see that this teardrop shape is a perfect teardrop, but this leaf is a little flatter and plumper. So the bottom kinda comes out wider. So I'll just continue to make marks until I get that shape. And then the top goes in a little. And again, I'm not looking for perfection. I'm looking to repeat the lines until I get the shape that I can see. And then up top here, it kind of bends over and gets very thin at the top. Almost an onion shape. So I'll continue to play around with this until I get the shape that I like. Once I have that, I'll take a moment and erase the shapes that I don't like. And I'm not looking to, again, make it perfect. I'm just trying to remove the shapes that are distracting to me. From here, I'll take another look at my piece and see how I can fine tune it. And drawing is just about fine tuning it as you go. The next thing I'll do is create the veining, and we'll do that in the next chapter.
5. Sketching the Dominant Veins: So now that I have my silhouette on, I want to work on this vane. And what I'd like to do is sketch out the main veins first. So looking down the center, it kind of divides the piece in half. And it will do that with any of the leaves that you have. If you have a sketching a leaf that has multiple leaves on it, treat each one individually. So I'm just going to gently create with a very light hand that vein going down the center right to the end. It doesn't I don't want to make a straight line. I'd like it to be like in nature where it has a little drape to it. And then as you can see on this one, it kind of comes out wider at the base. So I'll make that base just a little wider and kind of blended in. As it goes up top. Then I want to take my next dominant veins. On the bottom, there's 1234 on the left-hand side. And they don't come out straight. Again. They have that natural drape, whereas closest to the edge, they kind of parallel to the edge. And then they come down to the bottom. So I have one, 234 and there's another one up here. It's a little less dominant. And I'll put that in now while I'm here. There are further veins going in that direction, but I'm happy with the way the dominant ones look right now. I want to work on the next side over here. And I can count it. It's a little bit different here. The veins aren't symmetrical. There is a little bit of spacing. So I have 1, 2, 3, 4, 5, 6, 7, 8 dominant veins. So I'll come on this side. And again they go up and they parallel that side. And they come around. This one comes up just up above the existing vain. Same thing here. Here I have it coming up. I have it going down. 12345678. Now it's not an exact match, but it does pick up the sense of what I'm seeing on this vein. In the next chapter, we'll work on our next level of veining, the very small veins coming off, these dominant veins.
6. Sketching the Smaller Veining: So now looking at this skeleton leaf, I see that these major veins coming out towards the center and they match up with the veins coming out of the dominant veins from the other piece. They don't do that on the bottom. And they don't do that on the top. So on these pieces in the center, I'm going to try and combine the veining. Again, I don't have to match the exact number or shapes, but I know that, for example, on the right-hand side here, this veining is coming out from the dominant vein and coming into the center. It's not a straight line. It's got a little bit of an arch. And then this one will be coming out here to meet it. And again, it too has its little arch up top closest to the edge. It almost looks like it's going around and catching onto it. So then I'm going to work on my bottom piece here, or I have a few veins coming out. And again, they kind of loop around with veins dividing it. So I'll create those loops. And then if I look here on this bottom piece in between, these major veins are little veins. I'm going to save that little veining work for when I use my pen. But right now I'm just going to take a pencil sketch. I'm going to complete making my veining just like this to this stage on all of my mate dominant veins. So there I've completed my dominant veining and where it attaches to my smaller veining. There's still a very small level of veining left to do, but also on some of these veins appear to connect. And so I'm just going to connect each of those lines from the center all the way up to the end of the leaf. Again, I'm not doing straight lines. I'm just doing soft little curves, little blends here, very naturally found, very organic. The next chapter we're going to go over these small little areas.
7. Sketching the Smaller Details: So now that work on the top of our leaf where it's ultra small. And these little veins appear to be all going parallel just with a little gentle curve. And this is because it's such fine area. There seems to be a little bit found in between of these little curves, but not nearly as many on the larger curves. Now once I have that, if I'm pleased with the way that looks and it's a good basis. I can start my ink drawing. Again. I want to use my skeleton leaf as a reference. And if you have larger nibs on your pens, use the larger nib. If you only have one size pen, you'll just go over it multiple times to create that larger size nib. I like to start with my number one, which is my largest nib. And I start at the base here. And just gently with a light hand work my way up my leaf. And then somewhere around where it connects, I'll start it again and bring it down. And so therefore, I have my original vein. That's pretty much all I'm going to use for this larger nib. The number one, going to take the next largest one, the number eight. And I'm going to finish that vein. So I'll go over the area that I already started. And then I'm going to go for my dominant veins. And if you remember, there weren't too many of them, could go around and follow that up. Take my time doing this so that I can trace over those marks fairly nicely. And then I'm gonna do the same thing on this side. I bring that veining right to the center, the dominant vein. And so that's my number eight NIB. There's any areas that look a little off. I can come in here and fill them in just slightly with this number eight. So now I have the beginning of my veining in ink done. The next chapter will come in and start creating those other pieces.
8. Inking the Veins: So I have my major veining done to take my number 3 marker. And I'm going to start here on the left-hand side. And I want to very gently create a copy over those leaves. I'm still not drawing the perimeter, just creating those major veins. Then I'm going to come to the other side and gently create those veins as well. Come over here, connect them. And I'll finish the entire piece with my number 3. Tracing over all my pencil marks. Once I have all those marks done, I'm going to come in here and just create that veining in between dominant veins. Want to make sure your veining reaches right to that center vein. In the next chapter, we'll go over creating a little detail in between the veining.
9. Inking Veining Details: So now I'm going to switch to my even smaller point, my number 1, because I want to work on those very tiny petite veins in between the major veins. Before I do that, I want to erase the pencil marks all the way around the perimeter as well as the main part of the leaf. So here I could see how I didn't do the outline complete. I'll just outline this part first. Bring it all the way in. And then close off that bottom. I want to outline all the areas of the leaf. And I make a little dip in-between each. Same thing here. Now I'm going to start at the bottom over here. And if you look at my reference, there are a lot of little lines in between those major lines. So I'm going to start and going in-between each. I'll just go to continue that parallel. Taking those lines and drooping them out. They start at one side and move to the next. And I can add in a few extras here in there for a little variation. And then some of them come across different spots connecting the two veins. I'll add this in. Some of them might have more than one. Before I move to the next piece, I'm going to take any areas that are very large as you see here, and divide those in half and bring those down. And then add a few little veins in between as well. And I keep doing this until I feel like it's very intricate and very intriguing. When I'm happy with that leaf, I'll move up going all the way along. So I'll start here. And then I'll divide this in half. And over here. Same thing, start here. And I keep dividing. So I have an interesting section of that leaf. You can make this as close together, these little pieces or as far apart as you like. You want the veins to connect. And then have these little highways connecting them in-between. And I'll continue doing this all the way around my leaf. In some areas, I'll make a Y. In other areas I'll create a shape. But I'm always connecting the top and the bottom of the veining, the space in-between the veining. Now once you have your little once you have most of it done and you get to your talk, little lines, you just wanna do a few here and there just to give the impression that there's still veining going on. And I'll continue this on the other side. The next chapter, we'll come back and add a little shadowing with our watercolor marker.
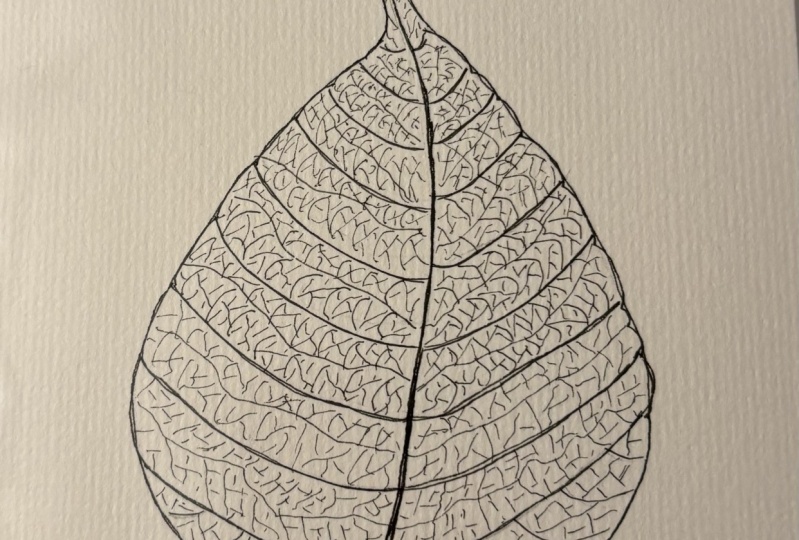
10. Adding the Shadow: So now that I've created all the veining inside my skeleton leaf and it's looking quite interesting. I can go in any areas that are really open. I can add a few more little veins, just changing it a little as I go. And I like to add a little bit of texture on the inside here just because I made this major vein quite large. So I'm just going to add some dots going up. And they'll eventually blend in, can add a few more on the bottom here. So there I've completed my pen sketch of my skeleton leaf, but now I want to add a little variation. So I'm going to take my watercolor marker here. It's just a soft gray. It's really very subtle. And I'm going to just go offset. I'm going to use the right hand side for my shadow. Just going to offset a little bit of that major vein with that gray. And then the dominant ones. I'll just do a little bit of shadow as well. And as you can see, it's a very small effect, but it's very intriguing. It adds just an interest to my leaf. So there I have a skeleton leaf done from a reference photo, or in this case an actual skeleton leaf. In the next chapter, I'll just show you a different way of sketching the perimeter. So those early stages in pencil of different shaped leaves and how I go through it, my process. And perhaps there's something that you might pick up doing that. And then in the final chapter, we'll review our final piece, as well as some variations.
11. Sketching Other Shaped Leaves: So if you were to do a different leaf than we did in class today. So you want to do this little skinny leaf. Again, you just look at the overall shape and it's kind of an oval. So I would just go around and just pencil, sketch that oval very quickly and very lightly. So once I have roughly the shape that I want, then I'll start to fine tune it. I know the top comes to a point. So I'll kind of add a little point in there. And the bottom kind of drags a little lower than just a perfect oval. And then it has a little stem. So once I have the bottom and the top, fairly succinct with the way I want them. I can just go around creating the general shape again. I'll do a light or race of the shape I don't need. And then I'll just come in here and just create that edging. It's not a straight line, It's a little bit ruffled. And I'll go around there just like that, making that point nice and sharp. And so there I have the silhouette done. The next stage, of course, is to start with those veining. And so I'll just go right down from the top to the bottom. Can add a little more, give a little more sway to it. And then from there I'd had the dominant veins and so on. Now if I wanted to do a leaf like this, this is a little more involved to me. This is very triangular shape. So I'll start by sketching a triangle. Again, very lightly in pencil. And just roughly. So I have that rounded triangle with my highest point over here. And I'll just pull that down as a guide for me. Over here. I know that this leaf is a little different. It doesn't have a stem, doesn't come to a flush point, kind of comes around like this. So I'll make my little shape there. This first tall area has a long part, so I'll just sketch the perimeter of that out here. And then I know it comes around on either side. So I'm going to create these circles, these ovals. So I know that that's where my leaves will go. And then the bottom, it does the same thing. So I have a very loose sketch of the general shape of this leaf. From here, I can just play with making the shape a little further. And obviously this is a very intricate leaf. So it comes out a little and then down, and then out a little. Finally out some more. Just until it reaches these bottom leaves. And then these bottom leaves come out. It's just about repeating your practicing strokes until you get the shape you want. So I have the tall part here. Same thing over here. Come out and I have the beginnings of that leaf. I'll erase the pencil marks I don't want. And then I can fine tune it further with the marks that remain. So I'll come over here all the way around and finish up. And there I have this leaf. And the same procedure with the remaining leaves for this leaf, I just create my circular shape. And then I know this major leaf here is going to be the largest. Sooner will come out of that circle just a little bit. I'll try and get the shape of that leaf where it's more domed on top and little more tapered at the bottom. Then there's one over here, one over here. And then three smaller ones. Combine them with the stem. And then I would treat each leaf individually, creating the major vein going down from the top to the center, and so on. And so that's how you create the perimeter of these unusually shaped leaves. In the next chapter, we'll look at the leaf we created in class as well as some variations.
12. Class Wrap Up & Variations: So here we have our completed skeleton leaf pen and ink drawing. We have the reference piece, which I'll include a photo of it in the class download class supply list. But you can see all the different textures that we created with different size nib of the pen. And if you don't have the different size pens, just repeat the lines to make thicker lines on the main veins. So maybe three times go over the main vein, 2 times go over the dominant vein, and then just complete your sketch with a pen. Now I wanted to show you some variations using the same technique, different papers and different leaves. So here we have one on just craft colored paper. It's colored paper using the same technique and a different leaf, but we really emphasize the veining here. So you have the skeleton of that leaf. Here's another example using colored paper and again, the same technique and the same tools. This is just a piece of patterned scrapbook paper. And I thought that was a really interesting effect because the background is kind of built-in and it's very subtle. Another method is using a gel pen. And here I used a white gel pen just on black card stock. And the contrast is superb and it's very textured and intriguing. The results, I know I didn't create shadows with this because I just liked that crisp feeling of the black and the white. And lastly, I have an image here done just on book paper. I use another micron pen, this time in green. And I created the same effect, again, a different shaped leaf. Thank you for joining me. I hope you really enjoyed the class and we'll try your hand at one of these very interesting textured skeleton leaves. If you create a skeleton leaf, snap a photo of it and post it in the project section. Be sure to follow me here on Skillshare to get notified of future classes. And please consider leaving a review. You can follow me on Instagram for more pieces of my work or join me on YouTube for additional classes.
 Daniela Mellen, Artist & Author